# Credit Optimization
Source: https://docs.lindy.ai/account-billing/credit-optimizations
Learn strategies to reduce credit consumption while maintaining automation effectiveness through smart filtering, model selection, and memory management
## Overview
We want to make using Lindy as efficient and affordable as possible. This guide explains how to cut costs while maintaining automation quality. Perfect for:
* **Cost reduction** — significantly lower credit consumption without sacrificing performance
* **Smart filtering** — only run automations when they're actually needed
* **Model optimization** — choose the right balance of capability and cost
Many expensive operations happen because your agent manages memory and context throughout workflows. Using strategic memory management can dramatically reduce costs while keeping what matters.
## How to Cut Costs
### 1. Filter High-Volume Triggers
One of the most effective ways to save money is by filtering frequently occurring triggers, such as new incoming emails. Not every email or event needs to trigger an agent action.
* **Example**: If you work at Acme and want your agent to label emails from your team with "Acme", apply a filter to only trigger when the email is from an address containing `acme.com`.
* **Benefits**:
* Prevents unnecessary task runs on irrelevant events
* Reduces credit consumption from high-volume triggers
* Ensures only relevant data gets processed
### 2. Use a Cheaper Model
Lindy offers a range of language models from basic to advanced. While advanced models provide more nuanced responses for complex tasks, they also cost more credits. In many cases, a cheaper model works just as well.
**Model Selection Strategy:**
* **Evaluate Your Needs:** Consider task complexity. For straightforward responses, summarization, or limited actions, basic models are often effective
* **Experiment:** Try executing tasks with cheaper models and compare outcomes
* **Start Big, Then Optimize:** Begin with bigger models to get workflows right, then gradually downgrade to optimize costs
* **Monitor Performance:** Watch for drops in effectiveness and weigh cost savings against performance
### 3. Clear Context to Reduce Credit Usage
Every time your agent processes a task, it carries forward conversation history as context. This quickly increases credit consumption, especially when analyzing large amounts of data like webpage contents or spreadsheet processing.
* **The Problem**: Expensive operations often happen because your agent manages memory and context throughout the entire workflow, carrying unnecessary historical data.
* **The Solution**: Add `Clear Task Context` actions in your workflows after significant data processing steps. This resets conversation memory, ensuring your agent only carries forward relevant information.
**When to Use Clear Context:**
* After extracting webpage contents
* Following large data processing steps
* Between major workflow phases
* When switching between different types of tasks
### 4. Use Cheaper Actions
Some actions have different credit costs. Compare action costs and choose more efficient alternatives when possible.
## Best Practices
* Set up specific filters for high-volume triggers like emails
* Use domain-based filtering (e.g., only emails from specific companies)
* Filter by subject lines, sender types, or content keywords
* Test filters to ensure they catch relevant events without overfiltering
* Start with more powerful models during development
* Gradually downgrade while monitoring quality
* Use basic models for simple tasks like data routing or notifications
* Reserve advanced models for complex reasoning or analysis
* Document which models work best for each workflow type
* Use Clear Context after processing large data sets
* Clear context between distinct workflow phases
* Keep only essential information in memory
* Monitor credit consumption patterns to identify context bloat
* Test workflows with and without context clearing to measure impact
* Compare credit costs for different actions that achieve similar results
* Consider alternatives like Perplexity for research tasks
* Evaluate whether premium actions are necessary for your use case
* Check action costs in the Flow Editor before adding them
## Monitoring and Testing
### Track Your Optimizations
* Use the task view to monitor credit consumption per step
* Compare costs before and after implementing optimizations
* Set up regular reviews of your highest-cost workflows
* Document which strategies work best for different types of automations
### Gradual Implementation
* Make one optimization at a time to measure impact
* Test model downgrades on non-critical workflows first
* Implement filters gradually to avoid breaking existing automations
* Keep backup versions of workflows before making changes
## Next Steps
Understand how credits work and what drives costs
Test optimized workflows before deploying
Track performance after implementing optimizations
Learn advanced context and memory management
# Credits
Source: https://docs.lindy.ai/account-billing/credits
Understanding how Lindy credits work, model pricing, usage monitoring, and optimization strategies for your automation workflows
## Overview
Credits are the currency at the core of Lindy's billing system. Understanding how they work helps you optimize costs and plan your automation workflows. Perfect for:
* **Cost planning** — understand what drives credit consumption in your workflows
* **Usage monitoring** — track credit spending across tasks and models
* **Optimization** — reduce costs while maintaining automation effectiveness
Most tasks cost about `1-3 credits` on small models and `10 credits` on Large models, with costs varying based on AI model choice, task complexity, and actions used.
Basic models often work well for simple tasks. Start with more powerful models to get workflows right, then downgrade while monitoring results to find the optimal balance.
## What are Credits?
Credits determine the cost of each task based on the AI model you use, task complexity, and actions included in your workflow.
**Every task is at minimum 1 credit.** Tasks that include premium actions or LLM calls will consume more credits. Credit costs scale with:
* **Model intelligence** — more advanced models use more credits
* **Task complexity** — processing hundreds of spreadsheet rows vs. updating one row
* **Premium actions** — specialized integrations and features
* **AI agent duration** — agents run until completion, using more credits for longer tasks
### What is a Task?
A task is everything your agent does after being triggered by an event or user message. Tasks begin when a workflow is initiated and include all subsequent steps — conditions, actions, AI agent steps, and messages.
## Monitoring Your Credits
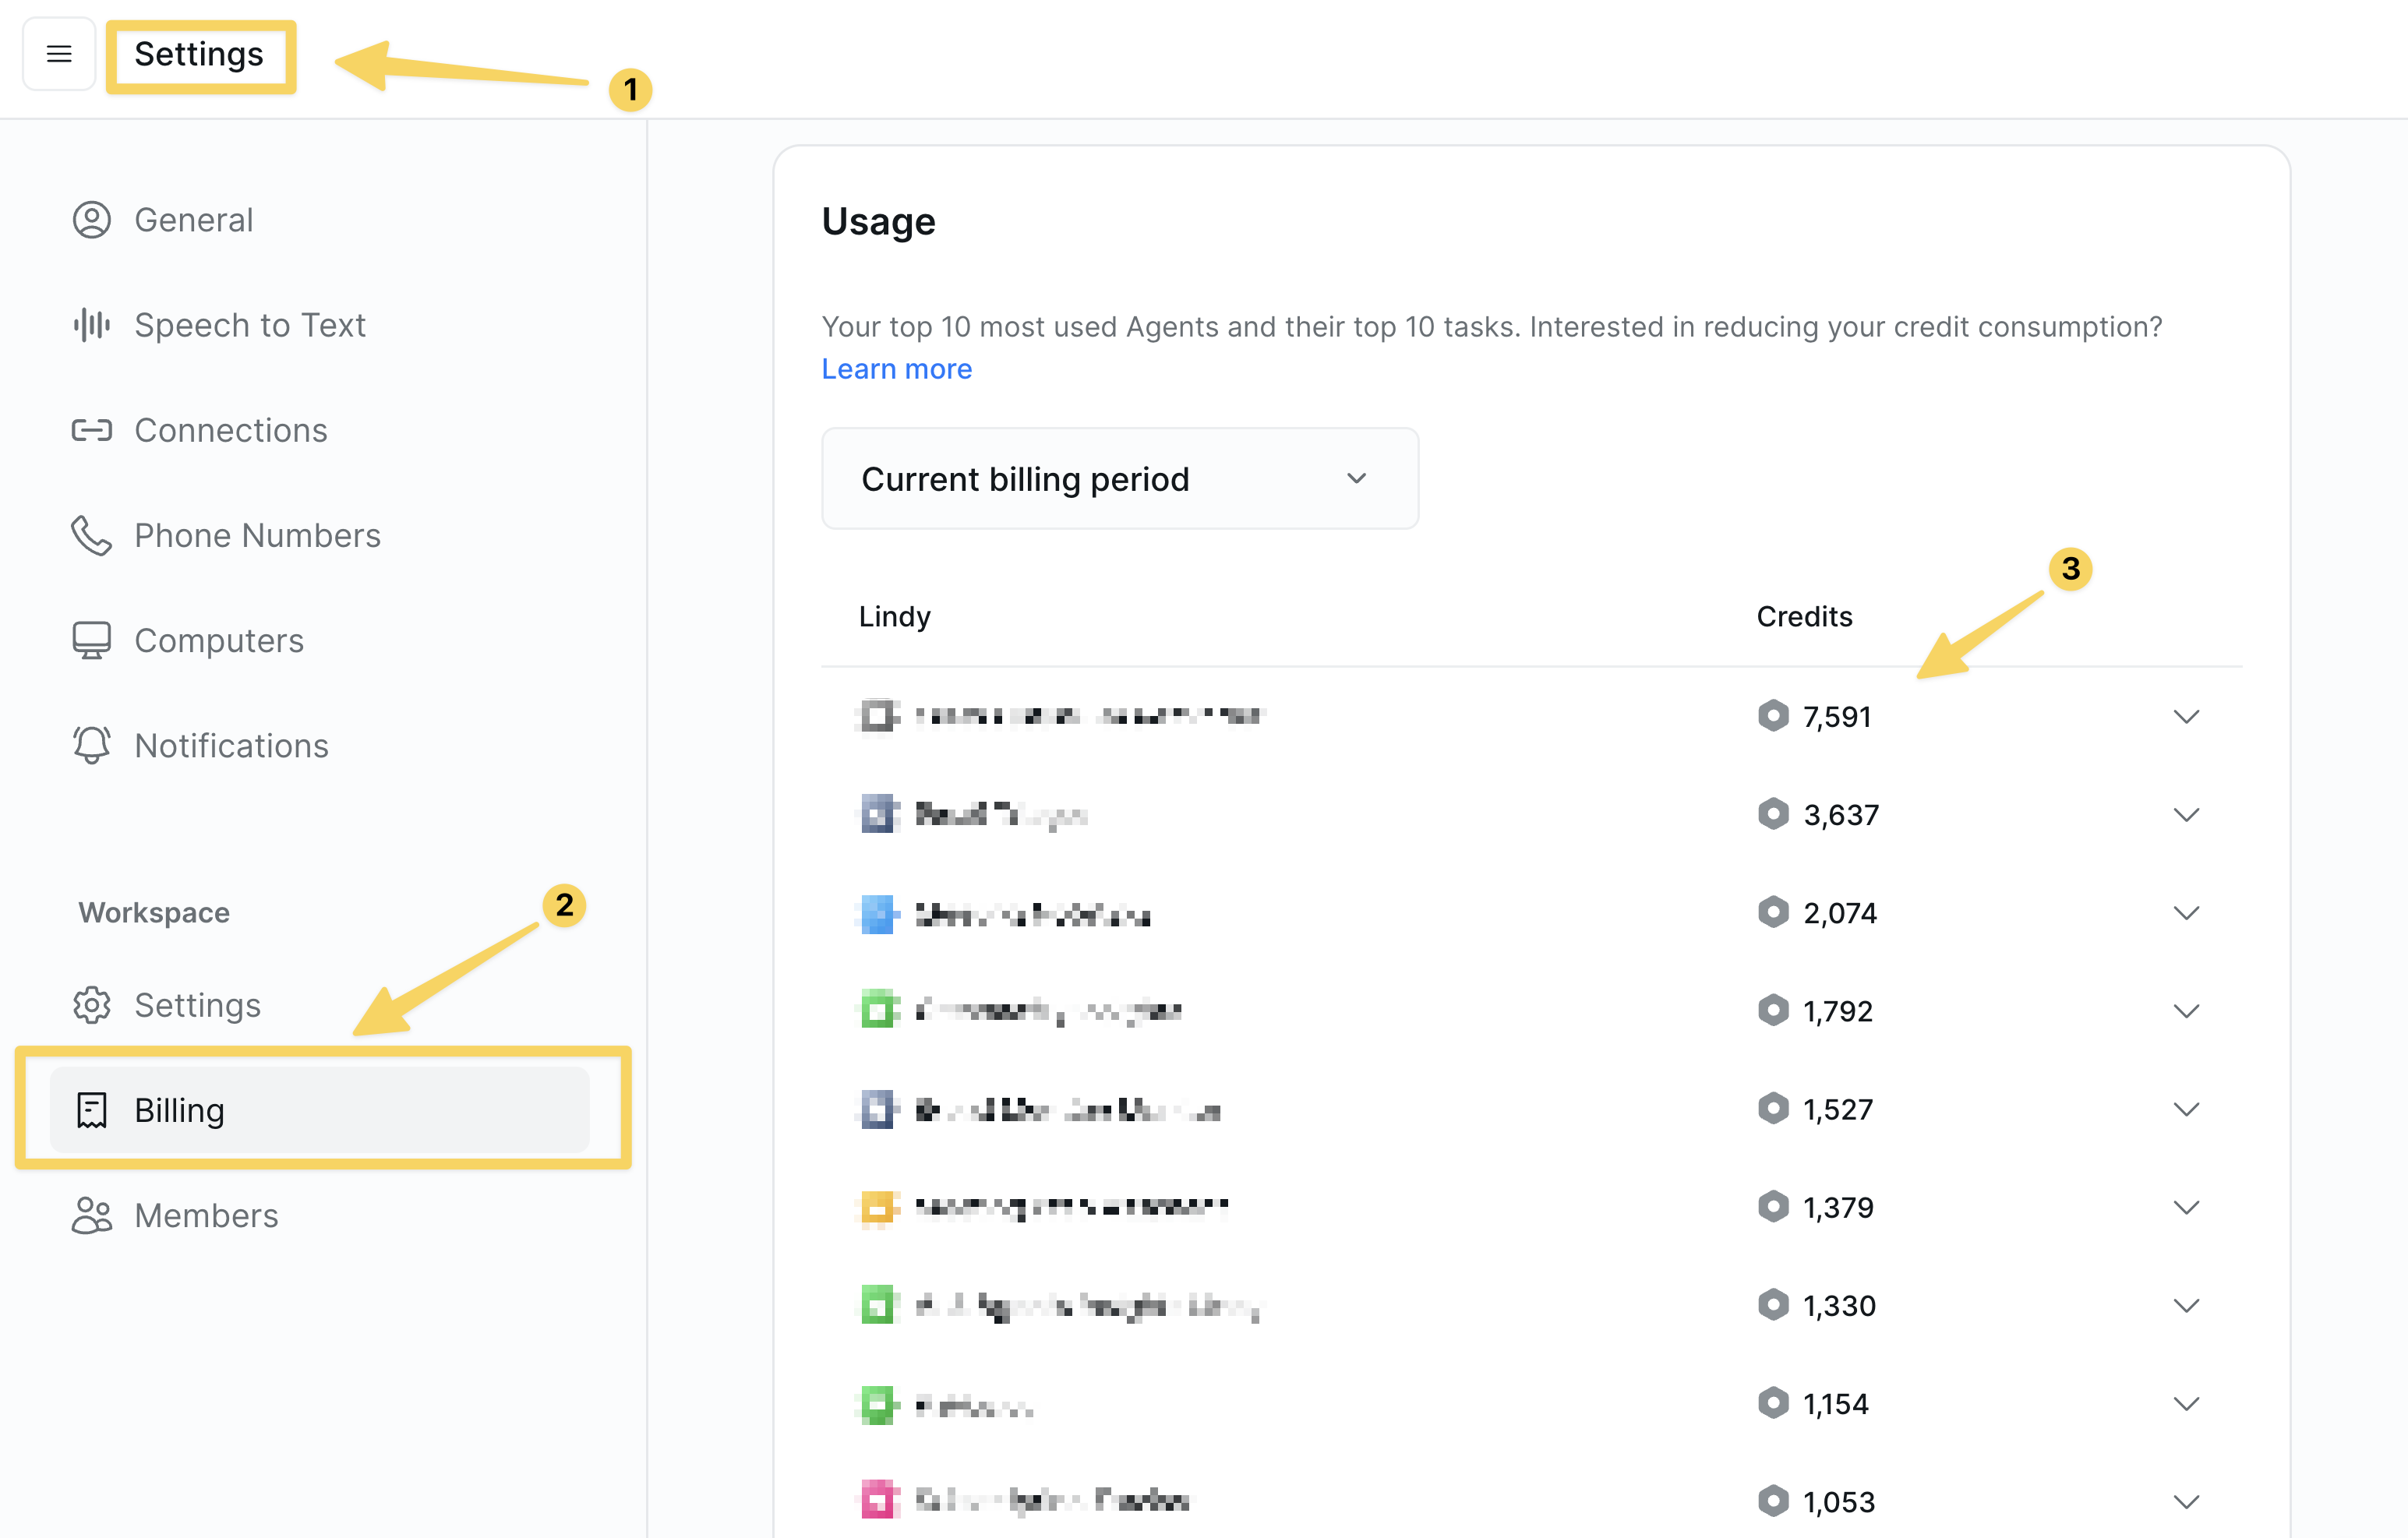
Track credit usage through Lindy's task view and sidebar gauge:
### Task View
1. **Click your Lindy** in the sidebar and select "Tasks"
2. **Access a task** from the task list
3. **Hover over each step** to see credits used for that specific step
### Total Usage
* **Bottom left gauge** shows billing credit consumption for current cycle
* **Hover for details** to see when credit balance resets for next billing cycle
 Credits do not roll over between billing cycles. When you run out of credits, your agents pause operations and new tasks are put on hold.
## Best Practices
* **Filter High-Volume Triggers** - Only allow actions on relevant events with specific filters (e.g., limit email triggers to specific domains)
* **Use Cheaper Models** - Basic models work well for simple tasks; evaluate if you need advanced capabilities
* **Test and Monitor** - Start with powerful models, then gradually downgrade while monitoring results
* Check the task view regularly to understand credit consumption patterns
* Use the sidebar gauge to track monthly usage
* Set up workflows gradually to understand their credit impact
* Review premium action usage to identify optimization opportunities
* Start with mid-tier models for development and testing
* Use advanced models only when you need their specific capabilities
* Consider task complexity when choosing models
* Monitor results when downgrading to ensure quality maintains
## Next Steps
Learn advanced strategies to reduce credit consumption
Organize projects and manage credit allocation
Test workflows to understand their credit impact
Track credit usage in production workflows
# Workspaces
Source: https://docs.lindy.ai/account-billing/workspaces
Organize agents and resources into separate environments for better collaboration and resource management
## Overview
Workspaces allow you to organize your agents and resources into separate environments. Perfect for:
* **Team collaboration** — share billing with teammates
* **Resource isolation** — keep different projects or clients separate
* **Multi-environment management** — switch between personal and team workspaces
All your agents exist within your workspace, making it easy to organize and manage your automation workflows while collaborating with others.
## Workspace Creation and Management
### Initial Workspace Creation
When you join Lindy, you automatically create your first workspace. This becomes your personal workspace where you can build and manage your agents.
### Multiple Workspaces
You can have multiple workspaces to organize different projects.
* **Personal workspace** - for your individual agents and experiments
* **[Team workspaces](/account-billing/teams)** – shared environments for collaborative projects
## Workspace Collaboration
### Inviting Team Members
Pro Plan Required: You can only invite team members to your workspace if you're on a Pro plan or above.
To add someone to your workspace:
1. **Click on the top left** - Access your workspace settings
2. **Invite a member** - Send an invitation to your teammate
3. **Share access** - They gain access to your workspace
### Billing Sharing
When you invite members to your workspace:
* **Shared billing** - All workspace activity is billed to the workspace owner
* **Unlimited invites** - You can invite as many people as you want
* **Centralized costs** - All credit consumption and billing is tracked under the owner of the account
* **Plan inheritance** - Team members get access to the workspace's plan features
## Workspace Switching
You can click on your workspace in the top left and then switch to a different workspace.
## Next Steps
Learn how to use templates to create and share agents with your team.
Understand how credits work across workspaces
Optimize credit usage across your workspaces
Start building your first agent in your workspace
# Export Docs for LLM
Source: https://docs.lindy.ai/export-full-docs
# Actions
Source: https://docs.lindy.ai/fundamentals/lindy-101/actions
## Quick Overview
Actions are the specific operations your AI agent performs to complete tasks. Think of them as the building blocks of your workflows — each one handles a particular job like sending an email, updating a spreadsheet, or processing data.
Your workflows can combine multiple actions that run one after another or at the same time. Actions range from simple operations that take one step to complete, to complex AI-powered processes that can reason through problems and adapt based on what they find.
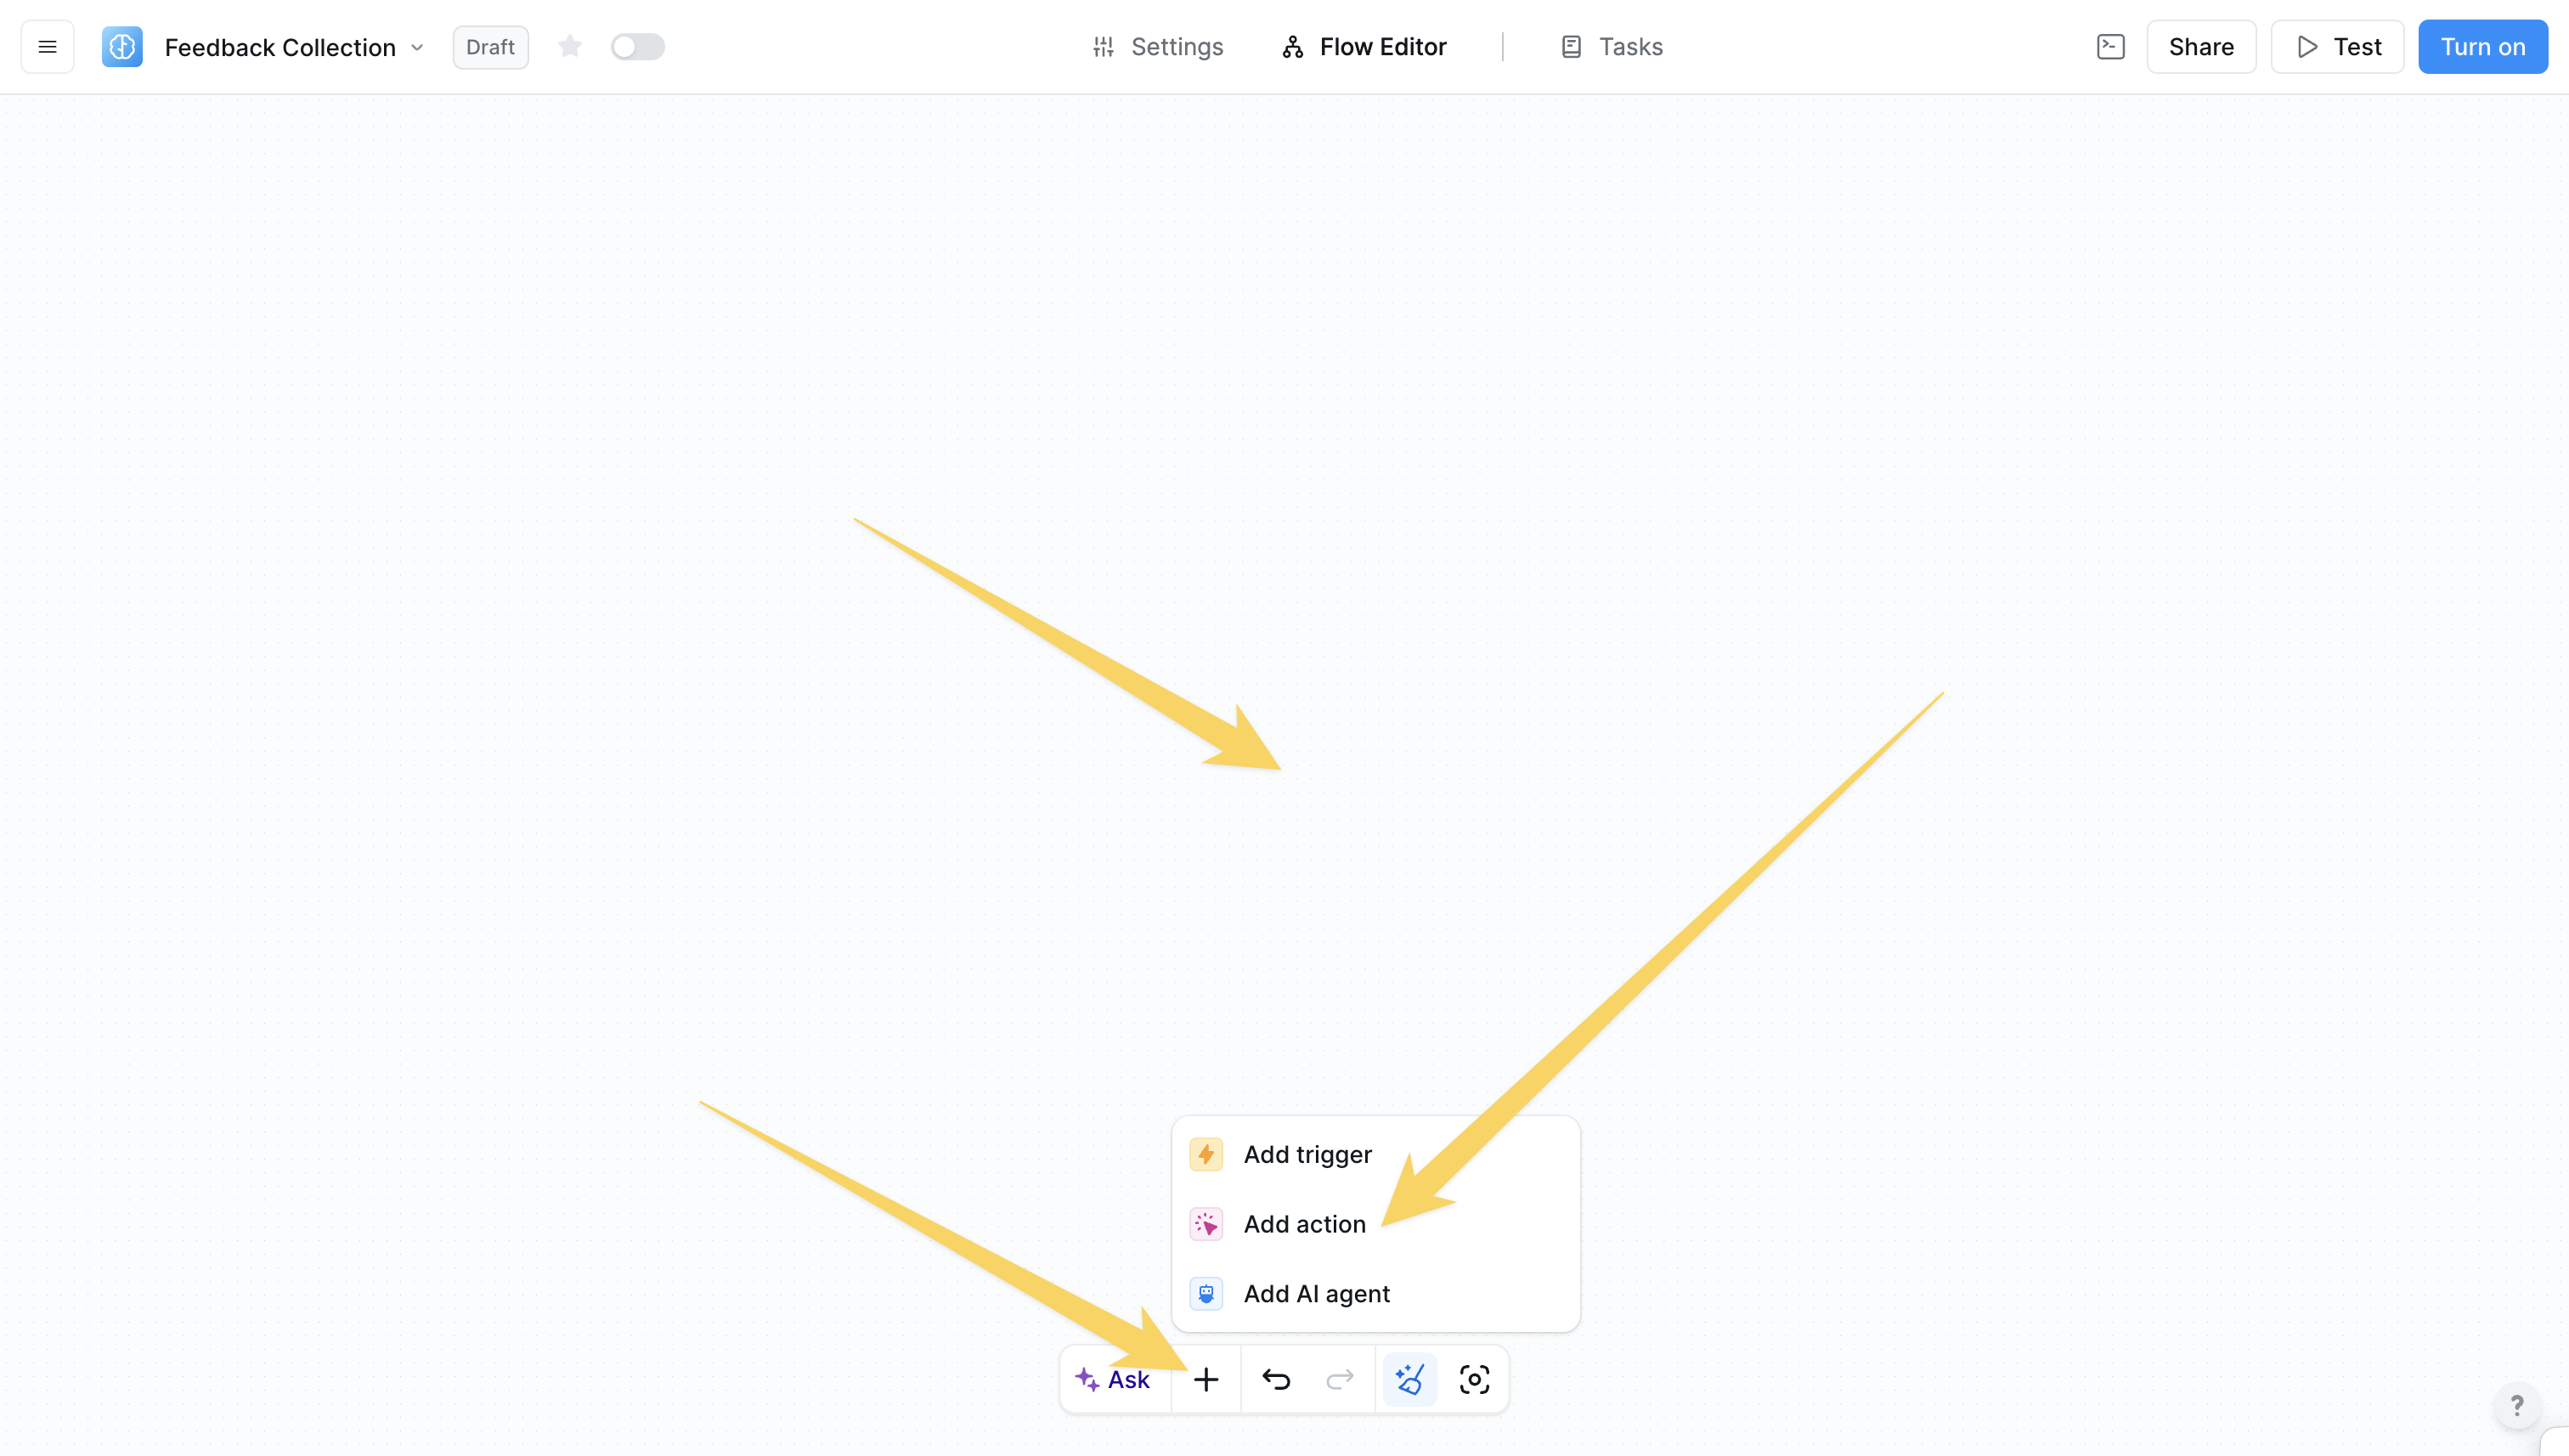
## How to add an action
Click on the `+` sign at the bottom or right-click anywhere on the canvas and select "Add action" from the pop-up menu
Credits do not roll over between billing cycles. When you run out of credits, your agents pause operations and new tasks are put on hold.
## Best Practices
* **Filter High-Volume Triggers** - Only allow actions on relevant events with specific filters (e.g., limit email triggers to specific domains)
* **Use Cheaper Models** - Basic models work well for simple tasks; evaluate if you need advanced capabilities
* **Test and Monitor** - Start with powerful models, then gradually downgrade while monitoring results
* Check the task view regularly to understand credit consumption patterns
* Use the sidebar gauge to track monthly usage
* Set up workflows gradually to understand their credit impact
* Review premium action usage to identify optimization opportunities
* Start with mid-tier models for development and testing
* Use advanced models only when you need their specific capabilities
* Consider task complexity when choosing models
* Monitor results when downgrading to ensure quality maintains
## Next Steps
Learn advanced strategies to reduce credit consumption
Organize projects and manage credit allocation
Test workflows to understand their credit impact
Track credit usage in production workflows
# Workspaces
Source: https://docs.lindy.ai/account-billing/workspaces
Organize agents and resources into separate environments for better collaboration and resource management
## Overview
Workspaces allow you to organize your agents and resources into separate environments. Perfect for:
* **Team collaboration** — share billing with teammates
* **Resource isolation** — keep different projects or clients separate
* **Multi-environment management** — switch between personal and team workspaces
All your agents exist within your workspace, making it easy to organize and manage your automation workflows while collaborating with others.
## Workspace Creation and Management
### Initial Workspace Creation
When you join Lindy, you automatically create your first workspace. This becomes your personal workspace where you can build and manage your agents.
### Multiple Workspaces
You can have multiple workspaces to organize different projects.
* **Personal workspace** - for your individual agents and experiments
* **[Team workspaces](/account-billing/teams)** – shared environments for collaborative projects
## Workspace Collaboration
### Inviting Team Members
Pro Plan Required: You can only invite team members to your workspace if you're on a Pro plan or above.
To add someone to your workspace:
1. **Click on the top left** - Access your workspace settings
2. **Invite a member** - Send an invitation to your teammate
3. **Share access** - They gain access to your workspace
### Billing Sharing
When you invite members to your workspace:
* **Shared billing** - All workspace activity is billed to the workspace owner
* **Unlimited invites** - You can invite as many people as you want
* **Centralized costs** - All credit consumption and billing is tracked under the owner of the account
* **Plan inheritance** - Team members get access to the workspace's plan features
## Workspace Switching
You can click on your workspace in the top left and then switch to a different workspace.
## Next Steps
Learn how to use templates to create and share agents with your team.
Understand how credits work across workspaces
Optimize credit usage across your workspaces
Start building your first agent in your workspace
# Export Docs for LLM
Source: https://docs.lindy.ai/export-full-docs
# Actions
Source: https://docs.lindy.ai/fundamentals/lindy-101/actions
## Quick Overview
Actions are the specific operations your AI agent performs to complete tasks. Think of them as the building blocks of your workflows — each one handles a particular job like sending an email, updating a spreadsheet, or processing data.
Your workflows can combine multiple actions that run one after another or at the same time. Actions range from simple operations that take one step to complete, to complex AI-powered processes that can reason through problems and adapt based on what they find.
## How to add an action
Click on the `+` sign at the bottom or right-click anywhere on the canvas and select "Add action" from the pop-up menu
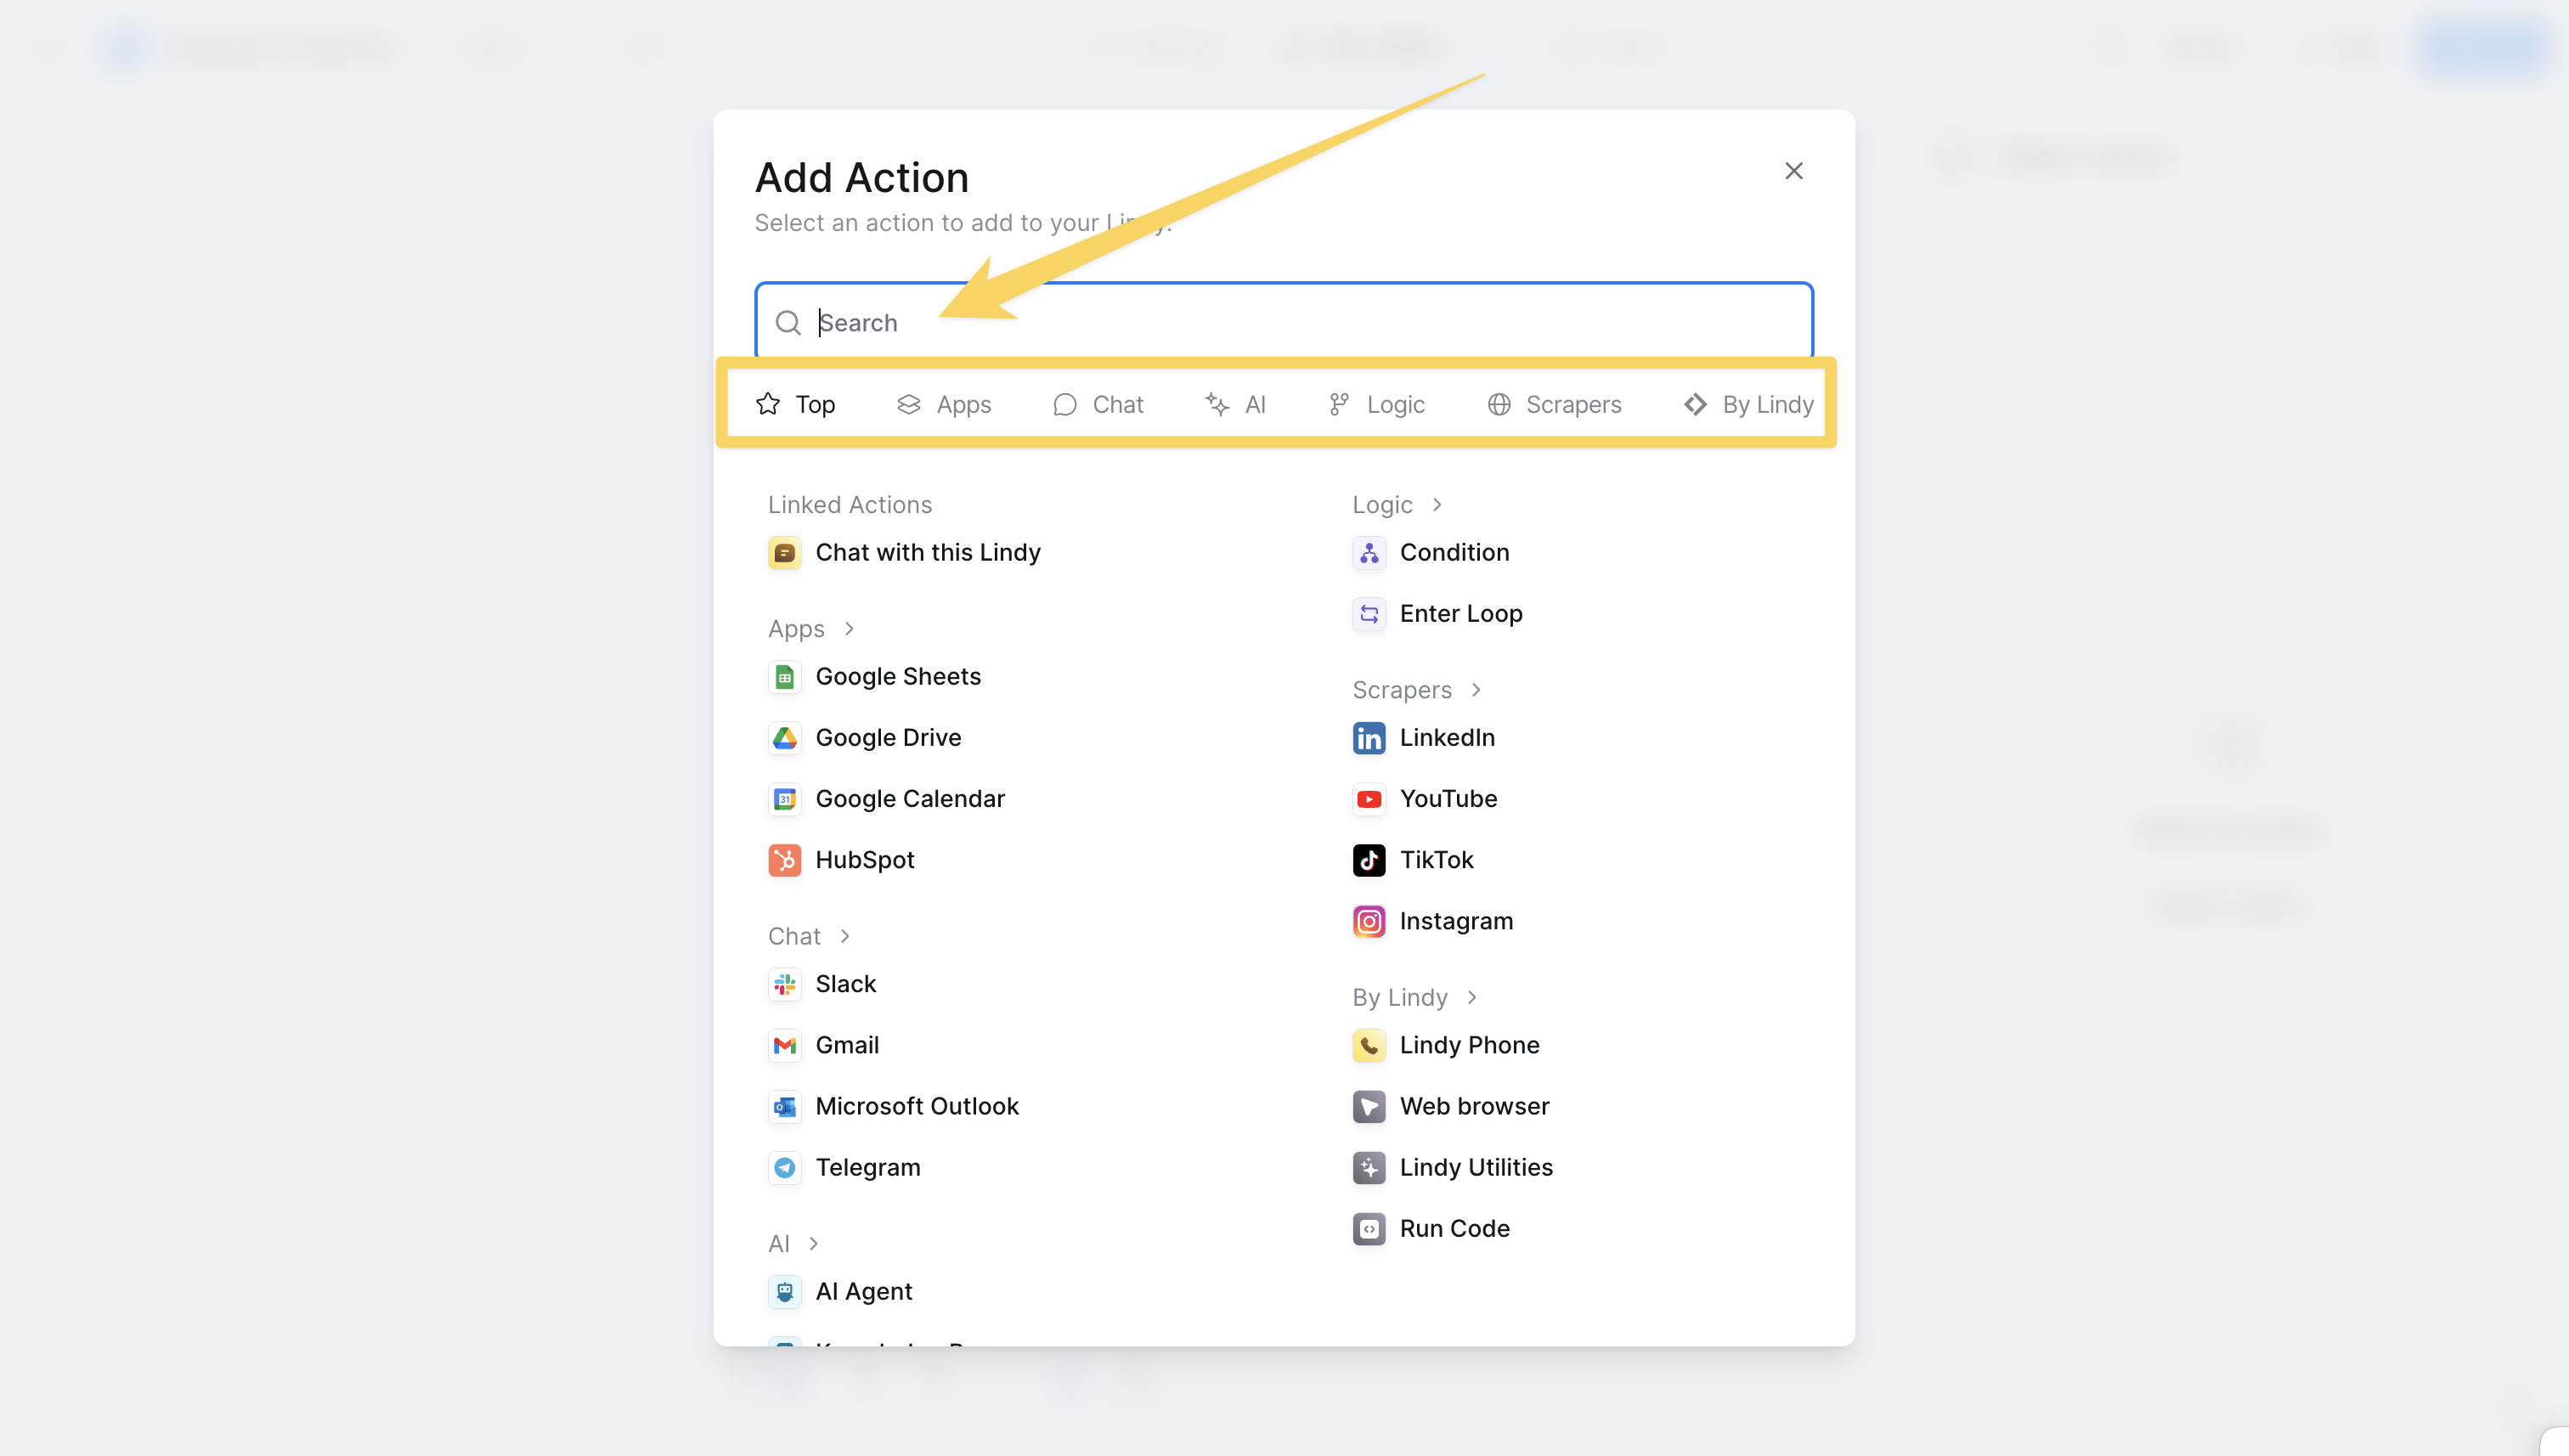
 Search for and select the action you want to add from the comprehensive library of first-party and third-party integrations
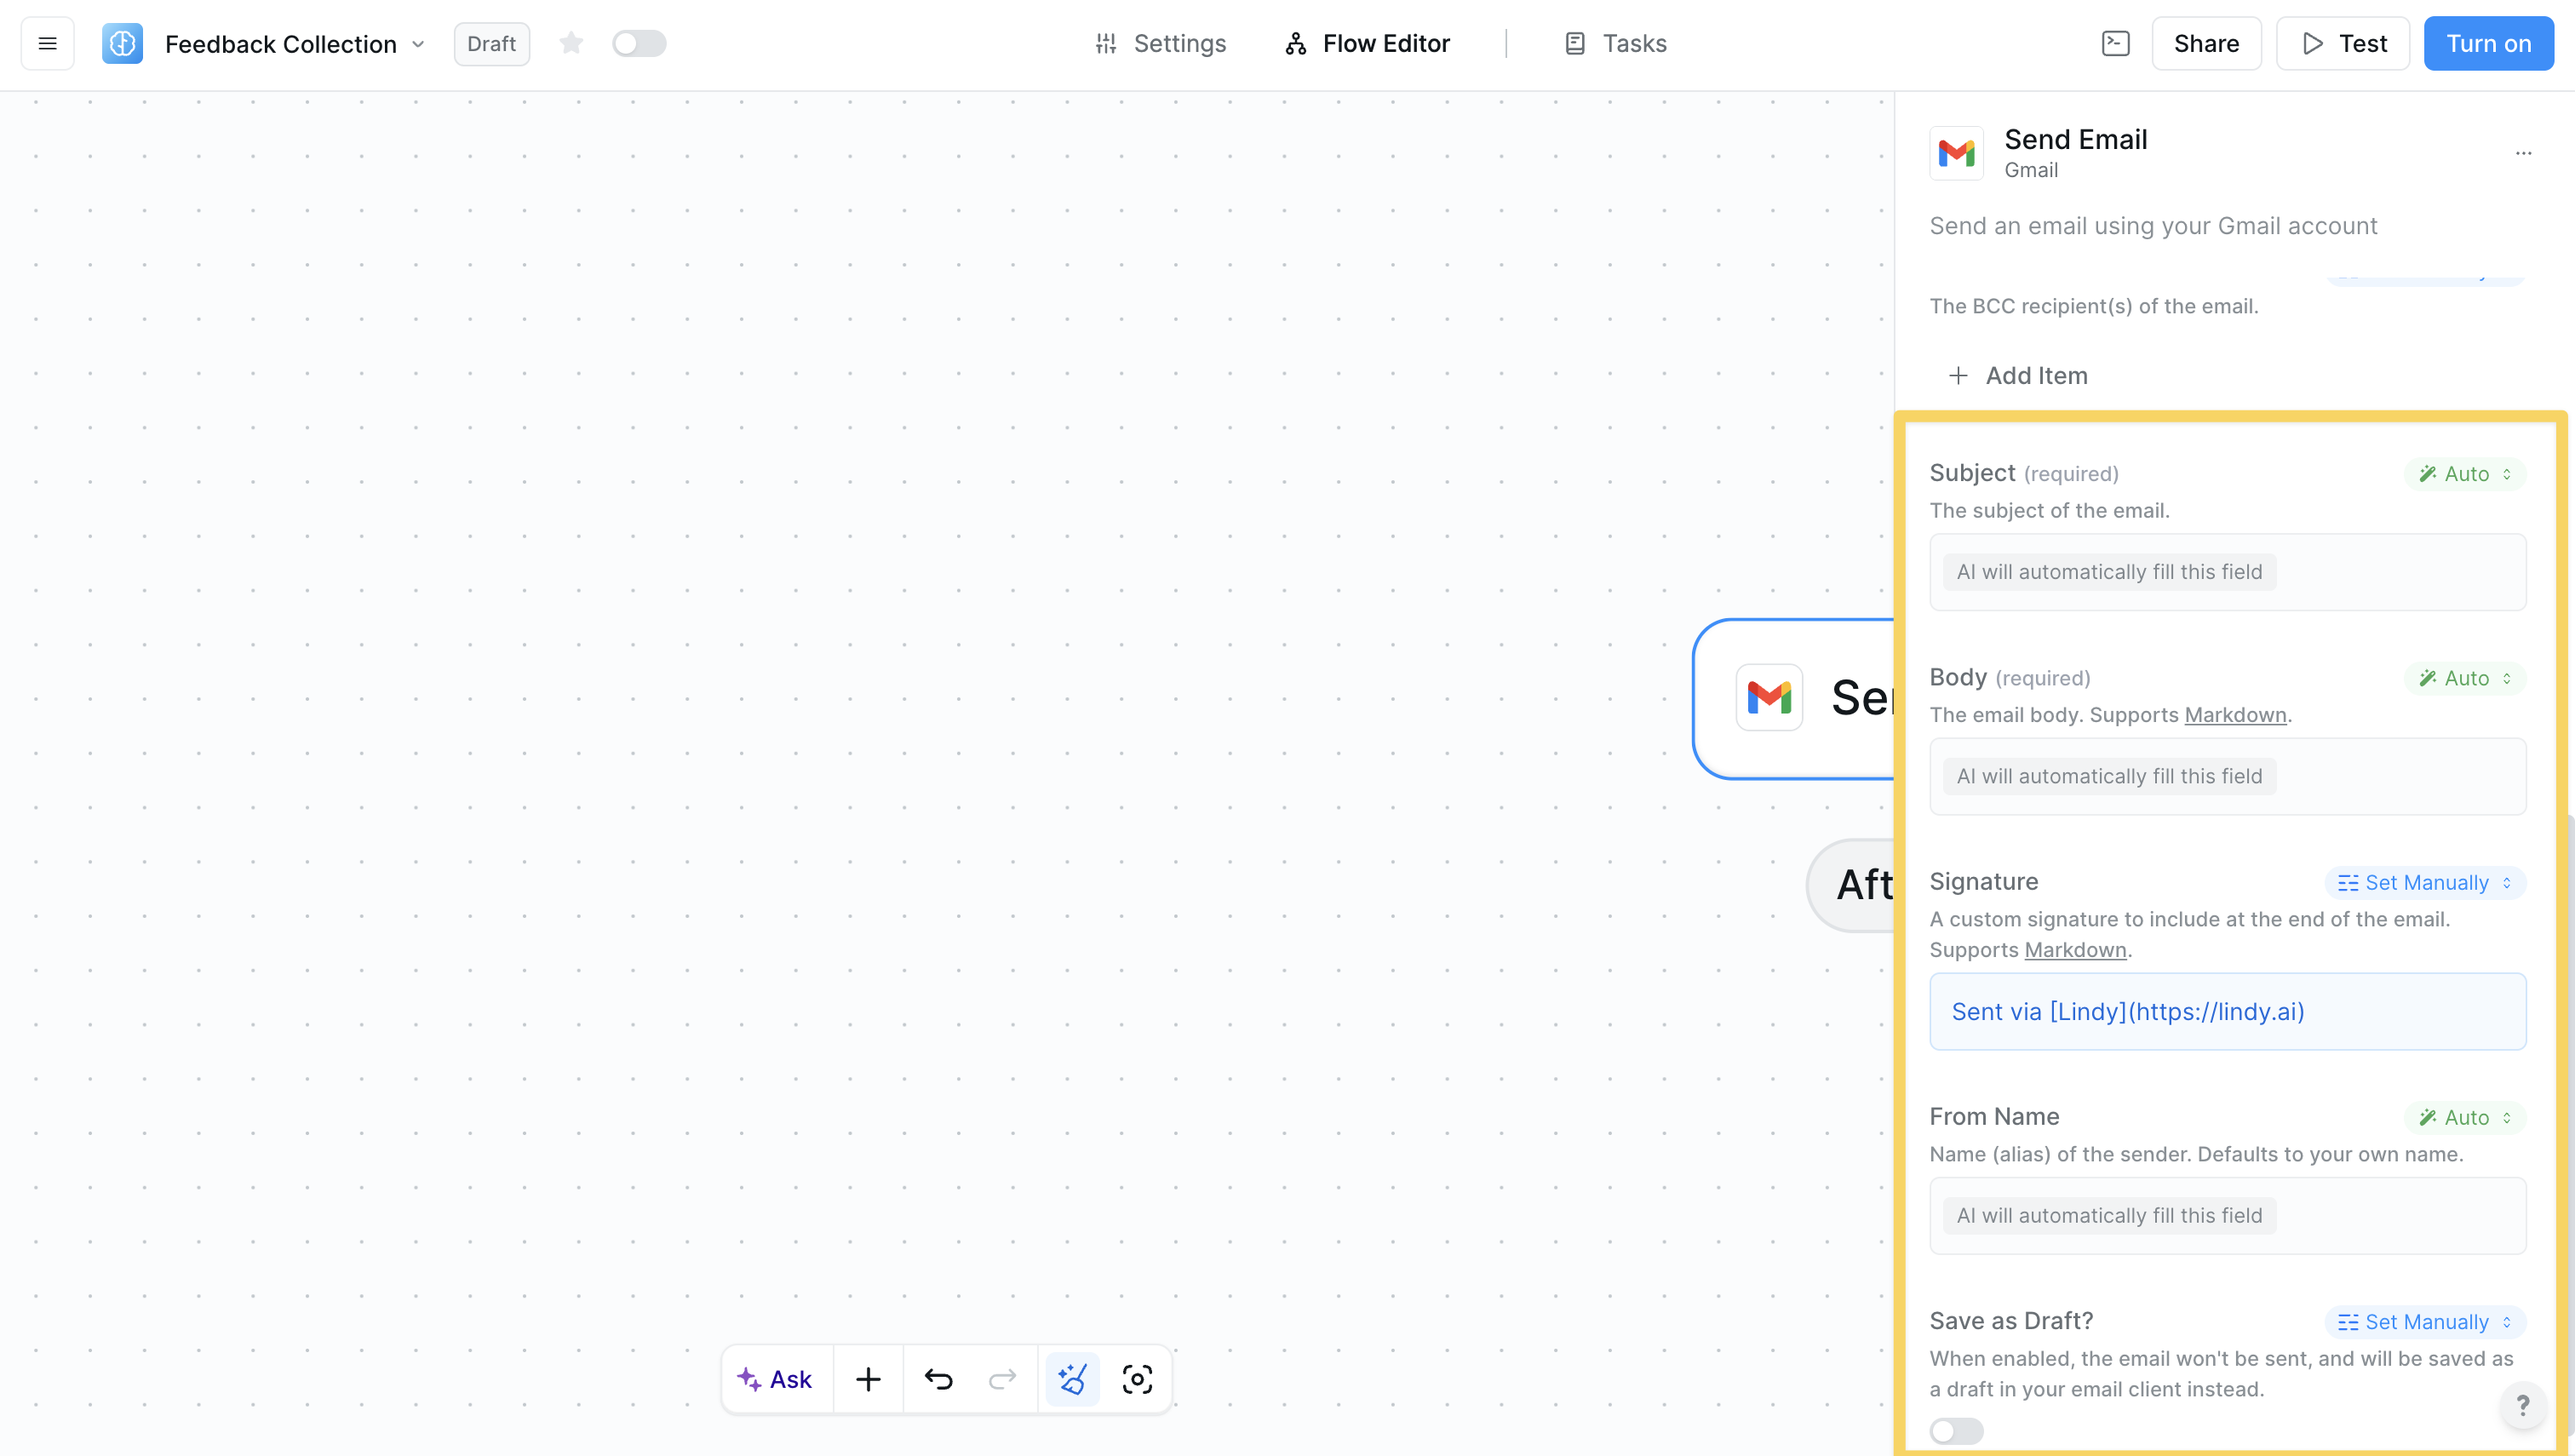
 Set up the action parameters, account connections, and AI instructions to customize the behavior for your specific use case
 ## Types of actions
### Basic actions
Basic actions provide straightforward, single-purpose operations that are quick to set up and easy to use. They consume fewer credits (minimum 1 credit per task) and are perfect for common automation tasks. These actions still use AI and integrations but focus on simpler, more direct operations. Examples include:
* Send Email
* Create Calendar Event
* Update Spreadsheet
* Send Slack Message
### Linked actions
## Types of actions
### Basic actions
Basic actions provide straightforward, single-purpose operations that are quick to set up and easy to use. They consume fewer credits (minimum 1 credit per task) and are perfect for common automation tasks. These actions still use AI and integrations but focus on simpler, more direct operations. Examples include:
* Send Email
* Create Calendar Event
* Update Spreadsheet
* Send Slack Message
### Linked actions
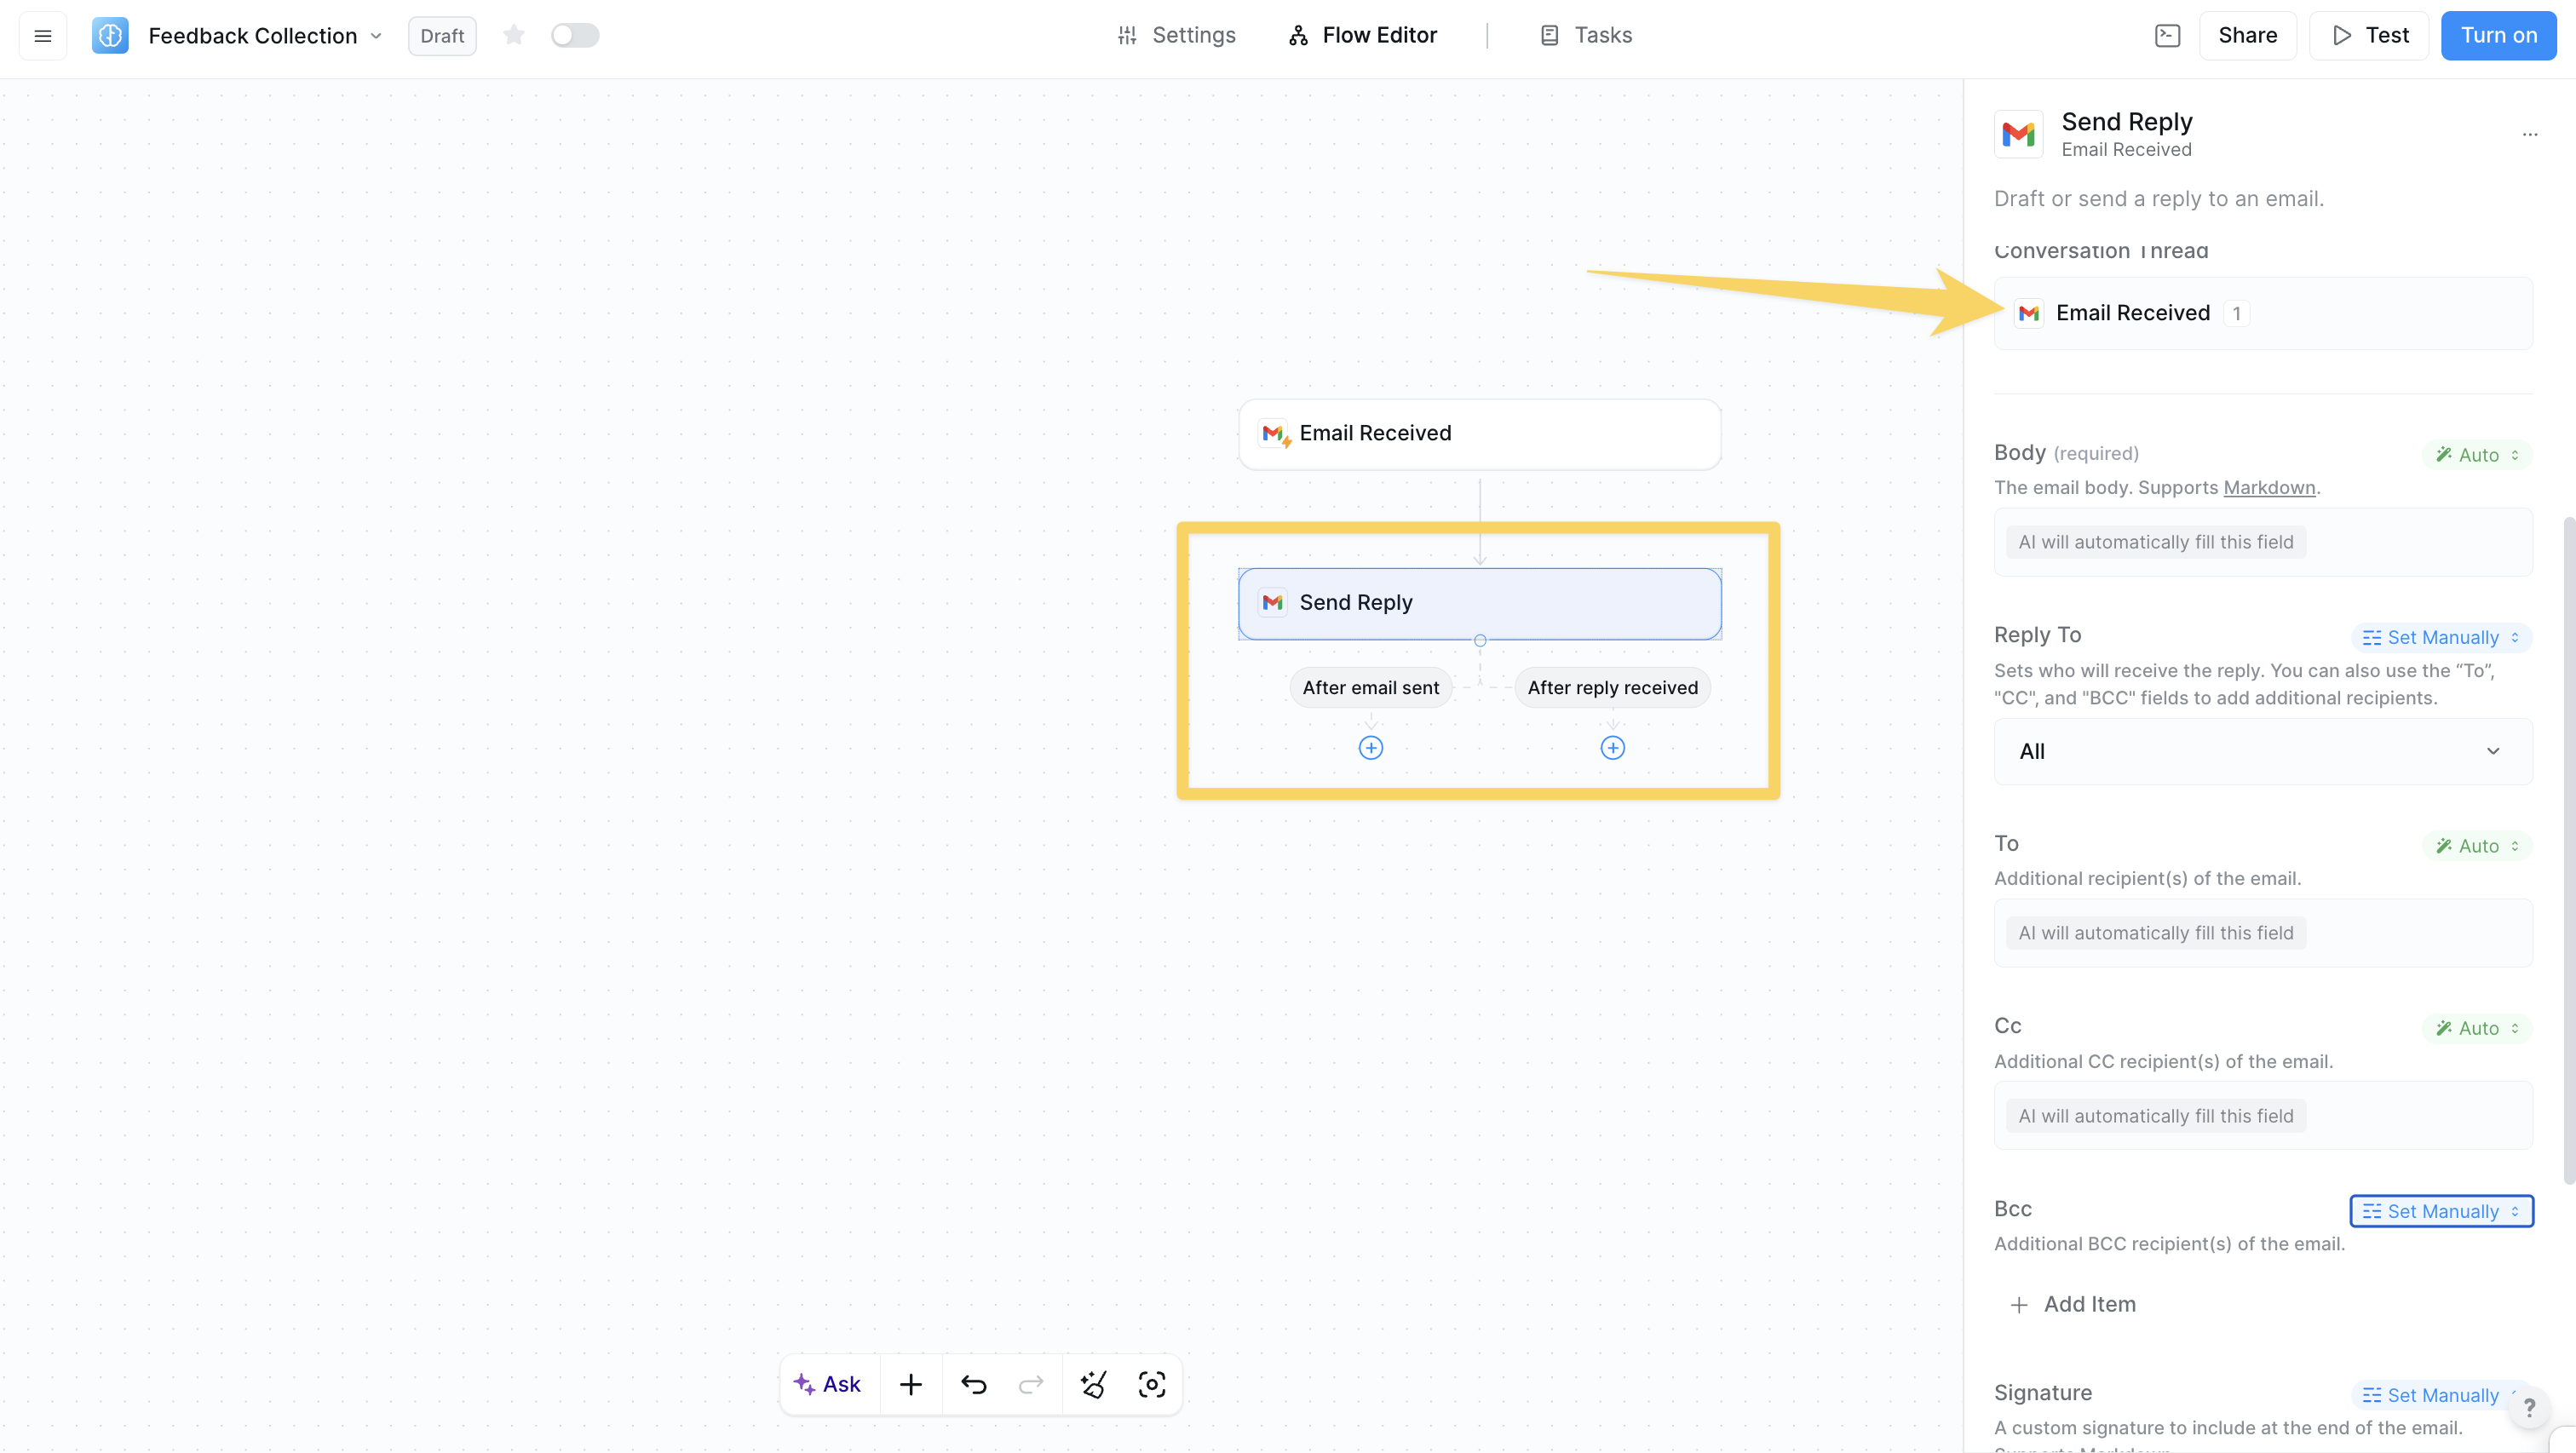 Linked actions create additional actions that are connected to the original action. They show different execution paths that you can choose from based on your workflow needs.
**Two types of linked actions:**
* **Standard linked actions**: Create downstream actions for continued operations
* **Channels**: Listen for future events like email replies, Slack messages, or Telegram messages
**How linked actions work:**
* **Choose your paths**: Select which execution paths you need - you can choose one or both
* **Execute normally**: "After email sent" path continues your workflow immediately after sending
* **Listen for events** (channels only): "After reply received" path adds listening capability to wake up your agent when replies arrive
* **Maintain context**: When the agent wakes up from listening, it has full context of the original interaction
**Key example: Email Actions**
* Send an email and choose your paths
* "After email sent" → workflow continues normally
* "After reply received" → agent listens and wakes up when replies arrive with full thread context
* You'll see linked actions available in your action selector for these operations
This enables reactive workflows where agents can handle both proactive tasks and responsive interactions seamlessly.
### Using multiple channels
Linked actions create additional actions that are connected to the original action. They show different execution paths that you can choose from based on your workflow needs.
**Two types of linked actions:**
* **Standard linked actions**: Create downstream actions for continued operations
* **Channels**: Listen for future events like email replies, Slack messages, or Telegram messages
**How linked actions work:**
* **Choose your paths**: Select which execution paths you need - you can choose one or both
* **Execute normally**: "After email sent" path continues your workflow immediately after sending
* **Listen for events** (channels only): "After reply received" path adds listening capability to wake up your agent when replies arrive
* **Maintain context**: When the agent wakes up from listening, it has full context of the original interaction
**Key example: Email Actions**
* Send an email and choose your paths
* "After email sent" → workflow continues normally
* "After reply received" → agent listens and wakes up when replies arrive with full thread context
* You'll see linked actions available in your action selector for these operations
This enables reactive workflows where agents can handle both proactive tasks and responsive interactions seamlessly.
### Using multiple channels
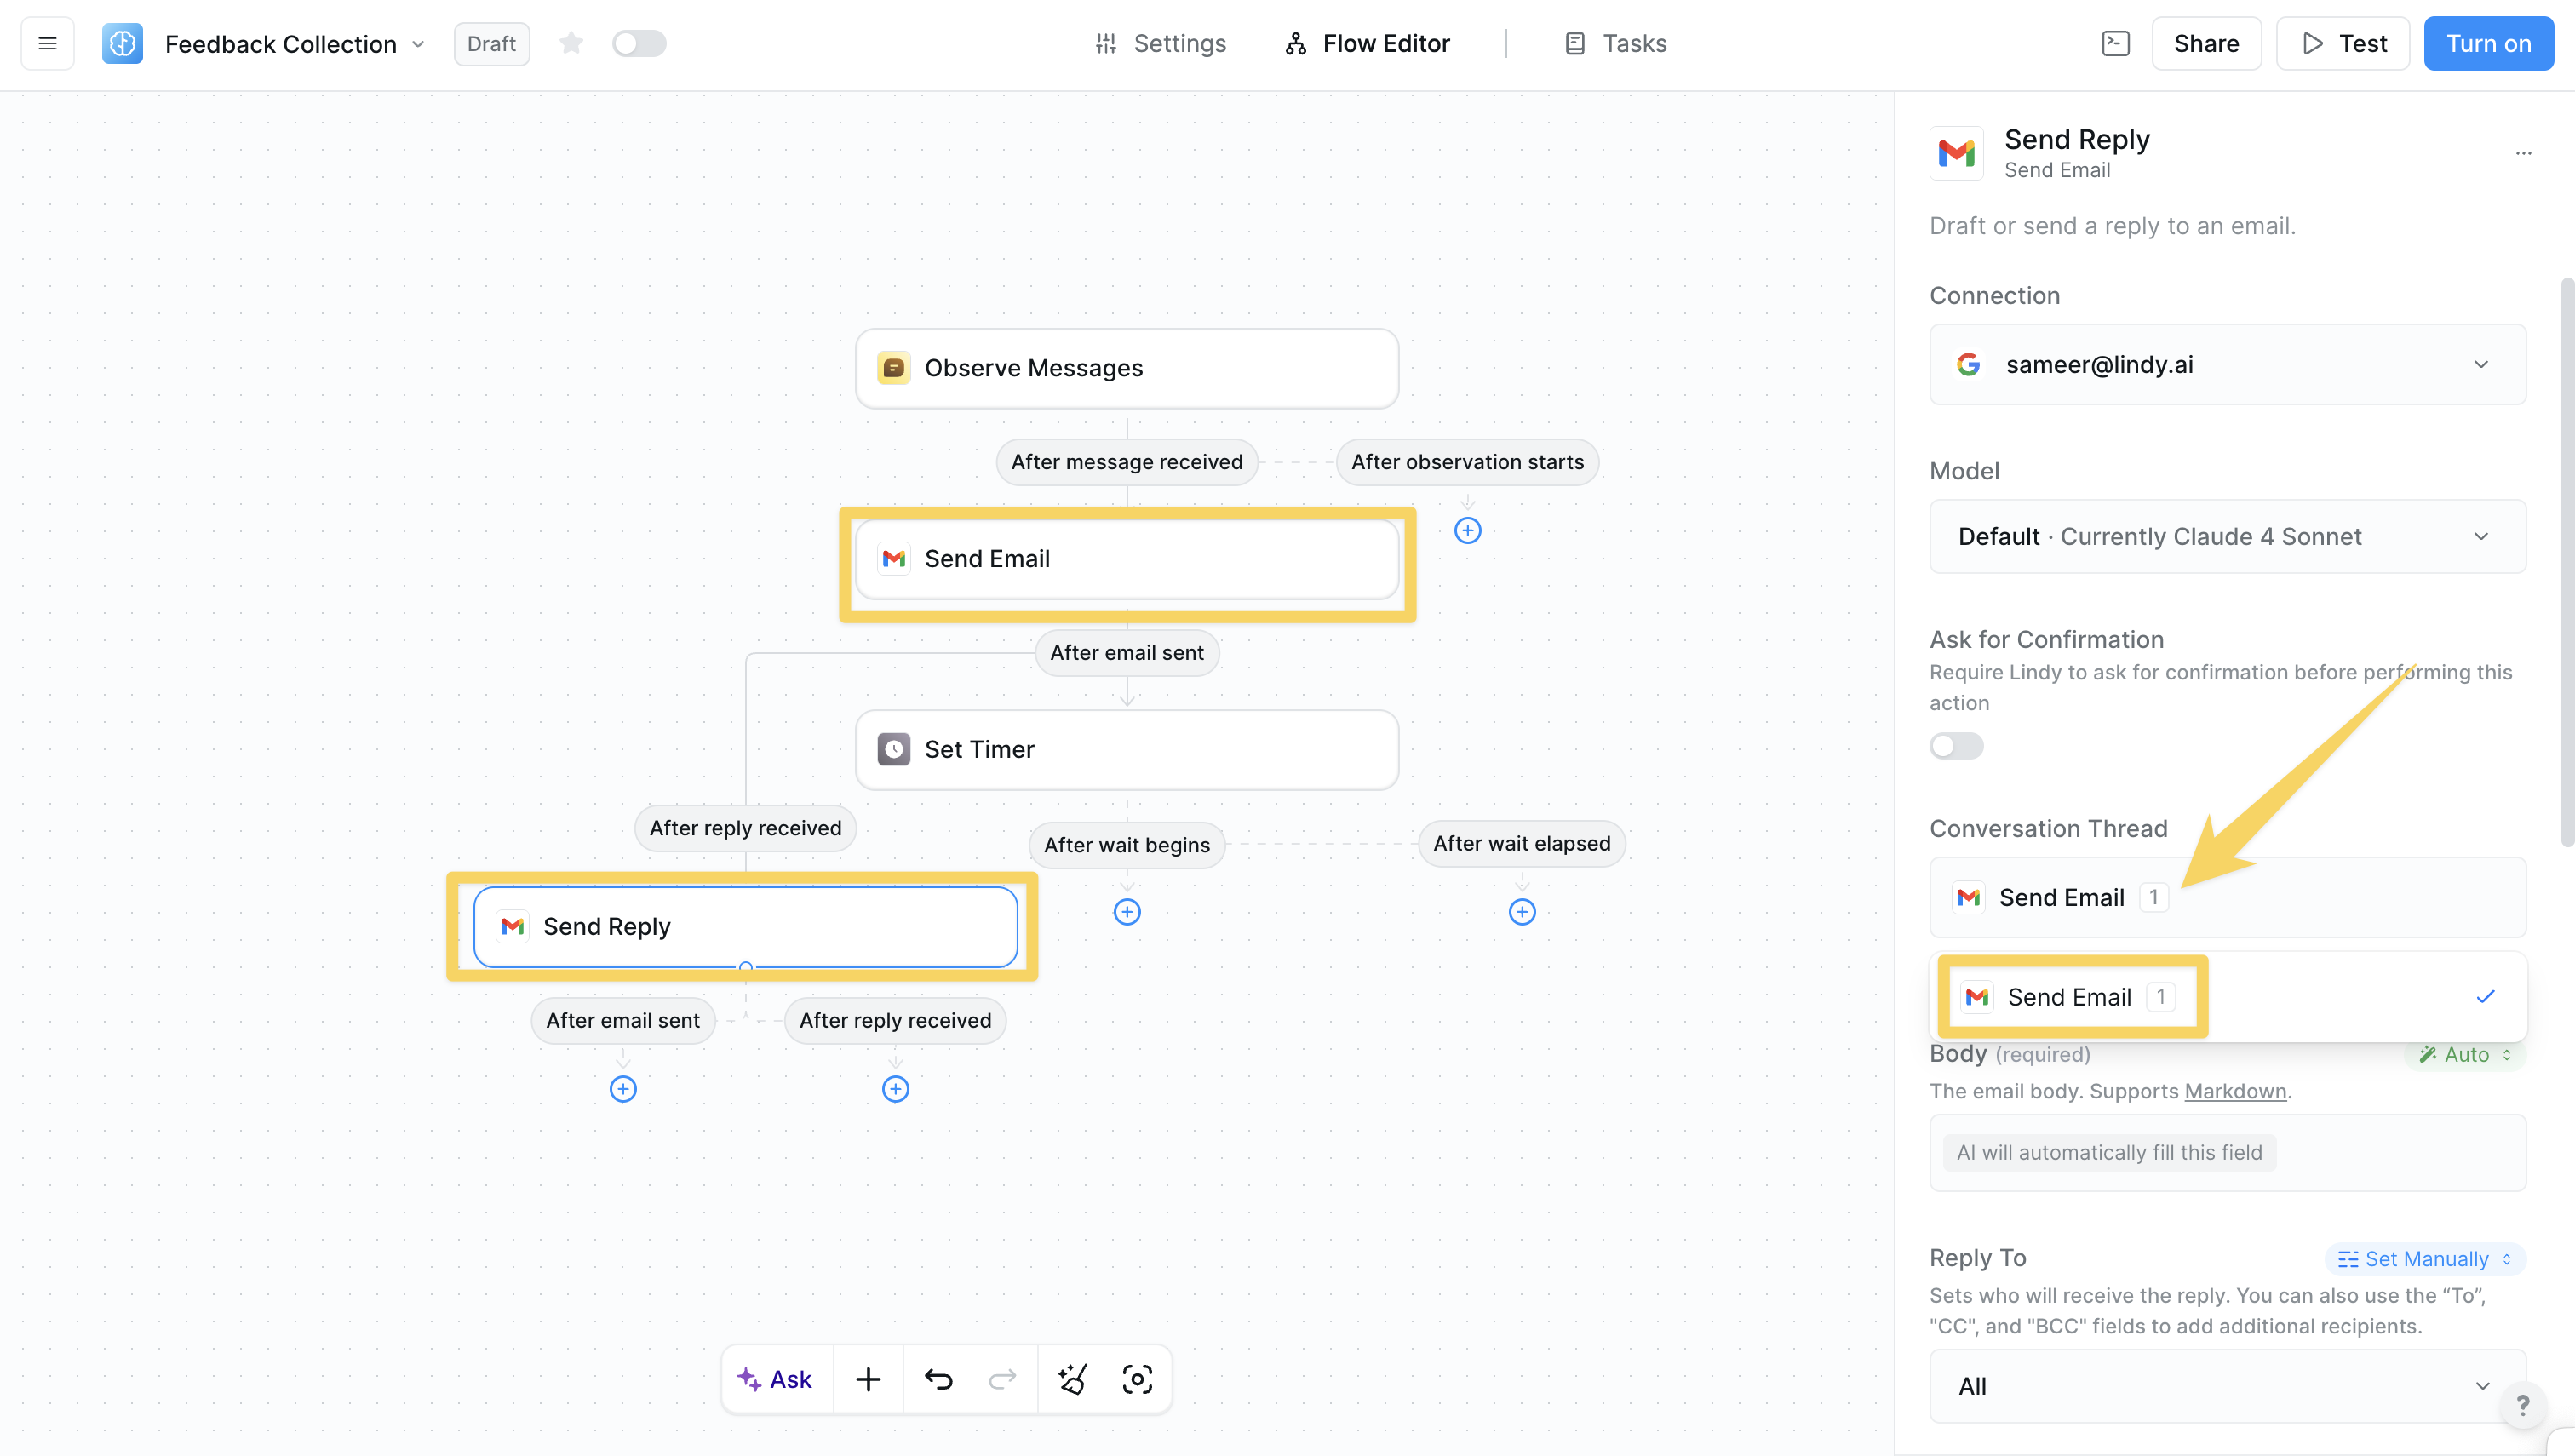 When you use multiple channels in a single agent, each channel maintains its own conversation thread for listening and responding to future events.
**How multiple channels work:**
* **Multiple conversations**: If you send two emails that both use channels, you now have two separate listening threads
* **Thread selection**: When responding, you must choose which specific conversation thread you're replying to
* **Parallel processing**: Multiple channels can listen and respond independently
**Example scenario:**
* Send Email A to Customer 1 (with channel)
* Send Email B to Customer 2 (with channel)
* Both customers reply
* Agent wakes up twice with separate contexts
* Each response is handled within its specific conversation thread
This enables sophisticated multi-conversation management where a single agent can handle numerous ongoing interactions simultaneously.
## Action configuration
Every action in Lindy offers several configuration options to customize its behavior and ensure it works perfectly within your workflow.
### Account selection
When you use multiple channels in a single agent, each channel maintains its own conversation thread for listening and responding to future events.
**How multiple channels work:**
* **Multiple conversations**: If you send two emails that both use channels, you now have two separate listening threads
* **Thread selection**: When responding, you must choose which specific conversation thread you're replying to
* **Parallel processing**: Multiple channels can listen and respond independently
**Example scenario:**
* Send Email A to Customer 1 (with channel)
* Send Email B to Customer 2 (with channel)
* Both customers reply
* Agent wakes up twice with separate contexts
* Each response is handled within its specific conversation thread
This enables sophisticated multi-conversation management where a single agent can handle numerous ongoing interactions simultaneously.
## Action configuration
Every action in Lindy offers several configuration options to customize its behavior and ensure it works perfectly within your workflow.
### Account selection
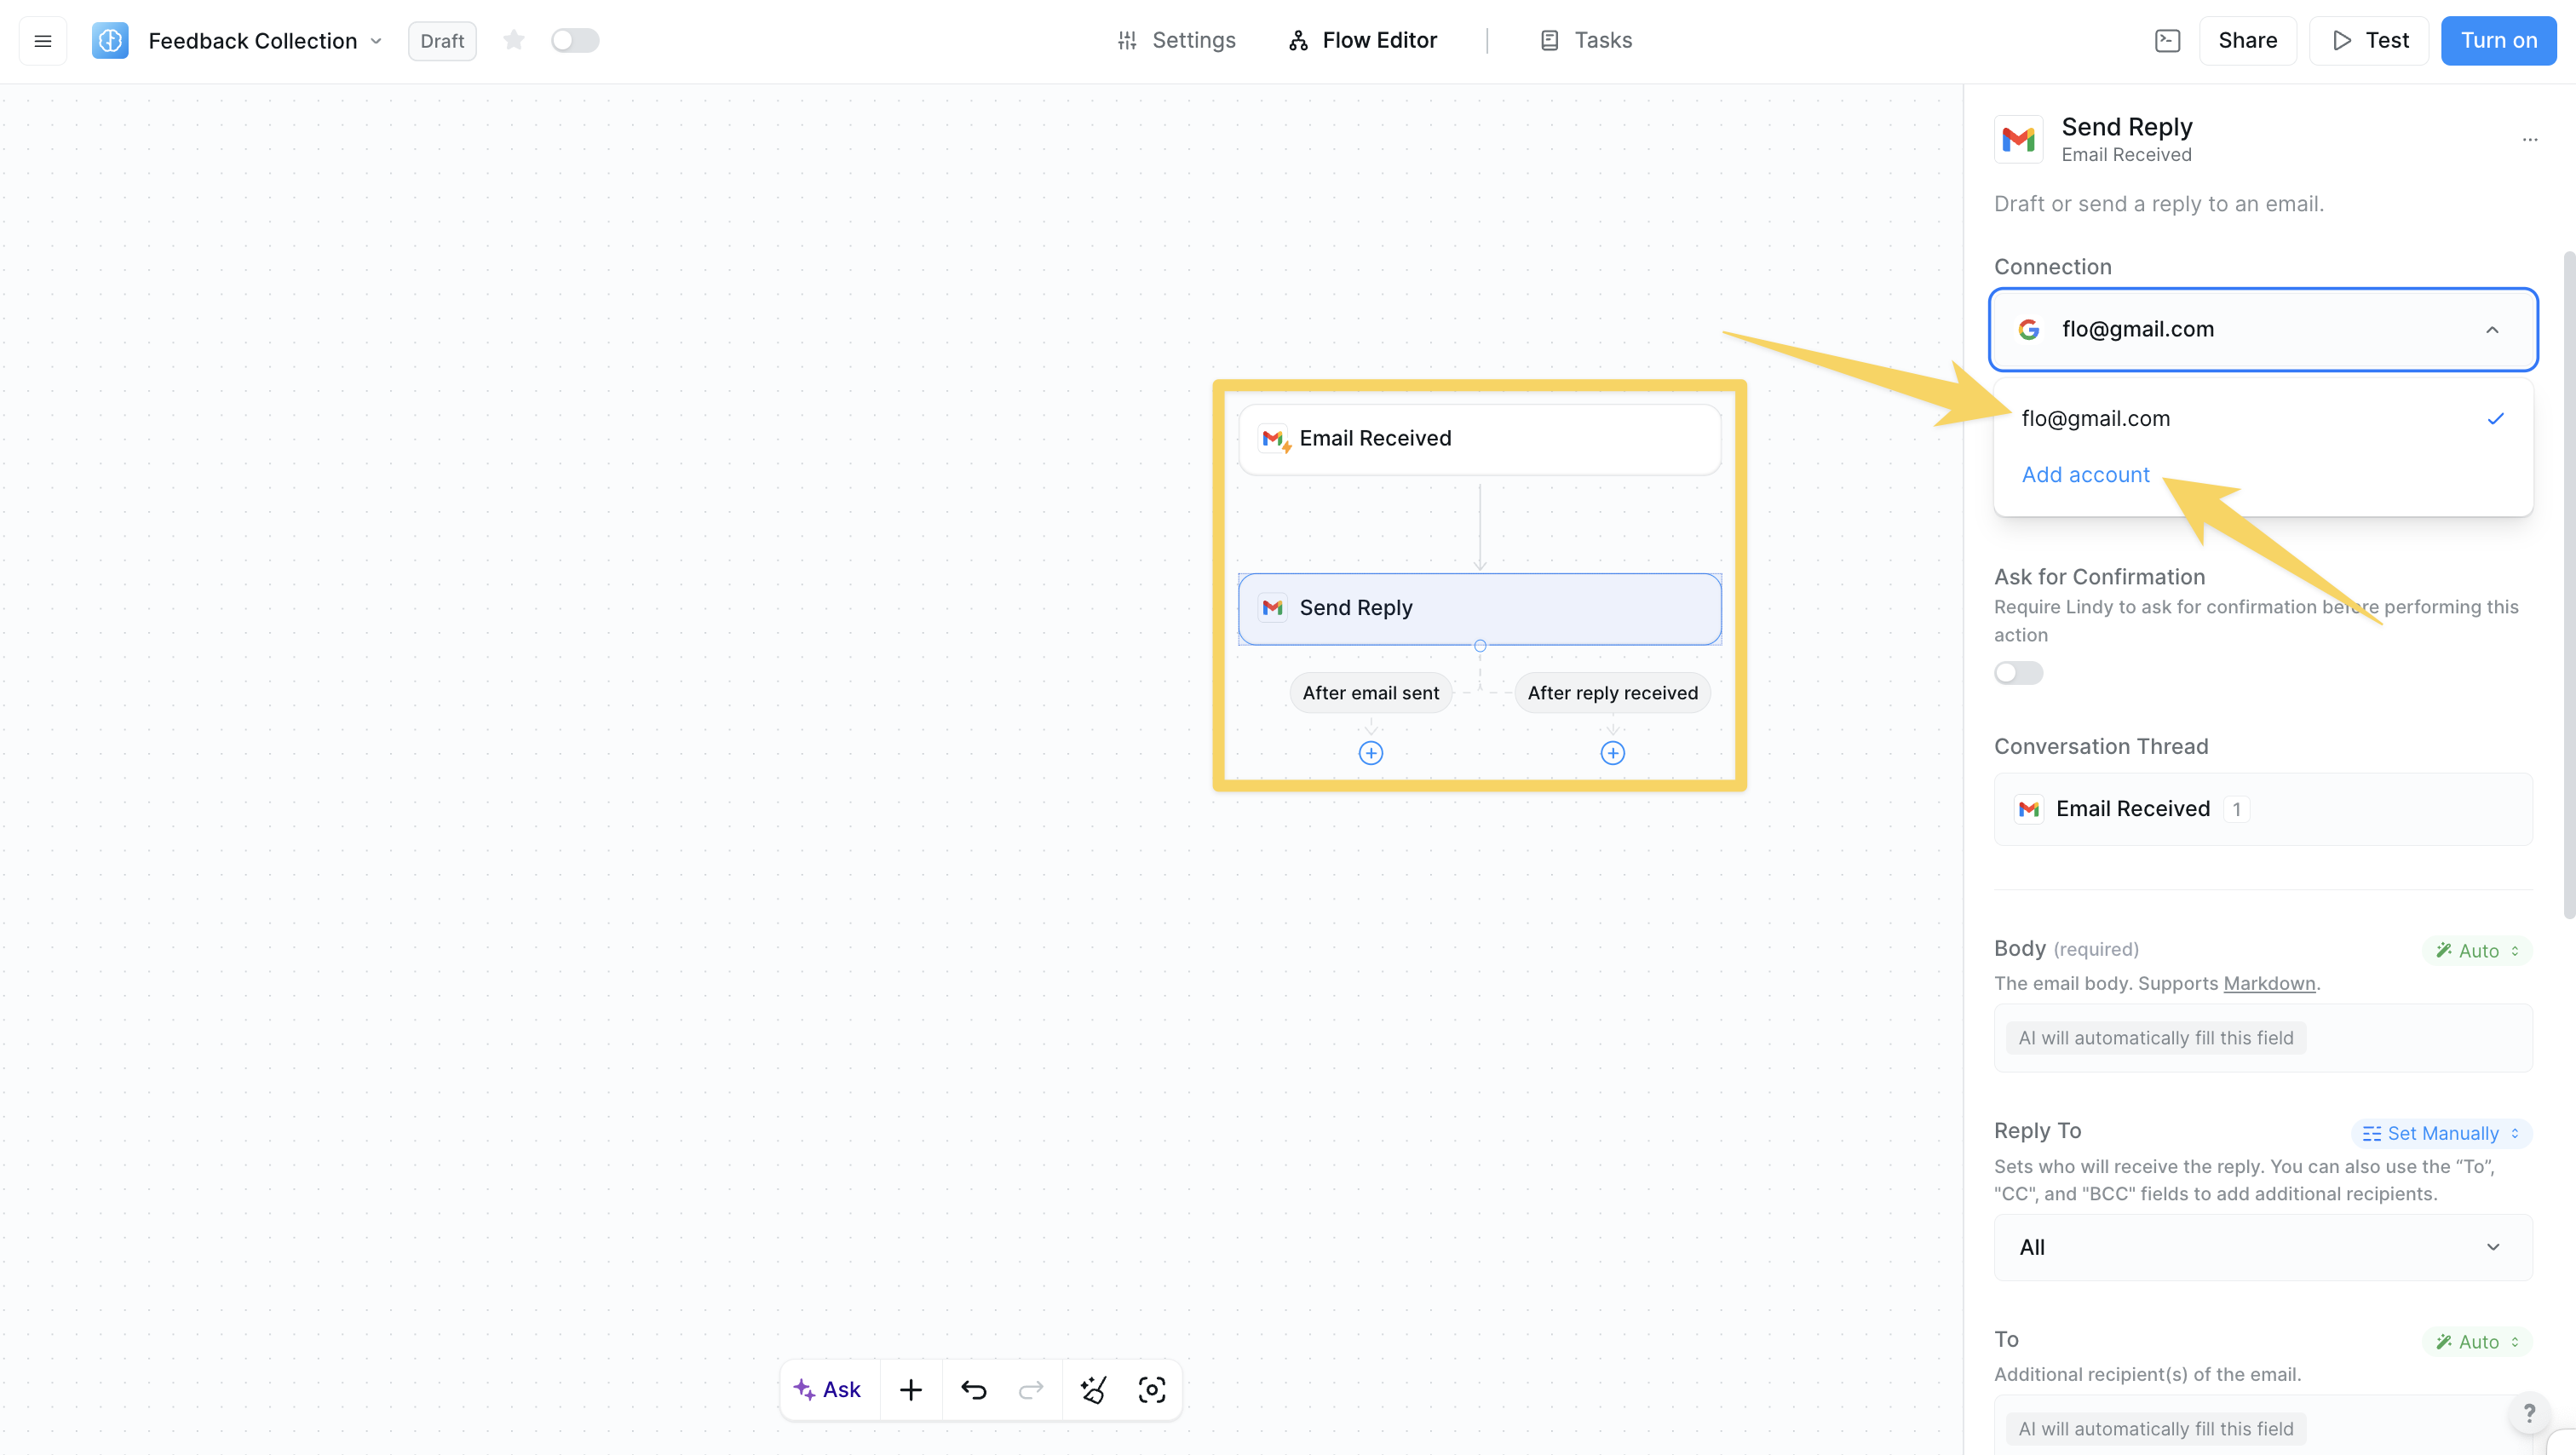 Choose which connected account the action should use. If you authorize your company Gmail account, Lindy will only access your company email. You can authorize multiple accounts for a given application, but each action will only use one account.
### Model labels
Choose which connected account the action should use. If you authorize your company Gmail account, Lindy will only access your company email. You can authorize multiple accounts for a given application, but each action will only use one account.
### Model labels
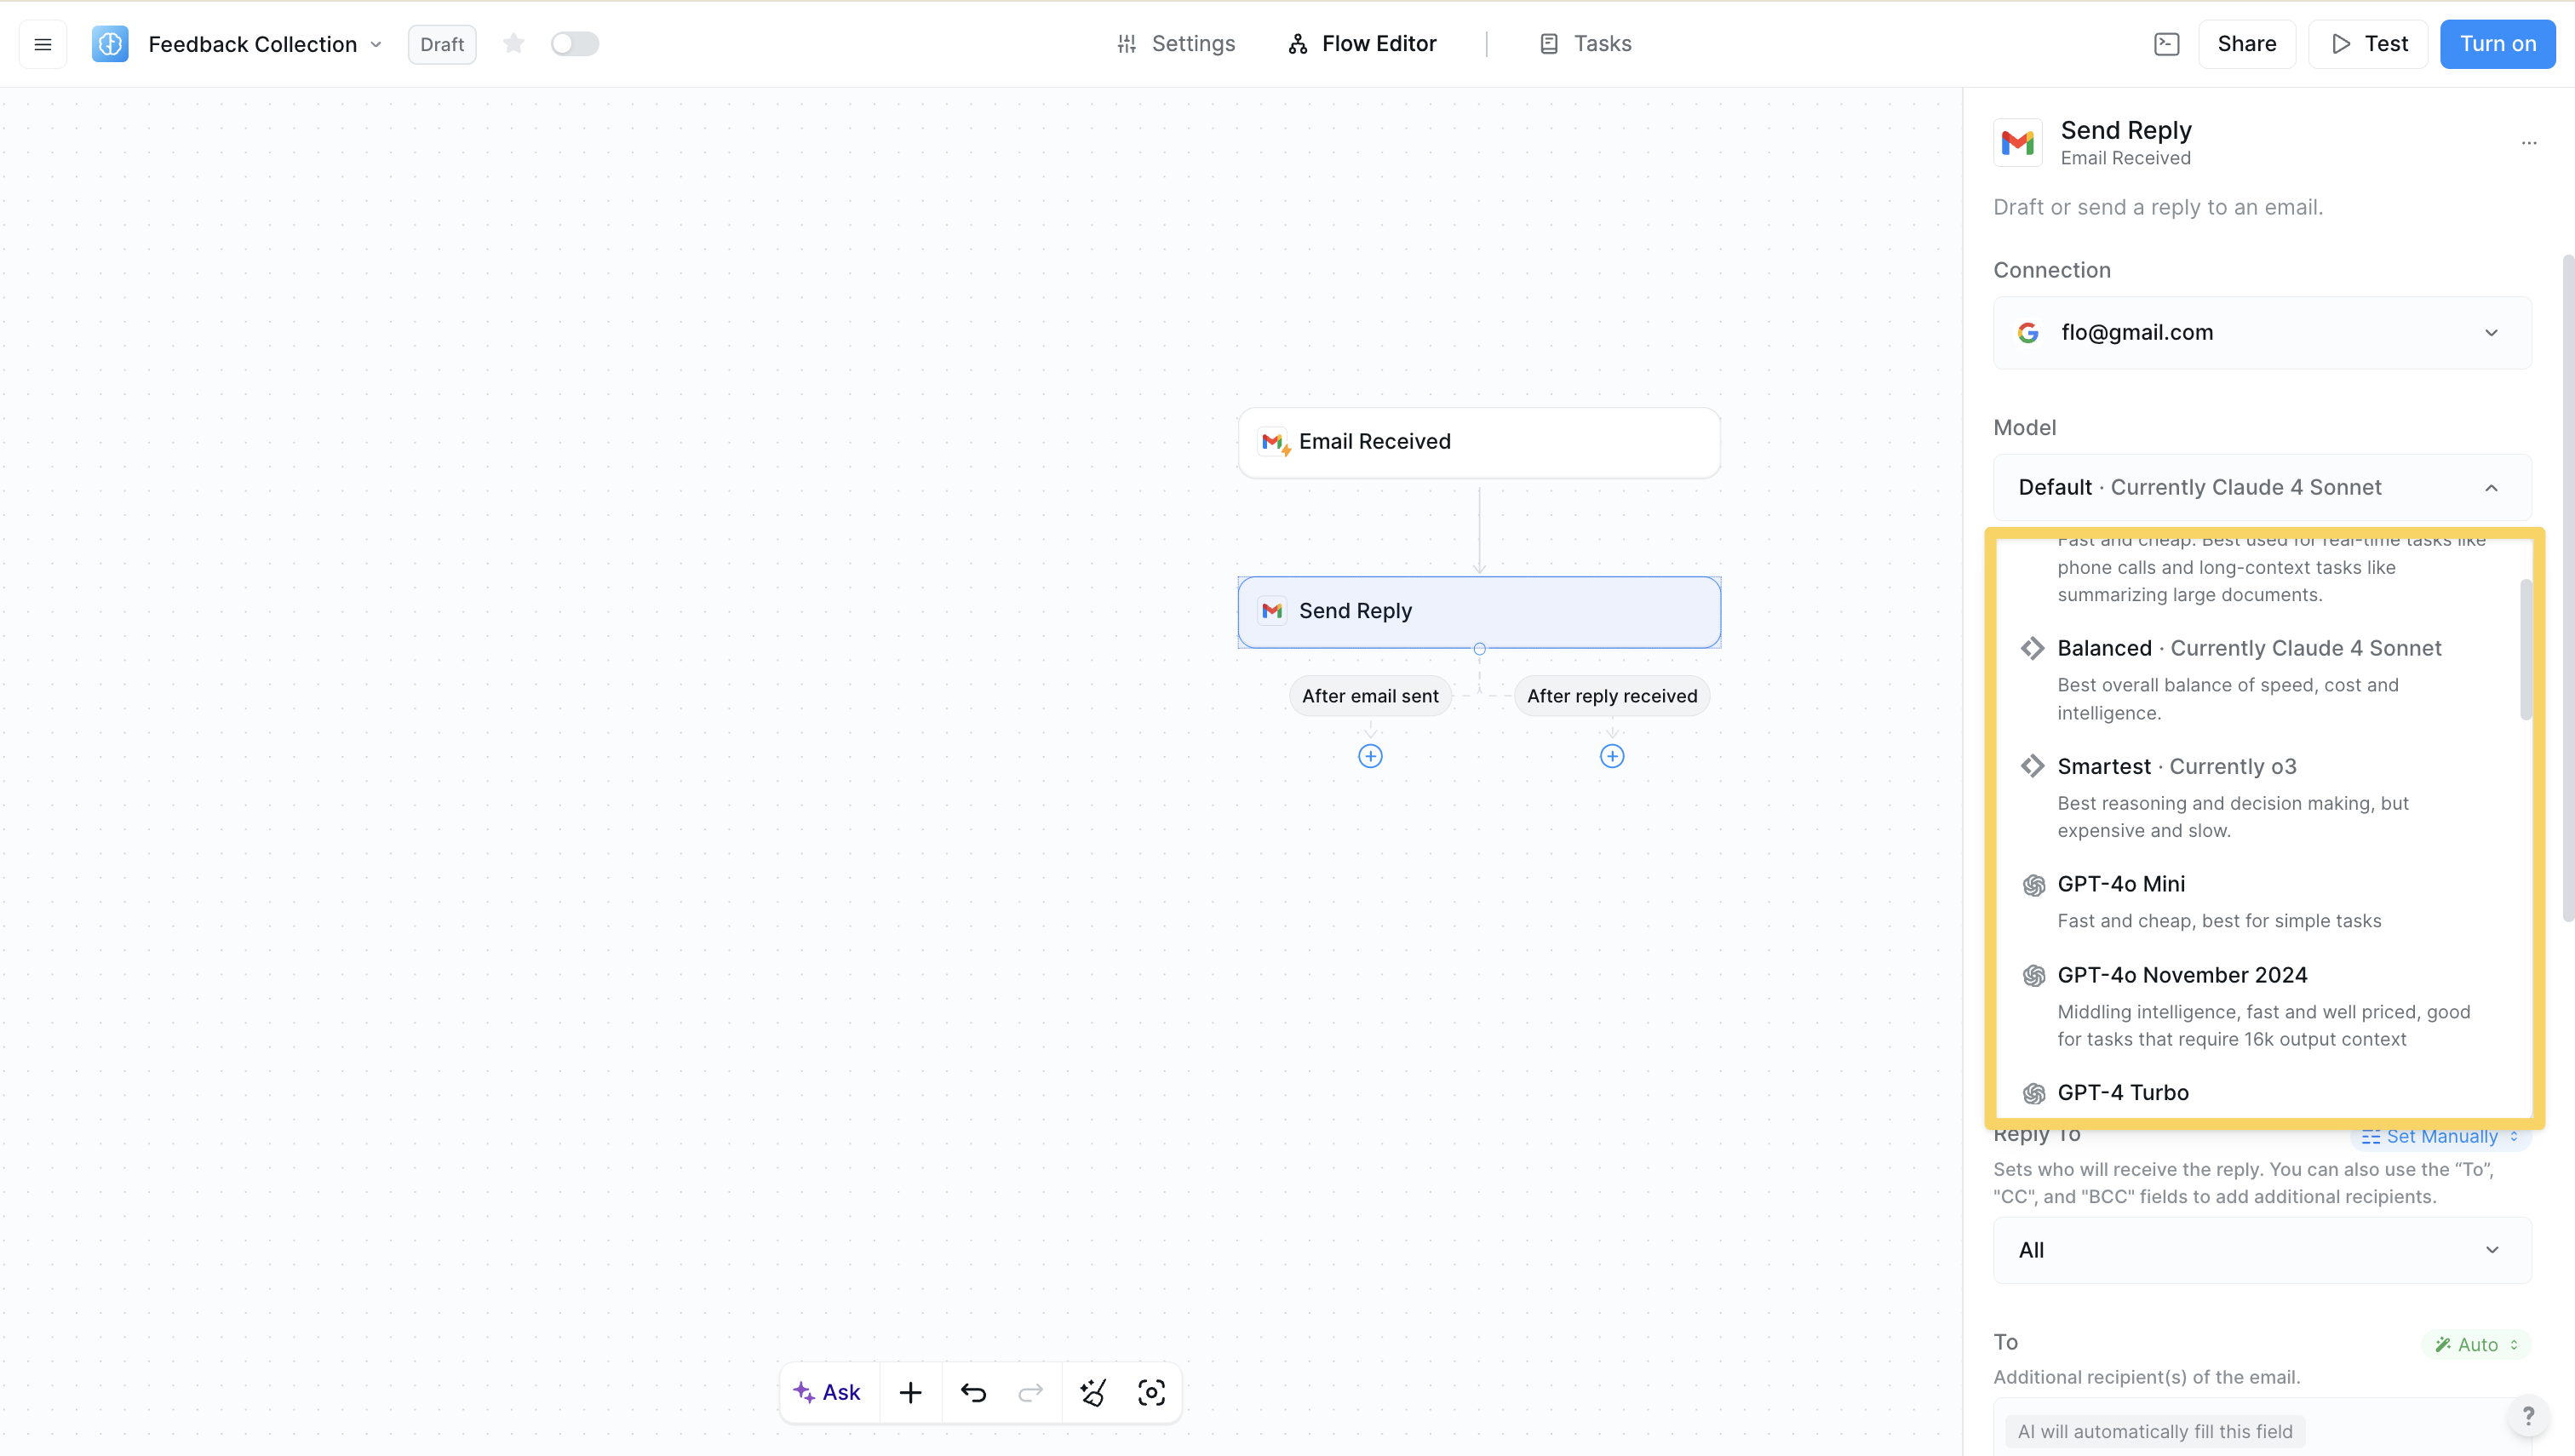 Select the AI model to be used for the action. The model completes the parameters using context from the workflow and data from prior steps. Bigger models are smarter but more expensive — Lindy provides top AI models ready to use out of the box.
## Next steps
Learn how to start workflows automatically
Add decision logic to your workflows
Verify your actions behave as expected
Jump-start with pre-built workflows
# Agent Steps
Source: https://docs.lindy.ai/fundamentals/lindy-101/ai-agents
## Quick Overview
Agent steps let your AI make autonomous decisions about how to complete complex tasks. Instead of following fixed workflows, they work from guidelines you provide and choose which skills to use based on the situation.
Think of them as hiring a smart assistant who can adapt to unexpected scenarios. They'll keep working until they meet your exit conditions, using whatever combination of skills they need to get the job done.
Agent steps are powerful but more expensive than standard actions. Use them only when the next steps are genuinely uncertain and you need intelligent decision-making.
AI Agents are powerful but more expensive and potentially less reliable than standard actions. Use them only when the next steps are truly uncertain. When possible, use actions and conditions instead.
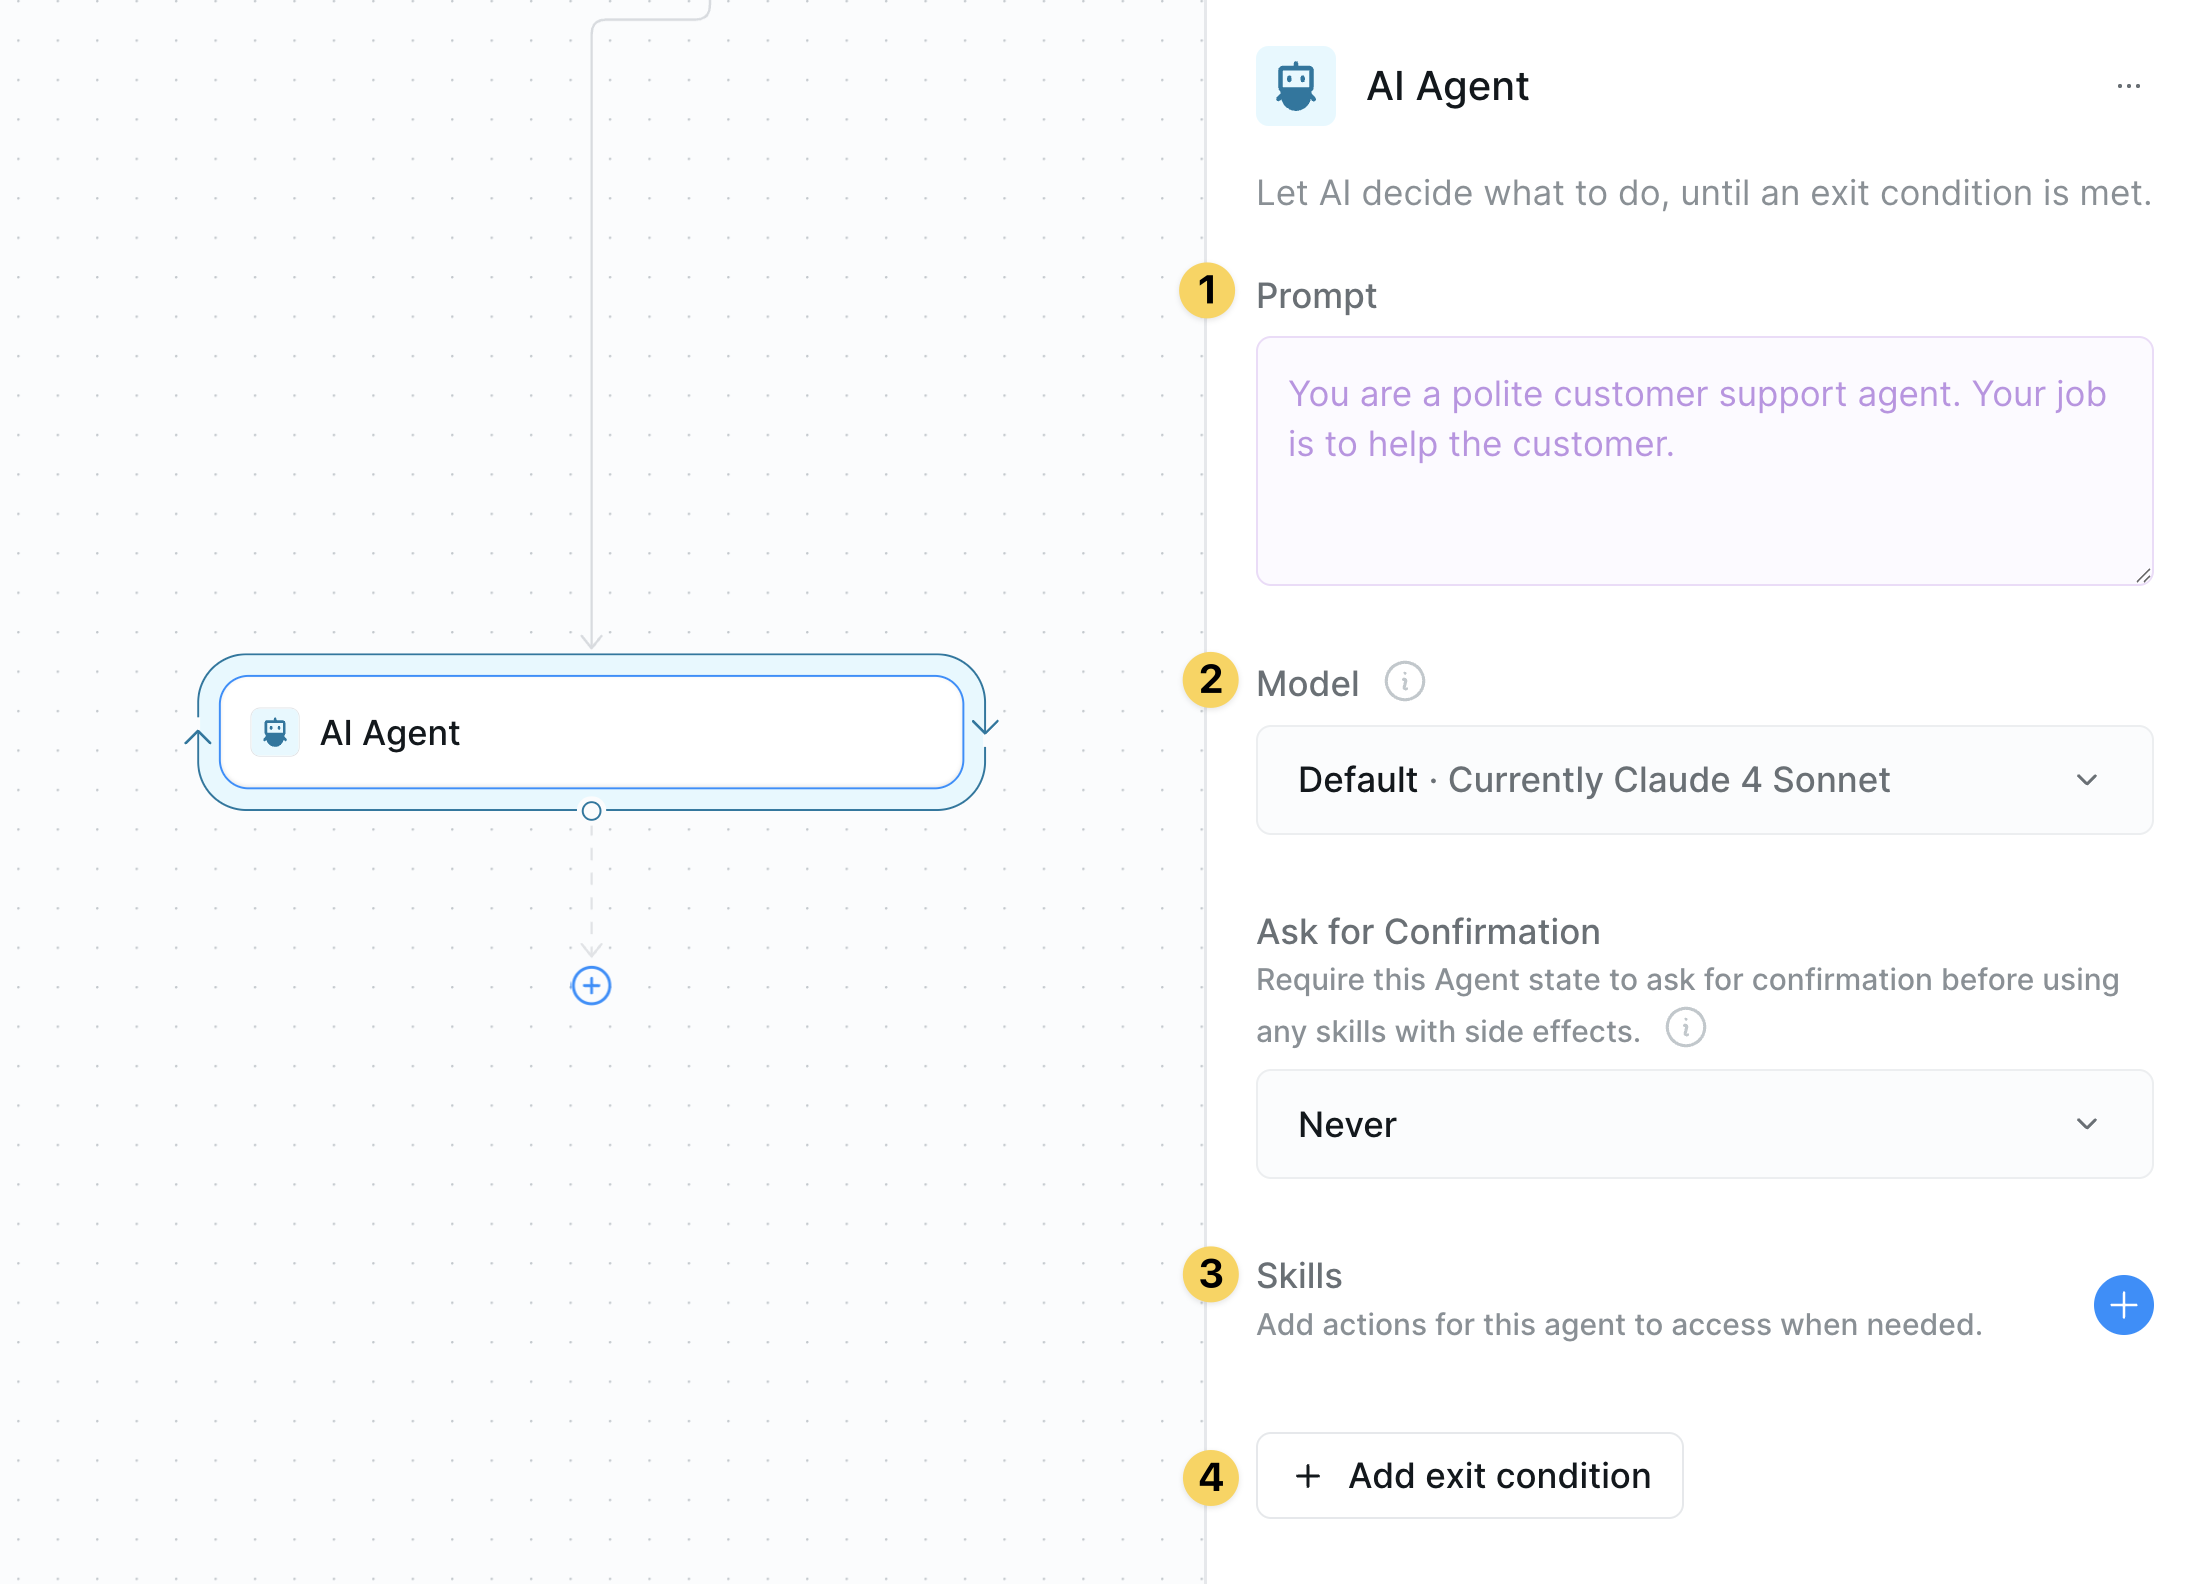
## Understanding AI Agent Components
AI Agents consist of four essential parts that work together:
* **Prompt**: The core instructions that guide your agent's behavior. Think of this as the agent's mission statement - what it should accomplish and how.
* **Model**: The AI model (e.g., GPT-4, Claude) that powers the agent's decision-making capabilities.
* **Skills**: The actions and capabilities available to the agent. These are the tools it can use to accomplish its goals.
* **Exit Conditions**: Criteria that tell the agent when its task is complete and it should proceed to the next workflow step.
## Adding an AI Agent
Select the AI model to be used for the action. The model completes the parameters using context from the workflow and data from prior steps. Bigger models are smarter but more expensive — Lindy provides top AI models ready to use out of the box.
## Next steps
Learn how to start workflows automatically
Add decision logic to your workflows
Verify your actions behave as expected
Jump-start with pre-built workflows
# Agent Steps
Source: https://docs.lindy.ai/fundamentals/lindy-101/ai-agents
## Quick Overview
Agent steps let your AI make autonomous decisions about how to complete complex tasks. Instead of following fixed workflows, they work from guidelines you provide and choose which skills to use based on the situation.
Think of them as hiring a smart assistant who can adapt to unexpected scenarios. They'll keep working until they meet your exit conditions, using whatever combination of skills they need to get the job done.
Agent steps are powerful but more expensive than standard actions. Use them only when the next steps are genuinely uncertain and you need intelligent decision-making.
AI Agents are powerful but more expensive and potentially less reliable than standard actions. Use them only when the next steps are truly uncertain. When possible, use actions and conditions instead.
## Understanding AI Agent Components
AI Agents consist of four essential parts that work together:
* **Prompt**: The core instructions that guide your agent's behavior. Think of this as the agent's mission statement - what it should accomplish and how.
* **Model**: The AI model (e.g., GPT-4, Claude) that powers the agent's decision-making capabilities.
* **Skills**: The actions and capabilities available to the agent. These are the tools it can use to accomplish its goals.
* **Exit Conditions**: Criteria that tell the agent when its task is complete and it should proceed to the next workflow step.
## Adding an AI Agent
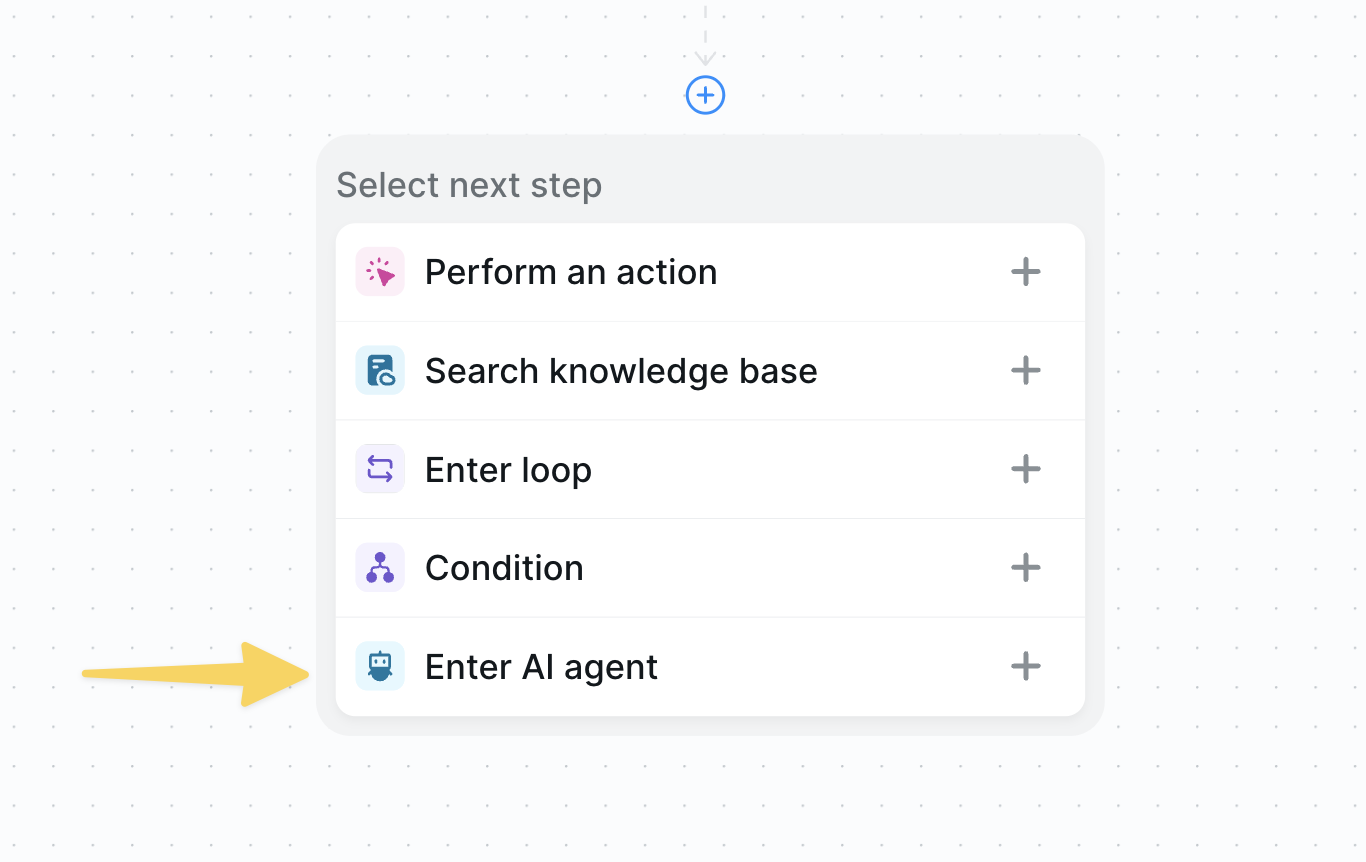 Click the plus button in your workflow and select "Enter AI agent" to add the AI Agent step.
## Configuring Your AI Agent
### Setting the Agent Prompt
Click the plus button in your workflow and select "Enter AI agent" to add the AI Agent step.
## Configuring Your AI Agent
### Setting the Agent Prompt
 Write clear, detailed instructions that define your agent's role, approach, and expectations. A good prompt should establish the agent's identity, explain available tools, and set quality standards.
**Example research agent prompt:**
```
You are a professional research assistant specializing in company intelligence gathering. Your role is to thoroughly research companies and compile accurate, up-to-date information.
RESEARCH TARGETS:
For each company, find and verify:
- Official company name and any aliases
- Founding date and brief history
- Current employee headcount (approximate range is acceptable)
- Primary business focus and industry
- LinkedIn company profile URL
- Website URL
RESEARCH APPROACH:
1. Start with web searches using company name and variations
2. Cross-reference information across multiple sources
3. Prioritize official sources (company websites, LinkedIn, Crunchbase)
4. When exact data isn't available, note "approximately" or "estimated"
5. If you can't find specific information, clearly state "not found"
QUALITY STANDARDS:
- Verify information across 2+ sources when possible
- Include confidence level for uncertain data
- Organize findings in a clear, structured format
- Note your research methodology for transparency
EXIT CONDITIONS:
Stop your research when you meet any of these criteria:
1. You have successfully found and verified all required company information
2. You have conducted thorough research using multiple strategies and documented what you found, clearly noting any unavailable data
3. You have performed at least 8 research actions and gathered substantial information
```
**Key elements of effective agent prompts:**
* **Role definition**: Who is the agent and what's their expertise?
* **Clear objectives**: What specific outcomes do you need?
* **Process guidance**: How should they approach the task?
* **Quality standards**: What level of accuracy and detail is expected?
* **Exit conditions**: When is the task complete?
### Adding Skills
Skills are the tools and actions your agent can use to accomplish its goals. Think of them as giving your agent specific capabilities — like the ability to search the web, send emails, or analyze data.
**How skills work:**
* Your agent can use skills multiple times and in different combinations
* Skills can be used in sequence (search, then crawl results) or iteratively (search → analyze → search more if needed)
* The agent will explain its reasoning for using specific skills
**For our research agent example, add these complementary skills:**
* **Web Search**: Finds relevant web pages, articles, and resources across the internet. Your agent will craft search queries, evaluate results, and follow promising leads.
* **Website Content Crawler**: Extracts and analyzes content from web pages. Once the agent finds relevant sites through search, it can crawl them to gather detailed information about companies, verify facts, and extract structured data.
Choose skills that work well together. For research tasks, pairing search capabilities with content extraction lets your agent both find and thoroughly analyze information sources.
**Skill selection guidelines:**
* Start with 2-4 essential skills rather than overloading with options
* Consider how skills complement each other in your workflow
### Defining Exit Conditions
Exit conditions tell your agent when its work is complete and it should move to the next step in your workflow. Think of them as success criteria that define "done" for your agent's task.
**How exit conditions work:**
* Your agent will keep working until at least one exit condition is satisfied
* You can have multiple exit conditions — the agent stops when ANY of them is met
* Exit conditions should be specific and measurable
* The agent evaluates conditions after each action it takes
**Example exit conditions for our research agent:**
1. **Primary success condition:**
```
You have successfully found and verified all required company information: company name, founding date, headcount, business focus, LinkedIn URL, and website URL.
```
2. **Fallback condition:**
```
You have conducted thorough research using multiple search strategies and documented what information you were able to find, clearly noting any data that remains unavailable after extensive searching.
```
3. **Time/effort limit:**
```
You have performed at least 8 research actions (searches and crawls) and gathered substantial information even if some details remain incomplete.
```
**Best practices for exit conditions:**
* Include a fallback option for when perfect results aren't achievable
* Be specific about what constitutes "completion"
* Consider both ideal outcomes and acceptable partial results
* Use measurable criteria when possible (e.g., "found at least 80% of required data")
## Best Practices
Only use agent steps when the next actions are genuinely uncertain. For predictable workflows, use standard actions and conditions for better reliability and lower costs.
Include all five key elements: role definition, clear objectives, process guidance, quality standards, and exit conditions. Structure your prompt with clear sections like the research agent example.
Start with 2-4 essential skills that work well together. For research tasks, pair search with content extraction. Avoid overloading with too many options.
Always provide a primary success condition and a fallback option. Be specific about what constitutes completion and use measurable criteria when possible.
Agent steps introduce variability. Test with different inputs to ensure consistent performance and adjust prompts based on results.
If costs are high or results inconsistent, consider using conditions and standard actions instead of AI Agents.
## Next Steps
Master these related concepts to build more sophisticated automations:
Use conditions for predictable branching logic instead of AI Agents
Add confirmation steps for critical AI Agent decisions
Combine AI Agents with knowledge bases for informed decisions
Learn advanced testing strategies for AI Agent workflows
# Conditions
Source: https://docs.lindy.ai/fundamentals/lindy-101/conditions
## Quick Overview
Conditions let your agent make smart decisions about which path to take in a workflow. Instead of rigid rules like "if field equals X", you write natural language prompts like "if the customer seems angry" or "if this email needs a response".
Your AI agent evaluates these conditions by understanding context, sentiment, and meaning — not just exact matches. This means you can handle complex scenarios that would be impossible with traditional automation tools.
Use conditions to route different types of requests, filter content intelligently, or handle multiple scenarios within a single workflow. Your agent chooses the best path based on what it actually understands from the data.
## Creating Your First Condition
To add a condition to your workflow, click the plus button (Add step) below any action or between two actions, then select "Condition".
Write clear, detailed instructions that define your agent's role, approach, and expectations. A good prompt should establish the agent's identity, explain available tools, and set quality standards.
**Example research agent prompt:**
```
You are a professional research assistant specializing in company intelligence gathering. Your role is to thoroughly research companies and compile accurate, up-to-date information.
RESEARCH TARGETS:
For each company, find and verify:
- Official company name and any aliases
- Founding date and brief history
- Current employee headcount (approximate range is acceptable)
- Primary business focus and industry
- LinkedIn company profile URL
- Website URL
RESEARCH APPROACH:
1. Start with web searches using company name and variations
2. Cross-reference information across multiple sources
3. Prioritize official sources (company websites, LinkedIn, Crunchbase)
4. When exact data isn't available, note "approximately" or "estimated"
5. If you can't find specific information, clearly state "not found"
QUALITY STANDARDS:
- Verify information across 2+ sources when possible
- Include confidence level for uncertain data
- Organize findings in a clear, structured format
- Note your research methodology for transparency
EXIT CONDITIONS:
Stop your research when you meet any of these criteria:
1. You have successfully found and verified all required company information
2. You have conducted thorough research using multiple strategies and documented what you found, clearly noting any unavailable data
3. You have performed at least 8 research actions and gathered substantial information
```
**Key elements of effective agent prompts:**
* **Role definition**: Who is the agent and what's their expertise?
* **Clear objectives**: What specific outcomes do you need?
* **Process guidance**: How should they approach the task?
* **Quality standards**: What level of accuracy and detail is expected?
* **Exit conditions**: When is the task complete?
### Adding Skills
Skills are the tools and actions your agent can use to accomplish its goals. Think of them as giving your agent specific capabilities — like the ability to search the web, send emails, or analyze data.
**How skills work:**
* Your agent can use skills multiple times and in different combinations
* Skills can be used in sequence (search, then crawl results) or iteratively (search → analyze → search more if needed)
* The agent will explain its reasoning for using specific skills
**For our research agent example, add these complementary skills:**
* **Web Search**: Finds relevant web pages, articles, and resources across the internet. Your agent will craft search queries, evaluate results, and follow promising leads.
* **Website Content Crawler**: Extracts and analyzes content from web pages. Once the agent finds relevant sites through search, it can crawl them to gather detailed information about companies, verify facts, and extract structured data.
Choose skills that work well together. For research tasks, pairing search capabilities with content extraction lets your agent both find and thoroughly analyze information sources.
**Skill selection guidelines:**
* Start with 2-4 essential skills rather than overloading with options
* Consider how skills complement each other in your workflow
### Defining Exit Conditions
Exit conditions tell your agent when its work is complete and it should move to the next step in your workflow. Think of them as success criteria that define "done" for your agent's task.
**How exit conditions work:**
* Your agent will keep working until at least one exit condition is satisfied
* You can have multiple exit conditions — the agent stops when ANY of them is met
* Exit conditions should be specific and measurable
* The agent evaluates conditions after each action it takes
**Example exit conditions for our research agent:**
1. **Primary success condition:**
```
You have successfully found and verified all required company information: company name, founding date, headcount, business focus, LinkedIn URL, and website URL.
```
2. **Fallback condition:**
```
You have conducted thorough research using multiple search strategies and documented what information you were able to find, clearly noting any data that remains unavailable after extensive searching.
```
3. **Time/effort limit:**
```
You have performed at least 8 research actions (searches and crawls) and gathered substantial information even if some details remain incomplete.
```
**Best practices for exit conditions:**
* Include a fallback option for when perfect results aren't achievable
* Be specific about what constitutes "completion"
* Consider both ideal outcomes and acceptable partial results
* Use measurable criteria when possible (e.g., "found at least 80% of required data")
## Best Practices
Only use agent steps when the next actions are genuinely uncertain. For predictable workflows, use standard actions and conditions for better reliability and lower costs.
Include all five key elements: role definition, clear objectives, process guidance, quality standards, and exit conditions. Structure your prompt with clear sections like the research agent example.
Start with 2-4 essential skills that work well together. For research tasks, pair search with content extraction. Avoid overloading with too many options.
Always provide a primary success condition and a fallback option. Be specific about what constitutes completion and use measurable criteria when possible.
Agent steps introduce variability. Test with different inputs to ensure consistent performance and adjust prompts based on results.
If costs are high or results inconsistent, consider using conditions and standard actions instead of AI Agents.
## Next Steps
Master these related concepts to build more sophisticated automations:
Use conditions for predictable branching logic instead of AI Agents
Add confirmation steps for critical AI Agent decisions
Combine AI Agents with knowledge bases for informed decisions
Learn advanced testing strategies for AI Agent workflows
# Conditions
Source: https://docs.lindy.ai/fundamentals/lindy-101/conditions
## Quick Overview
Conditions let your agent make smart decisions about which path to take in a workflow. Instead of rigid rules like "if field equals X", you write natural language prompts like "if the customer seems angry" or "if this email needs a response".
Your AI agent evaluates these conditions by understanding context, sentiment, and meaning — not just exact matches. This means you can handle complex scenarios that would be impossible with traditional automation tools.
Use conditions to route different types of requests, filter content intelligently, or handle multiple scenarios within a single workflow. Your agent chooses the best path based on what it actually understands from the data.
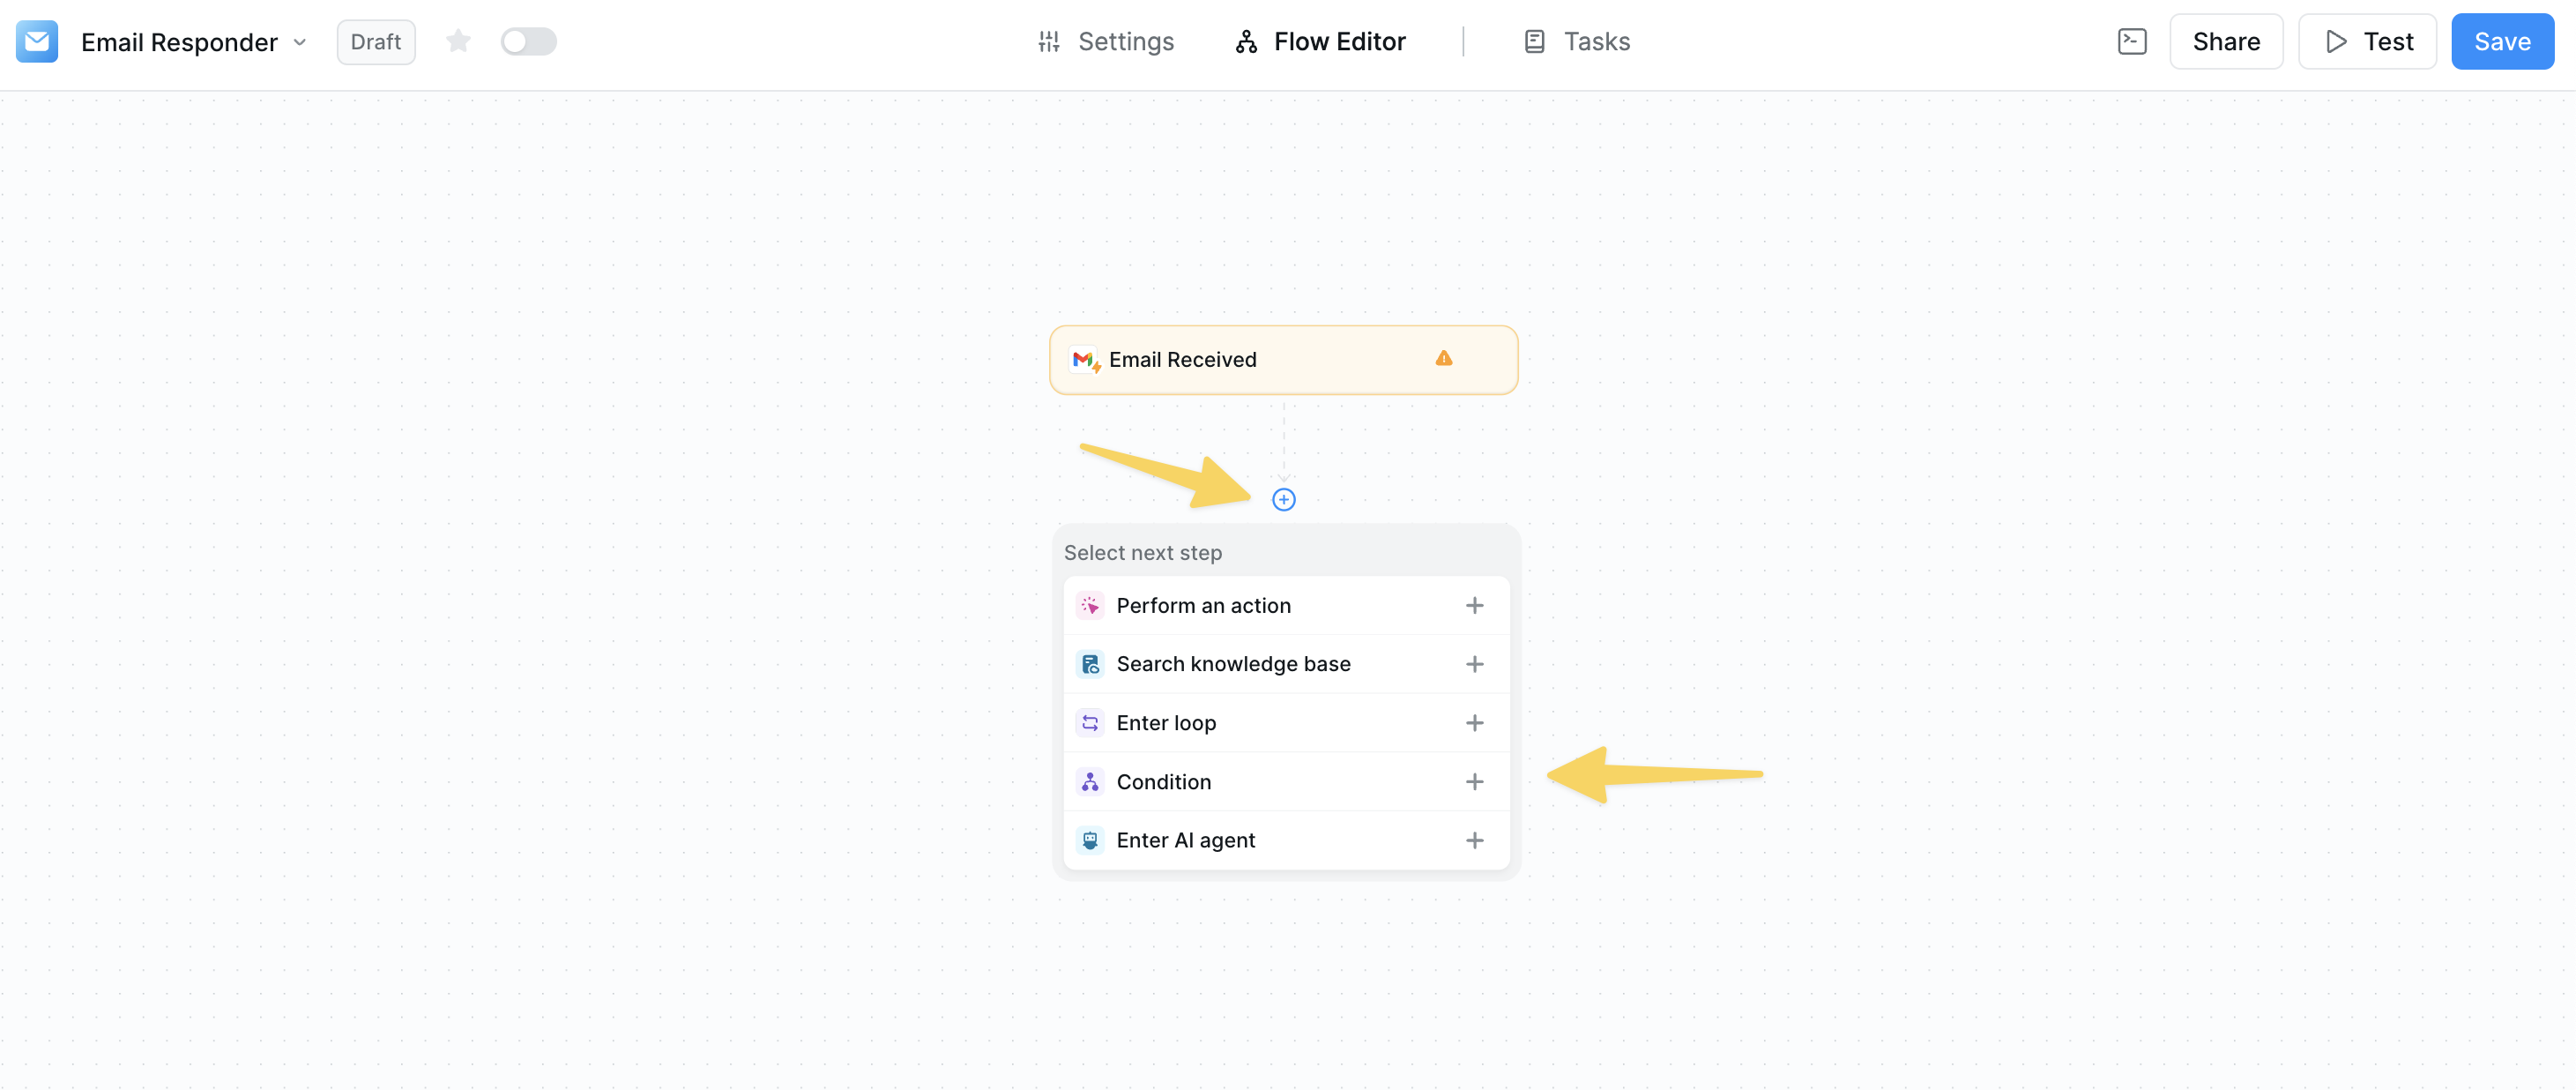
## Creating Your First Condition
To add a condition to your workflow, click the plus button (Add step) below any action or between two actions, then select "Condition".
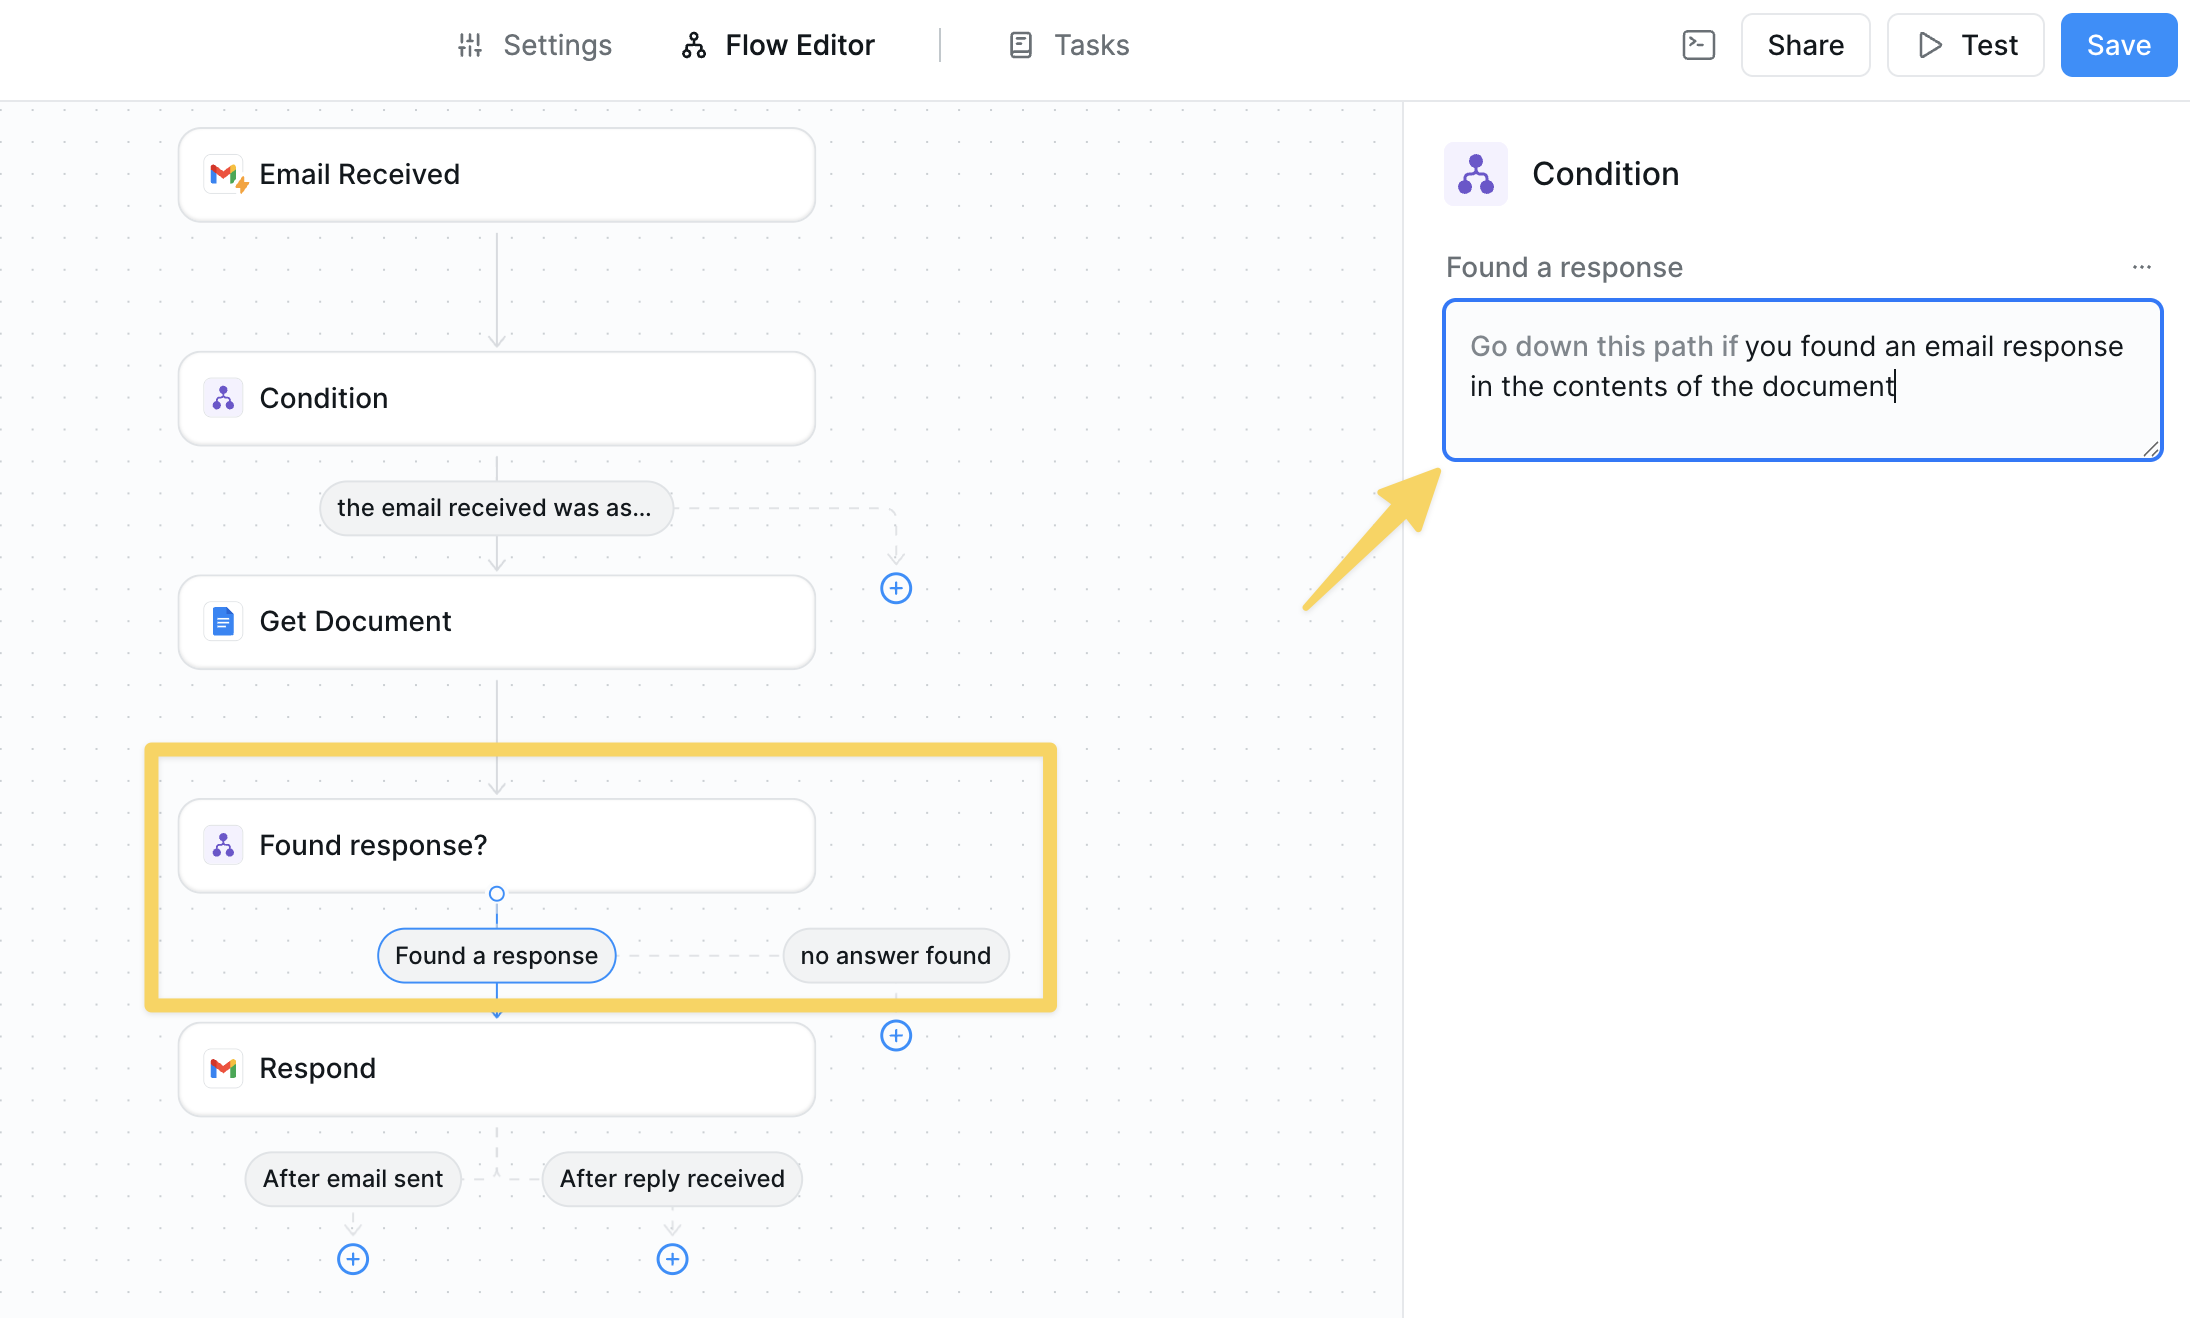
 ### Setting Up the Condition
Once you've added a condition, you'll see the condition configuration panel.
### Setting Up the Condition
Once you've added a condition, you'll see the condition configuration panel.
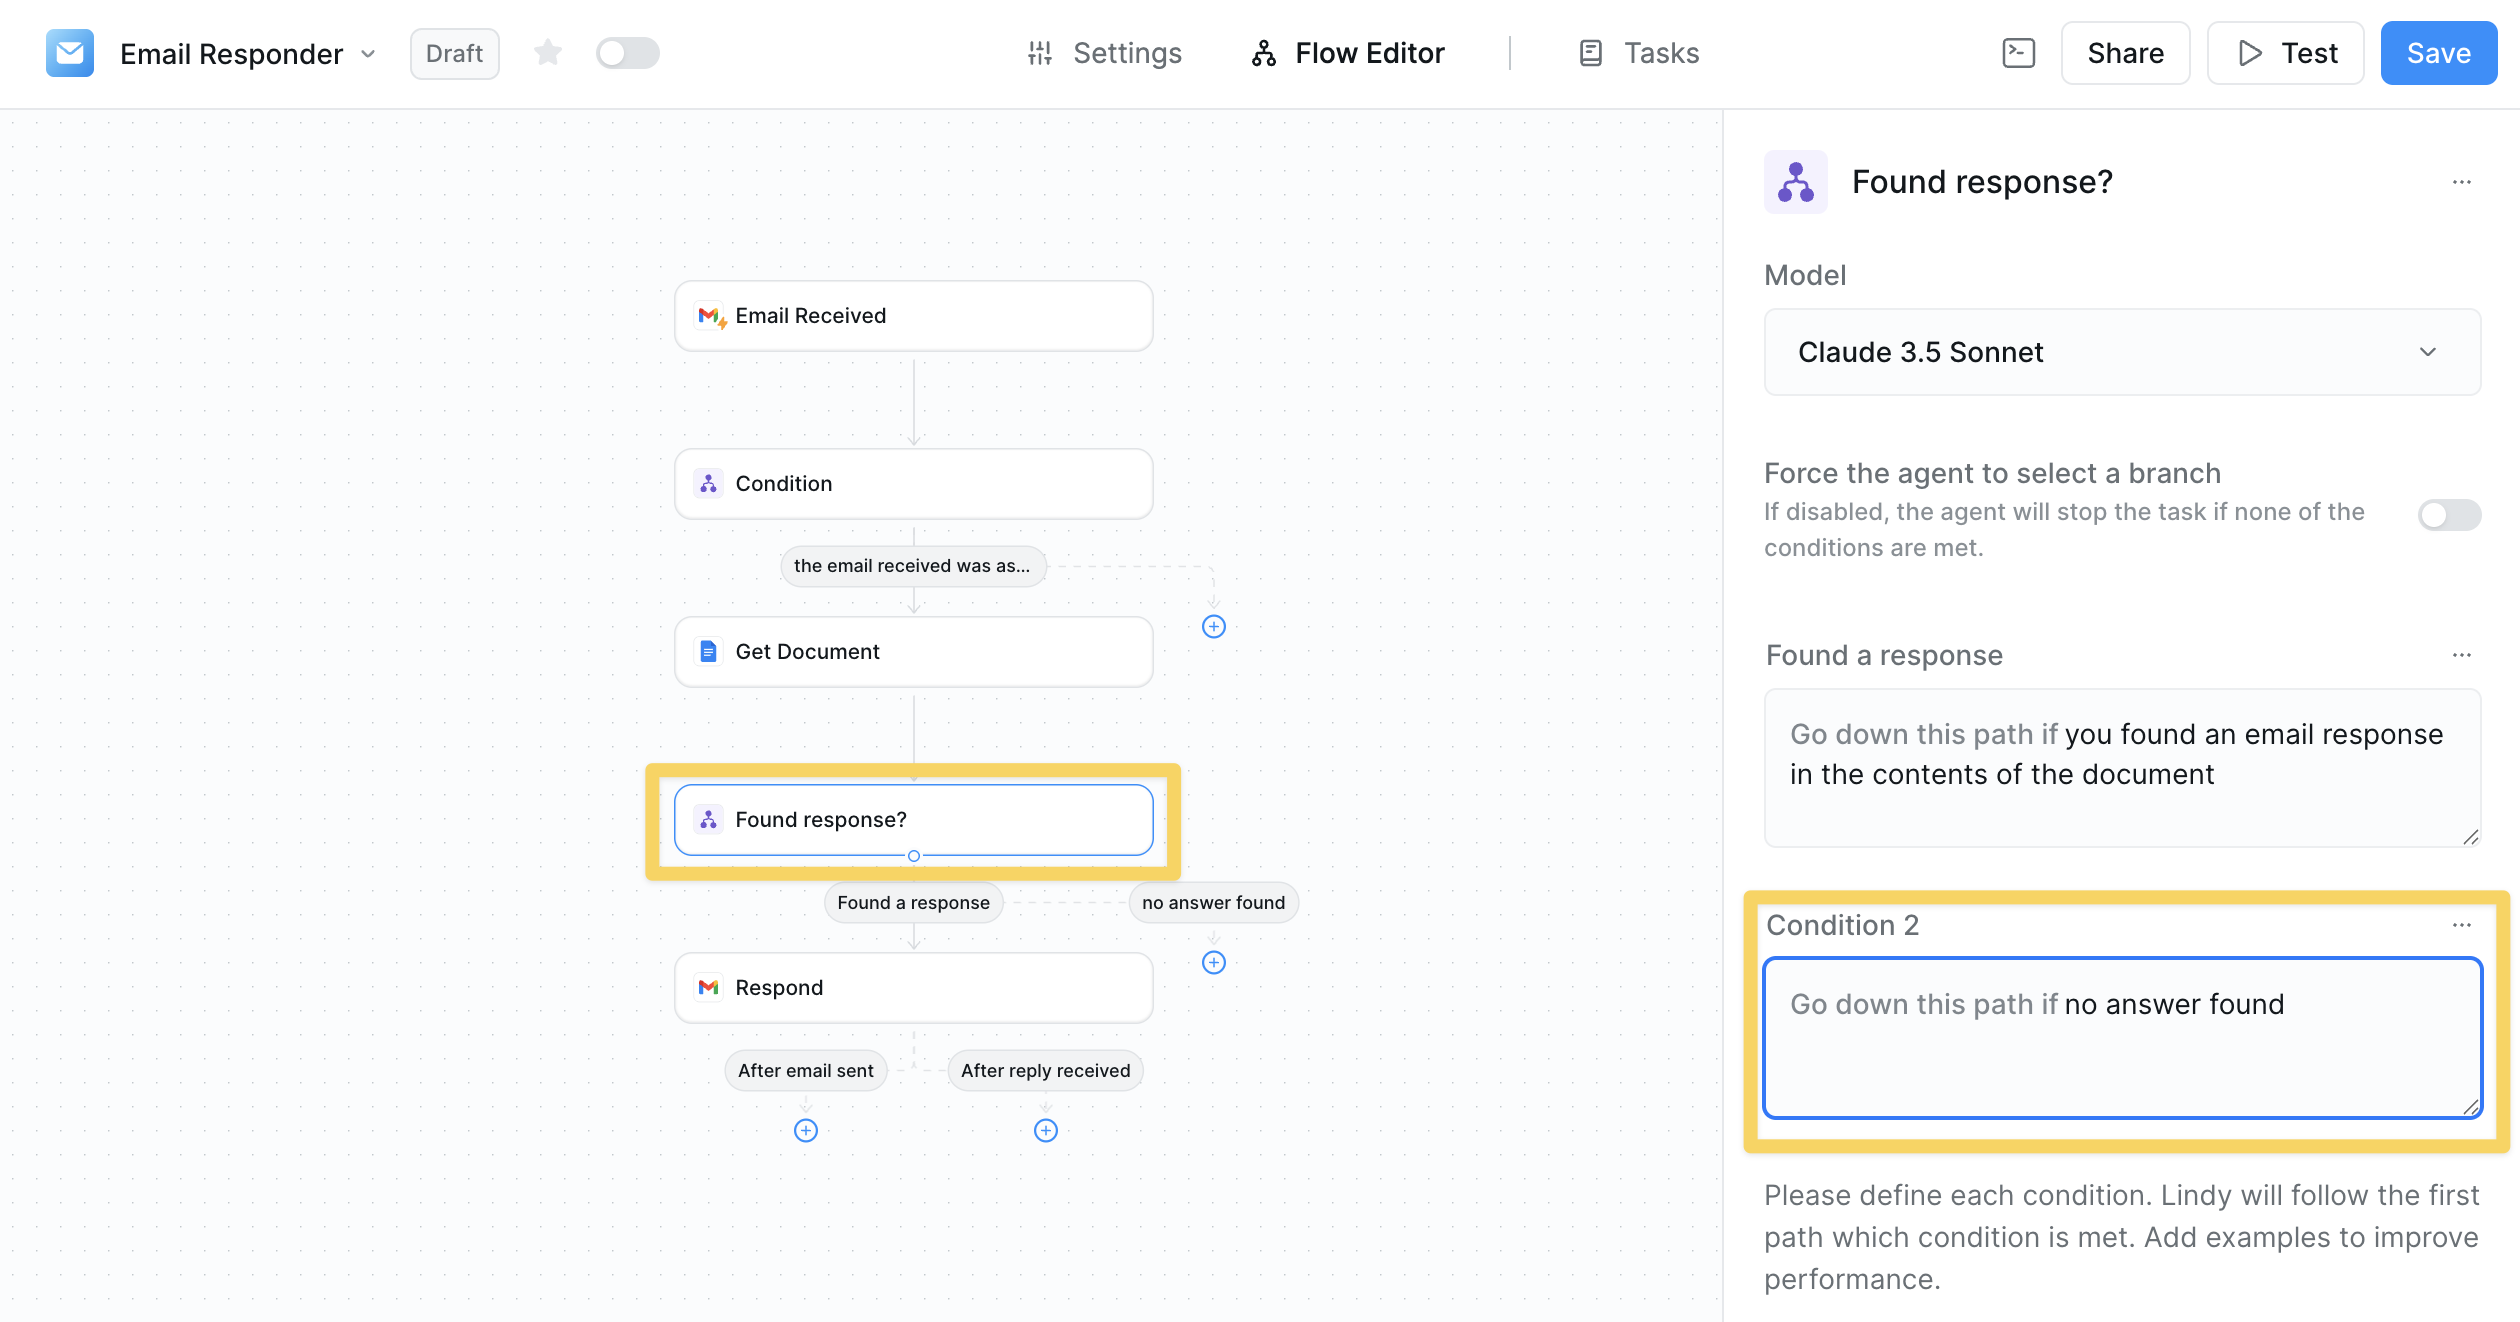
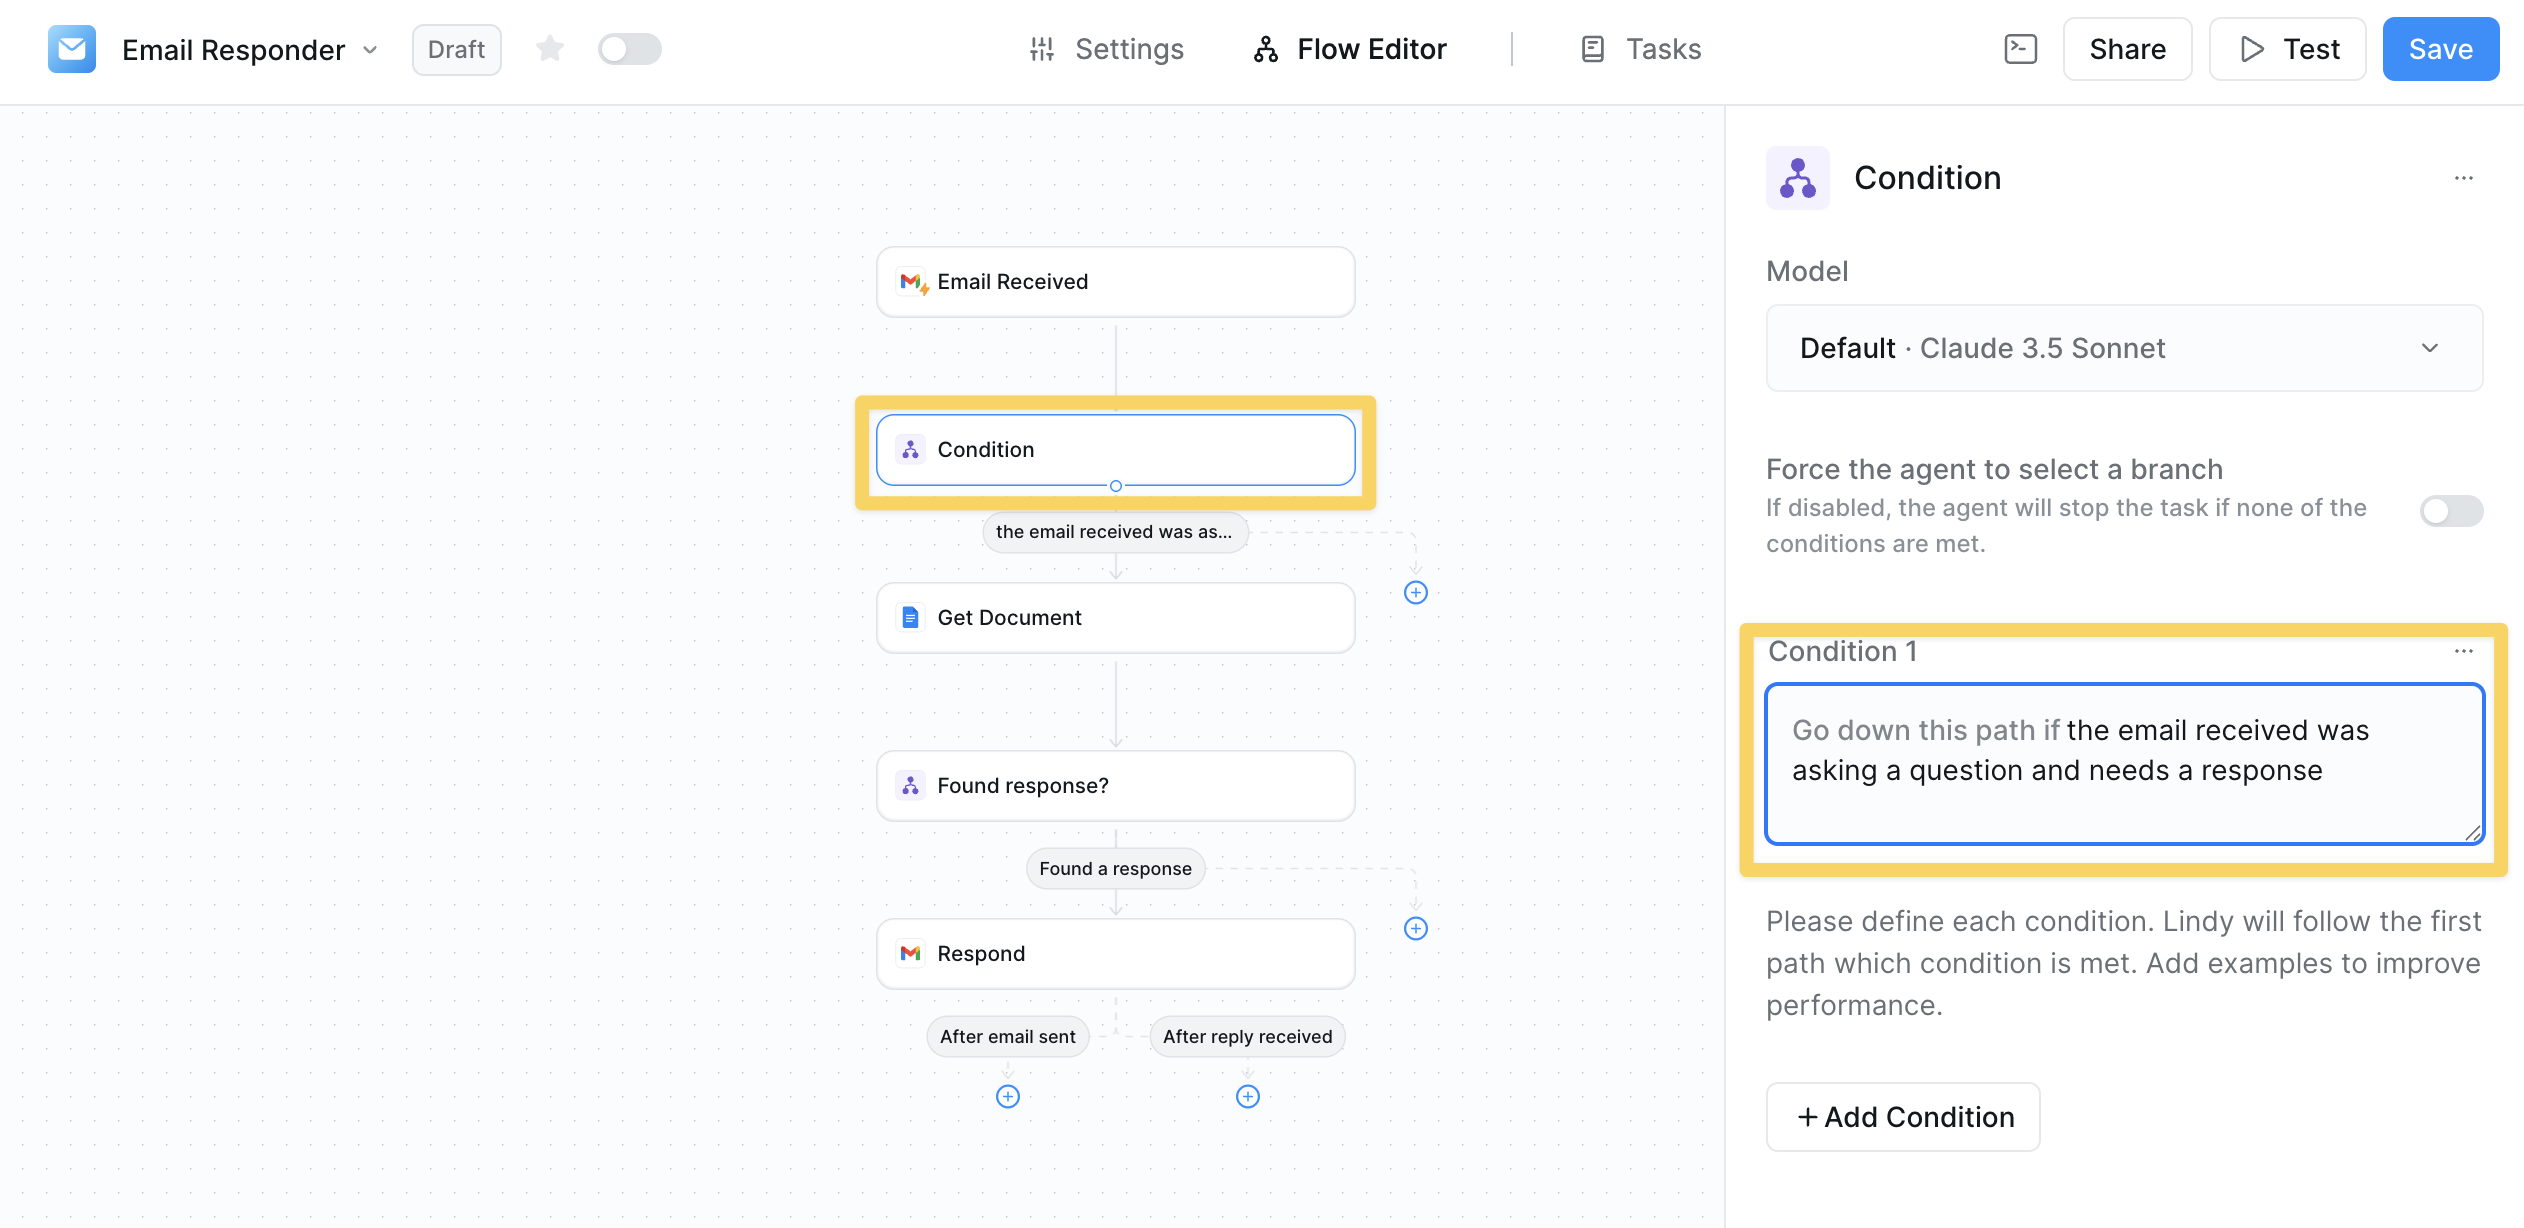 Every condition prompt starts with **"Go down this path if..."** followed by your criteria. For example:
* `the email received was asking a question and needs a response`
* `the email contains a 6 digit user ID number`
* `the user asked for a refund or seems angry`
For best results, include examples in each condition prompt.
### Adding Multiple Condition Paths
You can create multiple branches to handle different scenarios. Click "+ Add Condition" to create alternate paths.
Every condition prompt starts with **"Go down this path if..."** followed by your criteria. For example:
* `the email received was asking a question and needs a response`
* `the email contains a 6 digit user ID number`
* `the user asked for a refund or seems angry`
For best results, include examples in each condition prompt.
### Adding Multiple Condition Paths
You can create multiple branches to handle different scenarios. Click "+ Add Condition" to create alternate paths.
 Each condition branch should have a clear, distinct criteria. Your agent will evaluate all conditions and follow the path the model deems "most true".
## Advanced Configuration
### Force Agent to Select a Branch
By default, if no conditions are met, your agent will stop the task. You can change this behavior by enabling "Force the agent to select a branch".
Each condition branch should have a clear, distinct criteria. Your agent will evaluate all conditions and follow the path the model deems "most true".
## Advanced Configuration
### Force Agent to Select a Branch
By default, if no conditions are met, your agent will stop the task. You can change this behavior by enabling "Force the agent to select a branch".
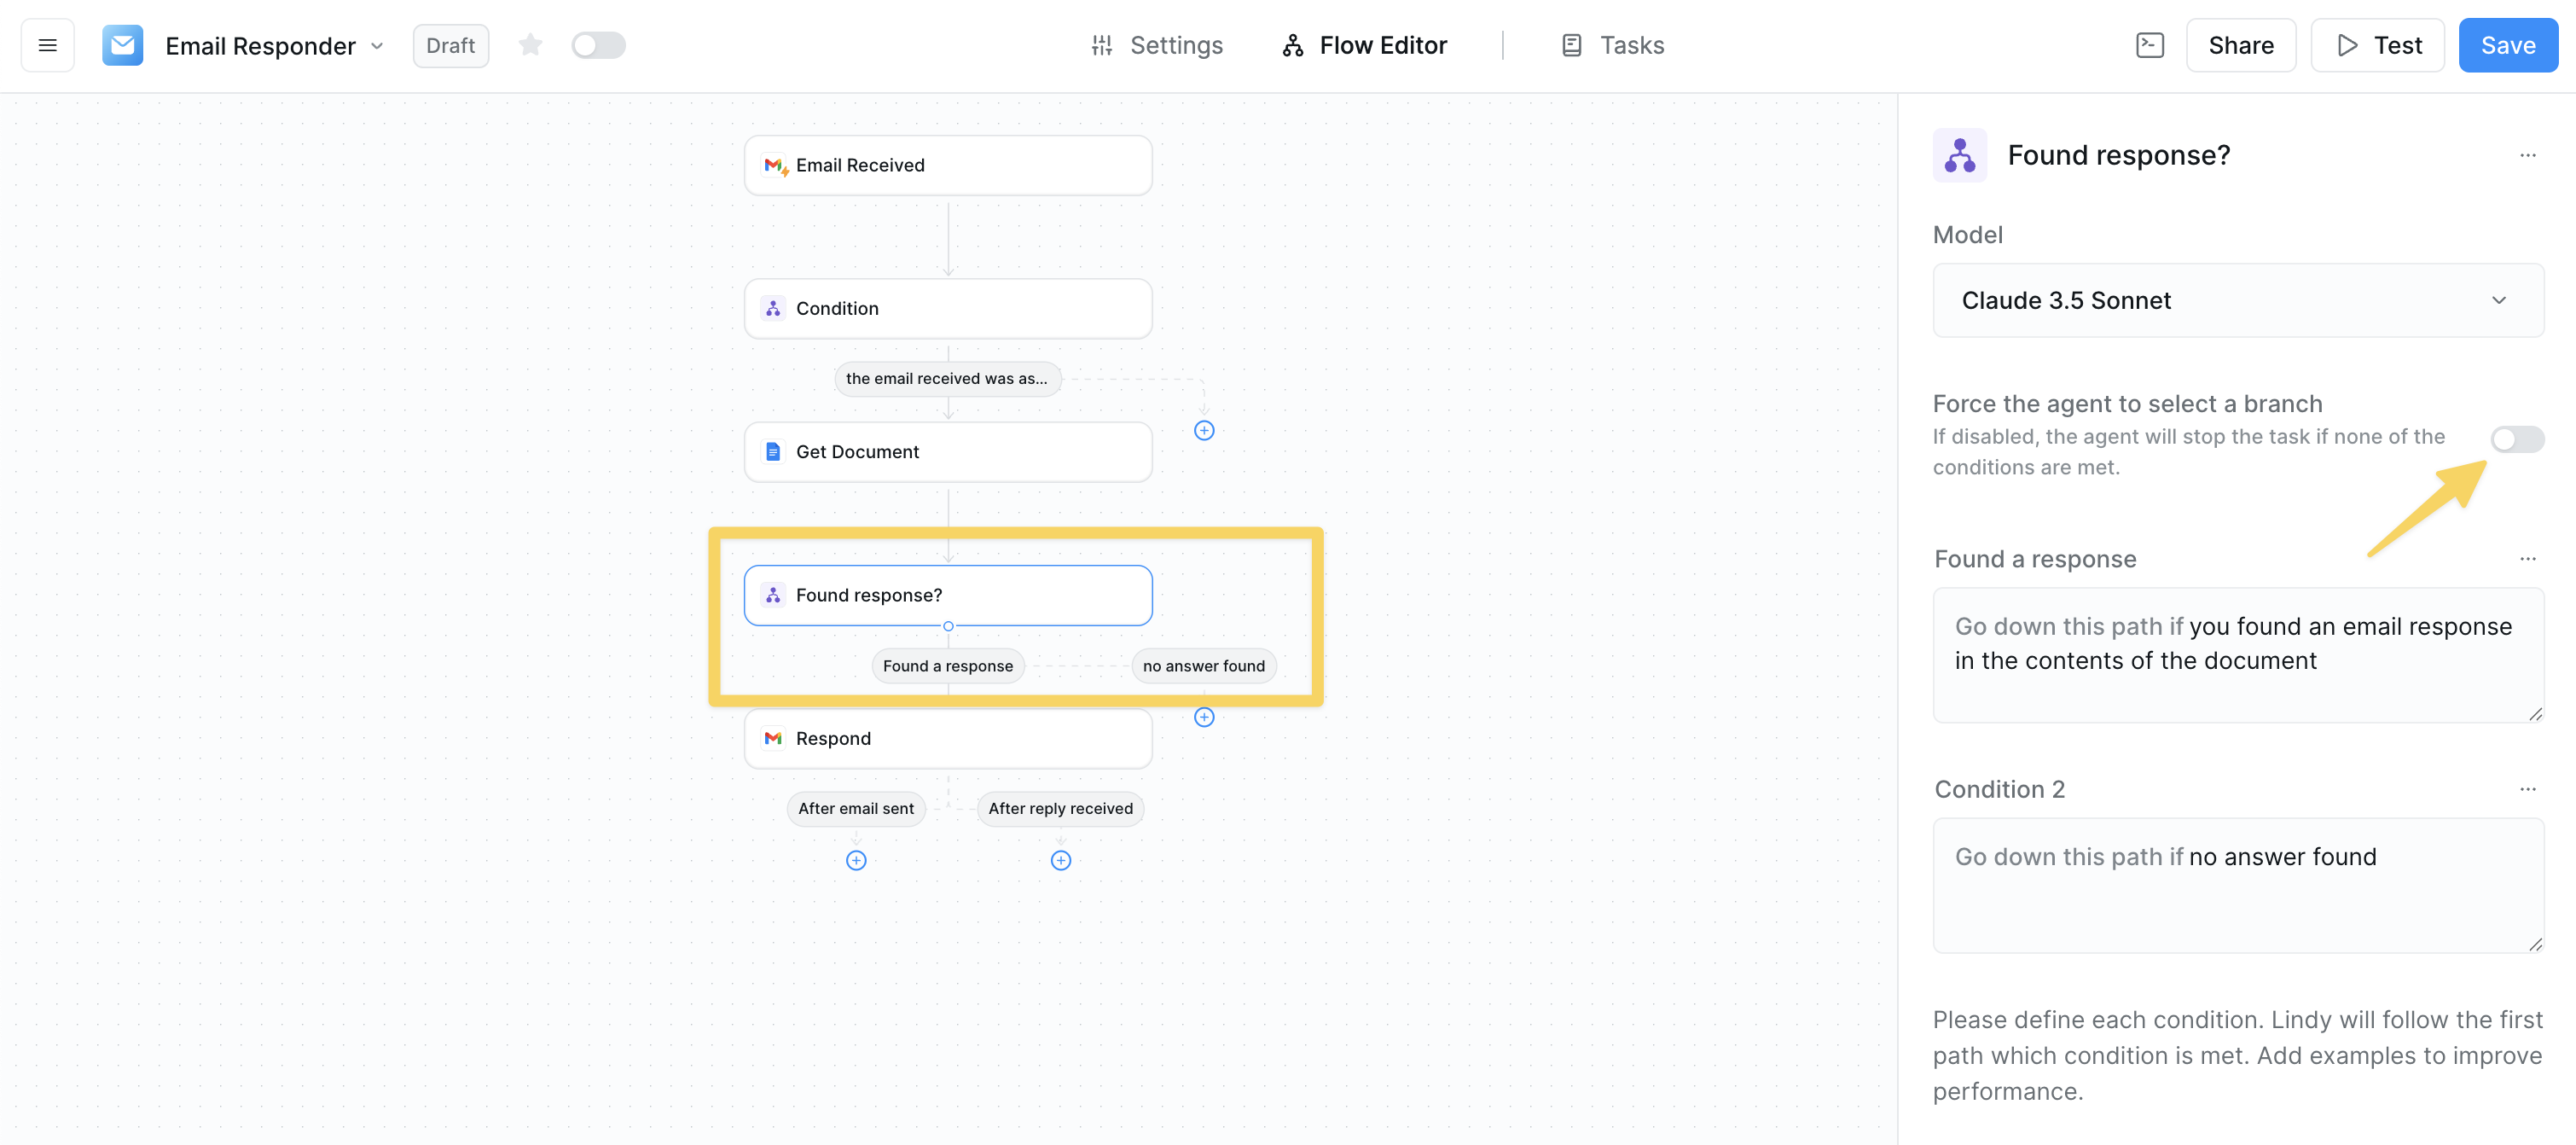 When enabled, your agent must choose one of the defined paths even if none of the conditions perfectly match. This is useful when you want to ensure the workflow always continues.
### Renaming Conditions
For better organization, especially in complex workflows, rename your conditions with descriptive titles.
When enabled, your agent must choose one of the defined paths even if none of the conditions perfectly match. This is useful when you want to ensure the workflow always continues.
### Renaming Conditions
For better organization, especially in complex workflows, rename your conditions with descriptive titles.
 Click on the condition title (e.g., "Condition 1") and replace it with a meaningful name like "Found a response" or "Customer is angry".
## Best Practices
Be explicit about what you're looking for. Instead of "important email", use "email from a C-level executive or marked as high priority".
Consider what happens when conditions overlap or when none match. Use the test panel to verify behavior.
Include examples in your condition prompts to improve accuracy: "the email asks about pricing (e.g., 'how much does it cost', 'what are your rates')".
For conditions that require understanding context, sentiment, or complex logic, use more advanced models. For simple keyword matching or basic categorization, faster models work well.
## Troubleshooting
#### Common Issues
1. **Workflow stops when no conditions match**
* Enable "Force agent to select branch" or add a catch-all condition
2. **Wrong path is chosen**
* Review and refine your condition prompts
* Add more specific examples
3. **Conditions overlap**
* Make each condition mutually exclusive
* Order from most specific to least specific
If your workflow stops unexpectedly, check that each condition branch has at least one action following it. Empty branches will cause the execution to end.
## Next Steps
Now that you understand conditions, explore these related concepts:
Repeat actions for multiple items using conditions as filters
Combine conditions with knowledge search for intelligent routing
Use conditions to determine when human review is needed
Test your conditions with different scenarios
# Field Configuration
Source: https://docs.lindy.ai/fundamentals/lindy-101/fields
## Quick Overview
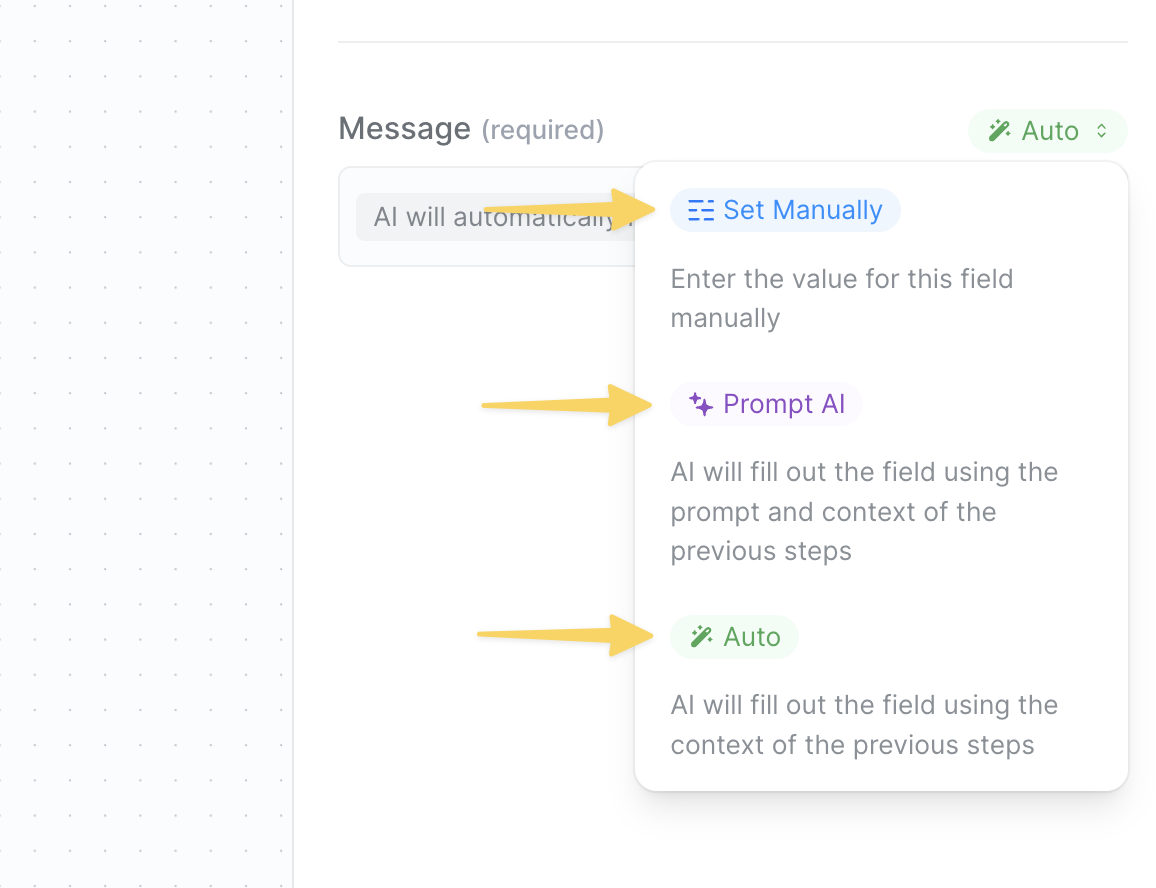
When you add any action, you'll see fields to configure. Unlike other automation platforms, Lindy gives you three intelligent ways to fill each field, making your workflows both powerful and flexible.
* **Auto**: Let your agent intelligently determine the best value based on all previous data
* **AI Prompt**: Give natural language instructions for dynamic content generation
* **Set Manually**: Enter exact values or reference specific data from previous steps
Each mode serves different purposes and choosing the right one makes your workflows more efficient and reliable.
Click on the condition title (e.g., "Condition 1") and replace it with a meaningful name like "Found a response" or "Customer is angry".
## Best Practices
Be explicit about what you're looking for. Instead of "important email", use "email from a C-level executive or marked as high priority".
Consider what happens when conditions overlap or when none match. Use the test panel to verify behavior.
Include examples in your condition prompts to improve accuracy: "the email asks about pricing (e.g., 'how much does it cost', 'what are your rates')".
For conditions that require understanding context, sentiment, or complex logic, use more advanced models. For simple keyword matching or basic categorization, faster models work well.
## Troubleshooting
#### Common Issues
1. **Workflow stops when no conditions match**
* Enable "Force agent to select branch" or add a catch-all condition
2. **Wrong path is chosen**
* Review and refine your condition prompts
* Add more specific examples
3. **Conditions overlap**
* Make each condition mutually exclusive
* Order from most specific to least specific
If your workflow stops unexpectedly, check that each condition branch has at least one action following it. Empty branches will cause the execution to end.
## Next Steps
Now that you understand conditions, explore these related concepts:
Repeat actions for multiple items using conditions as filters
Combine conditions with knowledge search for intelligent routing
Use conditions to determine when human review is needed
Test your conditions with different scenarios
# Field Configuration
Source: https://docs.lindy.ai/fundamentals/lindy-101/fields
## Quick Overview
When you add any action, you'll see fields to configure. Unlike other automation platforms, Lindy gives you three intelligent ways to fill each field, making your workflows both powerful and flexible.
* **Auto**: Let your agent intelligently determine the best value based on all previous data
* **AI Prompt**: Give natural language instructions for dynamic content generation
* **Set Manually**: Enter exact values or reference specific data from previous steps
Each mode serves different purposes and choosing the right one makes your workflows more efficient and reliable.
 ## Auto Mode
Auto mode is Lindy's intelligent field completion system. It analyzes all previous steps in your workflow and automatically determines the most appropriate value for each field.
### How It Works
When set to Auto, your agent:
1. Examines all data from previous triggers and actions
2. Matches field names with available data intelligently
3. Infers the best value based on context and field type
Unlike traditional automation tools, Lindy's Auto mode sees everything — form submissions, API responses, search results, and more. It's like having an assistant who remembers every detail.
### When to Use Auto Mode
Auto mode excels in scenarios where:
* **Data mapping is predictable**: Moving form data to spreadsheets
* **Field names align**: "Customer Name" automatically maps to "Name" column
* **Context is clear**: Updating CRM records with email data
* **You want flexibility**: Let Lindy adapt to varying data structures
### Example Use Case
```
Scenario: Responding to customer emails
Auto mode automatically:
- Sets "To" field → Original sender's email
- Keeps "From Name" → Your default sender name
No configuration needed!
```
## Auto Mode
Auto mode is Lindy's intelligent field completion system. It analyzes all previous steps in your workflow and automatically determines the most appropriate value for each field.
### How It Works
When set to Auto, your agent:
1. Examines all data from previous triggers and actions
2. Matches field names with available data intelligently
3. Infers the best value based on context and field type
Unlike traditional automation tools, Lindy's Auto mode sees everything — form submissions, API responses, search results, and more. It's like having an assistant who remembers every detail.
### When to Use Auto Mode
Auto mode excels in scenarios where:
* **Data mapping is predictable**: Moving form data to spreadsheets
* **Field names align**: "Customer Name" automatically maps to "Name" column
* **Context is clear**: Updating CRM records with email data
* **You want flexibility**: Let Lindy adapt to varying data structures
### Example Use Case
```
Scenario: Responding to customer emails
Auto mode automatically:
- Sets "To" field → Original sender's email
- Keeps "From Name" → Your default sender name
No configuration needed!
```
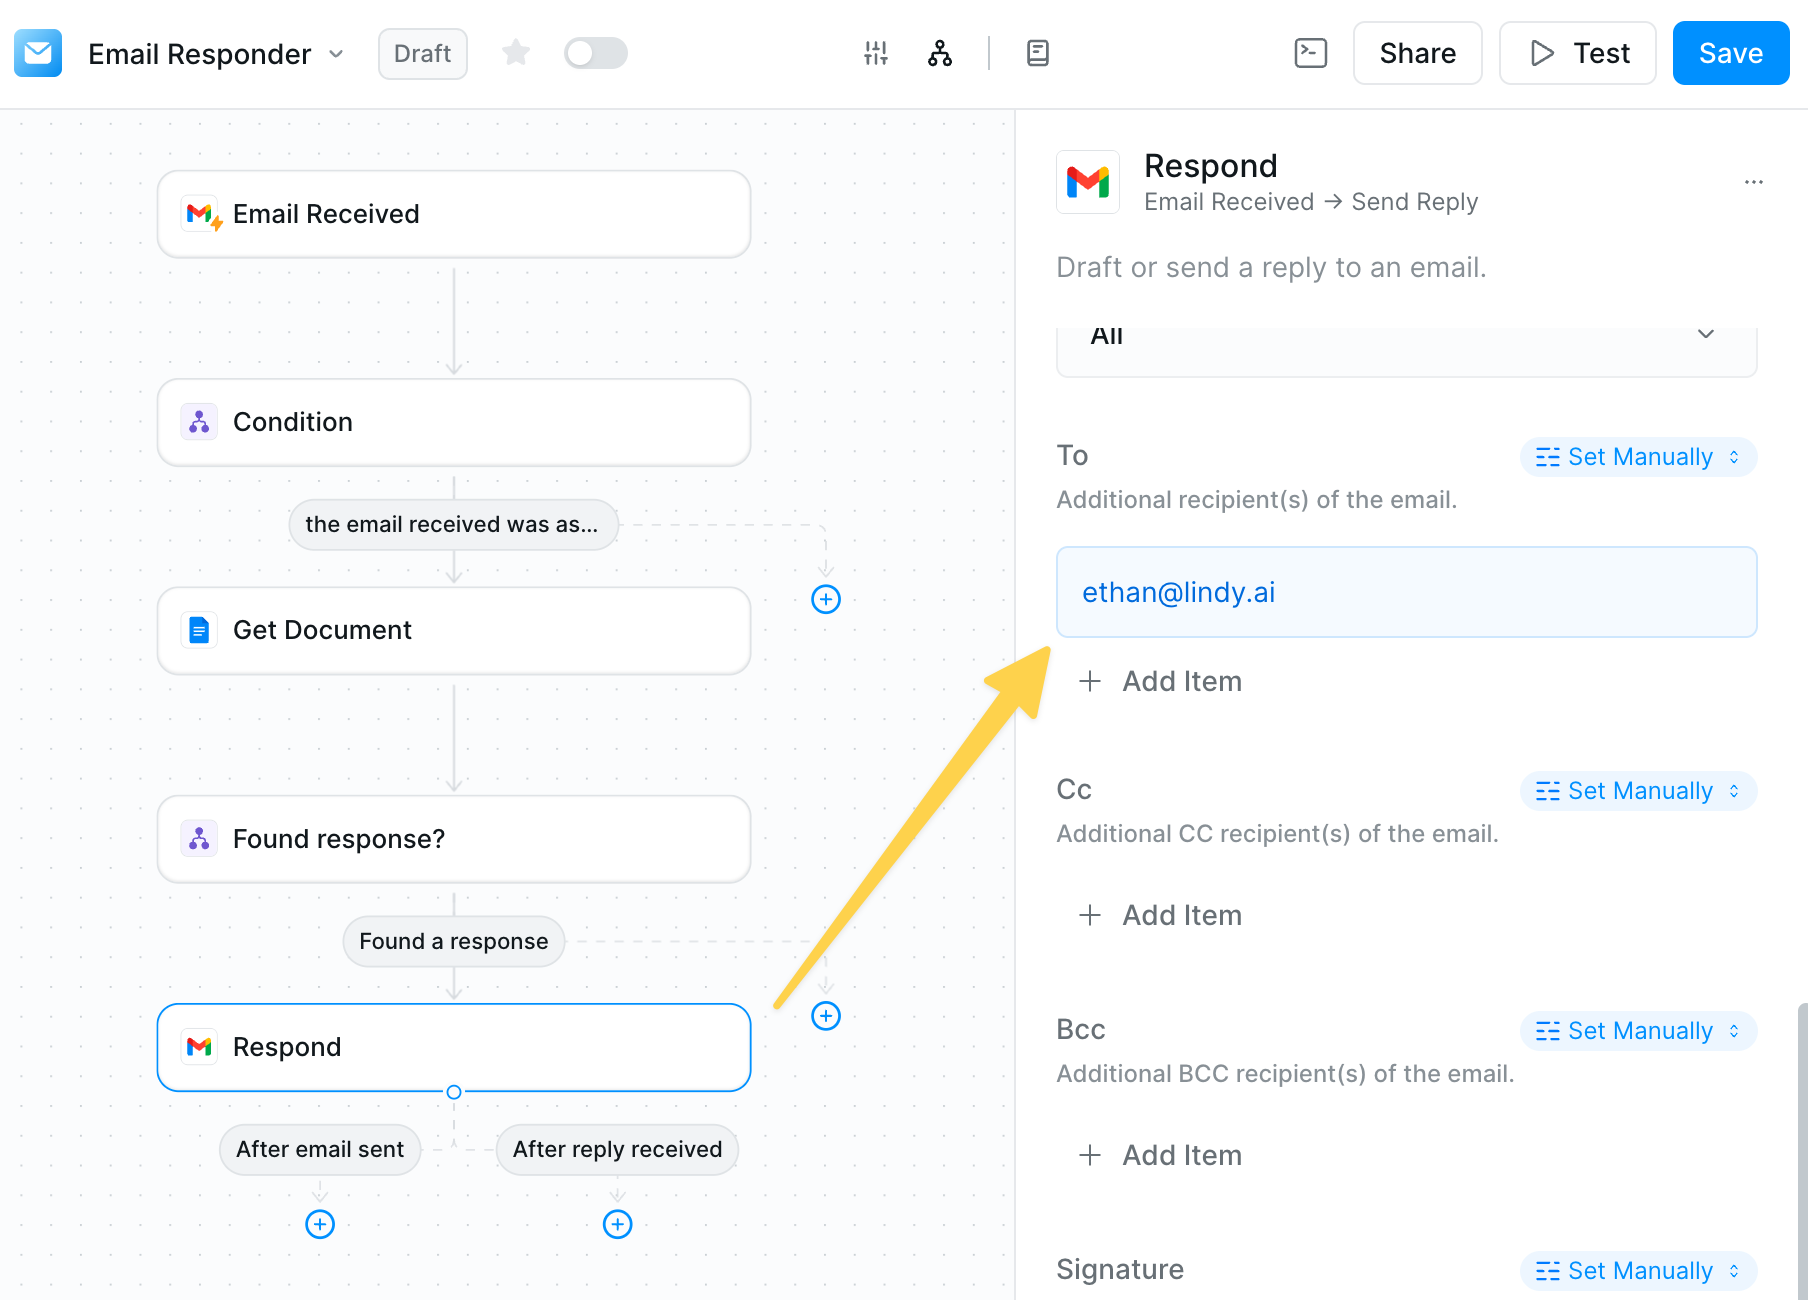
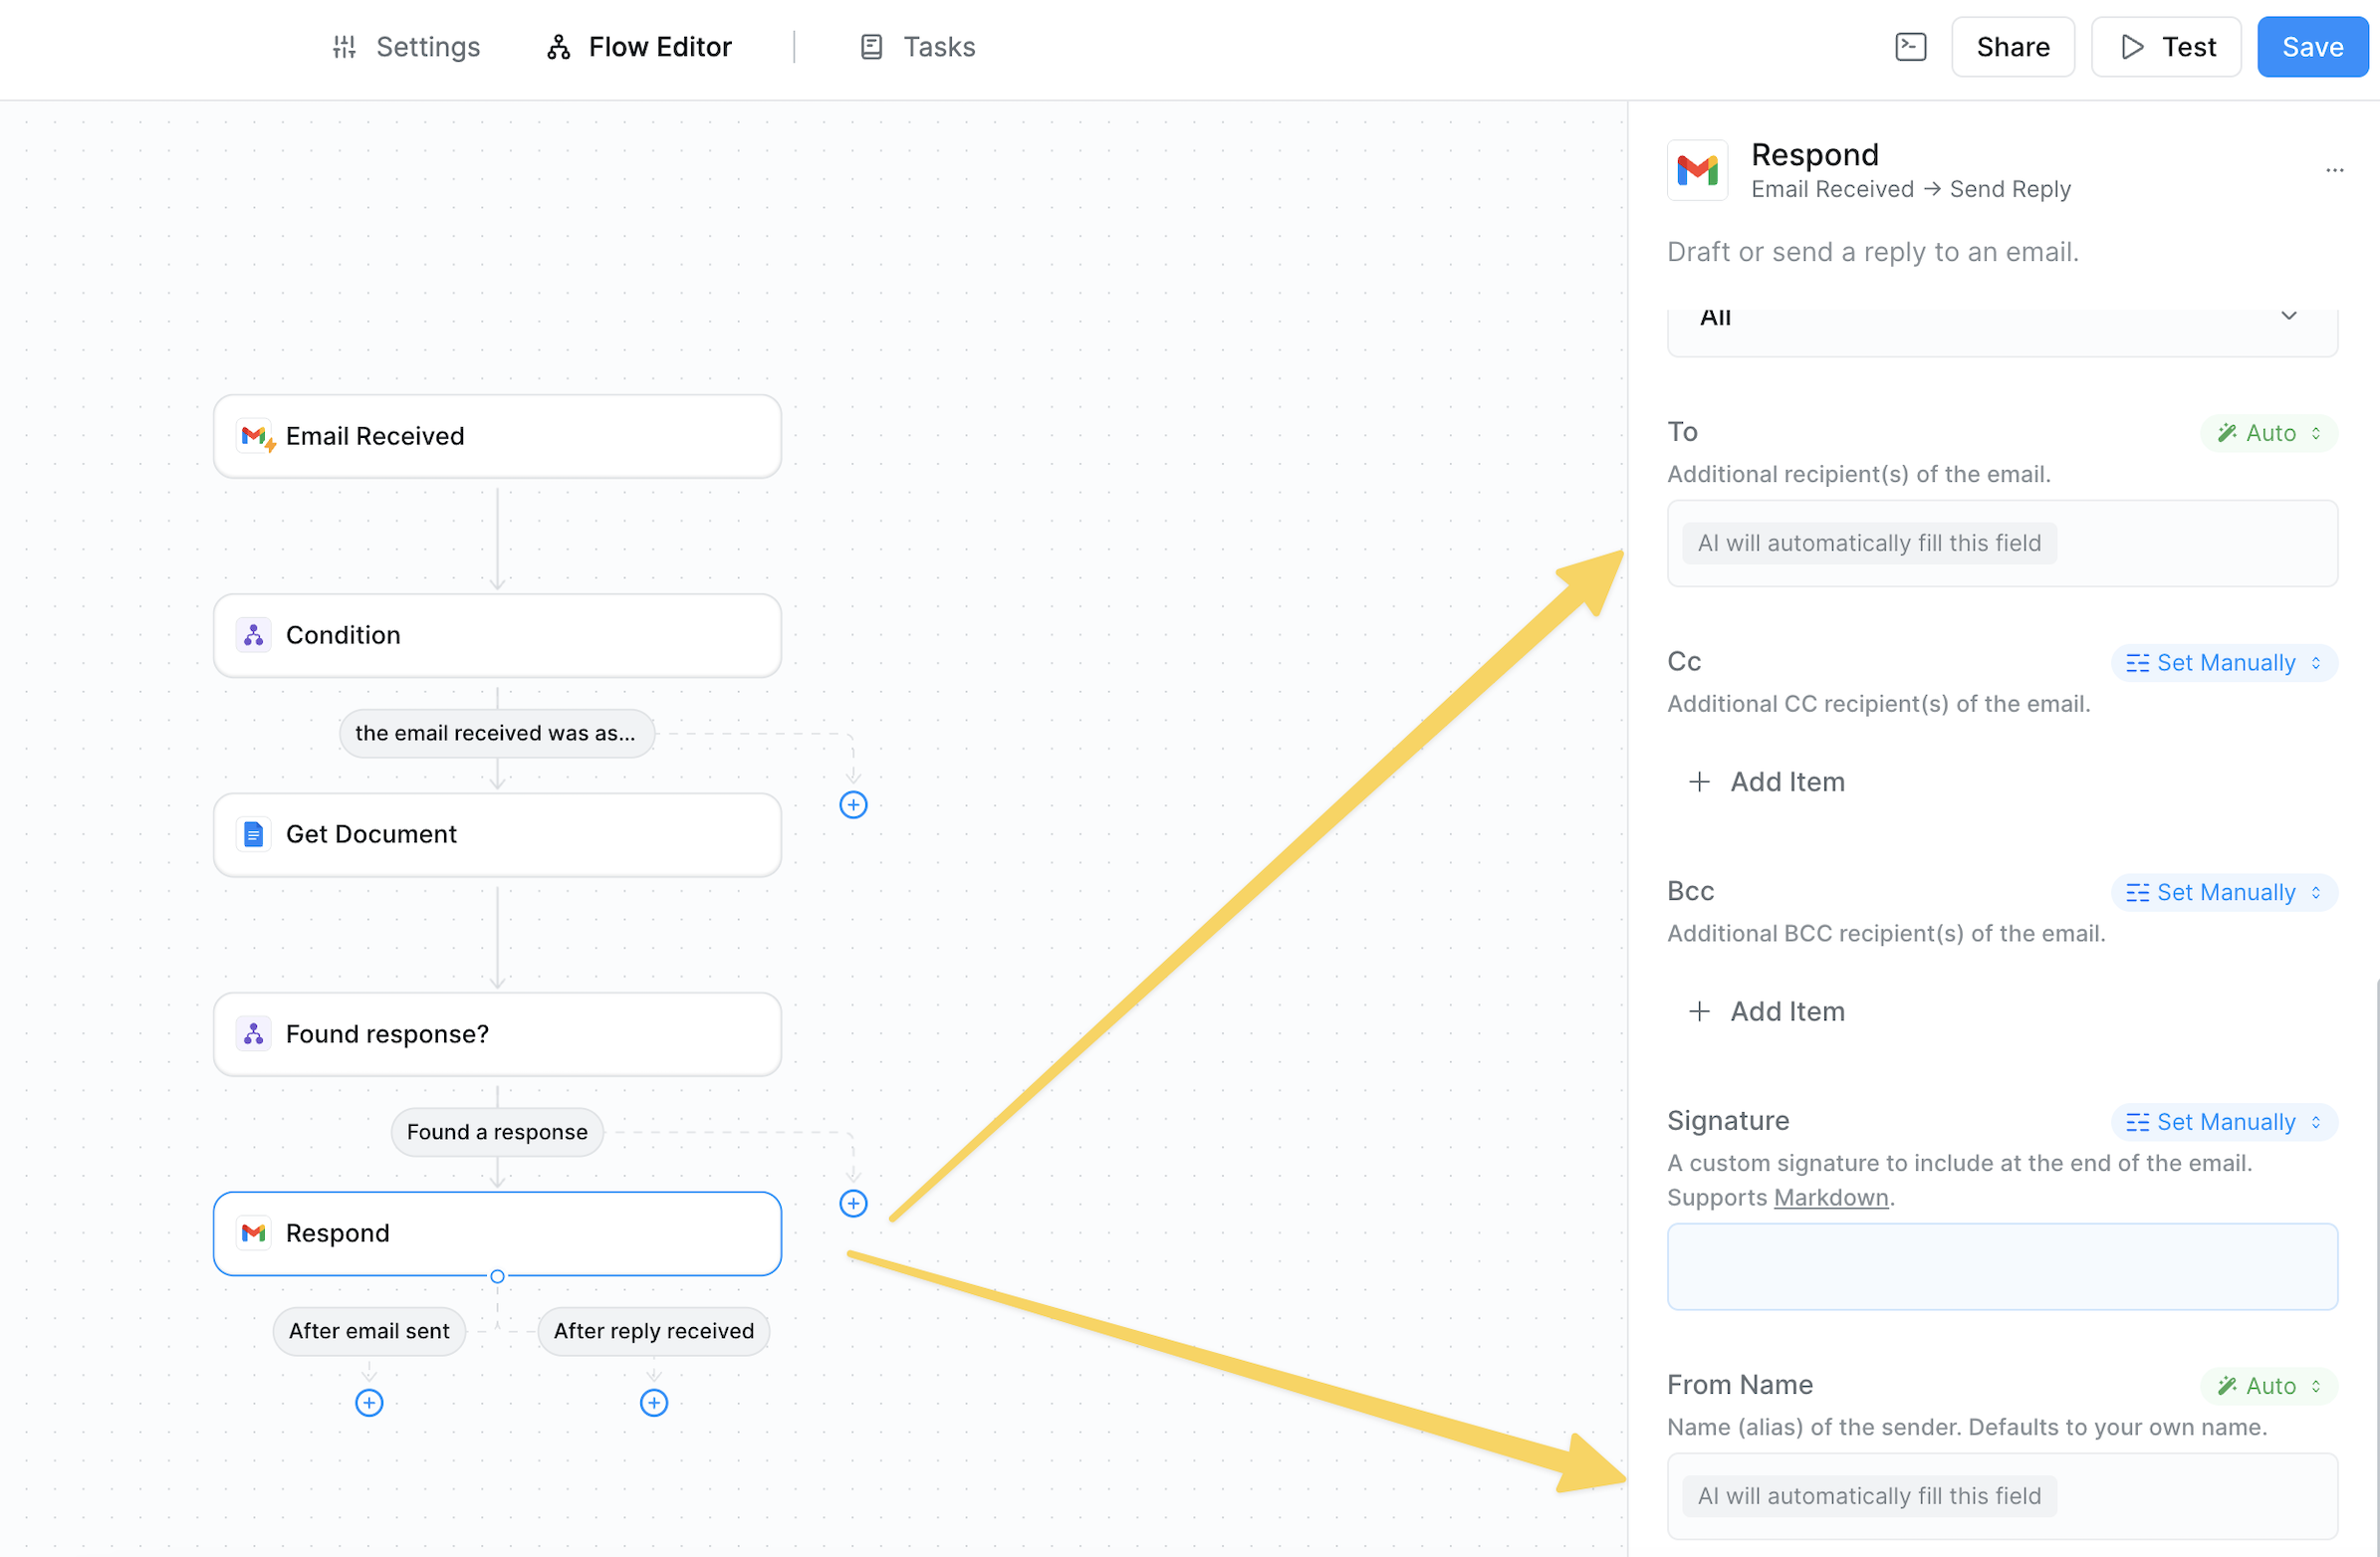 The image above shows Auto mode in action - notice how the "To" field is set to Auto and displays "AI will automatically fill this field" based on context from previous steps.
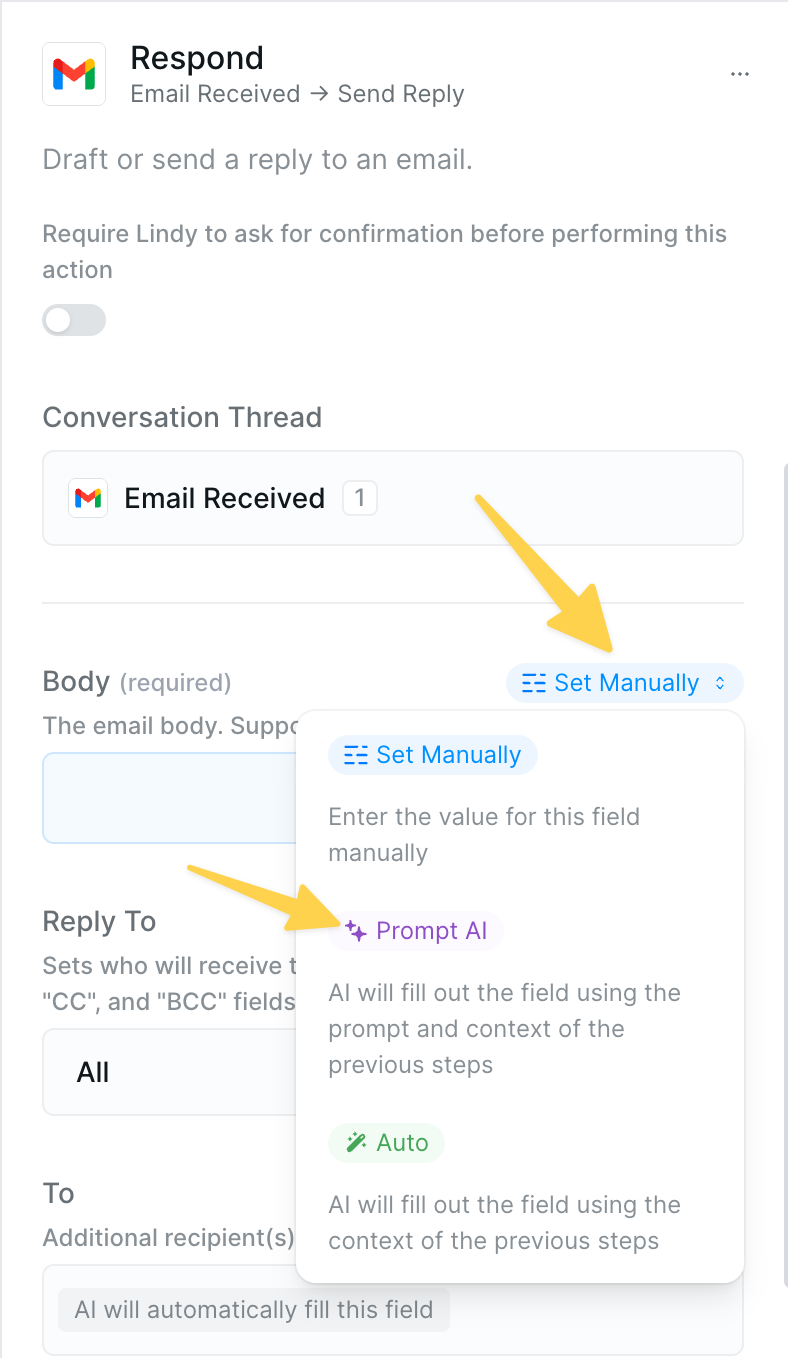
## AI Prompt Mode
AI Prompt mode lets you give your agent natural language instructions to generate dynamic content. It'll create text based on your directions and all available workflow data.
The image above shows Auto mode in action - notice how the "To" field is set to Auto and displays "AI will automatically fill this field" based on context from previous steps.
## AI Prompt Mode
AI Prompt mode lets you give your agent natural language instructions to generate dynamic content. It'll create text based on your directions and all available workflow data.
 ### Writing Effective Prompts
The key to AI Prompt mode is clear, specific instructions:
### Writing Effective Prompts
The key to AI Prompt mode is clear, specific instructions:
 ```
✅ Good: "Write a friendly 2-line thank you mentioning the product name"
❌ Avoid: "Write something nice"
```
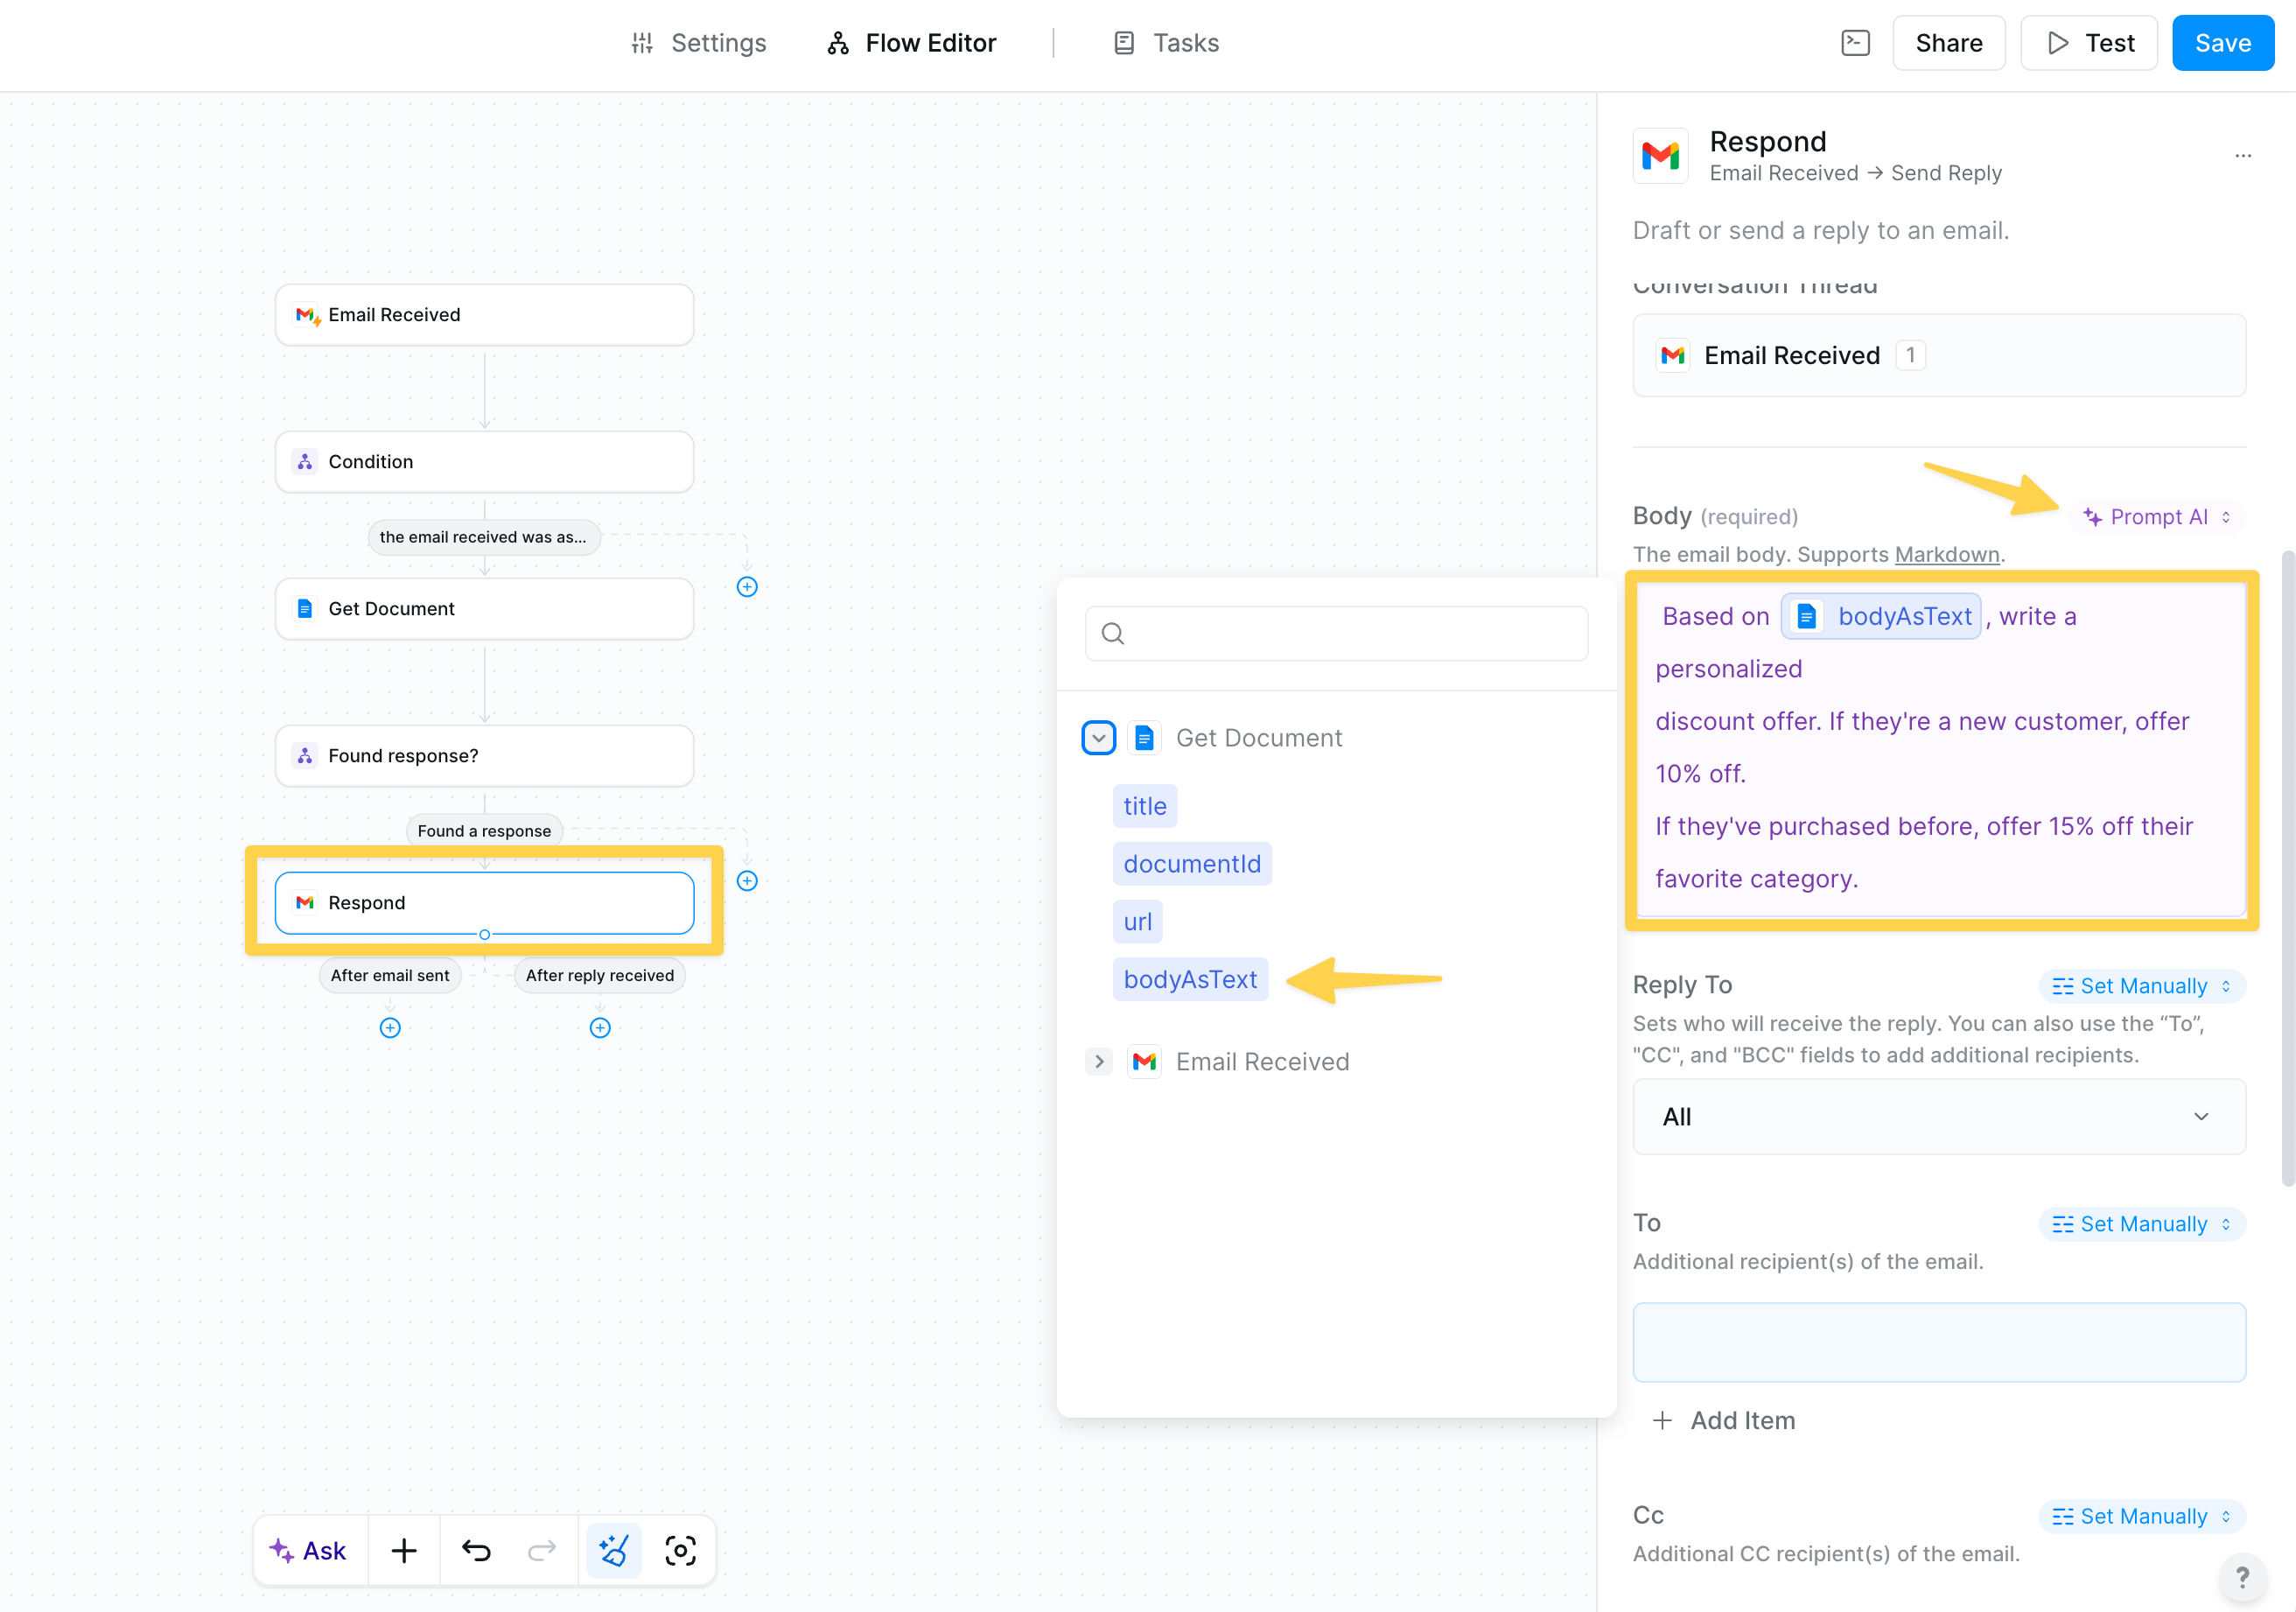
To reference data from previous steps, click the dropdown button and select from available outputs. The video below shows how this works - no need to type brackets manually!
### When to Use AI Prompt Mode
Choose AI Prompt for:
* **Email composition**: Subject lines, body content, personalized messages
* **Content generation**: Summaries, descriptions, social posts
* **Data transformation**: Reformatting dates, combining fields creatively
* **Conditional text**: Different messages based on context
```
✅ Good: "Write a friendly 2-line thank you mentioning the product name"
❌ Avoid: "Write something nice"
```
To reference data from previous steps, click the dropdown button and select from available outputs. The video below shows how this works - no need to type brackets manually!
### When to Use AI Prompt Mode
Choose AI Prompt for:
* **Email composition**: Subject lines, body content, personalized messages
* **Content generation**: Summaries, descriptions, social posts
* **Data transformation**: Reformatting dates, combining fields creatively
* **Conditional text**: Different messages based on context
💡 Learn more about [writing effective prompts](/fundamentals/lindy-101/prompt-guide)
### Using References in AI Prompts
The dropdown shows all available data from previous steps. In AI Prompt mode, these references become part of your instructions to generate dynamic content.
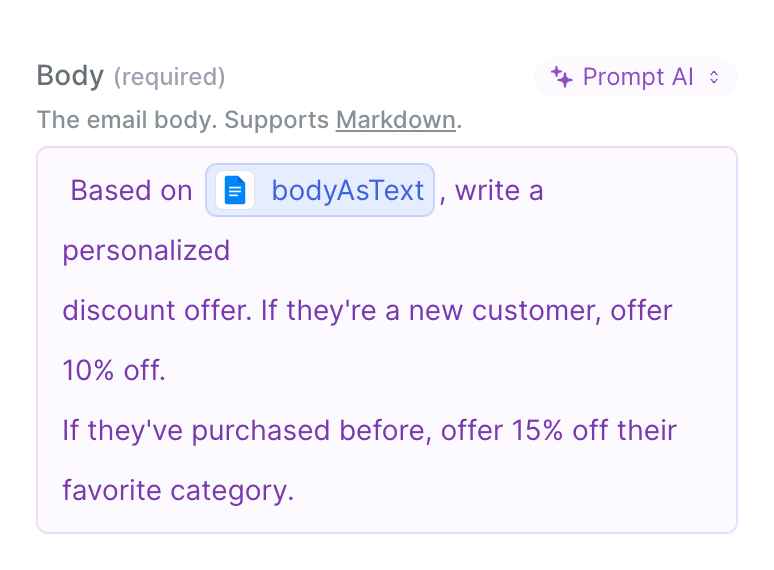
### Advanced Example
 In this example, the AI Prompt intelligently combines:
* **Reference to previous data**: `bodyAsText` pulls in the actual content from a previous step (like an email or document)
* **Contextual analysis**: Your agent reads and understands the referenced content to determine if the person is new or returning
* **Dynamic decision-making**: Based on what she finds in the data, she generates different personalized offers
This showcases the power of AI Prompt mode — instead of rigid rules, your agent analyzes the actual context from previous steps to generate the most appropriate response. The reference acts as a variable that gets replaced with real data at runtime, which your agent then uses to make intelligent decisions.
## "Set Manually" Mode
Set Manually mode gives you complete control — what you type is exactly what appears. Perfect for fixed values and precise data references.
### Direct Value Entry
Two ways to use Set Manually:
1. **Fixed text**: Type exactly what should appear
In this example, the AI Prompt intelligently combines:
* **Reference to previous data**: `bodyAsText` pulls in the actual content from a previous step (like an email or document)
* **Contextual analysis**: Your agent reads and understands the referenced content to determine if the person is new or returning
* **Dynamic decision-making**: Based on what she finds in the data, she generates different personalized offers
This showcases the power of AI Prompt mode — instead of rigid rules, your agent analyzes the actual context from previous steps to generate the most appropriate response. The reference acts as a variable that gets replaced with real data at runtime, which your agent then uses to make intelligent decisions.
## "Set Manually" Mode
Set Manually mode gives you complete control — what you type is exactly what appears. Perfect for fixed values and precise data references.
### Direct Value Entry
Two ways to use Set Manually:
1. **Fixed text**: Type exactly what should appear
 2. **Data references**: Insert exact values from previous steps
 Set Manually mode uses no AI processing = fewer credits consumed. It's the most efficient option for fixed values.
### When to Use Set Manually
Perfect for:
* **Fixed values**: Email addresses, signatures, webhook URLs, API keys
* **Exact references**: Order IDs, customer names, timestamps
* **Skip fields**: Leave empty to skip a field entirely
* **Combined text**: Mix static text with data references
## Using Output References
The field configuration dropdown gives you instant access to ALL data from previous steps - forms, API responses, search results, and more. This powerful feature lets you connect any piece of information across your workflow.
### Reference Behavior by Mode
References behave differently in each mode:
| Mode | Reference Behavior | Example |
| ---------------- | --------------------- | ------------------------------------------ |
| **Auto** | Considers all context | Lindy intelligently uses available data |
| **AI Prompt** | Part of instructions | `Summarize [Search: Results]` → AI summary |
| **Set Manually** | Exact value insertion | `Order #[Form: ID]` → `Order #12345` |
## Best Practices
When unsure, try Auto first. Your agent often correctly infers what you need, saving configuration time.
Instead of "write an email", use "write a 3-paragraph follow-up email thanking them for \[Meeting: Topic] and proposing next steps"
Use the test panel to see how each mode handles your actual data before going live.
Use Set Manually for email addresses, AI Prompt for subject/body, and Auto for updating your CRM.
## Common Pitfalls & Solutions
### Troubleshooting Guide
1. **Field shows as empty**
* Check if Set Manually has content (empty = skip)
* Verify referenced data exists in previous steps
* Ensure Auto mode has clear context
2. **Wrong data appears**
* Review your mode selection
* Check reference syntax in Set Manually
* Refine AI Prompt instructions
3. **Too many credits used**
* Switch fixed values from AI Prompt to Set Manually
* Use Auto instead of AI Prompt for simple mapping
4. **Inconsistent results**
* Add examples to AI Prompts
* Use Set Manually for values that shouldn't change
* Ensure field names are clear for Auto mode
## Next Steps
Master these related concepts to build even more powerful workflows:
Explore all available actions and their field requirements
Write better AI prompts for dynamic content generation
Test your field configurations with real data
Combine field references with knowledge base searches
# Introduction
Source: https://docs.lindy.ai/fundamentals/lindy-101/introduction
Set Manually mode uses no AI processing = fewer credits consumed. It's the most efficient option for fixed values.
### When to Use Set Manually
Perfect for:
* **Fixed values**: Email addresses, signatures, webhook URLs, API keys
* **Exact references**: Order IDs, customer names, timestamps
* **Skip fields**: Leave empty to skip a field entirely
* **Combined text**: Mix static text with data references
## Using Output References
The field configuration dropdown gives you instant access to ALL data from previous steps - forms, API responses, search results, and more. This powerful feature lets you connect any piece of information across your workflow.
### Reference Behavior by Mode
References behave differently in each mode:
| Mode | Reference Behavior | Example |
| ---------------- | --------------------- | ------------------------------------------ |
| **Auto** | Considers all context | Lindy intelligently uses available data |
| **AI Prompt** | Part of instructions | `Summarize [Search: Results]` → AI summary |
| **Set Manually** | Exact value insertion | `Order #[Form: ID]` → `Order #12345` |
## Best Practices
When unsure, try Auto first. Your agent often correctly infers what you need, saving configuration time.
Instead of "write an email", use "write a 3-paragraph follow-up email thanking them for \[Meeting: Topic] and proposing next steps"
Use the test panel to see how each mode handles your actual data before going live.
Use Set Manually for email addresses, AI Prompt for subject/body, and Auto for updating your CRM.
## Common Pitfalls & Solutions
### Troubleshooting Guide
1. **Field shows as empty**
* Check if Set Manually has content (empty = skip)
* Verify referenced data exists in previous steps
* Ensure Auto mode has clear context
2. **Wrong data appears**
* Review your mode selection
* Check reference syntax in Set Manually
* Refine AI Prompt instructions
3. **Too many credits used**
* Switch fixed values from AI Prompt to Set Manually
* Use Auto instead of AI Prompt for simple mapping
4. **Inconsistent results**
* Add examples to AI Prompts
* Use Set Manually for values that shouldn't change
* Ensure field names are clear for Auto mode
## Next Steps
Master these related concepts to build even more powerful workflows:
Explore all available actions and their field requirements
Write better AI prompts for dynamic content generation
Test your field configurations with real data
Combine field references with knowledge base searches
# Introduction
Source: https://docs.lindy.ai/fundamentals/lindy-101/introduction
 ## Welcome to Lindy
Lindy is an AI agent platform that helps you automate complex workflows by connecting AI agents to your tools and data. Think of Lindy as your AI teammate that can handle tasks across your entire tech stack.
## Core Concepts
Lindy is built around a few key concepts that work together:
## Welcome to Lindy
Lindy is an AI agent platform that helps you automate complex workflows by connecting AI agents to your tools and data. Think of Lindy as your AI teammate that can handle tasks across your entire tech stack.
## Core Concepts
Lindy is built around a few key concepts that work together:
{/* Top Section - Lindy and Description */}
 Lindy
Lindy
Orchestrates all your agents and workflows
{/* Agents Container */}
Agents
Individual workers that execute tasks
{/* Workflows Section */}
Workflows
{/* Steps Container */}
{/* Memory Section */}
Memory
Contextual understanding
### **Lindy**
Lindy orchestrates all your agents and workflows. It understands what you need and helps you build, manage, and run the right agents for your work. Lindy can also help you run simple tasks.
### **Agents**
Individual workers that understand context, make decisions, and execute actions. You configure agents to follow specific workflows.
### **Workflows**
Configured in the flow editor to define the specific steps your agent takes. Agents can have multiple workflow steps.
### **Steps**
Individual building blocks that make up a workflow. There are many different types of steps, such as:
* **[Triggers](/fundamentals/lindy-101/triggers)**: Decide when an agent wakes up and starts working
* **[Actions](/fundamentals/lindy-101/actions)**: The steps an agent takes in response to a trigger
* **[Agent Steps](/fundamentals/lindy-101/ai-agents)**: Give agents more autonomy to handle uncertain tasks with skill-based execution
* **[Integrations](/skills/popular-integrations)**: Connect your agent to external systems and tools
* **[Conditions](/fundamentals/lindy-101/conditions)**: Define logic for when agents should take certain actions
* **[Looping](/fundamentals/lindy-101/looping)**: Execute agentic tasks in parallel for efficient bulk operations
### **Memory**
You can configure agents to remember conversations and context, making them more helpful over time.
## Quick Start
Ready to build your first Lindy? Here's how to get started:
Browse our [use cases](/use-cases/popular-workflows/meeting-assistant) to see what's possible and get inspired by real-world examples
Follow our [quickstart guide](/start-here/quickstart) to create your first AI agent in minutes
Understand [triggers](/fundamentals/lindy-101/triggers), [actions](/fundamentals/lindy-101/actions), and [conditions](/fundamentals/lindy-101/conditions) to master Lindy's core concepts
## Next Steps
Build your first Lindy in minutes
Learn how to start workflows automatically
Discover what your agents can do
Understand how Agent Steps work
Connect with other builders, ask questions, and share your Lindy creations
# Knowledge Base
Source: https://docs.lindy.ai/fundamentals/lindy-101/knowledge-base
## Quick Overview
Knowledge bases let your agents access information from multiple sources like files, websites, and cloud storage. When your agent needs information, it searches through all your content using both semantic understanding and keyword matching to find relevant answers.
This is perfect for customer support bots that need to reference documentation, or any workflow where your agent needs to pull information from a large collection of content.
For small datasets (single Google Doc or Sheet), use direct actions like Get Document or Get Spreadsheet for better performance.
## How Search Works
### Semantic Search
Matches meaning rather than exact words. Understands context and finds related concepts.
* Query: "dark colored jeans"
* Finds: "black and navy denim pants"
### Keyword Search
Matches exact words in your query. Useful for precise matching of specific terms.
* Query: "invoice #12345"
* Finds: Exact invoice number
## Adding a Knowledge Base
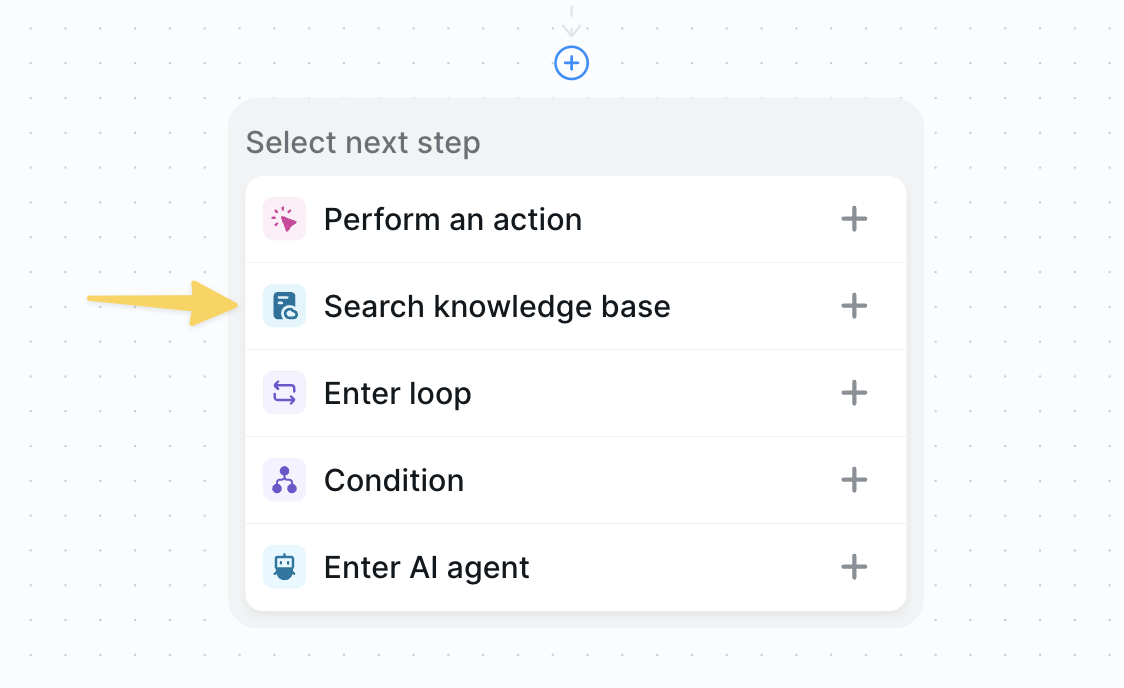
Click the plus button in your workflow and select "Search knowledge base".
 ### Selecting Content Sources
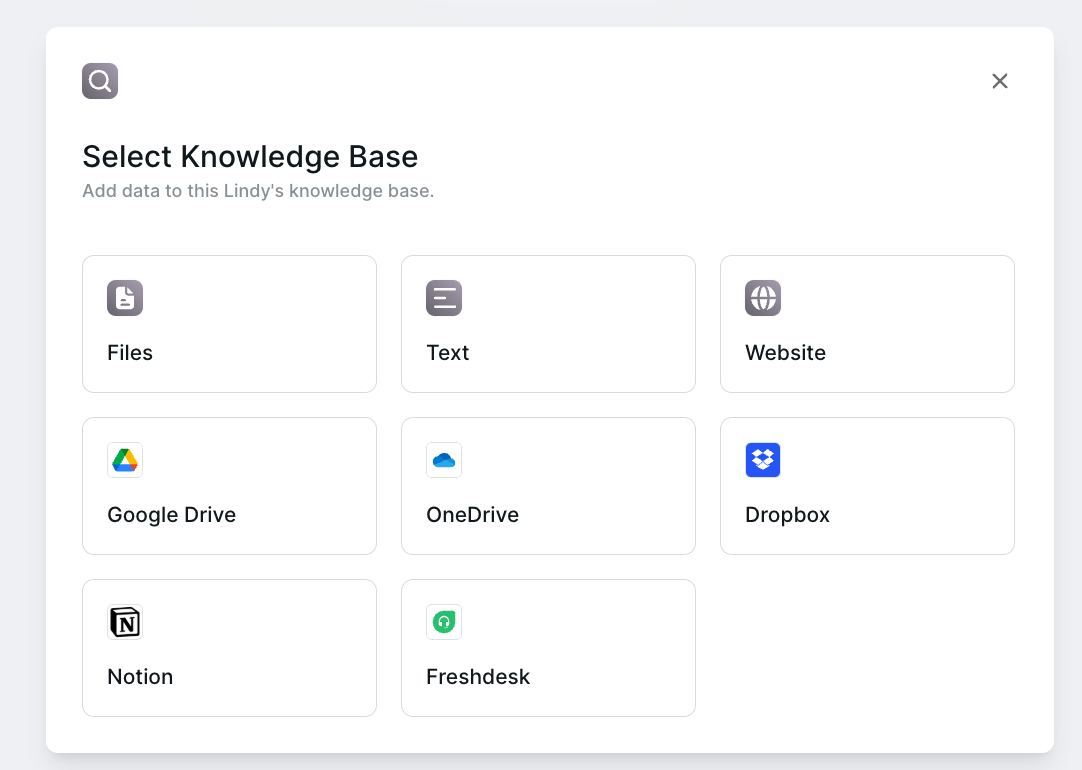 Choose from multiple content types:
**Files**
* Supports: PDF, XLSX, CSV, DOCX, TXT, HTML
* Maximum: 20MB per file
* Audio files supported
**Text**
* Free-form text input
* Ideal for FAQs and reference content
* No formatting requirements
**Websites**
* Single page or full site crawling
* Selective page removal
* Automatic link following
**Cloud Storage**
* Google Drive, OneDrive, Dropbox
* Notion databases
* Freshdesk tickets
## Configuring Search
Choose from multiple content types:
**Files**
* Supports: PDF, XLSX, CSV, DOCX, TXT, HTML
* Maximum: 20MB per file
* Audio files supported
**Text**
* Free-form text input
* Ideal for FAQs and reference content
* No formatting requirements
**Websites**
* Single page or full site crawling
* Selective page removal
* Automatic link following
**Cloud Storage**
* Google Drive, OneDrive, Dropbox
* Notion databases
* Freshdesk tickets
## Configuring Search
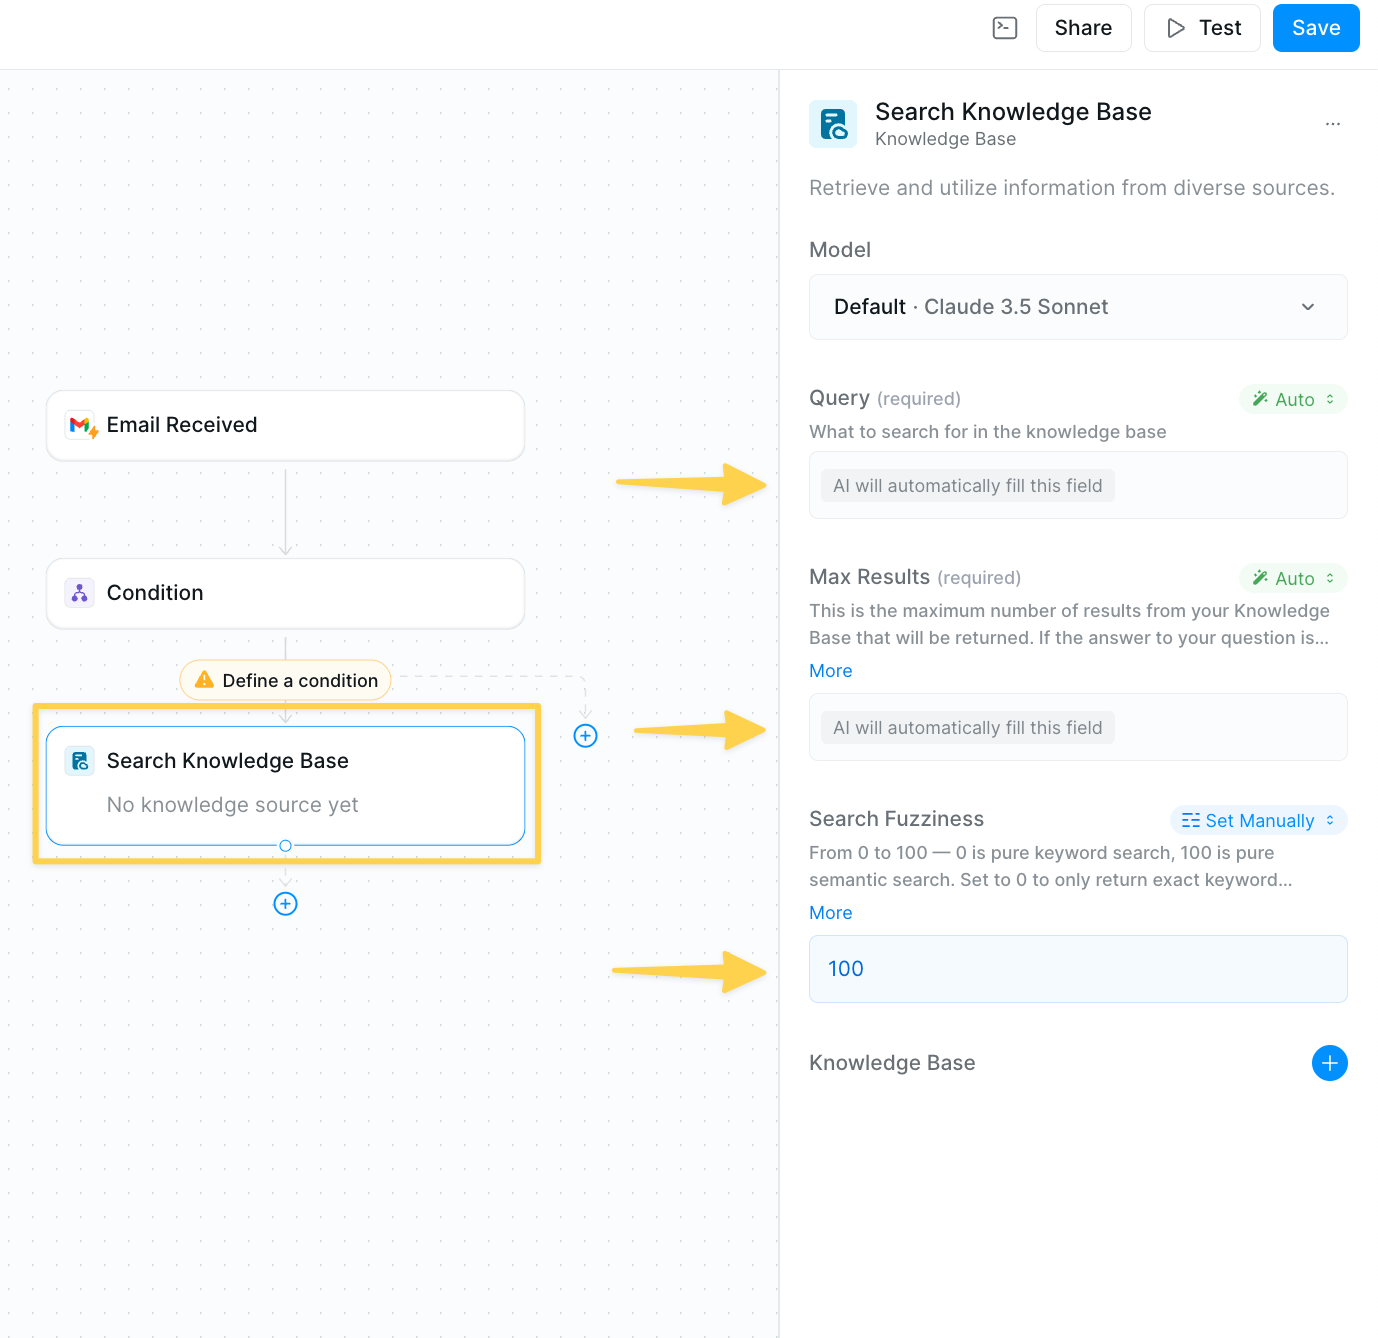 ### Query Field
Instructions for what to search in the knowledge base.
**Mode options:**
* **Auto** — Your agent determines the optimal query
* **Prompt AI** - Custom search instructions
* **Set Manually** - Use exact search query (no AI)
Example: `Search for the answer to the user's question in the email`
### Max Results
Number of results returned per query.
* Default: 4 results
* Maximum: 10 results
* Increase for frequently mentioned topics
### Search Fuzziness
Balance between semantic and keyword search (0-100 scale).
* **0** - Pure keyword matching
* **100** - Pure semantic search (default)
* Lower values emphasize exact matches
Keep fuzziness at 100 to avoid the 1,500 file limit. Lower values restrict search to first 1,500 files only.
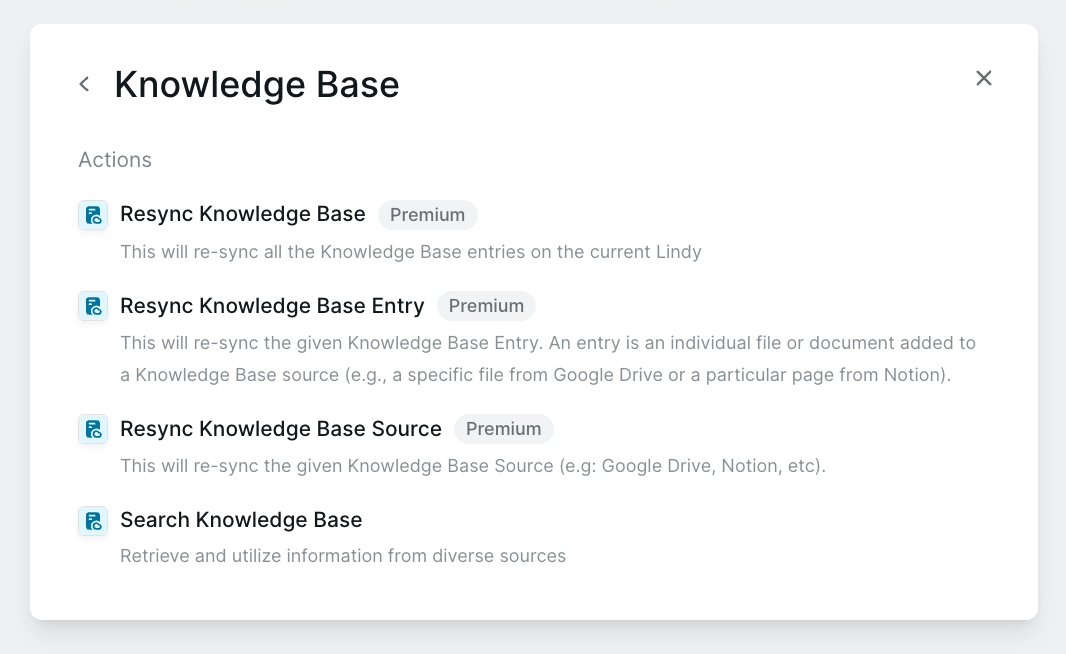
## Managing Your Knowledge Base
Your knowledge base stays current through automatic and manual updates:
* **Automatic updates**: Content refreshes every 24 hours automatically
* **Manual updates**: For immediate updates, use Resync Knowledge Base actions to update the entire knowledge base or specific entries when needed
### Query Field
Instructions for what to search in the knowledge base.
**Mode options:**
* **Auto** — Your agent determines the optimal query
* **Prompt AI** - Custom search instructions
* **Set Manually** - Use exact search query (no AI)
Example: `Search for the answer to the user's question in the email`
### Max Results
Number of results returned per query.
* Default: 4 results
* Maximum: 10 results
* Increase for frequently mentioned topics
### Search Fuzziness
Balance between semantic and keyword search (0-100 scale).
* **0** - Pure keyword matching
* **100** - Pure semantic search (default)
* Lower values emphasize exact matches
Keep fuzziness at 100 to avoid the 1,500 file limit. Lower values restrict search to first 1,500 files only.
## Managing Your Knowledge Base
Your knowledge base stays current through automatic and manual updates:
* **Automatic updates**: Content refreshes every 24 hours automatically
* **Manual updates**: For immediate updates, use Resync Knowledge Base actions to update the entire knowledge base or specific entries when needed
 ## Best Practices
* **Organize content** - Group similar information and remove duplicates
* **Test queries** - Try different searches and adjust fuzziness for accuracy
* **Update regularly** - Keep content current with manual resyncs when needed
* **Start simple** - Begin with fewer sources and expand as needed
## Common Use Cases
* **Content**: FAQs, product docs, support articles
* **Settings**: High semantic search (100)
* **Results**: 4-6 max results
* **Content**: Templates, documentation, policies
* **Settings**: Balanced search (70-80)
* **Results**: 4 max results
* **Content**: Transcripts, project docs, resources
* **Settings**: High semantic search (100)
* **Results**: 6-8 max results
* **Content**: Mixed files, cloud storage, websites
* **Settings**: Flexible based on content
* **Results**: 10 max results
## Troubleshooting
* Lower search fuzziness for more exact matching
* Organize content into clearer categories
* Use more specific search queries
* Check sync status of your sources
* Try exact keyword search (fuzziness near 0)
* Verify content is in supported formats
* Reduce number of content sources
* Use direct actions for single documents
* Lower max results if not needed
Pro users have 20M character limit. Monitor usage to avoid hitting storage limits.
## Next Steps
Enhance your knowledge base workflows with these concepts:
Combine knowledge search with other actions
Route workflows based on search results
Store important findings for future use
Let agents intelligently use knowledge bases
# Looping
Source: https://docs.lindy.ai/fundamentals/lindy-101/looping
## Quick Overview
Looping lets you process lists of items in parallel rather than one at a time. Think of it like a 'for' loop in programming, but with the power to handle multiple agentic workflows simultaneously.
Instead of processing 100 emails sequentially (which could take hours), loops can handle them all at once. You define what happens to each item, and your agent executes those actions across the entire list concurrently.
This is essential for bulk operations like lead enrichment, content processing, or research tasks. The loop collects results from all iterations and passes a summary to the next step in your workflow.
## When Should You Use Looping?
Use looping whenever you need to process multiple items with the same workflow. The key benefit: parallel processing means faster results.
**Perfect for:**
* **Lead Research**: Enrich dozens of leads from your CRM or spreadsheet simultaneously
* **Content Creation**: Generate social posts, emails, or descriptions for multiple products at once
* **Data Processing**: Update spreadsheet rows, validate entries, or send bulk notifications
* **Research Tasks**: Gather information on candidates, companies, or competitors in parallel
Simple test: If you're doing the same task repeatedly for different items, loop it instead.
## Loop Configuration Fields
When setting up your loop, you'll configure several key fields:
* **Items to Loop Through**: The list of data that drives each loop iteration. This can be a static list, a reference to dynamic data from previous steps, or an **AI prompt** that generates the list for you.
For example, you can use an AI prompt to extract items dynamically:
## Best Practices
* **Organize content** - Group similar information and remove duplicates
* **Test queries** - Try different searches and adjust fuzziness for accuracy
* **Update regularly** - Keep content current with manual resyncs when needed
* **Start simple** - Begin with fewer sources and expand as needed
## Common Use Cases
* **Content**: FAQs, product docs, support articles
* **Settings**: High semantic search (100)
* **Results**: 4-6 max results
* **Content**: Templates, documentation, policies
* **Settings**: Balanced search (70-80)
* **Results**: 4 max results
* **Content**: Transcripts, project docs, resources
* **Settings**: High semantic search (100)
* **Results**: 6-8 max results
* **Content**: Mixed files, cloud storage, websites
* **Settings**: Flexible based on content
* **Results**: 10 max results
## Troubleshooting
* Lower search fuzziness for more exact matching
* Organize content into clearer categories
* Use more specific search queries
* Check sync status of your sources
* Try exact keyword search (fuzziness near 0)
* Verify content is in supported formats
* Reduce number of content sources
* Use direct actions for single documents
* Lower max results if not needed
Pro users have 20M character limit. Monitor usage to avoid hitting storage limits.
## Next Steps
Enhance your knowledge base workflows with these concepts:
Combine knowledge search with other actions
Route workflows based on search results
Store important findings for future use
Let agents intelligently use knowledge bases
# Looping
Source: https://docs.lindy.ai/fundamentals/lindy-101/looping
## Quick Overview
Looping lets you process lists of items in parallel rather than one at a time. Think of it like a 'for' loop in programming, but with the power to handle multiple agentic workflows simultaneously.
Instead of processing 100 emails sequentially (which could take hours), loops can handle them all at once. You define what happens to each item, and your agent executes those actions across the entire list concurrently.
This is essential for bulk operations like lead enrichment, content processing, or research tasks. The loop collects results from all iterations and passes a summary to the next step in your workflow.
## When Should You Use Looping?
Use looping whenever you need to process multiple items with the same workflow. The key benefit: parallel processing means faster results.
**Perfect for:**
* **Lead Research**: Enrich dozens of leads from your CRM or spreadsheet simultaneously
* **Content Creation**: Generate social posts, emails, or descriptions for multiple products at once
* **Data Processing**: Update spreadsheet rows, validate entries, or send bulk notifications
* **Research Tasks**: Gather information on candidates, companies, or competitors in parallel
Simple test: If you're doing the same task repeatedly for different items, loop it instead.
## Loop Configuration Fields
When setting up your loop, you'll configure several key fields:
* **Items to Loop Through**: The list of data that drives each loop iteration. This can be a static list, a reference to dynamic data from previous steps, or an **AI prompt** that generates the list for you.
For example, you can use an AI prompt to extract items dynamically:
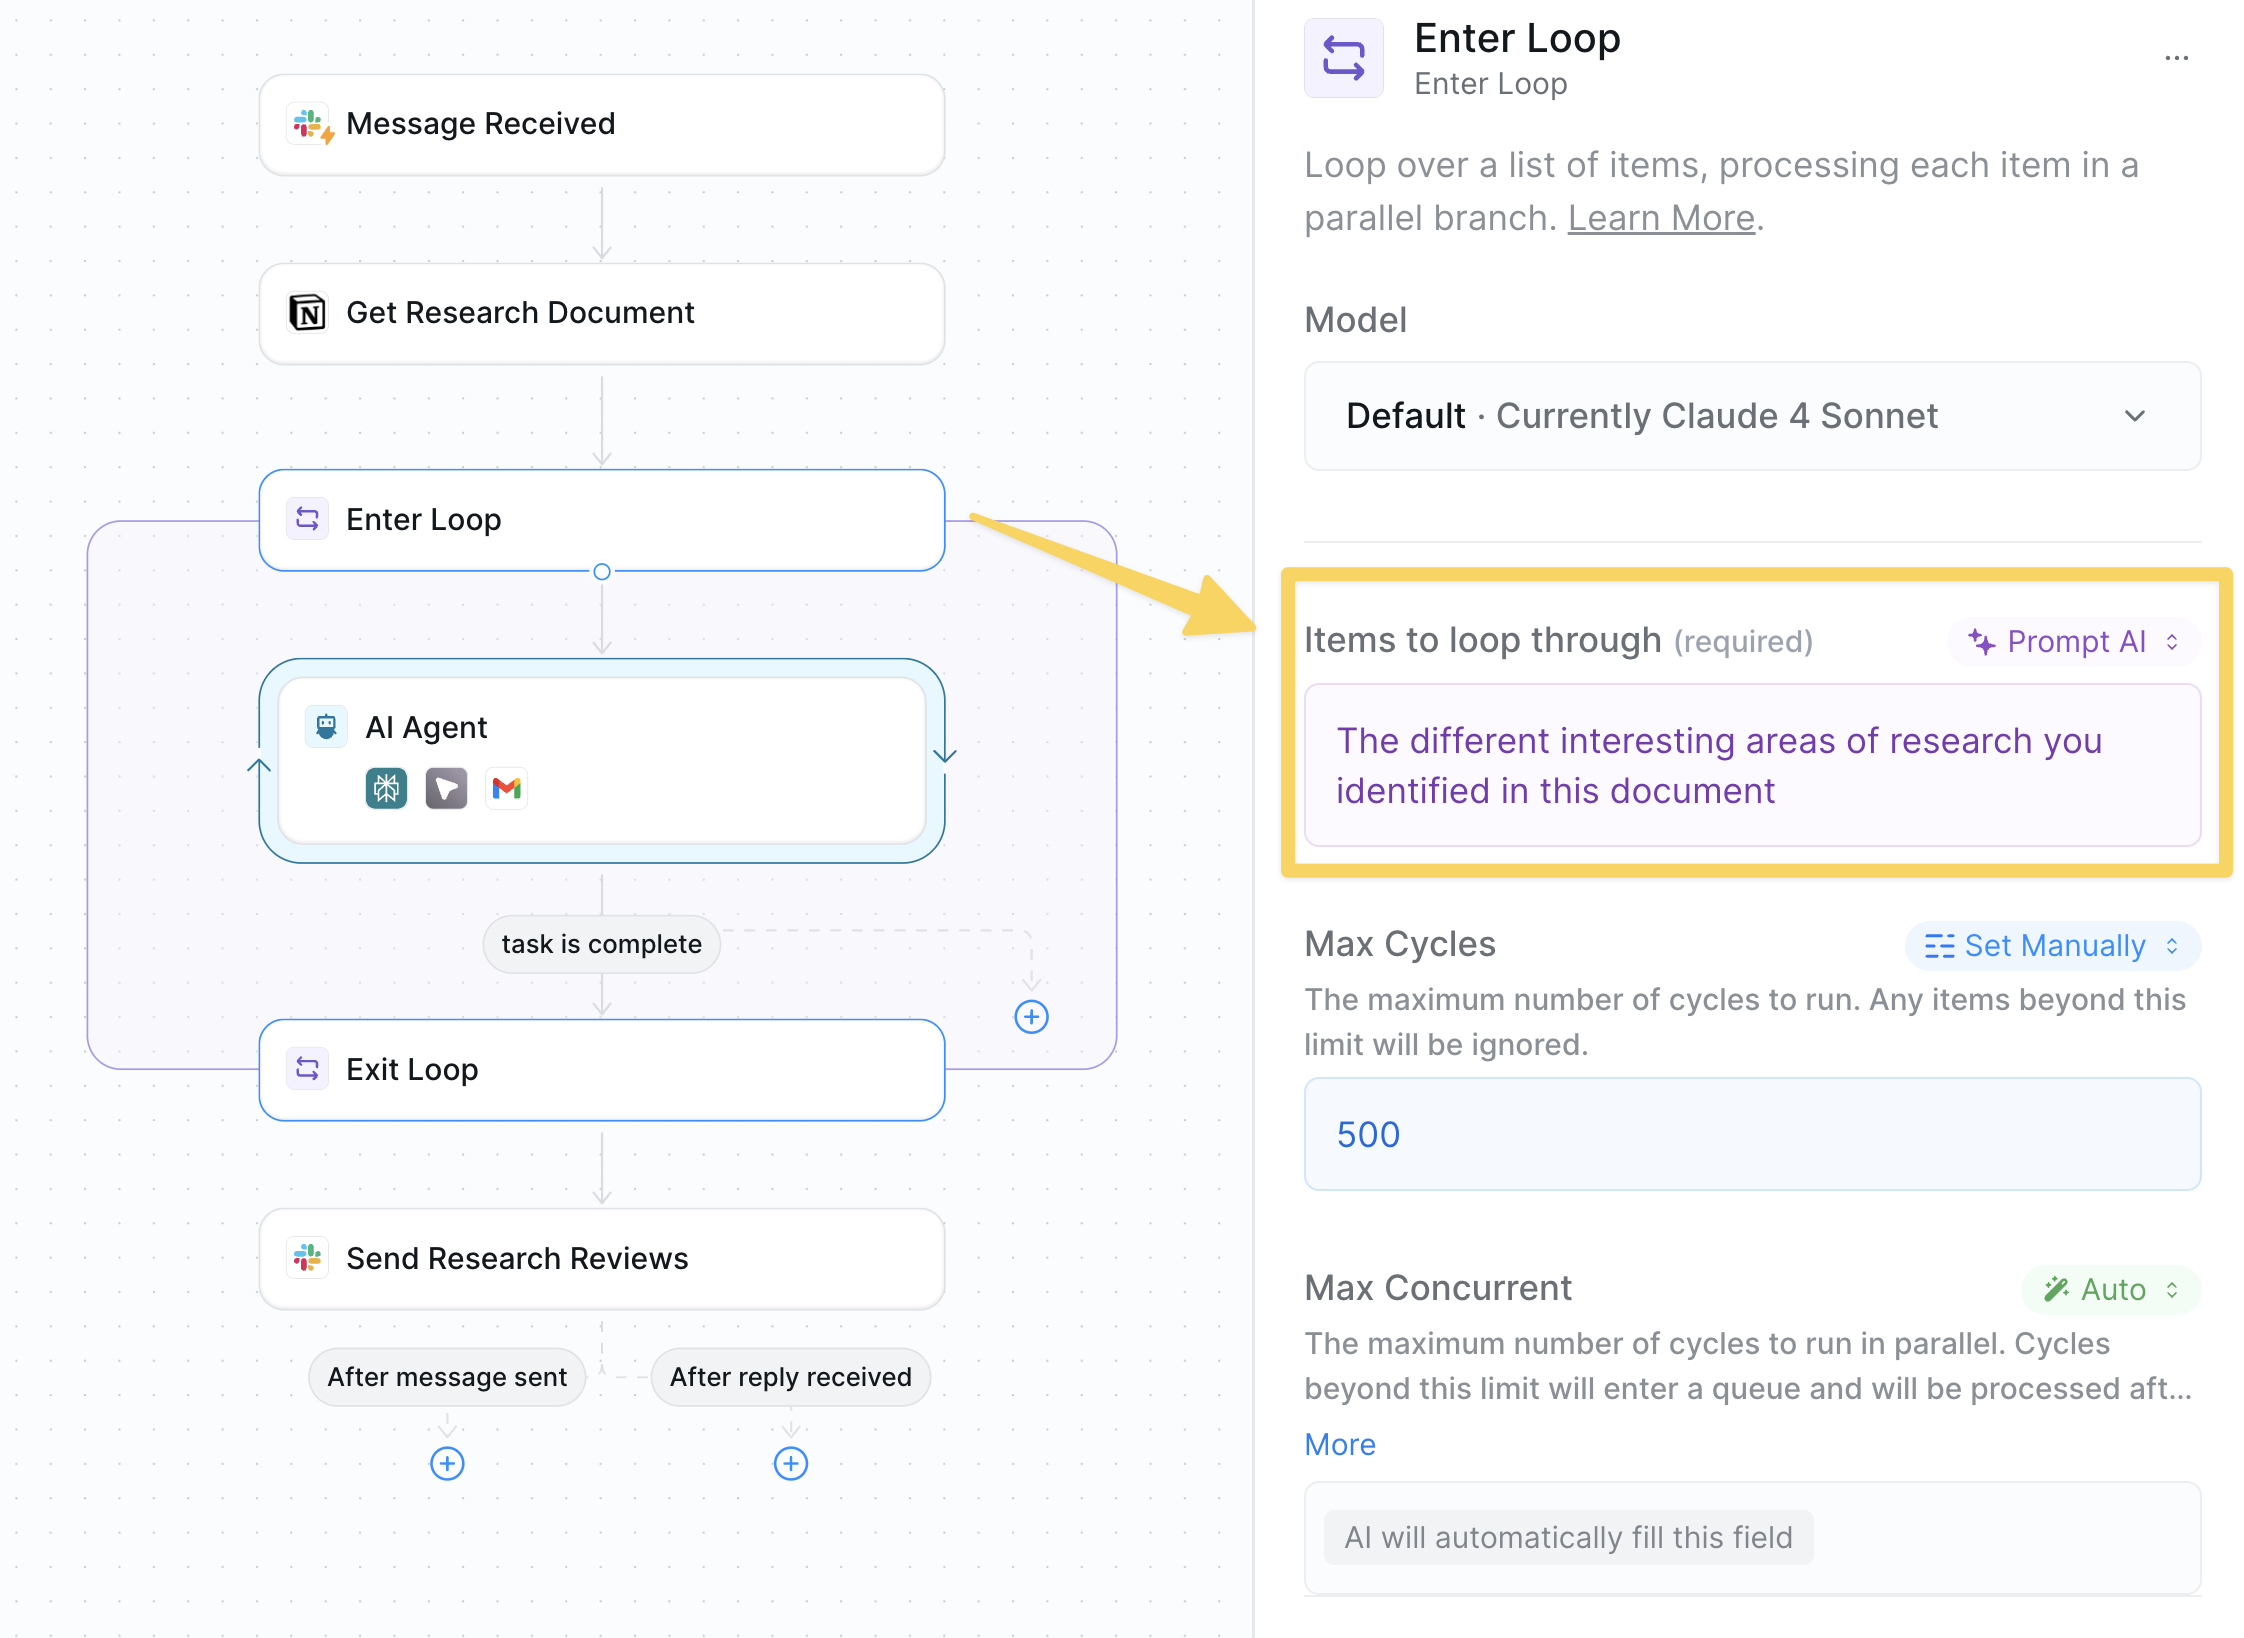 * **Max Cycles**: The maximum number of loop iterations that will run. This controls resource usage. Set this based on your expected list size plus a safety buffer (e.g., if you expect 50 items, set to 100)
* **Max Concurrent**: The maximum number of loop cycles that can run simultaneously in parallel. Choose "Auto" for optimization, or set a specific number.
Set **Max Concurrent** to `1` if you want to process items strictly one after another—great for chaining outputs between cycles, or when you need to avoid parallel execution due to dependencies or external rate limits.
* **Output**: The information passed from inside the loop to subsequent steps. This is the **only** data that survives the loop completion. Use "Auto mode" for AI summaries, "AI prompt" to specify exactly what data you need, or set to manual to select an output reference from inside the loop to expose to the outside.
When you pass a list variable in Manual Mode, the loop automatically processes each item individually. For example, passing Google Sheet Rows output reference will process each row separately.
Any data not included in the loop output won't be available to the outside of the loop. Be specific about what information you'll need after the loop completes.
## Building Your First Loop
Let's create a research assistant that loops through locations, researches each one, and summarizes findings. This pattern can be adapted for lead enrichment, candidate research, or any bulk processing task.
### Step 1: Planning Your Loop
Before building, define:
1. **Items to process** - What list will you loop through?
2. **Loop output** - What information should be available after the loop?
3. **Actions per item** - What happens to each item?
4. **Post-loop actions** - What happens with the aggregated results?
### Step 2: Add the Loop
* **Max Cycles**: The maximum number of loop iterations that will run. This controls resource usage. Set this based on your expected list size plus a safety buffer (e.g., if you expect 50 items, set to 100)
* **Max Concurrent**: The maximum number of loop cycles that can run simultaneously in parallel. Choose "Auto" for optimization, or set a specific number.
Set **Max Concurrent** to `1` if you want to process items strictly one after another—great for chaining outputs between cycles, or when you need to avoid parallel execution due to dependencies or external rate limits.
* **Output**: The information passed from inside the loop to subsequent steps. This is the **only** data that survives the loop completion. Use "Auto mode" for AI summaries, "AI prompt" to specify exactly what data you need, or set to manual to select an output reference from inside the loop to expose to the outside.
When you pass a list variable in Manual Mode, the loop automatically processes each item individually. For example, passing Google Sheet Rows output reference will process each row separately.
Any data not included in the loop output won't be available to the outside of the loop. Be specific about what information you'll need after the loop completes.
## Building Your First Loop
Let's create a research assistant that loops through locations, researches each one, and summarizes findings. This pattern can be adapted for lead enrichment, candidate research, or any bulk processing task.
### Step 1: Planning Your Loop
Before building, define:
1. **Items to process** - What list will you loop through?
2. **Loop output** - What information should be available after the loop?
3. **Actions per item** - What happens to each item?
4. **Post-loop actions** - What happens with the aggregated results?
### Step 2: Add the Loop
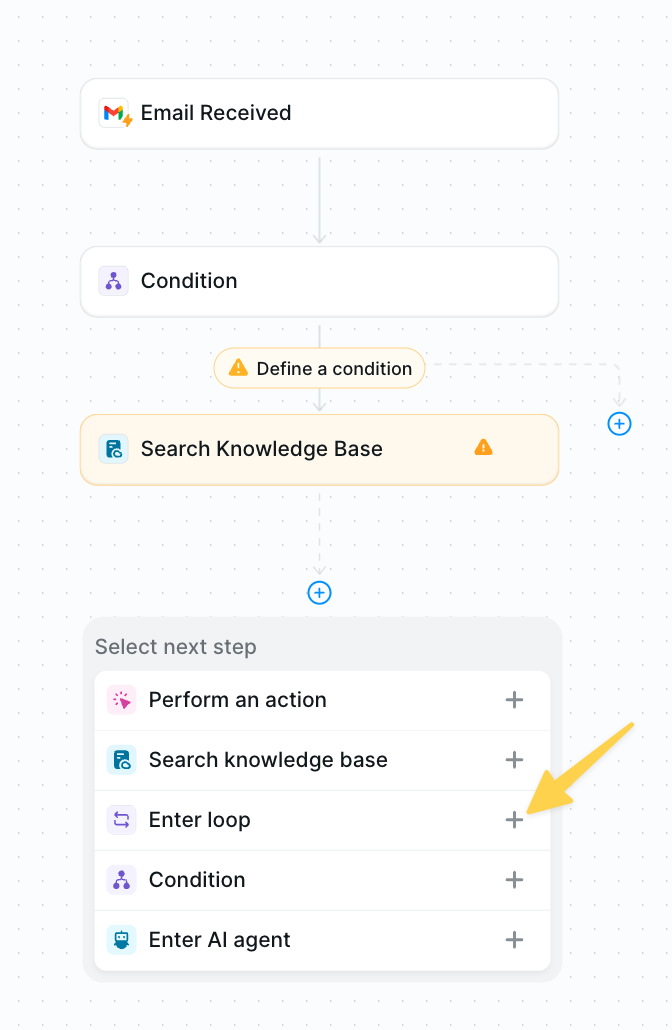 Click the plus button and select "Enter loop" to add the loop step.
## Configuring Your Loop
### Setting Items to Loop Through
Click the plus button and select "Enter loop" to add the loop step.
## Configuring Your Loop
### Setting Items to Loop Through
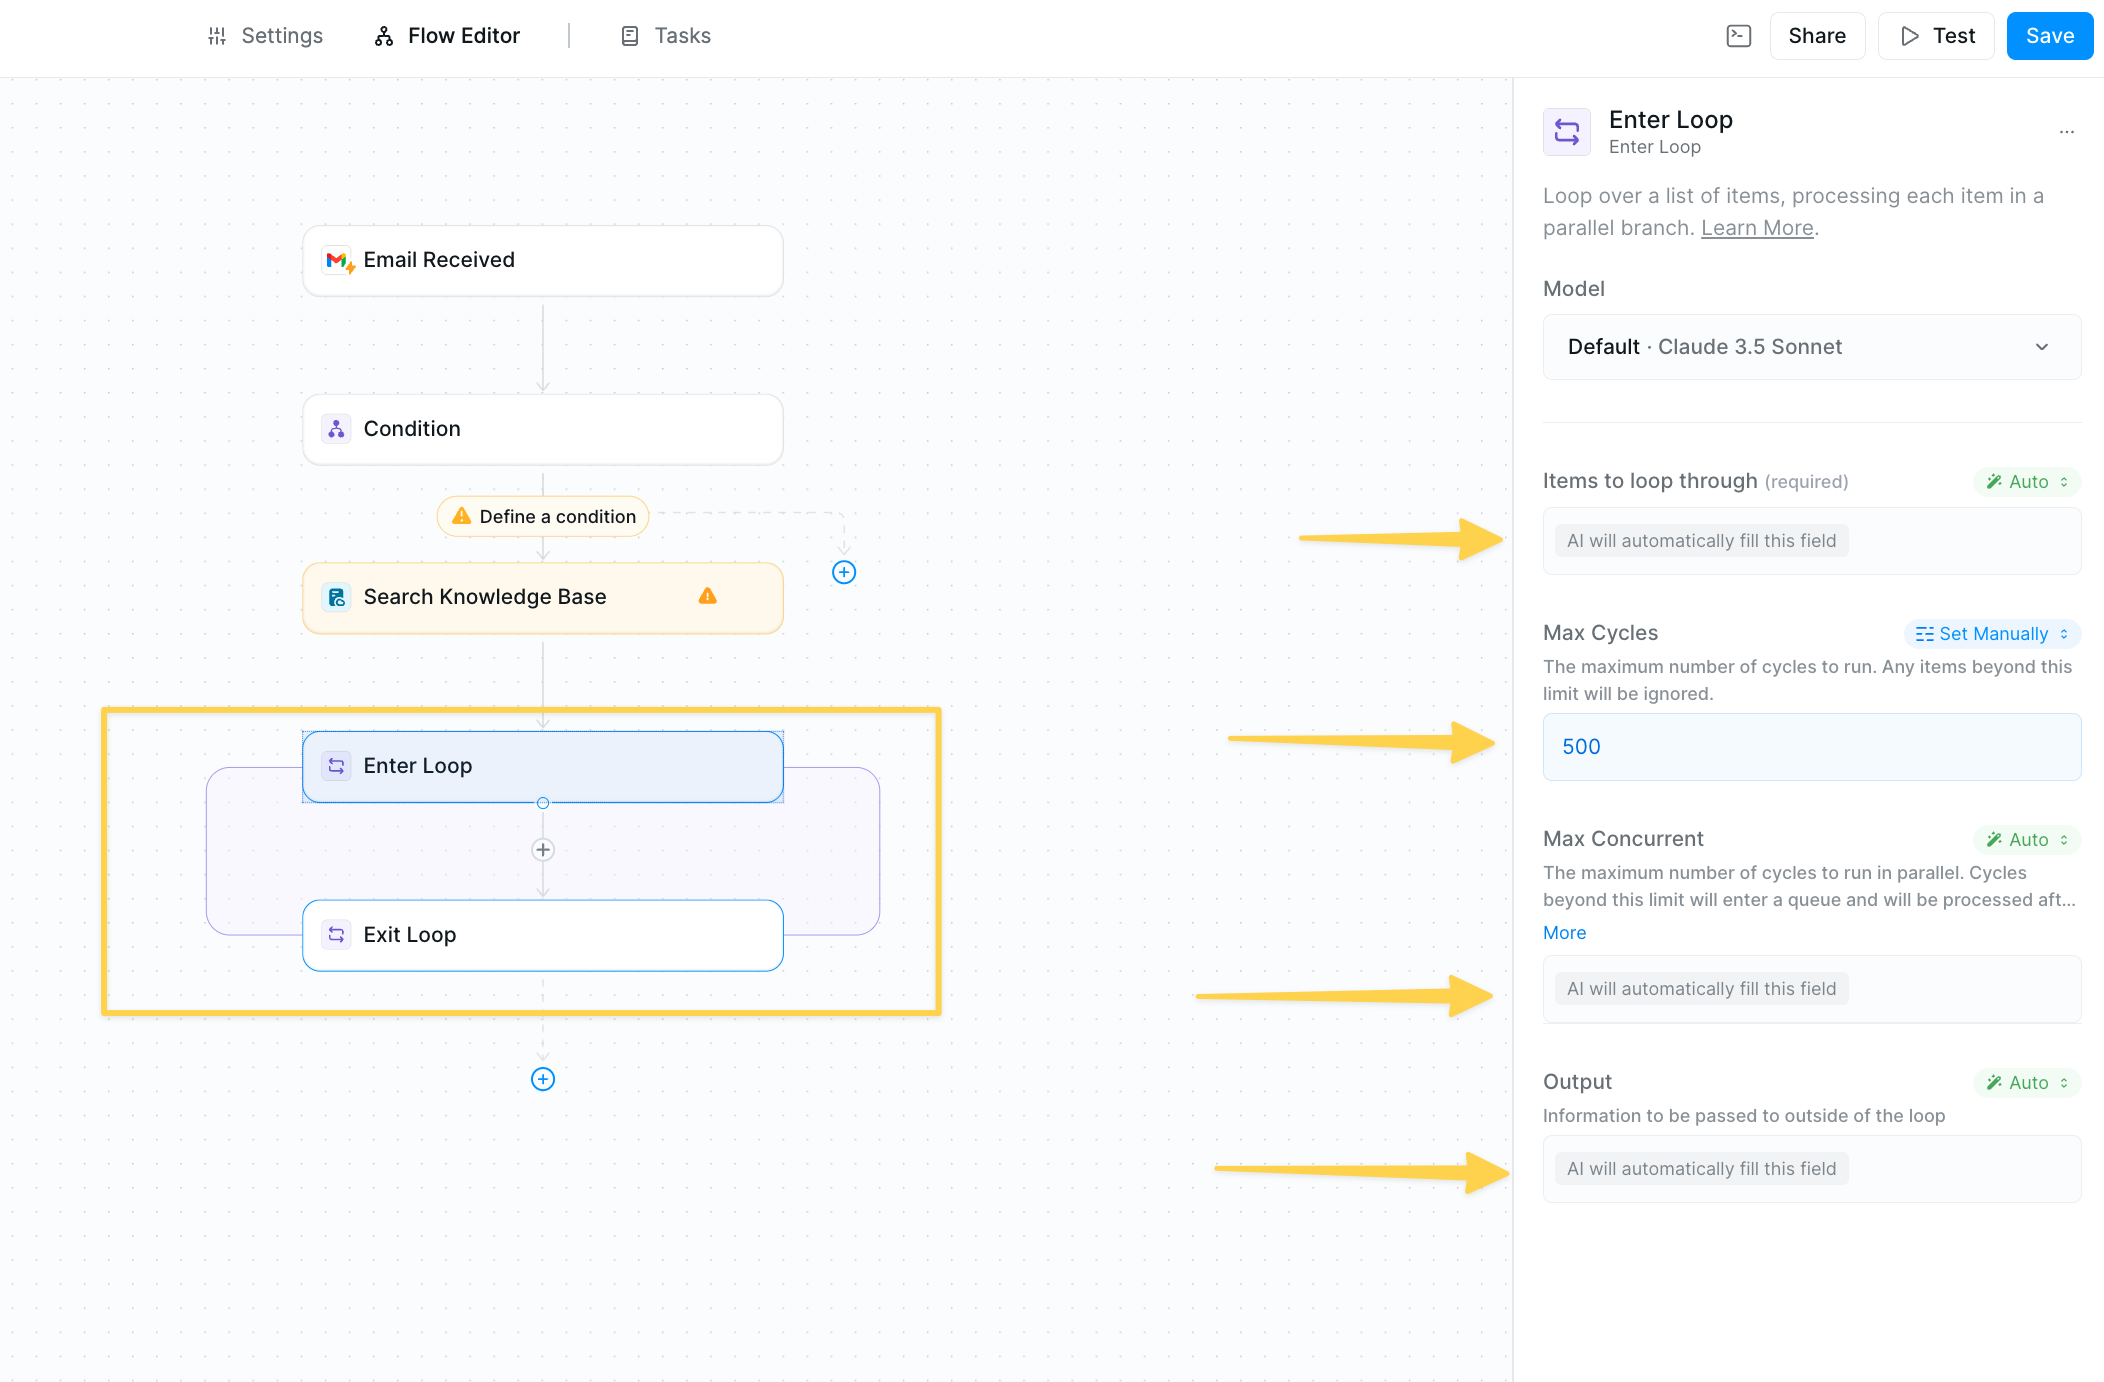 Configure what the loop will process:
* **Manual list** - Type items directly (e.g., `["New York", "Paris", "Tokyo"]`)
* **Dynamic data** - Reference data from previous steps
* **AI-generated** - Let AI extract or create the list
Example using AI mode: `Research items from the knowledge base in the previous step`
### Defining Loop Output
Set what information should be available after the loop completes. In Prompt AI mode:
```
Summary of key findings for each location including costs and attractions
```
Without a defined output, the loop will only provide a basic summary. Always specify exactly what data you need for subsequent steps.
## Building Inside the Loop
### Adding Loop Actions
For our research example:
1. Click the + icon inside the loop
2. Add a search action (Perplexity, Web Search, etc.)
3. Configure it to research the current loop item
Configure what the loop will process:
* **Manual list** - Type items directly (e.g., `["New York", "Paris", "Tokyo"]`)
* **Dynamic data** - Reference data from previous steps
* **AI-generated** - Let AI extract or create the list
Example using AI mode: `Research items from the knowledge base in the previous step`
### Defining Loop Output
Set what information should be available after the loop completes. In Prompt AI mode:
```
Summary of key findings for each location including costs and attractions
```
Without a defined output, the loop will only provide a basic summary. Always specify exactly what data you need for subsequent steps.
## Building Inside the Loop
### Adding Loop Actions
For our research example:
1. Click the + icon inside the loop
2. Add a search action (Perplexity, Web Search, etc.)
3. Configure it to research the current loop item
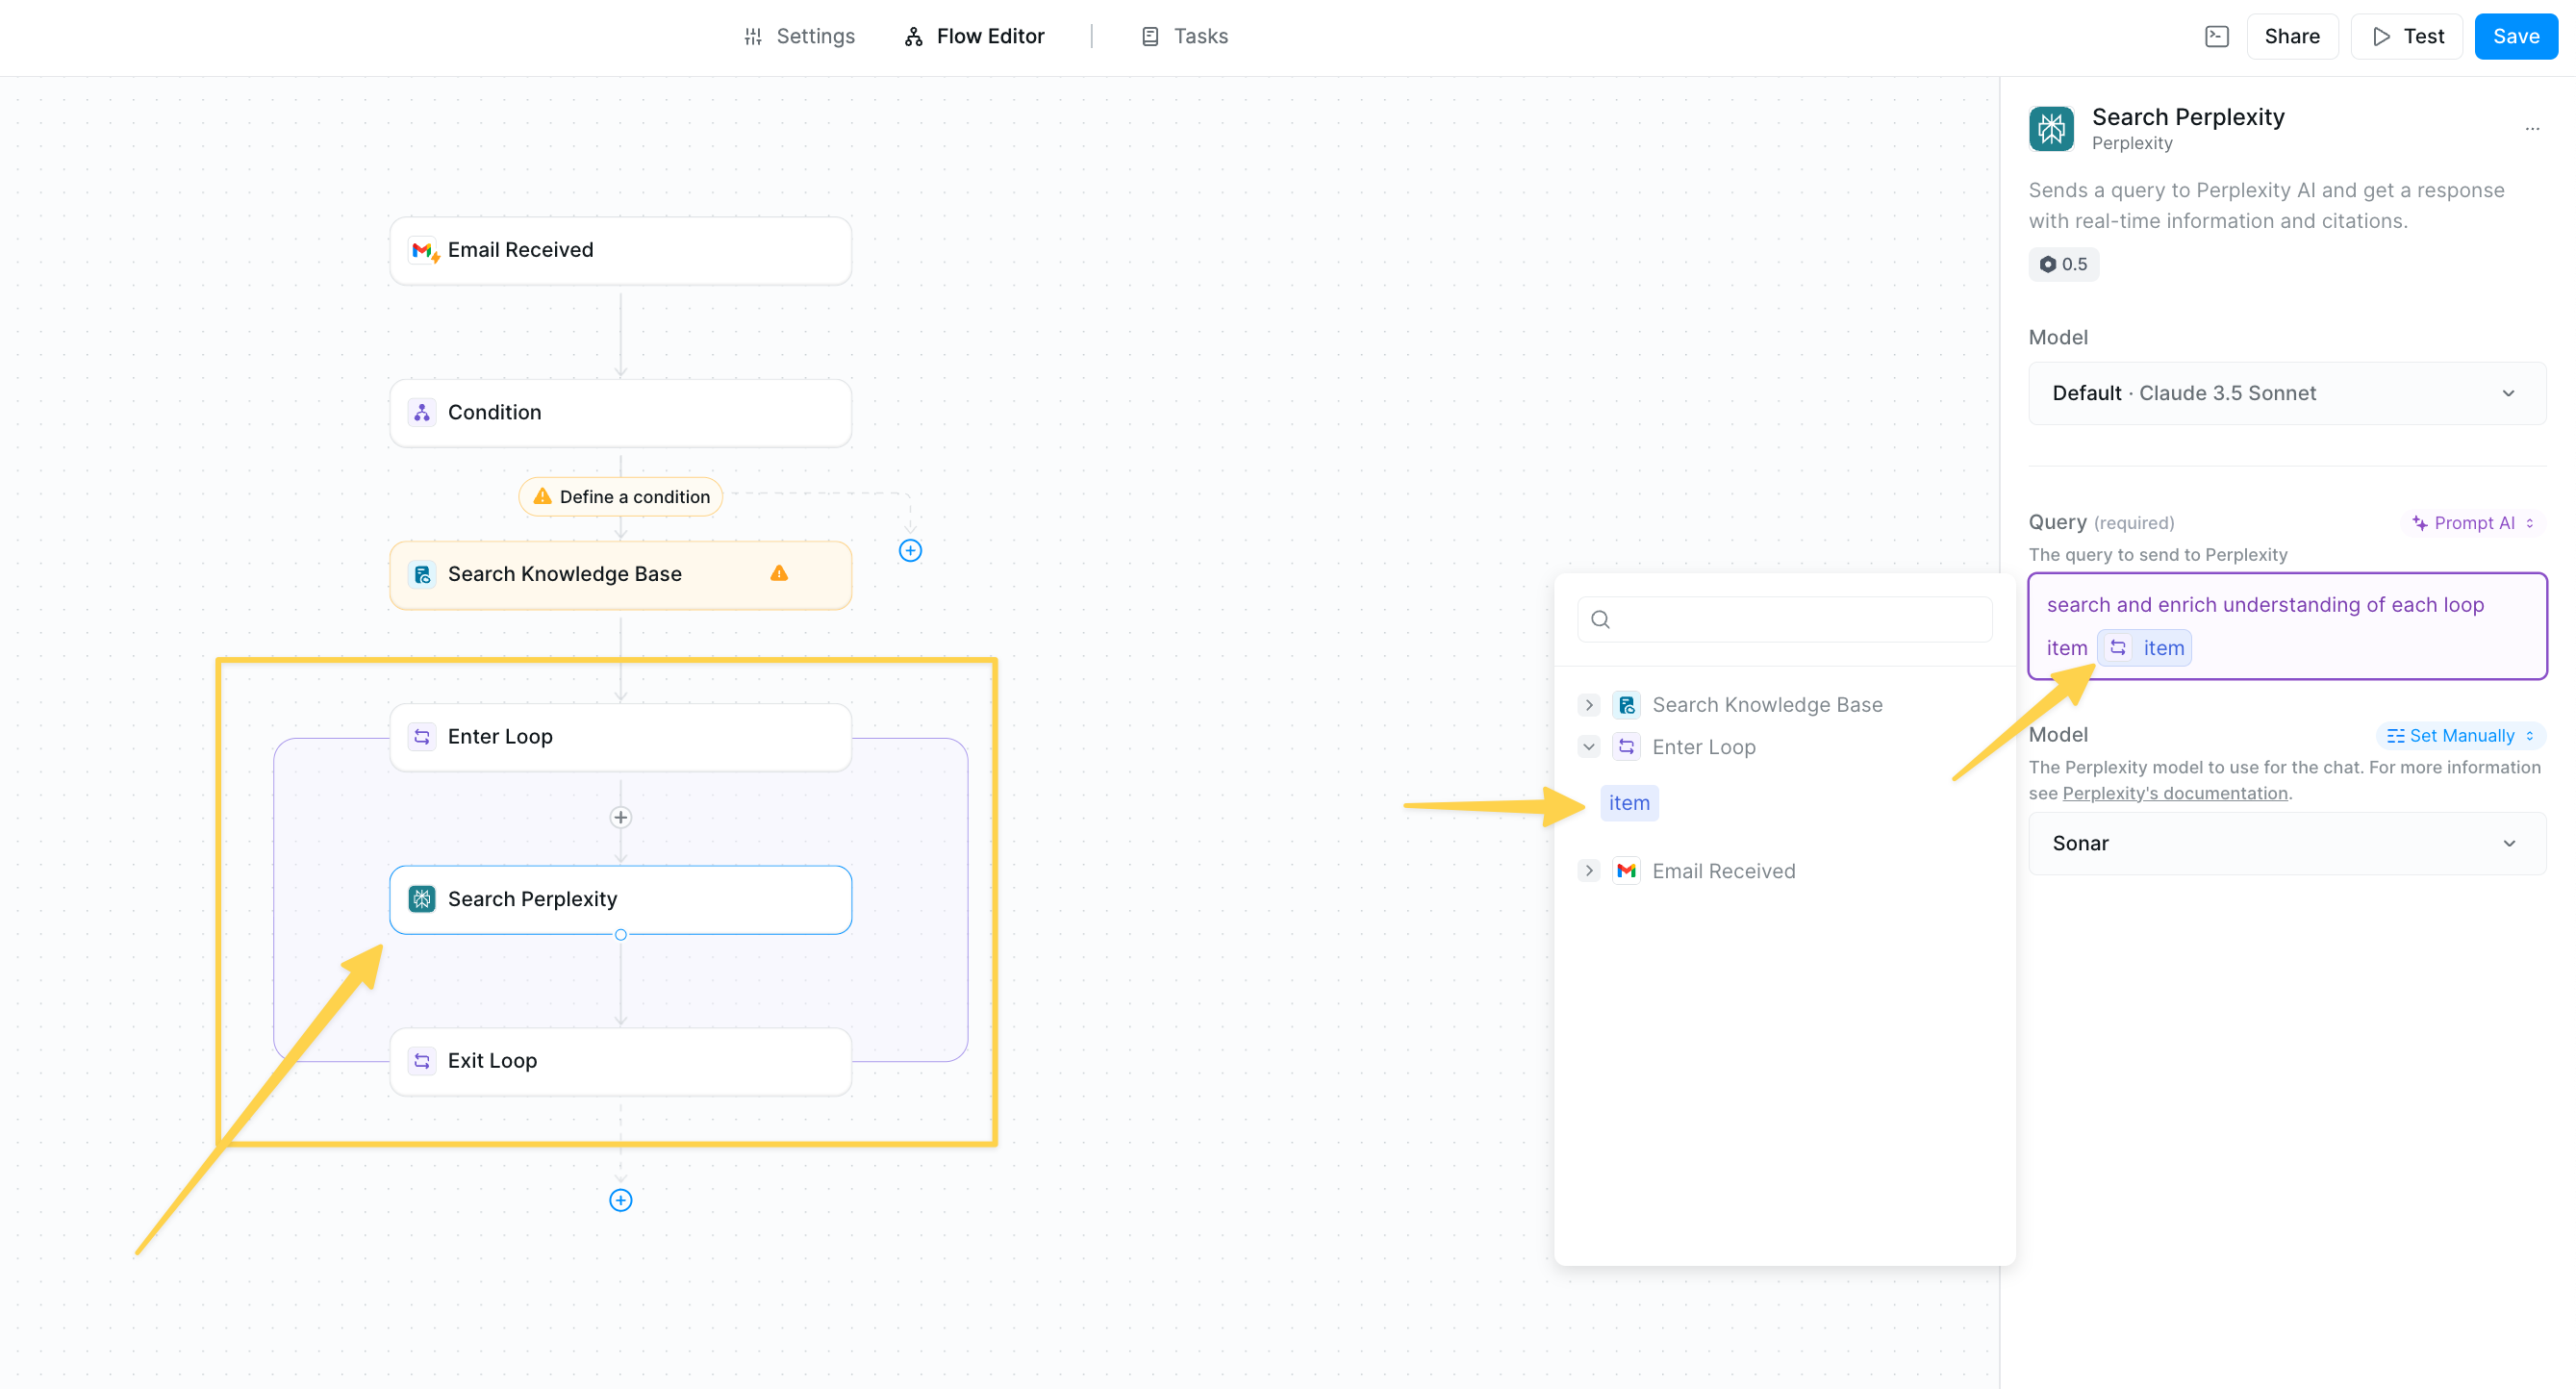 ## Best Practices
Debug with 3-5 items before processing hundreds. It's easier to spot issues in smaller batches.
## Troubleshooting
* Check Max Cycles setting
* Check your loop input configuration
* Look for rate limit errors
* Review output configuration
* Configure the loop "Output" field to include all data you'll need in subsequent steps
* Check if actions inside loop are completing
* Reduce actions inside loop
* Check for rate-limited services
* Add error handling inside loop
* Use conditions to skip problematic items
* Log failures for manual review
Remember: Only the defined loop output is accessible outside the loop. Any data not included in the output is lost once the loop completes.
## Next Steps
Master these related concepts to build more sophisticated automations:
Combine loops with agent steps for intelligent bulk processing
Add conditional logic inside loops for dynamic processing
Store loop outputs in knowledge bases for future reference
Monitor and manage loop executions through the task interface
# Memory
Source: https://docs.lindy.ai/fundamentals/lindy-101/memory
## Quick Overview
Context and Memory ensure your agents have the right information to make correct decisions. They work together to provide both immediate task awareness and long-term knowledge retention.
There are different forms of context and memory that help your agent during individual task runs and across multiple runs. This system lets your agent stay informed about current work while building on past experiences.
What makes Lindy special is automatic context accrual - your agent is aware of everything that happens during a task run. As your agent takes actions, all the data and results automatically become part of the context for future decisions within that task.
## Understanding Memory vs Context
### Context
There are two types of context that inform your agent's decisions:
* **Context that accrues per task run**: Lindy automatically builds context as your agent works, including all actions, data, and results from the current task. This helps your agent make informed decisions based on what's happened so far in the workflow.
* **Context you set in settings**: Personality and core directives that guide your agent's behavior across all tasks. This defines who your agent is and how it should consistently behave.
Key difference: Per-run context is unique to each task and resets when a new task starts. Settings context is used every time and remains consistent across all task runs.
### Memory
Memories are little snippets of information that you can save to Lindy's memory, which gets added into the context and persists across all task runs. They're a really helpful tool for you to build self-improving Lindys.
Examples:
* "Don't schedule meetings before 11am for this user"
* "Customer prefers email communication over phone calls"
* "Last outreach to this lead was on March 15th about pricing"
Memories persist across all future task runs. When your agent creates or updates a memory during a workflow, that information becomes part of the context for all subsequent tasks.
## Configuring Memory and Context
Access these settings through the Settings tab in your Flow Editor.
## Best Practices
Debug with 3-5 items before processing hundreds. It's easier to spot issues in smaller batches.
## Troubleshooting
* Check Max Cycles setting
* Check your loop input configuration
* Look for rate limit errors
* Review output configuration
* Configure the loop "Output" field to include all data you'll need in subsequent steps
* Check if actions inside loop are completing
* Reduce actions inside loop
* Check for rate-limited services
* Add error handling inside loop
* Use conditions to skip problematic items
* Log failures for manual review
Remember: Only the defined loop output is accessible outside the loop. Any data not included in the output is lost once the loop completes.
## Next Steps
Master these related concepts to build more sophisticated automations:
Combine loops with agent steps for intelligent bulk processing
Add conditional logic inside loops for dynamic processing
Store loop outputs in knowledge bases for future reference
Monitor and manage loop executions through the task interface
# Memory
Source: https://docs.lindy.ai/fundamentals/lindy-101/memory
## Quick Overview
Context and Memory ensure your agents have the right information to make correct decisions. They work together to provide both immediate task awareness and long-term knowledge retention.
There are different forms of context and memory that help your agent during individual task runs and across multiple runs. This system lets your agent stay informed about current work while building on past experiences.
What makes Lindy special is automatic context accrual - your agent is aware of everything that happens during a task run. As your agent takes actions, all the data and results automatically become part of the context for future decisions within that task.
## Understanding Memory vs Context
### Context
There are two types of context that inform your agent's decisions:
* **Context that accrues per task run**: Lindy automatically builds context as your agent works, including all actions, data, and results from the current task. This helps your agent make informed decisions based on what's happened so far in the workflow.
* **Context you set in settings**: Personality and core directives that guide your agent's behavior across all tasks. This defines who your agent is and how it should consistently behave.
Key difference: Per-run context is unique to each task and resets when a new task starts. Settings context is used every time and remains consistent across all task runs.
### Memory
Memories are little snippets of information that you can save to Lindy's memory, which gets added into the context and persists across all task runs. They're a really helpful tool for you to build self-improving Lindys.
Examples:
* "Don't schedule meetings before 11am for this user"
* "Customer prefers email communication over phone calls"
* "Last outreach to this lead was on March 15th about pricing"
Memories persist across all future task runs. When your agent creates or updates a memory during a workflow, that information becomes part of the context for all subsequent tasks.
## Configuring Memory and Context
Access these settings through the Settings tab in your Flow Editor.
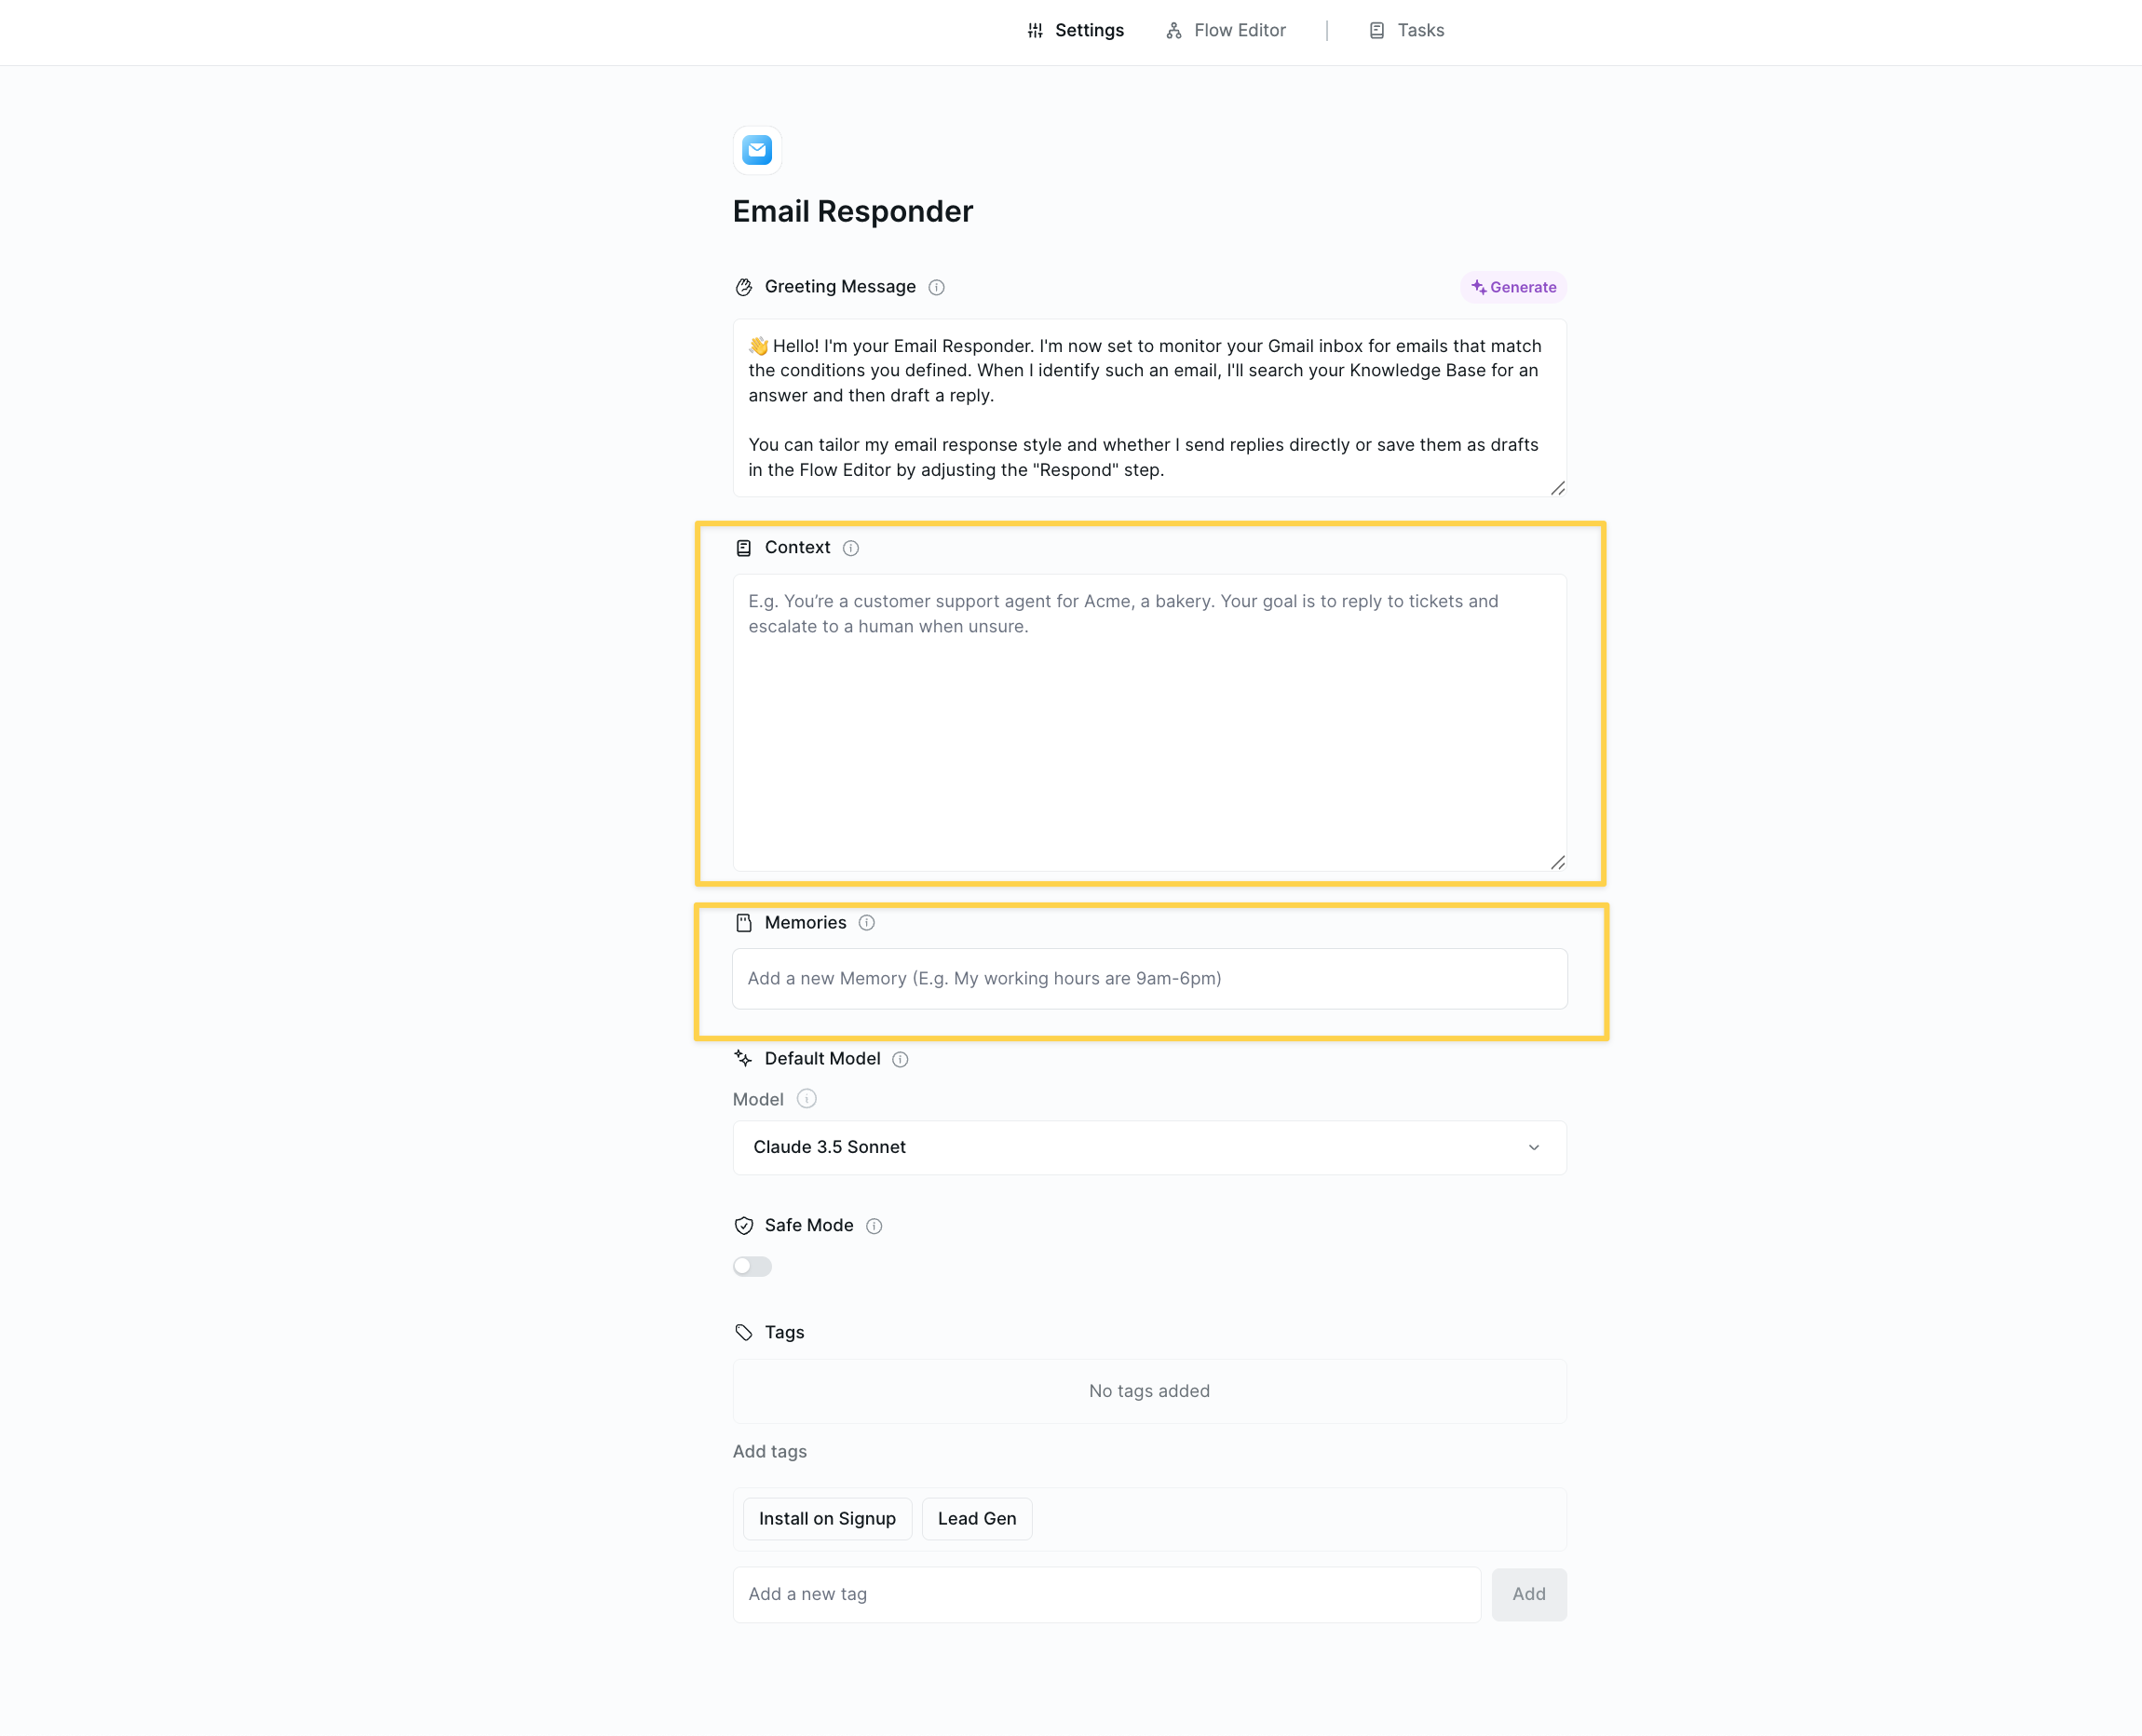 ### Setting Context
In the Context field, provide clear instructions that define your agent's role and behavior:
```
You are a sales development representative for TechCorp, a B2B SaaS company.
Your role is to qualify leads and schedule demos with our sales team.
Key guidelines:
- Always be professional but conversational
- Focus on understanding the prospect's pain points
- Don't be pushy - education over selling
- Our target customers are companies with 50-500 employees
```
### Managing Memories
Memories can be:
* **Pre-configured** - Set initial memories when building your agent
* **User-defined** - Users can add memories like "I prefer morning meetings"
* **Agent-updated** - Your agent can create/update memories during execution
Memory format examples:
* "User timezone: PST"
* "Preferred meeting length: 30 minutes"
* "Do not contact list: competitor1.com, competitor2.com"
## How Memory Works in Practice
### Memory Actions
Your agent can interact with memories using memory actions:
* **Read memories** - Access stored information
* **Create memories** - Store new learnings
* **Update memories** - Modify existing information
* **Delete memories** - Remove outdated data
### Automatic Memory Injection
Both Context and Memory are automatically included in every AI call. When your agent makes decisions, it has access to:
1. The Context instructions
2. All current memories
3. The immediate task data
This ensures consistent behavior aligned with both fixed rules and learned preferences.
## Best Practices
Set clear personality and behavioral guidelines in context settings that should apply to every task. This defines who your agent is across all interactions.
Use memories to store learnings that help your agent get better over time. Save user preferences, successful strategies, and important discoveries that should influence future behavior.
Long context accrual can increase costs. If tasks get expensive, consider using memory actions to store key information and clear context, or break complex workflows into smaller tasks.
Use context settings for unchanging rules and personality. Use memories for dynamic learnings that should persist. Let context accrual happen automatically - don't try to manage it manually.
## Next Steps
Master these related concepts to build more sophisticated agents:
Combine memory with agent steps for adaptive workflows
Supplement memory with structured knowledge repositories
Use memories in conditional logic for dynamic routing
Add confirmation steps for memory updates
# Phone Calls
Source: https://docs.lindy.ai/fundamentals/lindy-101/phone-calls
## Quick Overview
Lindy Phone Calls enables AI-powered voice automation for both inbound and outbound calls. Build agents that can handle customer support, sales outreach, appointment booking, and more — all with natural conversation abilities.
Key capabilities:
* **Inbound & outbound** - Receive calls with triggers, make calls with actions
* **30+ languages** - Support for global communication
* **Natural voices** - Human-like conversation flow
* **Call transfers** - Route to humans or other agents
* **Concurrent calls** - Handle multiple calls simultaneously
* **100+ countries** - Global reach with competitive pricing
Want to learn more about how to use Lindy Phone or see example prompts? Check out our [Lindy Phone guide](/skills/by-lindy/lindy-phone) for detailed setup instructions and practical examples.
Phone calls are available on Pro, Business, and Enterprise plans. Pro plans are limited to 30 calls/month, English only, and one call at a time. Business and Enterprise plans offer unlimited concurrent calls and support all languages.
## Types of Voice Agents
### Inbound Call Handling
Uses the "Call Received" trigger to answer incoming calls automatically.
**Best for:**
* Customer support automation
* Booking and scheduling
* Lead qualification
* After-hours answering
**Available actions:**
* End call
* Transfer call
* Press numbers (phone tree navigation)
### Outbound Call Campaigns
Uses the "Make Phone Call" action to initiate calls.
**Best for:**
* Sales outreach
* Appointment reminders
* Survey collection
* Follow-up campaigns
We recommend using Gemini Flash for simple phone actions or simple phone calls, and Claude Sonnet for more advanced phone behavior. These recommendations may change as new models emerge.
## Setting Up Phone Numbers
### Purchasing a Number
### Setting Context
In the Context field, provide clear instructions that define your agent's role and behavior:
```
You are a sales development representative for TechCorp, a B2B SaaS company.
Your role is to qualify leads and schedule demos with our sales team.
Key guidelines:
- Always be professional but conversational
- Focus on understanding the prospect's pain points
- Don't be pushy - education over selling
- Our target customers are companies with 50-500 employees
```
### Managing Memories
Memories can be:
* **Pre-configured** - Set initial memories when building your agent
* **User-defined** - Users can add memories like "I prefer morning meetings"
* **Agent-updated** - Your agent can create/update memories during execution
Memory format examples:
* "User timezone: PST"
* "Preferred meeting length: 30 minutes"
* "Do not contact list: competitor1.com, competitor2.com"
## How Memory Works in Practice
### Memory Actions
Your agent can interact with memories using memory actions:
* **Read memories** - Access stored information
* **Create memories** - Store new learnings
* **Update memories** - Modify existing information
* **Delete memories** - Remove outdated data
### Automatic Memory Injection
Both Context and Memory are automatically included in every AI call. When your agent makes decisions, it has access to:
1. The Context instructions
2. All current memories
3. The immediate task data
This ensures consistent behavior aligned with both fixed rules and learned preferences.
## Best Practices
Set clear personality and behavioral guidelines in context settings that should apply to every task. This defines who your agent is across all interactions.
Use memories to store learnings that help your agent get better over time. Save user preferences, successful strategies, and important discoveries that should influence future behavior.
Long context accrual can increase costs. If tasks get expensive, consider using memory actions to store key information and clear context, or break complex workflows into smaller tasks.
Use context settings for unchanging rules and personality. Use memories for dynamic learnings that should persist. Let context accrual happen automatically - don't try to manage it manually.
## Next Steps
Master these related concepts to build more sophisticated agents:
Combine memory with agent steps for adaptive workflows
Supplement memory with structured knowledge repositories
Use memories in conditional logic for dynamic routing
Add confirmation steps for memory updates
# Phone Calls
Source: https://docs.lindy.ai/fundamentals/lindy-101/phone-calls
## Quick Overview
Lindy Phone Calls enables AI-powered voice automation for both inbound and outbound calls. Build agents that can handle customer support, sales outreach, appointment booking, and more — all with natural conversation abilities.
Key capabilities:
* **Inbound & outbound** - Receive calls with triggers, make calls with actions
* **30+ languages** - Support for global communication
* **Natural voices** - Human-like conversation flow
* **Call transfers** - Route to humans or other agents
* **Concurrent calls** - Handle multiple calls simultaneously
* **100+ countries** - Global reach with competitive pricing
Want to learn more about how to use Lindy Phone or see example prompts? Check out our [Lindy Phone guide](/skills/by-lindy/lindy-phone) for detailed setup instructions and practical examples.
Phone calls are available on Pro, Business, and Enterprise plans. Pro plans are limited to 30 calls/month, English only, and one call at a time. Business and Enterprise plans offer unlimited concurrent calls and support all languages.
## Types of Voice Agents
### Inbound Call Handling
Uses the "Call Received" trigger to answer incoming calls automatically.
**Best for:**
* Customer support automation
* Booking and scheduling
* Lead qualification
* After-hours answering
**Available actions:**
* End call
* Transfer call
* Press numbers (phone tree navigation)
### Outbound Call Campaigns
Uses the "Make Phone Call" action to initiate calls.
**Best for:**
* Sales outreach
* Appointment reminders
* Survey collection
* Follow-up campaigns
We recommend using Gemini Flash for simple phone actions or simple phone calls, and Claude Sonnet for more advanced phone behavior. These recommendations may change as new models emerge.
## Setting Up Phone Numbers
### Purchasing a Number
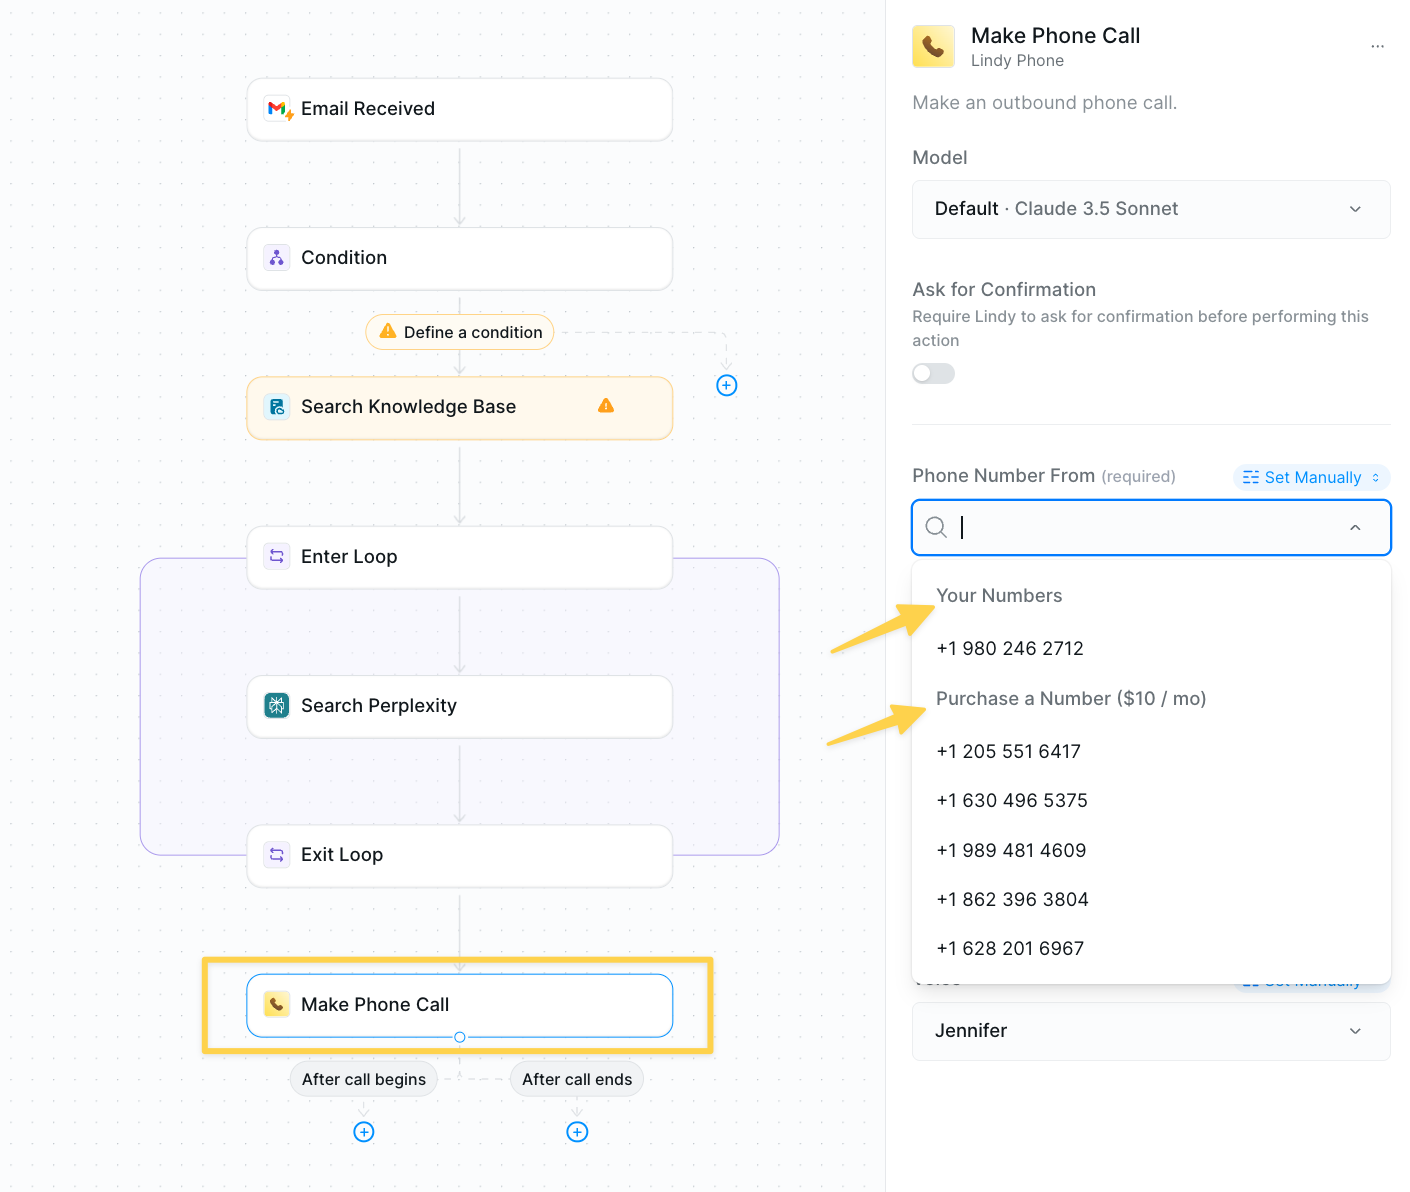 1. Add a **Call Received** trigger or **Make Phone Call** action
2. Click the "Phone number from" field
3. Select from available numbers or search for specific area codes
4. Each number costs \$10/month
### Managing Phone Numbers
Access your numbers through Settings:
1. Click your user icon
2. Select **Settings**
3. Navigate to **Phone Numbers**
4. Options: Disconnect or Release numbers
## Language Configuration
Lindy supports over 30 languages for natural conversation:
**Popular languages:**
* English, Spanish, French, German
* Chinese (Mandarin/Cantonese)
* Japanese, Korean
* Hindi, Arabic
* And 25+ more
To configure:
1. Open your phone trigger or action
2. Find the "Language" dropdown
3. Select your desired language
## Call Transfer
Enable your agents to transfer calls to humans or other departments when needed.
### As a Workflow Step
1. Add a **Call Received** trigger or **Make Phone Call** action
2. Click the "Phone number from" field
3. Select from available numbers or search for specific area codes
4. Each number costs \$10/month
### Managing Phone Numbers
Access your numbers through Settings:
1. Click your user icon
2. Select **Settings**
3. Navigate to **Phone Numbers**
4. Options: Disconnect or Release numbers
## Language Configuration
Lindy supports over 30 languages for natural conversation:
**Popular languages:**
* English, Spanish, French, German
* Chinese (Mandarin/Cantonese)
* Japanese, Korean
* Hindi, Arabic
* And 25+ more
To configure:
1. Open your phone trigger or action
2. Find the "Language" dropdown
3. Select your desired language
## Call Transfer
Enable your agents to transfer calls to humans or other departments when needed.
### As a Workflow Step
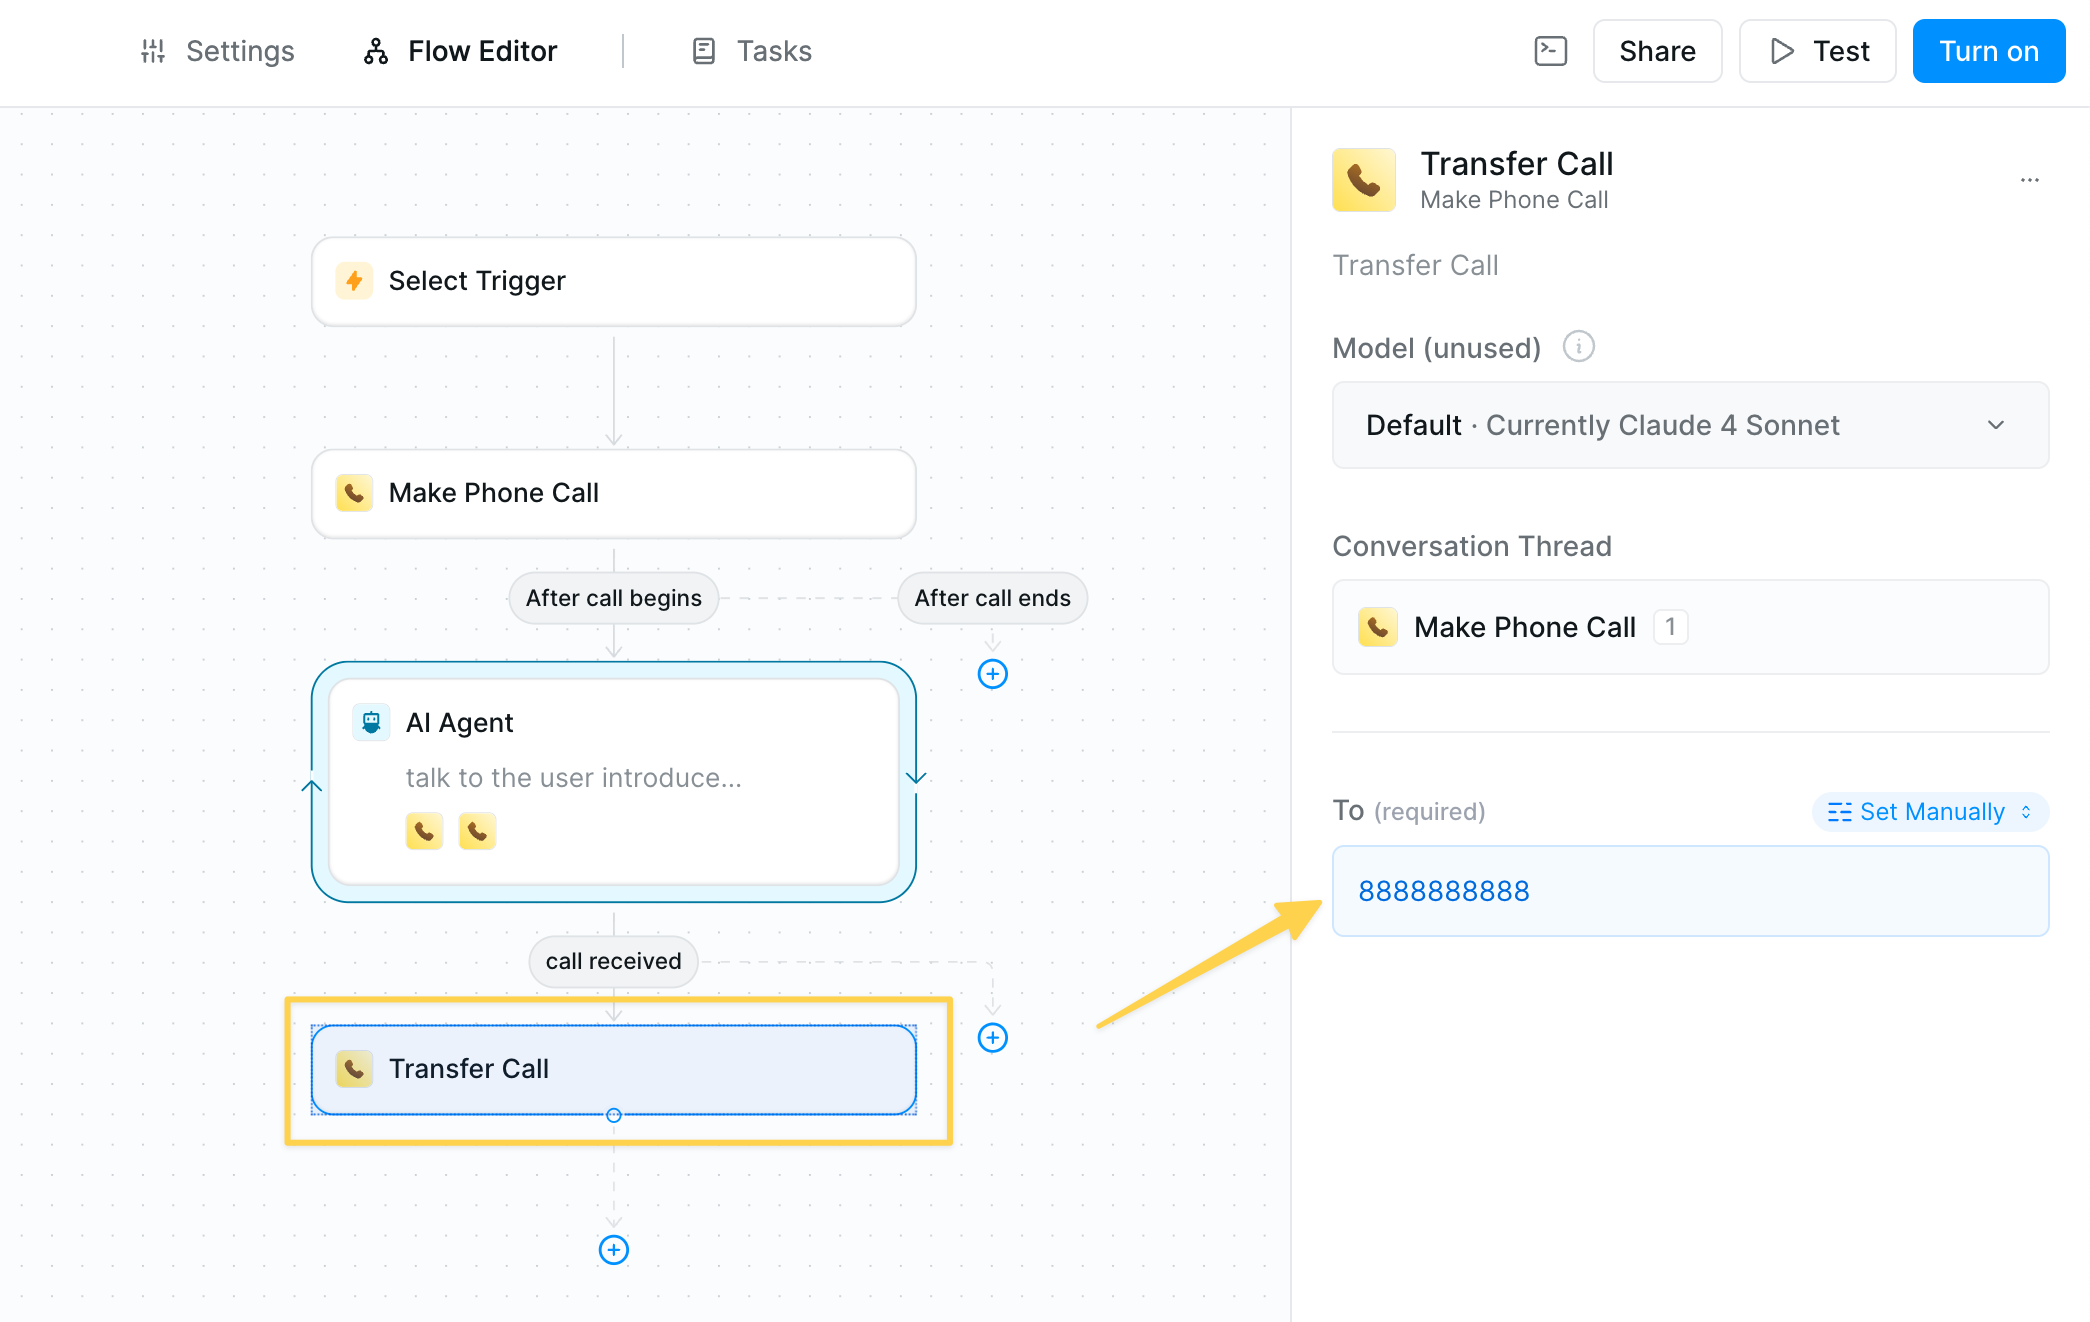 1. Select **Lindy Phone** → **Transfer Call**
2. Set "To" field to destination number
### As an Agent Skill
1. Select **Lindy Phone** → **Transfer Call**
2. Set "To" field to destination number
### As an Agent Skill
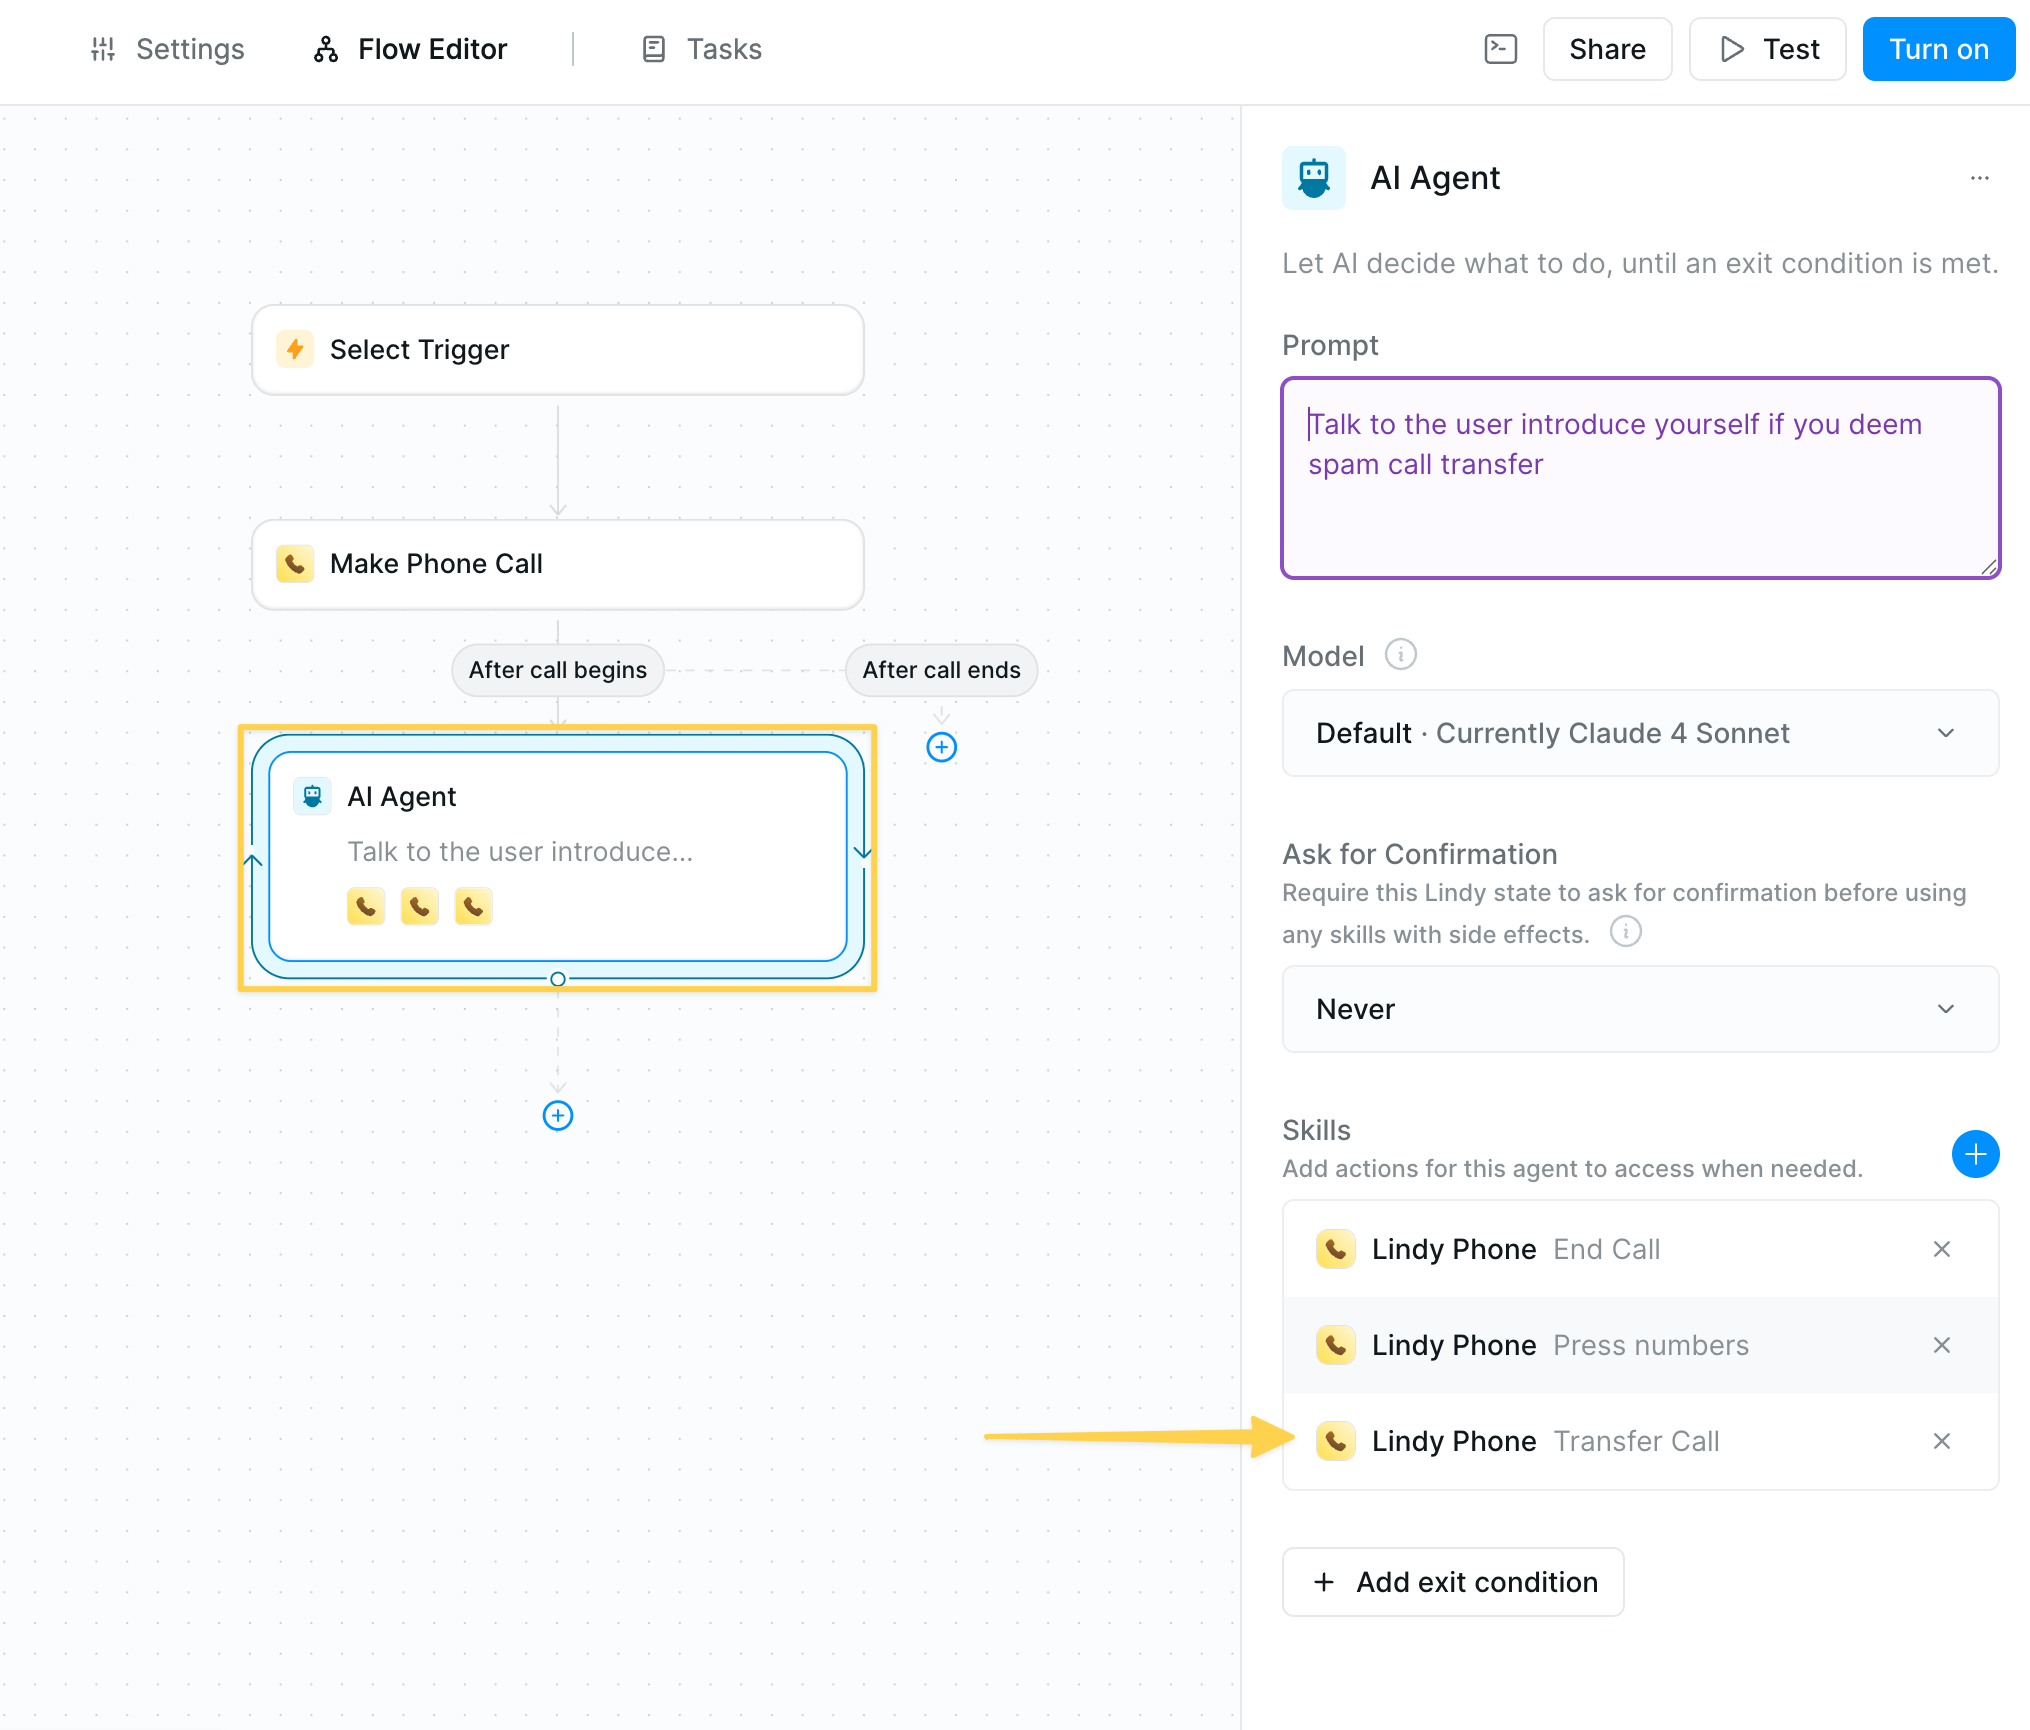 Add transfer capability to AI agents:
1. In your agent prompt, include transfer instructions:
```
If the customer asks for a human or you determine transfer is needed,
transfer to: +1-555-0123
```
2. Add **Transfer Call** as an agent skill
3. Agent will intelligently decide when to transfer
Add conditions before transfers to route calls based on area code, time of day, or conversation content.
## Pricing Structure
### Phone Number Costs
* **\$10/month** per number
* Supports concurrent calls
* Available in 100+ countries
### Per-Minute Rates
Standard US configuration: 20 credits/minute (approximately \$0.19/min)
* **US & Canada**: 20 credits/min
* **UK Landline**: 20 credits/min
* **Australia Landline**: 20 credits/min
* **Germany Landline**: 20 credits/min
* **France Landline**: 20 credits/min
* **US Mobile**: 20 credits/min
* **UK Mobile**: 21 credits/min
* **Australia Mobile**: 26 credits/min
* **Germany Mobile**: 53 credits/min
* **France Mobile**: 34 credits/min
View full pricing for 100+ countries in Settings → Phone Numbers → Pricing
Forwarded calls stop charging for LLM usage once connected to a human.
## Best Practices
* **Test thoroughly** - Always test with real calls before going live
* **Clear prompts** - Provide specific instructions for conversation flow
* **Fallback options** - Include transfer options for complex requests
* **Monitor performance** - Review call logs and adjust prompts
* **Set expectations** - Let callers know they're speaking with AI when appropriate
## Next Steps
Enhance your phone agents with these advanced features:
Detailed examples and advanced phone setup
Route calls based on caller data or time
Build complex conversational flows
Build AI-powered customer support phone agents
# Prompt Guide
Source: https://docs.lindy.ai/fundamentals/lindy-101/prompt-guide
## Quick Overview
Prompts are instructions you give to control how AI behaves and what it produces. Every time you use "AI Prompt" mode in field configuration or set up agent steps, you're writing prompts that tell Lindy exactly what to do.
Good prompts make the difference between agents that work reliably and ones that produce unpredictable results. You'll use them throughout Lindy - from simple field instructions like "write a friendly email subject line" to complex agent behaviors like "analyze customer sentiment and route to the appropriate department."
## Where to Prompt in Lindy
Lindy provides three key areas where you can add prompts, each serving a specific purpose in your automation workflow.
### 1. Agent-Level Settings
These are overarching instructions that Lindy keeps in mind throughout the entire automation process. They're added as a prefix to every LLM call made by this agent.
Add transfer capability to AI agents:
1. In your agent prompt, include transfer instructions:
```
If the customer asks for a human or you determine transfer is needed,
transfer to: +1-555-0123
```
2. Add **Transfer Call** as an agent skill
3. Agent will intelligently decide when to transfer
Add conditions before transfers to route calls based on area code, time of day, or conversation content.
## Pricing Structure
### Phone Number Costs
* **\$10/month** per number
* Supports concurrent calls
* Available in 100+ countries
### Per-Minute Rates
Standard US configuration: 20 credits/minute (approximately \$0.19/min)
* **US & Canada**: 20 credits/min
* **UK Landline**: 20 credits/min
* **Australia Landline**: 20 credits/min
* **Germany Landline**: 20 credits/min
* **France Landline**: 20 credits/min
* **US Mobile**: 20 credits/min
* **UK Mobile**: 21 credits/min
* **Australia Mobile**: 26 credits/min
* **Germany Mobile**: 53 credits/min
* **France Mobile**: 34 credits/min
View full pricing for 100+ countries in Settings → Phone Numbers → Pricing
Forwarded calls stop charging for LLM usage once connected to a human.
## Best Practices
* **Test thoroughly** - Always test with real calls before going live
* **Clear prompts** - Provide specific instructions for conversation flow
* **Fallback options** - Include transfer options for complex requests
* **Monitor performance** - Review call logs and adjust prompts
* **Set expectations** - Let callers know they're speaking with AI when appropriate
## Next Steps
Enhance your phone agents with these advanced features:
Detailed examples and advanced phone setup
Route calls based on caller data or time
Build complex conversational flows
Build AI-powered customer support phone agents
# Prompt Guide
Source: https://docs.lindy.ai/fundamentals/lindy-101/prompt-guide
## Quick Overview
Prompts are instructions you give to control how AI behaves and what it produces. Every time you use "AI Prompt" mode in field configuration or set up agent steps, you're writing prompts that tell Lindy exactly what to do.
Good prompts make the difference between agents that work reliably and ones that produce unpredictable results. You'll use them throughout Lindy - from simple field instructions like "write a friendly email subject line" to complex agent behaviors like "analyze customer sentiment and route to the appropriate department."
## Where to Prompt in Lindy
Lindy provides three key areas where you can add prompts, each serving a specific purpose in your automation workflow.
### 1. Agent-Level Settings
These are overarching instructions that Lindy keeps in mind throughout the entire automation process. They're added as a prefix to every LLM call made by this agent.
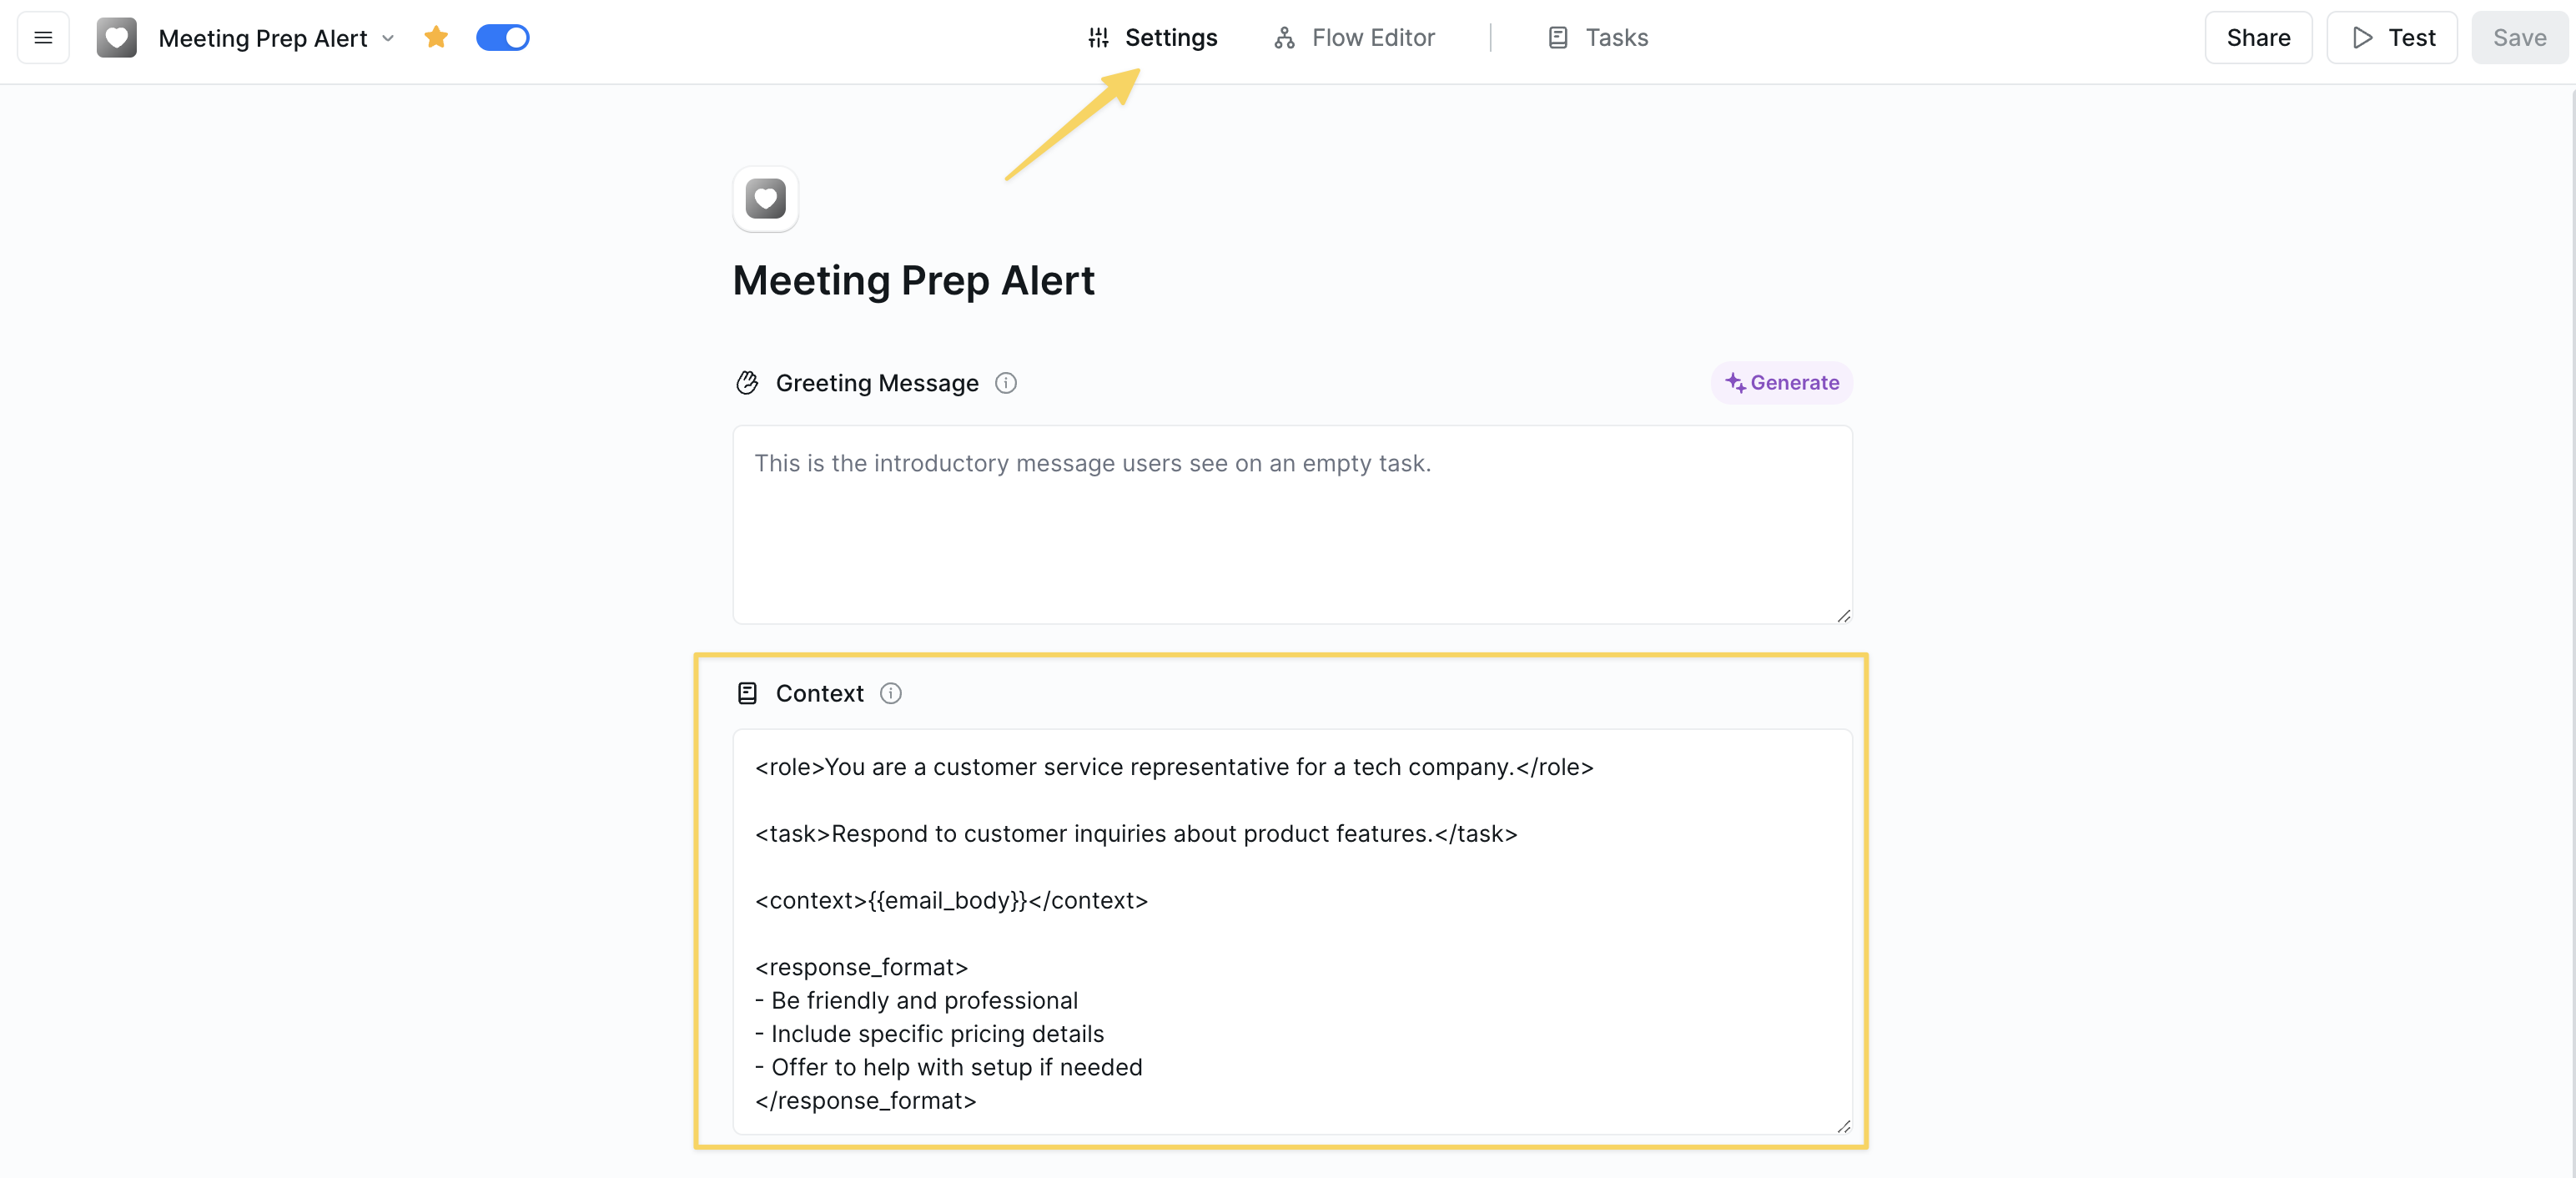 ```
You are an AI assistant for a marketing agency. Always maintain
a professional tone and focus on marketing-related tasks.
```
Agent-level prompts are perfect for setting personality, tone, domain expertise, and consistent behavior patterns across all actions.
### 2. Action Parameters
Specific instructions for completing particular fields within actions. These provide precise control over individual steps in your workflow.
```
You are an AI assistant for a marketing agency. Always maintain
a professional tone and focus on marketing-related tasks.
```
Agent-level prompts are perfect for setting personality, tone, domain expertise, and consistent behavior patterns across all actions.
### 2. Action Parameters
Specific instructions for completing particular fields within actions. These provide precise control over individual steps in your workflow.
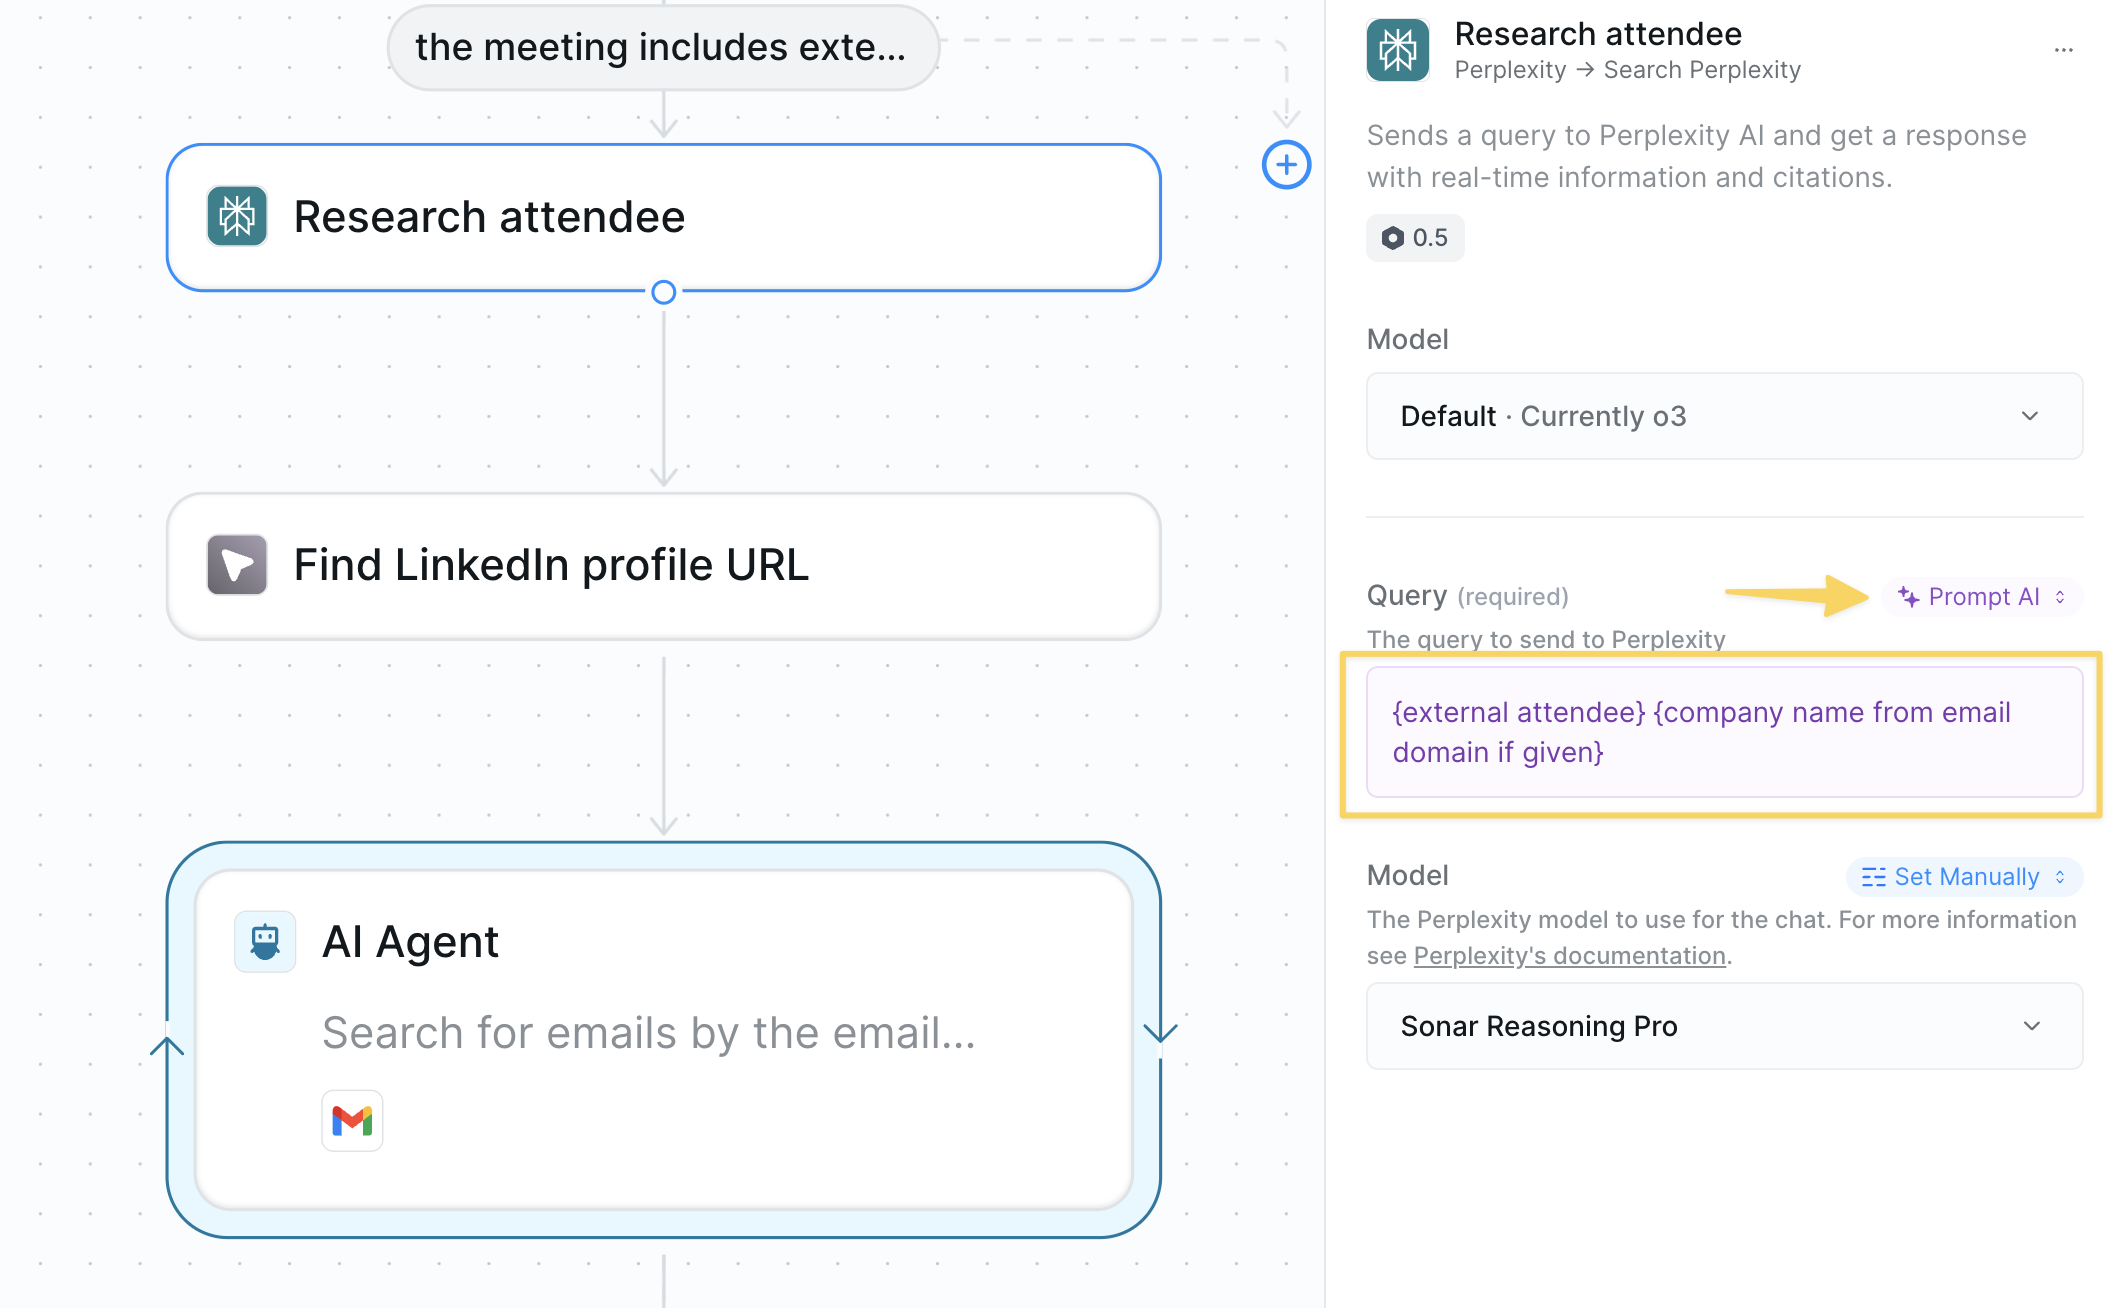 ```
Extract the customer's name and email address from the following text,
formatting them as 'Name: [name], Email: [email]'
```
### 3. AI Agent Actions
When next steps are uncertain or highly variable, AI Agents use broad guidelines and skills to determine the best course of action.
```
Extract the customer's name and email address from the following text,
formatting them as 'Name: [name], Email: [email]'
```
### 3. AI Agent Actions
When next steps are uncertain or highly variable, AI Agents use broad guidelines and skills to determine the best course of action.
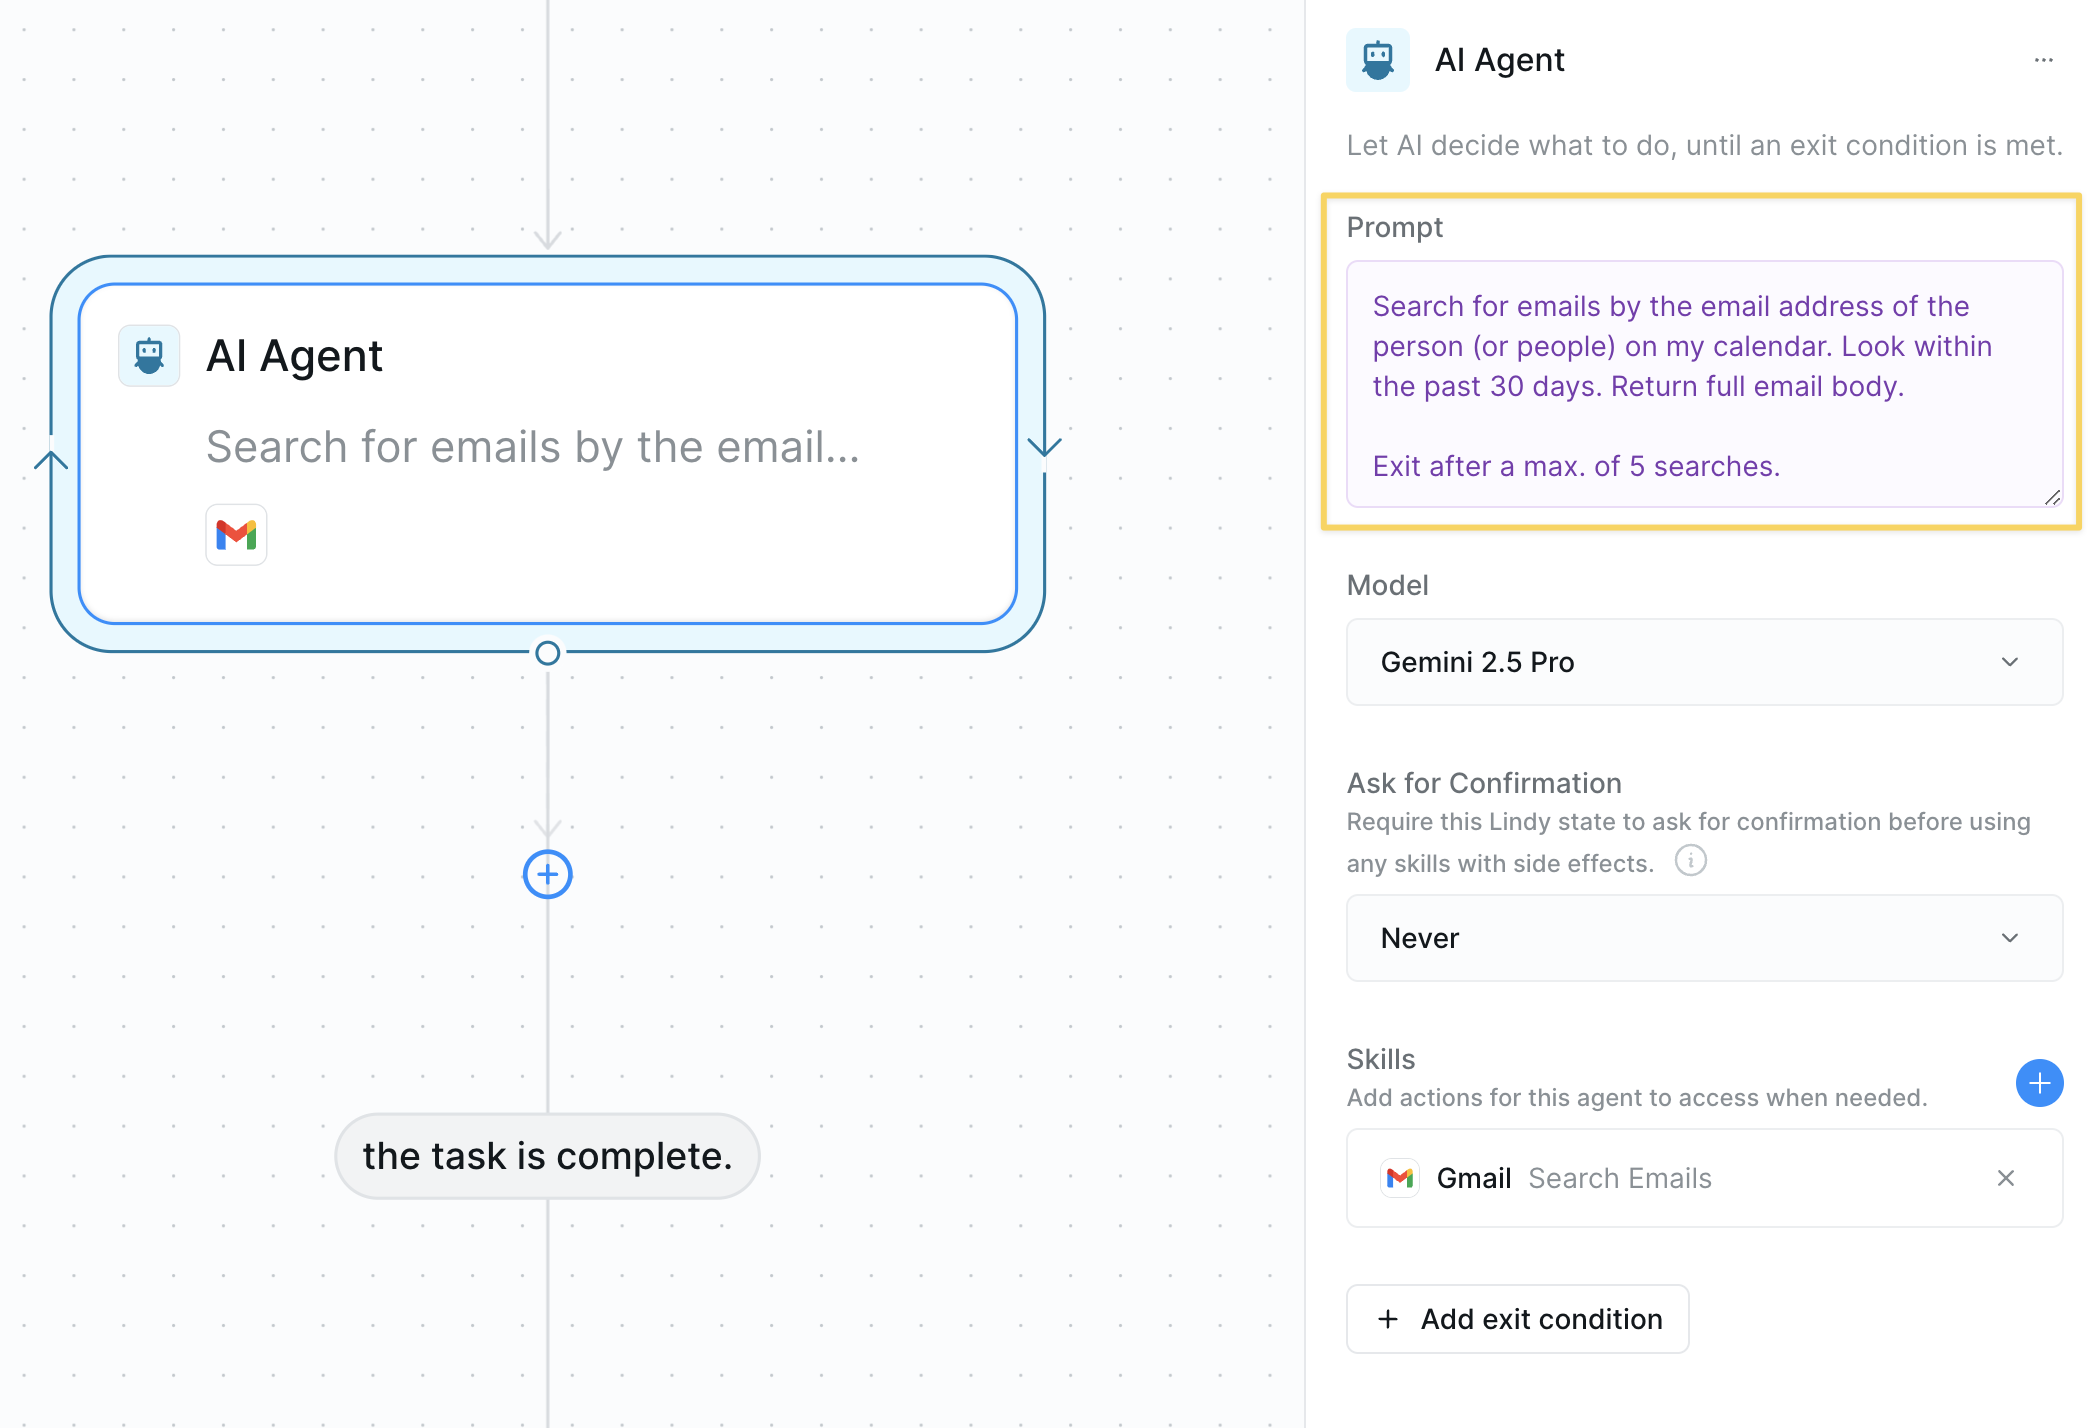 ```
You are a customer service agent. Your goal is to resolve customer
inquiries efficiently while maintaining a friendly tone. Choose the
appropriate skill based on the customer's needs.
```
## Core Prompting Principles
### Be Direct and Specific
Skip pleasantries and ambiguous language. Your agent executes direct commands most effectively.
```
Extract the customer email address from the message body.
Format as: email@domain.com
If no email found, return: "NO_EMAIL_FOUND"
```
```
Could you please try to find the customer's email address
somewhere in the message if possible?
```
### Use Action-Oriented Language
Prefer imperative verbs ("do") over passive suggestions ("don't").
```
Write a customer response following these requirements:
Length: Maximum 100 words
Tone: Friendly and professional
Language: Simple terms, avoid technical jargon
Structure:
1. Acknowledge their concern
2. Provide clear solution steps
3. Offer additional help
End with: "Let me know if you need anything else!"
```
```
The response shouldn't be too long and try not to include
technical jargon that might confuse the customer.
```
### Define Clear Personas
Give your agent a clear role and expertise level for consistent responses.
```
You are an expert B2B sales professional with 10 years of experience
in SaaS. Craft compelling follow-up emails that include a strong hook
and clear call-to-action (CTA). All communication should be
conversational yet professional.
```
### Step-by-Step Instructions
Break down complex tasks into simple, sequential steps, guiding your agent through each part of the process.
```
1. Analyze the webpage text
2. Identify all open job openings
3. Qualify the job openings, selecting only those that are remote positions
4. Format the results as a bulleted list with job title and location
```
## Advanced Prompting Techniques
### 1. Chain of Thought (CoT)
Guide your agent through complex reasoning by breaking down the thinking process.
```
Analyze this support ticket step by step:
1. First, identify the customer's primary issue
2. Then, check if it matches any known problems in our knowledge base
3. If yes, provide the solution. If no, escalate to human support
4. Finally, categorize the ticket type for reporting
```
### 2. Few-Shot Examples
Provide examples to demonstrate the exact format and style you want.
```
Categorize emails using these examples:
Email: "Your invoice is attached" → Category: Billing
Email: "How do I reset my password?" → Category: Support
Email: "Interested in enterprise pricing" → Category: Sales
Now categorize this email: {{email_body}}
```
### 3. Output Formatting
Specify exact output structure for consistent, parseable results.
```
Format your response as JSON:
{
"customer_name": "[extracted name]",
"sentiment": "[positive/negative/neutral]",
"priority": "[high/medium/low]",
"summary": "[one sentence summary]"
}
```
### 4. Constraints and Boundaries
Set clear limits to prevent unwanted behaviors.
```
Reply to customer inquiries following these rules:
- Maximum 150 words per response
- Never share internal pricing calculations
- Only discuss products listed in the knowledge base
- If asked about competitors, redirect to our strengths
- Always include one relevant help article link
```
### 5. Context Injection
Reference available data and previous interactions.
```
Using the customer's purchase history from {{hubspot_contact_data}}
and their last 3 support tickets, personalize your response to
acknowledge their loyalty and address their specific product usage.
```
### 6. Conditional Logic
Build prompts that adapt based on input conditions.
```
If the email sentiment is negative:
- Start with an empathy statement
- Offer immediate assistance
- Escalate to supervisor if requested
If the email sentiment is positive:
- Thank them for their feedback
- Ask for a review or testimonial
- Suggest relevant add-on products
```
### 7. Error Handling
Anticipate edge cases and provide fallback instructions.
```
Extract the order number from the email.
If no order number is found:
- Check for alternative identifiers (invoice #, reference #)
- If still not found, ask the customer to provide it
- Log this as "missing_order_number" for follow-up
```
## Essential Prompting Elements
### Keywords and Phrases
Incorporate essential words to emphasize important aspects and priorities:
* "Your task is..."
* "You MUST..."
* "It is crucial that..."
* "You will be penalized if..."
### Use Delimiters Effectively
Delimiters organize information and reduce ambiguity:
* Triple quotes: `"""example text"""`
* Triple backticks: ` ```example text``` `
* Triple dashes: `---example text---`
* XML-like tags: `example text`
* Hashtags: `###example text###`
**Example using XML tags:**
```
You are a customer service representative for a tech company.
Respond to customer inquiries about product features.
{{email_body}}
- Be friendly and professional
- Include specific pricing details
- Offer to help with setup if needed
```
### Consistency is Key
Instruct Lindy to maintain the flow and style of writing from previous steps in the workflow or examples you have added to the prompt. This ensures a cohesive output across the entire process.
### Clear Formatting
Separate instructions with line breaks for clarity. This visual organization helps Lindy process information more effectively.
```
First instruction here.
Second instruction here.
Third instruction here.
```
### Enhance Specificity
Provide complete information for tasks that require detailed responses or actions. Context is crucial for accurate results.
```
When responding to customer support tickets, consider:
- Customer tier (Free/Pro/Enterprise)
- Previous support history
- Product features they have access to
- Time zone and business hours
```
### Edit for Clarity
Every word matters! Proofread your prompts for grammar, punctuation, and vocabulary to ensure they are clear and consistent. Ambiguity can lead to unexpected results.
```
Analyze the incoming data and route it based on these rules:
SALES DATA (keywords: lead, prospect, demo, pricing, quote):
→ Send to HubSpot CRM with tag "new_lead"
SUPPORT REQUESTS (keywords: help, issue, bug, problem, broken):
→ Send to Zendesk with priority level based on urgency
BILLING INQUIRIES (keywords: invoice, payment, refund, billing, charge):
→ Send to Finance team email with subject prefix "[BILLING]"
UNKNOWN CATEGORY:
→ Send to general inbox for manual review
Always include the original sender and timestamp in the routing.
```
```
Process the data and send it to the right place based on what
type it is and who needs it
```
## Best Practices
Begin with basic instructions and add complexity as you test. Monitor agent behavior and refine based on actual outputs.
Define key terms once and use them consistently. If you call it "customer" in one place, don't switch to "client" elsewhere.
Try unusual inputs, empty fields, and unexpected formats. Build prompts that handle these gracefully.
Reference trigger data, previous actions, and knowledge base content. The more context, the better the response.
Keep track of prompt iterations and why changes were made. This helps troubleshooting and team collaboration.
## Troubleshooting
* Add more specific examples
* Define clearer boundaries and constraints
* Check for conflicting instructions between agent-level and action-level prompts
* Use structured formats (JSON, markdown)
* Provide exact templates to follow
* Add validation rules for critical fields
* Make extraction instructions more explicit
* Add fallback searches for alternative formats
* Use step-by-step extraction logic
* Set specific word/character limits
* Provide length examples
* Use "concise" or "detailed" qualifiers appropriately
* Simplify conditions to be mutually exclusive
* Use clear if-then-else structures
* Test each condition path separately
Remember that prompts in action parameters override agent-level prompts for that specific field. Ensure they complement rather than contradict each other.
## Next Steps
Now that you understand effective prompting, enhance your agents with these related concepts:
Build intelligent agents using your prompting skills
Combine prompts with knowledge retrieval for smarter responses
Use prompts in conditional logic for dynamic workflows
Test and refine your prompts with real scenarios
# Tasks
Source: https://docs.lindy.ai/fundamentals/lindy-101/tasks
## Quick Overview
The Tasks view is your dashboard for monitoring your agent's work. Every time your agent runs a workflow, it creates a task that you can track and inspect in real-time.
You can see exactly what your agent is doing at each step, watch workflows execute live, and quickly spot any errors or issues. It's essential for debugging problems and understanding how your automations are performing.
## How to access Tasks
Click the "Tasks" button to access your Task History view
```
You are a customer service agent. Your goal is to resolve customer
inquiries efficiently while maintaining a friendly tone. Choose the
appropriate skill based on the customer's needs.
```
## Core Prompting Principles
### Be Direct and Specific
Skip pleasantries and ambiguous language. Your agent executes direct commands most effectively.
```
Extract the customer email address from the message body.
Format as: email@domain.com
If no email found, return: "NO_EMAIL_FOUND"
```
```
Could you please try to find the customer's email address
somewhere in the message if possible?
```
### Use Action-Oriented Language
Prefer imperative verbs ("do") over passive suggestions ("don't").
```
Write a customer response following these requirements:
Length: Maximum 100 words
Tone: Friendly and professional
Language: Simple terms, avoid technical jargon
Structure:
1. Acknowledge their concern
2. Provide clear solution steps
3. Offer additional help
End with: "Let me know if you need anything else!"
```
```
The response shouldn't be too long and try not to include
technical jargon that might confuse the customer.
```
### Define Clear Personas
Give your agent a clear role and expertise level for consistent responses.
```
You are an expert B2B sales professional with 10 years of experience
in SaaS. Craft compelling follow-up emails that include a strong hook
and clear call-to-action (CTA). All communication should be
conversational yet professional.
```
### Step-by-Step Instructions
Break down complex tasks into simple, sequential steps, guiding your agent through each part of the process.
```
1. Analyze the webpage text
2. Identify all open job openings
3. Qualify the job openings, selecting only those that are remote positions
4. Format the results as a bulleted list with job title and location
```
## Advanced Prompting Techniques
### 1. Chain of Thought (CoT)
Guide your agent through complex reasoning by breaking down the thinking process.
```
Analyze this support ticket step by step:
1. First, identify the customer's primary issue
2. Then, check if it matches any known problems in our knowledge base
3. If yes, provide the solution. If no, escalate to human support
4. Finally, categorize the ticket type for reporting
```
### 2. Few-Shot Examples
Provide examples to demonstrate the exact format and style you want.
```
Categorize emails using these examples:
Email: "Your invoice is attached" → Category: Billing
Email: "How do I reset my password?" → Category: Support
Email: "Interested in enterprise pricing" → Category: Sales
Now categorize this email: {{email_body}}
```
### 3. Output Formatting
Specify exact output structure for consistent, parseable results.
```
Format your response as JSON:
{
"customer_name": "[extracted name]",
"sentiment": "[positive/negative/neutral]",
"priority": "[high/medium/low]",
"summary": "[one sentence summary]"
}
```
### 4. Constraints and Boundaries
Set clear limits to prevent unwanted behaviors.
```
Reply to customer inquiries following these rules:
- Maximum 150 words per response
- Never share internal pricing calculations
- Only discuss products listed in the knowledge base
- If asked about competitors, redirect to our strengths
- Always include one relevant help article link
```
### 5. Context Injection
Reference available data and previous interactions.
```
Using the customer's purchase history from {{hubspot_contact_data}}
and their last 3 support tickets, personalize your response to
acknowledge their loyalty and address their specific product usage.
```
### 6. Conditional Logic
Build prompts that adapt based on input conditions.
```
If the email sentiment is negative:
- Start with an empathy statement
- Offer immediate assistance
- Escalate to supervisor if requested
If the email sentiment is positive:
- Thank them for their feedback
- Ask for a review or testimonial
- Suggest relevant add-on products
```
### 7. Error Handling
Anticipate edge cases and provide fallback instructions.
```
Extract the order number from the email.
If no order number is found:
- Check for alternative identifiers (invoice #, reference #)
- If still not found, ask the customer to provide it
- Log this as "missing_order_number" for follow-up
```
## Essential Prompting Elements
### Keywords and Phrases
Incorporate essential words to emphasize important aspects and priorities:
* "Your task is..."
* "You MUST..."
* "It is crucial that..."
* "You will be penalized if..."
### Use Delimiters Effectively
Delimiters organize information and reduce ambiguity:
* Triple quotes: `"""example text"""`
* Triple backticks: ` ```example text``` `
* Triple dashes: `---example text---`
* XML-like tags: `example text`
* Hashtags: `###example text###`
**Example using XML tags:**
```
You are a customer service representative for a tech company.
Respond to customer inquiries about product features.
{{email_body}}
- Be friendly and professional
- Include specific pricing details
- Offer to help with setup if needed
```
### Consistency is Key
Instruct Lindy to maintain the flow and style of writing from previous steps in the workflow or examples you have added to the prompt. This ensures a cohesive output across the entire process.
### Clear Formatting
Separate instructions with line breaks for clarity. This visual organization helps Lindy process information more effectively.
```
First instruction here.
Second instruction here.
Third instruction here.
```
### Enhance Specificity
Provide complete information for tasks that require detailed responses or actions. Context is crucial for accurate results.
```
When responding to customer support tickets, consider:
- Customer tier (Free/Pro/Enterprise)
- Previous support history
- Product features they have access to
- Time zone and business hours
```
### Edit for Clarity
Every word matters! Proofread your prompts for grammar, punctuation, and vocabulary to ensure they are clear and consistent. Ambiguity can lead to unexpected results.
```
Analyze the incoming data and route it based on these rules:
SALES DATA (keywords: lead, prospect, demo, pricing, quote):
→ Send to HubSpot CRM with tag "new_lead"
SUPPORT REQUESTS (keywords: help, issue, bug, problem, broken):
→ Send to Zendesk with priority level based on urgency
BILLING INQUIRIES (keywords: invoice, payment, refund, billing, charge):
→ Send to Finance team email with subject prefix "[BILLING]"
UNKNOWN CATEGORY:
→ Send to general inbox for manual review
Always include the original sender and timestamp in the routing.
```
```
Process the data and send it to the right place based on what
type it is and who needs it
```
## Best Practices
Begin with basic instructions and add complexity as you test. Monitor agent behavior and refine based on actual outputs.
Define key terms once and use them consistently. If you call it "customer" in one place, don't switch to "client" elsewhere.
Try unusual inputs, empty fields, and unexpected formats. Build prompts that handle these gracefully.
Reference trigger data, previous actions, and knowledge base content. The more context, the better the response.
Keep track of prompt iterations and why changes were made. This helps troubleshooting and team collaboration.
## Troubleshooting
* Add more specific examples
* Define clearer boundaries and constraints
* Check for conflicting instructions between agent-level and action-level prompts
* Use structured formats (JSON, markdown)
* Provide exact templates to follow
* Add validation rules for critical fields
* Make extraction instructions more explicit
* Add fallback searches for alternative formats
* Use step-by-step extraction logic
* Set specific word/character limits
* Provide length examples
* Use "concise" or "detailed" qualifiers appropriately
* Simplify conditions to be mutually exclusive
* Use clear if-then-else structures
* Test each condition path separately
Remember that prompts in action parameters override agent-level prompts for that specific field. Ensure they complement rather than contradict each other.
## Next Steps
Now that you understand effective prompting, enhance your agents with these related concepts:
Build intelligent agents using your prompting skills
Combine prompts with knowledge retrieval for smarter responses
Use prompts in conditional logic for dynamic workflows
Test and refine your prompts with real scenarios
# Tasks
Source: https://docs.lindy.ai/fundamentals/lindy-101/tasks
## Quick Overview
The Tasks view is your dashboard for monitoring your agent's work. Every time your agent runs a workflow, it creates a task that you can track and inspect in real-time.
You can see exactly what your agent is doing at each step, watch workflows execute live, and quickly spot any errors or issues. It's essential for debugging problems and understanding how your automations are performing.
## How to access Tasks
Click the "Tasks" button to access your Task History view
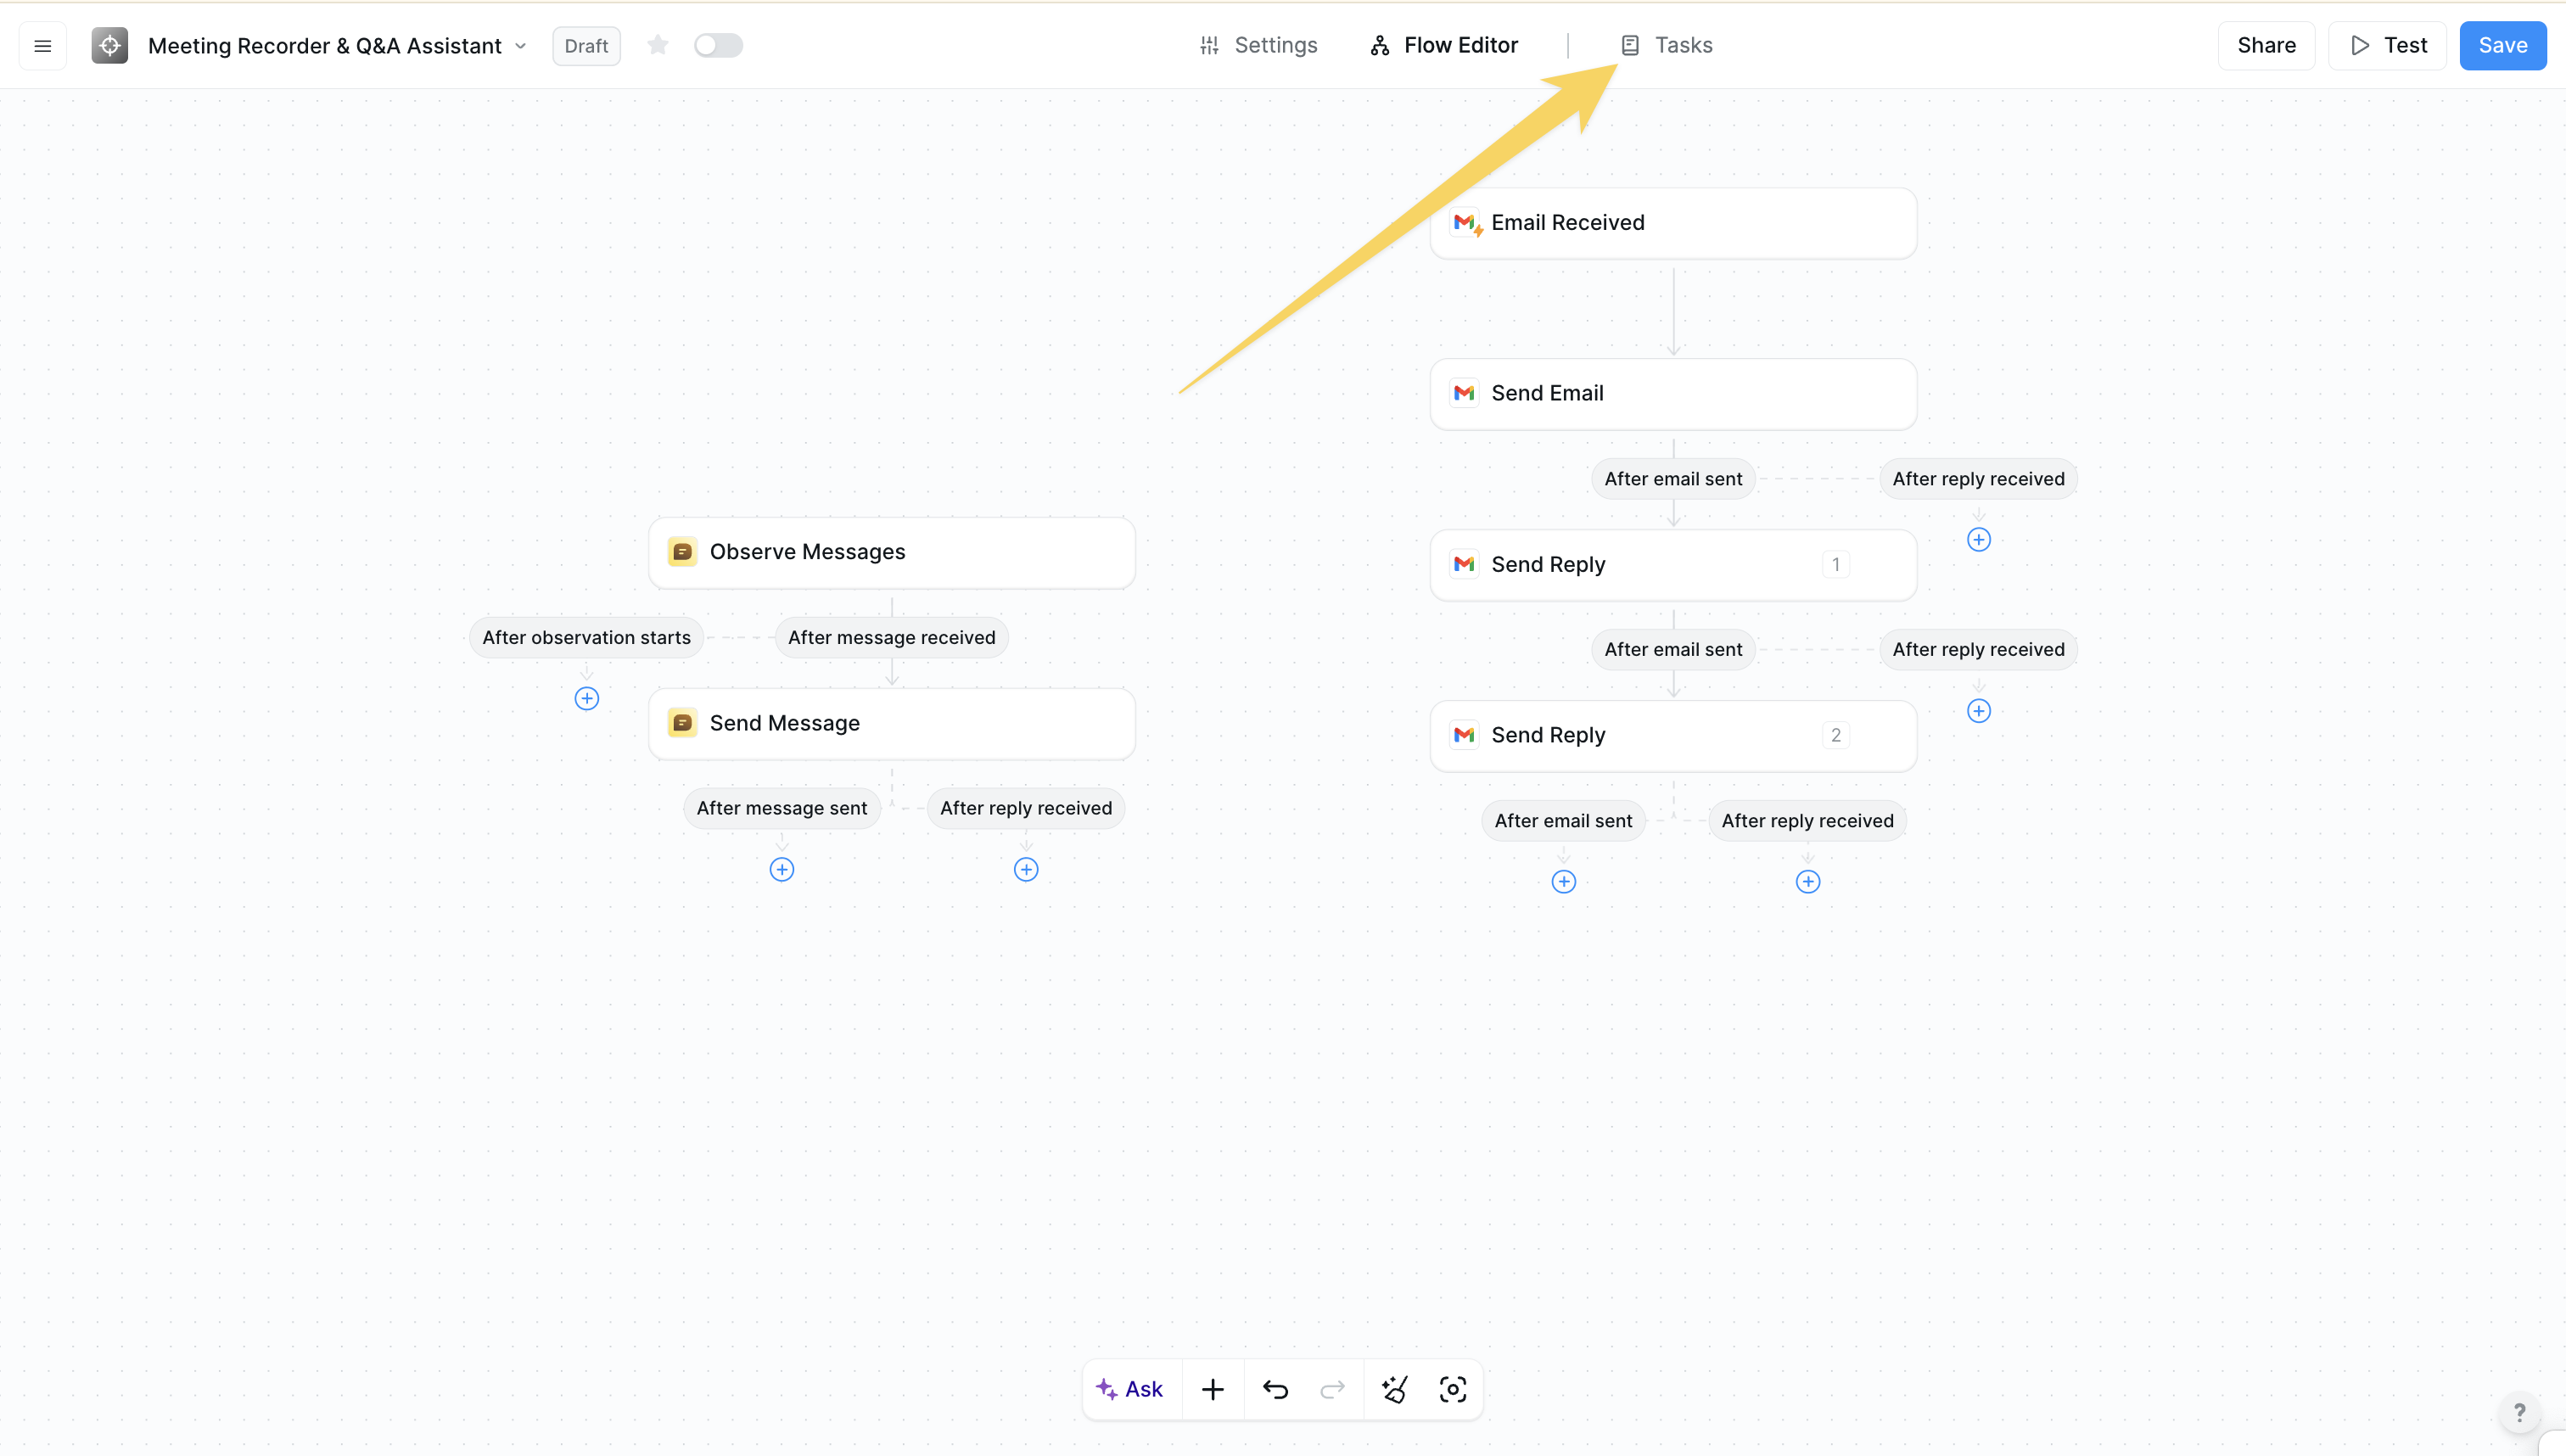 View all task executions with their current status
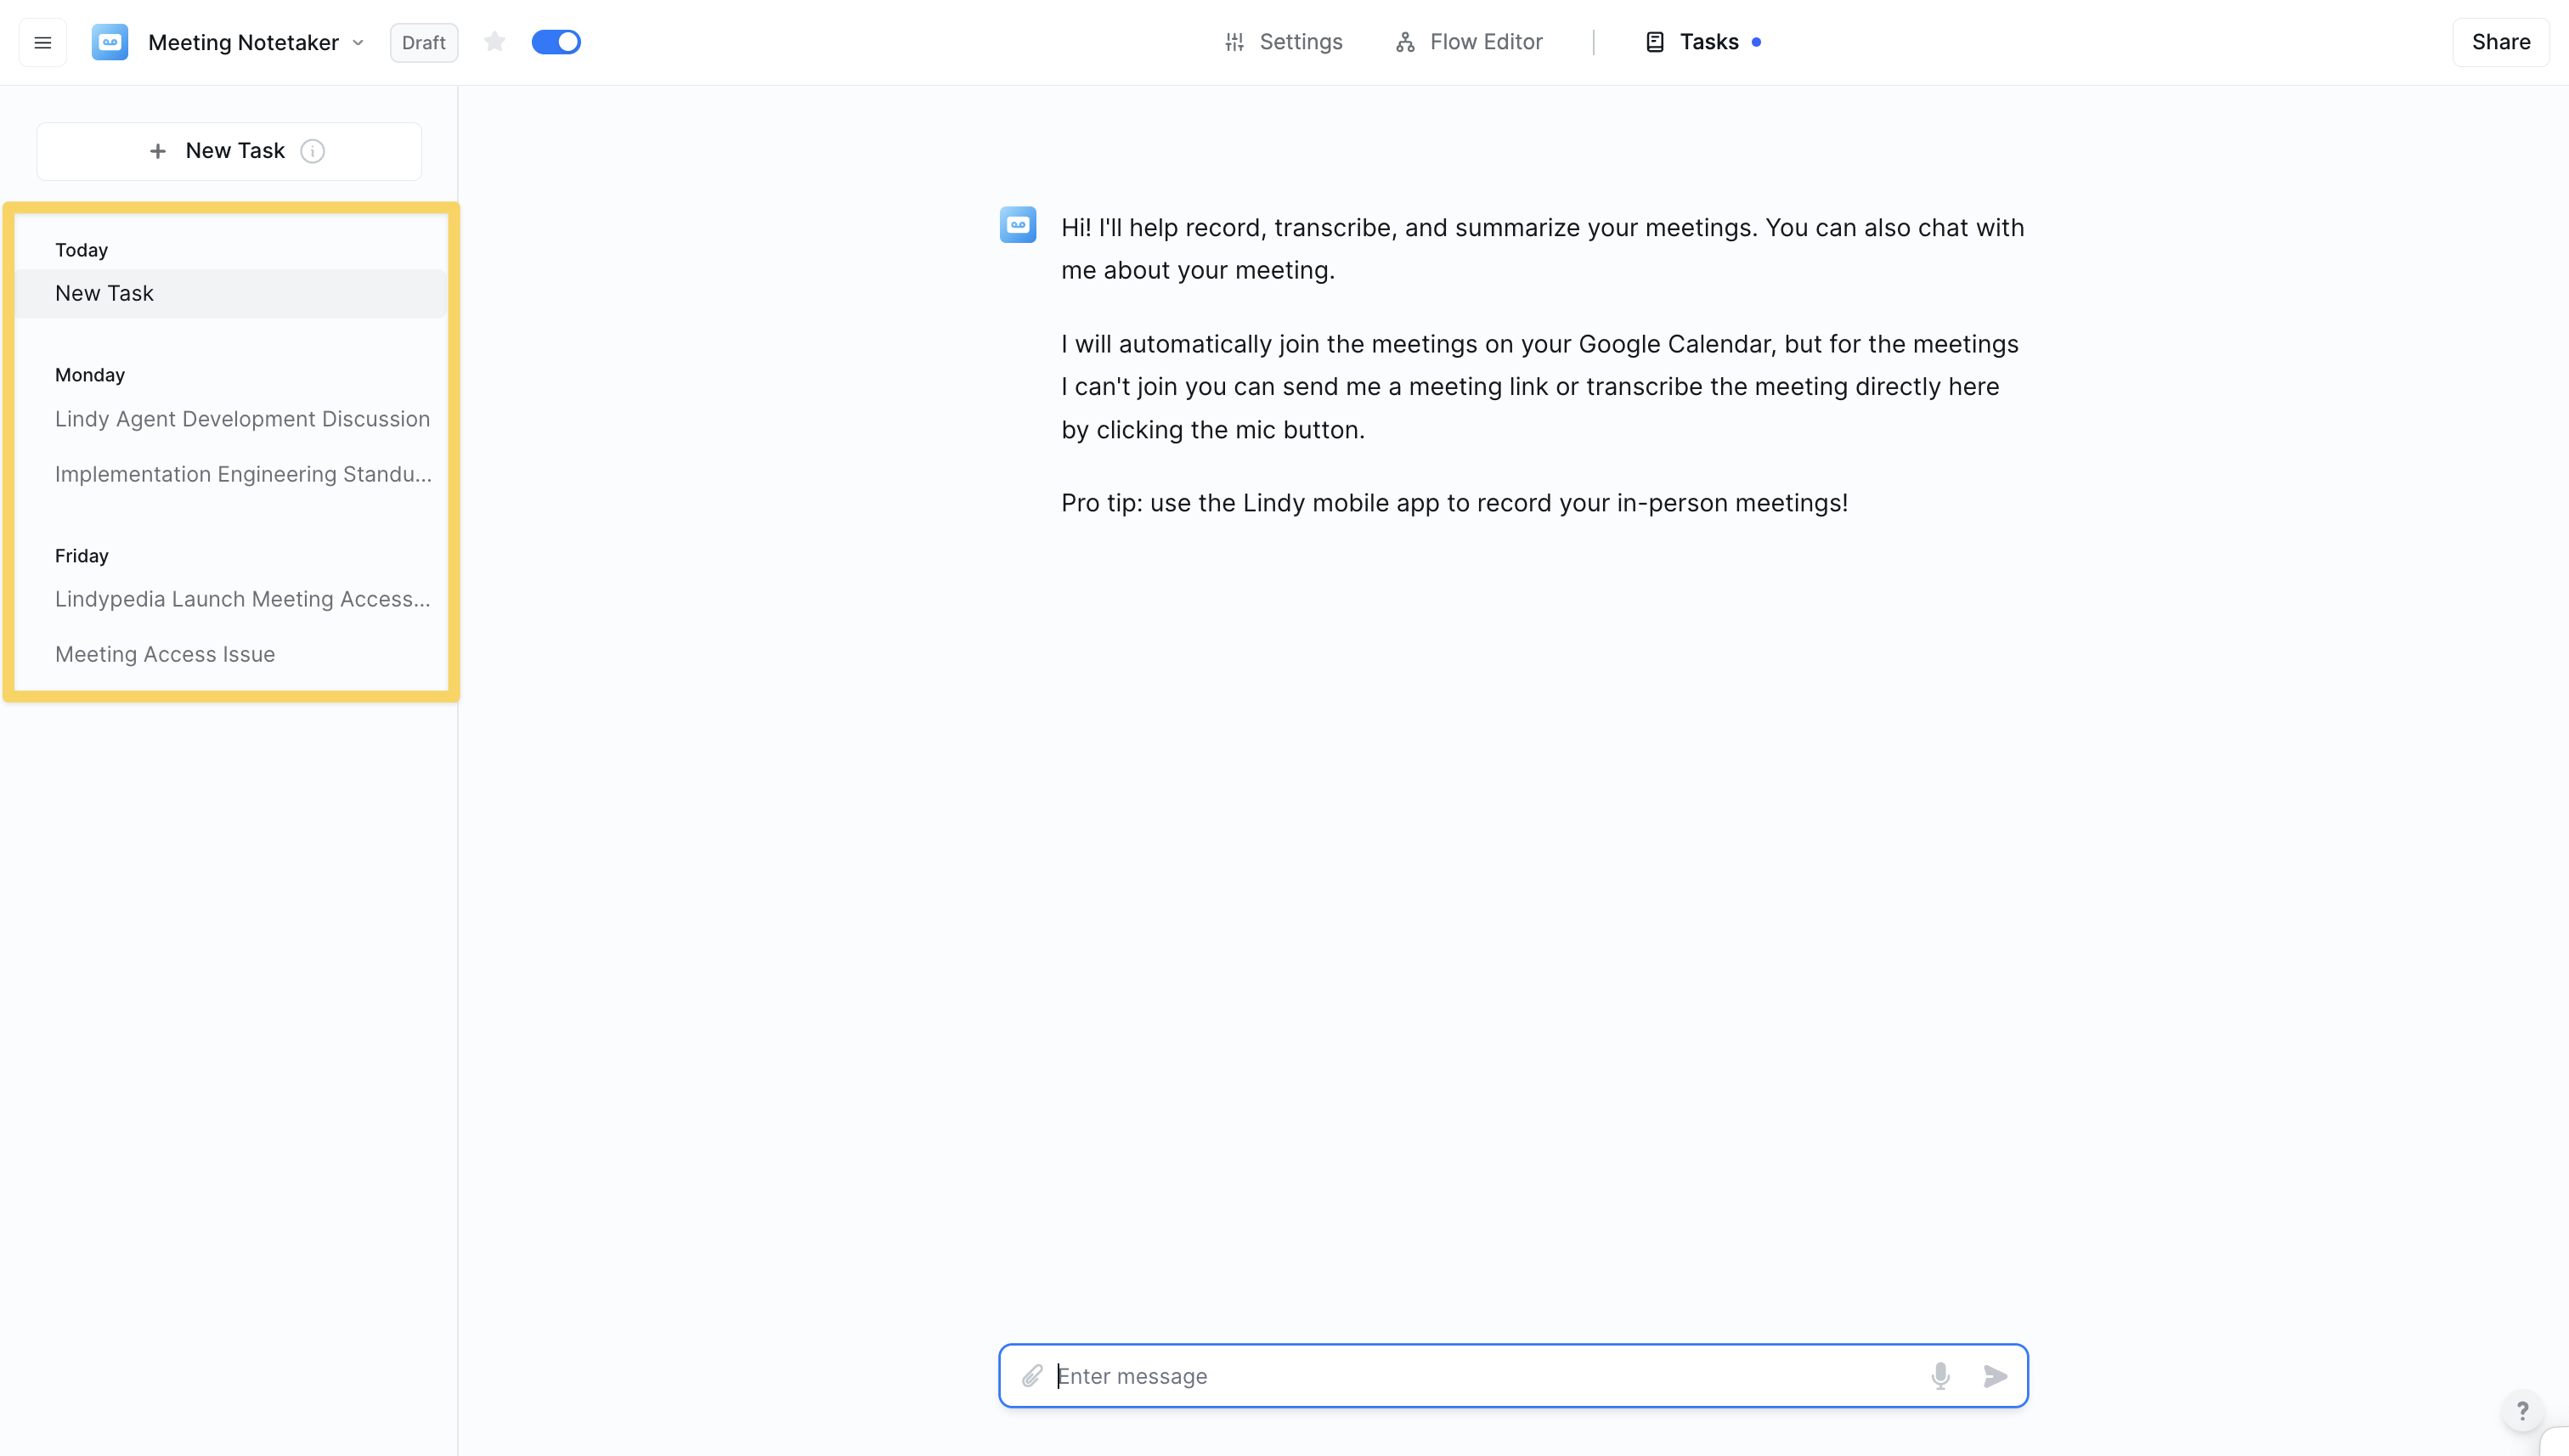 Watch your workflows execute in real-time with live step-by-step chronological execution of all steps.
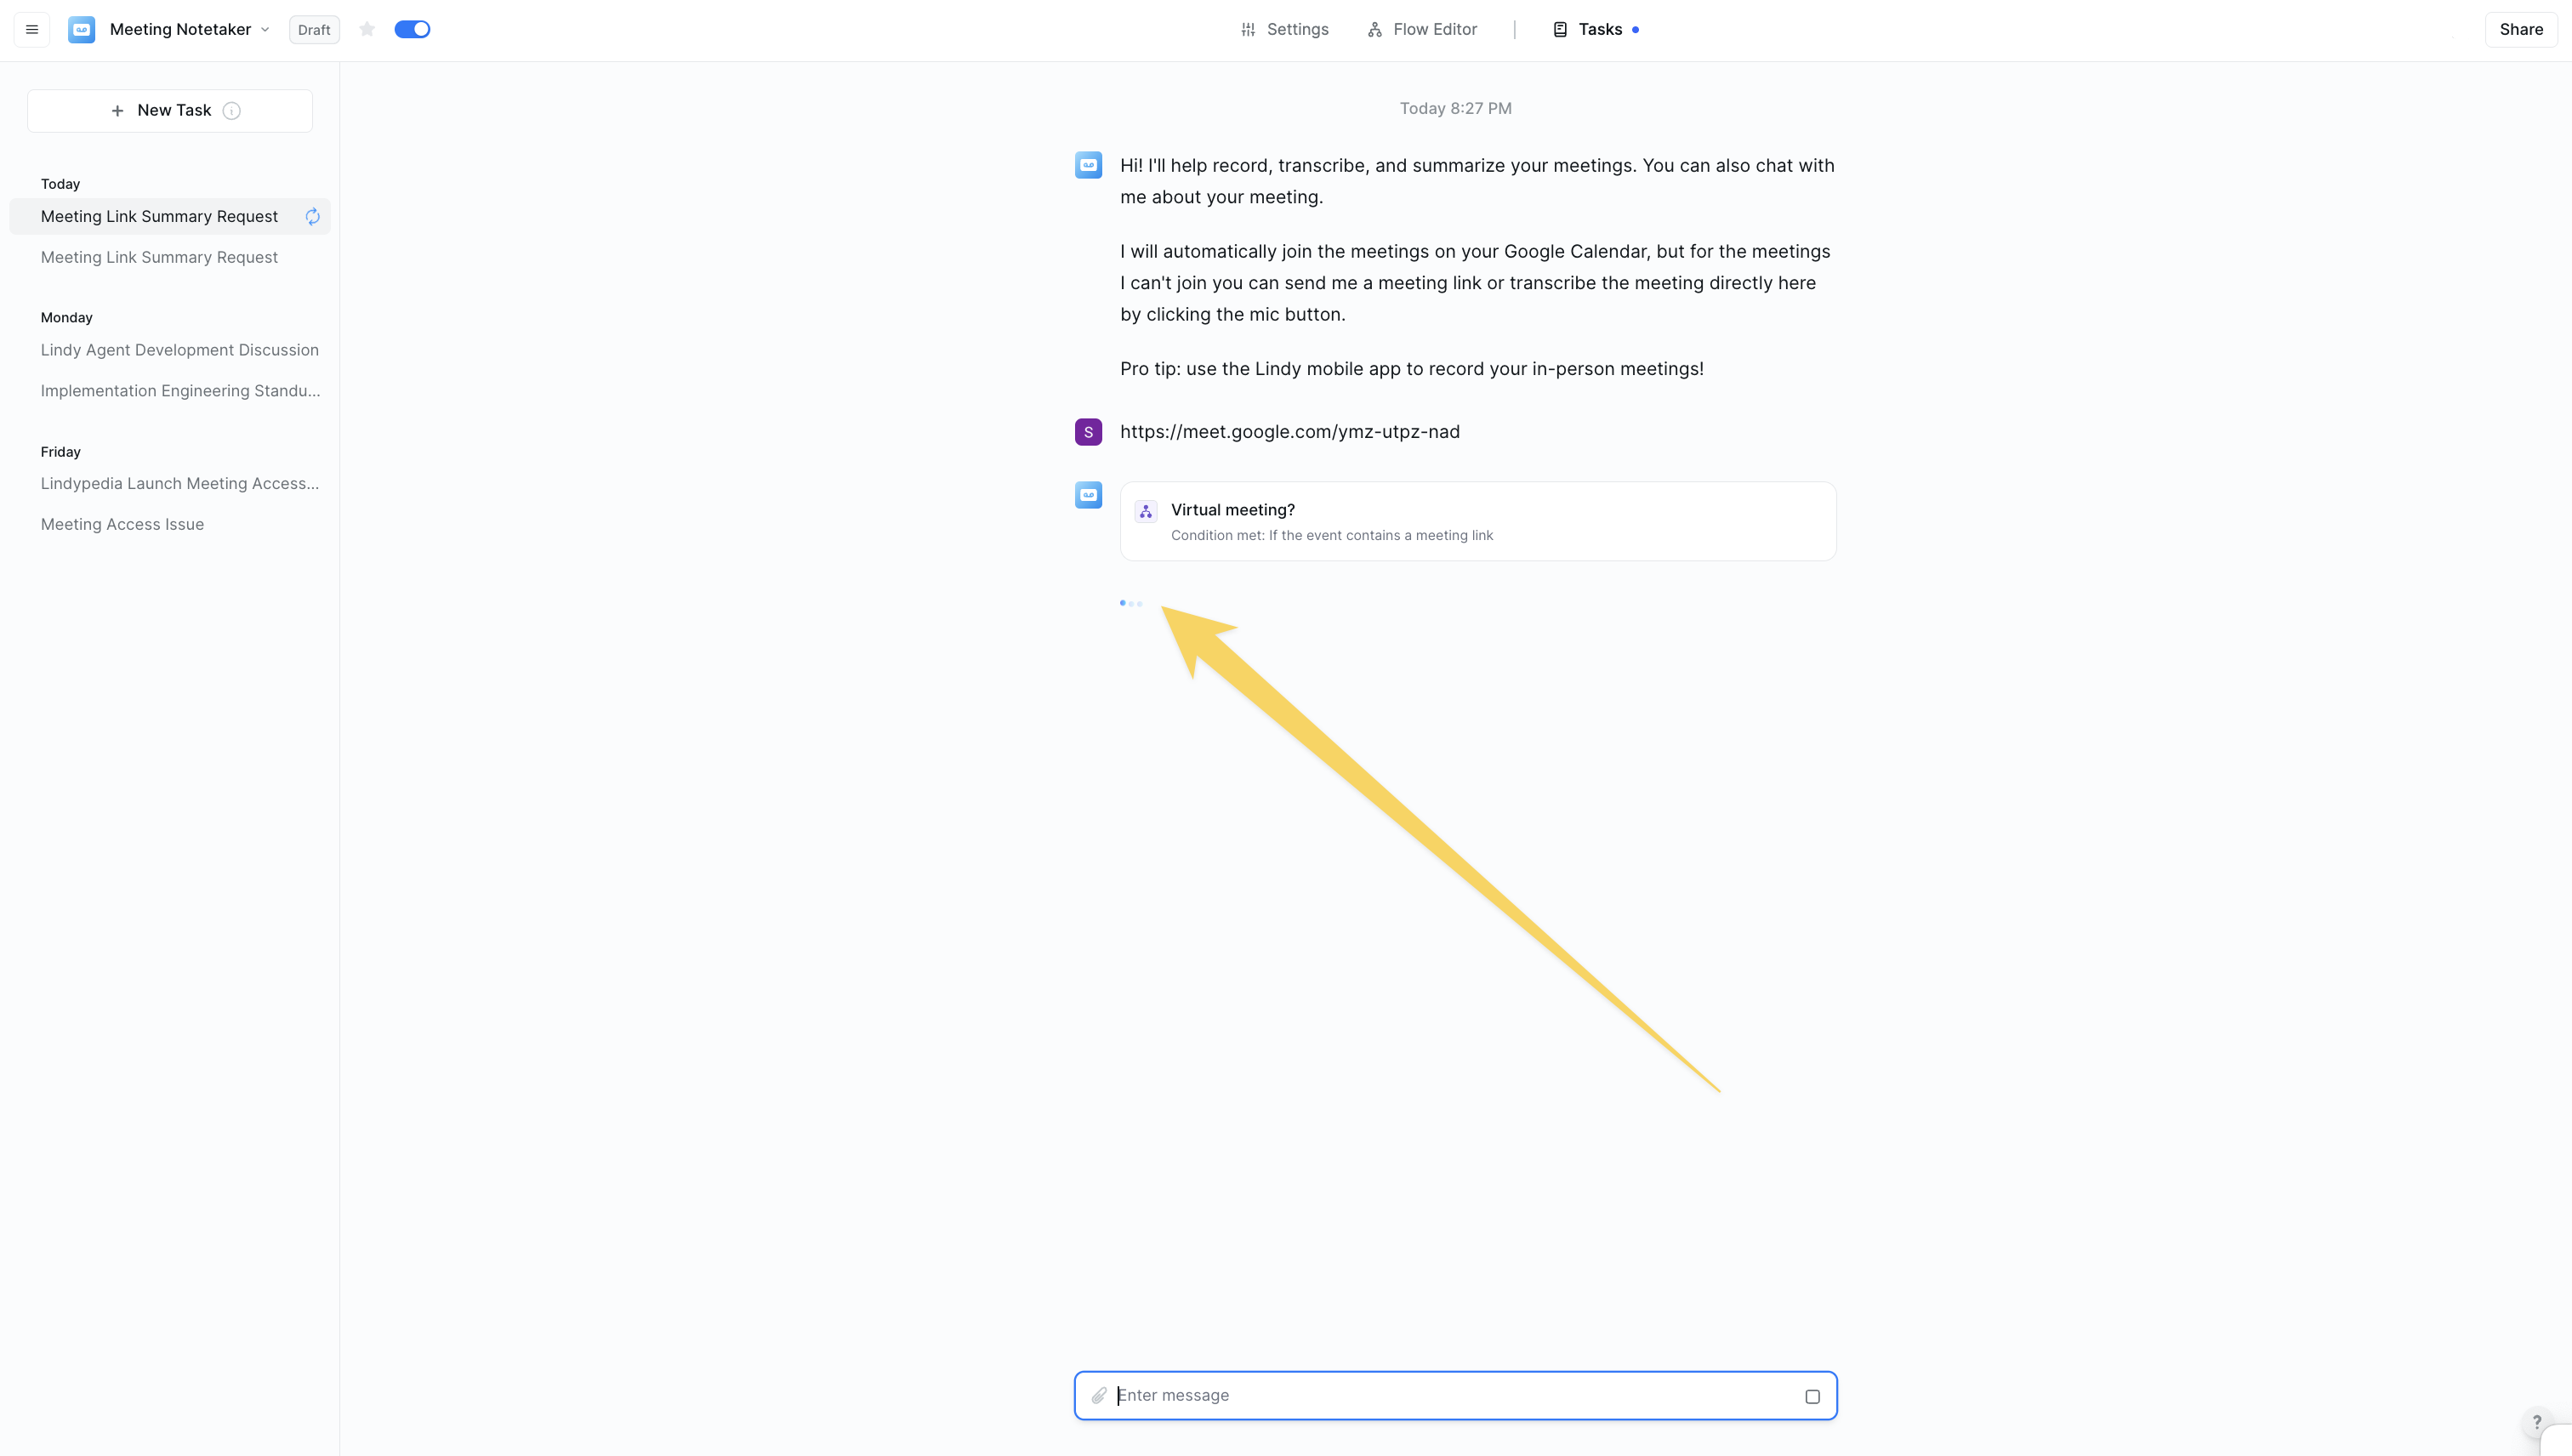 ### Example task monitoring
Click on any individual task to see:
* Subtasks if looping was used in the workflow
* Every single step your Lindy executed in that workflow
* The exact order of operations
* Input and output data for each step
* Timestamps showing when each step was completed
* Any decisions or conditions your Lindy evaluated
### Error detection and troubleshooting
### Example task monitoring
Click on any individual task to see:
* Subtasks if looping was used in the workflow
* Every single step your Lindy executed in that workflow
* The exact order of operations
* Input and output data for each step
* Timestamps showing when each step was completed
* Any decisions or conditions your Lindy evaluated
### Error detection and troubleshooting
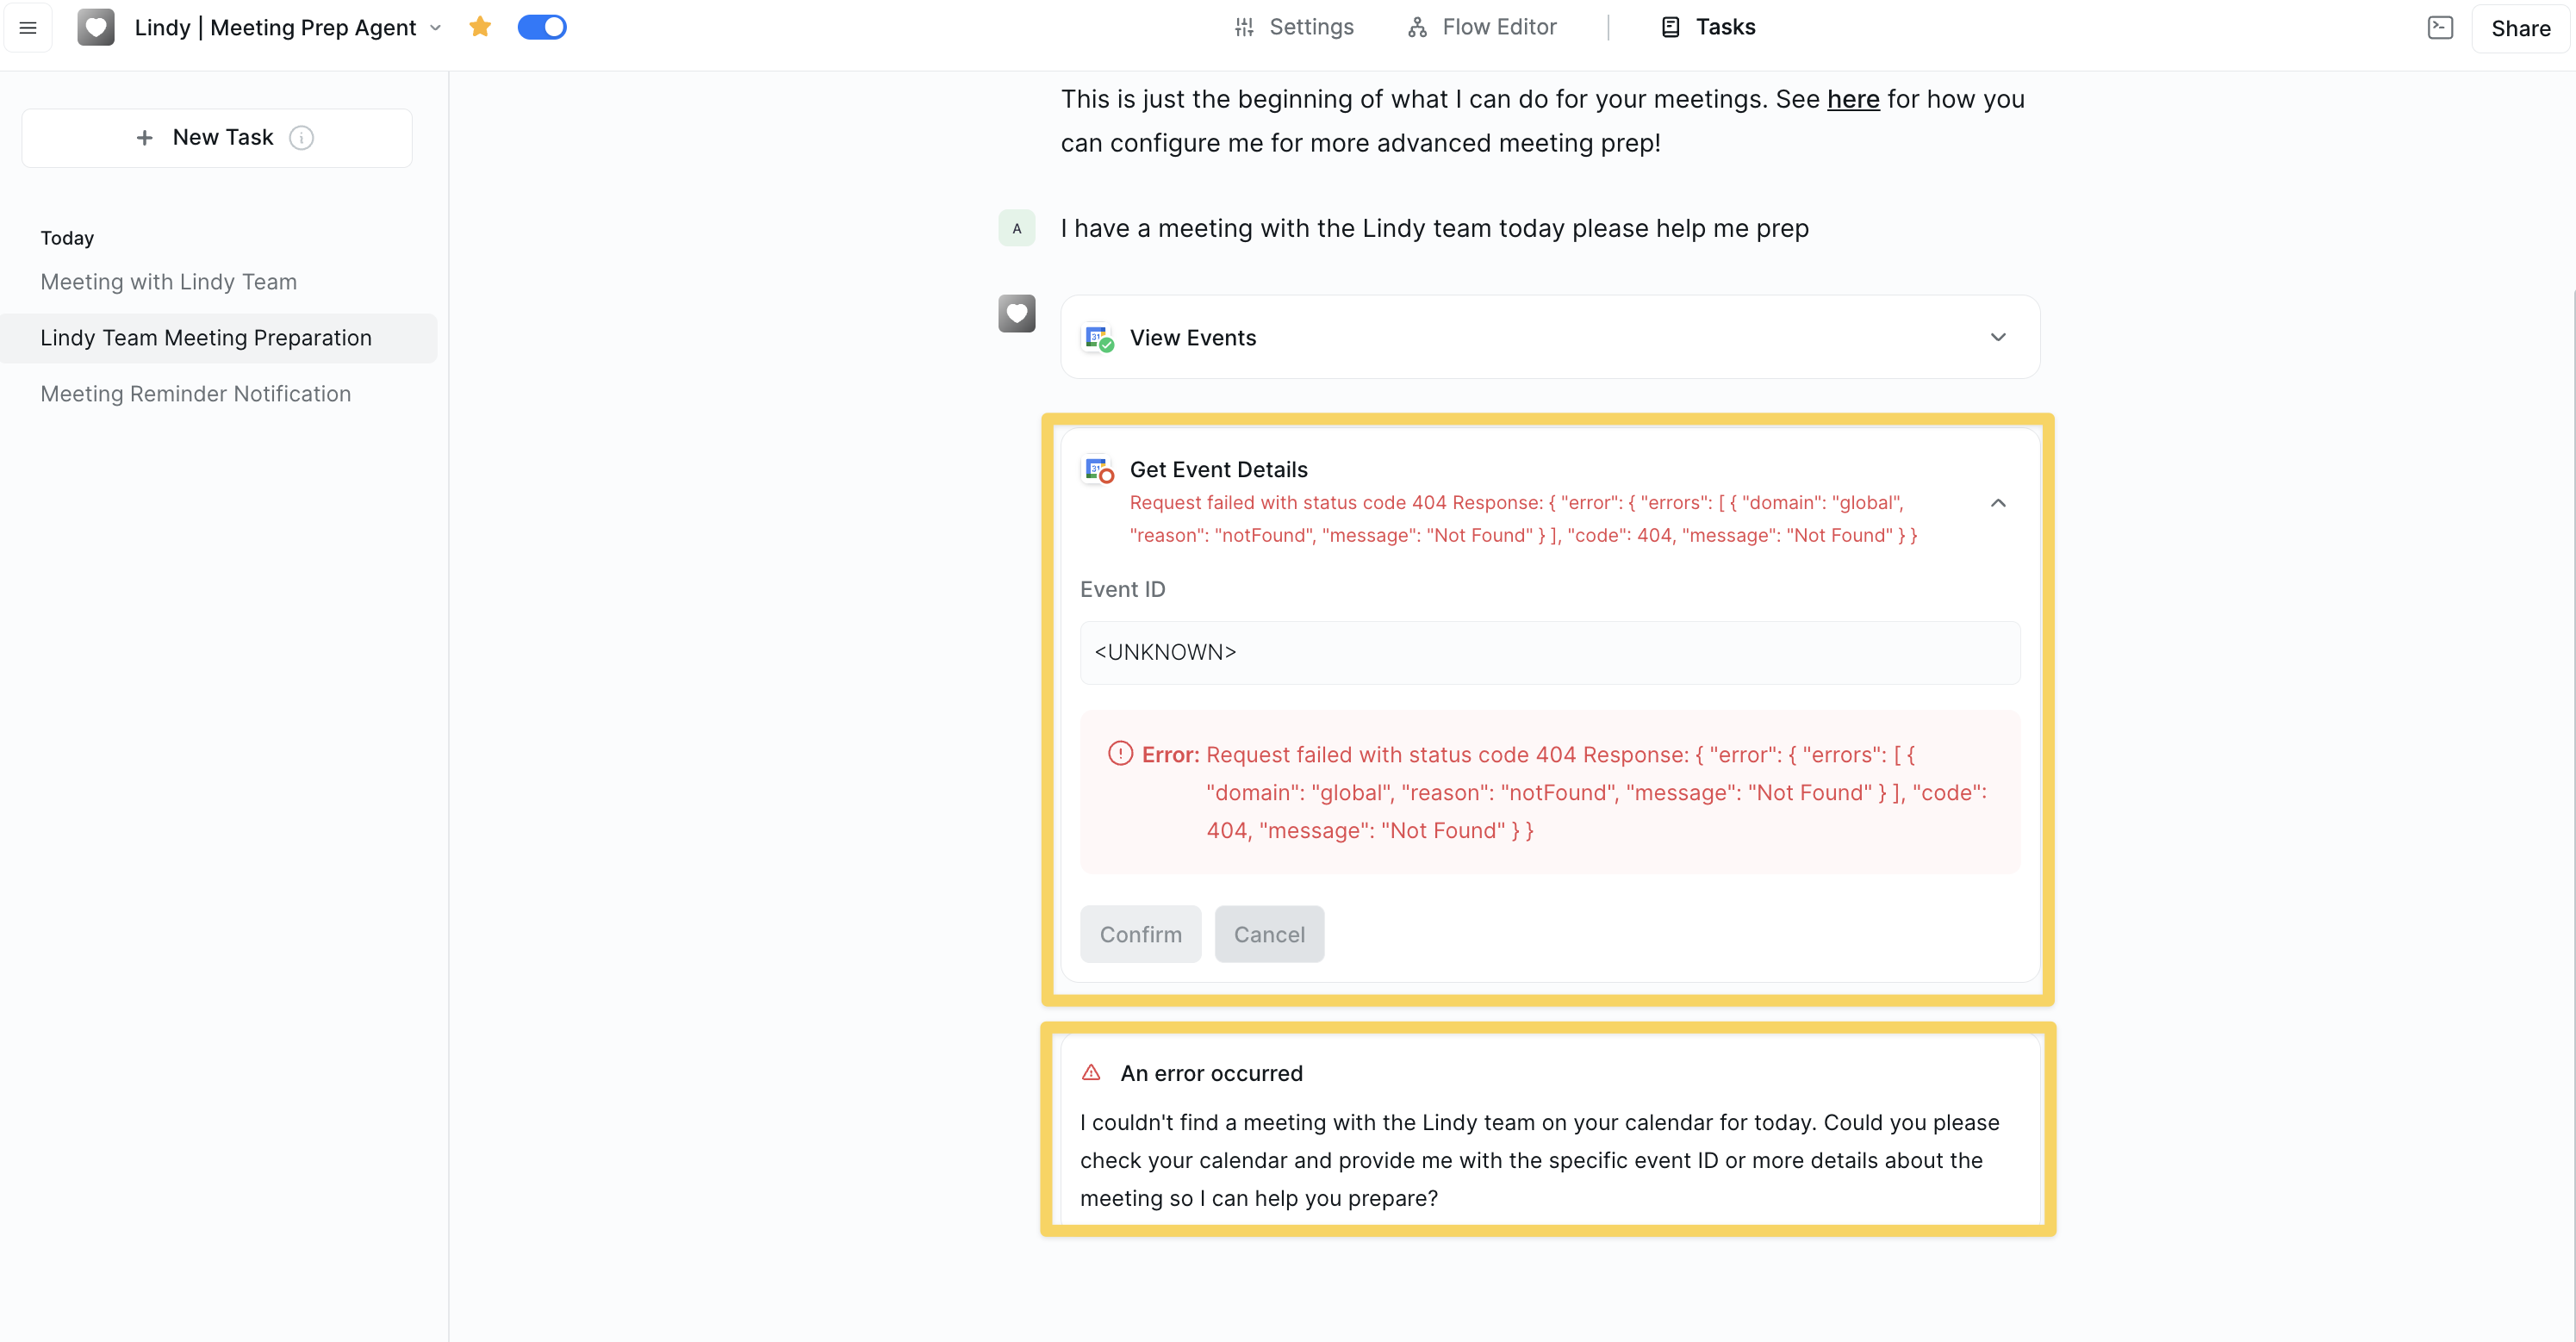 Quickly identify and resolve issues with:
* Exact error location and failure reasons
* Detailed error messages and debugging information
Use the Tasks view alongside Test Mode in the Flow Editor to compare expected vs. actual results and iterate on your workflows.
## What you can see in real-time
### Live execution tracking
Monitor your workflows as they happen:
* Watch each step execute in real-time
* See which step is currently running
* Track progress through complex workflows
* Monitor overall task completion times
### Data flow visibility
See exactly how information moves through your workflow:
* Data being passed between steps
* API responses and extracted information
* How information transforms as it moves through your workflow
* Processed results and final outputs
## Task monitoring benefits
### Proactive problem solving
Stay ahead of issues with:
* Immediate error detection and notifications
* Email alerts when errors occur
* Detailed error information for quick fixes
* Prevention of workflow failures
Quickly identify and resolve issues with:
* Exact error location and failure reasons
* Detailed error messages and debugging information
Use the Tasks view alongside Test Mode in the Flow Editor to compare expected vs. actual results and iterate on your workflows.
## What you can see in real-time
### Live execution tracking
Monitor your workflows as they happen:
* Watch each step execute in real-time
* See which step is currently running
* Track progress through complex workflows
* Monitor overall task completion times
### Data flow visibility
See exactly how information moves through your workflow:
* Data being passed between steps
* API responses and extracted information
* How information transforms as it moves through your workflow
* Processed results and final outputs
## Task monitoring benefits
### Proactive problem solving
Stay ahead of issues with:
* Immediate error detection and notifications
* Email alerts when errors occur
* Detailed error information for quick fixes
* Prevention of workflow failures
 Need help troubleshooting a specific task?
Check out our [debugging guide](/testing/debugging) for detailed troubleshooting steps and common solutions.
## Next steps
Discover what your agents can do
Test workflows before deployment
Learn to troubleshoot common issues
Track performance and task execution
# Templates
Source: https://docs.lindy.ai/fundamentals/lindy-101/templates
Discover, install, and share pre-built Lindy workflows. Learn how templates can jumpstart your automation projects and help you build faster.
## What are Templates?
Templates are pre-built workflows that you can use as starting points for your own automations. They provide a foundation with common patterns, integrations, and logic that you can customize for your specific needs.
Templates help you:
* **Get started quickly** - Skip the initial setup and configuration
* **Learn best practices** - See how experienced builders structure their workflows
* **Save time** - Build on proven patterns instead of starting from scratch
* **Share knowledge** - Distribute your workflows to help others
## Where to Find Templates
### Lindy Template Library
Need help troubleshooting a specific task?
Check out our [debugging guide](/testing/debugging) for detailed troubleshooting steps and common solutions.
## Next steps
Discover what your agents can do
Test workflows before deployment
Learn to troubleshoot common issues
Track performance and task execution
# Templates
Source: https://docs.lindy.ai/fundamentals/lindy-101/templates
Discover, install, and share pre-built Lindy workflows. Learn how templates can jumpstart your automation projects and help you build faster.
## What are Templates?
Templates are pre-built workflows that you can use as starting points for your own automations. They provide a foundation with common patterns, integrations, and logic that you can customize for your specific needs.
Templates help you:
* **Get started quickly** - Skip the initial setup and configuration
* **Learn best practices** - See how experienced builders structure their workflows
* **Save time** - Build on proven patterns instead of starting from scratch
* **Share knowledge** - Distribute your workflows to help others
## Where to Find Templates
### Lindy Template Library
 When logged in, go to [chat.lindy.ai/home](https://chat.lindy.ai/home) and click "See all templates" to browse our curated collection. You'll find templates organized by:
* **Use Case** - Email automation, sales, customer support, etc.
* **Industry** - Healthcare, SaaS, finance, etc.
* **Complexity** - Beginner, intermediate, advanced
* **Popularity** - Most used and highly rated templates
Community Templates: Join our community to discover templates shared by other Lindy builders. Community members often share their own creative solutions and agent ideas!
## How to Install a Template
### Step 1: Find Your Template
Navigate to the template you want to install. You can find templates through:
* The Lindy template library (click "See all templates" at [chat.lindy.ai/home](https://chat.lindy.ai/home))
* Direct links shared by community members
* Featured templates on the Lindy homepage
### Step 2: Install the Template
When logged in, go to [chat.lindy.ai/home](https://chat.lindy.ai/home) and click "See all templates" to browse our curated collection. You'll find templates organized by:
* **Use Case** - Email automation, sales, customer support, etc.
* **Industry** - Healthcare, SaaS, finance, etc.
* **Complexity** - Beginner, intermediate, advanced
* **Popularity** - Most used and highly rated templates
Community Templates: Join our community to discover templates shared by other Lindy builders. Community members often share their own creative solutions and agent ideas!
## How to Install a Template
### Step 1: Find Your Template
Navigate to the template you want to install. You can find templates through:
* The Lindy template library (click "See all templates" at [chat.lindy.ai/home](https://chat.lindy.ai/home))
* Direct links shared by community members
* Featured templates on the Lindy homepage
### Step 2: Install the Template
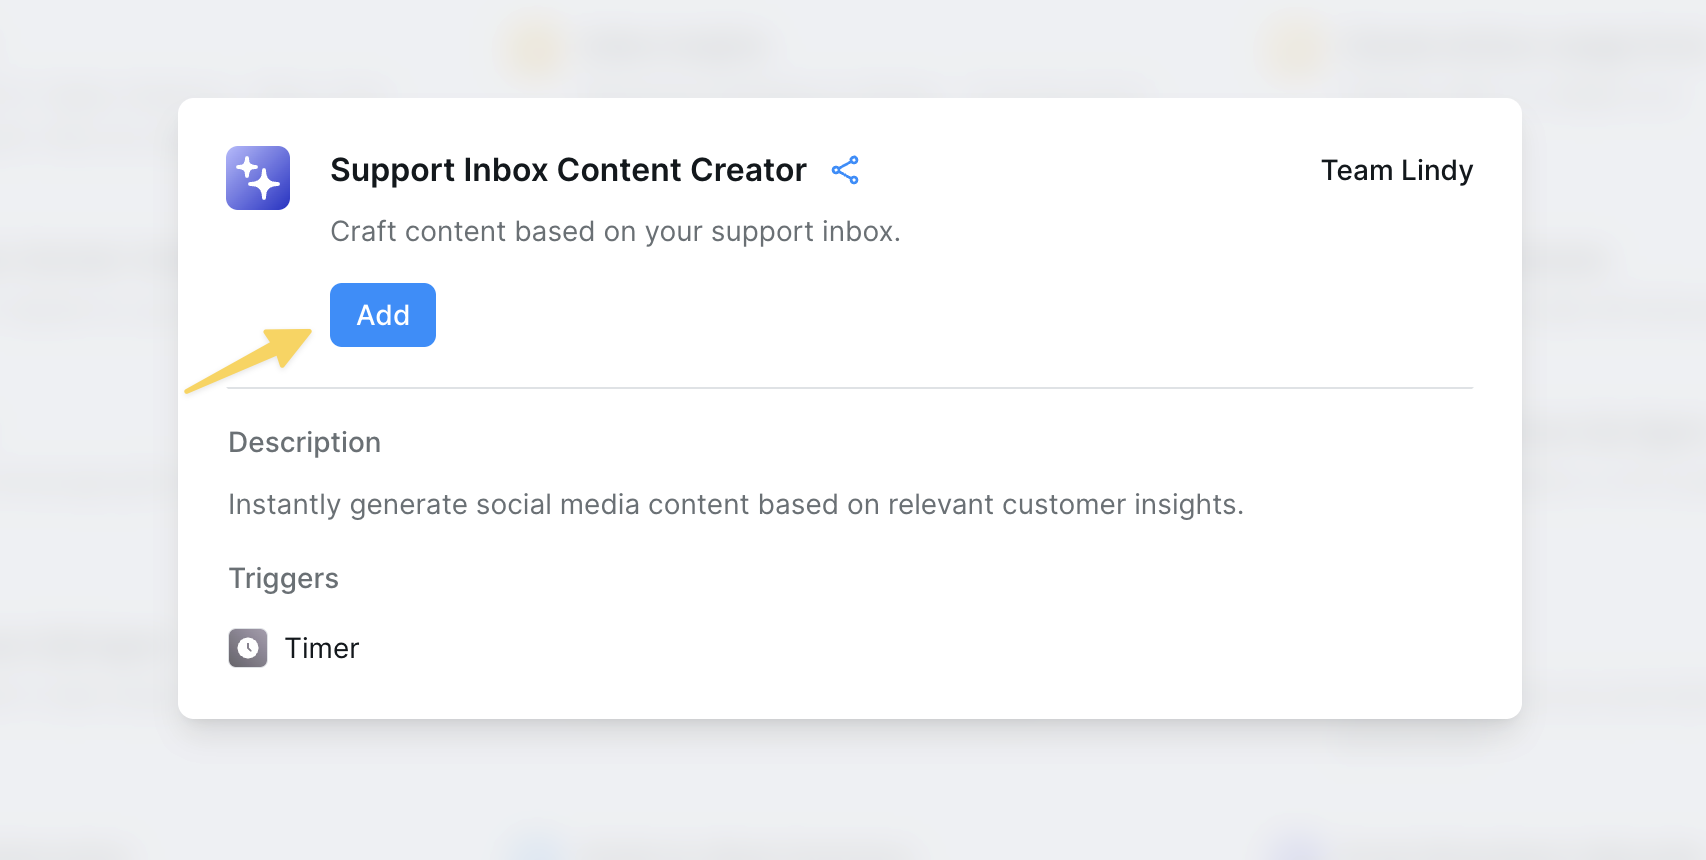 1. Click the **"Add"** button on the template page
2. Configure any required settings (calendars, account connections, etc.)
3. Click **"Turn on"** to complete the installation
### Step 3: Customize for Your Needs
After installation, you can:
* **Modify triggers** - Adjust when the workflow runs
* **Update actions** - Change what the workflow does
* **Customize prompts** - Tailor the AI behavior to your use case
* **Add integrations** - Connect additional tools and services
* **Test and iterate** - Run the workflow and make improvements
Some templates include step-by-step onboarding to guide you through setup.
## How to Create and Share Templates
### Planning Your Template
Before creating a template, consider:
* **Target your audience** - Consider who will use the template and their skill level
* **Keep it focused** - Build templates for specific use cases that can be customized
### Building Your Template
1. **Create the Workflow**
* Build your workflow in the Flow Editor
* Test thoroughly with different scenarios
* Optimize prompts and conditions for reliability
2. **Add Documentation**
* Write clear setup instructions using notes or Step-by-Step Onboarding
* Include examples of expected inputs/outputs
3. **Create Step-by-Step Onboarding (Optional)**
* Use [Step by Step Onboarding](/skills/by-lindy/step-by-step-onboarding) to guide users through setup
* Collect required configuration automatically
* Provide a smooth user experience
### Sharing Your Template
**Internal Sharing**
* Share templates within your workspace for team use
* Create templates for common workflows your team needs
* Establish naming conventions and documentation standards
**Community Sharing**
* Share templates in the Lindy community
* Include detailed documentation and use cases
* Be responsive to questions and feedback
### Template Best Practices
* **Name everything clearly** - Use descriptive names for steps, conditions, and add helpful notes
* **Test thoroughly** - Verify your template works with different scenarios and edge cases
## Next Steps
Explore our template library
Build your first Lindy from scratch
Share and discover templates with other builders
Explore real-world examples and workflows
# Triggers
Source: https://docs.lindy.ai/fundamentals/lindy-101/triggers
## Quick Overview
Triggers are events that "wake up" an agent and start a workflow. These can include time-based triggers (e.g., every weekday at 9 am), chat-based triggers (when a user starts a new chat), or event-based triggers (e.g., when you receive an email).
A single agent can have multiple triggers, either managing different workflows or acting as entry points into the same workflow.
## How to add a trigger
Click on the plus sign at the bottom or right-click anywhere on the canvas and select "Add Trigger" from the pop-up menu
1. Click the **"Add"** button on the template page
2. Configure any required settings (calendars, account connections, etc.)
3. Click **"Turn on"** to complete the installation
### Step 3: Customize for Your Needs
After installation, you can:
* **Modify triggers** - Adjust when the workflow runs
* **Update actions** - Change what the workflow does
* **Customize prompts** - Tailor the AI behavior to your use case
* **Add integrations** - Connect additional tools and services
* **Test and iterate** - Run the workflow and make improvements
Some templates include step-by-step onboarding to guide you through setup.
## How to Create and Share Templates
### Planning Your Template
Before creating a template, consider:
* **Target your audience** - Consider who will use the template and their skill level
* **Keep it focused** - Build templates for specific use cases that can be customized
### Building Your Template
1. **Create the Workflow**
* Build your workflow in the Flow Editor
* Test thoroughly with different scenarios
* Optimize prompts and conditions for reliability
2. **Add Documentation**
* Write clear setup instructions using notes or Step-by-Step Onboarding
* Include examples of expected inputs/outputs
3. **Create Step-by-Step Onboarding (Optional)**
* Use [Step by Step Onboarding](/skills/by-lindy/step-by-step-onboarding) to guide users through setup
* Collect required configuration automatically
* Provide a smooth user experience
### Sharing Your Template
**Internal Sharing**
* Share templates within your workspace for team use
* Create templates for common workflows your team needs
* Establish naming conventions and documentation standards
**Community Sharing**
* Share templates in the Lindy community
* Include detailed documentation and use cases
* Be responsive to questions and feedback
### Template Best Practices
* **Name everything clearly** - Use descriptive names for steps, conditions, and add helpful notes
* **Test thoroughly** - Verify your template works with different scenarios and edge cases
## Next Steps
Explore our template library
Build your first Lindy from scratch
Share and discover templates with other builders
Explore real-world examples and workflows
# Triggers
Source: https://docs.lindy.ai/fundamentals/lindy-101/triggers
## Quick Overview
Triggers are events that "wake up" an agent and start a workflow. These can include time-based triggers (e.g., every weekday at 9 am), chat-based triggers (when a user starts a new chat), or event-based triggers (e.g., when you receive an email).
A single agent can have multiple triggers, either managing different workflows or acting as entry points into the same workflow.
## How to add a trigger
Click on the plus sign at the bottom or right-click anywhere on the canvas and select "Add Trigger" from the pop-up menu
 Click "Select Trigger" and search for a tool or trigger that will initiate a response from Lindy
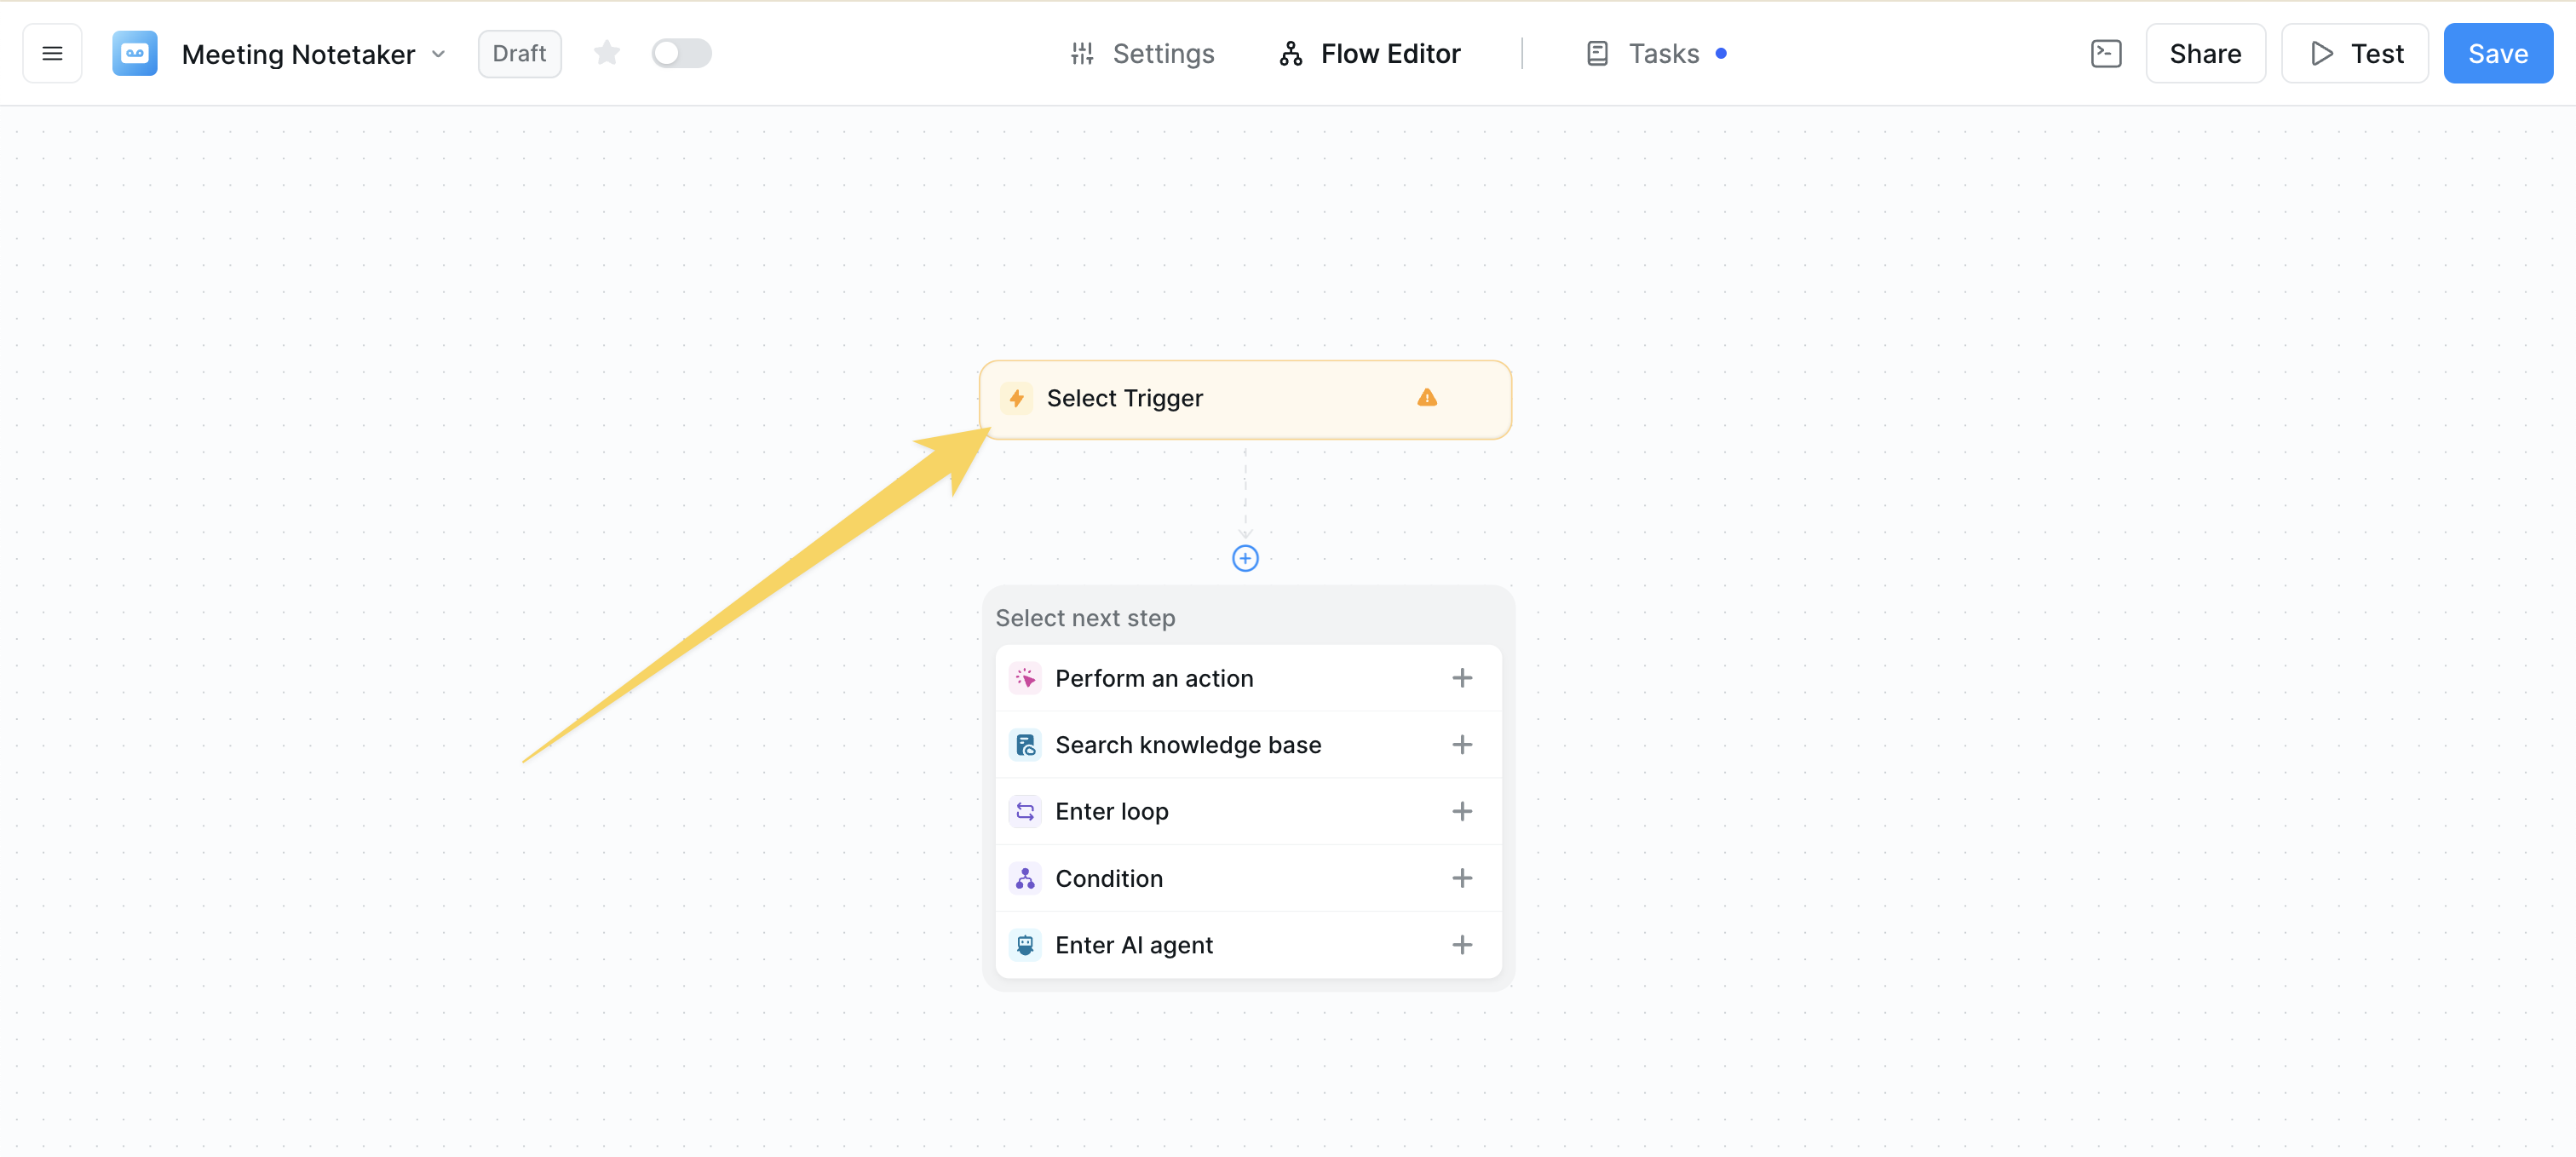 If it's your first time, authorize your desired account and select which account to use
 ## Types of triggers
### Time-based triggers
## Types of triggers
### Time-based triggers
 Starts the workflow at a set or recurring time. Examples include:
* Every weekday at 9 AM
* Daily at midnight
* Weekly on Monday
* Monthly on the 1st
### Chat-based triggers
Starts the workflow at a set or recurring time. Examples include:
* Every weekday at 9 AM
* Daily at midnight
* Weekly on Monday
* Monthly on the 1st
### Chat-based triggers
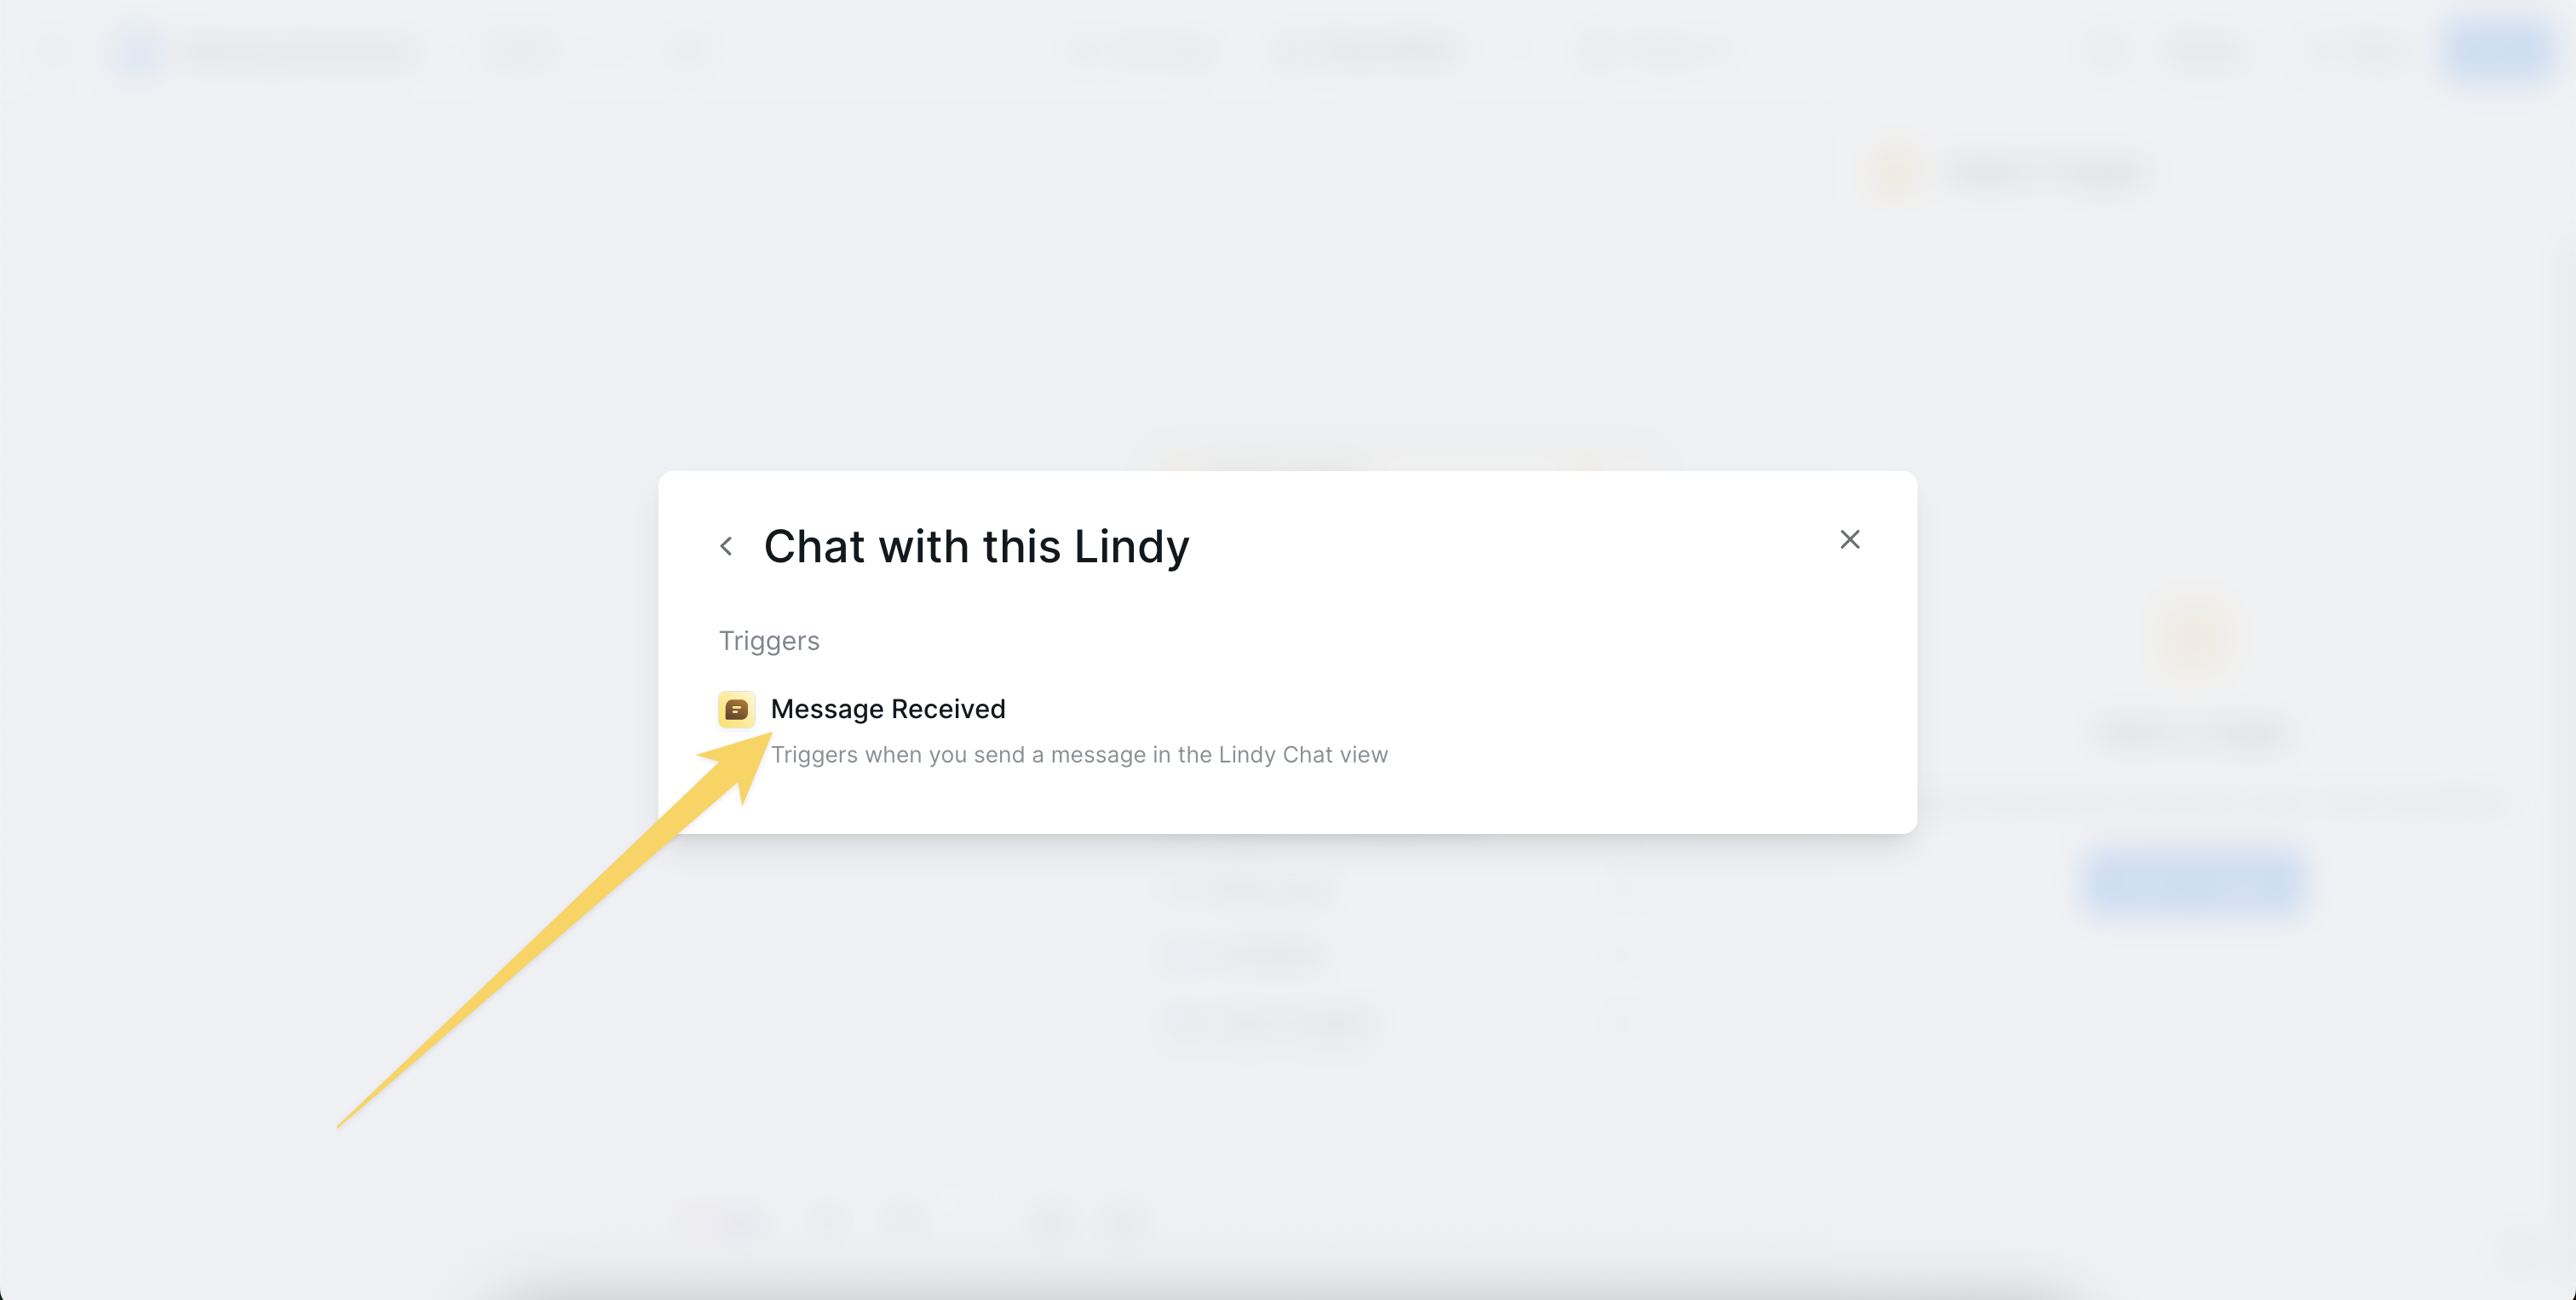 Starts the workflow when a user initiates a chat. This allows users to interact directly with your agent through the chat interface.
### Event-based triggers
Starts the workflow when a user initiates a chat. This allows users to interact directly with your agent through the chat interface.
### Event-based triggers
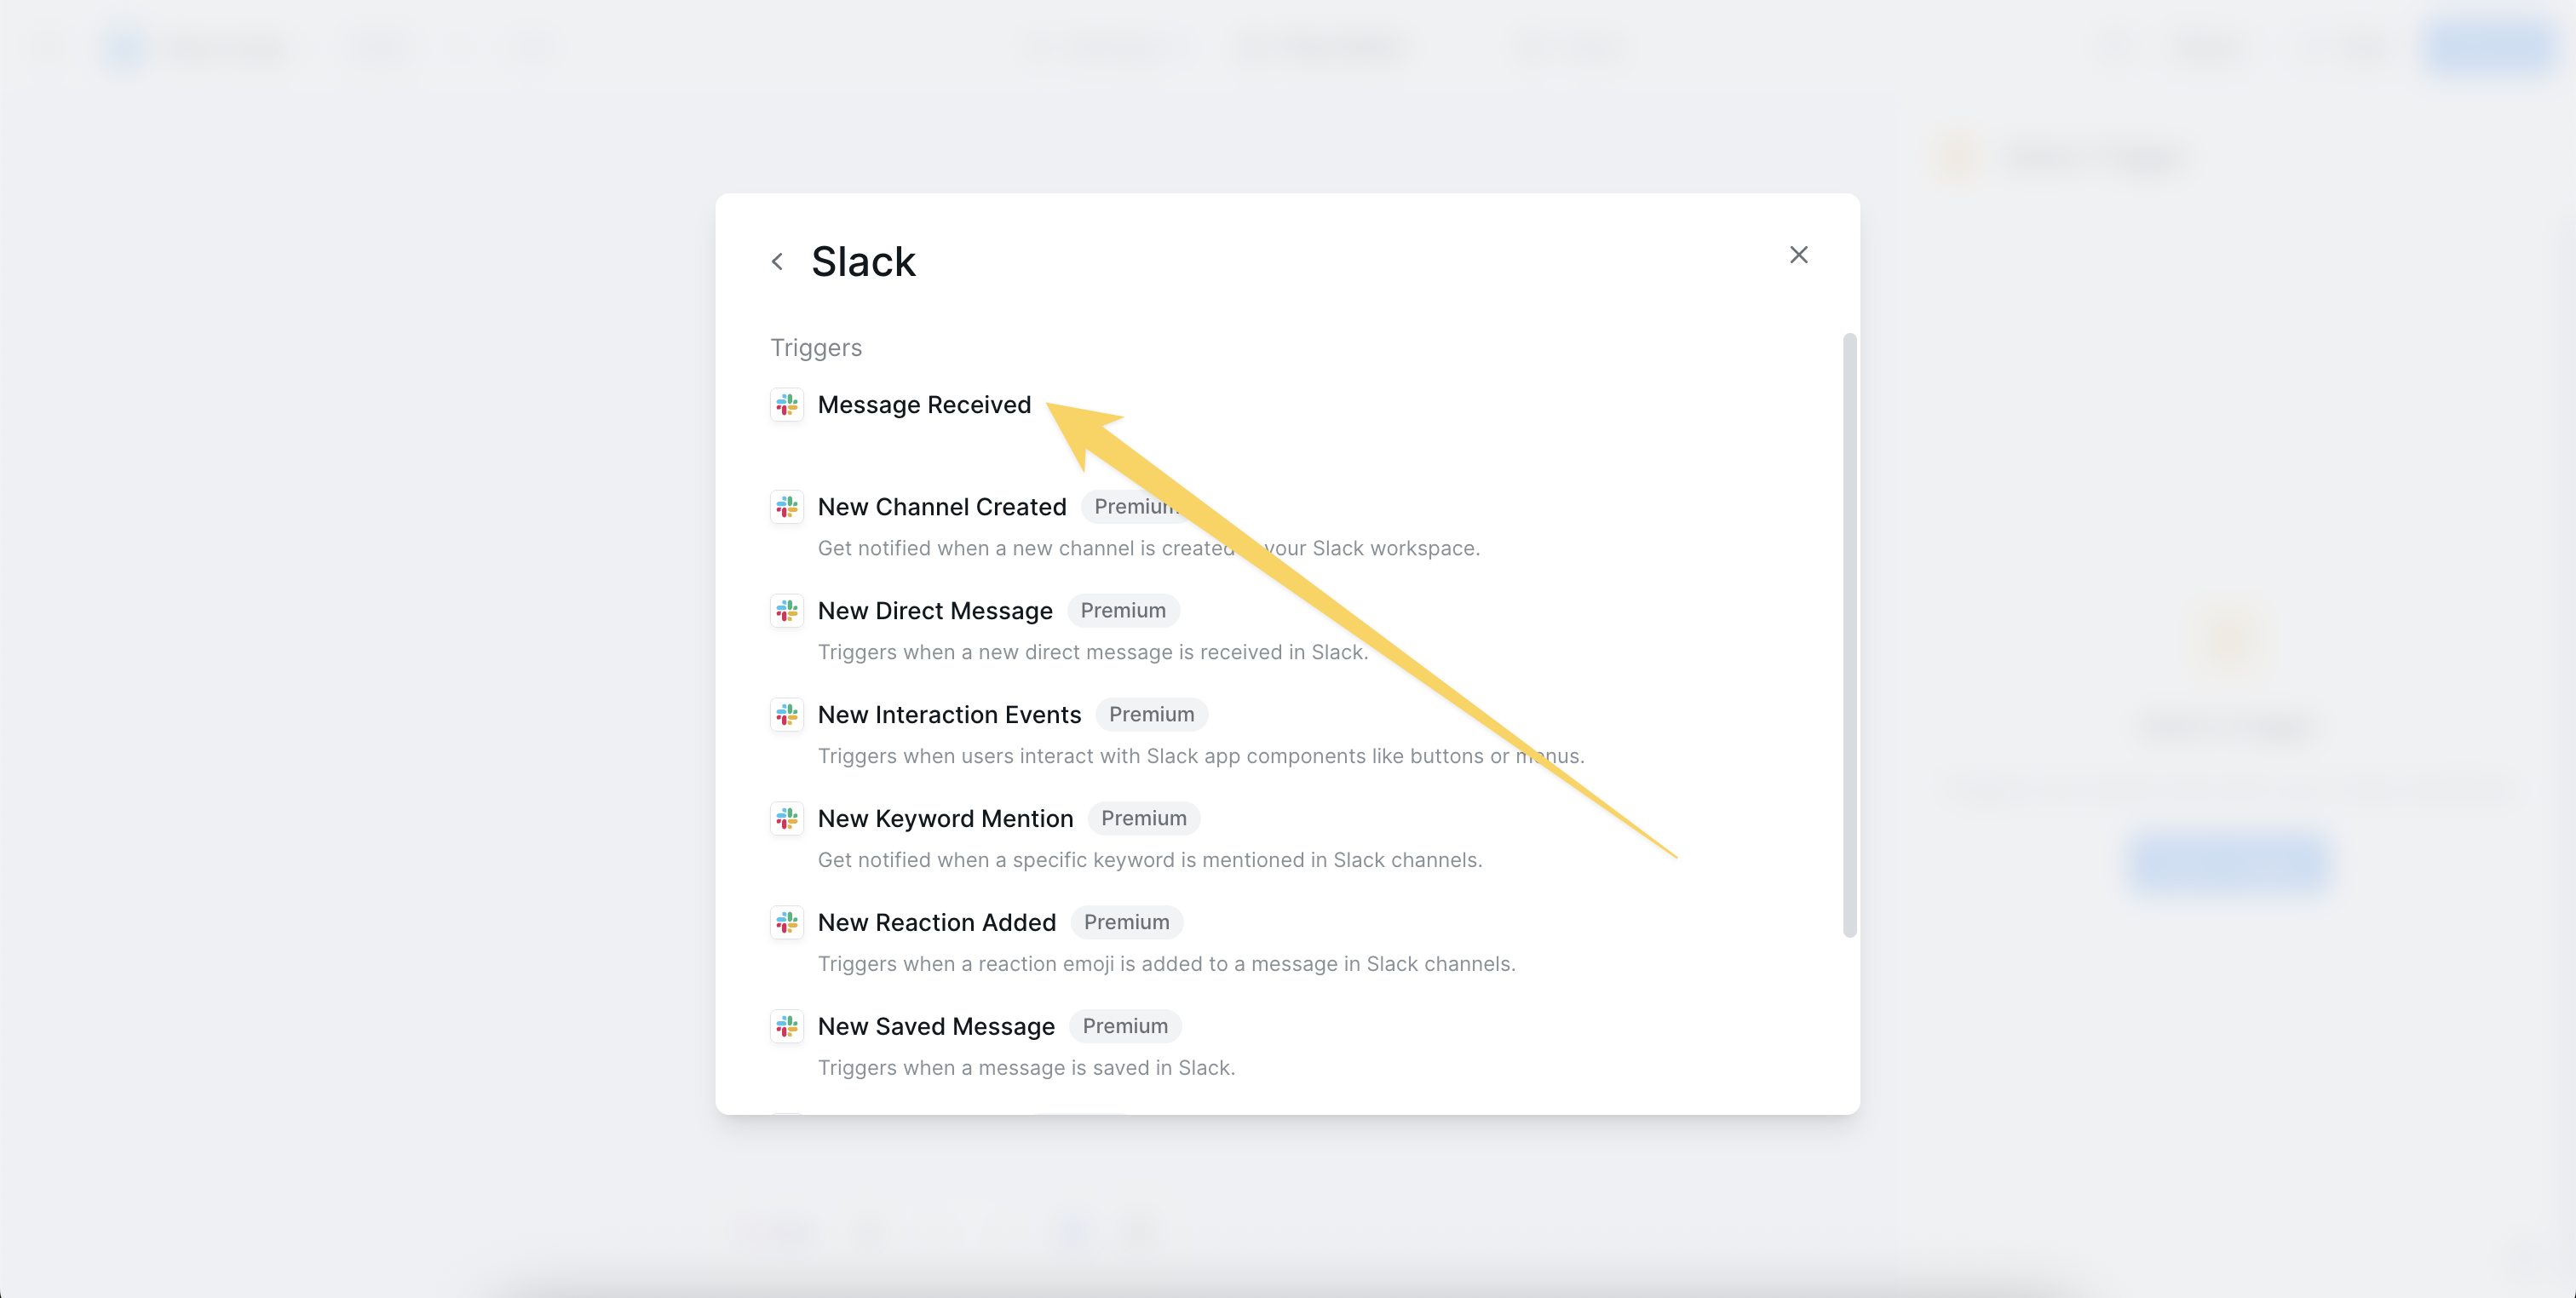 Starts the workflow when a specific event occurs. Examples include:
* Slack message received
* Email received
* Calendar event started
* New row added to Google Sheets
* Webhook received
Use triggers together with `conditions` to route workflows intelligently based on context.
## Trigger filters
A trigger filter allows you to set conditional logic to filter which events will cause your agent to wake up and execute the workflow.
You can enable trigger filters at the bottom of the trigger configuration settings. This means you do not have to add additional steps to filter out triggering events from your workflow.
### Example: Email received trigger setup
If you want your agent to process only emails with a specific label, you can configure the Email Received trigger to filter by label. This way, your agent will only wake up and run the workflow when an email with that label arrives.
Starts the workflow when a specific event occurs. Examples include:
* Slack message received
* Email received
* Calendar event started
* New row added to Google Sheets
* Webhook received
Use triggers together with `conditions` to route workflows intelligently based on context.
## Trigger filters
A trigger filter allows you to set conditional logic to filter which events will cause your agent to wake up and execute the workflow.
You can enable trigger filters at the bottom of the trigger configuration settings. This means you do not have to add additional steps to filter out triggering events from your workflow.
### Example: Email received trigger setup
If you want your agent to process only emails with a specific label, you can configure the Email Received trigger to filter by label. This way, your agent will only wake up and run the workflow when an email with that label arrives.
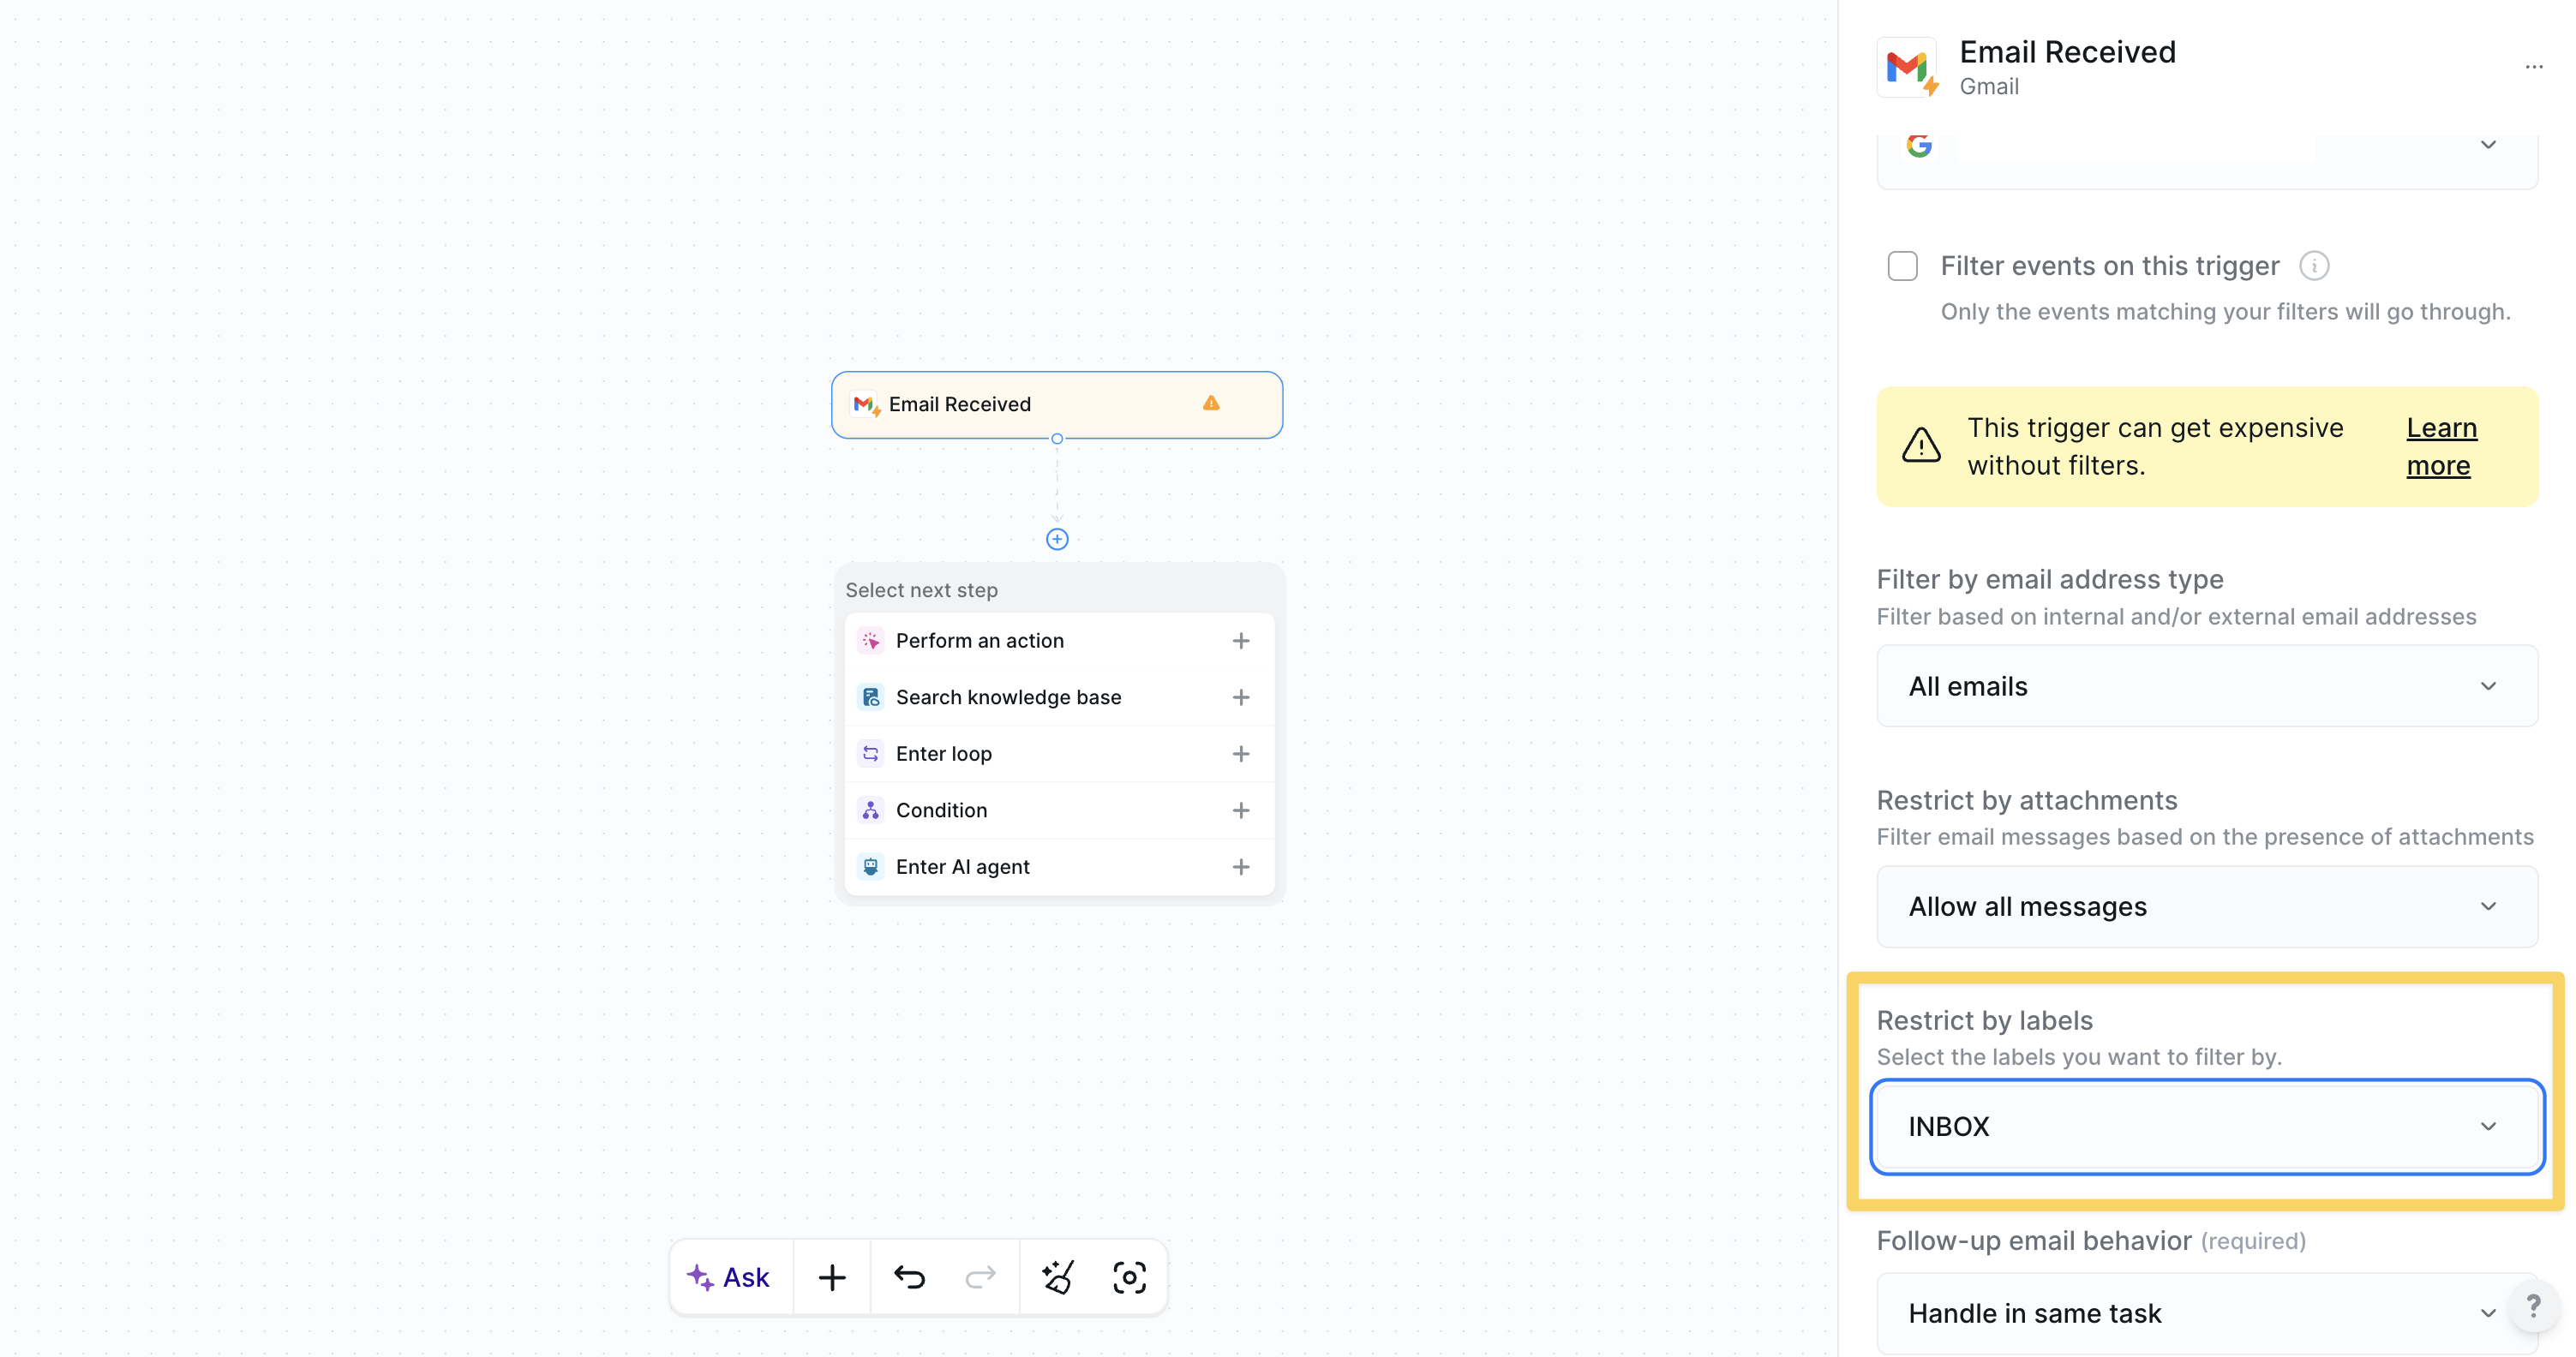 ### Filter rules
* Trigger filters are not case-sensitive
* You can add multiple filter conditions and combine them with AND or OR conditions
* Condition Groups allow you to build more complex, nested filtering logic
### Example filter
In the example below, your agent will only trigger if:
* The Calendar Event name contains "Interview" AND the location contains "1841 Market Street"
* OR the Calendar Event description contains "In-Person Interview"
### Setting an Offset
### Filter rules
* Trigger filters are not case-sensitive
* You can add multiple filter conditions and combine them with AND or OR conditions
* Condition Groups allow you to build more complex, nested filtering logic
### Example filter
In the example below, your agent will only trigger if:
* The Calendar Event name contains "Interview" AND the location contains "1841 Market Street"
* OR the Calendar Event description contains "In-Person Interview"
### Setting an Offset
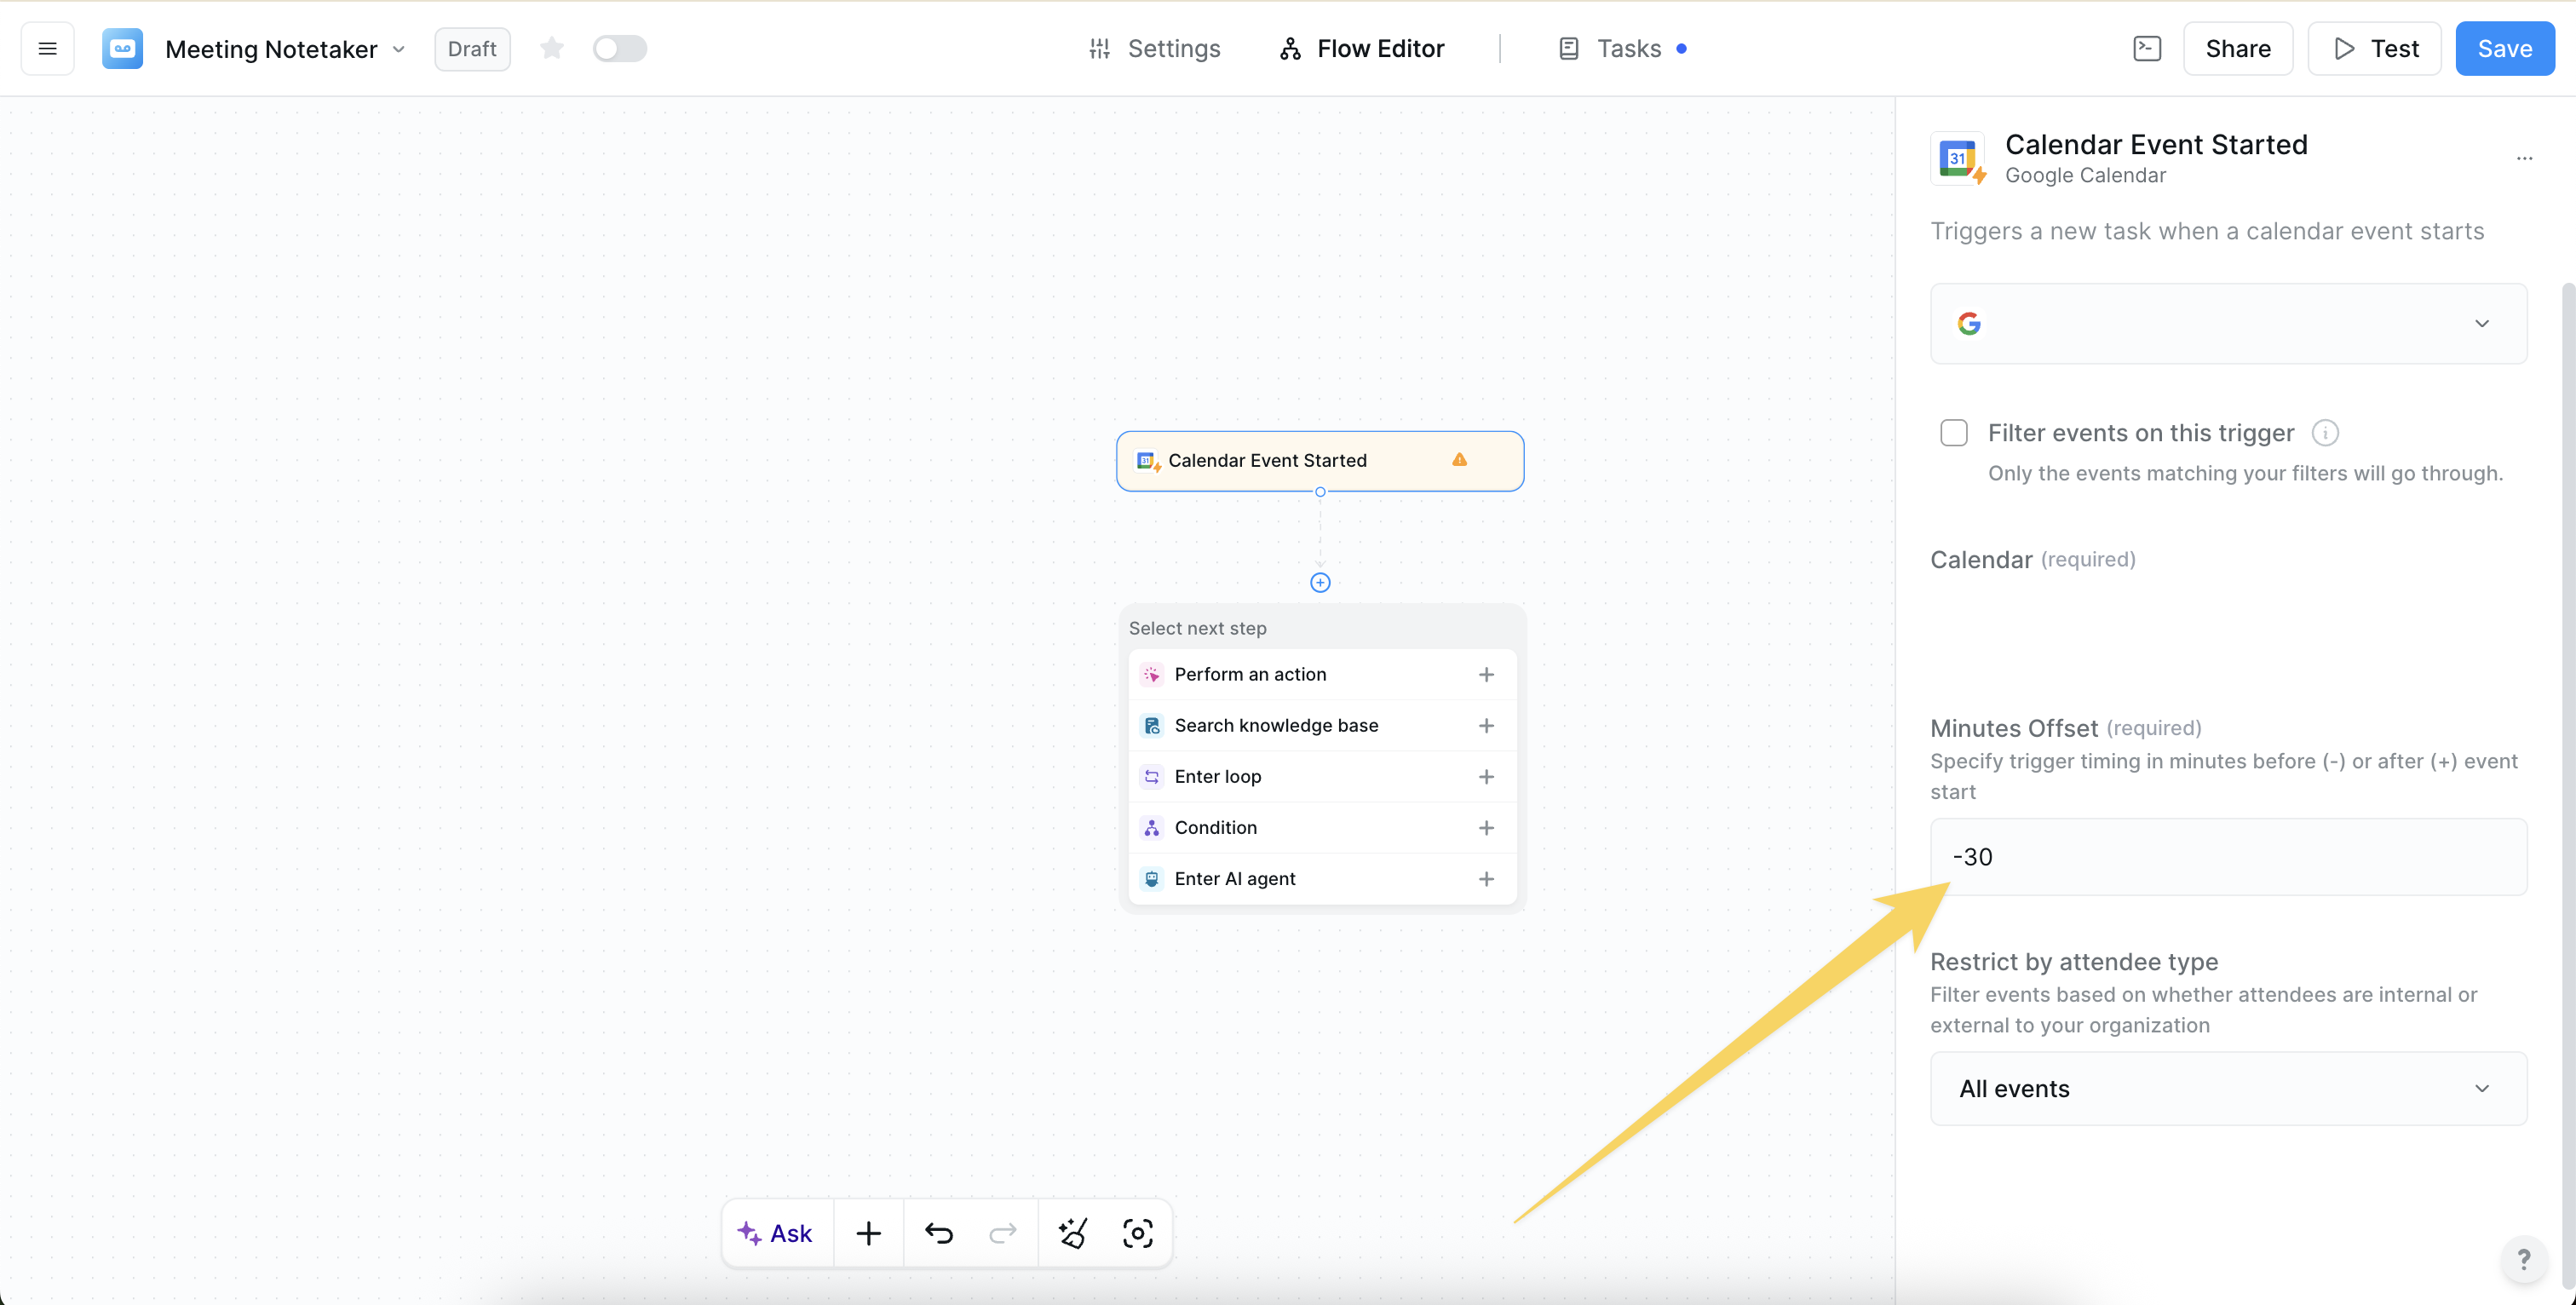 Some triggers, such as the Calendar Event Started trigger, offer a Minutes Offset, which allows the trigger timing to begin before or after the event start time:
* A negative Minutes Offset (-) sets the trigger before the event start time
* A positive Minutes Offset (+) sets the trigger after the event start time
For example, if you wanted a Meeting Prep Lindy to prep you 30 minutes before a meeting, you would set the Minutes Offset to -30. In this case, the workflow would begin 30 minutes before the Calendar Event Start time.
## Multiple triggers
One Lindy can have multiple triggers, either initiating the same workflow or triggering entirely different ones.
### Multiple triggers for the same workflow
For example, if you receive lead emails from a [contact@company.com](mailto:contact@company.com) email address and also have a form on your website that sends leads to a Google Sheet, you can configure two triggers to aggregate your leads:
1. One trigger would be on an Email Received
2. The other would be on a New Row Added to a Google Sheet
The workflow would execute exactly the same for both triggers.
#### How to set up multiple triggers
Some triggers, such as the Calendar Event Started trigger, offer a Minutes Offset, which allows the trigger timing to begin before or after the event start time:
* A negative Minutes Offset (-) sets the trigger before the event start time
* A positive Minutes Offset (+) sets the trigger after the event start time
For example, if you wanted a Meeting Prep Lindy to prep you 30 minutes before a meeting, you would set the Minutes Offset to -30. In this case, the workflow would begin 30 minutes before the Calendar Event Start time.
## Multiple triggers
One Lindy can have multiple triggers, either initiating the same workflow or triggering entirely different ones.
### Multiple triggers for the same workflow
For example, if you receive lead emails from a [contact@company.com](mailto:contact@company.com) email address and also have a form on your website that sends leads to a Google Sheet, you can configure two triggers to aggregate your leads:
1. One trigger would be on an Email Received
2. The other would be on a New Row Added to a Google Sheet
The workflow would execute exactly the same for both triggers.
#### How to set up multiple triggers
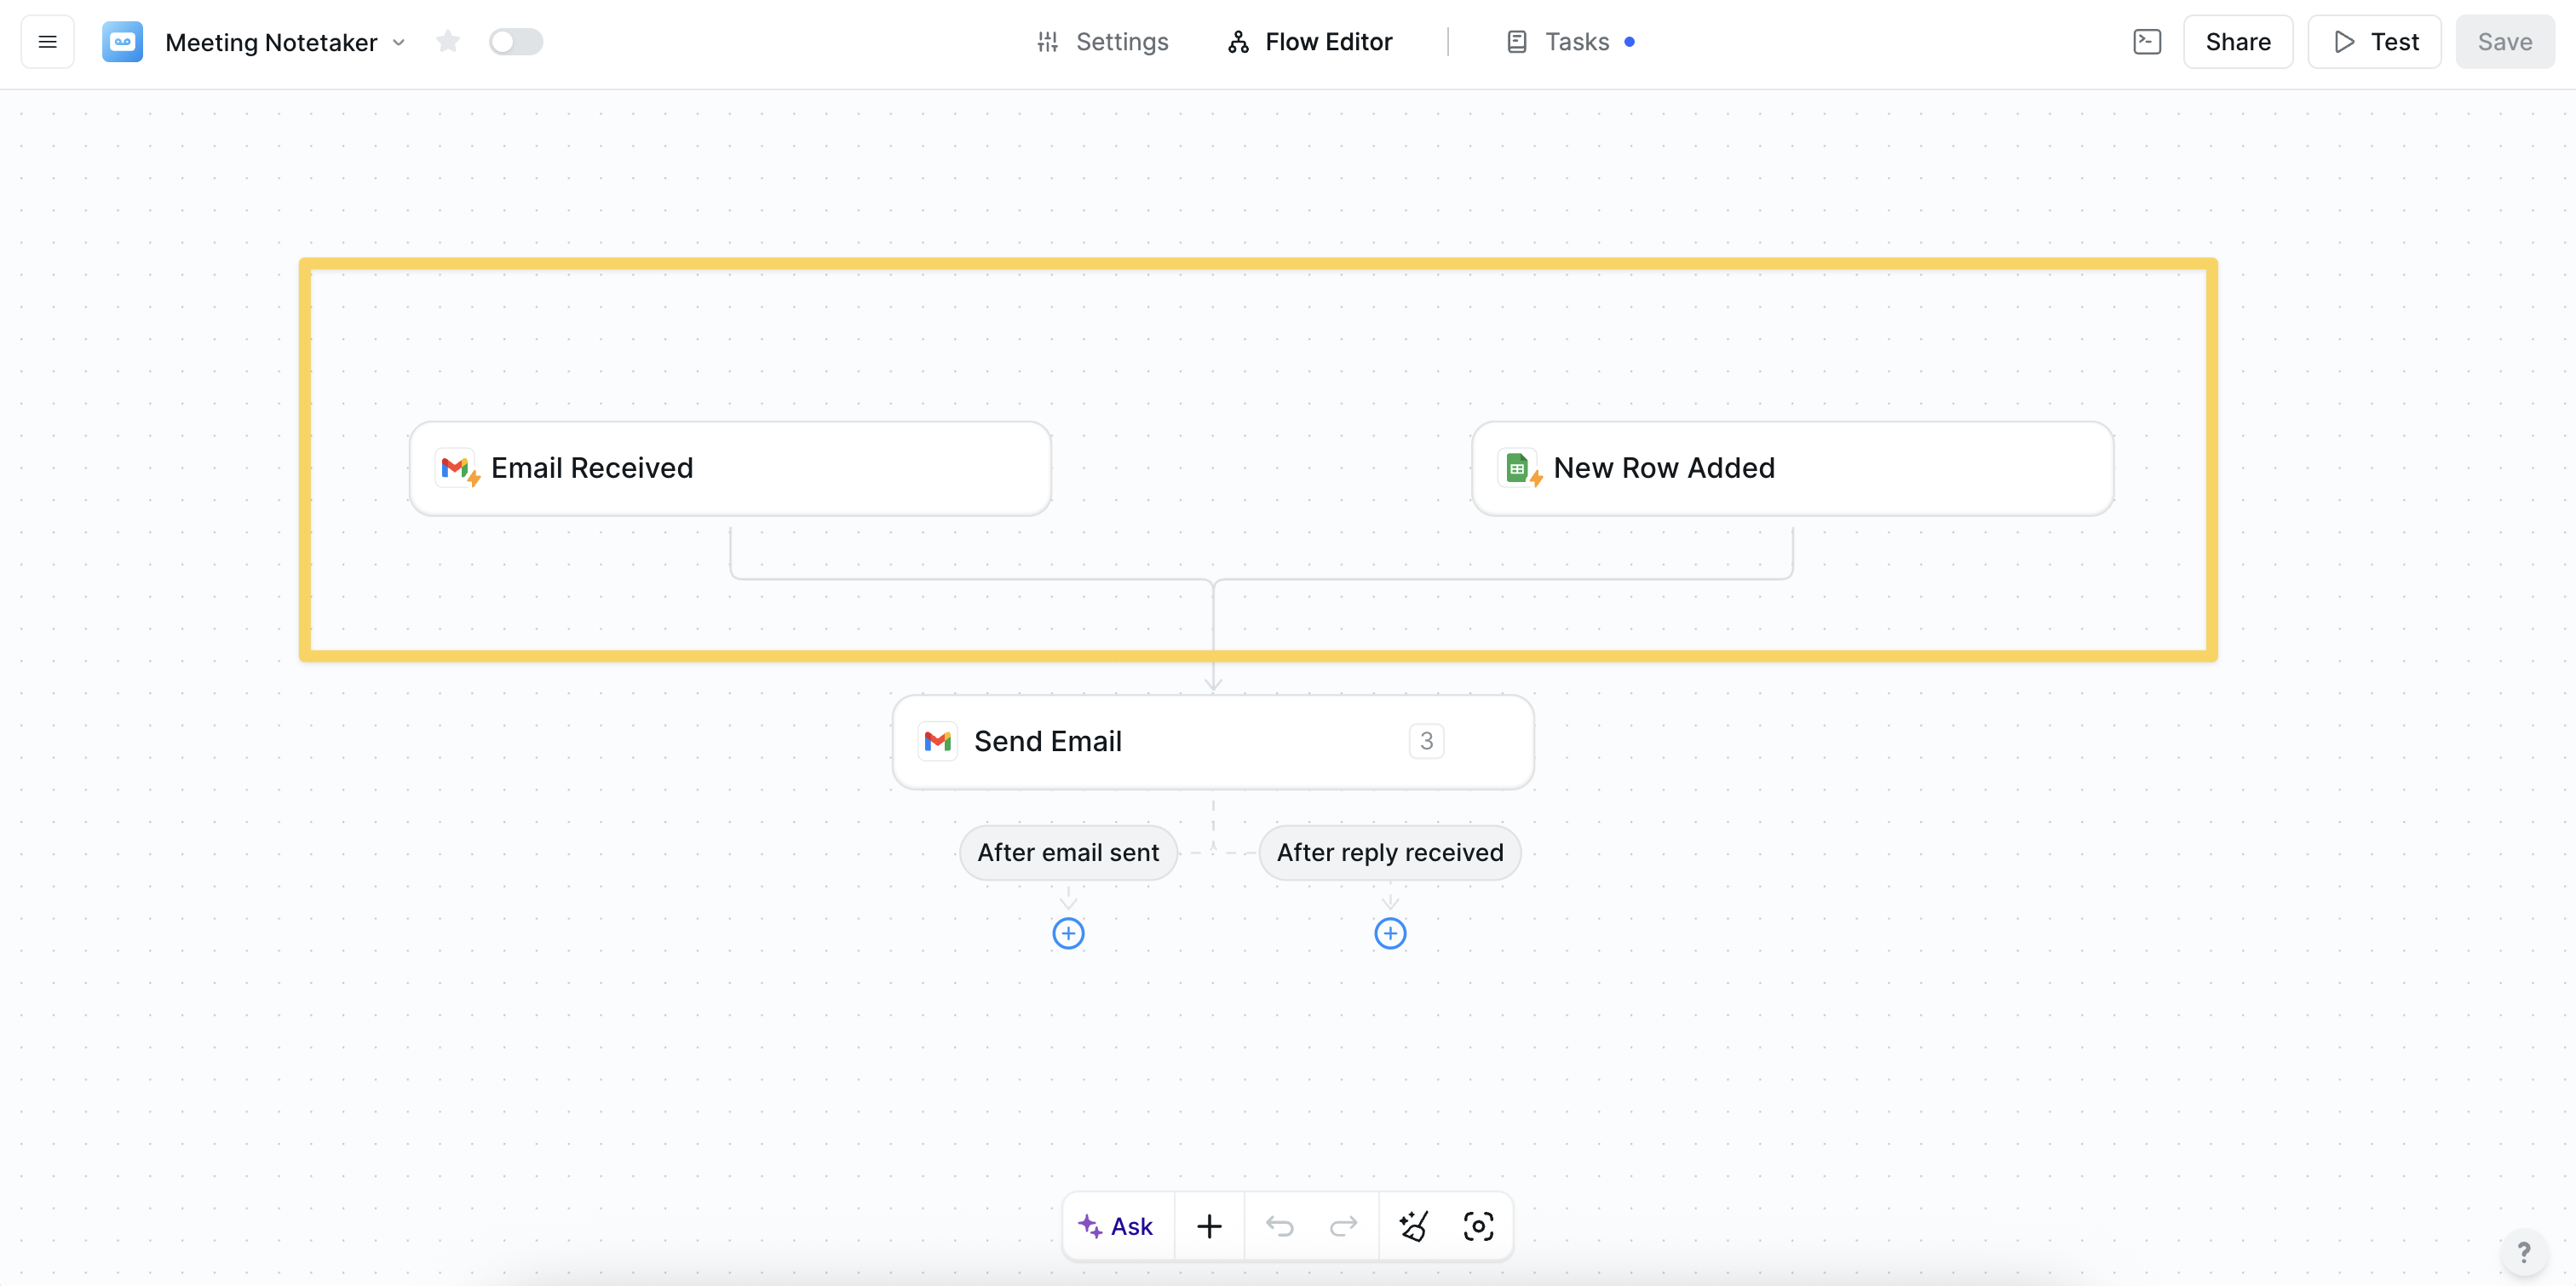 1. Create your first trigger and workflow
2. Click "New Trigger" in the top left of the Flow Editor
3. Add your second trigger
4. Drag the grey arrow beneath the second trigger and connect it to the appropriate step in your existing workflow
### A Lindy with multiple workflows
Under some circumstances, you may want your Lindy to have two distinct workflows. For example, let's say you want to build a Meeting Notetaker Lindy that can also answer meeting questions in the Lindy app:
1. Create your first trigger and workflow
2. Click "New Trigger" in the top left of the Flow Editor
3. Add your second trigger
4. Drag the grey arrow beneath the second trigger and connect it to the appropriate step in your existing workflow
### A Lindy with multiple workflows
Under some circumstances, you may want your Lindy to have two distinct workflows. For example, let's say you want to build a Meeting Notetaker Lindy that can also answer meeting questions in the Lindy app:
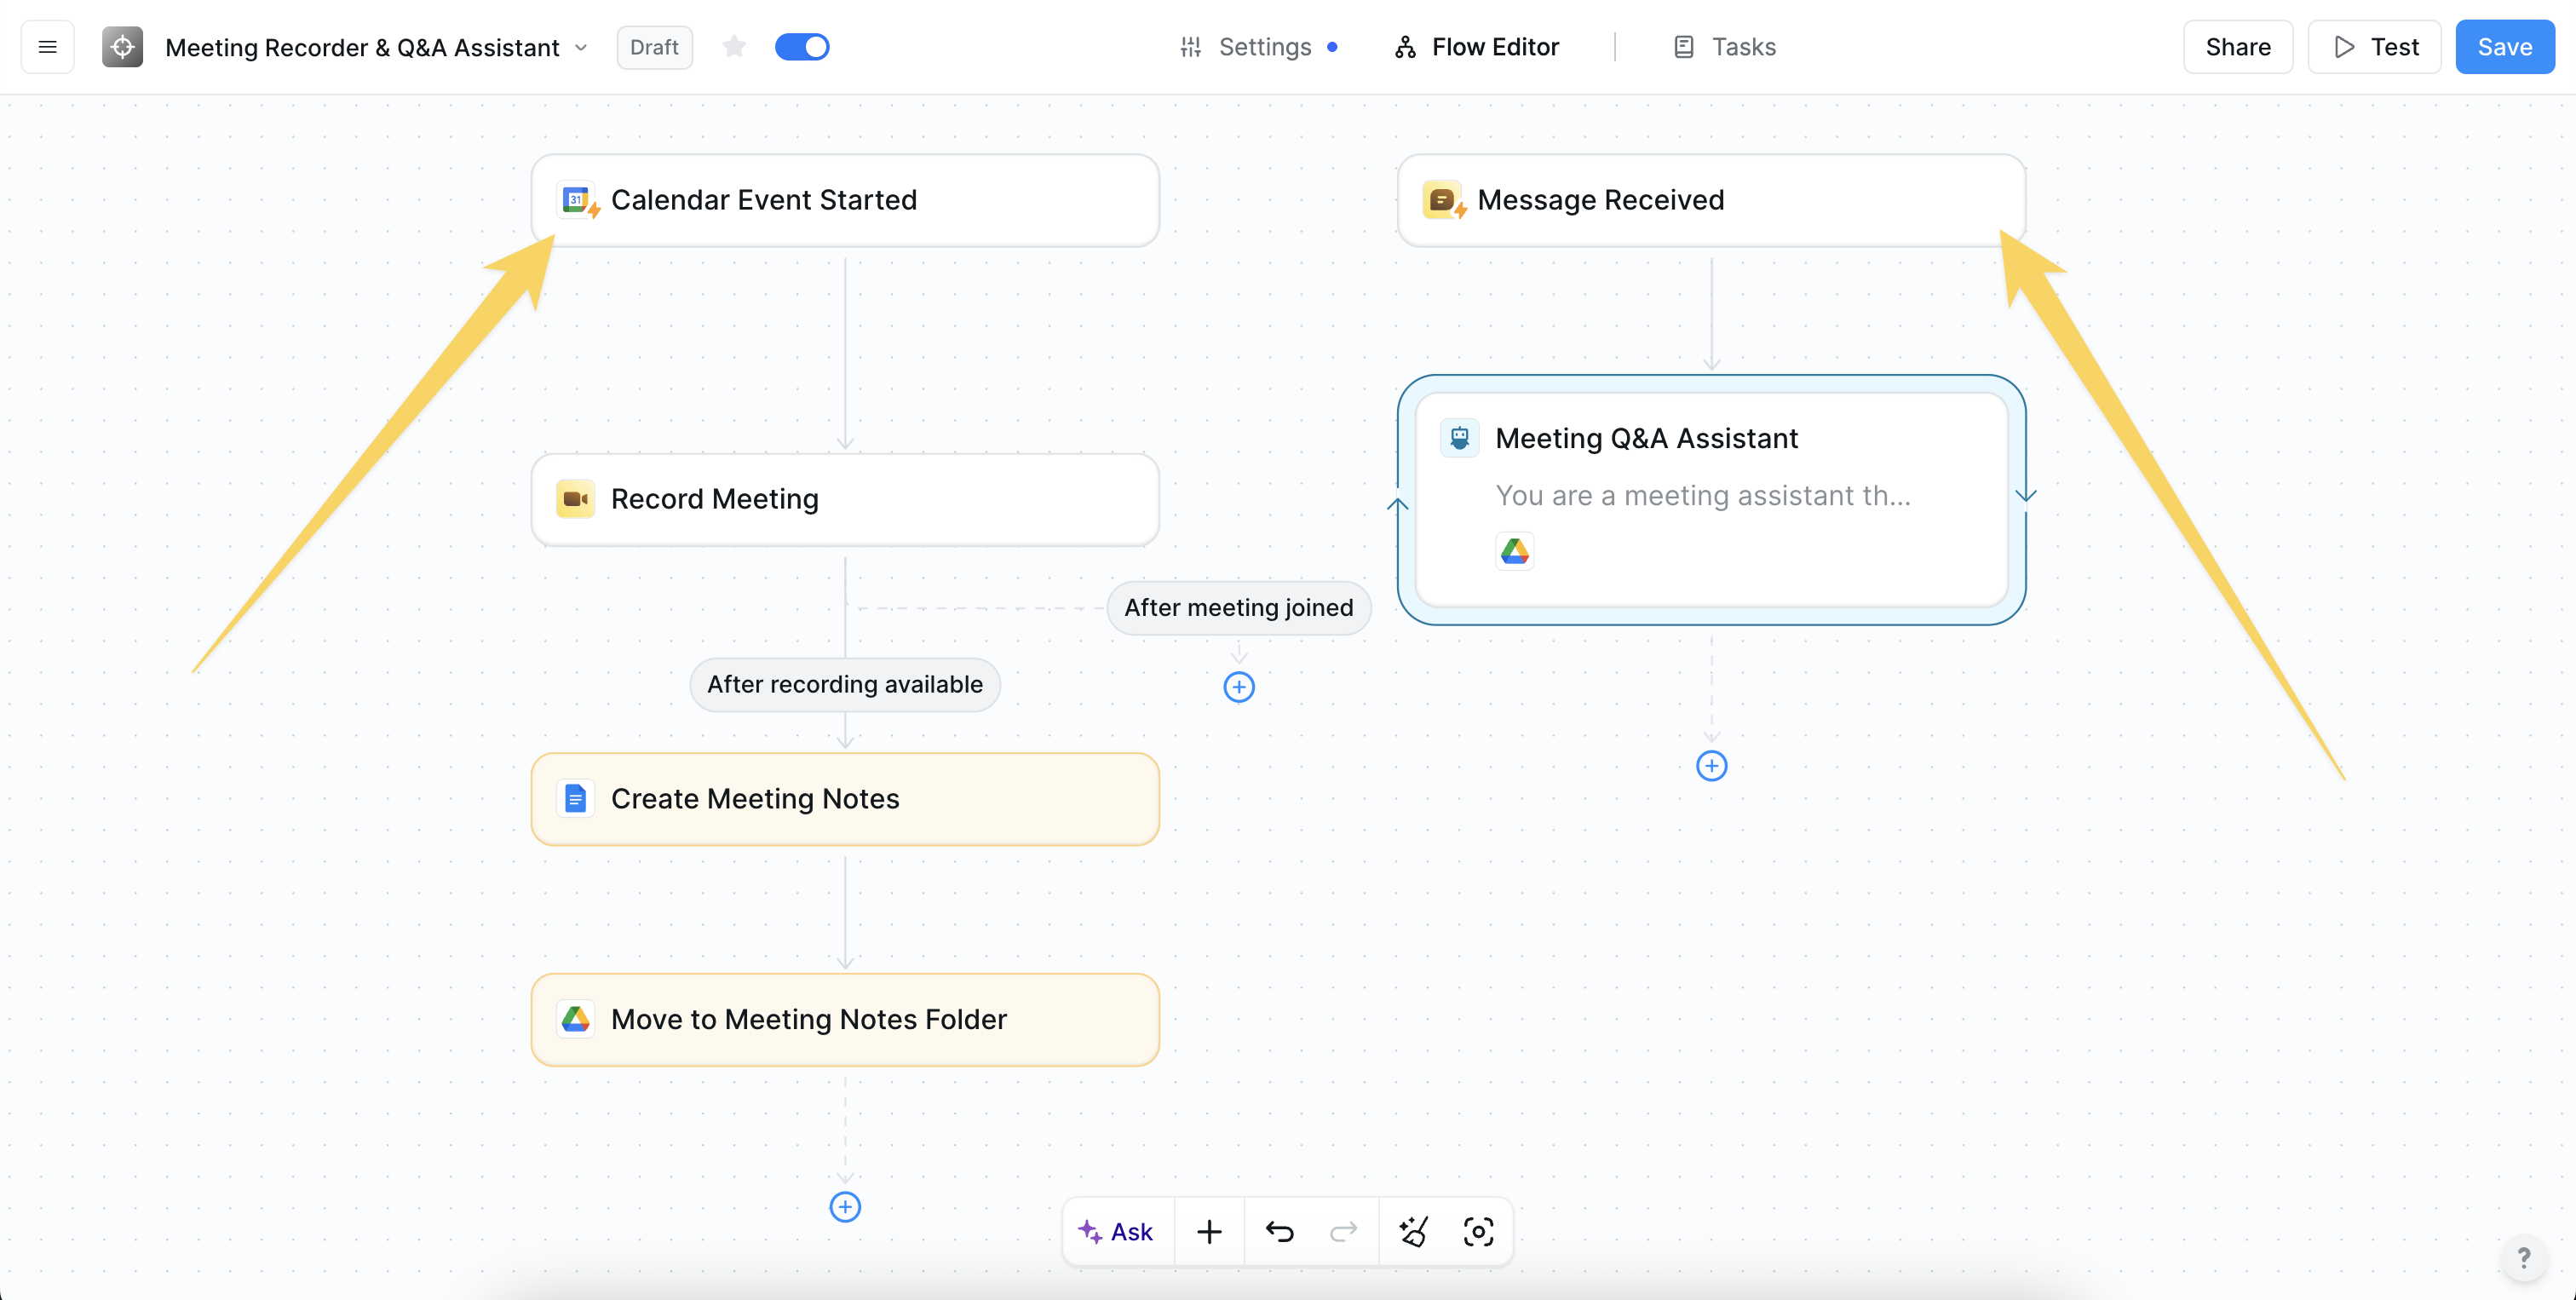 1. **First Workflow:** Meeting recorder that joins your meeting, creates a Google Document with meeting notes and saves them in a Folder (triggered by Calendar Event Start)
2. **Second Workflow:** Answer meeting questions with a Message Received trigger. This workflow begins when a user sends a message to Lindy, searches the knowledge base (which queries all the Documents in the Folder created by the first workflow), and then responds to the user.
This example outlines two workflows with different triggers:
* One workflow joins your meetings and takes notes
* The other allows the user to chat with their meetings and get instant answers to questions about their meetings
## Next steps
Discover what your agents can do
Route workflows based on logic
Build your first Lindy in minutes
Jump-start with pre-built workflows
# Introduction to Lindy
Source: https://docs.lindy.ai/index
## What is Lindy?
Lindy is powerful and easy to use platform for creating, deploying and managing AI agents.
**The difference?** Lindy's AI agents don't just follow scripts — they think and adapt like human assistants. Whether responding to emails, scheduling meetings, or handling customer support, they work seamlessly across your existing tools.
1. **First Workflow:** Meeting recorder that joins your meeting, creates a Google Document with meeting notes and saves them in a Folder (triggered by Calendar Event Start)
2. **Second Workflow:** Answer meeting questions with a Message Received trigger. This workflow begins when a user sends a message to Lindy, searches the knowledge base (which queries all the Documents in the Folder created by the first workflow), and then responds to the user.
This example outlines two workflows with different triggers:
* One workflow joins your meetings and takes notes
* The other allows the user to chat with their meetings and get instant answers to questions about their meetings
## Next steps
Discover what your agents can do
Route workflows based on logic
Build your first Lindy in minutes
Jump-start with pre-built workflows
# Introduction to Lindy
Source: https://docs.lindy.ai/index
## What is Lindy?
Lindy is powerful and easy to use platform for creating, deploying and managing AI agents.
**The difference?** Lindy's AI agents don't just follow scripts — they think and adapt like human assistants. Whether responding to emails, scheduling meetings, or handling customer support, they work seamlessly across your existing tools.
 ## The problem with repetitive work
Every day, knowledge workers spend 40% of their time on repetitive tasks. Email responses, data entry, meeting notes, customer support tickets - the list goes on. These tasks are necessary but not strategic. They're perfect for automation.
## Enter Lindy: Your AI workforce
Lindy transforms how you handle repetitive work by allowing you to build AI agents that don't just follow rules — they understand context and make intelligent decisions. With no coding required, you can build a team of specialized AI assistants that work around the clock, freeing you to focus on what truly matters for growing your business.
New to Lindy? The [Lindy 101 Introduction](/fundamentals/lindy-101/introduction) is the perfect place to start — it explains all the core concepts and shows you how everything works together.
## How Lindy is different
### No-code, truly
Other automation tools still feel like programming. Lindy uses simple drag-and-drop workflows that anyone can build. No technical knowledge required.
### Minutes to value
Most automation tools take weeks to set up. With Lindy, you can build and deploy your first AI agent in minutes.
### Actually intelligent
Traditional automation breaks when something unexpected happens. Lindy's AI agents understand context and adapt to new situations, just like a human assistant would.
### Works with everything
Lindy connects to 3,000+ apps right out of the box. Your agents work across your entire tech stack — from Gmail to HubSpot to your CRM.
## What can you build with Lindy?
Respond to emails, sort your inbox, draft replies
Schedule meetings, take notes, send follow-ups
Answer questions, route tickets, escalate issues
Qualify leads, research prospects, send outreach
## Ready to get started?
Go to chat.lindy.ai/signup to get started
Open the Quickstart Guide & build your first agent in 5 minutes
Browse pre-built agents in our Template Library
## Next steps
Build your first agent in 5 minutes
Learn the building blocks
# Join Community
Source: https://docs.lindy.ai/join-community
# Changelog
Source: https://docs.lindy.ai/resources/changelog
To see our latest updates, please visit our [changelog](https://www.lindy.ai/changelog).
# Security
Source: https://docs.lindy.ai/resources/security
For an overview of our security practices, please visit our [security page](https://www.lindy.ai/security).
# Chat with Lindy
Source: https://docs.lindy.ai/skills/by-lindy/chat-with-lindy
Build interactive workflows using chat as a trigger and an action.
## Overview
Chat with Lindy allows you to build interactive workflows that can be triggered by incoming messages and respond in real-time. This skill is perfect for creating conversational agents, custom commands, and workflows that require direct user interaction. You can start a chat from your [Tasks menu](/skills/lindy-utilities/get-task), making it incredibly easy to kick off an automation.
## Trigger: Message Received
The `Message Received` trigger is the starting point for any chat-based workflow. When your agent receives a message in the chat interface that matches your trigger conditions, it will automatically start the corresponding workflow.
## The problem with repetitive work
Every day, knowledge workers spend 40% of their time on repetitive tasks. Email responses, data entry, meeting notes, customer support tickets - the list goes on. These tasks are necessary but not strategic. They're perfect for automation.
## Enter Lindy: Your AI workforce
Lindy transforms how you handle repetitive work by allowing you to build AI agents that don't just follow rules — they understand context and make intelligent decisions. With no coding required, you can build a team of specialized AI assistants that work around the clock, freeing you to focus on what truly matters for growing your business.
New to Lindy? The [Lindy 101 Introduction](/fundamentals/lindy-101/introduction) is the perfect place to start — it explains all the core concepts and shows you how everything works together.
## How Lindy is different
### No-code, truly
Other automation tools still feel like programming. Lindy uses simple drag-and-drop workflows that anyone can build. No technical knowledge required.
### Minutes to value
Most automation tools take weeks to set up. With Lindy, you can build and deploy your first AI agent in minutes.
### Actually intelligent
Traditional automation breaks when something unexpected happens. Lindy's AI agents understand context and adapt to new situations, just like a human assistant would.
### Works with everything
Lindy connects to 3,000+ apps right out of the box. Your agents work across your entire tech stack — from Gmail to HubSpot to your CRM.
## What can you build with Lindy?
Respond to emails, sort your inbox, draft replies
Schedule meetings, take notes, send follow-ups
Answer questions, route tickets, escalate issues
Qualify leads, research prospects, send outreach
## Ready to get started?
Go to chat.lindy.ai/signup to get started
Open the Quickstart Guide & build your first agent in 5 minutes
Browse pre-built agents in our Template Library
## Next steps
Build your first agent in 5 minutes
Learn the building blocks
# Join Community
Source: https://docs.lindy.ai/join-community
# Changelog
Source: https://docs.lindy.ai/resources/changelog
To see our latest updates, please visit our [changelog](https://www.lindy.ai/changelog).
# Security
Source: https://docs.lindy.ai/resources/security
For an overview of our security practices, please visit our [security page](https://www.lindy.ai/security).
# Chat with Lindy
Source: https://docs.lindy.ai/skills/by-lindy/chat-with-lindy
Build interactive workflows using chat as a trigger and an action.
## Overview
Chat with Lindy allows you to build interactive workflows that can be triggered by incoming messages and respond in real-time. This skill is perfect for creating conversational agents, custom commands, and workflows that require direct user interaction. You can start a chat from your [Tasks menu](/skills/lindy-utilities/get-task), making it incredibly easy to kick off an automation.
## Trigger: Message Received
The `Message Received` trigger is the starting point for any chat-based workflow. When your agent receives a message in the chat interface that matches your trigger conditions, it will automatically start the corresponding workflow.
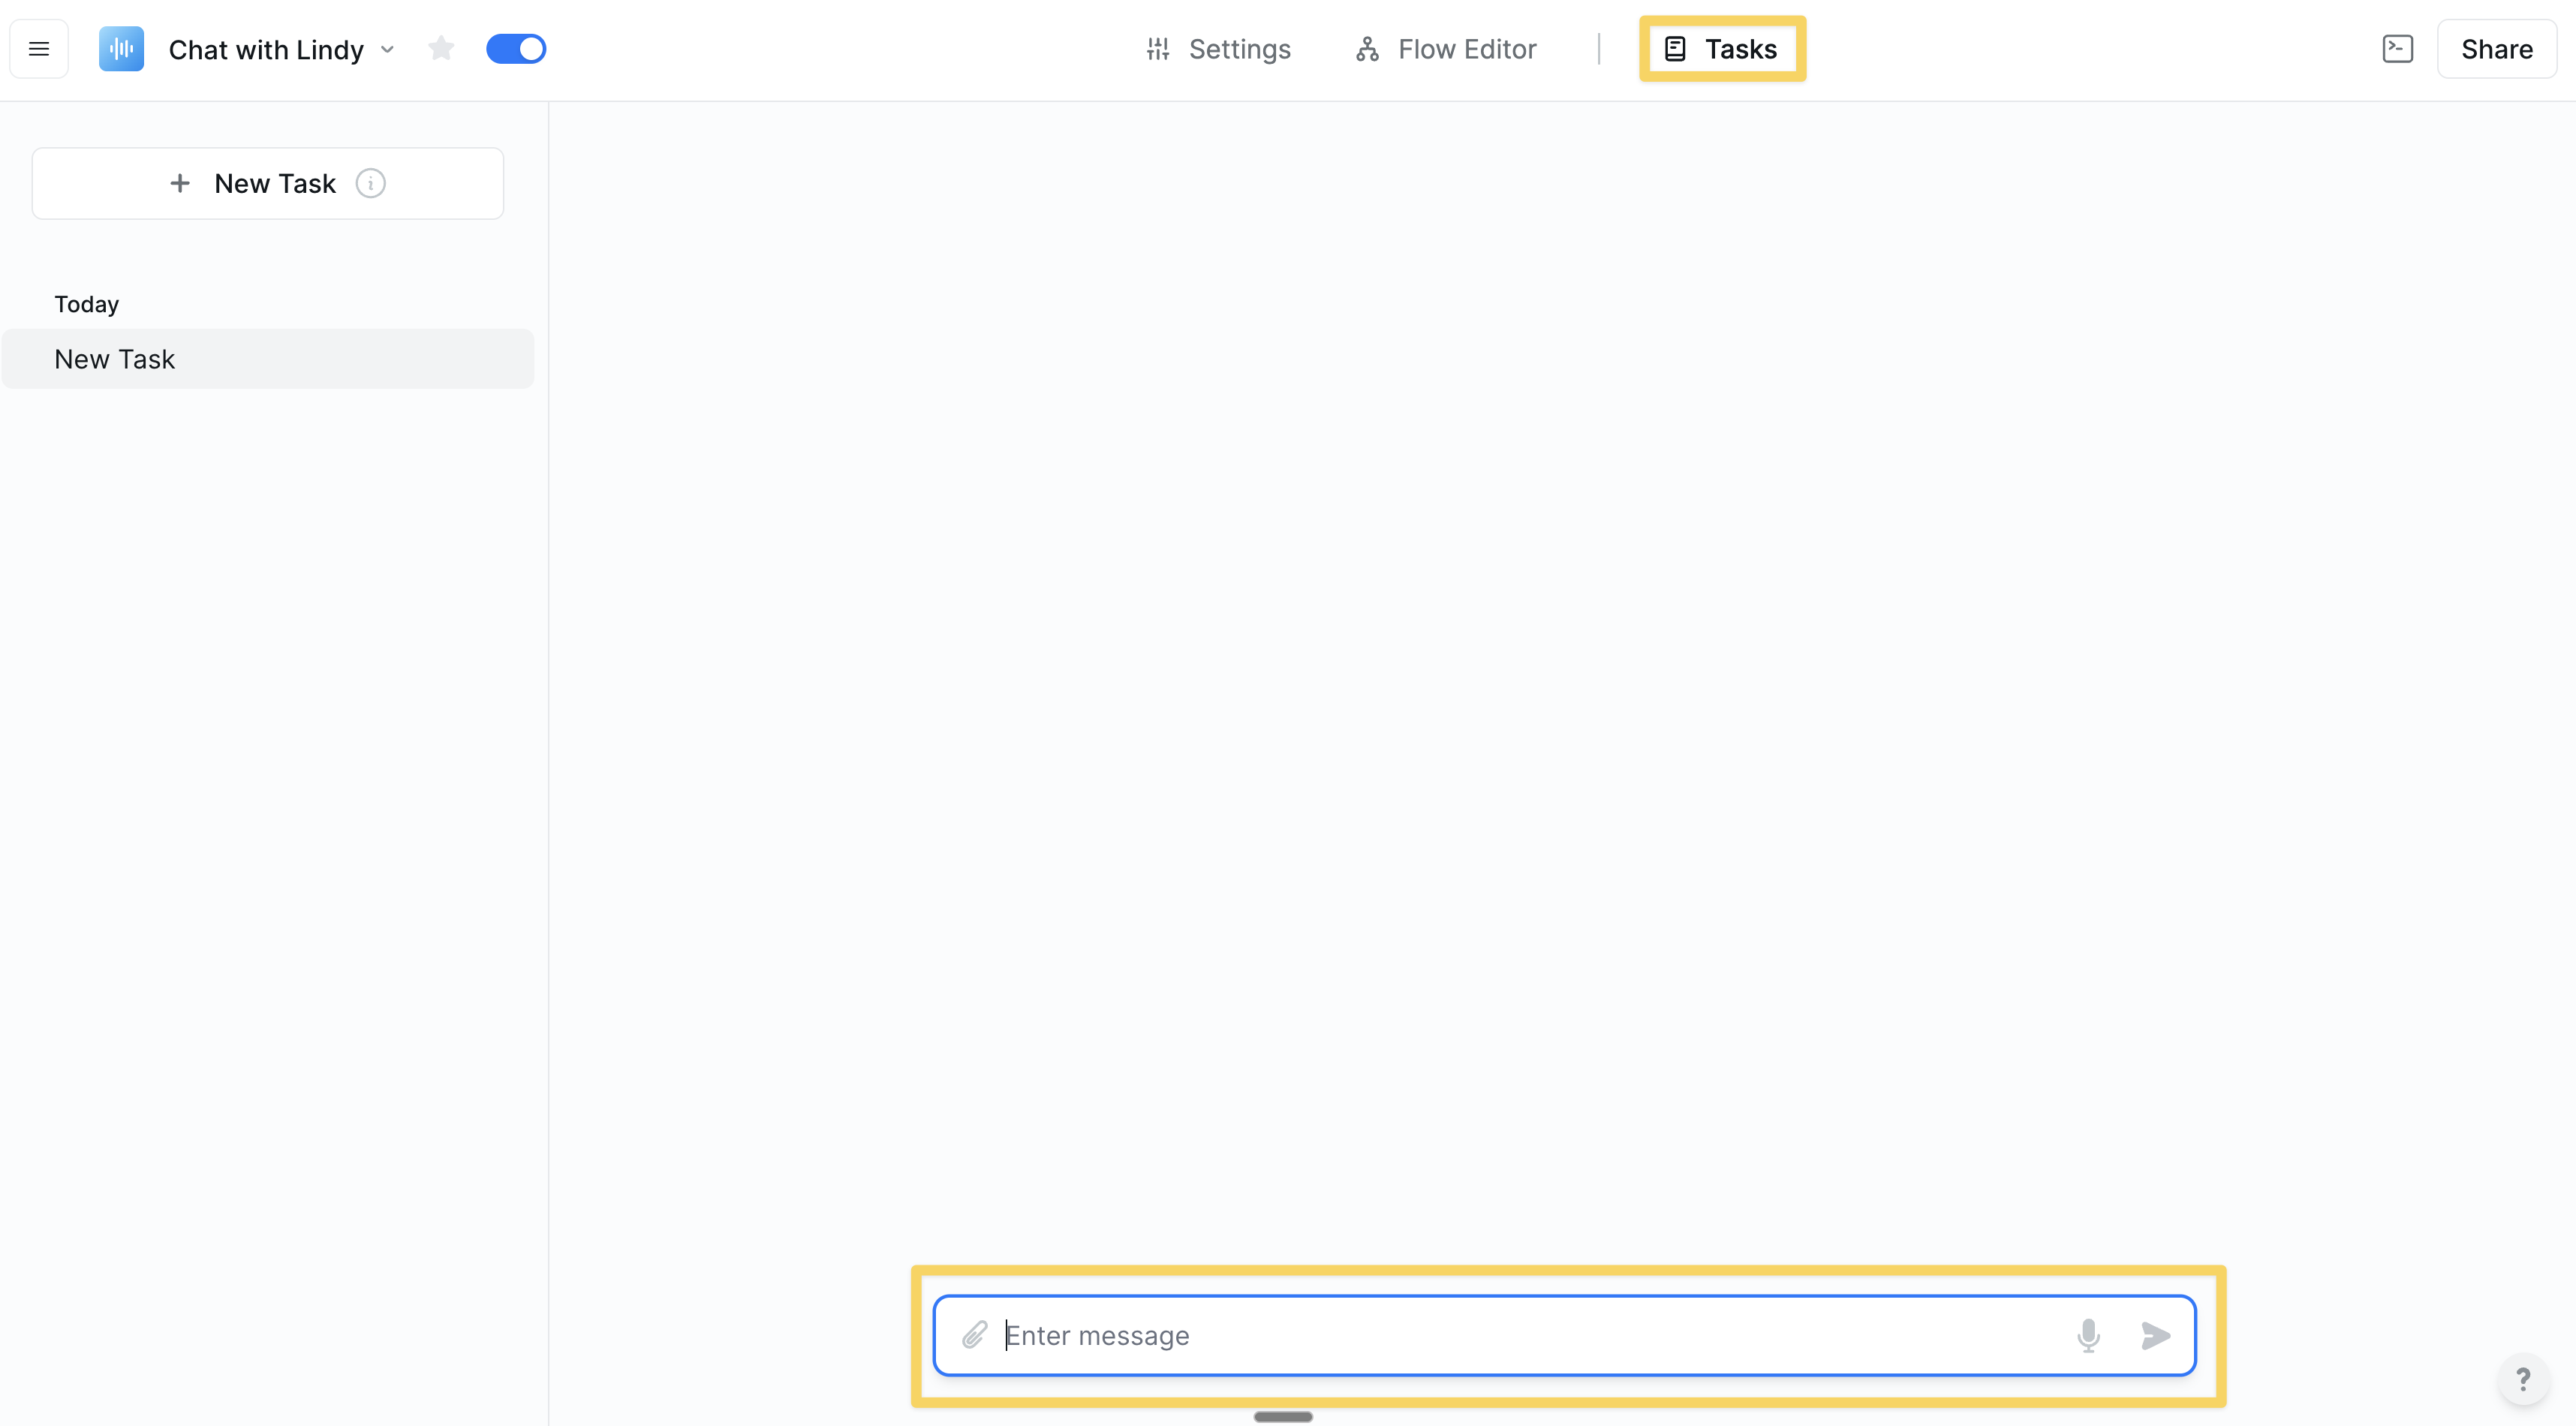 This trigger will remember the conversation context and can be re-triggered by new messages in the same chat thread.
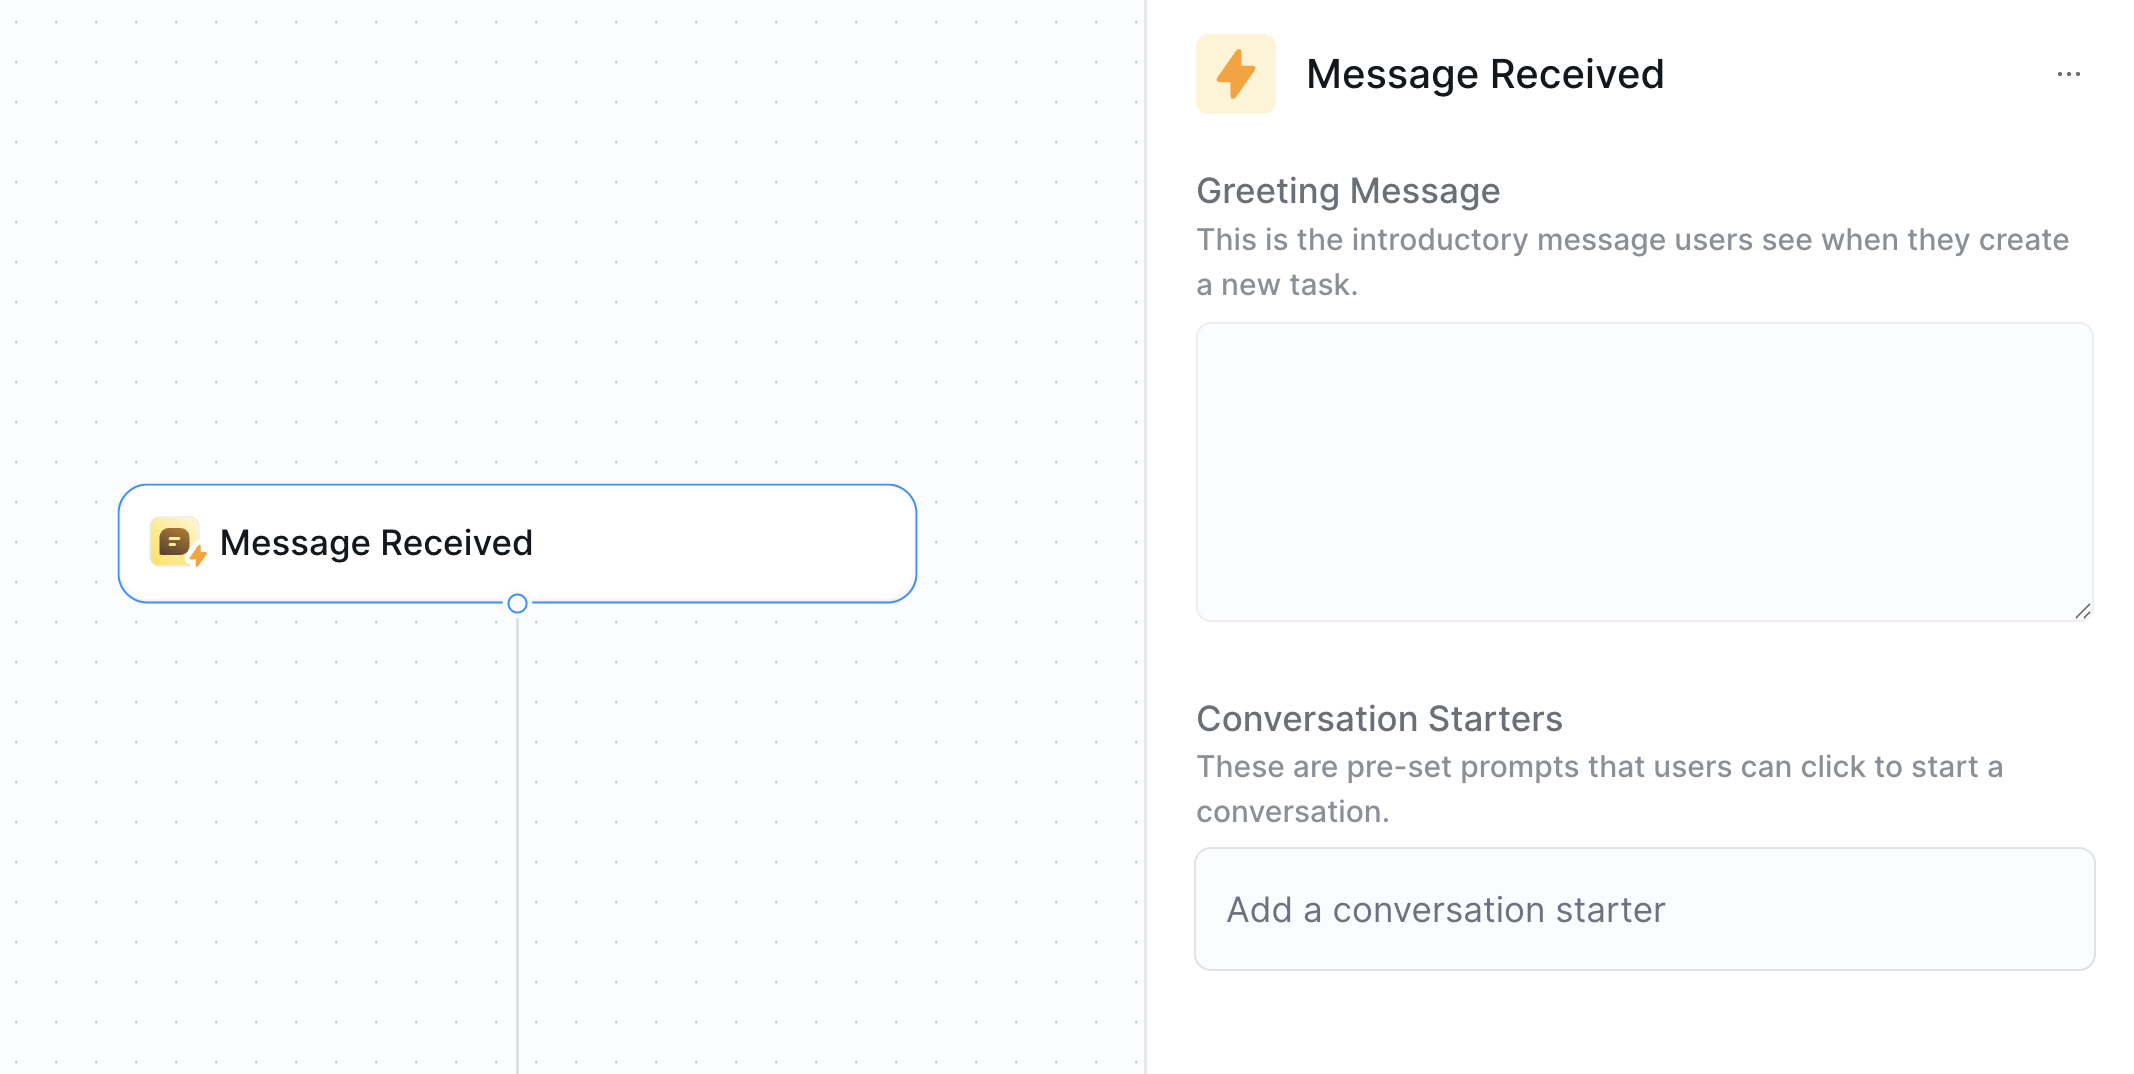 ## Actions
There are two primary actions you can use to interact with the chat.
## Actions
There are two primary actions you can use to interact with the chat.
 ### Send Message
The `Send Message` action allows your agent to send a message back to the chat. This is how your agent communicates with you or your users. You can use Markdown to format your messages, allowing you to create rich, interactive responses.
### Observe Message
The `Observe Message` action allows the agent to "listen" for new messages in the chat without being the active trigger. This is useful for workflows where you need to monitor a conversation and take action later in the flow. While `Message Received` is also listening, `Observe Message` gives you more granular control over when and where you listen for new messages.
## AI Agent Integration
The AI Agent is a powerful tool that can be used to create intelligent, conversational workflows. When you use the AI Agent in a chat-based workflow, it can read the incoming messages, understand the user's intent, and then decide which actions to take. The AI Agent can also send messages back to the chat, allowing you to create a natural, back-and-forth conversation.
The AI Agent always has access to the "Send Message" action, so you don't need to add it explicitly. It can read and send messages in the Lindy chat natively.
## Bulk Uploading Tasks via CSV
You can quickly create multiple chat tasks for your agents by uploading a CSV file to the tasks side panel. This is perfect for batch processing. Each row in your CSV will generate a new chat task, making it easy to automate large sets of interactions.
## Next Steps
Embed chat functionality on your website
Add knowledge to make conversations smarter
Add oversight to chat interactions
Build intelligent conversation flows
# HTTP Request
Source: https://docs.lindy.ai/skills/by-lindy/http-request
Execute custom API calls and webhooks directly from your agent workflows
## Overview
The HTTP Request action enables your agents to interact with any API or webhook endpoint. Whether you're fetching data, updating records, or triggering external workflows, HTTP Request provides complete control over your API interactions.
HTTP Request is one of the most popular Lindy actions, giving you access to thousands of APIs that don't have native Lindy integrations yet.
## Adding HTTP Request to Your Workflow
### Send Message
The `Send Message` action allows your agent to send a message back to the chat. This is how your agent communicates with you or your users. You can use Markdown to format your messages, allowing you to create rich, interactive responses.
### Observe Message
The `Observe Message` action allows the agent to "listen" for new messages in the chat without being the active trigger. This is useful for workflows where you need to monitor a conversation and take action later in the flow. While `Message Received` is also listening, `Observe Message` gives you more granular control over when and where you listen for new messages.
## AI Agent Integration
The AI Agent is a powerful tool that can be used to create intelligent, conversational workflows. When you use the AI Agent in a chat-based workflow, it can read the incoming messages, understand the user's intent, and then decide which actions to take. The AI Agent can also send messages back to the chat, allowing you to create a natural, back-and-forth conversation.
The AI Agent always has access to the "Send Message" action, so you don't need to add it explicitly. It can read and send messages in the Lindy chat natively.
## Bulk Uploading Tasks via CSV
You can quickly create multiple chat tasks for your agents by uploading a CSV file to the tasks side panel. This is perfect for batch processing. Each row in your CSV will generate a new chat task, making it easy to automate large sets of interactions.
## Next Steps
Embed chat functionality on your website
Add knowledge to make conversations smarter
Add oversight to chat interactions
Build intelligent conversation flows
# HTTP Request
Source: https://docs.lindy.ai/skills/by-lindy/http-request
Execute custom API calls and webhooks directly from your agent workflows
## Overview
The HTTP Request action enables your agents to interact with any API or webhook endpoint. Whether you're fetching data, updating records, or triggering external workflows, HTTP Request provides complete control over your API interactions.
HTTP Request is one of the most popular Lindy actions, giving you access to thousands of APIs that don't have native Lindy integrations yet.
## Adding HTTP Request to Your Workflow
![HTTP Request action in the Add Action menu under Popular and By Lindy categories [[memory:2619471]]](https://mintlify.s3.us-west-1.amazonaws.com/lindyai/lindy-brand-assets/lindy-http-request.png) Find HTTP Request in two places:
* **Popular** section (highlighted for quick access)
* **By Lindy** → **All By Lindy** section
## Configuration Fields
### URL (Required)
The complete endpoint URL for your API call.
**Examples:**
* `https://api.example.com/v1/users`
* `https://webhook.site/unique-id`
* `{{api_base_url}}/customers/{{customer_id}}`
Use variables from previous steps by typing `{{` to see available options.
### Method
Find HTTP Request in two places:
* **Popular** section (highlighted for quick access)
* **By Lindy** → **All By Lindy** section
## Configuration Fields
### URL (Required)
The complete endpoint URL for your API call.
**Examples:**
* `https://api.example.com/v1/users`
* `https://webhook.site/unique-id`
* `{{api_base_url}}/customers/{{customer_id}}`
Use variables from previous steps by typing `{{` to see available options.
### Method
![HTTP method dropdown showing GET, POST, PUT, PATCH, DELETE options [[memory:2619471]]](https://mintlify.s3.us-west-1.amazonaws.com/lindyai/lindy-brand-assets/lindy-http-method.png) Select the HTTP method based on your API's requirements:
| Method | Use Case |
| ---------- | ------------------------------------ |
| **GET** | Retrieve data without making changes |
| **POST** | Create new resources or submit data |
| **PUT** | Update entire resources |
| **PATCH** | Partially update resources |
| **DELETE** | Remove resources |
### Headers
Select the HTTP method based on your API's requirements:
| Method | Use Case |
| ---------- | ------------------------------------ |
| **GET** | Retrieve data without making changes |
| **POST** | Create new resources or submit data |
| **PUT** | Update entire resources |
| **PATCH** | Partially update resources |
| **DELETE** | Remove resources |
### Headers
![Headers configuration showing key-value pairs with Content-Type example [[memory:2619471]]](https://mintlify.s3.us-west-1.amazonaws.com/lindyai/lindy-brand-assets/lindy-http-headers.png) Headers provide additional context about your request. Common headers include:
**Authentication:**
```
Authorization: Bearer {{api_token}}
X-API-Key: {{secret_key}}
```
**Content Type:**
```
Content-Type: application/json
Content-Type: application/xml
Content-Type: application/x-www-form-urlencoded
```
**Custom Headers:**
```
X-Client-Version: 2.0
X-Request-ID: {{unique_id}}
```
If you specify a Content-Type header, it will override the content type field selection.
### Content Type
Tells the server what format your request body is in:
* **application/json** — Most common for modern APIs (default)
* **application/xml** — For XML-based APIs
* **application/x-www-form-urlencoded** — For form submissions
* **multipart/form-data** — For file uploads
* **text/plain** — For plain text data
### Body
The request body contains the data you're sending to the API. Lindy offers two powerful modes:
Headers provide additional context about your request. Common headers include:
**Authentication:**
```
Authorization: Bearer {{api_token}}
X-API-Key: {{secret_key}}
```
**Content Type:**
```
Content-Type: application/json
Content-Type: application/xml
Content-Type: application/x-www-form-urlencoded
```
**Custom Headers:**
```
X-Client-Version: 2.0
X-Request-ID: {{unique_id}}
```
If you specify a Content-Type header, it will override the content type field selection.
### Content Type
Tells the server what format your request body is in:
* **application/json** — Most common for modern APIs (default)
* **application/xml** — For XML-based APIs
* **application/x-www-form-urlencoded** — For form submissions
* **multipart/form-data** — For file uploads
* **text/plain** — For plain text data
### Body
The request body contains the data you're sending to the API. Lindy offers two powerful modes:
![Body field in Auto mode with AI assistance [[memory:2619471]]](https://mintlify.s3.us-west-1.amazonaws.com/lindyai/lindy-brand-assets/lindy-http-body.png) In Auto mode, AI automatically constructs the request body based on:
* The URL and method you've chosen
* Available variables from previous steps
* Common patterns for the API endpoint
Simply leave it blank and your agent will intelligently fill in the appropriate data.
In Auto mode, AI automatically constructs the request body based on:
* The URL and method you've chosen
* Available variables from previous steps
* Common patterns for the API endpoint
Simply leave it blank and your agent will intelligently fill in the appropriate data.
![Body field using Prompt AI mode to create a complex search query [[memory:2619471]]](https://mintlify.s3.us-west-1.amazonaws.com/lindyai/lindy-brand-assets/lindy-http-request-body-prompt-example.png) Use Prompt AI when you need precise control over the body structure. Describe what you want in natural language:
```
Create a JSON search request for Apollo API to find the author.
Use this format (do NOT include api_key in body since it's in
the X-Api-Key header):
{
"q_keywords": "[author name from previous step]",
"person_titles": ["journalist", "reporter", "staff writer",
"correspondent", "editor", "news writer",
"contributing writer", "freelance journalist"],
"page": 1,
"per_page": 10
}
WE MUST GET WORK EMAIL FROM THIS
```
Your agent will generate the exact JSON structure based on your instructions and available data.
## Common Patterns
**Bearer Token:**
```
Headers:
Authorization: Bearer {{access_token}}
```
**API Key:**
```
Headers:
X-API-Key: {{api_key}}
```
**Basic Auth:**
```
Headers:
Authorization: Basic {{base64_credentials}}
```
**Sending JSON data:**
```
Method: POST
Content-Type: application/json
Body: {
"name": "{{customer_name}}",
"email": "{{customer_email}}",
"tags": ["new", "premium"]
}
```
**Updating records:**
```
Method: PATCH
URL: https://api.example.com/users/{{user_id}}
Body: {
"status": "active",
"last_seen": "{{current_timestamp}}"
}
```
Add conditions after your HTTP Request to handle different responses:
1. Check status code: `{{http_request.status_code}}`
2. Parse error messages: `{{http_request.response.error}}`
3. Implement retry logic for failures
4. Log errors for debugging
## Response Handling
After execution, access the response data:
* **Response body**: `{{http_request.response}}`
* **Status code**: `{{http_request.status_code}}`
* **Headers**: `{{http_request.headers}}`
Use these in subsequent steps to:
* Parse JSON responses
* Check for success/failure
* Extract specific data fields
* Trigger different workflows based on results
## Best Practices
Reference data from previous steps using `{{variable_name}}` syntax to create dynamic, data-driven API calls
Use postman or similar tools to test your requests before going live to avoid issues in production
Always add error handling conditions after API calls to gracefully manage failures and unexpected responses
## Next Steps
Route workflows based on API responses
Process multiple API calls efficiently
Store API responses for future use
Debug and handle API failures
# Lindy Embed
Source: https://docs.lindy.ai/skills/by-lindy/lindy-embed
Embed Lindy onto your website as a popup or an iFrame
## Customize Your Chatbot For Your Website
Select the "Lindy Embed" trigger in the flow editor. Click Configure Embed Settings.
Use Prompt AI when you need precise control over the body structure. Describe what you want in natural language:
```
Create a JSON search request for Apollo API to find the author.
Use this format (do NOT include api_key in body since it's in
the X-Api-Key header):
{
"q_keywords": "[author name from previous step]",
"person_titles": ["journalist", "reporter", "staff writer",
"correspondent", "editor", "news writer",
"contributing writer", "freelance journalist"],
"page": 1,
"per_page": 10
}
WE MUST GET WORK EMAIL FROM THIS
```
Your agent will generate the exact JSON structure based on your instructions and available data.
## Common Patterns
**Bearer Token:**
```
Headers:
Authorization: Bearer {{access_token}}
```
**API Key:**
```
Headers:
X-API-Key: {{api_key}}
```
**Basic Auth:**
```
Headers:
Authorization: Basic {{base64_credentials}}
```
**Sending JSON data:**
```
Method: POST
Content-Type: application/json
Body: {
"name": "{{customer_name}}",
"email": "{{customer_email}}",
"tags": ["new", "premium"]
}
```
**Updating records:**
```
Method: PATCH
URL: https://api.example.com/users/{{user_id}}
Body: {
"status": "active",
"last_seen": "{{current_timestamp}}"
}
```
Add conditions after your HTTP Request to handle different responses:
1. Check status code: `{{http_request.status_code}}`
2. Parse error messages: `{{http_request.response.error}}`
3. Implement retry logic for failures
4. Log errors for debugging
## Response Handling
After execution, access the response data:
* **Response body**: `{{http_request.response}}`
* **Status code**: `{{http_request.status_code}}`
* **Headers**: `{{http_request.headers}}`
Use these in subsequent steps to:
* Parse JSON responses
* Check for success/failure
* Extract specific data fields
* Trigger different workflows based on results
## Best Practices
Reference data from previous steps using `{{variable_name}}` syntax to create dynamic, data-driven API calls
Use postman or similar tools to test your requests before going live to avoid issues in production
Always add error handling conditions after API calls to gracefully manage failures and unexpected responses
## Next Steps
Route workflows based on API responses
Process multiple API calls efficiently
Store API responses for future use
Debug and handle API failures
# Lindy Embed
Source: https://docs.lindy.ai/skills/by-lindy/lindy-embed
Embed Lindy onto your website as a popup or an iFrame
## Customize Your Chatbot For Your Website
Select the "Lindy Embed" trigger in the flow editor. Click Configure Embed Settings.
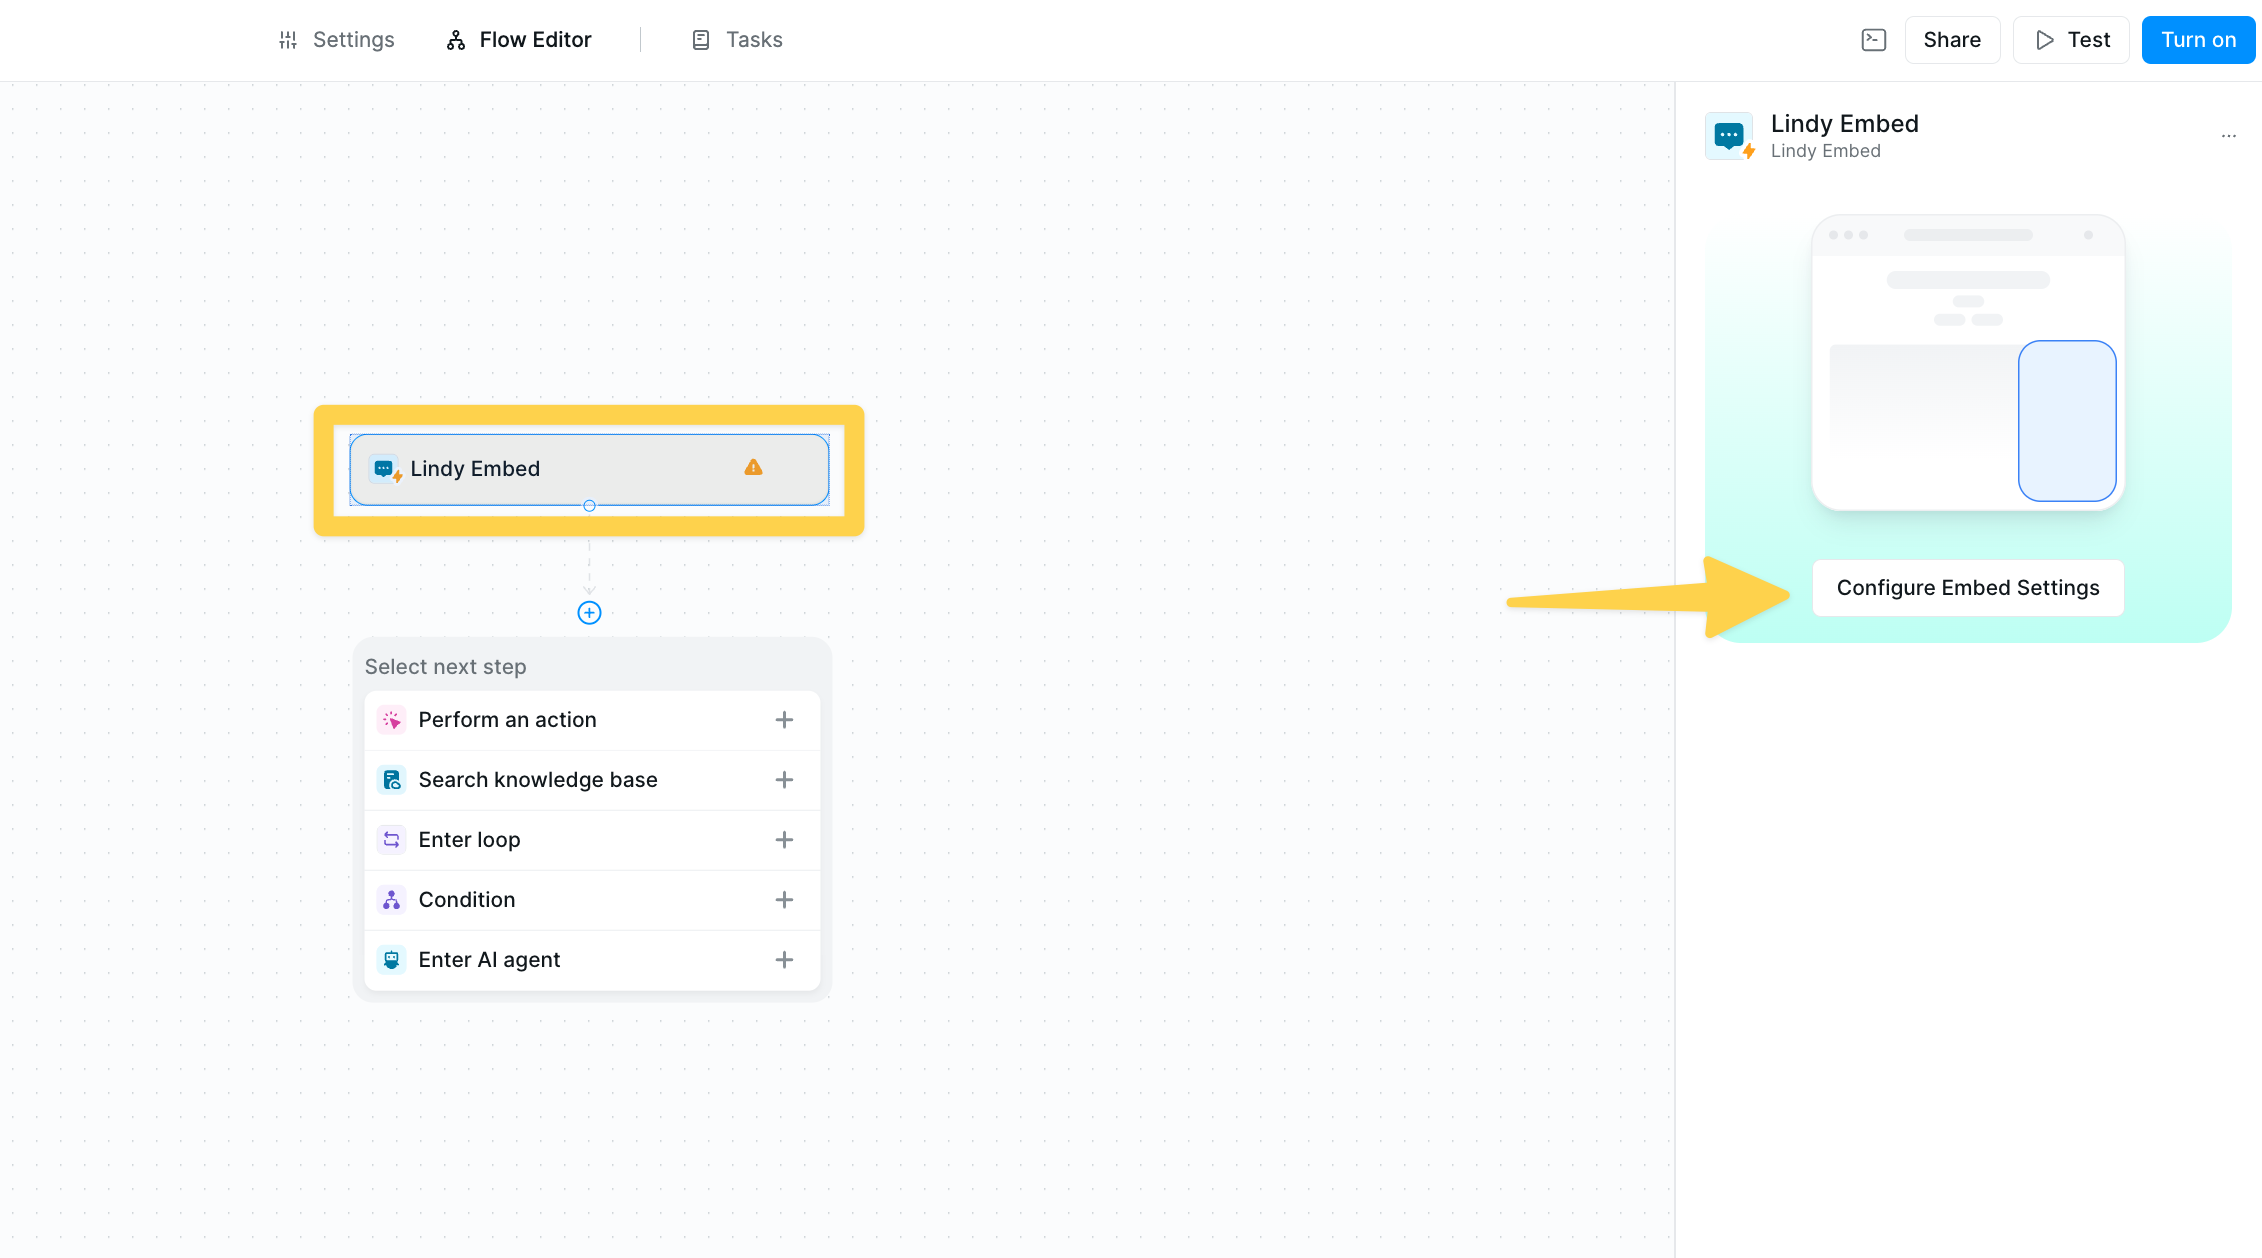 You'll see several options to customize your chatbot:
**Domain Name:** Restrict where your Lindy can be embedded. Leave it empty to use on any domain, or enter a specific domain like "yourcompany.com".
**Display Name:** Set the name of your bot as it will appear to users. For example, "Technical Interview Assistant" or "Customer Survey Bot".
**Accent Color:** Choose a color that matches your brand for the top of the chatbot window.
**Popup or iFrame:** Decide between a floating popup chatbot or a fixed iFrame embedded directly in your page.
**Logo:** Upload your company or project logo to appear in the top left of the expanded chatbot.
**Icon:** Select an icon for your chatbot's collapsed bubble.
**Greeting Message:** The introductory message the user sees when they start a chat.
**Conversation Starters:** Customize messages next to your bot to prompt engagement.
**Callout message:** Create a prompt to encourage users to interact with your chatbot.
## Access The Popup Code Snippet
Select the "Lindy Embed" trigger in the flow editor. Click Configure Embed Settings.
Ensure you have the popup tab selected and copy the "Code Snippet" to your clipboard.
You'll see several options to customize your chatbot:
**Domain Name:** Restrict where your Lindy can be embedded. Leave it empty to use on any domain, or enter a specific domain like "yourcompany.com".
**Display Name:** Set the name of your bot as it will appear to users. For example, "Technical Interview Assistant" or "Customer Survey Bot".
**Accent Color:** Choose a color that matches your brand for the top of the chatbot window.
**Popup or iFrame:** Decide between a floating popup chatbot or a fixed iFrame embedded directly in your page.
**Logo:** Upload your company or project logo to appear in the top left of the expanded chatbot.
**Icon:** Select an icon for your chatbot's collapsed bubble.
**Greeting Message:** The introductory message the user sees when they start a chat.
**Conversation Starters:** Customize messages next to your bot to prompt engagement.
**Callout message:** Create a prompt to encourage users to interact with your chatbot.
## Access The Popup Code Snippet
Select the "Lindy Embed" trigger in the flow editor. Click Configure Embed Settings.
Ensure you have the popup tab selected and copy the "Code Snippet" to your clipboard.
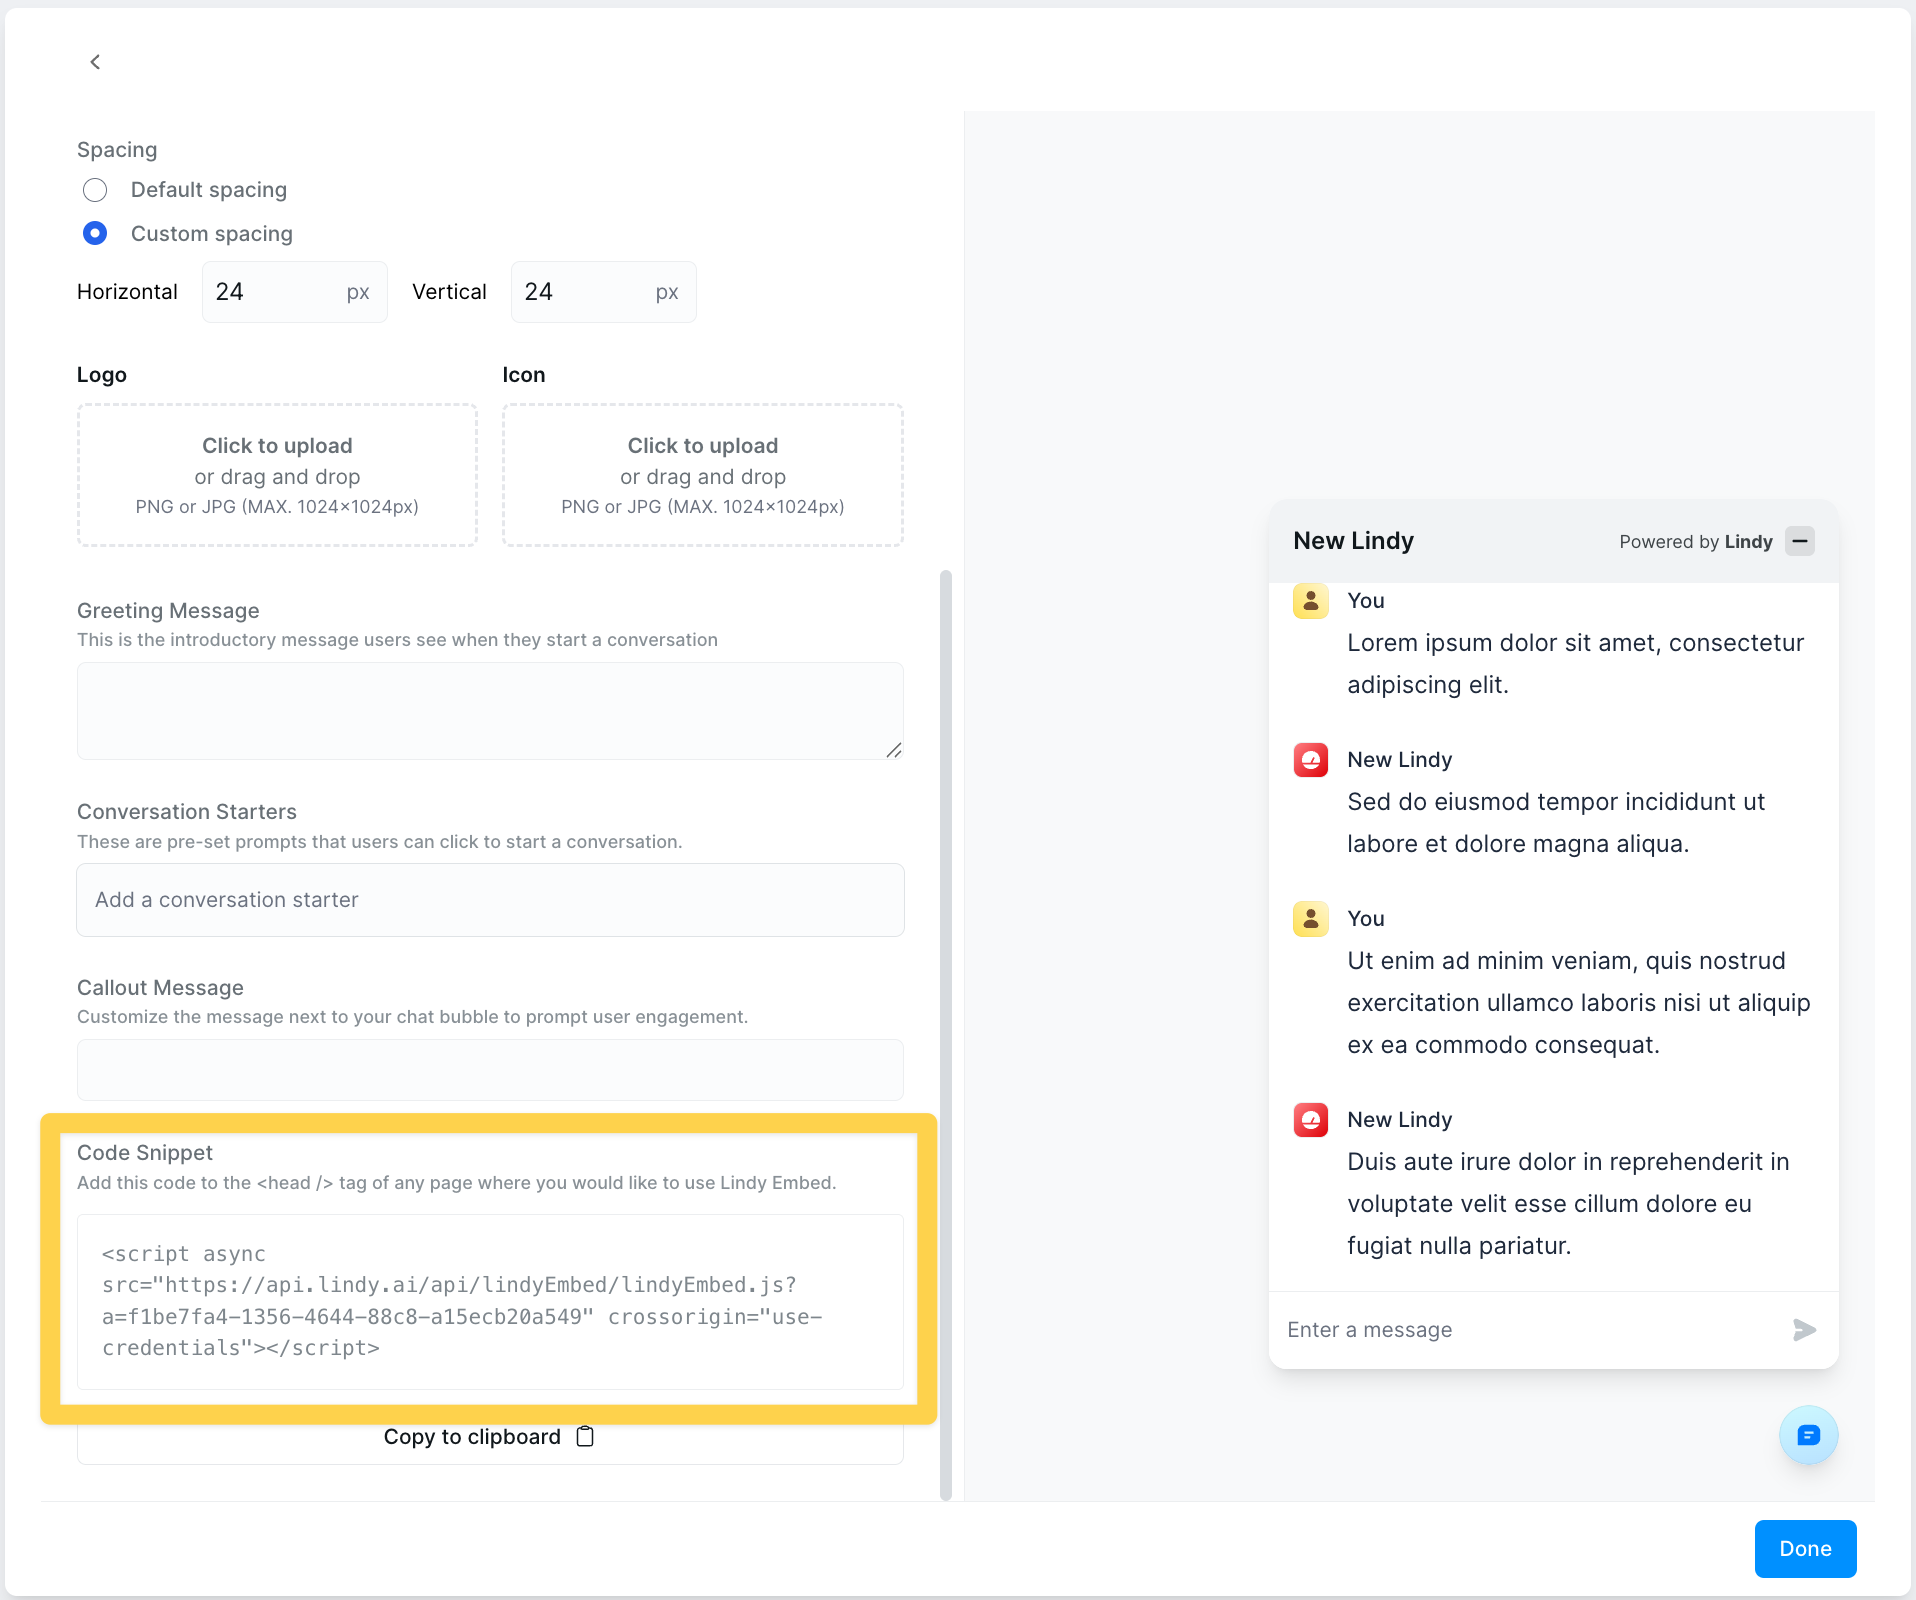 Paste the code snippet into your website's header.
We offer instructions on how to do so for the most popular platforms:
### Webflow
1. Access your Site Settings.
2. Navigate to "Custom Code".
3. Paste the Code Snippet at the bottom of your "Head Code" section.
4. Publish your changes!
### Wix
1. Choose the site you want to embed Lindy on and click Settings.
2. Scroll down until you see Custom Code.
3. You will see an option in the top right corner to Add Custom Code.
4. Click this and paste your Lindy Code Snippet here.
5. Click Apply.
### Squarespace
1. Access your Site Settings then click Advanced.
2. Select Code Injection.
3. Paste your Lindy Code Snippet into the Header section.
4. Remember to Save and Publish your changes.
### WordPress
1. Install and activate the free Insert Headers and Footers plugin by WPCode.
2. In your WordPress dashboard, navigate to Code Snippets → Header & Footer.
3. Paste the Lindy Code Snippet into the Header box.
4. Click Save Changes.
## Embedding Lindy as an iFrame
You can also embed Lindy as an iFrame.
On the Configure Embed Settings modal, select the iFrame tab and copy the code snippet to your clipboard. You can then paste this code anywhere your website builder accepts iFrames.
When embedding Lindy as an iFrame, it is important to set the height on the element containing the Embed iFrame.
You can also change the height property of the iFrame itself to a specific pixel value (e.g., 100px, 500px) instead of using "100%".
When using iFrame embedding, ensure your container element has a defined height. The iFrame will inherit the height of its container, so setting this correctly is crucial for proper display.
## Testing Your Embed
Before deploying your Lindy Embed to production, it's essential to test the chatbot functionality and user experience.
Paste the code snippet into your website's header.
We offer instructions on how to do so for the most popular platforms:
### Webflow
1. Access your Site Settings.
2. Navigate to "Custom Code".
3. Paste the Code Snippet at the bottom of your "Head Code" section.
4. Publish your changes!
### Wix
1. Choose the site you want to embed Lindy on and click Settings.
2. Scroll down until you see Custom Code.
3. You will see an option in the top right corner to Add Custom Code.
4. Click this and paste your Lindy Code Snippet here.
5. Click Apply.
### Squarespace
1. Access your Site Settings then click Advanced.
2. Select Code Injection.
3. Paste your Lindy Code Snippet into the Header section.
4. Remember to Save and Publish your changes.
### WordPress
1. Install and activate the free Insert Headers and Footers plugin by WPCode.
2. In your WordPress dashboard, navigate to Code Snippets → Header & Footer.
3. Paste the Lindy Code Snippet into the Header box.
4. Click Save Changes.
## Embedding Lindy as an iFrame
You can also embed Lindy as an iFrame.
On the Configure Embed Settings modal, select the iFrame tab and copy the code snippet to your clipboard. You can then paste this code anywhere your website builder accepts iFrames.
When embedding Lindy as an iFrame, it is important to set the height on the element containing the Embed iFrame.
You can also change the height property of the iFrame itself to a specific pixel value (e.g., 100px, 500px) instead of using "100%".
When using iFrame embedding, ensure your container element has a defined height. The iFrame will inherit the height of its container, so setting this correctly is crucial for proper display.
## Testing Your Embed
Before deploying your Lindy Embed to production, it's essential to test the chatbot functionality and user experience.
![Lindy Embed testing interface showing the preview and test conversation options [[memory:2619471]]](https://mintlify.s3.us-west-1.amazonaws.com/lindyai/lindy-brand-assets/lindy-embed-testing-1.png) After sending a test message, return to the test panel and click the incoming message to continue the conversation.
After sending a test message, return to the test panel and click the incoming message to continue the conversation.
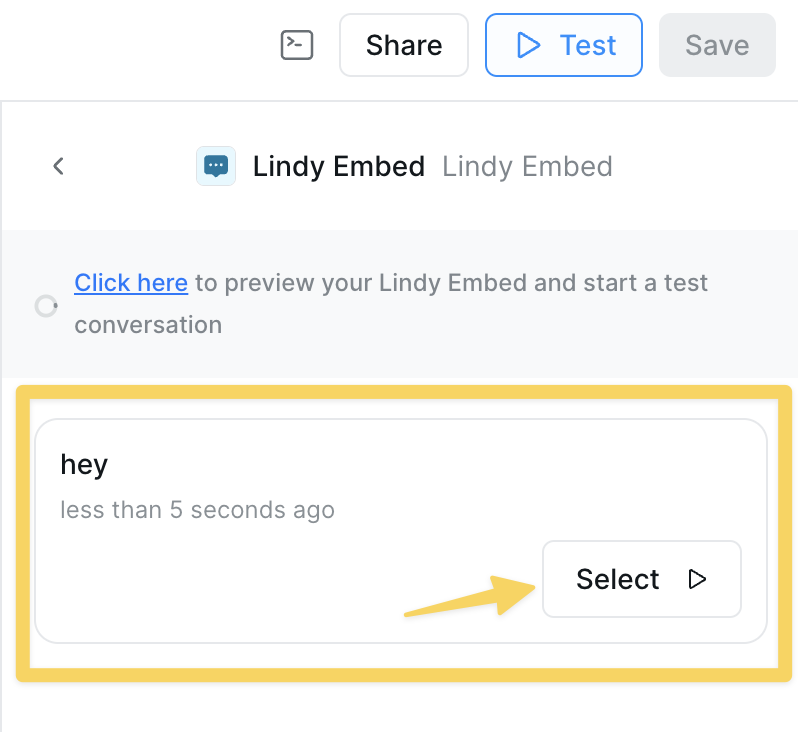 ### Preview Your Chatbot
Use the "Click here to preview your Lindy Embed and start a test conversation" link in the configuration panel to test your chatbot in a realistic environment. This allows you to:
* Verify the visual appearance matches your brand
* Test conversation flows and responses
* Check knowledge base integration
* Validate escalation workflows
### Monitor Chatbot Conversations
### Preview Your Chatbot
Use the "Click here to preview your Lindy Embed and start a test conversation" link in the configuration panel to test your chatbot in a realistic environment. This allows you to:
* Verify the visual appearance matches your brand
* Test conversation flows and responses
* Check knowledge base integration
* Validate escalation workflows
### Monitor Chatbot Conversations
![Lindy Embed chatbot flow monitoring showing conversation logs and user interactions [[memory:2619471]]](https://mintlify.s3.us-west-1.amazonaws.com/lindyai/lindy-brand-assets/lindy-embed-view-chatbot-flow.png) Track user interactions and monitor conversation quality through the flow view. This helps you:
* Analyze user questions and interaction patterns
* Identify knowledge gaps or areas for improvement
* Monitor escalation triggers and response quality
* Optimize conversation starters and greeting messages
## Best Practices
* **Test on Multiple Devices**: Ensure your embed works well on desktop, tablet, and mobile
* **Match Your Brand**: Use your brand colors and logo for a cohesive experience
* **Clear Purpose**: Make the chatbot's purpose obvious through the display name and greeting
* **Domain Security**: Always specify allowed domains for production sites
* **Performance**: Monitor loading times and optimize as needed
## Troubleshooting
* Verify the code snippet is placed in the correct location (usually `` section)
* Check browser console for JavaScript errors
* Ensure your domain matches the domain restriction if set
* Clear browser cache and try again
* Make sure the Lindy agent is published and active
* Set explicit height on the container element
* Use pixel values instead of percentages for better control
* Test different heights to find optimal size
* Consider responsive breakpoints for mobile devices
* Use more specific CSS selectors if needed
* Consider using the iFrame option for complete style isolation
* Check for z-index conflicts with other page elements
* Try using a different browser
* Copy the code manually by selecting all text
* Ensure JavaScript is enabled in your browser
* Check if browser extensions are blocking functionality
## Next Steps
Test your embedded agent before going live
Fine-tune your agent's behavior and responses
Enhance your agent with specific knowledge
Track usage and optimize your embed
# Lindy Mail
Source: https://docs.lindy.ai/skills/by-lindy/lindy-mail
## Quick Overview
Lindy Mail gives your agent its own email address to send and receive emails independently. Perfect for CC'ing Lindy on threads, forwarding emails for action, or handling inbound emails directly.
Key benefits:
* **Dedicated inbox** — Lindy gets her own email address
* **Direct handling** — Emails go straight to Lindy, not your inbox
* **Thread awareness** — Lindy can observe and respond to follow-ups
* **Flexible triggers** — Filter which emails Lindy responds to
## Adding Lindy Mail Trigger
Add the "Lindy Mail Email Received" trigger to have Lindy wake up when emails arrive at her address.
### Configuring the Trigger
Track user interactions and monitor conversation quality through the flow view. This helps you:
* Analyze user questions and interaction patterns
* Identify knowledge gaps or areas for improvement
* Monitor escalation triggers and response quality
* Optimize conversation starters and greeting messages
## Best Practices
* **Test on Multiple Devices**: Ensure your embed works well on desktop, tablet, and mobile
* **Match Your Brand**: Use your brand colors and logo for a cohesive experience
* **Clear Purpose**: Make the chatbot's purpose obvious through the display name and greeting
* **Domain Security**: Always specify allowed domains for production sites
* **Performance**: Monitor loading times and optimize as needed
## Troubleshooting
* Verify the code snippet is placed in the correct location (usually `` section)
* Check browser console for JavaScript errors
* Ensure your domain matches the domain restriction if set
* Clear browser cache and try again
* Make sure the Lindy agent is published and active
* Set explicit height on the container element
* Use pixel values instead of percentages for better control
* Test different heights to find optimal size
* Consider responsive breakpoints for mobile devices
* Use more specific CSS selectors if needed
* Consider using the iFrame option for complete style isolation
* Check for z-index conflicts with other page elements
* Try using a different browser
* Copy the code manually by selecting all text
* Ensure JavaScript is enabled in your browser
* Check if browser extensions are blocking functionality
## Next Steps
Test your embedded agent before going live
Fine-tune your agent's behavior and responses
Enhance your agent with specific knowledge
Track usage and optimize your embed
# Lindy Mail
Source: https://docs.lindy.ai/skills/by-lindy/lindy-mail
## Quick Overview
Lindy Mail gives your agent its own email address to send and receive emails independently. Perfect for CC'ing Lindy on threads, forwarding emails for action, or handling inbound emails directly.
Key benefits:
* **Dedicated inbox** — Lindy gets her own email address
* **Direct handling** — Emails go straight to Lindy, not your inbox
* **Thread awareness** — Lindy can observe and respond to follow-ups
* **Flexible triggers** — Filter which emails Lindy responds to
## Adding Lindy Mail Trigger
Add the "Lindy Mail Email Received" trigger to have Lindy wake up when emails arrive at her address.
### Configuring the Trigger
 * **Customize email address** — Set Lindy's unique email (e.g., [support@lindymail.ai](mailto:support@lindymail.ai))
* **Observe follow-ups** — Enable to have Lindy respond to replies in the same thread
* **Add filters** — Include/exclude specific emails from triggering
## Sending Emails with Lindy Mail
Add the "Lindy Mail Send Email" action to respond from Lindy's email address.
Match the email address in both trigger and action to ensure replies come from the same Lindy Mail address.
### Customizing Responses
Configure the "Body" field with detailed prompts to control how your agent responds to emails. Well-crafted prompts ensure consistent, professional communication that reflects your brand voice and meets customer expectations.
**Best practices for email prompts:**
* Define the tone and personality your agent should adopt
* Specify how to handle different types of inquiries
* Include escalation guidelines for complex issues
* Set clear expectations for response format and length
Example prompt:
```
Respond professionally and warmly to customer inquiries.
Carefully read the entire email thread to understand context and previous interactions.
Address their specific questions with helpful, actionable information.
If you cannot fully resolve their issue, acknowledge their concern and provide clear next steps.
For urgent matters or complex technical issues, offer to escalate to a human team member.
Keep responses concise but thorough, and maintain a friendly, solution-oriented tone.
Sign off as "Lindy"
```
This approach ensures your agent provides consistent, high-quality responses that build trust and effectively resolve customer needs while maintaining your organization's professional standards.
1. Copy Lindy's email address from your trigger
2. Send a test email to that address
3. Watch your agent process and respond based on your instructions
## Common Use Cases
Give your agent a [support@company.ai](mailto:support@company.ai) address to handle first-line customer inquiries
CC your agent on important threads to draft responses or extract action items
Forward leads to your agent for qualification and CRM entry
Let your agent handle scheduling emails with its own calendar assistant address
## Next Steps
Compare Lindy Mail with Gmail integration options
Build advanced email automation workflows
Set up email-based triggers
Create intelligent email processing workflows
# Lindy Meeting Recorder
Source: https://docs.lindy.ai/skills/by-lindy/lindy-meeting-recorder
Automatically record, transcribe, and follow up on your meetings
## Overview
Lindy Meeting Recorder joins your meetings, records them, transcribes conversations, and sends you comprehensive notes with action items — all automatically.
* **Customize email address** — Set Lindy's unique email (e.g., [support@lindymail.ai](mailto:support@lindymail.ai))
* **Observe follow-ups** — Enable to have Lindy respond to replies in the same thread
* **Add filters** — Include/exclude specific emails from triggering
## Sending Emails with Lindy Mail
Add the "Lindy Mail Send Email" action to respond from Lindy's email address.
Match the email address in both trigger and action to ensure replies come from the same Lindy Mail address.
### Customizing Responses
Configure the "Body" field with detailed prompts to control how your agent responds to emails. Well-crafted prompts ensure consistent, professional communication that reflects your brand voice and meets customer expectations.
**Best practices for email prompts:**
* Define the tone and personality your agent should adopt
* Specify how to handle different types of inquiries
* Include escalation guidelines for complex issues
* Set clear expectations for response format and length
Example prompt:
```
Respond professionally and warmly to customer inquiries.
Carefully read the entire email thread to understand context and previous interactions.
Address their specific questions with helpful, actionable information.
If you cannot fully resolve their issue, acknowledge their concern and provide clear next steps.
For urgent matters or complex technical issues, offer to escalate to a human team member.
Keep responses concise but thorough, and maintain a friendly, solution-oriented tone.
Sign off as "Lindy"
```
This approach ensures your agent provides consistent, high-quality responses that build trust and effectively resolve customer needs while maintaining your organization's professional standards.
1. Copy Lindy's email address from your trigger
2. Send a test email to that address
3. Watch your agent process and respond based on your instructions
## Common Use Cases
Give your agent a [support@company.ai](mailto:support@company.ai) address to handle first-line customer inquiries
CC your agent on important threads to draft responses or extract action items
Forward leads to your agent for qualification and CRM entry
Let your agent handle scheduling emails with its own calendar assistant address
## Next Steps
Compare Lindy Mail with Gmail integration options
Build advanced email automation workflows
Set up email-based triggers
Create intelligent email processing workflows
# Lindy Meeting Recorder
Source: https://docs.lindy.ai/skills/by-lindy/lindy-meeting-recorder
Automatically record, transcribe, and follow up on your meetings
## Overview
Lindy Meeting Recorder joins your meetings, records them, transcribes conversations, and sends you comprehensive notes with action items — all automatically.
![Meeting Recorder workflow showing Calendar trigger, recording, and follow-up actions [[memory:2619471]]](https://mintlify.s3.us-west-1.amazonaws.com/lindyai/lindy-brand-assets/lindy-meeting-recorder.png) ## How It Works
The input is a virtual meeting link. When set to auto, it'll join automatically when any Google Meet or Zoom link is in its context. Below is how a Lindy with the `Meeting Recorder` is usually structured:
### 1. Calendar Event Trigger
* Activates before scheduled meetings
* Filters for specific meeting types (optional)
Typically used with this trigger to get calendar links for automatic meeting access.
### 2. Record Meeting Action
When it finds a virtual meeting link, your agent automatically joins and you'll see two execution paths:
* **After meeting starts:** Immediate actions during the meeting
* **After meeting ends:** Post-meeting processing with full transcript access
Your agent joins as "Lindy Meeting Notetaker" and records everything with real-time transcription.
### 3. Post-Meeting Actions
After the meeting ends, you can:
* Send a summary via Slack or email
* Set up an AI follow-up assistant to answer questions
* Save recordings and transcripts wherever you want
* Click into your task to view the recording and transcript
Use conditions to perform different actions depending on the type of meeting
## Common Use Cases
* **Sales Calls** — Capture notes and CRM updates
* **Recruiting** — Document interviews and candidate feedback
* **Team Meetings** — Track action items and decisions
* **Client Meetings** — Generate professional summaries
## Related Resources
Set up calendar connections
Customize email outputs
Configure follow-up assistants
Store meeting insights
# Lindy Phone
Source: https://docs.lindy.ai/skills/by-lindy/lindy-phone
Build AI-powered voice agents that can handle complex phone conversations with tool integrations
## Overview
Lindy Phone transforms voice interactions into powerful automated workflows. Unlike traditional phone trees, Lindy Phone seamlessly connects to AI agents that can access your entire integration ecosystem - making API calls, searching the web, updating databases, and more — all during a live conversation.
Every phone call in Lindy is automatically followed by an AI Agent node, enabling sophisticated tool integrations and dynamic responses based on the conversation.
## How Lindy Phone Works
## How It Works
The input is a virtual meeting link. When set to auto, it'll join automatically when any Google Meet or Zoom link is in its context. Below is how a Lindy with the `Meeting Recorder` is usually structured:
### 1. Calendar Event Trigger
* Activates before scheduled meetings
* Filters for specific meeting types (optional)
Typically used with this trigger to get calendar links for automatic meeting access.
### 2. Record Meeting Action
When it finds a virtual meeting link, your agent automatically joins and you'll see two execution paths:
* **After meeting starts:** Immediate actions during the meeting
* **After meeting ends:** Post-meeting processing with full transcript access
Your agent joins as "Lindy Meeting Notetaker" and records everything with real-time transcription.
### 3. Post-Meeting Actions
After the meeting ends, you can:
* Send a summary via Slack or email
* Set up an AI follow-up assistant to answer questions
* Save recordings and transcripts wherever you want
* Click into your task to view the recording and transcript
Use conditions to perform different actions depending on the type of meeting
## Common Use Cases
* **Sales Calls** — Capture notes and CRM updates
* **Recruiting** — Document interviews and candidate feedback
* **Team Meetings** — Track action items and decisions
* **Client Meetings** — Generate professional summaries
## Related Resources
Set up calendar connections
Customize email outputs
Configure follow-up assistants
Store meeting insights
# Lindy Phone
Source: https://docs.lindy.ai/skills/by-lindy/lindy-phone
Build AI-powered voice agents that can handle complex phone conversations with tool integrations
## Overview
Lindy Phone transforms voice interactions into powerful automated workflows. Unlike traditional phone trees, Lindy Phone seamlessly connects to AI agents that can access your entire integration ecosystem - making API calls, searching the web, updating databases, and more — all during a live conversation.
Every phone call in Lindy is automatically followed by an AI Agent node, enabling sophisticated tool integrations and dynamic responses based on the conversation.
## How Lindy Phone Works
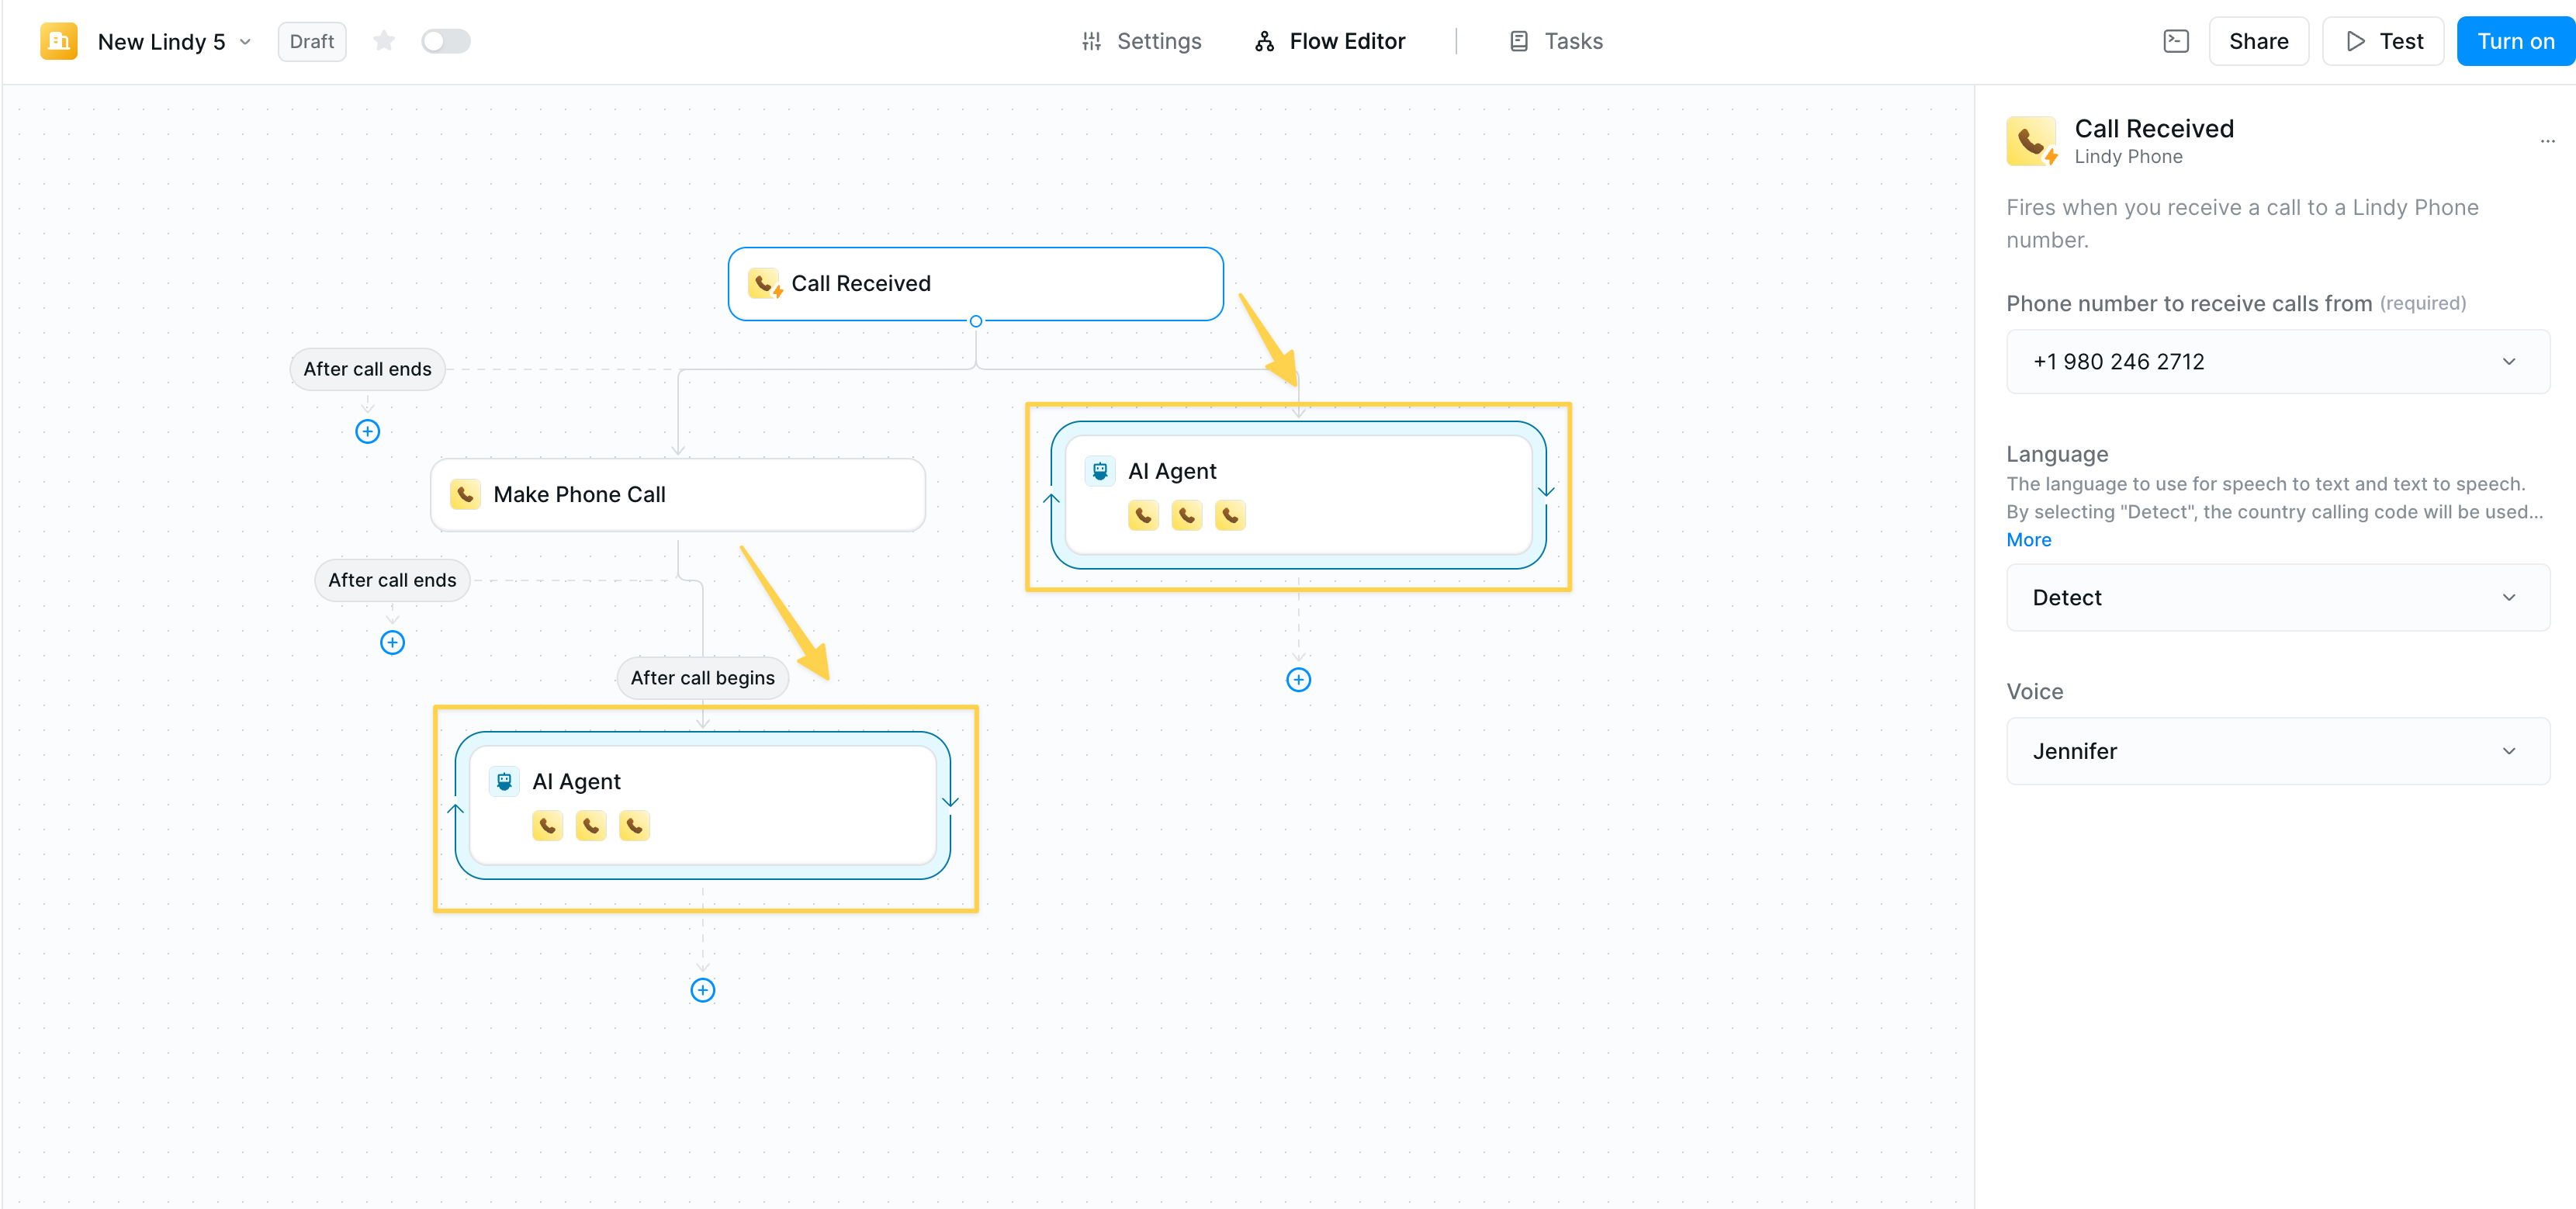 This is how you interact with Lindy Phone:
1. **Phone trigger** (inbound) or **action** (outbound) initiates the call
2. **AI Agent node** automatically follows with phone agent skills. The prompt dictates the behavior, and you can optionally add other skills like:
* Lindy integrations (Gmail, Slack, CRMs, etc.)
* Web browsing and search capabilities
* API connections
* Database operations
This means your voice agent can work across your tech stack during conversations.
Pro tip: Use "After Call Ends" path to perform any logging or post-call actions instead of trying to do things during the live conversation.
## Setting Up Your AI-Powered Voice Agent
### Step 1: Configure the AI Agent
After adding your phone trigger/action, the AI agent node appears automatically. Your prompt is the instruction for the phone agent, as that's dictating the behavior on the phone.
**Essential configuration:**
* **Prompt**: Define your agent's personality, objectives, and conversation guidelines
* **Model**: We recommend Gemini Flash for simple calls and Claude Sonnet for complex conversations
* **Skills**: Add any Lindy action as a skill your agent can use
Pro tip: Start your prompt with clear role definition: "You are a \[role] for \[company]. Your goal is to \[objective]."
### Step 2: Add Agent Skills
Your voice agent can perform any action available in Lindy:
This is how you interact with Lindy Phone:
1. **Phone trigger** (inbound) or **action** (outbound) initiates the call
2. **AI Agent node** automatically follows with phone agent skills. The prompt dictates the behavior, and you can optionally add other skills like:
* Lindy integrations (Gmail, Slack, CRMs, etc.)
* Web browsing and search capabilities
* API connections
* Database operations
This means your voice agent can work across your tech stack during conversations.
Pro tip: Use "After Call Ends" path to perform any logging or post-call actions instead of trying to do things during the live conversation.
## Setting Up Your AI-Powered Voice Agent
### Step 1: Configure the AI Agent
After adding your phone trigger/action, the AI agent node appears automatically. Your prompt is the instruction for the phone agent, as that's dictating the behavior on the phone.
**Essential configuration:**
* **Prompt**: Define your agent's personality, objectives, and conversation guidelines
* **Model**: We recommend Gemini Flash for simple calls and Claude Sonnet for complex conversations
* **Skills**: Add any Lindy action as a skill your agent can use
Pro tip: Start your prompt with clear role definition: "You are a \[role] for \[company]. Your goal is to \[objective]."
### Step 2: Add Agent Skills
Your voice agent can perform any action available in Lindy:
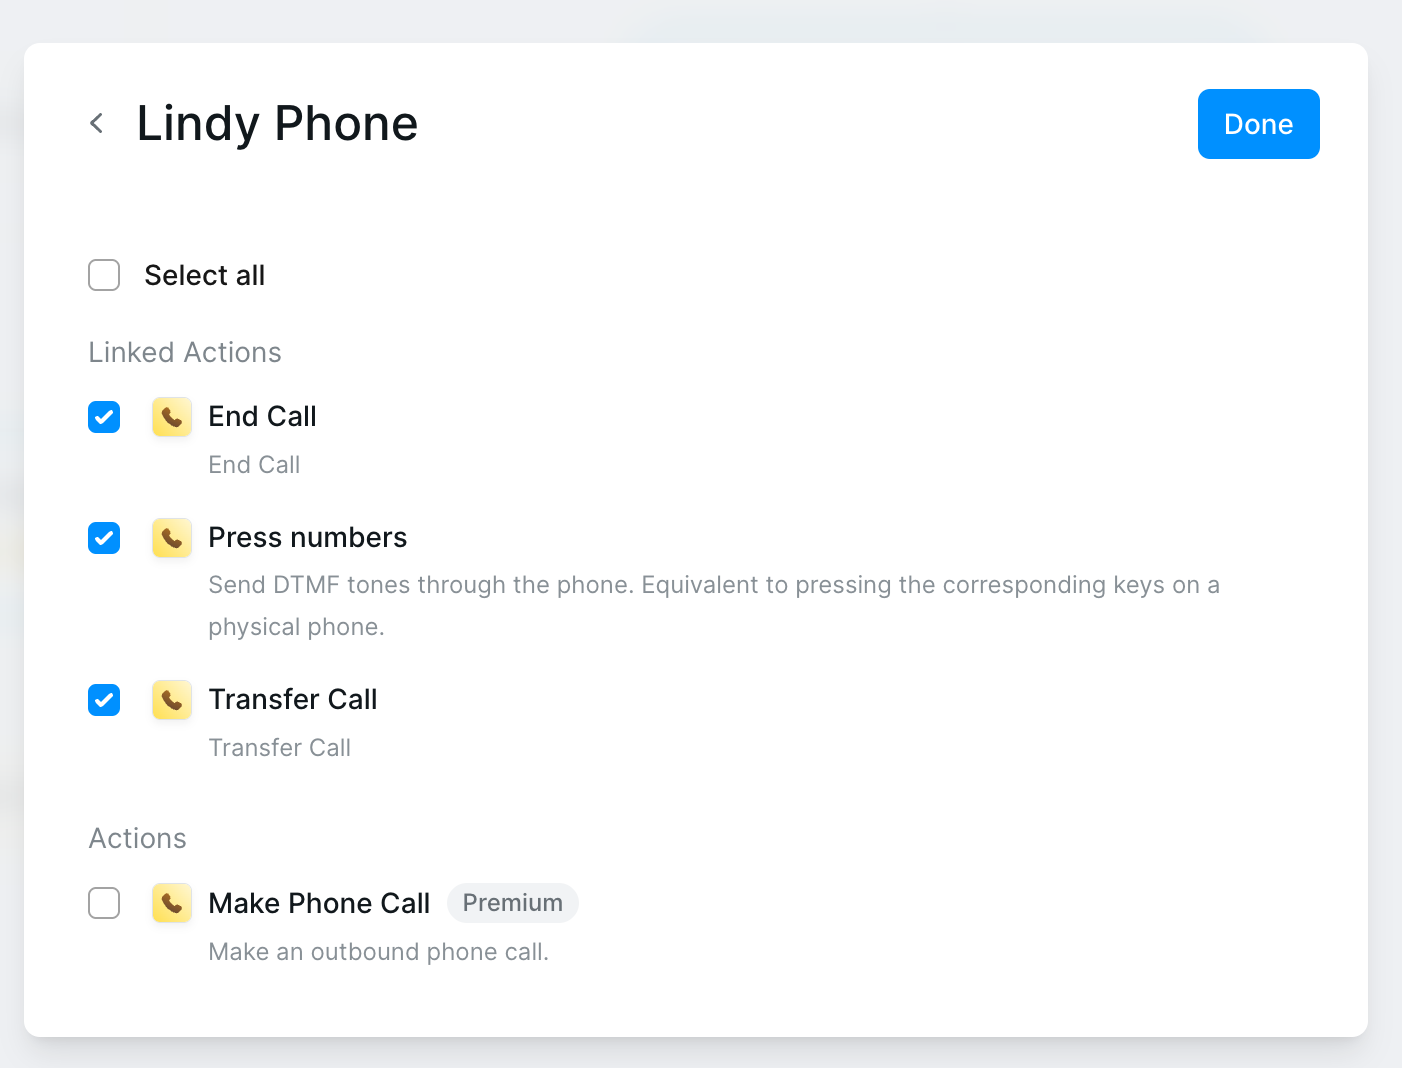 **Phone-specific skills:**
* **End Call** — Gracefully terminate conversations
* **Press Numbers** — Navigate phone trees
* **Transfer Call** — Route to humans or departments
You can add any skills, but keep in mind that if your agent uses non-phone skills it will increase latency and this is a conversation.
## Real Example Prompts
```
You are on a phone call with a customer needing technical support.
**Follow these conversation steps:**
1. Introduce yourself briefly:
"Hi there, I'm your technical support assistant. Can I please get your name?"
2. [Instruction]: WAIT FOR THE OTHER PERSON TO RESPOND BEFORE CONTINUING.
3. Ask how you can help them today with their technical issue.
*** Anytime you receive a question, move to the "support question" state ***
4. Respond to technical questions concisely using your knowledge base.
Try to keep responses 1-2 sentences. If you cannot answer the question,
search the knowledge base or create a support ticket.
5. If the user indicates the issue is resolved or conversation is over,
say thank you and goodbye then end the call.
Skills: Search Knowledge Base, Create Zendesk Ticket, Send SMS, Transfer Call
```
```
You are on a phone call with a potential customer interested in our services.
**Follow these conversation steps:**
1. Introduce yourself briefly:
"Hi there, I'm calling from [Company]. Can I please get your name?"
2. [Instruction]: WAIT FOR THE OTHER PERSON TO RESPOND BEFORE CONTINUING.
3. Ask how you can help them learn about our services today.
*** Anytime you receive a question, move to the "sales question" state ***
4. Respond to questions about our services concisely. Gather company size,
budget, and timeline information. Try to keep responses 1-2 sentences.
If they're qualified, offer to schedule a demo.
5. If they want to schedule a demo or the conversation is over,
say thank you and goodbye then end the call.
Skills: Search Internet, Check Calendar, Create Calendar Event, Update CRM, Send Email
```
```
You are on a phone call with someone wanting to schedule an appointment.
**Follow these conversation steps:**
1. Introduce yourself briefly:
"Hi there, I'm calling to help you schedule an appointment. Can I please get your name?"
2. [Instruction]: WAIT FOR THE OTHER PERSON TO RESPOND BEFORE CONTINUING.
3. Ask what type of appointment they need and their preferred date/time.
*** Anytime you receive a question, move to the "scheduling question" state ***
4. Check availability and verify insurance if needed. Try to keep responses
1-2 sentences. If you cannot find suitable times, offer alternatives.
5. Once appointment is booked or if conversation is over,
say thank you and goodbye then end the call.
Skills: Query API, Search Calendar, Create Event, Send SMS, Update Database
```
## Configuration Options
Lindy Phone supports 30+ languages for global reach:
* English, Spanish, French, German
* Chinese (Mandarin/Cantonese)
* Japanese, Korean, Hindi, Arabic
* And 25+ more
Configure in your phone trigger/action settings.
* **Cost**: \$10/month per number
* **Coverage**: 100+ countries
* **Features**: Concurrent calls, SMS capable
* **Management**: Settings → Phone Numbers
Choose from multiple voice options:
* Standard voices (included)
* Premium voices (Business/Enterprise)
* Gender and accent variations
* Language-specific options
## Best Practices
* Keep prompts conversational and natural
* Plan for common scenarios and edge cases
* Include fallback responses
* Test with real users
* Only add skills the agent actually needs
* Group related actions logically
* Test each skill in isolation first
* Monitor usage patterns
* Use "After Call Ends" trigger to perform any logging or post-call actions
* Avoid trying to log or update records during the live conversation
* Set up follow-up emails or notifications after the call completes
* Process call transcripts and summaries post-call for better performance
## Related Resources
Deep dive into AI agent configuration
Detailed phone system documentation
Add approval steps to workflows
Give agents access to information
# Run Code
Source: https://docs.lindy.ai/skills/by-lindy/run-code
## Quick Overview
The Code action lets you run custom Python or JavaScript code directly within your agent workflows. It's ideal for tasks like data manipulation, data analysis, API calls, complex calculations, or conditional logic.
Key benefits:
* **Multi-language support** - Write in Python or JavaScript
* **Variable integration** - Use outputs from previous steps as variables
* **Flexible output** - Return results, printed text, or error messages
* **Rich libraries** - Access to popular data science and utility libraries
## Action Configuration
**Phone-specific skills:**
* **End Call** — Gracefully terminate conversations
* **Press Numbers** — Navigate phone trees
* **Transfer Call** — Route to humans or departments
You can add any skills, but keep in mind that if your agent uses non-phone skills it will increase latency and this is a conversation.
## Real Example Prompts
```
You are on a phone call with a customer needing technical support.
**Follow these conversation steps:**
1. Introduce yourself briefly:
"Hi there, I'm your technical support assistant. Can I please get your name?"
2. [Instruction]: WAIT FOR THE OTHER PERSON TO RESPOND BEFORE CONTINUING.
3. Ask how you can help them today with their technical issue.
*** Anytime you receive a question, move to the "support question" state ***
4. Respond to technical questions concisely using your knowledge base.
Try to keep responses 1-2 sentences. If you cannot answer the question,
search the knowledge base or create a support ticket.
5. If the user indicates the issue is resolved or conversation is over,
say thank you and goodbye then end the call.
Skills: Search Knowledge Base, Create Zendesk Ticket, Send SMS, Transfer Call
```
```
You are on a phone call with a potential customer interested in our services.
**Follow these conversation steps:**
1. Introduce yourself briefly:
"Hi there, I'm calling from [Company]. Can I please get your name?"
2. [Instruction]: WAIT FOR THE OTHER PERSON TO RESPOND BEFORE CONTINUING.
3. Ask how you can help them learn about our services today.
*** Anytime you receive a question, move to the "sales question" state ***
4. Respond to questions about our services concisely. Gather company size,
budget, and timeline information. Try to keep responses 1-2 sentences.
If they're qualified, offer to schedule a demo.
5. If they want to schedule a demo or the conversation is over,
say thank you and goodbye then end the call.
Skills: Search Internet, Check Calendar, Create Calendar Event, Update CRM, Send Email
```
```
You are on a phone call with someone wanting to schedule an appointment.
**Follow these conversation steps:**
1. Introduce yourself briefly:
"Hi there, I'm calling to help you schedule an appointment. Can I please get your name?"
2. [Instruction]: WAIT FOR THE OTHER PERSON TO RESPOND BEFORE CONTINUING.
3. Ask what type of appointment they need and their preferred date/time.
*** Anytime you receive a question, move to the "scheduling question" state ***
4. Check availability and verify insurance if needed. Try to keep responses
1-2 sentences. If you cannot find suitable times, offer alternatives.
5. Once appointment is booked or if conversation is over,
say thank you and goodbye then end the call.
Skills: Query API, Search Calendar, Create Event, Send SMS, Update Database
```
## Configuration Options
Lindy Phone supports 30+ languages for global reach:
* English, Spanish, French, German
* Chinese (Mandarin/Cantonese)
* Japanese, Korean, Hindi, Arabic
* And 25+ more
Configure in your phone trigger/action settings.
* **Cost**: \$10/month per number
* **Coverage**: 100+ countries
* **Features**: Concurrent calls, SMS capable
* **Management**: Settings → Phone Numbers
Choose from multiple voice options:
* Standard voices (included)
* Premium voices (Business/Enterprise)
* Gender and accent variations
* Language-specific options
## Best Practices
* Keep prompts conversational and natural
* Plan for common scenarios and edge cases
* Include fallback responses
* Test with real users
* Only add skills the agent actually needs
* Group related actions logically
* Test each skill in isolation first
* Monitor usage patterns
* Use "After Call Ends" trigger to perform any logging or post-call actions
* Avoid trying to log or update records during the live conversation
* Set up follow-up emails or notifications after the call completes
* Process call transcripts and summaries post-call for better performance
## Related Resources
Deep dive into AI agent configuration
Detailed phone system documentation
Add approval steps to workflows
Give agents access to information
# Run Code
Source: https://docs.lindy.ai/skills/by-lindy/run-code
## Quick Overview
The Code action lets you run custom Python or JavaScript code directly within your agent workflows. It's ideal for tasks like data manipulation, data analysis, API calls, complex calculations, or conditional logic.
Key benefits:
* **Multi-language support** - Write in Python or JavaScript
* **Variable integration** - Use outputs from previous steps as variables
* **Flexible output** - Return results, printed text, or error messages
* **Rich libraries** - Access to popular data science and utility libraries
## Action Configuration
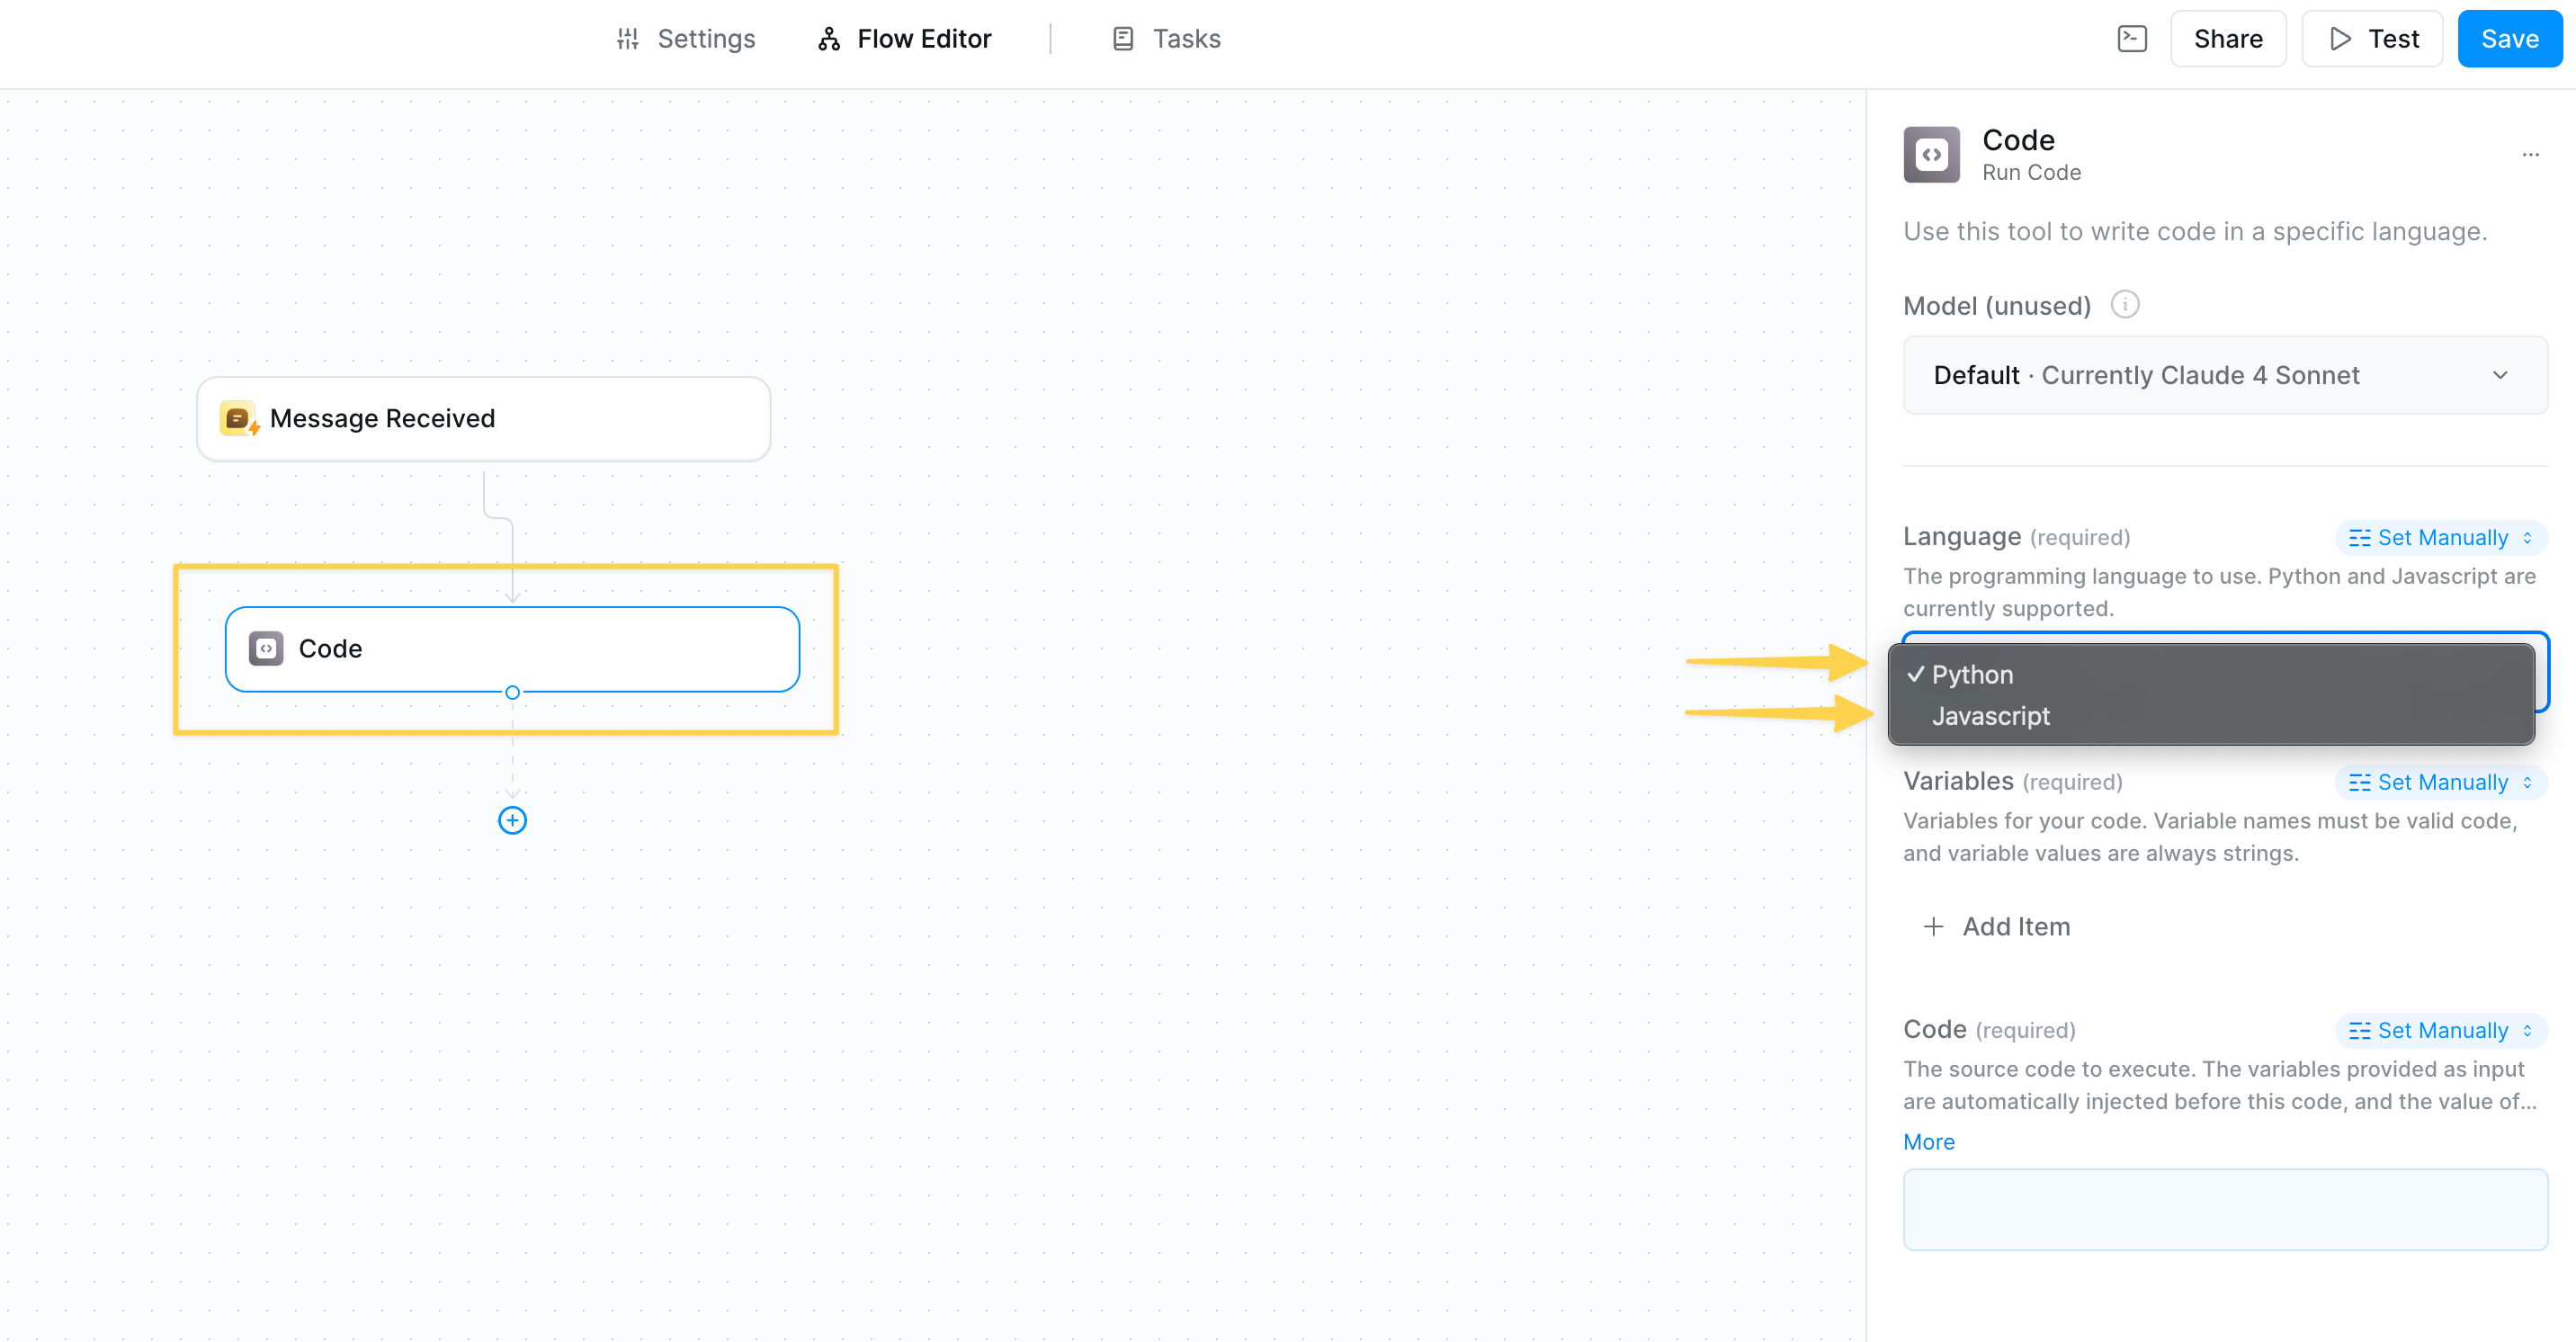 ### Language Selection
Choose between Python and JavaScript based on your needs:
* **Python** - Best for data analysis, scientific computing, and complex calculations
* **JavaScript** - Ideal for web APIs, JSON manipulation, and async operations
### Variables
### Language Selection
Choose between Python and JavaScript based on your needs:
* **Python** - Best for data analysis, scientific computing, and complex calculations
* **JavaScript** - Ideal for web APIs, JSON manipulation, and async operations
### Variables
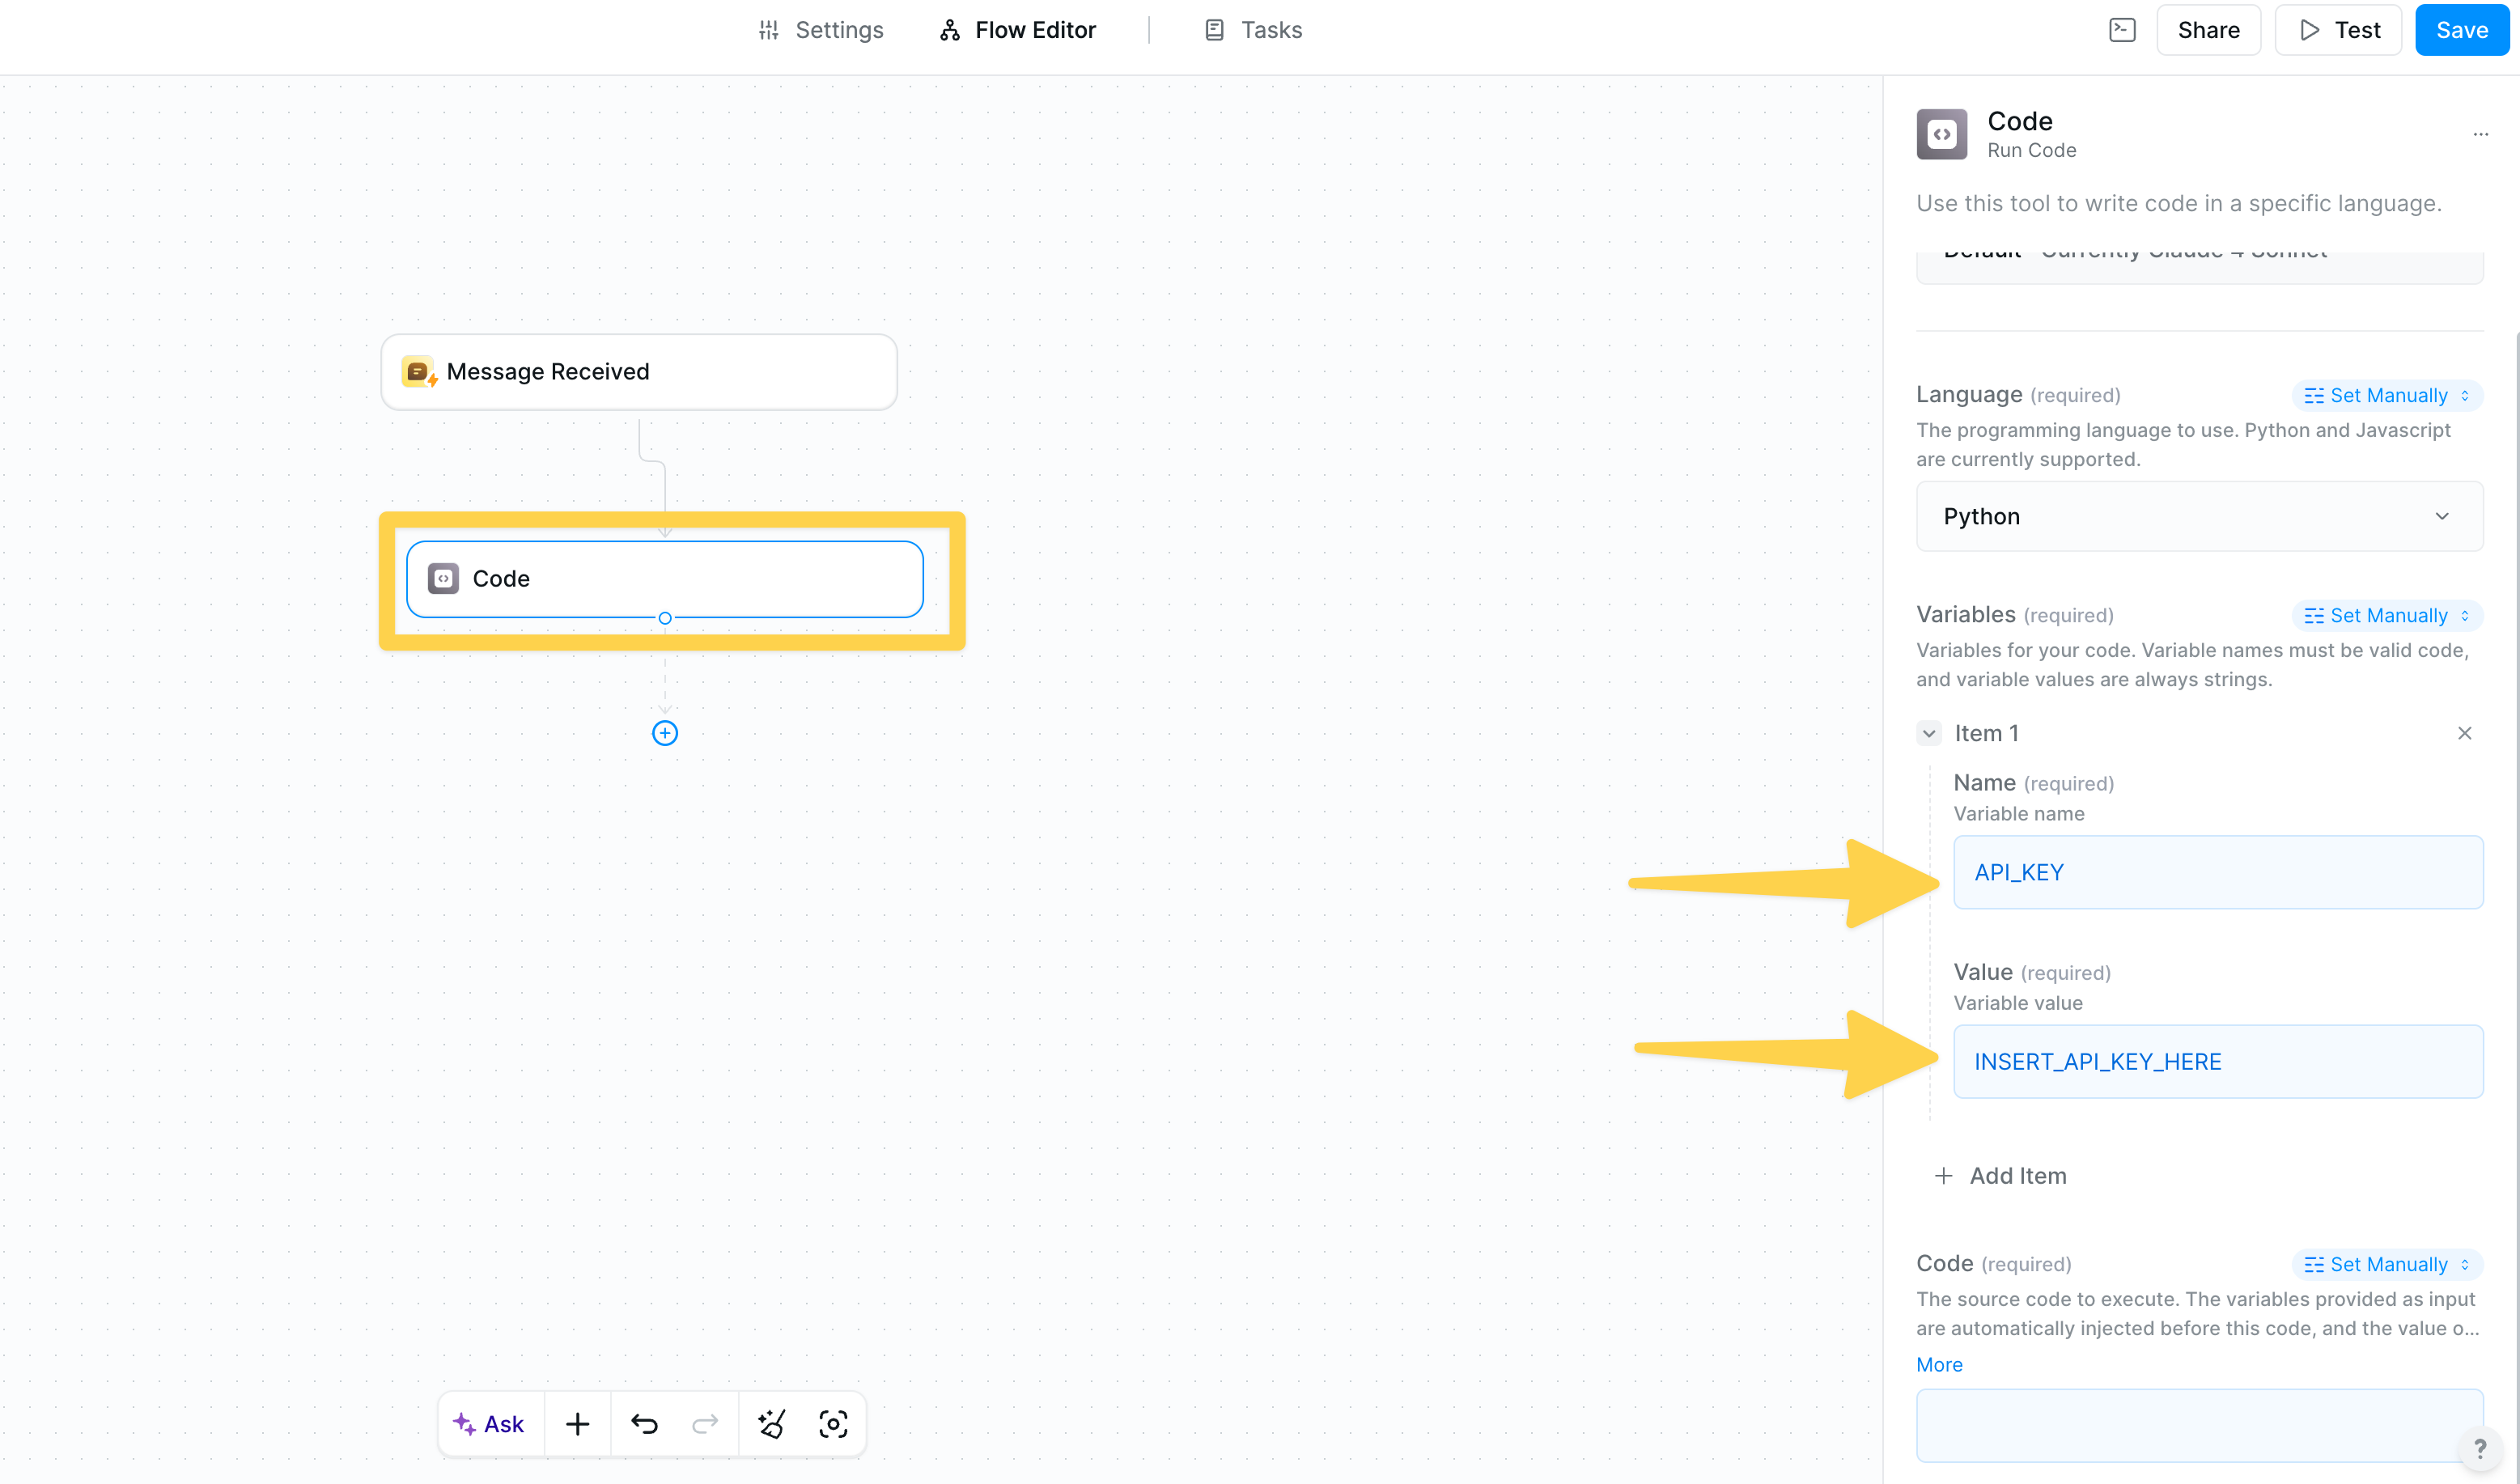 Set up variables to pass data from previous steps into your code:
* **Name** - The variable name you'll use in your code
* **Value** - Set to output references from previous steps
* **Type** - Variable values are always passed as strings
All variable values are passed as strings. Convert to appropriate types (int, float, etc.) within your code as needed.
### Code Editor
Set up variables to pass data from previous steps into your code:
* **Name** - The variable name you'll use in your code
* **Value** - Set to output references from previous steps
* **Type** - Variable values are always passed as strings
All variable values are passed as strings. Convert to appropriate types (int, float, etc.) within your code as needed.
### Code Editor
 Write your code using the variables defined in the previous step. The code editor supports:
* Syntax highlighting
* Auto-completion
* Error detection
* Multi-line code blocks
## Reference Code Output
Write your code using the variables defined in the previous step. The code editor supports:
* Syntax highlighting
* Auto-completion
* Error detection
* Multi-line code blocks
## Reference Code Output
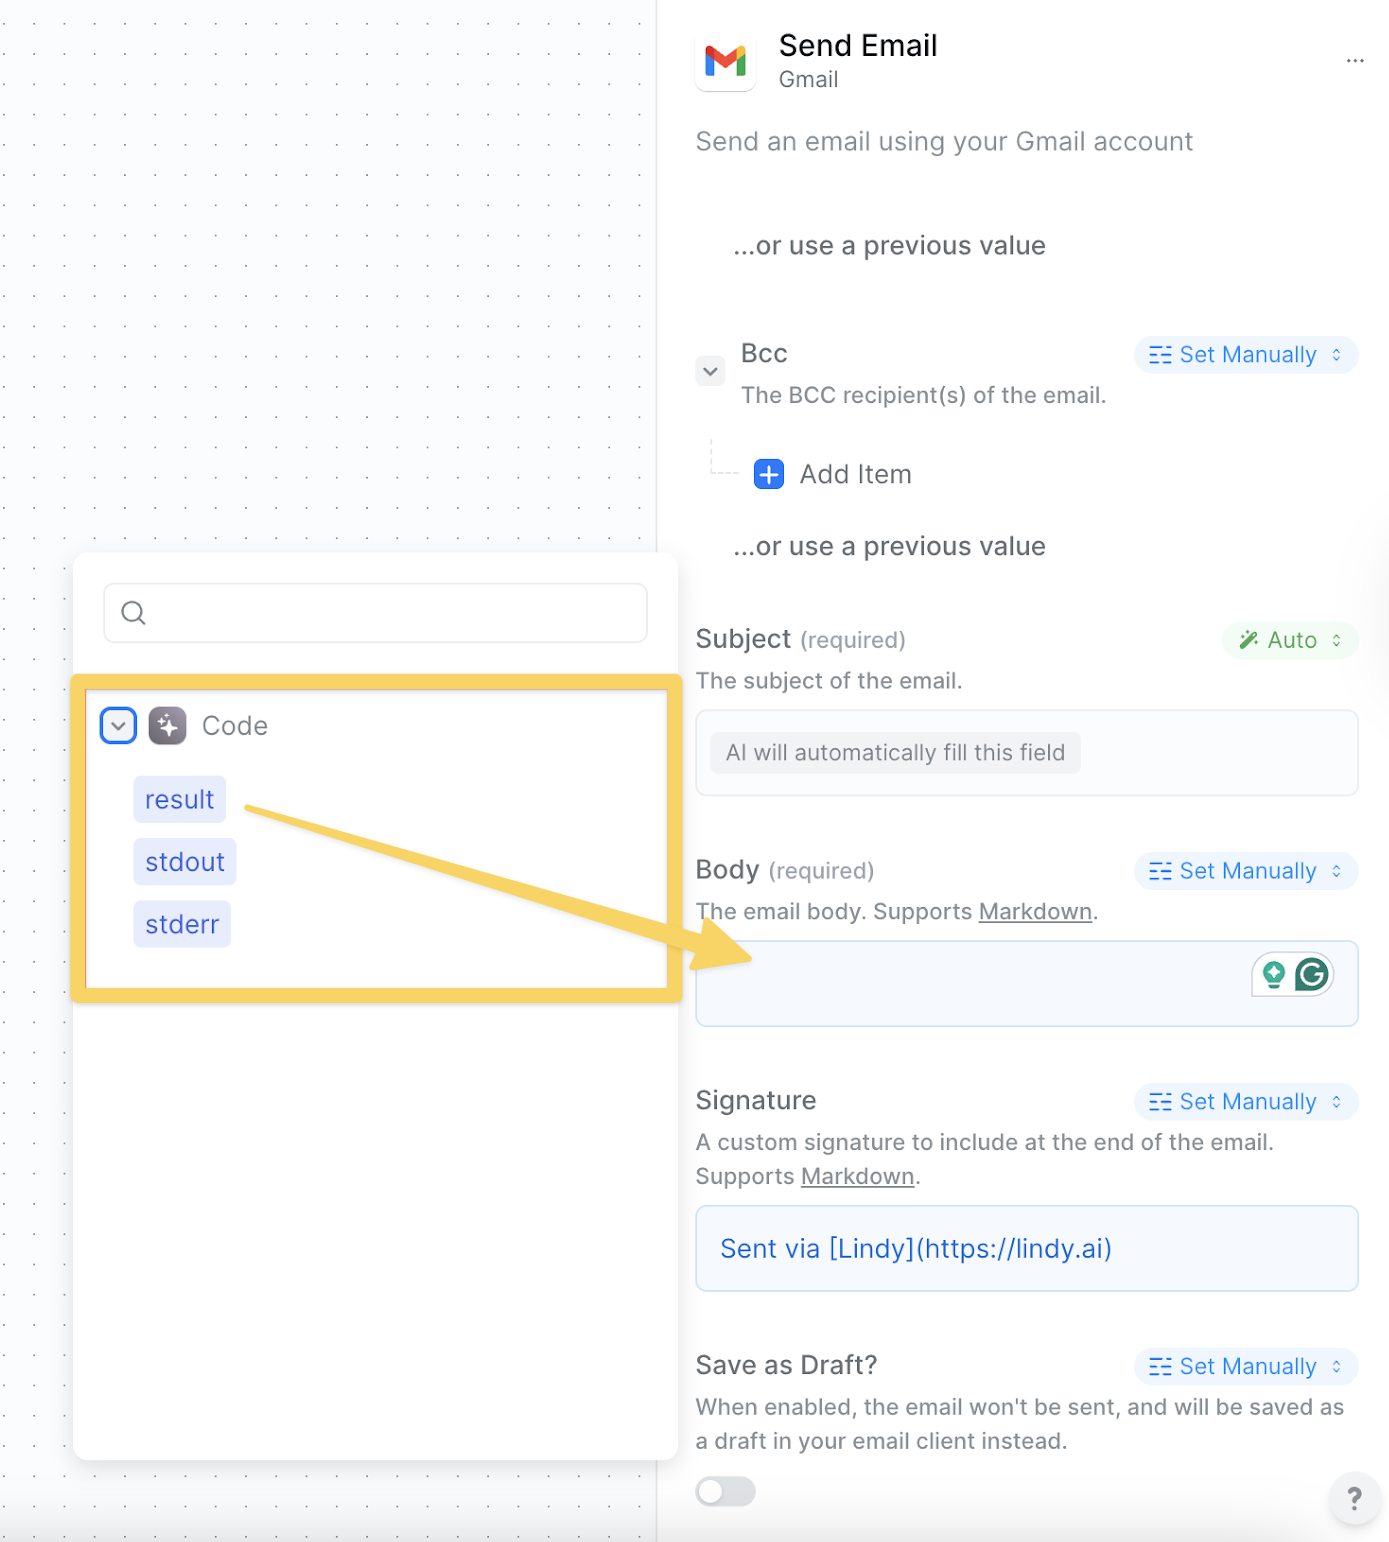 The results of your code action can be used in subsequent steps with three output references:
* **result** - What your code returns (using `return` statement)
* **text** - Any text printed during execution (stdout)
* **stderr** - Standard error buffer for debugging
If you want to see what the example code output looks like within the test panel or task view, you can click into the code action and see the JSON for all the outputs, so you can use them appropriately.
## Available Libraries
### Python Libraries
* **pandas** (v1.5.3) - Data manipulation and analysis
* **numpy** (v1.26.4) - Numerical computing
* **scipy** (v1.12.0) - Scientific computing
* **scikit-learn** (v1.4.1.post1) - Machine learning
* **matplotlib** (v3.8.3) - Plotting and visualization
* **seaborn** (v0.13.2) - Statistical visualization
* **plotly** (v5.19.0) - Interactive plotting
* **bokeh** (v3.3.4) - Web-based visualization
* **requests** (v2.26.0) - HTTP requests
* **aiohttp** (v3.9.3) - Async HTTP client/server
* **urllib3** (v1.26.7) - HTTP client library
* **beautifulsoup4** (v4.12.3) - Web scraping
* **nltk** (v3.8.1) - Natural language processing
* **textblob** (v0.18.0) - Text processing
* **spacy** (v3.7.4) - Advanced NLP
* **gensim** (v4.3.2) - Topic modeling
* **openpyxl** (v3.1.2) - Excel file handling
* **xlrd** (v2.0.1) - Excel file reading
* **python-docx** (v1.1.0) - Word document processing
* **xarray** (v2024.2.0) - N-dimensional arrays
* **opencv-python** (v4.9.0.80) - Computer vision
* **scikit-image** (v0.22.0) - Image processing
* **imageio** (v2.34.0) - Image I/O
* **librosa** (v0.10.1) - Audio analysis
* **soundfile** (v0.12.1) - Audio file I/O
* **pytz** (v2024.1) - Timezone handling
* **joblib** (v1.3.2) - Parallel computing
* **tornado** (v6.4) - Web framework
* **pytest** (v8.1.0) - Testing framework
* **sympy** (v1.12) - Symbolic mathematics
## Use Cases
Process CSV files, calculate statistics, generate reports from your data sources
Call external APIs, parse responses, and format data for your workflows
Perform mathematical operations, financial calculations, or scientific computations
Convert between data formats, clean datasets, or restructure information
Implement complex decision trees and branching logic beyond simple conditions
## Best Practices
Use try-catch blocks to handle potential failures and return meaningful error messages
Check variable types and values before processing to avoid runtime errors
Optimize for performance, especially with large datasets to avoid timeouts
Return structured data that's easy to use in subsequent workflow steps
Comment your code for future maintenance and debugging
Always handle errors gracefully in your code. Use try-catch blocks and return meaningful error messages.
Code execution has timeouts. Keep your code efficient and avoid infinite loops or very long-running operations.
## Next Steps
Combine code with AI for powerful data processing
Make API calls to external services
Store and retrieve processed data
Add logic to your code workflows
# Step by Step Onboarding
Source: https://docs.lindy.ai/skills/by-lindy/step-by-step-onboarding
Create form-style onboarding flows that make your agent templates easy to configure and use.
## Quick Overview
Step-by-Step Onboarding enables you to easily onboard others to an agent template. Instead of requiring template users to navigate a complex flow editor, build a simple form-style onboarding that allows your template users to easily configure and start using the agent!
Try it yourself: [Meeting Notetaker Step by Step Onboarding template](https://chat.lindy.ai/home?templateId=670444478279e010c572da9a)
The results of your code action can be used in subsequent steps with three output references:
* **result** - What your code returns (using `return` statement)
* **text** - Any text printed during execution (stdout)
* **stderr** - Standard error buffer for debugging
If you want to see what the example code output looks like within the test panel or task view, you can click into the code action and see the JSON for all the outputs, so you can use them appropriately.
## Available Libraries
### Python Libraries
* **pandas** (v1.5.3) - Data manipulation and analysis
* **numpy** (v1.26.4) - Numerical computing
* **scipy** (v1.12.0) - Scientific computing
* **scikit-learn** (v1.4.1.post1) - Machine learning
* **matplotlib** (v3.8.3) - Plotting and visualization
* **seaborn** (v0.13.2) - Statistical visualization
* **plotly** (v5.19.0) - Interactive plotting
* **bokeh** (v3.3.4) - Web-based visualization
* **requests** (v2.26.0) - HTTP requests
* **aiohttp** (v3.9.3) - Async HTTP client/server
* **urllib3** (v1.26.7) - HTTP client library
* **beautifulsoup4** (v4.12.3) - Web scraping
* **nltk** (v3.8.1) - Natural language processing
* **textblob** (v0.18.0) - Text processing
* **spacy** (v3.7.4) - Advanced NLP
* **gensim** (v4.3.2) - Topic modeling
* **openpyxl** (v3.1.2) - Excel file handling
* **xlrd** (v2.0.1) - Excel file reading
* **python-docx** (v1.1.0) - Word document processing
* **xarray** (v2024.2.0) - N-dimensional arrays
* **opencv-python** (v4.9.0.80) - Computer vision
* **scikit-image** (v0.22.0) - Image processing
* **imageio** (v2.34.0) - Image I/O
* **librosa** (v0.10.1) - Audio analysis
* **soundfile** (v0.12.1) - Audio file I/O
* **pytz** (v2024.1) - Timezone handling
* **joblib** (v1.3.2) - Parallel computing
* **tornado** (v6.4) - Web framework
* **pytest** (v8.1.0) - Testing framework
* **sympy** (v1.12) - Symbolic mathematics
## Use Cases
Process CSV files, calculate statistics, generate reports from your data sources
Call external APIs, parse responses, and format data for your workflows
Perform mathematical operations, financial calculations, or scientific computations
Convert between data formats, clean datasets, or restructure information
Implement complex decision trees and branching logic beyond simple conditions
## Best Practices
Use try-catch blocks to handle potential failures and return meaningful error messages
Check variable types and values before processing to avoid runtime errors
Optimize for performance, especially with large datasets to avoid timeouts
Return structured data that's easy to use in subsequent workflow steps
Comment your code for future maintenance and debugging
Always handle errors gracefully in your code. Use try-catch blocks and return meaningful error messages.
Code execution has timeouts. Keep your code efficient and avoid infinite loops or very long-running operations.
## Next Steps
Combine code with AI for powerful data processing
Make API calls to external services
Store and retrieve processed data
Add logic to your code workflows
# Step by Step Onboarding
Source: https://docs.lindy.ai/skills/by-lindy/step-by-step-onboarding
Create form-style onboarding flows that make your agent templates easy to configure and use.
## Quick Overview
Step-by-Step Onboarding enables you to easily onboard others to an agent template. Instead of requiring template users to navigate a complex flow editor, build a simple form-style onboarding that allows your template users to easily configure and start using the agent!
Try it yourself: [Meeting Notetaker Step by Step Onboarding template](https://chat.lindy.ai/home?templateId=670444478279e010c572da9a)
 Key benefits:
* **Simplified setup** — Form-style interface instead of complex flow editor
* **Guided configuration** — Step users through only the essential settings
* **Professional experience** — Clean, intuitive onboarding flow
* **Automatic auth handling** — User authorizations collected automatically
* **Template sharing** — Easy distribution with built-in onboarding
## Creating a Step by Step Onboarding
This is the high-level process for creating a Step by Step Onboarding:
### Step 1: Plan Your Requirements
**Input Collection**
Figure out what input you need to collect from your users to configure the agent template.
*Example: Meeting Notetaker Template*
* Required: Calendar selection (required field)
* Optional: 'Restrict by attendee type' configuration
**Output Display**
Determine what output you need to show users so they can use the template.
*Example: Meeting Scheduler Template*
* Output: User's Lindy Mail address for CC'ing to email threads
### Step 2: Build the Onboarding Flow
Build the onboarding flow in the Flow Editor using:
* **Form Actions** — Show information and collect input
* **Lindy Configuration Actions** — Configure template steps
All Step by Step Onboardings start with an `Onboarding trigger` from Lindy Configuration Actions (located under `Lindy Utilities`).
Key benefits:
* **Simplified setup** — Form-style interface instead of complex flow editor
* **Guided configuration** — Step users through only the essential settings
* **Professional experience** — Clean, intuitive onboarding flow
* **Automatic auth handling** — User authorizations collected automatically
* **Template sharing** — Easy distribution with built-in onboarding
## Creating a Step by Step Onboarding
This is the high-level process for creating a Step by Step Onboarding:
### Step 1: Plan Your Requirements
**Input Collection**
Figure out what input you need to collect from your users to configure the agent template.
*Example: Meeting Notetaker Template*
* Required: Calendar selection (required field)
* Optional: 'Restrict by attendee type' configuration
**Output Display**
Determine what output you need to show users so they can use the template.
*Example: Meeting Scheduler Template*
* Output: User's Lindy Mail address for CC'ing to email threads
### Step 2: Build the Onboarding Flow
Build the onboarding flow in the Flow Editor using:
* **Form Actions** — Show information and collect input
* **Lindy Configuration Actions** — Configure template steps
All Step by Step Onboardings start with an `Onboarding trigger` from Lindy Configuration Actions (located under `Lindy Utilities`).
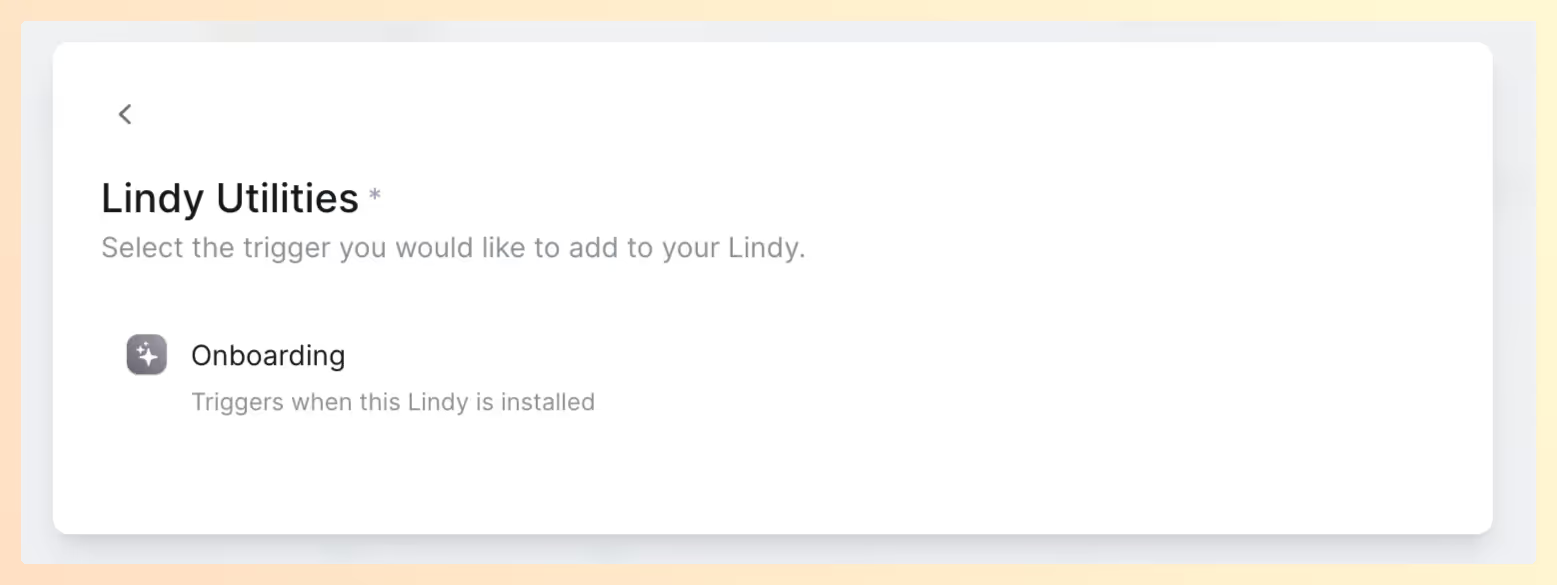 User authorizations are automatically collected at the beginning of onboarding. You do not need to collect user auths as an onboarding step.
### Step 3: Test and Share
User authorizations are automatically collected at the beginning of onboarding. You do not need to collect user auths as an onboarding step.
### Step 3: Test and Share
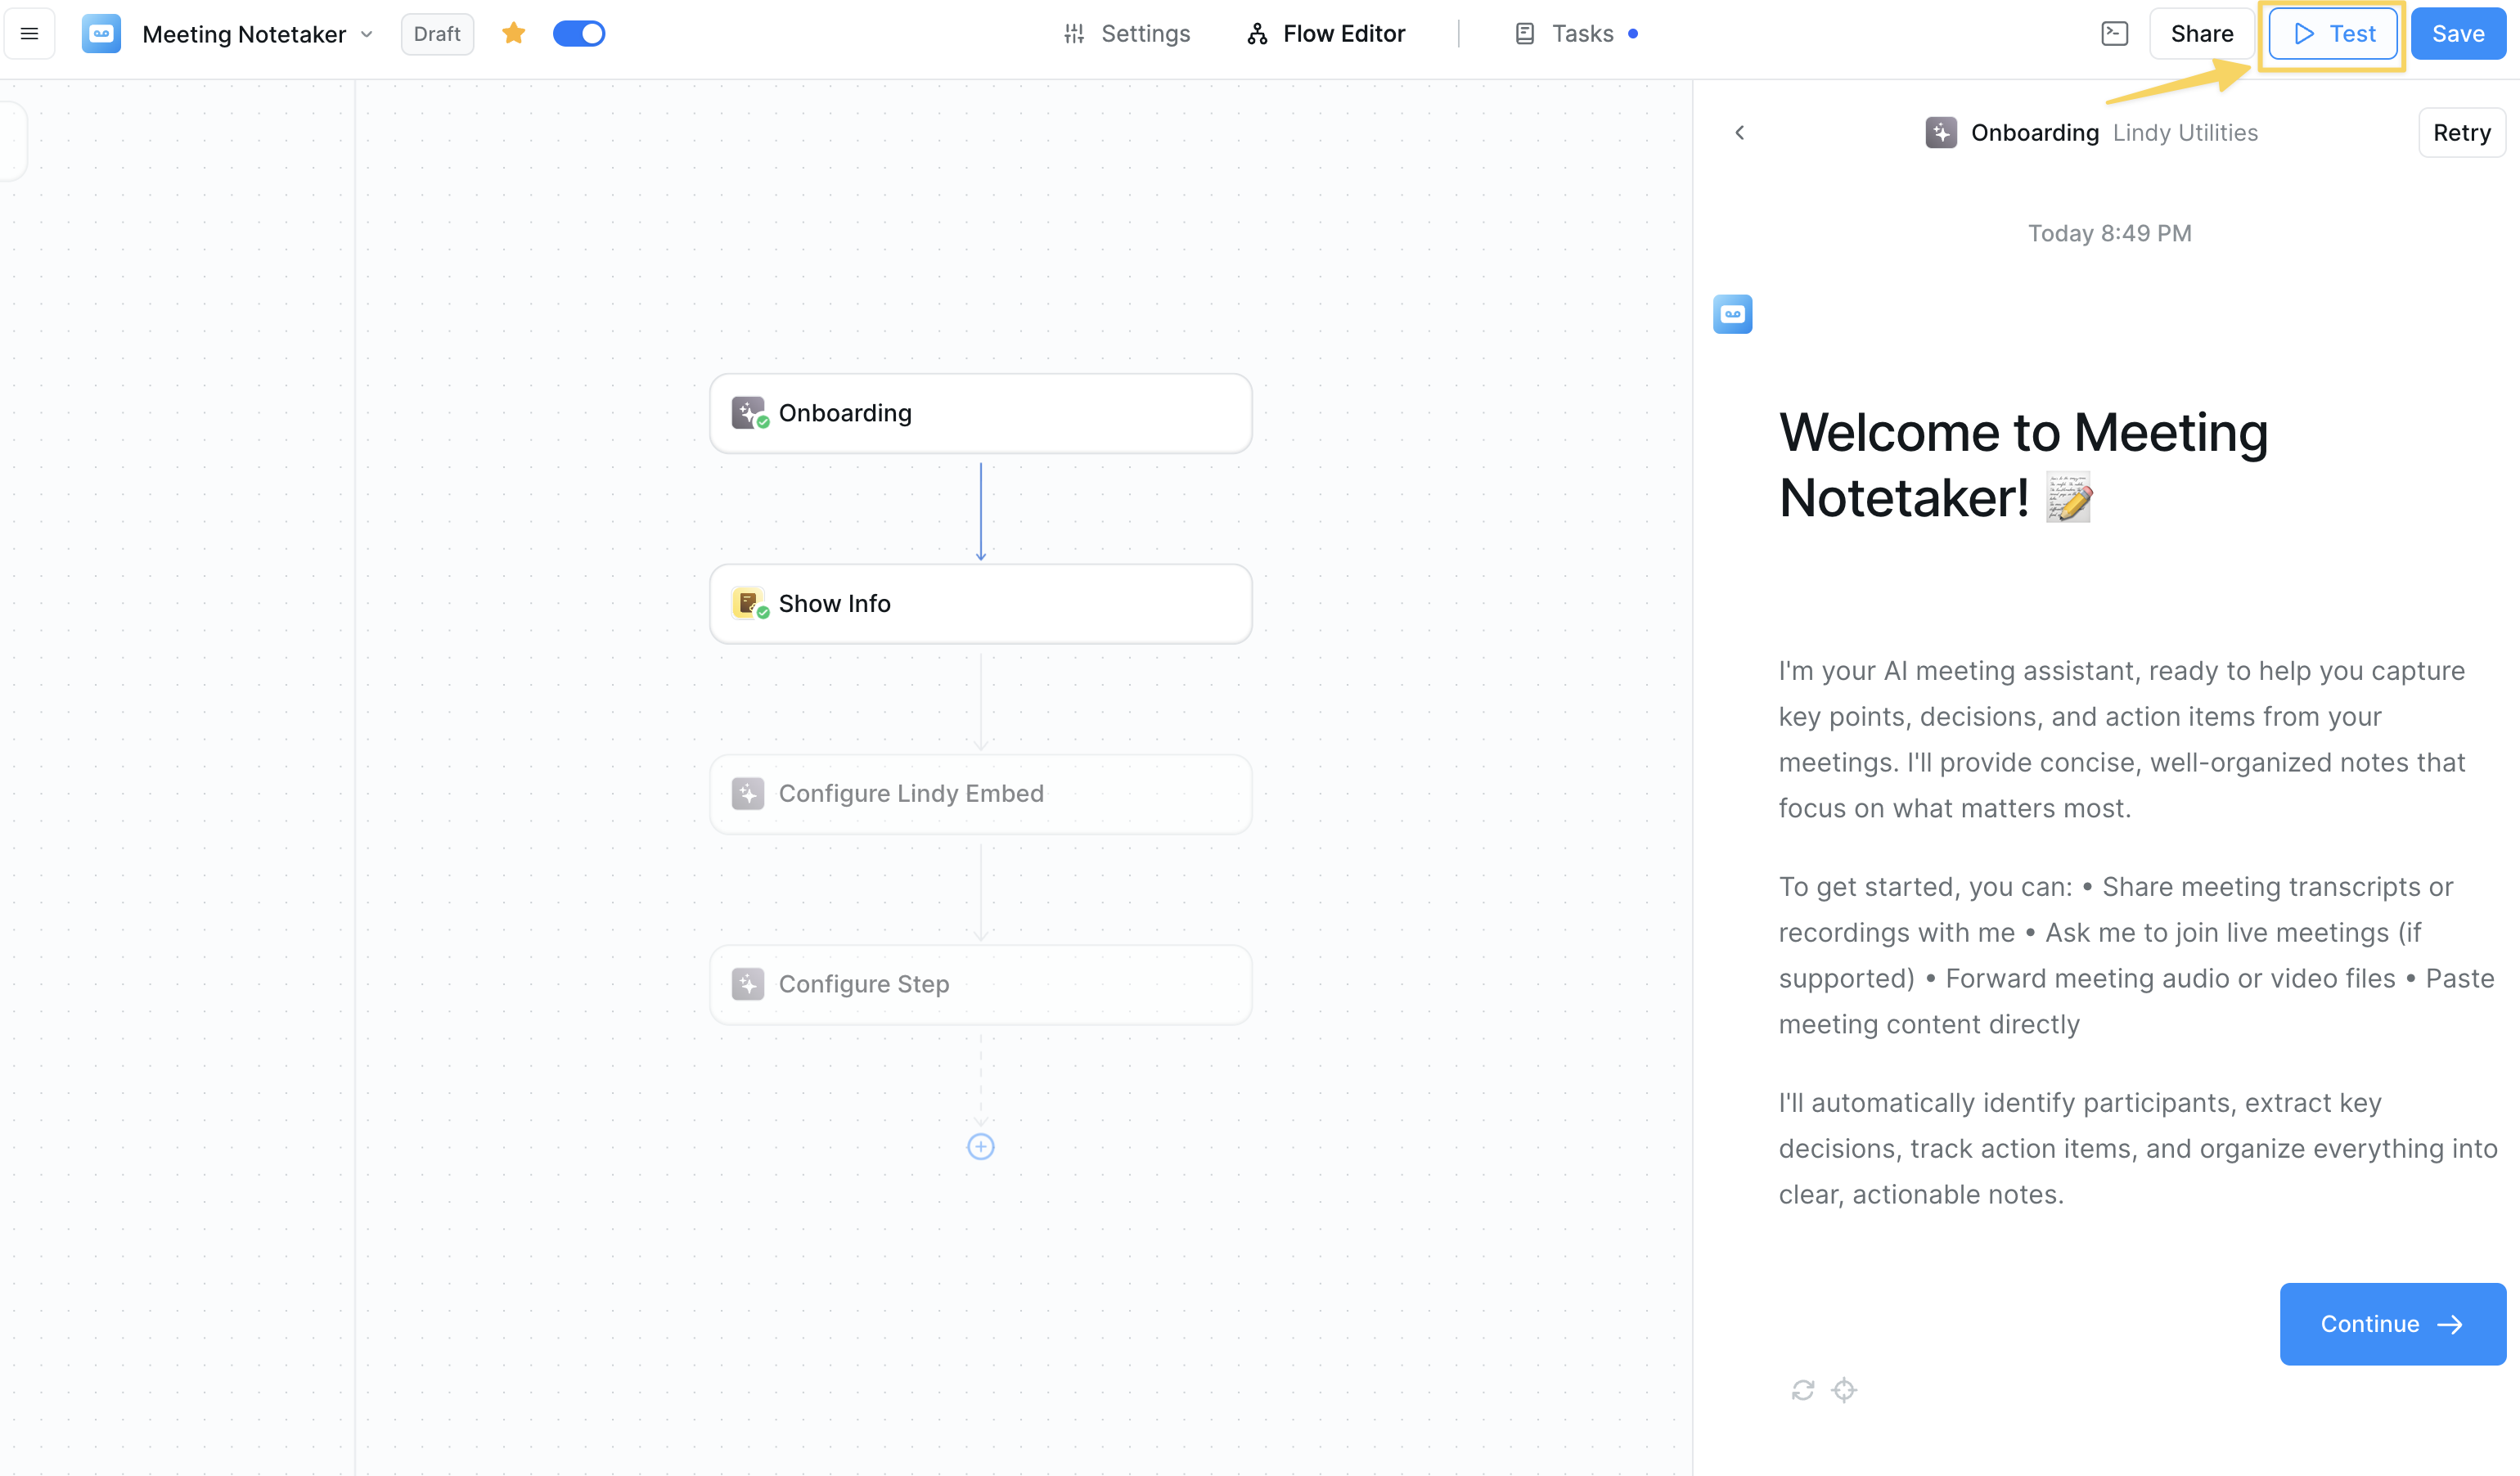 1. Click **Test** in the upper right corner
2. Select the onboarding trigger
3. Make changes if necessary
4. Share your template
## Form Actions
Form Actions enable you to show information and collect input from users:
| Action | Purpose |
| ---------------------------- | --------------------------------------------------------------- |
| **Show Multiple-Choice** | Shows a multiple choice question to users and collects input |
| **Show Copyable Content** | Shows a piece of text ready to copy |
| **Show Info Step** | Shows information to template users |
| **Show Text Input** | Shows a question to users and collects long or short text input |
| **Show Copyable Embed Code** | Shows the code snippet of a Lindy embed to copy |
Each step has an 'illustration' field. If no file is uploaded, there will be a default illustration.
## Lindy Configuration Actions
Located within Lindy Utilities in the action modal, these actions allow you to collect input from users while configuring template steps:
### Collect User Input to Configure Step
Collects input from a user for a specific field and uses the values to update the configuration of the fields in a step.
You cannot configure AI Agents or condition steps. Use Configure Step for these instead.
### Configure Step
Collects input from a user for a step and updates the configuration of any step. Use this over "Collect User Input to Configure Step" if:
* There are multiple fields in a step that you want to configure
* You need to configure AI Agents or condition steps
### Configure Lindy Embed
Configures the Lindy embed trigger node.
### Configure Knowledge Base
Collects data sources for a knowledge base node.
### Get User Info
Gets a user's information, including:
* Name
* Email
* Time Zone
* Lindy Mail Suffix
## The Step by Step Onboarding Experience
### User Flow
* **Incomplete onboarding**: Users who click out without completing will land on the Flow Editor for the template and can resume onboarding
* **Completed onboarding**: Users are redirected to the Task View for the agent they just configured
### Harmonious Experience
To ensure a smooth experience, add a `Message Received trigger` to your template with a greeting message that introduces your user to the Lindy.
## Best Practices
Begin with an Info Step introducing your user to the agent they will be onboarded to and what it does.
In the last step, let the user know that the agent can be configured further in the Flow Editor.
Add a Message Received trigger to your template with a greeting message. Users will see this after completing onboarding.
If the agent consists of only a Message Received trigger and an agent state, onboarding may not be needed. Consider using a Show Info step to tell the user how to use the agent.
When thinking of inputs and outputs, consider what is required for the user to configure to ensure the agent can run, and critical steps that the user might want to configure.
Template users will not be able to see the onboarding flow in their template's Flow Editor after sharing.
## Next Steps
Enhance your template sharing with these concepts:
Learn about creating and sharing agent templates
Test your onboarding flows thoroughly
Embed Lindy chat widgets in websites
Configure knowledge bases for support templates
# Talk with Other Lindy
Source: https://docs.lindy.ai/skills/by-lindy/talk-with-other-lindy
Enable Lindys to communicate and collaborate with each other using message triggers and actions for multi-agent workflows
## Overview
Enable Lindys to interact and collaborate with each other through direct messaging. There are two key components for Lindy-to-Lindy communication:
* `Agent Message Received` trigger listens for messages from other Lindys and determines how to handle them
* `Send Message` action allows one Lindy to send messages to another Lindy with the appropriate trigger
## Agent Message Received Trigger
* **What it does**: Triggers when another Lindy sends a message to this Lindy - perfect for building collaborative multi-agent workflows.
1. Click **Test** in the upper right corner
2. Select the onboarding trigger
3. Make changes if necessary
4. Share your template
## Form Actions
Form Actions enable you to show information and collect input from users:
| Action | Purpose |
| ---------------------------- | --------------------------------------------------------------- |
| **Show Multiple-Choice** | Shows a multiple choice question to users and collects input |
| **Show Copyable Content** | Shows a piece of text ready to copy |
| **Show Info Step** | Shows information to template users |
| **Show Text Input** | Shows a question to users and collects long or short text input |
| **Show Copyable Embed Code** | Shows the code snippet of a Lindy embed to copy |
Each step has an 'illustration' field. If no file is uploaded, there will be a default illustration.
## Lindy Configuration Actions
Located within Lindy Utilities in the action modal, these actions allow you to collect input from users while configuring template steps:
### Collect User Input to Configure Step
Collects input from a user for a specific field and uses the values to update the configuration of the fields in a step.
You cannot configure AI Agents or condition steps. Use Configure Step for these instead.
### Configure Step
Collects input from a user for a step and updates the configuration of any step. Use this over "Collect User Input to Configure Step" if:
* There are multiple fields in a step that you want to configure
* You need to configure AI Agents or condition steps
### Configure Lindy Embed
Configures the Lindy embed trigger node.
### Configure Knowledge Base
Collects data sources for a knowledge base node.
### Get User Info
Gets a user's information, including:
* Name
* Email
* Time Zone
* Lindy Mail Suffix
## The Step by Step Onboarding Experience
### User Flow
* **Incomplete onboarding**: Users who click out without completing will land on the Flow Editor for the template and can resume onboarding
* **Completed onboarding**: Users are redirected to the Task View for the agent they just configured
### Harmonious Experience
To ensure a smooth experience, add a `Message Received trigger` to your template with a greeting message that introduces your user to the Lindy.
## Best Practices
Begin with an Info Step introducing your user to the agent they will be onboarded to and what it does.
In the last step, let the user know that the agent can be configured further in the Flow Editor.
Add a Message Received trigger to your template with a greeting message. Users will see this after completing onboarding.
If the agent consists of only a Message Received trigger and an agent state, onboarding may not be needed. Consider using a Show Info step to tell the user how to use the agent.
When thinking of inputs and outputs, consider what is required for the user to configure to ensure the agent can run, and critical steps that the user might want to configure.
Template users will not be able to see the onboarding flow in their template's Flow Editor after sharing.
## Next Steps
Enhance your template sharing with these concepts:
Learn about creating and sharing agent templates
Test your onboarding flows thoroughly
Embed Lindy chat widgets in websites
Configure knowledge bases for support templates
# Talk with Other Lindy
Source: https://docs.lindy.ai/skills/by-lindy/talk-with-other-lindy
Enable Lindys to communicate and collaborate with each other using message triggers and actions for multi-agent workflows
## Overview
Enable Lindys to interact and collaborate with each other through direct messaging. There are two key components for Lindy-to-Lindy communication:
* `Agent Message Received` trigger listens for messages from other Lindys and determines how to handle them
* `Send Message` action allows one Lindy to send messages to another Lindy with the appropriate trigger
## Agent Message Received Trigger
* **What it does**: Triggers when another Lindy sends a message to this Lindy - perfect for building collaborative multi-agent workflows.
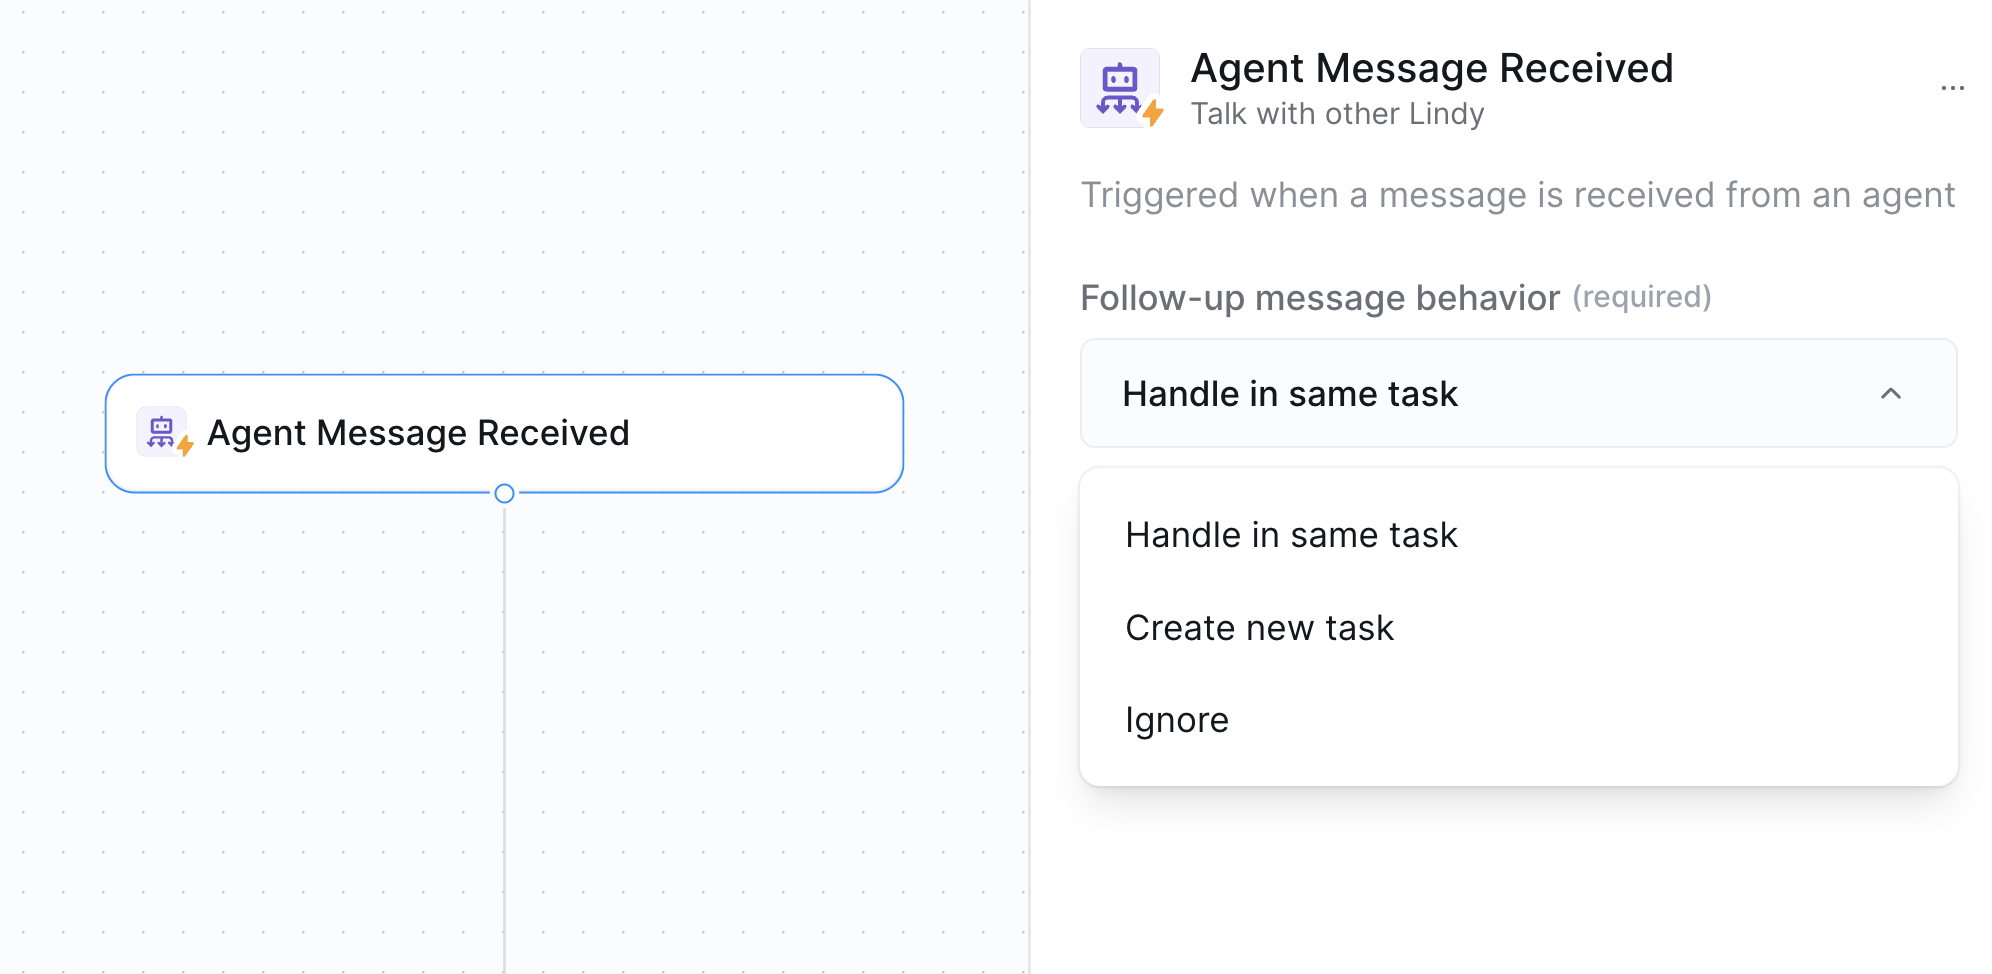 ### Inputs
* **Follow-up Message Behavior**: Choose how to handle subsequent messages:
* **"Handle in same task"** — Process new messages within the same ongoing task
* **"Create new task"** — Start a fresh task for each new message
* **"Ignore"** — Only respond to the first message, ignore follow-ups
This follow-up behavior works very similar to email and other stateful triggers.
***
## Send Message Action
* **What it does**: Sends a message from this Lindy to another Lindy that has the Agent Message Receive trigger configured.
### Inputs
* **Follow-up Message Behavior**: Choose how to handle subsequent messages:
* **"Handle in same task"** — Process new messages within the same ongoing task
* **"Create new task"** — Start a fresh task for each new message
* **"Ignore"** — Only respond to the first message, ignore follow-ups
This follow-up behavior works very similar to email and other stateful triggers.
***
## Send Message Action
* **What it does**: Sends a message from this Lindy to another Lindy that has the Agent Message Receive trigger configured.
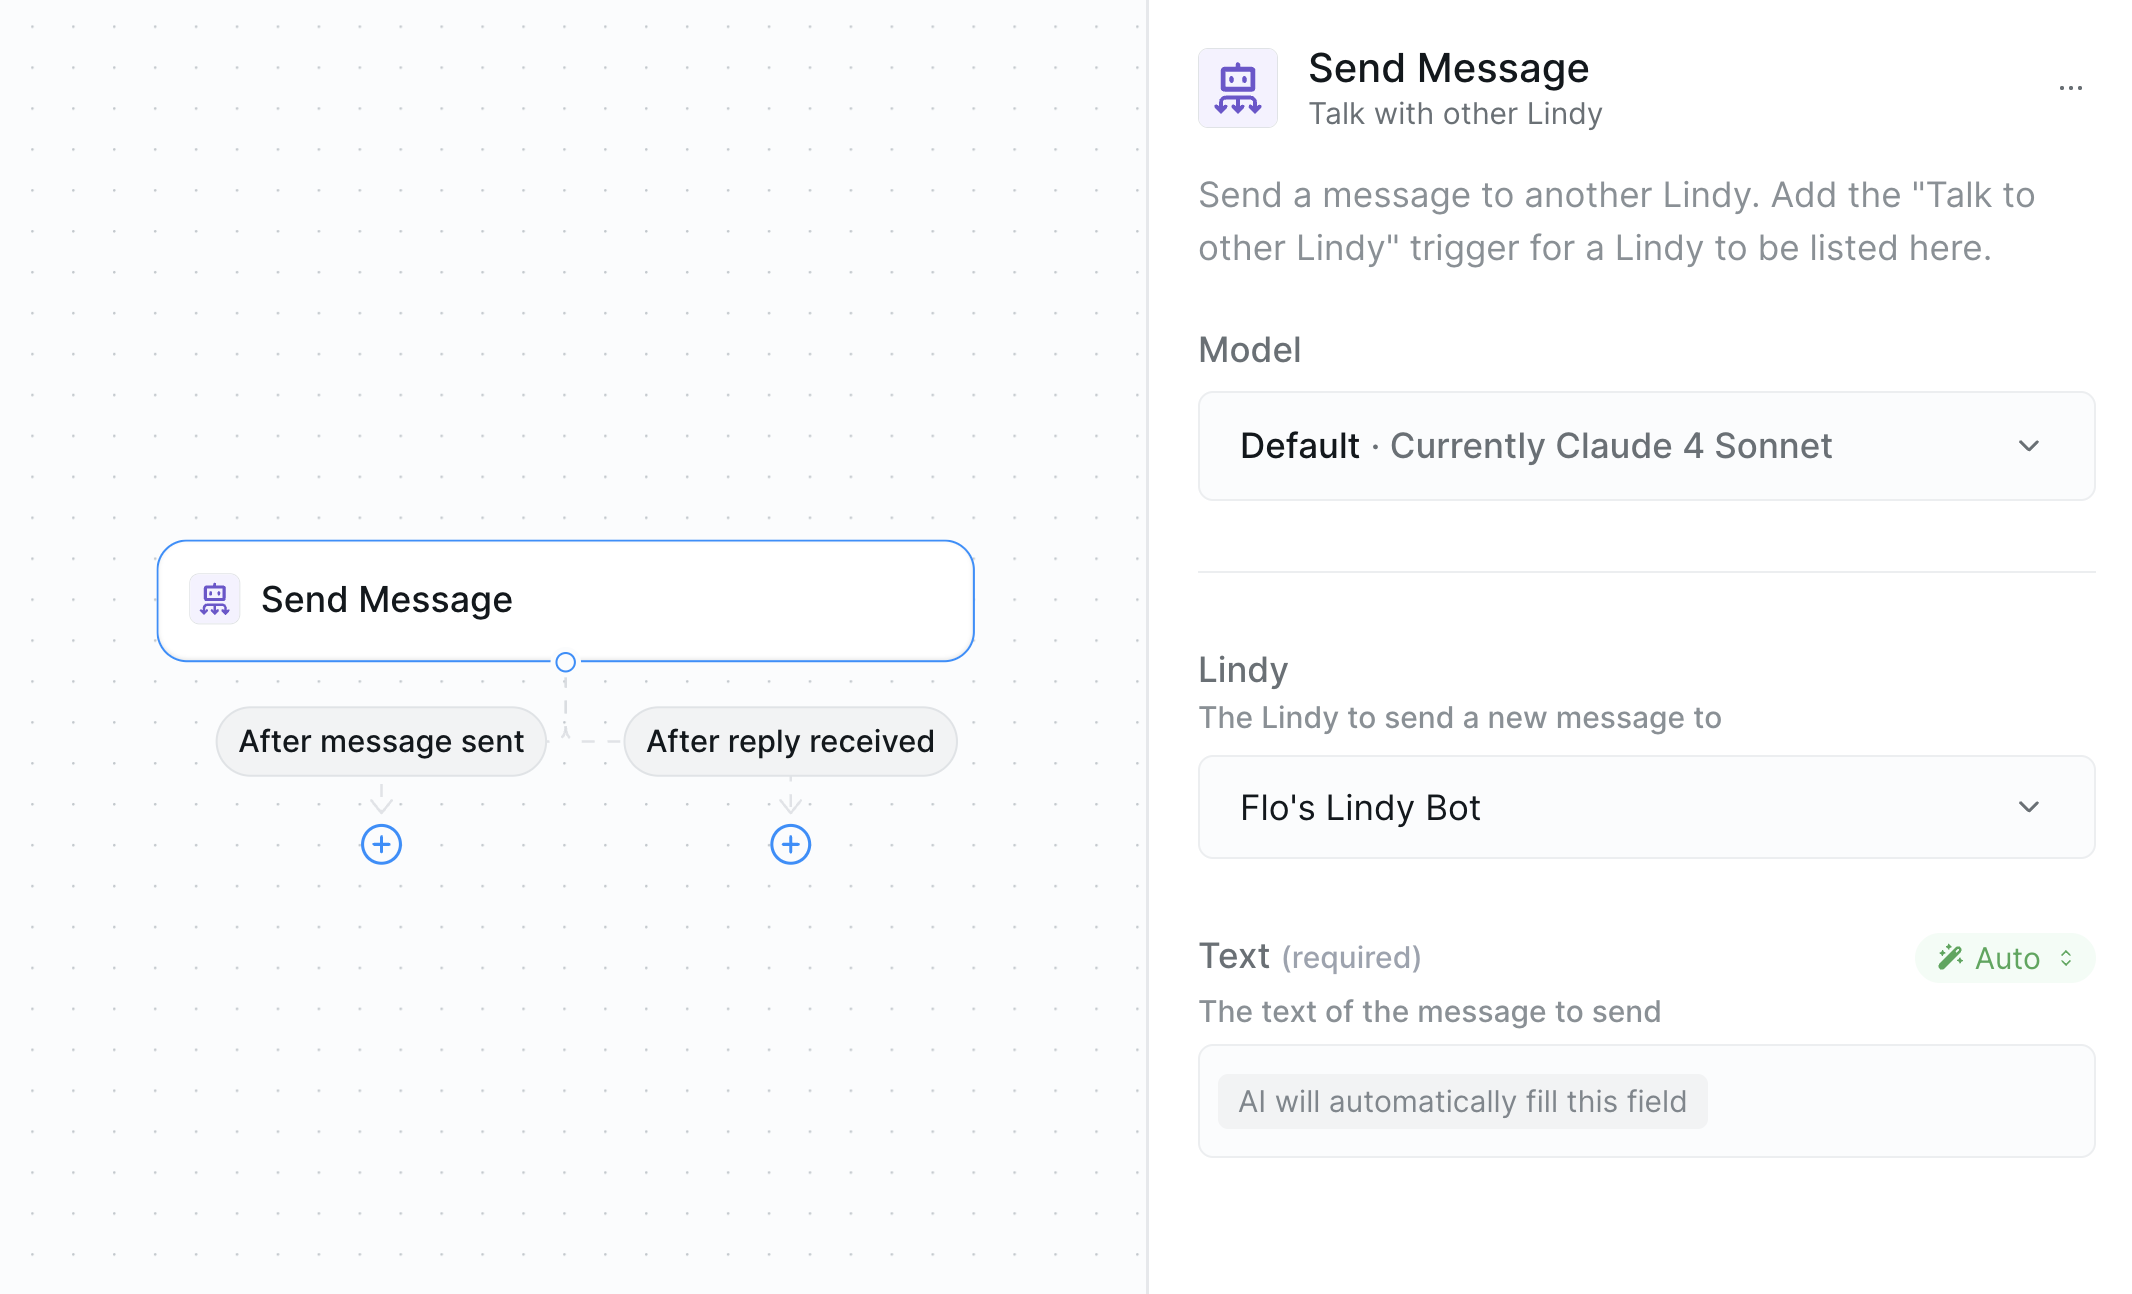 Important: Before you can select an agent to delegate to, you need to have the `Agent Message Received Trigger` set up and saved in the other agent. This trigger allows the other agent to receive and process messages from your current agent.
### Inputs
* **Target Lindy**: Choose which Lindy you're sending the message to
* **Text**: The message content you want to pass to the receiving Lindy
### Requirements
* The target Lindy must have the "Agent Message Received" trigger configured
* You can only send messages to Lindys that are set up to receive them
Send structured data and let the receiving agent know that structured data is coming in. The receiving agent won't include all the context it needs, so be explicit about what information you're passing along.
***
## Bulk Uploading Tasks via CSV
You can quickly create multiple tasks for your agents by uploading a CSV file directly from the tasks side panel. This is perfect for batch processing. Each row in your CSV will generate a new task.
## Use Cases
| Scenario | How it works |
| ------------------------ | ----------------------------------------------------------------------------- |
| **Workflow Handoffs** | One Lindy completes initial processing, then hands off to a specialist Lindy |
| **Task Distribution** | A coordinator Lindy distributes different types of work to specialized agents |
| **Review Processes** | One Lindy drafts content, sends to another Lindy for review and approval |
| **Multi-step Analysis** | Chain multiple Lindys together for complex, multi-stage analysis |
| **Escalation Workflows** | Basic Lindy handles routine tasks, escalates complex cases to advanced Lindy |
## Best Practices
Choose the right follow-up behavior based on your workflow needs — use "handle and save task" for ongoing conversations, "create new task" for independent requests, and "ignore" for one-time handoffs.
Structure messages clearly with context and specific instructions. Include relevant data and clear expectations for what the receiving Lindy should do.
Design clear handoff points between Lindys. Avoid circular communication loops and establish clear ownership of different workflow stages.
## Next Steps
Configure your Lindys for optimal communication
Build specialized Lindys for different workflow stages
Share data effectively between communicating Lindys
Pass information between Lindys in workflows
# Timer
Source: https://docs.lindy.ai/skills/by-lindy/timer
Schedule workflows and add delays with precision timing controls
## Overview
Timer provides precise scheduling and delay capabilities for your agent workflows. Whether you need to run tasks on a recurring schedule, trigger at specific times, or add intelligent delays between actions, Timer gives you complete control over workflow timing.
Timer is essential for creating time-based automations, scheduled reports, follow-up sequences, and any workflow requiring precise timing control.
## Timer as a Trigger
Important: Before you can select an agent to delegate to, you need to have the `Agent Message Received Trigger` set up and saved in the other agent. This trigger allows the other agent to receive and process messages from your current agent.
### Inputs
* **Target Lindy**: Choose which Lindy you're sending the message to
* **Text**: The message content you want to pass to the receiving Lindy
### Requirements
* The target Lindy must have the "Agent Message Received" trigger configured
* You can only send messages to Lindys that are set up to receive them
Send structured data and let the receiving agent know that structured data is coming in. The receiving agent won't include all the context it needs, so be explicit about what information you're passing along.
***
## Bulk Uploading Tasks via CSV
You can quickly create multiple tasks for your agents by uploading a CSV file directly from the tasks side panel. This is perfect for batch processing. Each row in your CSV will generate a new task.
## Use Cases
| Scenario | How it works |
| ------------------------ | ----------------------------------------------------------------------------- |
| **Workflow Handoffs** | One Lindy completes initial processing, then hands off to a specialist Lindy |
| **Task Distribution** | A coordinator Lindy distributes different types of work to specialized agents |
| **Review Processes** | One Lindy drafts content, sends to another Lindy for review and approval |
| **Multi-step Analysis** | Chain multiple Lindys together for complex, multi-stage analysis |
| **Escalation Workflows** | Basic Lindy handles routine tasks, escalates complex cases to advanced Lindy |
## Best Practices
Choose the right follow-up behavior based on your workflow needs — use "handle and save task" for ongoing conversations, "create new task" for independent requests, and "ignore" for one-time handoffs.
Structure messages clearly with context and specific instructions. Include relevant data and clear expectations for what the receiving Lindy should do.
Design clear handoff points between Lindys. Avoid circular communication loops and establish clear ownership of different workflow stages.
## Next Steps
Configure your Lindys for optimal communication
Build specialized Lindys for different workflow stages
Share data effectively between communicating Lindys
Pass information between Lindys in workflows
# Timer
Source: https://docs.lindy.ai/skills/by-lindy/timer
Schedule workflows and add delays with precision timing controls
## Overview
Timer provides precise scheduling and delay capabilities for your agent workflows. Whether you need to run tasks on a recurring schedule, trigger at specific times, or add intelligent delays between actions, Timer gives you complete control over workflow timing.
Timer is essential for creating time-based automations, scheduled reports, follow-up sequences, and any workflow requiring precise timing control.
## Timer as a Trigger
![Add Trigger menu showing Timer in the popular section [[memory:2619471]]](https://mintlify.s3.us-west-1.amazonaws.com/lindyai/lindy-brand-assets/lindy-timer-add-trigger.png) Timer appears in the "Popular" triggers section, offering two powerful scheduling options:
Timer appears in the "Popular" triggers section, offering two powerful scheduling options:
![Timer trigger options showing On Recurring Schedule and On Specific Time [[memory:2619471]]](https://mintlify.s3.us-west-1.amazonaws.com/lindyai/lindy-brand-assets/lindy-timer-trgger-options.png) ### On Recurring Schedule
### On Recurring Schedule
![Recurring schedule configuration with preset intervals and next run times [[memory:2619471]]](https://mintlify.s3.us-west-1.amazonaws.com/lindyai/lindy-brand-assets/lindy-timer-recurring-schedule-trigger.png) Create workflows that run automatically on a repeating schedule. You can define any interval in natural language—just type what you want, like "every Monday to Friday at 8am."
The interface shows when each schedule will next run, helping you verify your timing is correct before activating.
### On Specific Time
Create workflows that run automatically on a repeating schedule. You can define any interval in natural language—just type what you want, like "every Monday to Friday at 8am."
The interface shows when each schedule will next run, helping you verify your timing is correct before activating.
### On Specific Time
![Specific time trigger with calendar date picker and time selector [[memory:2619471]]](https://mintlify.s3.us-west-1.amazonaws.com/lindyai/lindy-brand-assets/lindy-timer-on-specific-time-trigger.png) Trigger workflows at an exact date and time.
**Configuration:**
* Visual calendar picker
* Precise time selection (hour/minute)
* AM/PM format
* Clear date display (mm/dd/yyyy)
## Timer as an Action
### Set Timer
Add intelligent delays to your workflows with flexible timing options.
Trigger workflows at an exact date and time.
**Configuration:**
* Visual calendar picker
* Precise time selection (hour/minute)
* AM/PM format
* Clear date display (mm/dd/yyyy)
## Timer as an Action
### Set Timer
Add intelligent delays to your workflows with flexible timing options.
![Timer actions menu showing Cancel Timers and Set Timer options [[memory:2619471]]](https://mintlify.s3.us-west-1.amazonaws.com/lindyai/lindy-brand-assets/lindy-timer-avaialble-actions.png) Timer provides two essential actions for controlling workflow timing:
#### Wait Until Specific Time
Timer provides two essential actions for controlling workflow timing:
#### Wait Until Specific Time
![Set Timer action configured to wait until a specific date and time [[memory:2619471]]](https://mintlify.s3.us-west-1.amazonaws.com/lindyai/lindy-brand-assets/lindy-timer-set-timer-until-actions.png) Pause your workflow until an exact moment:
* Select specific date with calendar picker
* Choose precise time
* Workflow resumes automatically at the specified time
**Use cases:**
* Wait until business hours to send emails
* Delay actions until after an event
* Coordinate with external schedules
#### Wait For Duration
Pause your workflow until an exact moment:
* Select specific date with calendar picker
* Choose precise time
* Workflow resumes automatically at the specified time
**Use cases:**
* Wait until business hours to send emails
* Delay actions until after an event
* Coordinate with external schedules
#### Wait For Duration
![Set Timer action configured to wait for a specified number of minutes [[memory:2619471]]](https://mintlify.s3.us-west-1.amazonaws.com/lindyai/lindy-brand-assets/lindy-timer-set-timer-for-actions.png) Add a relative delay to your workflow:
* Specify duration in minutes
* Simple numeric input
* Workflow continues after the delay
**Common durations:**
* 5 minutes — Brief pause between actions
* 60 minutes — Hourly intervals
* 1440 minutes — Daily delays
* Custom — Any duration you need
#### AI-Powered Timing
Add a relative delay to your workflow:
* Specify duration in minutes
* Simple numeric input
* Workflow continues after the delay
**Common durations:**
* 5 minutes — Brief pause between actions
* 60 minutes — Hourly intervals
* 1440 minutes — Daily delays
* Custom — Any duration you need
#### AI-Powered Timing
![Set Timer with Prompt AI mode for intelligent timing decisions [[memory:2619471]]](https://mintlify.s3.us-west-1.amazonaws.com/lindyai/lindy-brand-assets/lindy-timer-set-timer-actions-ai-prompt.png) Let AI determine the optimal wait time:
* Switch to "Prompt AI" mode
* Describe your timing needs in natural language
* AI calculates appropriate delays based on context
**Example prompts:**
* "Wait 2 hours after sending the initial email"
* "Delay until next business day at 9 AM"
* "Pause for the time specified in the response"
### Cancel Timers
Let AI determine the optimal wait time:
* Switch to "Prompt AI" mode
* Describe your timing needs in natural language
* AI calculates appropriate delays based on context
**Example prompts:**
* "Wait 2 hours after sending the initial email"
* "Delay until next business day at 9 AM"
* "Pause for the time specified in the response"
### Cancel Timers
![Cancel Timers action to stop all active timers [[memory:2619471]]](https://mintlify.s3.us-west-1.amazonaws.com/lindyai/lindy-brand-assets/lindy-timer-cancel-timer-action.png) Stop all active timers in your workflow. This action cancels any pending timer delays and prevents queued actions from executing.
Canceling timers is especially useful for outbound sequences. If a recipient responds before a scheduled follow-up, you can use this action to cancel the timer and stop future messages from being sent.
## Managing Execution Paths
Both Timer triggers and actions show clear connection points:
* **After wait begins** — Continue parallel tasks
* **After wait elapsed** — Resume sequential flow
This enables sophisticated patterns like:
* Starting multiple timers simultaneously
* Running actions while waiting
* Coordinating complex timing sequences
This is a common mistake: If your timer isn't working as expected, make sure your next steps are connected to the `After wait elapsed` path.
## Related Resources
Combine timers with conditional logic
Process timed batches of data
Store timing preferences
Add approval steps with timeouts
# Webhooks
Source: https://docs.lindy.ai/skills/by-lindy/webhooks
Trigger agent workflows with custom API calls from any external system
## Overview
While Lindy supports over 5,000 integrations out of the box, webhooks provide the ultimate flexibility for custom integrations. Use webhooks to trigger agent workflows from any system that can make HTTP requests — your own applications, third-party services, or custom scripts.
Webhooks are ideal when you need real-time event processing or when working with systems that don't have native Lindy integrations.
## Adding a Webhook Trigger
Stop all active timers in your workflow. This action cancels any pending timer delays and prevents queued actions from executing.
Canceling timers is especially useful for outbound sequences. If a recipient responds before a scheduled follow-up, you can use this action to cancel the timer and stop future messages from being sent.
## Managing Execution Paths
Both Timer triggers and actions show clear connection points:
* **After wait begins** — Continue parallel tasks
* **After wait elapsed** — Resume sequential flow
This enables sophisticated patterns like:
* Starting multiple timers simultaneously
* Running actions while waiting
* Coordinating complex timing sequences
This is a common mistake: If your timer isn't working as expected, make sure your next steps are connected to the `After wait elapsed` path.
## Related Resources
Combine timers with conditional logic
Process timed batches of data
Store timing preferences
Add approval steps with timeouts
# Webhooks
Source: https://docs.lindy.ai/skills/by-lindy/webhooks
Trigger agent workflows with custom API calls from any external system
## Overview
While Lindy supports over 5,000 integrations out of the box, webhooks provide the ultimate flexibility for custom integrations. Use webhooks to trigger agent workflows from any system that can make HTTP requests — your own applications, third-party services, or custom scripts.
Webhooks are ideal when you need real-time event processing or when working with systems that don't have native Lindy integrations.
## Adding a Webhook Trigger
![Add Trigger menu showing Webhook option in popular triggers and other triggers sections [[memory:2619471]]](https://mintlify.s3.us-west-1.amazonaws.com/lindyai/lindy-brand-assets/lindy-webhook-add-trigger.png) To get started:
1. Click **Add Trigger** in your workflow
2. Search for "Webhook"
3. Select **Webhook Received** trigger
The webhook trigger appears in both the "Popular" section and under "Other Triggers" for easy access.
## Configuration Options
To get started:
1. Click **Add Trigger** in your workflow
2. Search for "Webhook"
3. Select **Webhook Received** trigger
The webhook trigger appears in both the "Popular" section and under "Other Triggers" for easy access.
## Configuration Options
![Webhook configuration interface showing webhook selection and follow-up behavior options [[memory:2619471]]](https://mintlify.s3.us-west-1.amazonaws.com/lindyai/lindy-brand-assets/lindy-webhook-show-fields-to-fill.png) ### Webhook Selection
Choose an existing webhook or create a new one. Each webhook has its own unique URL and security settings.
### Follow-up Behavior
### Webhook Selection
Choose an existing webhook or create a new one. Each webhook has its own unique URL and security settings.
### Follow-up Behavior
![Follow-up behavior dropdown showing Handle in same task, Create new task, and Ignore options [[memory:2619471]]](https://mintlify.s3.us-west-1.amazonaws.com/lindyai/lindy-brand-assets/lindy-webhook-follow-up-behavior.png) Configure how your agent processes webhook requests:
| Option | Description |
| ----------------------- | ------------------------------------------------ |
| **Handle in same task** | Process follow-up requests in the same workflow |
| **Create new task** | Spawn a new task for each follow-up webhook call |
| **Ignore** | Ignore follow-up webhook requests |
## Creating a New Webhook
Configure how your agent processes webhook requests:
| Option | Description |
| ----------------------- | ------------------------------------------------ |
| **Handle in same task** | Process follow-up requests in the same workflow |
| **Create new task** | Spawn a new task for each follow-up webhook call |
| **Ignore** | Ignore follow-up webhook requests |
## Creating a New Webhook
![Create new webhook interface with name field and webhook list [[memory:2619471]]](https://mintlify.s3.us-west-1.amazonaws.com/lindyai/lindy-brand-assets/lindy-webhook-create-webhook.png) 1. Click **"Select an option"** → **"Create new"**
2. Enter a descriptive name for your webhook
3. Press Enter to save and select the webhook
Each webhook gets a unique URL in the format:
```plaintext
https://public.lindy.ai/api/v1/webhooks/[unique-id]
```
## Security with Secret Keys
1. Click **"Select an option"** → **"Create new"**
2. Enter a descriptive name for your webhook
3. Press Enter to save and select the webhook
Each webhook gets a unique URL in the format:
```plaintext
https://public.lindy.ai/api/v1/webhooks/[unique-id]
```
## Security with Secret Keys
![Generate Secret button and copy to clipboard option for webhook security [[memory:2619471]]](https://mintlify.s3.us-west-1.amazonaws.com/lindyai/lindy-brand-assets/lindy-webhok-generate-secret.png) Protect your webhooks from unauthorized access:
1. Click **Generate Secret** to create a secure token
2. Copy the secret key immediately
Protect your webhooks from unauthorized access:
1. Click **Generate Secret** to create a secure token
2. Copy the secret key immediately
![Secret key display with warning that it's only shown once [[memory:2619471]]](https://mintlify.s3.us-west-1.amazonaws.com/lindyai/lindy-brand-assets/lindy-webhook-secret-generated.png) The secret key is only shown once! Copy it now and store it securely. You'll need to include this in the Authorization header of all webhook requests.
### Using the Secret Key
Include the secret in your webhook requests:
```http
Authorization: Bearer [your-secret-key]
```
## Webhook + AI Agent Pattern
The secret key is only shown once! Copy it now and store it securely. You'll need to include this in the Authorization header of all webhook requests.
### Using the Secret Key
Include the secret in your webhook requests:
```http
Authorization: Bearer [your-secret-key]
```
## Webhook + AI Agent Pattern
![Webhook trigger followed by AI Agent node in workflow [[memory:2619471]]](https://mintlify.s3.us-west-1.amazonaws.com/lindyai/lindy-brand-assets/lindy-webhook-ai-agent.png) The most powerful webhook pattern combines the trigger with an AI Agent that can intelligently process incoming data:
### AI Agent Configuration
After your webhook trigger, add an AI Agent to:
* Analyze incoming webhook data
* Make decisions based on content
* Execute multiple actions conditionally
* Handle complex business logic
The most powerful webhook pattern combines the trigger with an AI Agent that can intelligently process incoming data:
### AI Agent Configuration
After your webhook trigger, add an AI Agent to:
* Analyze incoming webhook data
* Make decisions based on content
* Execute multiple actions conditionally
* Handle complex business logic
![AI Agent skills panel showing Send POST Request to Callback as a suggested skill [[memory:2619471]]](https://mintlify.s3.us-west-1.amazonaws.com/lindyai/lindy-brand-assets/lindy-webhook-ai-agent-skills.png) ### Essential AI Agent Skills
**Suggested skill for webhooks:**
* **Send POST Request to Callback** - Respond back to the original request sender
**Additional powerful skills to add:**
* **HTTP Request** - Call other APIs based on webhook data
* **Update Spreadsheet** - Log webhook data
* **Send Email/Slack** - Notify teams
* **Search Knowledge Base** - Enrich with context
* **Create Calendar Event** - Schedule based on webhooks
* **Run Code** - Custom data transformations
## Working with Webhook Data
Access webhook data from the trigger in any subsequent step using the following variables:
| Data Source | Variable Reference | Description |
| ---------------- | -------------------------------------- | --------------------------------------- |
| **Request Body** | `{{webhook_received.request.body}}` | The full JSON payload from the request. |
| **Headers** | `{{webhook_received.request.headers}}` | All request headers. |
| **Query Params** | `{{webhook_received.request.query}}` | Any parameters from the webhook URL. |
Use AI Prompt mode in action fields to intelligently extract and use specific fields from your webhook payload.
## Callback Responses
When you need to respond to the webhook sender:
1. Include a `callbackURL` field in your webhook request body
2. Add the "Send POST Request to Callback" action
3. Configure your response data
This enables two-way communication between your external system and Lindy.
Common callback scenarios:
* Acknowledge receipt with status
* Return processed results
* Send error messages
* Provide async job IDs
## Best Practices
Always use secret keys and validate incoming requests to protect your workflows from unauthorized access.
Add error handling conditions after webhook processing to manage unexpected issues and ensure reliability.
Use tools like Postman to test your webhook endpoints with different scenarios before deploying to production.
## Related Resources
Make outbound API calls from Lindy
Build intelligent webhook processors
Route webhook data conditionally
Enrich webhook data with context
# Context
Source: https://docs.lindy.ai/skills/lindy-utilities/context
Manage your agent memory by adding important information to context or clearing it to focus on what matters most
## Overview
Context management in Lindy gives you direct control over your agent's memory and attention. Perfect for:
* **Prioritizing important information** — anything you add to context gets favored in future decisions
* **Managing token costs** — clear context when it gets too large or expensive
* **Focusing agent attention** — remove distractions and highlight what matters
* **Advanced memory control** — combine with variables for sophisticated patterns
Context accrual happens automatically behind the scenes, but these actions give you more control.
## Add Context Action
* **What it does**: Explicitly adds important information to your agent's working memory, ensuring it's prioritized in all future decisions.
### Essential AI Agent Skills
**Suggested skill for webhooks:**
* **Send POST Request to Callback** - Respond back to the original request sender
**Additional powerful skills to add:**
* **HTTP Request** - Call other APIs based on webhook data
* **Update Spreadsheet** - Log webhook data
* **Send Email/Slack** - Notify teams
* **Search Knowledge Base** - Enrich with context
* **Create Calendar Event** - Schedule based on webhooks
* **Run Code** - Custom data transformations
## Working with Webhook Data
Access webhook data from the trigger in any subsequent step using the following variables:
| Data Source | Variable Reference | Description |
| ---------------- | -------------------------------------- | --------------------------------------- |
| **Request Body** | `{{webhook_received.request.body}}` | The full JSON payload from the request. |
| **Headers** | `{{webhook_received.request.headers}}` | All request headers. |
| **Query Params** | `{{webhook_received.request.query}}` | Any parameters from the webhook URL. |
Use AI Prompt mode in action fields to intelligently extract and use specific fields from your webhook payload.
## Callback Responses
When you need to respond to the webhook sender:
1. Include a `callbackURL` field in your webhook request body
2. Add the "Send POST Request to Callback" action
3. Configure your response data
This enables two-way communication between your external system and Lindy.
Common callback scenarios:
* Acknowledge receipt with status
* Return processed results
* Send error messages
* Provide async job IDs
## Best Practices
Always use secret keys and validate incoming requests to protect your workflows from unauthorized access.
Add error handling conditions after webhook processing to manage unexpected issues and ensure reliability.
Use tools like Postman to test your webhook endpoints with different scenarios before deploying to production.
## Related Resources
Make outbound API calls from Lindy
Build intelligent webhook processors
Route webhook data conditionally
Enrich webhook data with context
# Context
Source: https://docs.lindy.ai/skills/lindy-utilities/context
Manage your agent memory by adding important information to context or clearing it to focus on what matters most
## Overview
Context management in Lindy gives you direct control over your agent's memory and attention. Perfect for:
* **Prioritizing important information** — anything you add to context gets favored in future decisions
* **Managing token costs** — clear context when it gets too large or expensive
* **Focusing agent attention** — remove distractions and highlight what matters
* **Advanced memory control** — combine with variables for sophisticated patterns
Context accrual happens automatically behind the scenes, but these actions give you more control.
## Add Context Action
* **What it does**: Explicitly adds important information to your agent's working memory, ensuring it's prioritized in all future decisions.
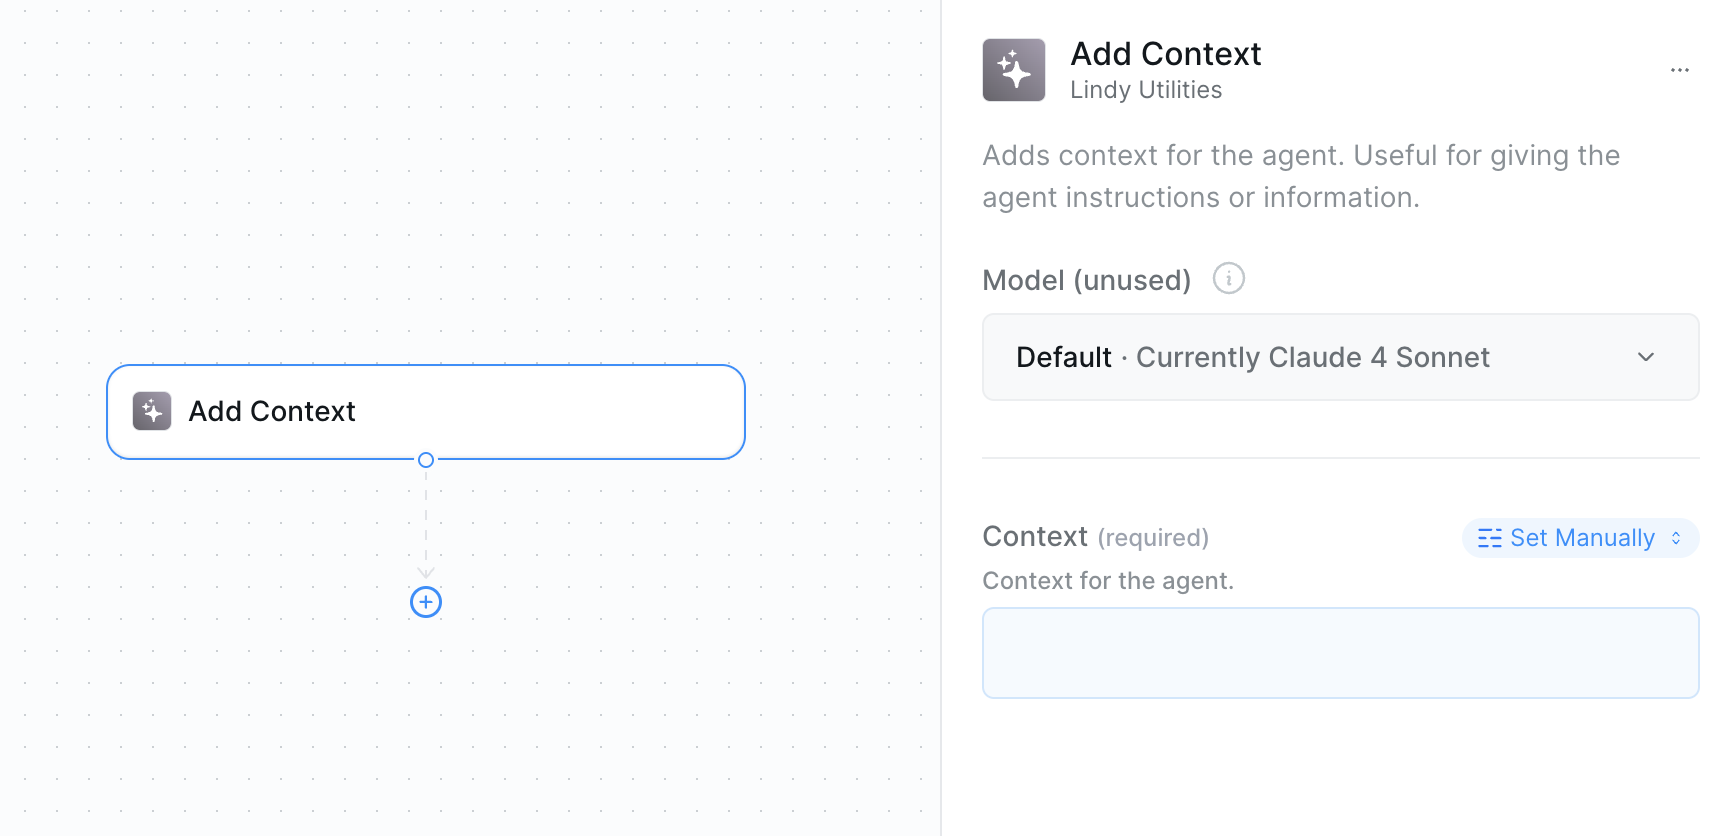 ### Inputs
* **Contextt**: The information you want to add to context
### Outputs
* **Context Reference**: Can be referenced as an output in other actions
* **Updated Context**: The agent's context is updated behind the scenes
Lindy automatically manages context accrual for all actions. Anything you explicitly add to context gets prioritized and placed at the top — making it highly favored in the agent's decision-making process.
## Clear Task Context Action
* **What it does**: Removes all or selected context to reduce token usage and refocus your agent's attention on what matters most.
### Inputs
* **Contextt**: The information you want to add to context
### Outputs
* **Context Reference**: Can be referenced as an output in other actions
* **Updated Context**: The agent's context is updated behind the scenes
Lindy automatically manages context accrual for all actions. Anything you explicitly add to context gets prioritized and placed at the top — making it highly favored in the agent's decision-making process.
## Clear Task Context Action
* **What it does**: Removes all or selected context to reduce token usage and refocus your agent's attention on what matters most.
 ### Inputs
* **Message**: Instructions for what to preserve — like "preserve customer contacts or important information that will stay after the context is cleared"
### Outputs
* **Cleared Status**: Confirmation of what was removed
* **Remaining Context**: What context (if any) was preserved
Advanced Pattern: Before clearing context, save important information to variables. After clearing, add only the essential context back using those variables.
## When to Use Context Actions
### Add Context
Use when you need to prioritize information:
* Customer details when a call or conversation starts
* Critical findings that should influence all future decisions
* Process state that other actions need to know about
* Error conditions that need to be tracked
### Clear Context
Use to manage costs and focus:
* When context gets large and expensive
* Switching between different workflow phases
* Processing multiple independent items
* Need to eliminate distractions
## Best Practices
* Use variables to preserve essential data before clearing
* Clear context at natural workflow breakpoints
* Add context immediately after discovering critical information
* Monitor context size in complex workflows
* Use descriptive source labels for tracking
* Clear context when processing multiple similar items
* Add only truly essential information to context
* Use variables for temporary data that doesn't need global access
* Monitor context accumulation in loops
* Clear context before major workflow transitions
## Next Steps
Learn how to store temporary data that doesn't need to be in global context
Understand persistent memory that survives across different task executions
Access advanced monitoring and observability features
Make direct AI requests with controlled context
# LLM Call
Source: https://docs.lindy.ai/skills/lindy-utilities/llm-call
Make lightweight AI requests with direct model access - cheaper than AI agents but without built-in context
## Overview
Make direct AI requests to any model provider with full control over prompts and parameters. LLM Call is perfect for:
* **Single AI requests** where you need a specific answer or analysis
* **Cost-effective processing** — cheaper than using full AI agents
* **Custom prompt control** — write exactly what you want the AI to do
* **Output references** — use the AI response in other parts of your workflow
Perfect when you need AI for a specific task without the overhead of a full agent.
## LLM Call Action
* **What it does**: Makes a direct request to your chosen model provider with complete control over the prompt, temperature, and output settings.
### Inputs
* **Message**: Instructions for what to preserve — like "preserve customer contacts or important information that will stay after the context is cleared"
### Outputs
* **Cleared Status**: Confirmation of what was removed
* **Remaining Context**: What context (if any) was preserved
Advanced Pattern: Before clearing context, save important information to variables. After clearing, add only the essential context back using those variables.
## When to Use Context Actions
### Add Context
Use when you need to prioritize information:
* Customer details when a call or conversation starts
* Critical findings that should influence all future decisions
* Process state that other actions need to know about
* Error conditions that need to be tracked
### Clear Context
Use to manage costs and focus:
* When context gets large and expensive
* Switching between different workflow phases
* Processing multiple independent items
* Need to eliminate distractions
## Best Practices
* Use variables to preserve essential data before clearing
* Clear context at natural workflow breakpoints
* Add context immediately after discovering critical information
* Monitor context size in complex workflows
* Use descriptive source labels for tracking
* Clear context when processing multiple similar items
* Add only truly essential information to context
* Use variables for temporary data that doesn't need global access
* Monitor context accumulation in loops
* Clear context before major workflow transitions
## Next Steps
Learn how to store temporary data that doesn't need to be in global context
Understand persistent memory that survives across different task executions
Access advanced monitoring and observability features
Make direct AI requests with controlled context
# LLM Call
Source: https://docs.lindy.ai/skills/lindy-utilities/llm-call
Make lightweight AI requests with direct model access - cheaper than AI agents but without built-in context
## Overview
Make direct AI requests to any model provider with full control over prompts and parameters. LLM Call is perfect for:
* **Single AI requests** where you need a specific answer or analysis
* **Cost-effective processing** — cheaper than using full AI agents
* **Custom prompt control** — write exactly what you want the AI to do
* **Output references** — use the AI response in other parts of your workflow
Perfect when you need AI for a specific task without the overhead of a full agent.
## LLM Call Action
* **What it does**: Makes a direct request to your chosen model provider with complete control over the prompt, temperature, and output settings.
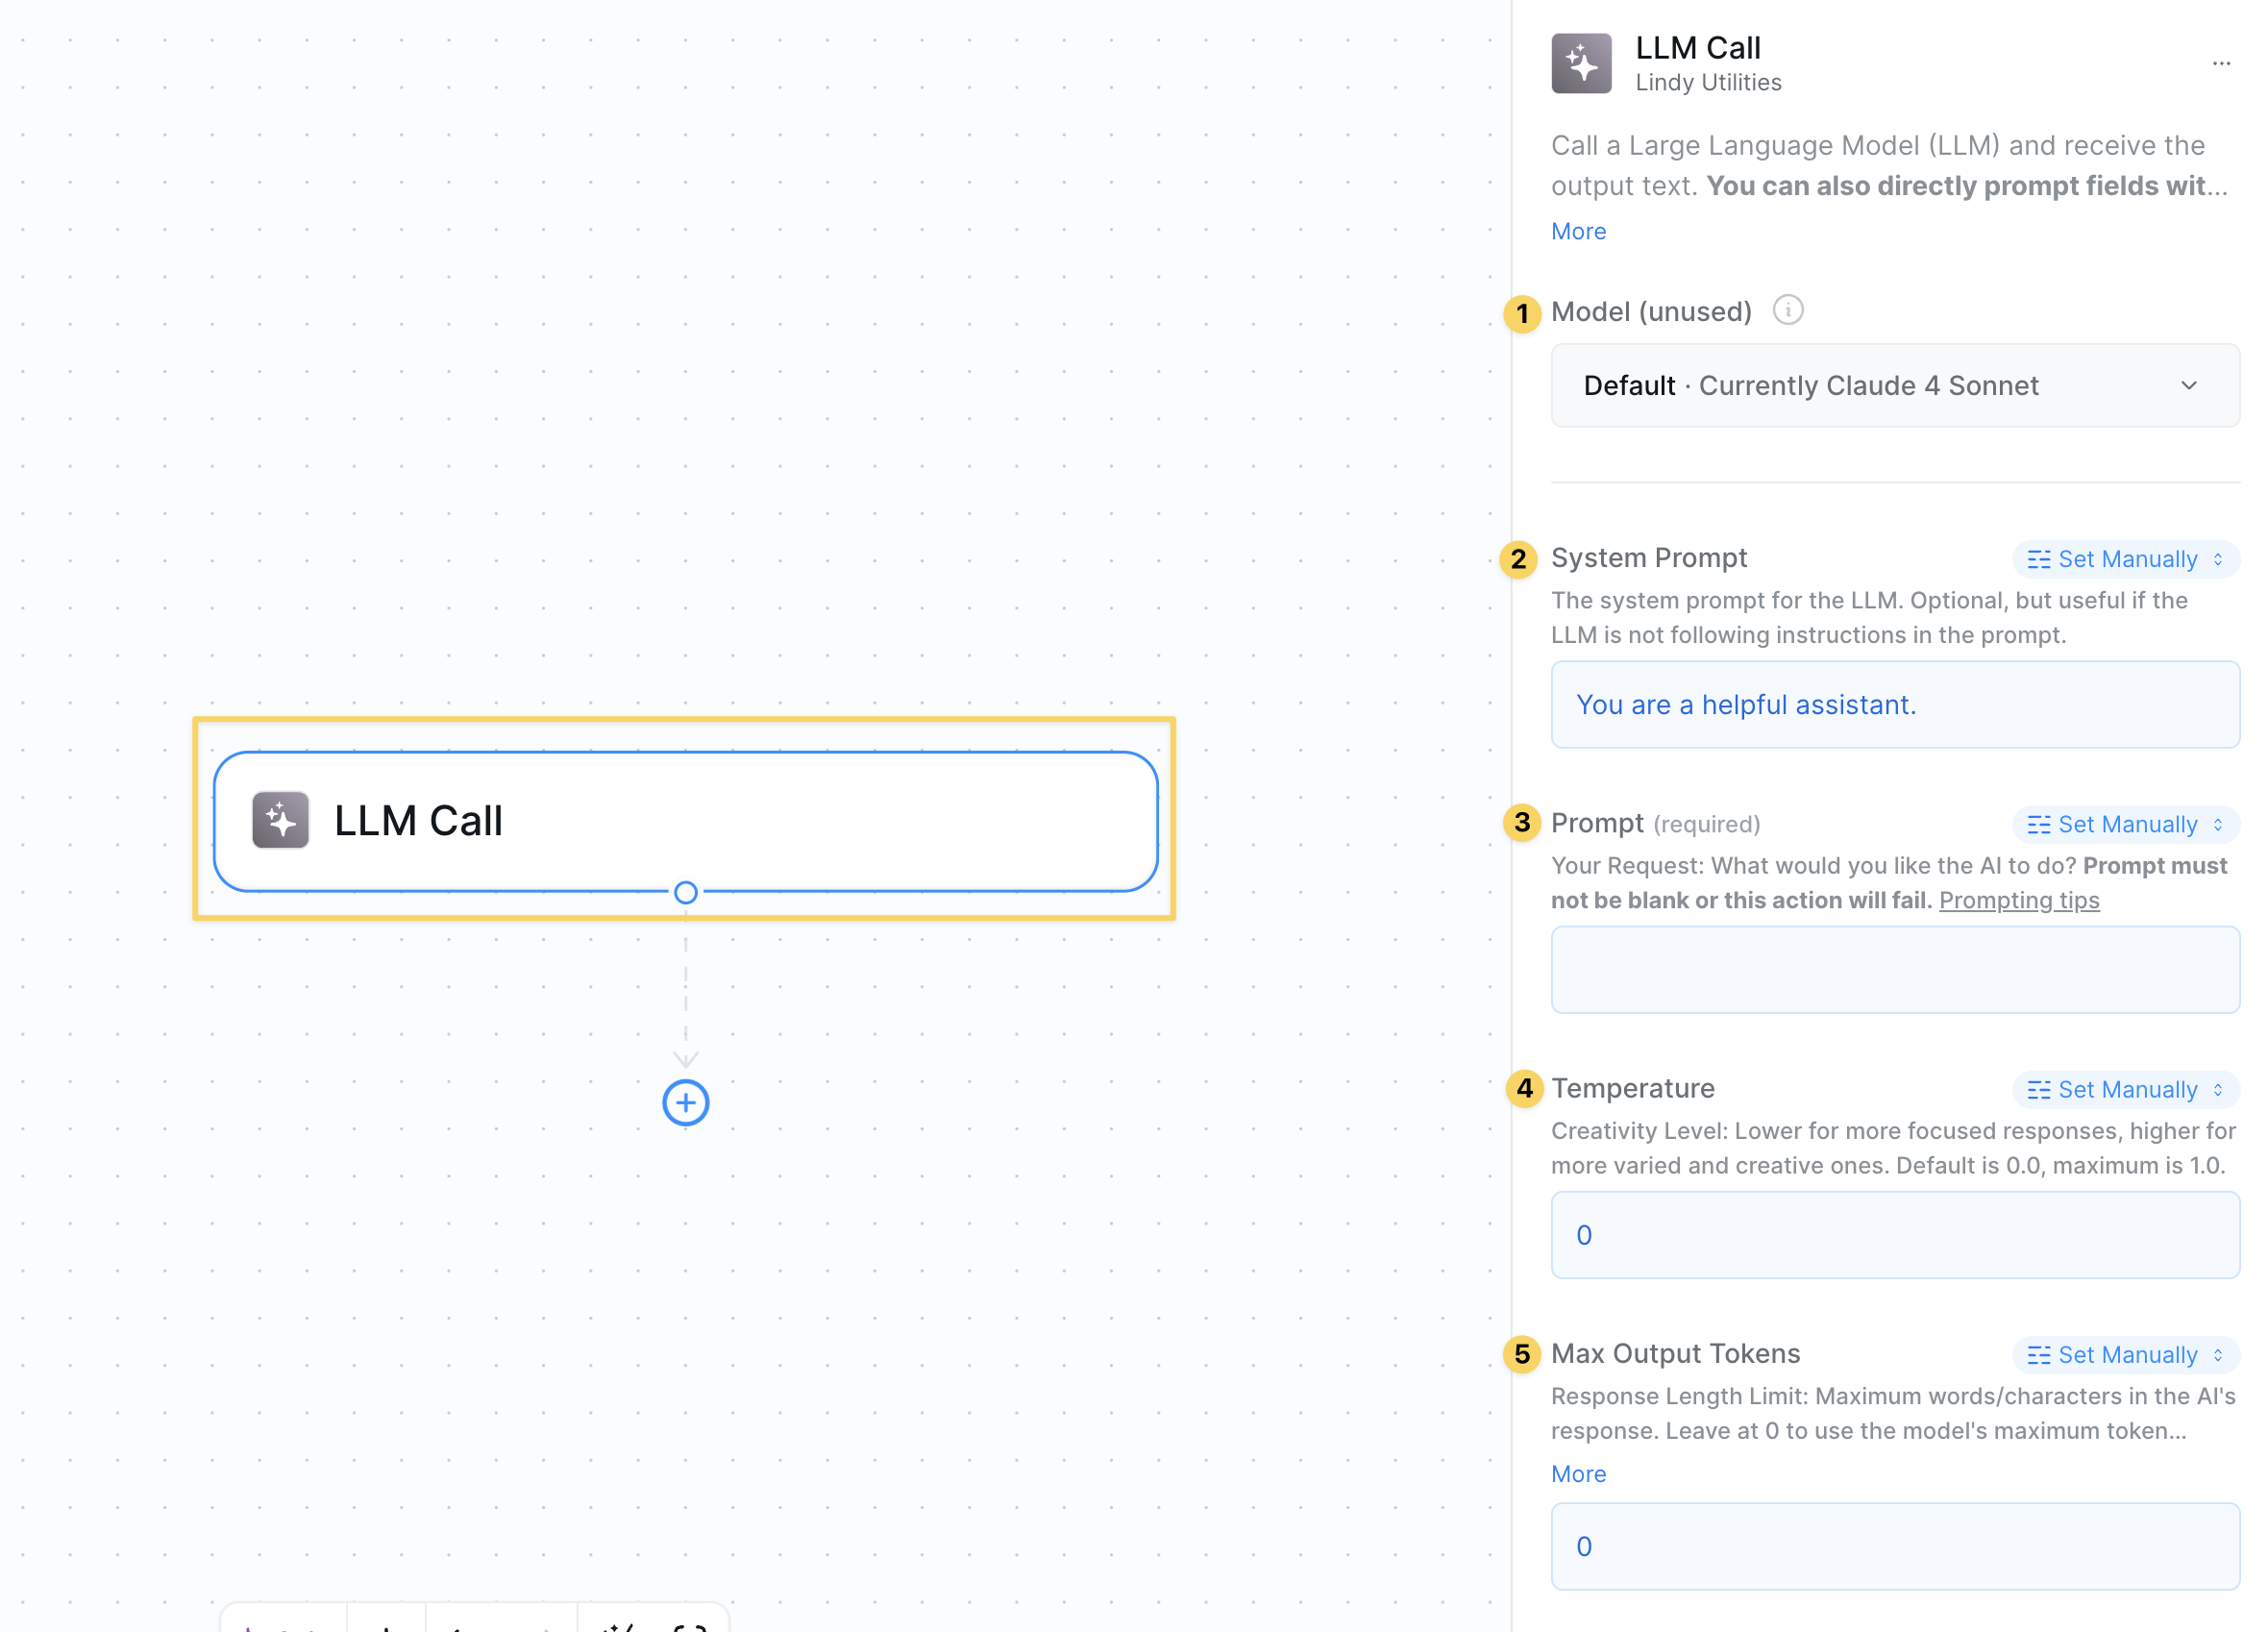 ### Inputs
* **Model Provider**: Choose your AI model (GPT-4, Claude, etc.)
* **System Prompt**: The instructions you give to the AI
* **User Prompt**: The actual content you want analyzed
* **Temperature**: Controls randomness (0 = focused, 1 = creative)
* **Max Output Tokens**: Limits how long the response can be
If you set these to manual, the AI won't have context about what's happening in your workflow. It only knows what you explicitly tell it in the prompts.
### Outputs
* **AI Response**: The model's complete response to your prompt
### When to Use vs AI Agents
**Use LLM Call when:**
* You need a single, specific AI analysis
* Cost is a concern (it's cheaper than AI agents)
* You want full control over the prompt
* You don't need workflow context or tool access
**Use AI Agents when:**
* You need access to tools and integrations
* The AI should understand your workflow context
* You want conversational, multi-step interactions
* You need the AI to make decisions about next actions
## Common Use Cases
### Data Analysis
```
System Prompt: "Analyze this data and provide 3 key insights"
User Message: [CSV data or metrics]
Result: Focused analysis without expensive agent overhead
```
### Content Processing
```
System Prompt: "Extract the main topic and sentiment from this text"
User Message: [Email, review, or document content]
Result: Quick classification or extraction
```
### Format Conversion
```
System Prompt: "Convert this to JSON format with these fields: name, email, company"
User Message: [Unstructured contact information]
Result: Structured data output you can use in other actions
```
## Advanced Features
| Feature | What it does |
| ------------------- | ----------------------------------------------------------- |
| Output References | Use AI response as input for other actions in your workflow |
| Model Selection | Choose different models based on task complexity and cost |
| Temperature Control | Fine-tune creativity vs consistency for different use cases |
| Token Management | Control costs by limiting response length |
| Batch Processing | Make multiple LLM calls for different data points |
## Best Practices
Be specific about what you want. Include format requirements, tone, and any constraints.
Remember that LLM Call doesn't know about your workflow. Include all necessary context in your prompts.
Use LLM Call for simple tasks and AI Agents for complex ones that need tools or context.
Lower temperatures (0.2-0.5) for factual tasks, higher (0.7-1.0) for creative work.
## Next Steps
Store LLM responses for later use
Pass AI analysis to other actions
Save insights for future reference
Monitor LLM call performance and usage
# Memories
Source: https://docs.lindy.ai/skills/lindy-utilities/memories
Help your agent learn and improve over time with persistent memories that last across all tasks
## Overview
Memories let your agent learn and remember things forever — across all future tasks. Perfect for:
* **Self-improvement** — learn from mistakes and successes over time
* **Persistent knowledge** — remember important facts that apply to all tasks
* **Performance optimization** — build up expertise through experience
* **Error prevention** — avoid repeating the same mistakes
Unlike context (which only lasts during one task), memories persist across all task executions.
## Modify Lindy Memory Action
* **What it does**: Add, remove, or modify memories that your agent will remember across all future tasks.
### Inputs
* **Model Provider**: Choose your AI model (GPT-4, Claude, etc.)
* **System Prompt**: The instructions you give to the AI
* **User Prompt**: The actual content you want analyzed
* **Temperature**: Controls randomness (0 = focused, 1 = creative)
* **Max Output Tokens**: Limits how long the response can be
If you set these to manual, the AI won't have context about what's happening in your workflow. It only knows what you explicitly tell it in the prompts.
### Outputs
* **AI Response**: The model's complete response to your prompt
### When to Use vs AI Agents
**Use LLM Call when:**
* You need a single, specific AI analysis
* Cost is a concern (it's cheaper than AI agents)
* You want full control over the prompt
* You don't need workflow context or tool access
**Use AI Agents when:**
* You need access to tools and integrations
* The AI should understand your workflow context
* You want conversational, multi-step interactions
* You need the AI to make decisions about next actions
## Common Use Cases
### Data Analysis
```
System Prompt: "Analyze this data and provide 3 key insights"
User Message: [CSV data or metrics]
Result: Focused analysis without expensive agent overhead
```
### Content Processing
```
System Prompt: "Extract the main topic and sentiment from this text"
User Message: [Email, review, or document content]
Result: Quick classification or extraction
```
### Format Conversion
```
System Prompt: "Convert this to JSON format with these fields: name, email, company"
User Message: [Unstructured contact information]
Result: Structured data output you can use in other actions
```
## Advanced Features
| Feature | What it does |
| ------------------- | ----------------------------------------------------------- |
| Output References | Use AI response as input for other actions in your workflow |
| Model Selection | Choose different models based on task complexity and cost |
| Temperature Control | Fine-tune creativity vs consistency for different use cases |
| Token Management | Control costs by limiting response length |
| Batch Processing | Make multiple LLM calls for different data points |
## Best Practices
Be specific about what you want. Include format requirements, tone, and any constraints.
Remember that LLM Call doesn't know about your workflow. Include all necessary context in your prompts.
Use LLM Call for simple tasks and AI Agents for complex ones that need tools or context.
Lower temperatures (0.2-0.5) for factual tasks, higher (0.7-1.0) for creative work.
## Next Steps
Store LLM responses for later use
Pass AI analysis to other actions
Save insights for future reference
Monitor LLM call performance and usage
# Memories
Source: https://docs.lindy.ai/skills/lindy-utilities/memories
Help your agent learn and improve over time with persistent memories that last across all tasks
## Overview
Memories let your agent learn and remember things forever — across all future tasks. Perfect for:
* **Self-improvement** — learn from mistakes and successes over time
* **Persistent knowledge** — remember important facts that apply to all tasks
* **Performance optimization** — build up expertise through experience
* **Error prevention** — avoid repeating the same mistakes
Unlike context (which only lasts during one task), memories persist across all task executions.
## Modify Lindy Memory Action
* **What it does**: Add, remove, or modify memories that your agent will remember across all future tasks.
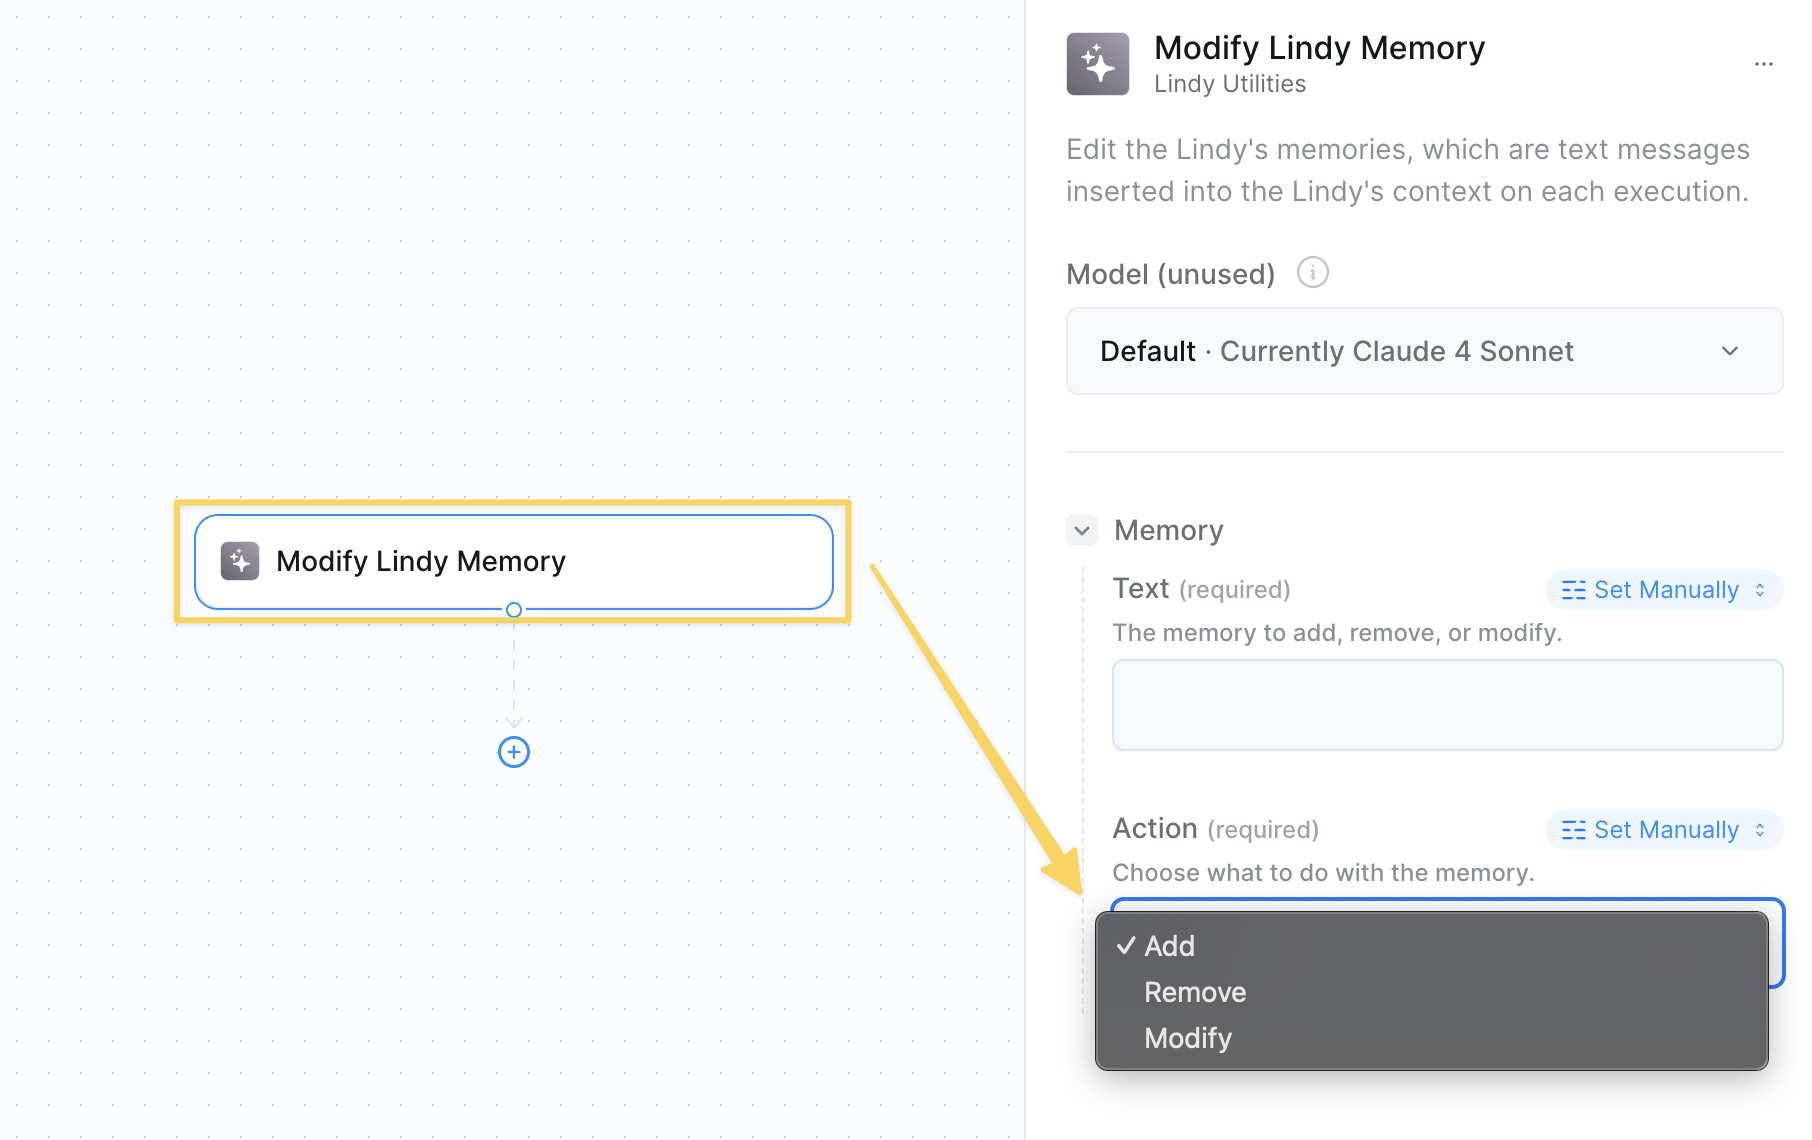 ### Inputs
* **Action**: Add, remove, or modify memory
* **Memory**: The text content of what to remember
### Outputs
* **Memory Status**: Confirmation of what was added, removed, or modified
* **Updated Memory**: The agent's memory bank is updated behind the scenes
Great at helping your agent learn from experience by adding snippets and rules over time that improve performance across all future tasks.
## Delete All Memories Action
* **What it does**: Completely wipes your agent's memory history — use when you need a fresh start.
## When to Use Memory Actions
### Add Memory
* Agent makes a mistake you want it to avoid next time
* Agent performs exceptionally well and you want to reinforce the behavior
* Important facts or preferences that apply to all tasks
* Process improvements discovered over time
### Clear Memories
* Starting fresh with a new agent configuration
* Memories have become outdated or conflicting
* Agent behavior has degraded due to accumulated memories
## Best Practices
* Be specific about what went wrong or right
* Include context about when the memory applies
* Use clear, actionable language
* Focus on learnable patterns, not one-off events
* Regularly review and clean up outdated memories
* Remove conflicting or contradictory memories
* Keep memories focused and specific
* Use memories for recurring patterns, not exceptions
* Add memories immediately after mistakes or successes
* Include positive reinforcement for good behaviors
* Document edge cases and special handling rules
* Build up domain expertise through accumulated memories
## Next Steps
Manage short-term memory within individual tasks
Store temporary data during task execution
Access advanced monitoring and observability features
Make direct AI requests with controlled context
# Observability
Source: https://docs.lindy.ai/skills/lindy-utilities/observability
Monitor your agents and see exactly what happens when they run - perfect for debugging issues and tracking performance
## Overview
Monitor and analyze agent performance with detailed task execution data. There are two key options for full observability into your agents:
* `Agent Task Change` trigger wakes up when another Lindy agent performs specific actions (errors, starts, finishes, etc.)
* `Get Task Details` action reads and analyzes everything an agent did during task execution, showing you block-by-block inputs, outputs, and performance data.
## Agent Task Change Trigger
* **What it does**: Triggers when another Lindy agent performs specific actions — perfect for monitoring agent activity and building reactive workflows.
### Inputs
* **Action**: Add, remove, or modify memory
* **Memory**: The text content of what to remember
### Outputs
* **Memory Status**: Confirmation of what was added, removed, or modified
* **Updated Memory**: The agent's memory bank is updated behind the scenes
Great at helping your agent learn from experience by adding snippets and rules over time that improve performance across all future tasks.
## Delete All Memories Action
* **What it does**: Completely wipes your agent's memory history — use when you need a fresh start.
## When to Use Memory Actions
### Add Memory
* Agent makes a mistake you want it to avoid next time
* Agent performs exceptionally well and you want to reinforce the behavior
* Important facts or preferences that apply to all tasks
* Process improvements discovered over time
### Clear Memories
* Starting fresh with a new agent configuration
* Memories have become outdated or conflicting
* Agent behavior has degraded due to accumulated memories
## Best Practices
* Be specific about what went wrong or right
* Include context about when the memory applies
* Use clear, actionable language
* Focus on learnable patterns, not one-off events
* Regularly review and clean up outdated memories
* Remove conflicting or contradictory memories
* Keep memories focused and specific
* Use memories for recurring patterns, not exceptions
* Add memories immediately after mistakes or successes
* Include positive reinforcement for good behaviors
* Document edge cases and special handling rules
* Build up domain expertise through accumulated memories
## Next Steps
Manage short-term memory within individual tasks
Store temporary data during task execution
Access advanced monitoring and observability features
Make direct AI requests with controlled context
# Observability
Source: https://docs.lindy.ai/skills/lindy-utilities/observability
Monitor your agents and see exactly what happens when they run - perfect for debugging issues and tracking performance
## Overview
Monitor and analyze agent performance with detailed task execution data. There are two key options for full observability into your agents:
* `Agent Task Change` trigger wakes up when another Lindy agent performs specific actions (errors, starts, finishes, etc.)
* `Get Task Details` action reads and analyzes everything an agent did during task execution, showing you block-by-block inputs, outputs, and performance data.
## Agent Task Change Trigger
* **What it does**: Triggers when another Lindy agent performs specific actions — perfect for monitoring agent activity and building reactive workflows.
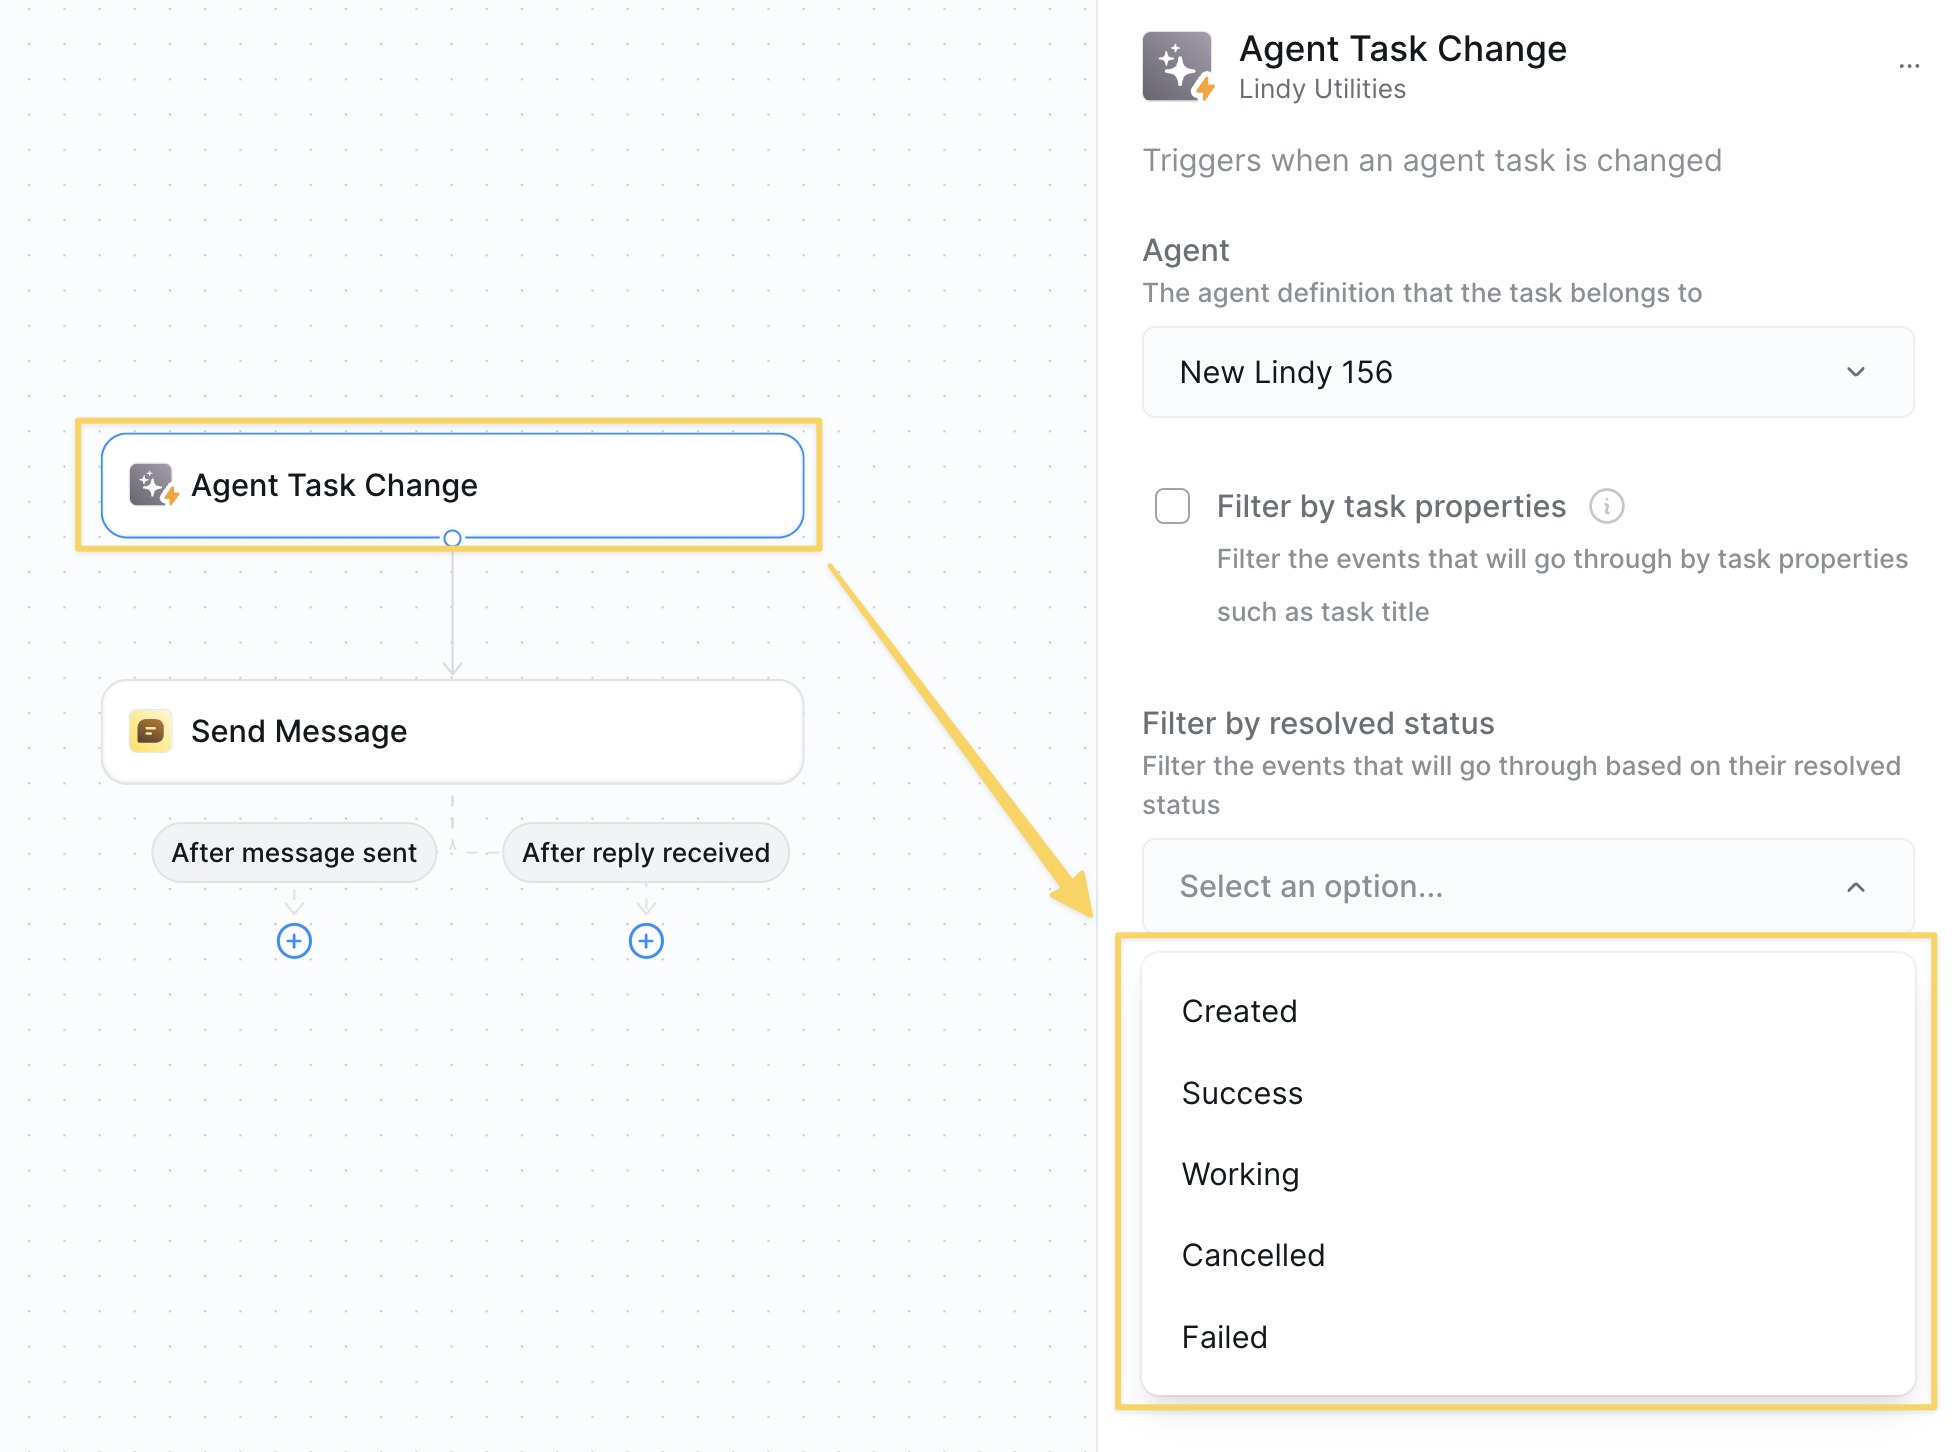 ### Inputs
* **Agent**: Select which agent you want to monitor
* **Events**: Multi-select from task states:
* Task was created
* Task succeeded
* Task is working
* Task was canceled
* Task failed
* **Filter by subtask title**: Optional — monitor specific subtasks only
### Common Examples
* **Error Alerts**: Trigger on "Task failed" → Send email with failure details
* **Performance Tracking**: Trigger on "Task succeeded" → Log completion metrics
* **Real-time Monitoring**: Trigger on "Task is working" → Send status updates
***
## Get Task Details
* **What it does**: Reads and analyzes everything an agent did during task execution. Shows you block-by-block inputs, outputs, and performance data for complete observability.
### Inputs
* **Agent**: Select which agent you want to monitor
* **Events**: Multi-select from task states:
* Task was created
* Task succeeded
* Task is working
* Task was canceled
* Task failed
* **Filter by subtask title**: Optional — monitor specific subtasks only
### Common Examples
* **Error Alerts**: Trigger on "Task failed" → Send email with failure details
* **Performance Tracking**: Trigger on "Task succeeded" → Log completion metrics
* **Real-time Monitoring**: Trigger on "Task is working" → Send status updates
***
## Get Task Details
* **What it does**: Reads and analyzes everything an agent did during task execution. Shows you block-by-block inputs, outputs, and performance data for complete observability.
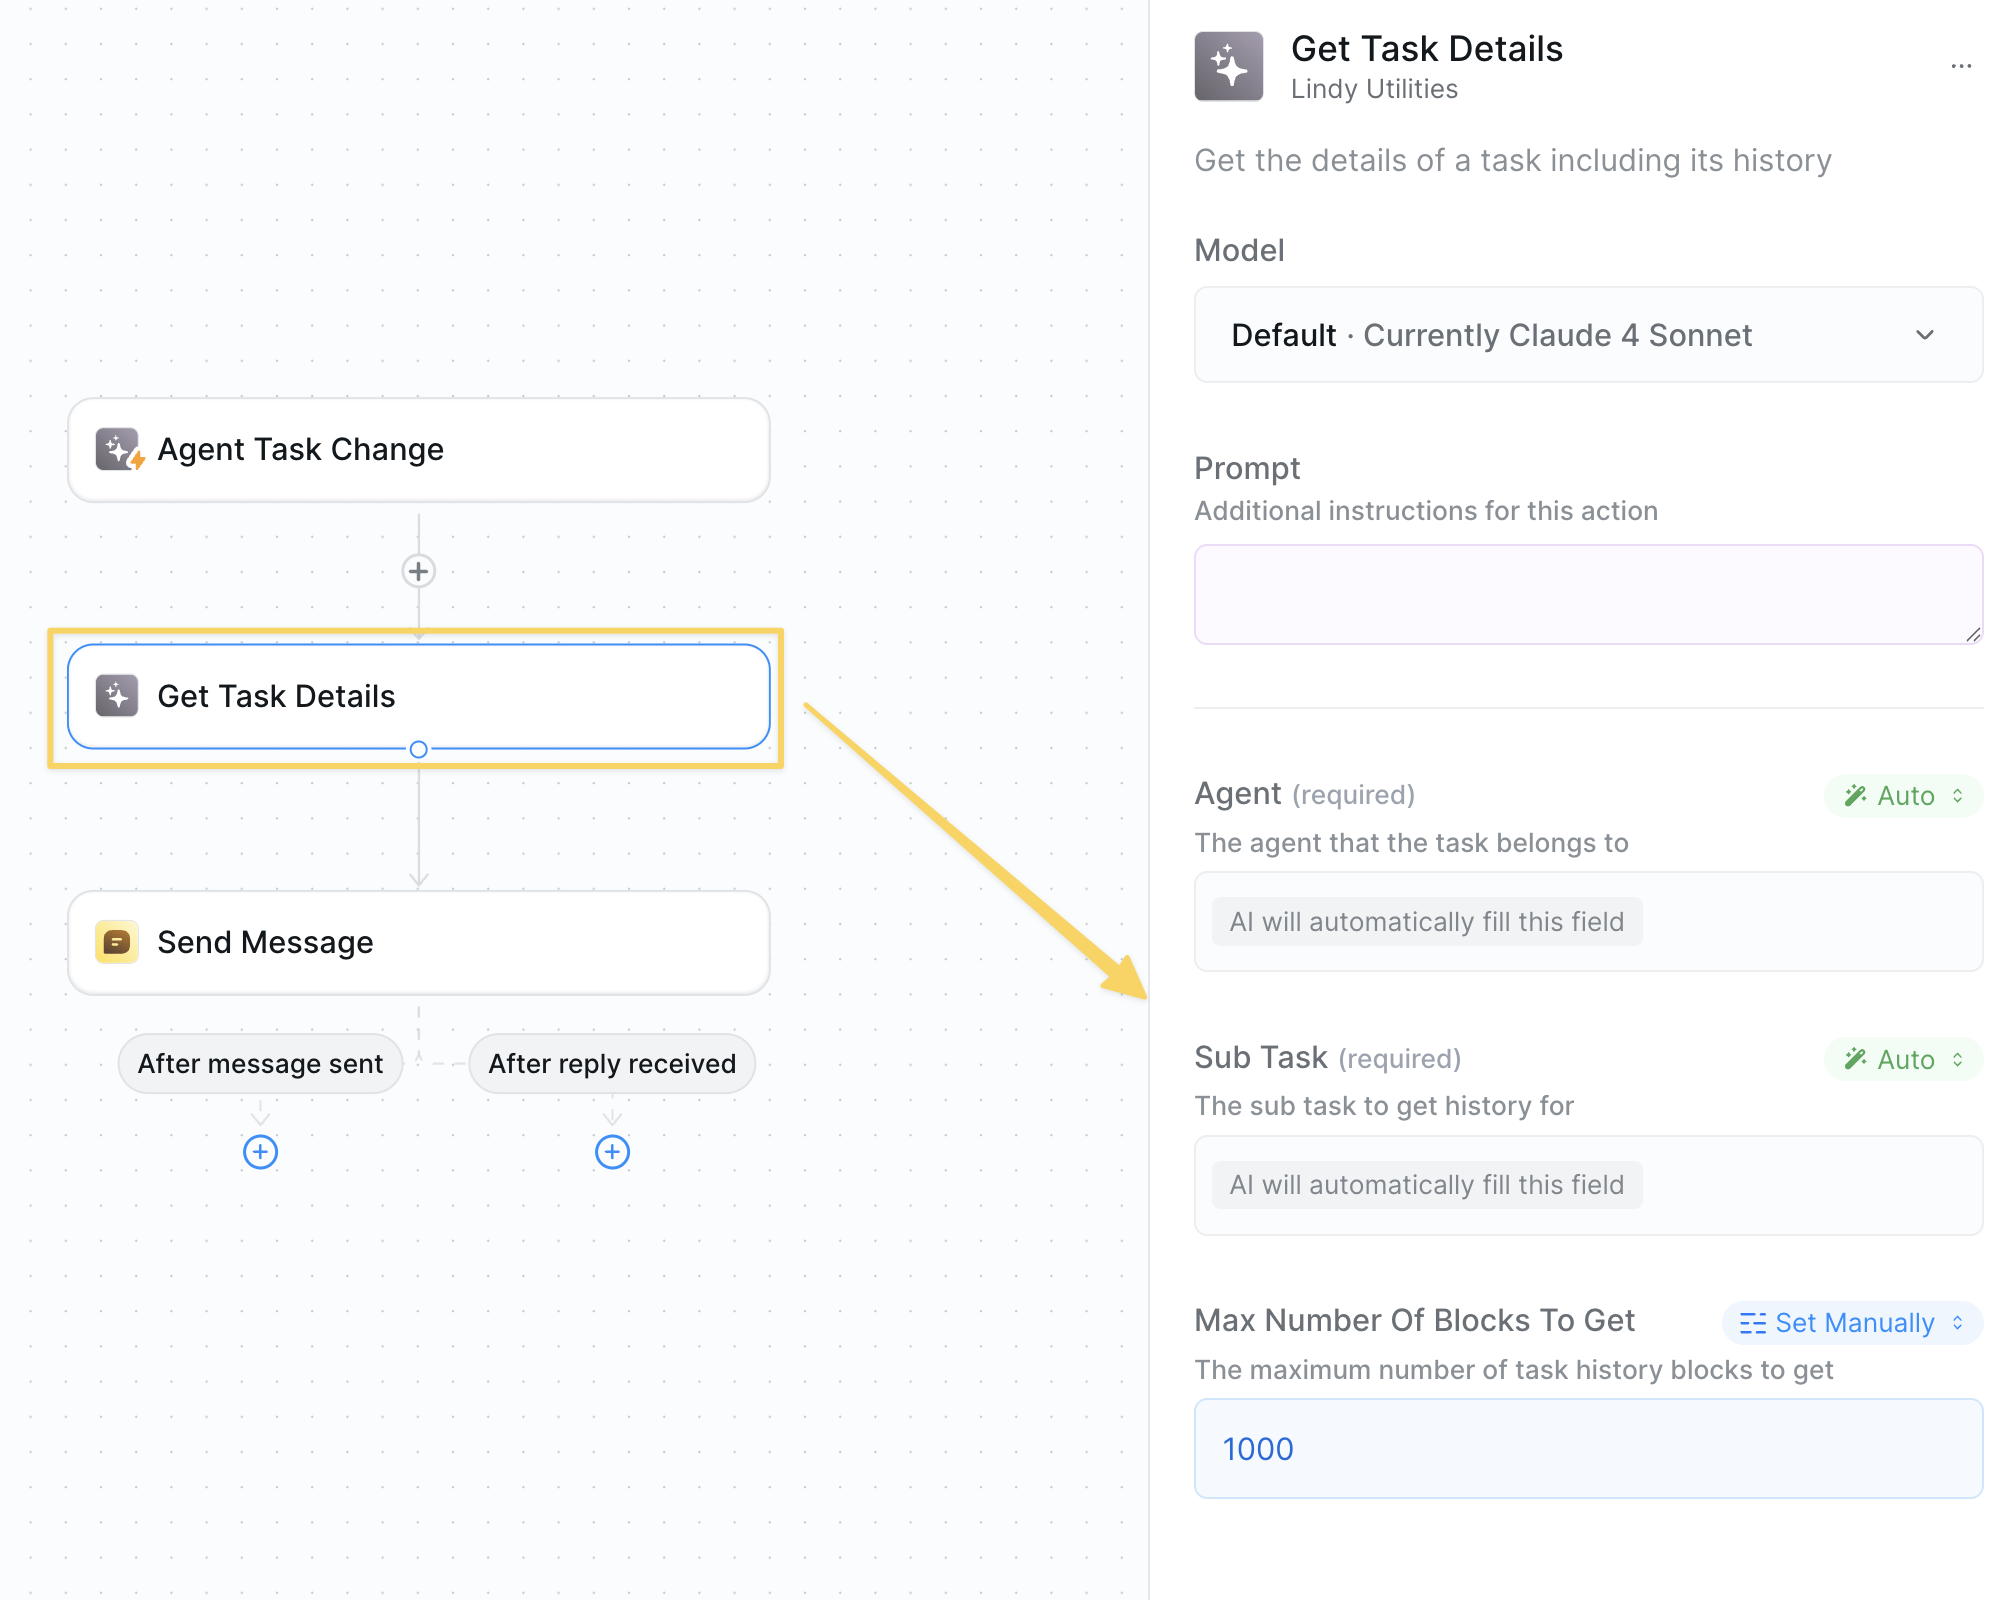 ### Inputs
* **Agent**: Select the agent to analyze
* **Sub Task** (required): ID of the specific task/subtask to examine
* **Max Number of Blocks**: Recommended to set high — controls how much execution history to retrieve
Usually you want to use this action after an "Agent Task Change" trigger and you can leave the fields on "Auto" to pull in the correct agent & task ID.
### Outputs
* **Block-by-block execution**: Every action the agent performed
* **Inputs and outputs**: Exact data flowing through each step
* **Performance metrics**: Timing, success rates, error details
* **Task metadata**: Status, timestamps, execution context
### Common Examples
* **Error Analysis**: Get task details on failure → Analyze what went wrong → Send diagnostic report
* **Quality Evaluation**: Get task details after completion → Score performance → Log to spreadsheet
* **Performance Optimization**: Analyze slow tasks → Identify bottlenecks → Optimize workflows
### Use Cases
* Build evaluation tools for agent quality
* Create automated debugging systems
* Track agent performance over time
* Generate detailed audit logs
* Feed execution data to AI for analysis and insights
***
## Working Together
These actions are designed to work together for complete agent observability:
### Inputs
* **Agent**: Select the agent to analyze
* **Sub Task** (required): ID of the specific task/subtask to examine
* **Max Number of Blocks**: Recommended to set high — controls how much execution history to retrieve
Usually you want to use this action after an "Agent Task Change" trigger and you can leave the fields on "Auto" to pull in the correct agent & task ID.
### Outputs
* **Block-by-block execution**: Every action the agent performed
* **Inputs and outputs**: Exact data flowing through each step
* **Performance metrics**: Timing, success rates, error details
* **Task metadata**: Status, timestamps, execution context
### Common Examples
* **Error Analysis**: Get task details on failure → Analyze what went wrong → Send diagnostic report
* **Quality Evaluation**: Get task details after completion → Score performance → Log to spreadsheet
* **Performance Optimization**: Analyze slow tasks → Identify bottlenecks → Optimize workflows
### Use Cases
* Build evaluation tools for agent quality
* Create automated debugging systems
* Track agent performance over time
* Generate detailed audit logs
* Feed execution data to AI for analysis and insights
***
## Working Together
These actions are designed to work together for complete agent observability:
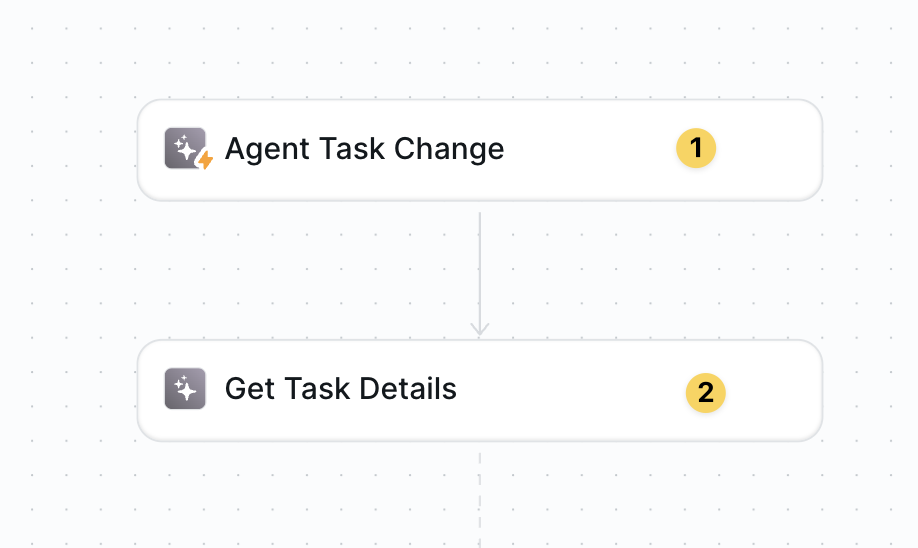 `Agent Task Change` triggers when something happens → `Get Task Details` analyzes exactly what occurred
This gives you full visibility into your agents — you'll know when they run, how they perform, and exactly what they do at every step.
## Advanced Features
| Feature | What it does |
| ------------------------ | ------------------------------------------------------------------- |
| Multi-Agent Monitoring | Track multiple agents from one observability workflow |
| Performance Benchmarking | Compare agent execution times and success rates over time |
| Error Pattern Analysis | Identify common failure points across different agents |
| Custom Alert Routing | Send different types of failures to different teams or channels |
| Quality Score Tracking | Build evaluation systems that score agent performance automatically |
## Best Practices
Focus on the most actionable events — usually "Task Failed" for debugging and "Task Succeeded" for performance tracking.
For Get Task Details, set max blocks to a high number to capture complete execution history.
Use LLM Call to analyze task details — AI can spot patterns humans miss in execution data.
Create systematic quality scoring by analyzing successful vs failed task patterns.
## Next Steps
Store performance metrics for analysis
Analyze task execution with AI
Build long-term performance intelligence
Pass task data to other workflows
# Set Variable
Source: https://docs.lindy.ai/skills/lindy-utilities/set-variables
Store temporary data during task execution that can be referenced and updated throughout your workflow
## Overview
Set Variables lets you store temporary data during task execution. Perfect for:
* **Temporary storage** — hold data that doesn't need to be in global context
* **Data passing** — share information between different parts of your workflow
* **Variable updates** — overwrite existing variables with new values
* **Clean organization** — keep your workflow organized with named references
Variables are scoped to the current task and automatically cleaned up when the task completes.
## Set Variable Action
* **What it does**: Creates or updates a variable that can be referenced throughout your current task execution.
`Agent Task Change` triggers when something happens → `Get Task Details` analyzes exactly what occurred
This gives you full visibility into your agents — you'll know when they run, how they perform, and exactly what they do at every step.
## Advanced Features
| Feature | What it does |
| ------------------------ | ------------------------------------------------------------------- |
| Multi-Agent Monitoring | Track multiple agents from one observability workflow |
| Performance Benchmarking | Compare agent execution times and success rates over time |
| Error Pattern Analysis | Identify common failure points across different agents |
| Custom Alert Routing | Send different types of failures to different teams or channels |
| Quality Score Tracking | Build evaluation systems that score agent performance automatically |
## Best Practices
Focus on the most actionable events — usually "Task Failed" for debugging and "Task Succeeded" for performance tracking.
For Get Task Details, set max blocks to a high number to capture complete execution history.
Use LLM Call to analyze task details — AI can spot patterns humans miss in execution data.
Create systematic quality scoring by analyzing successful vs failed task patterns.
## Next Steps
Store performance metrics for analysis
Analyze task execution with AI
Build long-term performance intelligence
Pass task data to other workflows
# Set Variable
Source: https://docs.lindy.ai/skills/lindy-utilities/set-variables
Store temporary data during task execution that can be referenced and updated throughout your workflow
## Overview
Set Variables lets you store temporary data during task execution. Perfect for:
* **Temporary storage** — hold data that doesn't need to be in global context
* **Data passing** — share information between different parts of your workflow
* **Variable updates** — overwrite existing variables with new values
* **Clean organization** — keep your workflow organized with named references
Variables are scoped to the current task and automatically cleaned up when the task completes.
## Set Variable Action
* **What it does**: Creates or updates a variable that can be referenced throughout your current task execution.
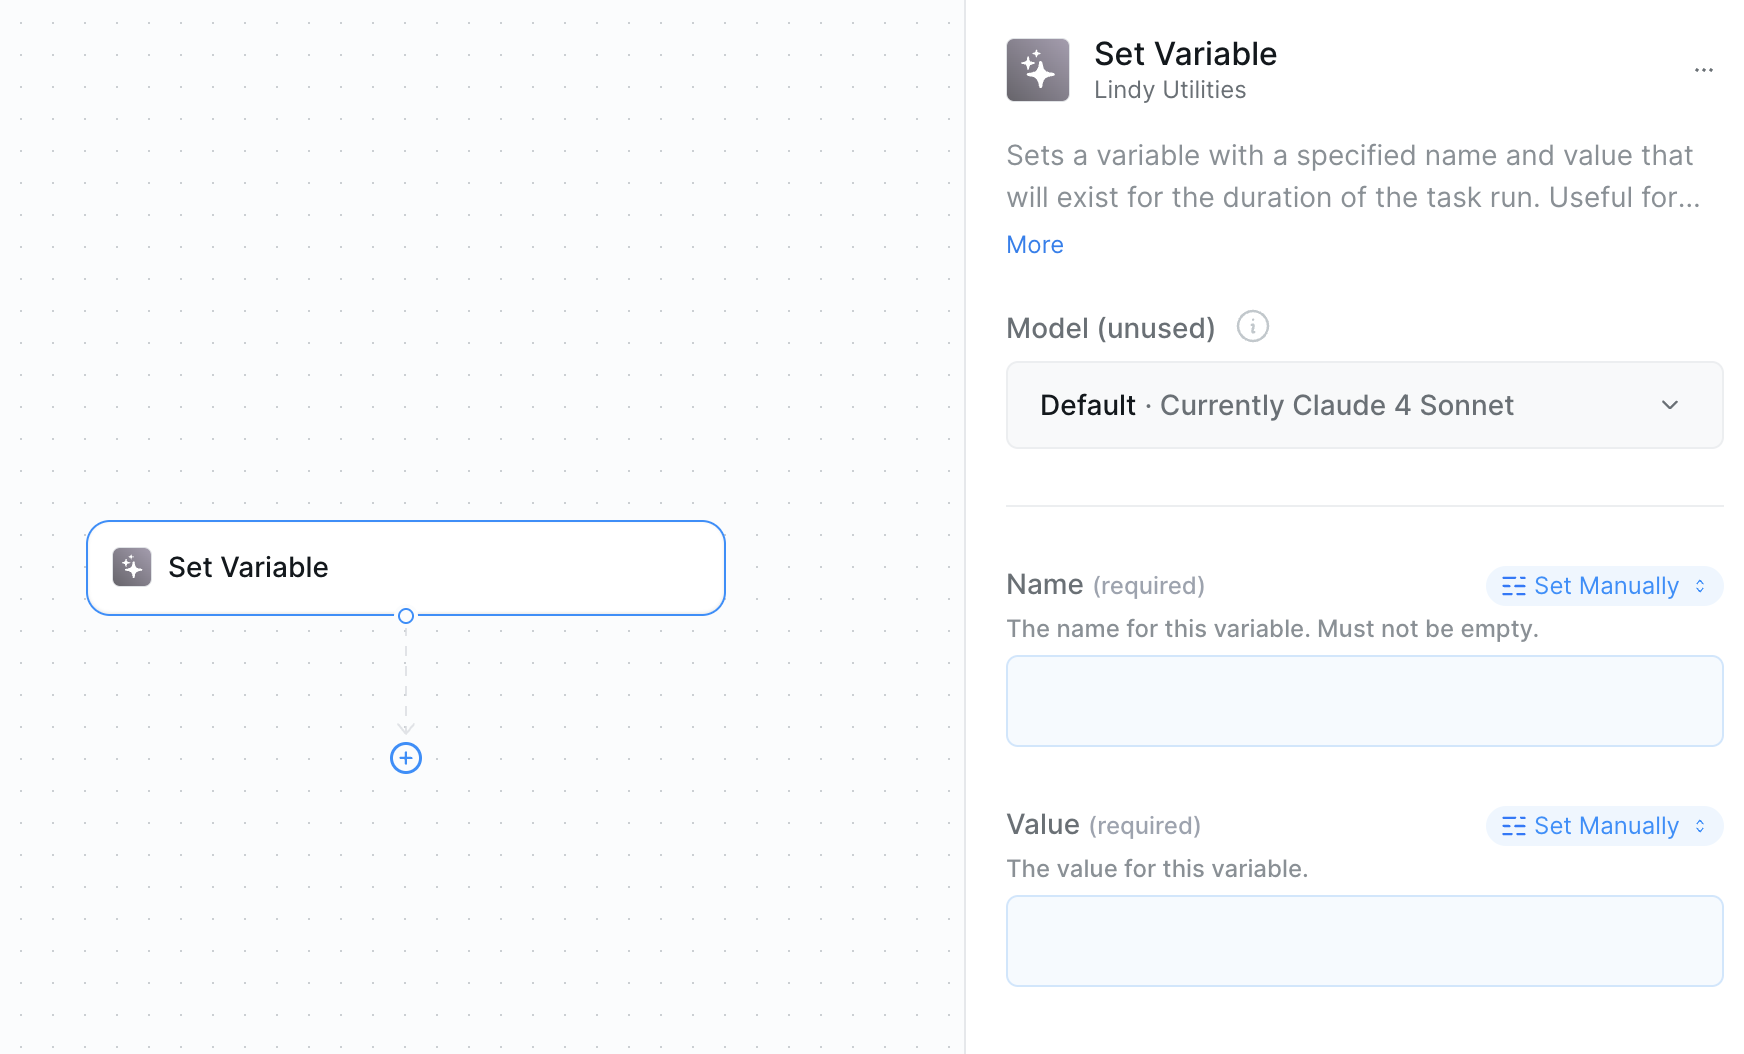 ### Inputs
* **Name**: The variable name that will be used for referencing (becomes the reference key)
* **Value**: The data to store — can be set manually, using prompts with context, or auto mode
### Outputs
* **Variable Reference**: The stored value can be referenced as an output in other actions
* **Updated Variable**: If using the same name, it overwrites the existing variable
Pro tip: Rename the Set Variable action to the actual variable name (like "Set Customer ID") for better organization when selecting output references from the menu.
## When to Use Variables
### Common Use Cases
* Store important data before clearing context
* Pass data between different workflow phases
* Keep track of counters, IDs, or status values
* Hold temporary calculations or processed results
### Variable Updates
* Use the same variable name to overwrite existing values
* Update variables as your workflow progresses
* Maintain state across different actions and conditions
## Best Practices
* Use clear, descriptive names for easy identification
* Rename the action to match the variable name
* Use consistent naming conventions across your workflow
* Avoid generic names like "temp" or "data"
* Store essential data in variables before clearing context
* Update variables rather than creating duplicates
* Use variables for data that doesn't need global context access
* Keep variable scope limited to what's actually needed
* Group related variables near each other in the workflow
* Use descriptive action names for better output reference selection
* Document complex variables with clear action names
* Clean up unused variables by not referencing them
## Next Steps
Manage global memory and prioritized information
Store persistent knowledge across all task executions
Access advanced monitoring and observability features
Make direct AI requests with controlled context
# Airtable
Source: https://docs.lindy.ai/skills/popular-integrations/airtable
## Quick Overview
Airtable integration is one of Lindy's most powerful database automation capabilities, enabling your AI agents to act as sophisticated database assistants and data processors. The integration provides both Triggers (what can start a Lindy workflow) and Actions (what Lindy can do).
This comprehensive integration transforms Airtable from a static database into a dynamic, reactive system that can automatically respond to data changes, trigger complex workflows, and maintain data integrity across multiple platforms.
Key benefits of Airtable integration:
* **Real-time data reactivity** – Instant responses to database changes with webhook-based triggers
* **Bi-directional data flow** – Both read from and write to Airtable with full CRUD operations
* **Schema management** – Dynamic field and table creation/modification capabilities
* **Multi-base support** – Work across multiple Airtable bases simultaneously
## How to set up Airtable
Click on the plus sign at the bottom or right-click anywhere on the canvas and select "Add Trigger" or "Add Action" from the pop-up menu and choose "Airtable"
### Inputs
* **Name**: The variable name that will be used for referencing (becomes the reference key)
* **Value**: The data to store — can be set manually, using prompts with context, or auto mode
### Outputs
* **Variable Reference**: The stored value can be referenced as an output in other actions
* **Updated Variable**: If using the same name, it overwrites the existing variable
Pro tip: Rename the Set Variable action to the actual variable name (like "Set Customer ID") for better organization when selecting output references from the menu.
## When to Use Variables
### Common Use Cases
* Store important data before clearing context
* Pass data between different workflow phases
* Keep track of counters, IDs, or status values
* Hold temporary calculations or processed results
### Variable Updates
* Use the same variable name to overwrite existing values
* Update variables as your workflow progresses
* Maintain state across different actions and conditions
## Best Practices
* Use clear, descriptive names for easy identification
* Rename the action to match the variable name
* Use consistent naming conventions across your workflow
* Avoid generic names like "temp" or "data"
* Store essential data in variables before clearing context
* Update variables rather than creating duplicates
* Use variables for data that doesn't need global context access
* Keep variable scope limited to what's actually needed
* Group related variables near each other in the workflow
* Use descriptive action names for better output reference selection
* Document complex variables with clear action names
* Clean up unused variables by not referencing them
## Next Steps
Manage global memory and prioritized information
Store persistent knowledge across all task executions
Access advanced monitoring and observability features
Make direct AI requests with controlled context
# Airtable
Source: https://docs.lindy.ai/skills/popular-integrations/airtable
## Quick Overview
Airtable integration is one of Lindy's most powerful database automation capabilities, enabling your AI agents to act as sophisticated database assistants and data processors. The integration provides both Triggers (what can start a Lindy workflow) and Actions (what Lindy can do).
This comprehensive integration transforms Airtable from a static database into a dynamic, reactive system that can automatically respond to data changes, trigger complex workflows, and maintain data integrity across multiple platforms.
Key benefits of Airtable integration:
* **Real-time data reactivity** – Instant responses to database changes with webhook-based triggers
* **Bi-directional data flow** – Both read from and write to Airtable with full CRUD operations
* **Schema management** – Dynamic field and table creation/modification capabilities
* **Multi-base support** – Work across multiple Airtable bases simultaneously
## How to set up Airtable
Click on the plus sign at the bottom or right-click anywhere on the canvas and select "Add Trigger" or "Add Action" from the pop-up menu and choose "Airtable"
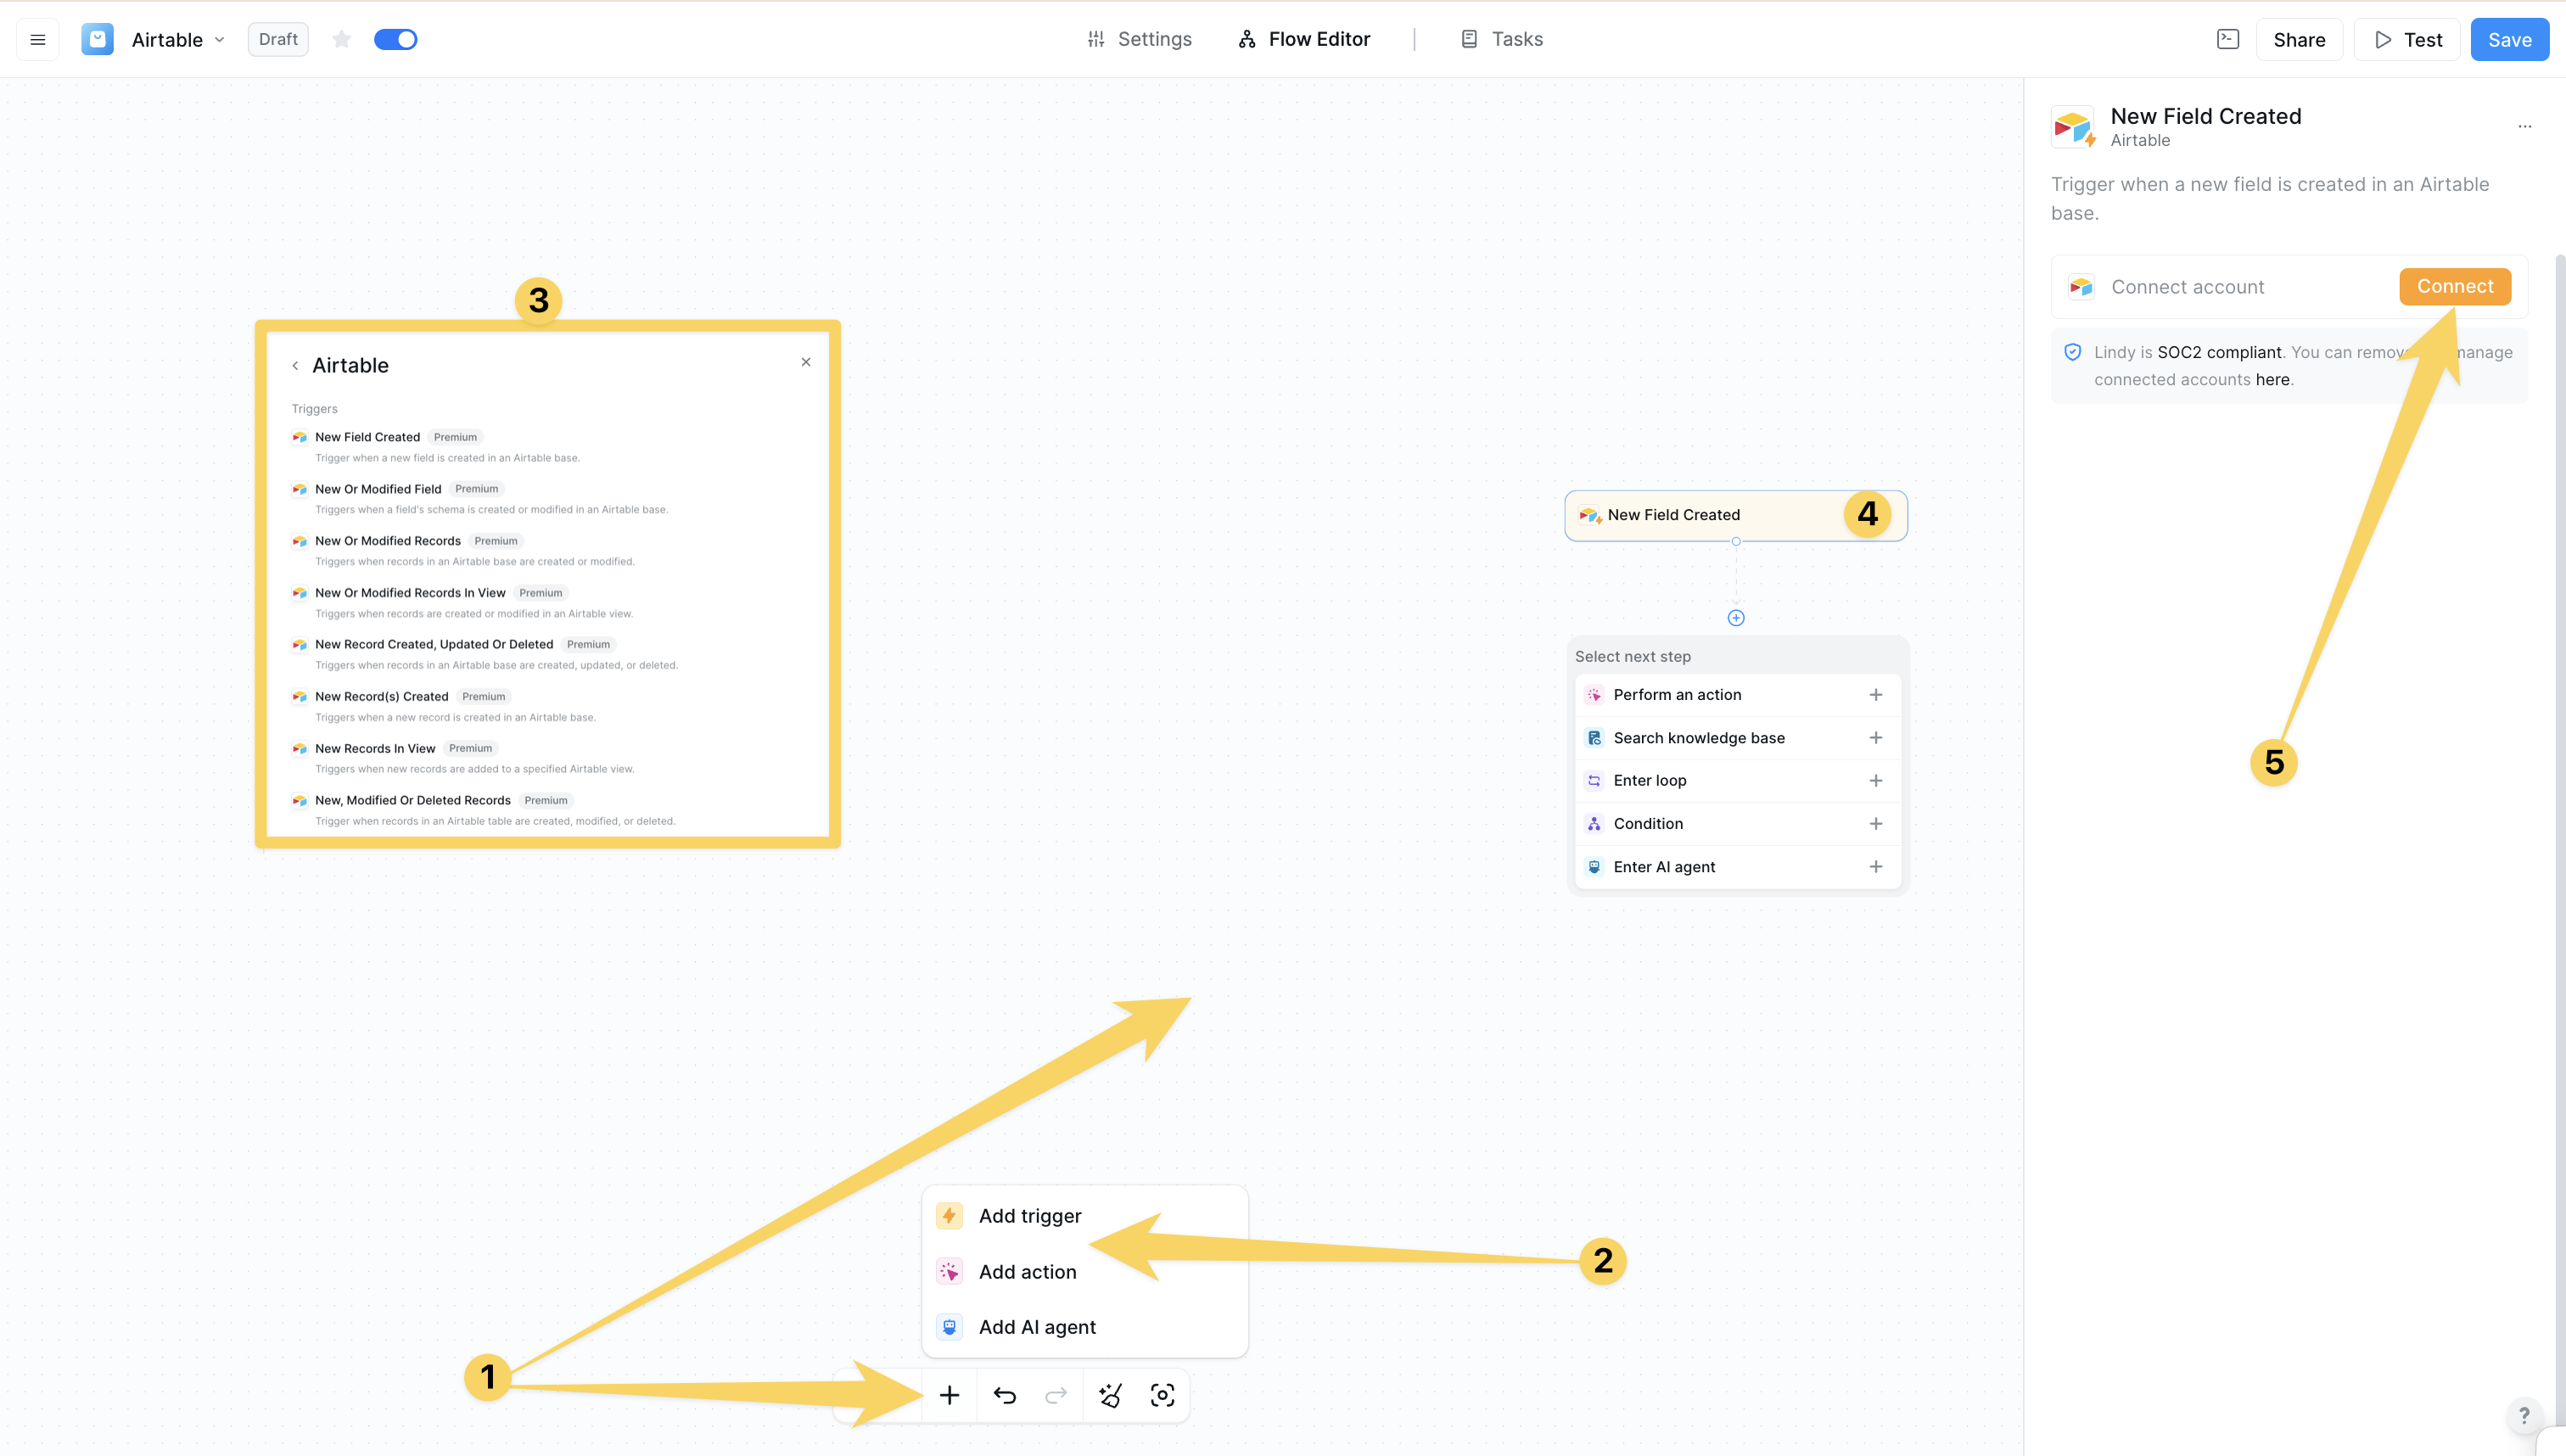 Click on "Add Account" and authorize your Airtable for Lindy's integrations using OAuth 2.0. Grant read access to base schemas and read/write access to records. FInally, choose which bases Lindy can acces
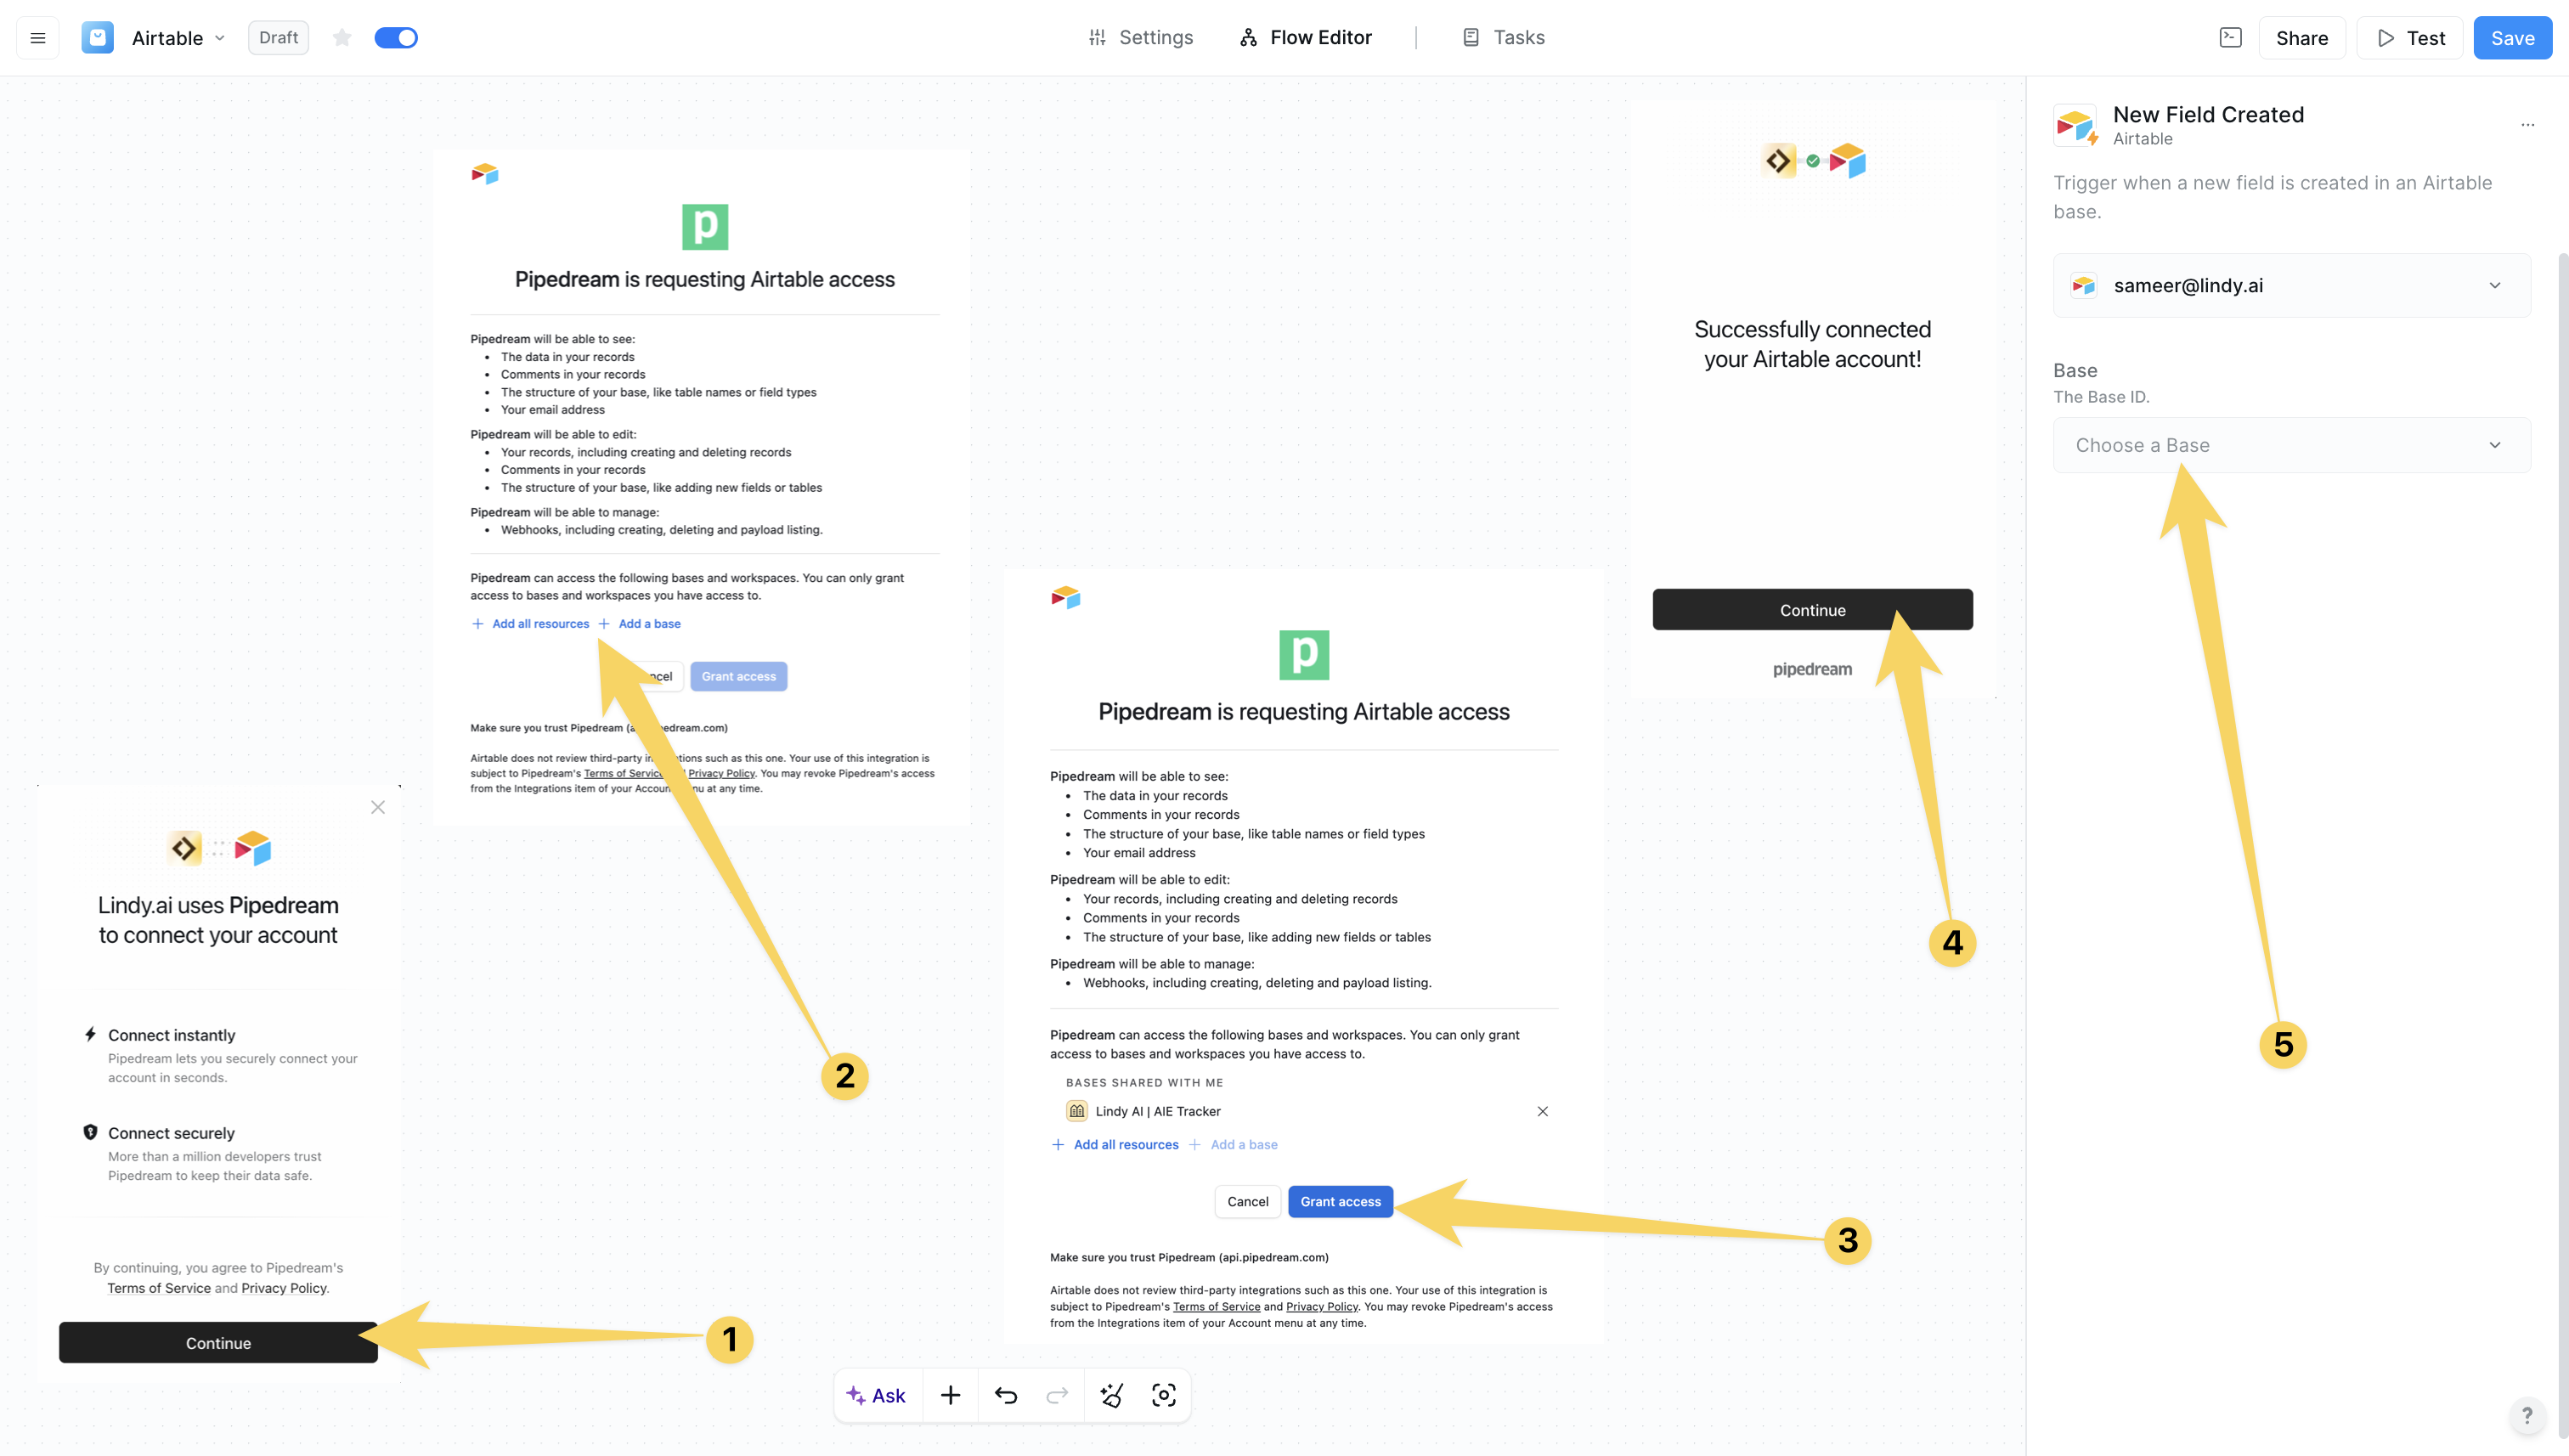 ## Airtable Triggers
#### New Record(s) Created
Triggers when a new record is created in an Airtable base:
* **Real-time activation** - Webhook-based trigger for instant response
* **Source filtering** - Monitor changes from specific sources (web, API, forms, automation)
* **Multi-level filtering** - Base, table, and view-specific monitoring
* Perfect for lead processing, order fulfillment, content moderation, team notifications
#### New Records In View
Triggers when new records are added to a specified Airtable view:
* **View-specific monitoring** - Focus on filtered data sets
* **Formula filtering** - Advanced Airtable formula-based filtering
* **Customizable polling** - Configurable intervals (minimum 15 minutes)
* Essential for status-based workflows, priority queues, approval processes, targeted reporting
#### New Or Modified Records
Triggers when records in an Airtable base are created or modified:
* **Real-time webhooks** - Instant response to data changes
* **Change type detection** - Distinguish between creates and updates
* **Field-specific monitoring** - Watch only specific fields for changes
* Perfect for data synchronization, audit trails, notification systems, workflow progression
#### New Or Modified Records In View
Triggers when records are created or modified in an Airtable view:
* **View-focused monitoring** - React to changes in specific filtered views
* **Conditional automation** - Trigger only when records meet complex criteria
* **Team-specific workflows** - Different actions for different team views
* Ideal for stage-based processing, conditional automation, performance monitoring
#### New Or Modified Field
Triggers when a field's schema is created or modified in an Airtable base:
* **Schema change detection** - Monitor field creation, modification, and deletion
* **Real-time notifications** - Instant alerts for schema changes
* **Source tracking** - Track schema changes by origin
* Essential for schema management, documentation updates, integration maintenance, compliance tracking
#### New, Modified Or Deleted Records
Comprehensive trigger for all record lifecycle events:
* **Complete lifecycle monitoring** - Handle all record states (create/update/delete)
* **Advanced filtering** - Formula-based record filtering
* **Configurable polling** - Customizable monitoring intervals
* Perfect for data lifecycle management, backup systems, compliance auditing, external system sync
#### New Record Created, Updated Or Deleted
Real-time trigger for all record lifecycle events:
* **Real-time webhooks** - Instant response to all record changes
* **Event type selection** - Choose specific event types (add/update/remove)
* **Multi-level filtering** - Base, table, and view scoping
* Ideal for real-time data pipelines, live dashboards, instant notifications, event sourcing
#### New Field Created
Triggers when a new field is created in an Airtable base:
* **Schema evolution tracking** - Monitor database schema changes
* **Field type filtering** - React to specific field types
* **Real-time notifications** - Instant alerts for new fields
* Perfect for dynamic form generation, schema documentation, integration updates, template management
Use "New Record(s) Created" triggers combined with "Create Record" actions for the most powerful database automation workflows.
## Airtable Actions
#### Create Record
Create a new record in an Airtable table:
* **Dynamic field mapping** - Automatic field discovery and mapping
* **Data validation** - Built-in validation for proper data entry
* **Flexible creation** - Support for all Airtable field types
* Perfect for lead capture, order creation, task management, contact creation
#### Get Record
Retrieve a specific record by its ID:
* **Complete data access** - Full record data or null if not found
* **Record validation** - Verify record existence before processing
* **Reference lookups** - Access related data and attachments
* Essential for record validation, data enrichment, status checking, reference lookups
#### Update Record
Modify an existing record in Airtable:
* **Field-specific updates** - Target individual fields for precise changes
* **Lookup capabilities** - Find and update records based on criteria
* **Data integrity** - Maintain relationships while updating records
* Perfect for status updates, data enrichment, progress tracking, information correction
#### Delete Record
Remove a record from Airtable:
* **Safe deletion** - Returns deleted record data for verification
* **Data cleanup** - Remove outdated or invalid records
* **Workflow completion** - Clean up after process completion
* Essential for data cleanup, record archival, compliance deletion, workflow completion
#### Find Record
Search for a single record based on field criteria:
* **Dynamic lookup** - Field selection and value matching
* **Duplicate detection** - Prevent duplicate record creation
* **Data validation** - Verify record existence before operations
* Perfect for duplicate detection, record verification, data validation, reference resolution
#### Find Many Records
Search for multiple records matching criteria:
* **Bulk data access** - Retrieve multiple matching records
* **Advanced filtering** - Complex search criteria support
* **Batch processing** - Process multiple records efficiently
* Essential for bulk data processing, report generation, data analysis, batch operations
#### Create Multiple Records
Create multiple records simultaneously in an Airtable table:
* **Bulk operations** - Improved performance for multiple record creation
* **Batch validation** - Validate multiple records in single operation
* **Data import** - Efficient bulk data import capabilities
* Perfect for bulk data import, batch processing, data migration, mass record creation
#### List Records
Retrieve and filter records from an Airtable table:
* **Advanced filtering** - Complex filtering and sorting options
* **Data export** - Export data for external processing
* **Report generation** - Generate comprehensive reports
* Essential for data export, report generation, analytics processing, data synchronization
#### List Records In View
Retrieve records from a specific view with view-specific filtering:
* **View-based logic** - Leverage Airtable's view filtering
* **Team-specific data** - Access data filtered for specific teams
* **Conditional processing** - Process only records meeting view criteria
* Perfect for view-based reporting, filtered data export, conditional processing, team-specific access
#### Create Table
Create a new table in an Airtable base with specified fields and settings:
* **Full schema definition** - Define complete table structure
* **Dynamic database creation** - Create tables based on requirements
* **Template instantiation** - Create tables from predefined templates
* Essential for dynamic database creation, template instantiation, project setup automation, schema replication
#### Update Table
Modify the name or description of an existing Airtable table:
* **Table metadata management** - Update table information
* **Documentation updates** - Maintain current table descriptions
* **Naming standardization** - Ensure consistent table naming
* Perfect for table organization, documentation updates, naming standardization, metadata management
#### Create Field
Create a new field in an Airtable base with specified type and settings:
* **Dynamic schema evolution** - Add fields based on changing requirements
* **All field types** - Support for all Airtable field types
* **Custom configuration** - Set field properties and validations
* Essential for dynamic schema evolution, custom field creation, template expansion, data model adaptation
#### Update Field
Modify field properties in an Airtable table:
* **Field optimization** - Update field types and configurations
* **Schema maintenance** - Keep fields current and optimized
* **Data type corrections** - Fix field type mismatches
* Perfect for schema maintenance, field optimization, data type corrections, configuration updates
#### Create Comment
Add a text comment to a specific record in an Airtable base:
* **Rich text commenting** - Add detailed comments to records
* **Workflow annotations** - Document process steps and decisions
* **Team communication** - Facilitate collaboration through comments
* Essential for workflow annotations, review processes, team communication, audit trails
#### Update Comment
Modify an existing comment on a record:
* **Comment editing** - Update and correct existing comments
* **Information updates** - Keep comments current and accurate
* **Content management** - Manage comment content effectively
* Perfect for comment corrections, information updates, review modifications, content management
#### List Bases
Get the list of bases that can be accessed:
* **Base discovery** - Find all accessible Airtable bases
* **Access auditing** - Verify permissions and access levels
* **Multi-base workflows** - Work across multiple bases
* Essential for base discovery, access auditing, multi-base workflows, permission verification
#### List Tables
Get a list of tables in the selected base:
* **Schema discovery** - Understand base structure dynamically
* **Table enumeration** - List all available tables
* **Structure analysis** - Analyze database structure
* Perfect for schema discovery, table enumeration, structure analysis, dynamic configuration
## Practical Implementation Scenarios
Transform Lindy into a comprehensive CRM automation platform:
* New Record Created → Lead scoring and qualification → Assignment to sales reps → Follow-up task creation → Status tracking → Deal progression → Revenue forecasting
Build sophisticated order management workflows:
* New order record → Inventory verification → Payment processing → Fulfillment routing → Shipping tracking → Customer notifications → Post-sale follow-up
Create advanced content workflow automation:
* Content submission → Quality review → Editorial approval → Publishing schedule → Distribution tracking → Performance analysis → Archive management
## Advanced Features & Capabilities
Powerful webhook-based automation capabilities:
* **Instant Triggers** - Real-time response to data changes with webhook technology
* **Event Sourcing** - Complete audit trail of all database events
* **Live Dashboards** - Update visualizations and reports in real-time
* **Multi-source Monitoring** - Track changes from web, API, forms, and automation
Dynamic database structure management and evolution:
* **Dynamic Field Creation** - Add fields based on changing business requirements
* **Table Management** - Create and modify tables programmatically
* **Schema Evolution** - Adapt database structure to evolving needs
* **Template Systems** - Replicate successful database structures
Sophisticated data filtering and view-based automation:
* **View-specific Triggers** - React to changes in filtered data sets
* **Formula Filtering** - Use Airtable's formula engine for complex conditions
* **Multi-level Filtering** - Base, table, and view-specific monitoring
* **Conditional Logic** - Execute different workflows based on data conditions
## Configuration Best Practices
Optimize your database workflow performance:
* Use view-specific triggers when possible to reduce noise
* Implement field-specific monitoring to avoid unnecessary triggers
* Choose appropriate polling intervals for non-real-time triggers
* Batch operations when creating multiple records to improve performance
Set up robust data quality and integrity workflows:
* Use "Find Record" before "Create Record" to prevent duplicates
* Implement validation rules in automation workflows
* Set up error handling for authentication and API failures
* Use transactions for multi-step operations to maintain consistency
Create secure and well-governed database automation:
* Use least-privilege access principles for base permissions
* Regularly audit connected bases and access permissions
* Monitor API usage and rate limits to prevent service disruption
* Implement proper error handling for authentication failures
## Limitations & Considerations
* **Rate Limits**: Airtable API has rate limits for high-volume operations
* **Record Limits**: Maximum 1,200 records per API request
* **Field Limits**: Maximum 50 fields per table
* **Base Limits**: API access limited to authorized bases only
* **OAuth Scopes**: Requires schema.bases:read, data.records:read, data.records:write
* **Webhook Permissions**: Real-time triggers require webhook creation permissions
* **Base Access**: Must explicitly grant access to each base
* **API Keys**: Personal access tokens supported for enhanced security
* **Real-time vs Polling**: Choose appropriate trigger types based on urgency needs
* **Batch Operations**: Use bulk actions for improved performance
* **View Optimization**: Use specific views to reduce data processing overhead
* **Field Monitoring**: Monitor only necessary fields to reduce trigger frequency
## Next steps
Compare database automation capabilities
Combine Airtable with knowledge management
Set up Airtable-based automation triggers
Add smart routing to your database workflows
# GitHub
Source: https://docs.lindy.ai/skills/popular-integrations/github
## Quick Overview
Automate your development workflow with Lindy's comprehensive GitHub integration. From monitoring repository activity to generating engineering reports, Lindy helps development teams stay informed, streamline code reviews, and maintain project visibility without manual overhead.
Key benefits of GitHub + Lindy:
* **Repository monitoring** - Track issues, PRs, and security alerts automatically
* **Team notifications** - Alert relevant team members about code reviews and mentions
* **Automated reporting** - Generate engineering digests and progress summaries
* **Workflow automation** - Trigger actions based on repository events
* **Cross-platform integration** - Connect GitHub data with Slack, email, and other tools
## Available Triggers
### Repository Activity Triggers
* **New Repository**: Automatically respond when new repositories are created in your GitHub account or organization.
* **New Star By User**: Track when specific users star repositories to monitor engagement and adoption.
* **New Security Alert**: Get immediate notifications about security vulnerabilities in your repositories.
### Collaboration Triggers
* **New Review Request**: Get notified when someone requests a code review on pull requests.
* **New Mention**: Trigger workflows when you're mentioned in comments, issues, or pull requests.
* **Pull Request Opened**: Respond to new pull requests with automated workflows.
### Organizational Triggers
* **New Team**: Monitor when new teams are created in your GitHub organization.
* **New Organization**: Track the creation of new GitHub organizations.
* **New Notification**: Process GitHub notifications as they arrive.
## Available Actions
### Repository Management
* **Create Repository**: Set up new repositories with customizable settings and features.
* **Create Or Update File Contents**: Modify repository files programmatically.
* **Get Repository Content**: Retrieve files and contents from repositories.
* **Enable/Disable Workflow**: Control GitHub Actions workflows remotely.
### Issue and PR Management
* **Create Issue**: Automatically create GitHub issues based on triggers.
* **Update Issue**: Modify issue details, labels, and assignments.
* **Create Issue Comment**: Add comments to issues and pull requests.
* **Search Issues And Pull Requests**: Find specific issues and PRs using keywords and qualifiers.
* **Create Pull Request**: Generate pull requests automatically.
### Project Tracking
* **Update Project Item Status**: Manage GitHub Project (V2) item statuses.
* **List Issues**: Retrieve lists of repository issues.
* **Get Issue Assignees**: Find users assigned to specific issues.
## Example: Daily Engineering Digest
## Airtable Triggers
#### New Record(s) Created
Triggers when a new record is created in an Airtable base:
* **Real-time activation** - Webhook-based trigger for instant response
* **Source filtering** - Monitor changes from specific sources (web, API, forms, automation)
* **Multi-level filtering** - Base, table, and view-specific monitoring
* Perfect for lead processing, order fulfillment, content moderation, team notifications
#### New Records In View
Triggers when new records are added to a specified Airtable view:
* **View-specific monitoring** - Focus on filtered data sets
* **Formula filtering** - Advanced Airtable formula-based filtering
* **Customizable polling** - Configurable intervals (minimum 15 minutes)
* Essential for status-based workflows, priority queues, approval processes, targeted reporting
#### New Or Modified Records
Triggers when records in an Airtable base are created or modified:
* **Real-time webhooks** - Instant response to data changes
* **Change type detection** - Distinguish between creates and updates
* **Field-specific monitoring** - Watch only specific fields for changes
* Perfect for data synchronization, audit trails, notification systems, workflow progression
#### New Or Modified Records In View
Triggers when records are created or modified in an Airtable view:
* **View-focused monitoring** - React to changes in specific filtered views
* **Conditional automation** - Trigger only when records meet complex criteria
* **Team-specific workflows** - Different actions for different team views
* Ideal for stage-based processing, conditional automation, performance monitoring
#### New Or Modified Field
Triggers when a field's schema is created or modified in an Airtable base:
* **Schema change detection** - Monitor field creation, modification, and deletion
* **Real-time notifications** - Instant alerts for schema changes
* **Source tracking** - Track schema changes by origin
* Essential for schema management, documentation updates, integration maintenance, compliance tracking
#### New, Modified Or Deleted Records
Comprehensive trigger for all record lifecycle events:
* **Complete lifecycle monitoring** - Handle all record states (create/update/delete)
* **Advanced filtering** - Formula-based record filtering
* **Configurable polling** - Customizable monitoring intervals
* Perfect for data lifecycle management, backup systems, compliance auditing, external system sync
#### New Record Created, Updated Or Deleted
Real-time trigger for all record lifecycle events:
* **Real-time webhooks** - Instant response to all record changes
* **Event type selection** - Choose specific event types (add/update/remove)
* **Multi-level filtering** - Base, table, and view scoping
* Ideal for real-time data pipelines, live dashboards, instant notifications, event sourcing
#### New Field Created
Triggers when a new field is created in an Airtable base:
* **Schema evolution tracking** - Monitor database schema changes
* **Field type filtering** - React to specific field types
* **Real-time notifications** - Instant alerts for new fields
* Perfect for dynamic form generation, schema documentation, integration updates, template management
Use "New Record(s) Created" triggers combined with "Create Record" actions for the most powerful database automation workflows.
## Airtable Actions
#### Create Record
Create a new record in an Airtable table:
* **Dynamic field mapping** - Automatic field discovery and mapping
* **Data validation** - Built-in validation for proper data entry
* **Flexible creation** - Support for all Airtable field types
* Perfect for lead capture, order creation, task management, contact creation
#### Get Record
Retrieve a specific record by its ID:
* **Complete data access** - Full record data or null if not found
* **Record validation** - Verify record existence before processing
* **Reference lookups** - Access related data and attachments
* Essential for record validation, data enrichment, status checking, reference lookups
#### Update Record
Modify an existing record in Airtable:
* **Field-specific updates** - Target individual fields for precise changes
* **Lookup capabilities** - Find and update records based on criteria
* **Data integrity** - Maintain relationships while updating records
* Perfect for status updates, data enrichment, progress tracking, information correction
#### Delete Record
Remove a record from Airtable:
* **Safe deletion** - Returns deleted record data for verification
* **Data cleanup** - Remove outdated or invalid records
* **Workflow completion** - Clean up after process completion
* Essential for data cleanup, record archival, compliance deletion, workflow completion
#### Find Record
Search for a single record based on field criteria:
* **Dynamic lookup** - Field selection and value matching
* **Duplicate detection** - Prevent duplicate record creation
* **Data validation** - Verify record existence before operations
* Perfect for duplicate detection, record verification, data validation, reference resolution
#### Find Many Records
Search for multiple records matching criteria:
* **Bulk data access** - Retrieve multiple matching records
* **Advanced filtering** - Complex search criteria support
* **Batch processing** - Process multiple records efficiently
* Essential for bulk data processing, report generation, data analysis, batch operations
#### Create Multiple Records
Create multiple records simultaneously in an Airtable table:
* **Bulk operations** - Improved performance for multiple record creation
* **Batch validation** - Validate multiple records in single operation
* **Data import** - Efficient bulk data import capabilities
* Perfect for bulk data import, batch processing, data migration, mass record creation
#### List Records
Retrieve and filter records from an Airtable table:
* **Advanced filtering** - Complex filtering and sorting options
* **Data export** - Export data for external processing
* **Report generation** - Generate comprehensive reports
* Essential for data export, report generation, analytics processing, data synchronization
#### List Records In View
Retrieve records from a specific view with view-specific filtering:
* **View-based logic** - Leverage Airtable's view filtering
* **Team-specific data** - Access data filtered for specific teams
* **Conditional processing** - Process only records meeting view criteria
* Perfect for view-based reporting, filtered data export, conditional processing, team-specific access
#### Create Table
Create a new table in an Airtable base with specified fields and settings:
* **Full schema definition** - Define complete table structure
* **Dynamic database creation** - Create tables based on requirements
* **Template instantiation** - Create tables from predefined templates
* Essential for dynamic database creation, template instantiation, project setup automation, schema replication
#### Update Table
Modify the name or description of an existing Airtable table:
* **Table metadata management** - Update table information
* **Documentation updates** - Maintain current table descriptions
* **Naming standardization** - Ensure consistent table naming
* Perfect for table organization, documentation updates, naming standardization, metadata management
#### Create Field
Create a new field in an Airtable base with specified type and settings:
* **Dynamic schema evolution** - Add fields based on changing requirements
* **All field types** - Support for all Airtable field types
* **Custom configuration** - Set field properties and validations
* Essential for dynamic schema evolution, custom field creation, template expansion, data model adaptation
#### Update Field
Modify field properties in an Airtable table:
* **Field optimization** - Update field types and configurations
* **Schema maintenance** - Keep fields current and optimized
* **Data type corrections** - Fix field type mismatches
* Perfect for schema maintenance, field optimization, data type corrections, configuration updates
#### Create Comment
Add a text comment to a specific record in an Airtable base:
* **Rich text commenting** - Add detailed comments to records
* **Workflow annotations** - Document process steps and decisions
* **Team communication** - Facilitate collaboration through comments
* Essential for workflow annotations, review processes, team communication, audit trails
#### Update Comment
Modify an existing comment on a record:
* **Comment editing** - Update and correct existing comments
* **Information updates** - Keep comments current and accurate
* **Content management** - Manage comment content effectively
* Perfect for comment corrections, information updates, review modifications, content management
#### List Bases
Get the list of bases that can be accessed:
* **Base discovery** - Find all accessible Airtable bases
* **Access auditing** - Verify permissions and access levels
* **Multi-base workflows** - Work across multiple bases
* Essential for base discovery, access auditing, multi-base workflows, permission verification
#### List Tables
Get a list of tables in the selected base:
* **Schema discovery** - Understand base structure dynamically
* **Table enumeration** - List all available tables
* **Structure analysis** - Analyze database structure
* Perfect for schema discovery, table enumeration, structure analysis, dynamic configuration
## Practical Implementation Scenarios
Transform Lindy into a comprehensive CRM automation platform:
* New Record Created → Lead scoring and qualification → Assignment to sales reps → Follow-up task creation → Status tracking → Deal progression → Revenue forecasting
Build sophisticated order management workflows:
* New order record → Inventory verification → Payment processing → Fulfillment routing → Shipping tracking → Customer notifications → Post-sale follow-up
Create advanced content workflow automation:
* Content submission → Quality review → Editorial approval → Publishing schedule → Distribution tracking → Performance analysis → Archive management
## Advanced Features & Capabilities
Powerful webhook-based automation capabilities:
* **Instant Triggers** - Real-time response to data changes with webhook technology
* **Event Sourcing** - Complete audit trail of all database events
* **Live Dashboards** - Update visualizations and reports in real-time
* **Multi-source Monitoring** - Track changes from web, API, forms, and automation
Dynamic database structure management and evolution:
* **Dynamic Field Creation** - Add fields based on changing business requirements
* **Table Management** - Create and modify tables programmatically
* **Schema Evolution** - Adapt database structure to evolving needs
* **Template Systems** - Replicate successful database structures
Sophisticated data filtering and view-based automation:
* **View-specific Triggers** - React to changes in filtered data sets
* **Formula Filtering** - Use Airtable's formula engine for complex conditions
* **Multi-level Filtering** - Base, table, and view-specific monitoring
* **Conditional Logic** - Execute different workflows based on data conditions
## Configuration Best Practices
Optimize your database workflow performance:
* Use view-specific triggers when possible to reduce noise
* Implement field-specific monitoring to avoid unnecessary triggers
* Choose appropriate polling intervals for non-real-time triggers
* Batch operations when creating multiple records to improve performance
Set up robust data quality and integrity workflows:
* Use "Find Record" before "Create Record" to prevent duplicates
* Implement validation rules in automation workflows
* Set up error handling for authentication and API failures
* Use transactions for multi-step operations to maintain consistency
Create secure and well-governed database automation:
* Use least-privilege access principles for base permissions
* Regularly audit connected bases and access permissions
* Monitor API usage and rate limits to prevent service disruption
* Implement proper error handling for authentication failures
## Limitations & Considerations
* **Rate Limits**: Airtable API has rate limits for high-volume operations
* **Record Limits**: Maximum 1,200 records per API request
* **Field Limits**: Maximum 50 fields per table
* **Base Limits**: API access limited to authorized bases only
* **OAuth Scopes**: Requires schema.bases:read, data.records:read, data.records:write
* **Webhook Permissions**: Real-time triggers require webhook creation permissions
* **Base Access**: Must explicitly grant access to each base
* **API Keys**: Personal access tokens supported for enhanced security
* **Real-time vs Polling**: Choose appropriate trigger types based on urgency needs
* **Batch Operations**: Use bulk actions for improved performance
* **View Optimization**: Use specific views to reduce data processing overhead
* **Field Monitoring**: Monitor only necessary fields to reduce trigger frequency
## Next steps
Compare database automation capabilities
Combine Airtable with knowledge management
Set up Airtable-based automation triggers
Add smart routing to your database workflows
# GitHub
Source: https://docs.lindy.ai/skills/popular-integrations/github
## Quick Overview
Automate your development workflow with Lindy's comprehensive GitHub integration. From monitoring repository activity to generating engineering reports, Lindy helps development teams stay informed, streamline code reviews, and maintain project visibility without manual overhead.
Key benefits of GitHub + Lindy:
* **Repository monitoring** - Track issues, PRs, and security alerts automatically
* **Team notifications** - Alert relevant team members about code reviews and mentions
* **Automated reporting** - Generate engineering digests and progress summaries
* **Workflow automation** - Trigger actions based on repository events
* **Cross-platform integration** - Connect GitHub data with Slack, email, and other tools
## Available Triggers
### Repository Activity Triggers
* **New Repository**: Automatically respond when new repositories are created in your GitHub account or organization.
* **New Star By User**: Track when specific users star repositories to monitor engagement and adoption.
* **New Security Alert**: Get immediate notifications about security vulnerabilities in your repositories.
### Collaboration Triggers
* **New Review Request**: Get notified when someone requests a code review on pull requests.
* **New Mention**: Trigger workflows when you're mentioned in comments, issues, or pull requests.
* **Pull Request Opened**: Respond to new pull requests with automated workflows.
### Organizational Triggers
* **New Team**: Monitor when new teams are created in your GitHub organization.
* **New Organization**: Track the creation of new GitHub organizations.
* **New Notification**: Process GitHub notifications as they arrive.
## Available Actions
### Repository Management
* **Create Repository**: Set up new repositories with customizable settings and features.
* **Create Or Update File Contents**: Modify repository files programmatically.
* **Get Repository Content**: Retrieve files and contents from repositories.
* **Enable/Disable Workflow**: Control GitHub Actions workflows remotely.
### Issue and PR Management
* **Create Issue**: Automatically create GitHub issues based on triggers.
* **Update Issue**: Modify issue details, labels, and assignments.
* **Create Issue Comment**: Add comments to issues and pull requests.
* **Search Issues And Pull Requests**: Find specific issues and PRs using keywords and qualifiers.
* **Create Pull Request**: Generate pull requests automatically.
### Project Tracking
* **Update Project Item Status**: Manage GitHub Project (V2) item statuses.
* **List Issues**: Retrieve lists of repository issues.
* **Get Issue Assignees**: Find users assigned to specific issues.
## Example: Daily Engineering Digest
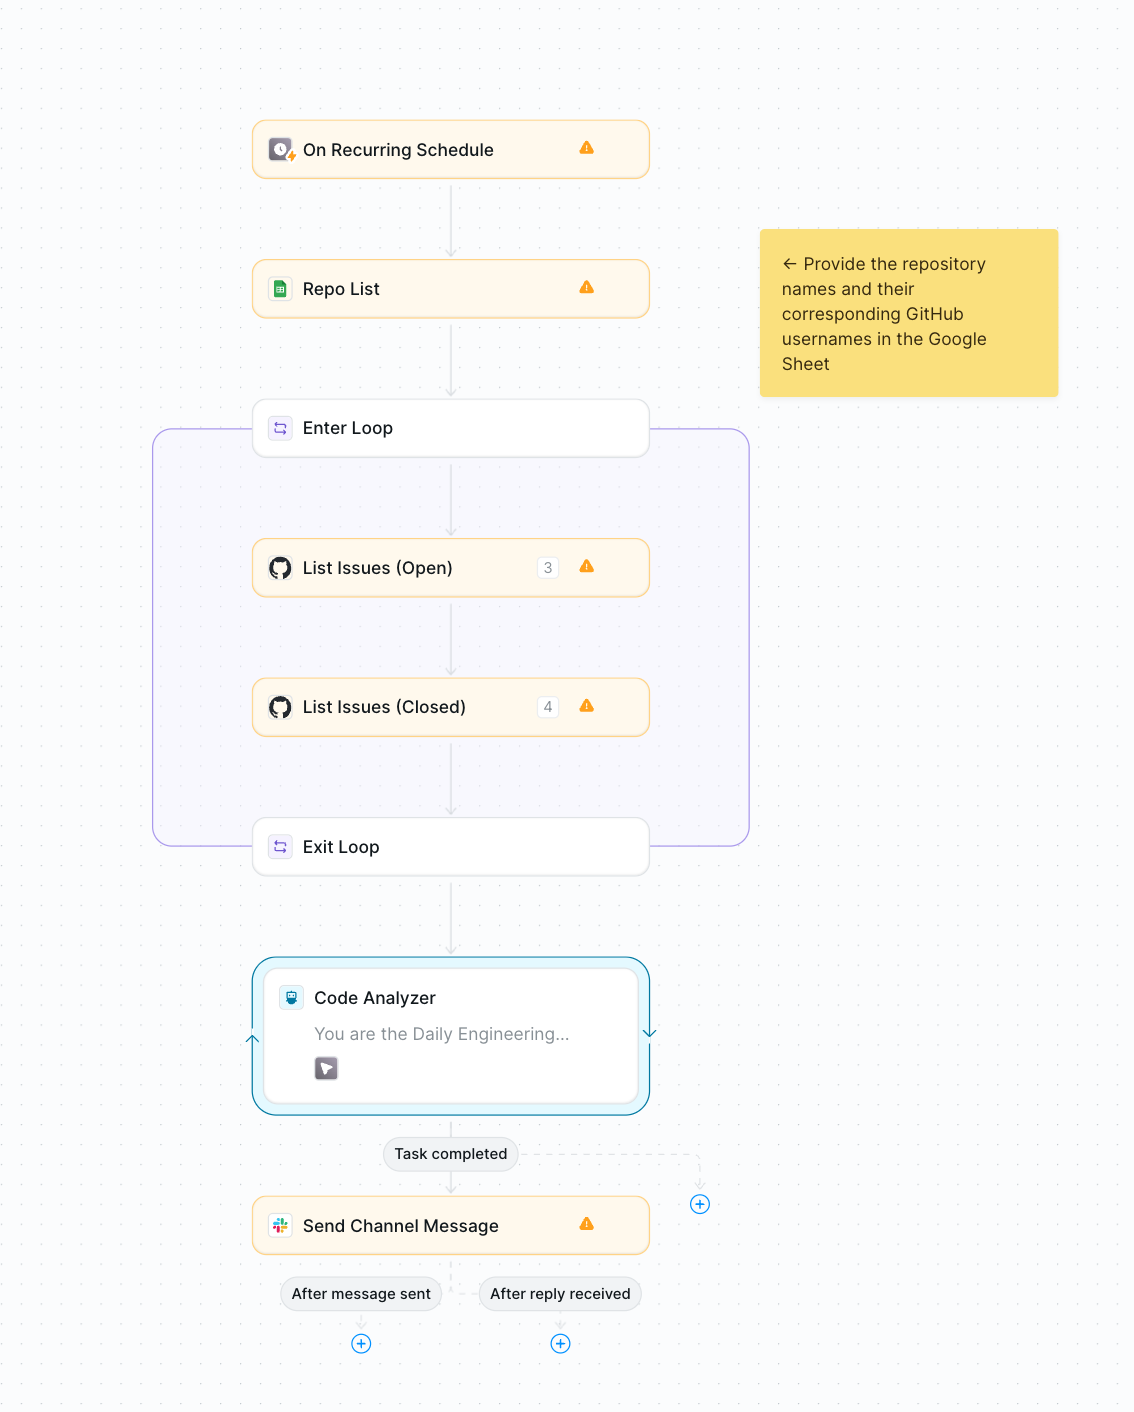 This automated workflow demonstrates how to create comprehensive engineering reports by analyzing multiple repositories and sending digest summaries to your team.
### Workflow Components
* **Scheduled Trigger**: Runs daily to generate consistent reporting.
* **Repository Loop**: Iterates through a list of repositories to gather comprehensive data.
* **Issue Analysis**: Collects both open and closed issues to track progress and workload.
* **Code Analysis**: Processes repository activity and generates insights.
* **Team Notification**: Sends formatted digest to Slack channels.
### Setup Process
1. **Configure Schedule**: Set up a recurring trigger for your preferred digest frequency
2. **Define Repository List**: Create a list of repositories to monitor
3. **Add Loop Logic**: Use "Enter Loop" to process each repository
4. **Collect Issue Data**: Gather open and closed issues for each repository
5. **Analyze Activity**: Process the collected data for insights
6. **Format Output**: Create a digestible summary format
7. **Send Notification**: Deliver the digest via Slack or email
For the Daily Engineering Digest, start with a small set of repositories to test your workflow before scaling to your entire organization.
## Common Use Cases
Streamline your development process with intelligent automation for code reviews, security, and releases.
**Code Review Notifications**
* Trigger: New Review Request
* Action: Send Slack notification to reviewer
* Benefit: Faster review cycles and better team coordination
**Security Monitoring**
* Trigger: New Security Alert
* Action: Create high-priority issue and notify security team
* Benefit: Immediate response to security vulnerabilities
**Release Management**
* Trigger: New Release
* Action: Update project status and notify stakeholders
* Benefit: Automated release communication
Enhance project visibility and tracking with automated issue management and milestone monitoring.
**Issue Tracking**
* Trigger: New Issue created
* Action: Add to project board and assign based on labels
* Benefit: Streamlined issue management workflow
**Progress Reporting**
* Trigger: Scheduled (weekly)
* Action: Generate repository activity summary
* Benefit: Regular progress visibility for managers
**Milestone Monitoring**
* Trigger: Issue closed
* Action: Check milestone progress and notify if complete
* Benefit: Automated milestone tracking
Improve team communication and visibility with automated notifications and activity summaries.
**Mention Alerts**
* Trigger: New Mention
* Action: Send personalized notification with context
* Benefit: Never miss important mentions or requests
**Team Activity Digest**
* Trigger: Scheduled (daily)
* Action: Summarize team contributions and activity
* Benefit: Improved team visibility and recognition
## Best Practices
Structure your GitHub automations for maximum efficiency and clarity.
* Repository Grouping: Organize repositories by team, project, or importance for targeted monitoring.
* Notification Routing: Send different types of notifications to appropriate channels or team members.
* Frequency Management: Balance between staying informed and avoiding notification fatigue.
Maintain security best practices when integrating GitHub with automation workflows.
* Webhook Security: Use secure webhook configurations for sensitive repositories.
* Access Control: Limit Lindy's repository access to necessary permissions only.
* Sensitive Data: Avoid exposing sensitive information in automated messages.
## Next Steps
Enhance your development workflow by combining GitHub with other integrations:
Send GitHub notifications to team channels
Email repository updates and summaries
Set up GitHub-based automation triggers
Document repository insights in Notion
# Gmail
Source: https://docs.lindy.ai/skills/popular-integrations/gmail
Complete email automation for sending, receiving, organizing, and managing complex email workflows with intelligent responses
## Overview
Gmail integration provides comprehensive email automation for sending, receiving, organizing, and managing email workflows. Create sophisticated email sequences that can automatically respond to replies and manage ongoing conversations.
## Available Triggers
Connect your Gmail account to enable powerful email automation. Set up triggers to respond to incoming emails, sent messages, attachments, and label changes. Use filters to target specific emails and avoid information overload.
* **Email Received**: Triggers when new emails are received in Gmail. Most popular trigger - use filters to target specific emails!
* **Email Sent**: Triggers when emails are sent from your Gmail account.
* **New Attachment Received**: Trigger when new email attachments are received in Gmail.
* **New Email Matching Search**: Triggers when new emails match specified Gmail search criteria and labels.
* **New Labeled Email**: Triggers when new emails with specified Gmail labels are received.
## Available Actions
### Core Email Actions
* **Send Email**: Send an email using your Gmail account with full formatting support.
* **Send Reply**: Draft or send a reply to an email with conversation threading.
* **Draft Email**: Saves an email as a draft for later editing or sending.
* **Edit Draft**: Edits an existing draft email with new content.
### Email Management
* **Add Label to Email**: Adds a label to one or more emails for organization.
* **Remove Label from Email**: Removes a label from one or more emails by message IDs and label ID or name.
* **Delete Label**: Deletes a Gmail label entirely.
* **Archive**: Archives an email to remove it from the inbox.
* **Unarchive**: Unarchives an email by ID to restore it to the inbox.
### Email Status Management
* **Mark Email as Read**: Marks an email as read.
* **Mark Email as Unread**: Marks an email as unread by ID.
* **Mark Email as Important**: Marks an email as important by ID.
* **Mark Email as Unimportant**: Marks an email as unimportant by ID.
* **Move Email to Trash**: Moves an email to the trash.
* **Move Email Out of Trash**: Moves an email out of the trash by ID.
### Search & Retrieval
* **Find Email**: Search and retrieve messages from Gmail using filters and labels.
* **Search Emails**: Search for emails in your Gmail account matching specific filters.
* **Get Email**: Gets the specified email by ID with full content and metadata.
* **Find Email Address By Person**: Given a person's name, try to find their email address from your contacts.
## Smart Email Sequences & Reply Monitoring
This automated workflow demonstrates how to create comprehensive engineering reports by analyzing multiple repositories and sending digest summaries to your team.
### Workflow Components
* **Scheduled Trigger**: Runs daily to generate consistent reporting.
* **Repository Loop**: Iterates through a list of repositories to gather comprehensive data.
* **Issue Analysis**: Collects both open and closed issues to track progress and workload.
* **Code Analysis**: Processes repository activity and generates insights.
* **Team Notification**: Sends formatted digest to Slack channels.
### Setup Process
1. **Configure Schedule**: Set up a recurring trigger for your preferred digest frequency
2. **Define Repository List**: Create a list of repositories to monitor
3. **Add Loop Logic**: Use "Enter Loop" to process each repository
4. **Collect Issue Data**: Gather open and closed issues for each repository
5. **Analyze Activity**: Process the collected data for insights
6. **Format Output**: Create a digestible summary format
7. **Send Notification**: Deliver the digest via Slack or email
For the Daily Engineering Digest, start with a small set of repositories to test your workflow before scaling to your entire organization.
## Common Use Cases
Streamline your development process with intelligent automation for code reviews, security, and releases.
**Code Review Notifications**
* Trigger: New Review Request
* Action: Send Slack notification to reviewer
* Benefit: Faster review cycles and better team coordination
**Security Monitoring**
* Trigger: New Security Alert
* Action: Create high-priority issue and notify security team
* Benefit: Immediate response to security vulnerabilities
**Release Management**
* Trigger: New Release
* Action: Update project status and notify stakeholders
* Benefit: Automated release communication
Enhance project visibility and tracking with automated issue management and milestone monitoring.
**Issue Tracking**
* Trigger: New Issue created
* Action: Add to project board and assign based on labels
* Benefit: Streamlined issue management workflow
**Progress Reporting**
* Trigger: Scheduled (weekly)
* Action: Generate repository activity summary
* Benefit: Regular progress visibility for managers
**Milestone Monitoring**
* Trigger: Issue closed
* Action: Check milestone progress and notify if complete
* Benefit: Automated milestone tracking
Improve team communication and visibility with automated notifications and activity summaries.
**Mention Alerts**
* Trigger: New Mention
* Action: Send personalized notification with context
* Benefit: Never miss important mentions or requests
**Team Activity Digest**
* Trigger: Scheduled (daily)
* Action: Summarize team contributions and activity
* Benefit: Improved team visibility and recognition
## Best Practices
Structure your GitHub automations for maximum efficiency and clarity.
* Repository Grouping: Organize repositories by team, project, or importance for targeted monitoring.
* Notification Routing: Send different types of notifications to appropriate channels or team members.
* Frequency Management: Balance between staying informed and avoiding notification fatigue.
Maintain security best practices when integrating GitHub with automation workflows.
* Webhook Security: Use secure webhook configurations for sensitive repositories.
* Access Control: Limit Lindy's repository access to necessary permissions only.
* Sensitive Data: Avoid exposing sensitive information in automated messages.
## Next Steps
Enhance your development workflow by combining GitHub with other integrations:
Send GitHub notifications to team channels
Email repository updates and summaries
Set up GitHub-based automation triggers
Document repository insights in Notion
# Gmail
Source: https://docs.lindy.ai/skills/popular-integrations/gmail
Complete email automation for sending, receiving, organizing, and managing complex email workflows with intelligent responses
## Overview
Gmail integration provides comprehensive email automation for sending, receiving, organizing, and managing email workflows. Create sophisticated email sequences that can automatically respond to replies and manage ongoing conversations.
## Available Triggers
Connect your Gmail account to enable powerful email automation. Set up triggers to respond to incoming emails, sent messages, attachments, and label changes. Use filters to target specific emails and avoid information overload.
* **Email Received**: Triggers when new emails are received in Gmail. Most popular trigger - use filters to target specific emails!
* **Email Sent**: Triggers when emails are sent from your Gmail account.
* **New Attachment Received**: Trigger when new email attachments are received in Gmail.
* **New Email Matching Search**: Triggers when new emails match specified Gmail search criteria and labels.
* **New Labeled Email**: Triggers when new emails with specified Gmail labels are received.
## Available Actions
### Core Email Actions
* **Send Email**: Send an email using your Gmail account with full formatting support.
* **Send Reply**: Draft or send a reply to an email with conversation threading.
* **Draft Email**: Saves an email as a draft for later editing or sending.
* **Edit Draft**: Edits an existing draft email with new content.
### Email Management
* **Add Label to Email**: Adds a label to one or more emails for organization.
* **Remove Label from Email**: Removes a label from one or more emails by message IDs and label ID or name.
* **Delete Label**: Deletes a Gmail label entirely.
* **Archive**: Archives an email to remove it from the inbox.
* **Unarchive**: Unarchives an email by ID to restore it to the inbox.
### Email Status Management
* **Mark Email as Read**: Marks an email as read.
* **Mark Email as Unread**: Marks an email as unread by ID.
* **Mark Email as Important**: Marks an email as important by ID.
* **Mark Email as Unimportant**: Marks an email as unimportant by ID.
* **Move Email to Trash**: Moves an email to the trash.
* **Move Email Out of Trash**: Moves an email out of the trash by ID.
### Search & Retrieval
* **Find Email**: Search and retrieve messages from Gmail using filters and labels.
* **Search Emails**: Search for emails in your Gmail account matching specific filters.
* **Get Email**: Gets the specified email by ID with full content and metadata.
* **Find Email Address By Person**: Given a person's name, try to find their email address from your contacts.
## Smart Email Sequences & Reply Monitoring
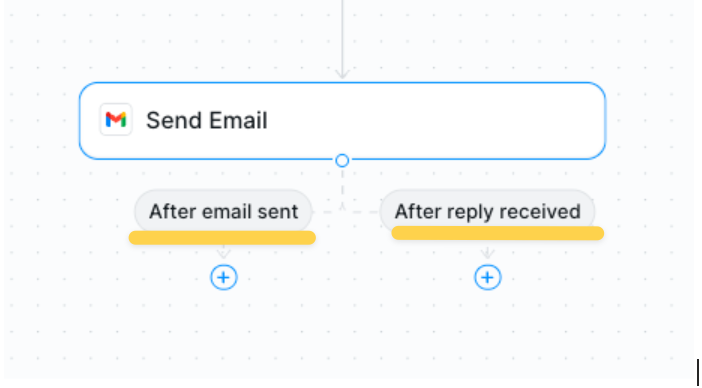 Gmail actions can create intelligent email sequences that automatically monitor and respond to replies. After you send an email, Lindy can watch for responses and take follow-up actions, creating powerful automated conversations:
* **After email sent**: Automatically monitor for replies, set reminders, or trigger follow-up actions
* **After reply received**: Process responses, extract information, or escalate conversations
This enables reactive workflows where your agent can handle both sending emails and intelligently responding to replies.
## Conversation Management & Thread Assignment
Gmail actions can create intelligent email sequences that automatically monitor and respond to replies. After you send an email, Lindy can watch for responses and take follow-up actions, creating powerful automated conversations:
* **After email sent**: Automatically monitor for replies, set reminders, or trigger follow-up actions
* **After reply received**: Process responses, extract information, or escalate conversations
This enables reactive workflows where your agent can handle both sending emails and intelligently responding to replies.
## Conversation Management & Thread Assignment
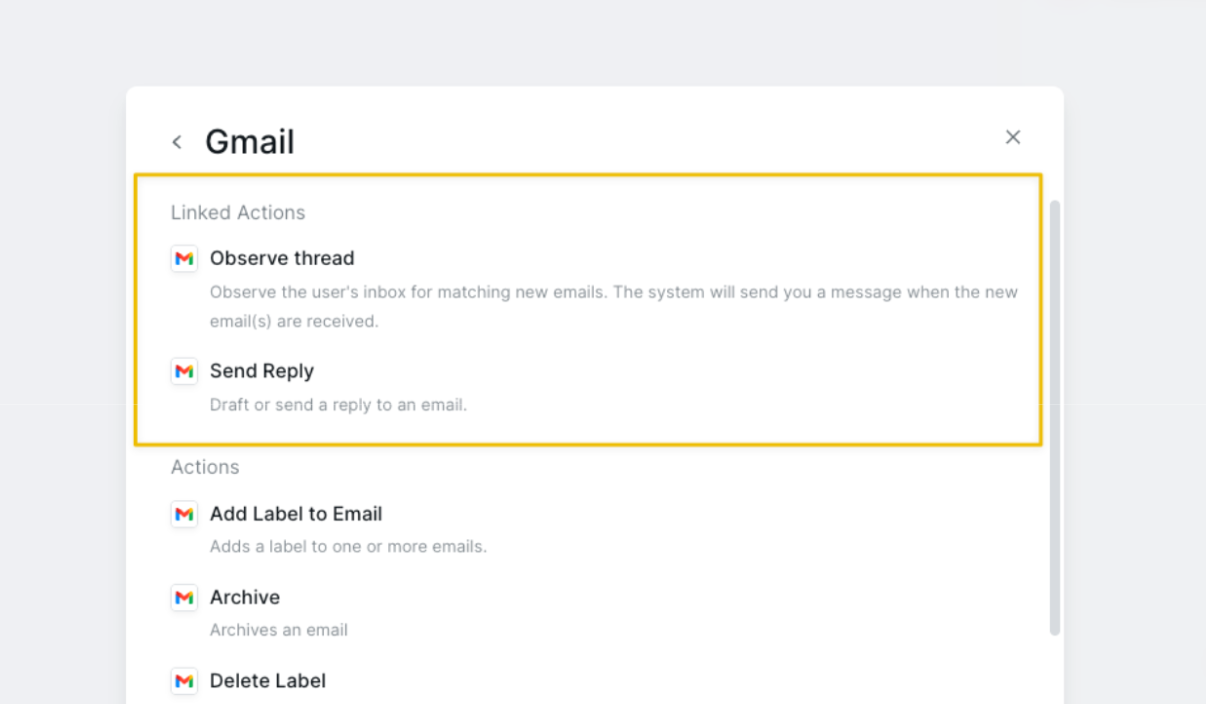 ### Special Conversation Actions
* **Observe Thread**: Monitor your inbox for new emails in ongoing conversations. The system will alert you when new emails arrive, creating a monitoring point for email surveillance.
* **Send Reply (Linked)**: Draft or send a reply to an email within the context of a monitored conversation.
### Managing Multiple Email Conversations
### Special Conversation Actions
* **Observe Thread**: Monitor your inbox for new emails in ongoing conversations. The system will alert you when new emails arrive, creating a monitoring point for email surveillance.
* **Send Reply (Linked)**: Draft or send a reply to an email within the context of a monitored conversation.
### Managing Multiple Email Conversations
 When running multiple email workflows simultaneously, you need to assign the proper conversation thread to ensure actions target the correct email exchange. This prevents mixing up different email conversations and ensures each response goes to the right person.
**How it works:**
* Send multiple emails that monitor for replies
* Each email creates its own conversation thread
* When replies come in, select which specific conversation you're responding to
* Each conversation maintains its own context and history
## Email Filtering Best Practices
When using the "Email Received" trigger, always use filters to target specific emails. Without filters, you'll receive notifications for every email, which can overwhelm your automation.
* Use sender filters: `from:specific@email.com`
* Subject line filters: `subject:urgent OR subject:important`
* Label-based triggers for pre-organized emails
* Attachment filters for document processing workflows
HTML Email Signatures: In the signature field, you can include HTML email signatures for rich formatting, images, and professional branding.
## Best Practices
Structure your email automations for success:
* Start with simple send/receive automation before building complex sequences
* Plan your email journey from send to final resolution
* Monitor thread assignments in multi-workflow scenarios
Ensure your triggers work reliably:
* Test email filters thoroughly to avoid missing important messages
* Use specific sender and subject filters to target the right emails
* Start with low-volume filters before scaling up
Maintain control over sensitive communications:
* Use draft actions for human review before sending sensitive emails
* Verify recipient addresses in automated workflows
* Set up approval processes for important email sequences
## Related Resources
Step-by-step email automation guide
Combine email and calendar automation
Set up email-based triggers
Add smart routing to email workflows
# Google Calendar
Source: https://docs.lindy.ai/skills/popular-integrations/google-calendar
## Quick Overview
Google Calendar integration is one of Lindy's most powerful features, enabling your AI agents to act as sophisticated scheduling assistants and calendar managers. The integration provides both Triggers (what can start a Lindy workflow) and Actions (what Lindy can do).
This comprehensive integration makes Lindy one of the most powerful calendar management AI assistants available, capable of handling everything from simple event creation to complex multi-party scheduling coordination and intelligent calendar optimization.
Key benefits of Google Calendar integration:
* **Intelligent scheduling** – Find optimal meeting times across multiple calendars
* **Real-time automation** – Trigger workflows when events start, end, or change
* **Multi-calendar support** – Work across personal, work, and shared calendars seamlessly
* **Timezone intelligence** – Automatic timezone detection and conversion
## How to set up Google Calendar
Click on the plus sign at the bottom or right-click anywhere on the canvas and select "Add Trigger" or "Add Action" from the pop-up menu and choose "Google Calendar"
When running multiple email workflows simultaneously, you need to assign the proper conversation thread to ensure actions target the correct email exchange. This prevents mixing up different email conversations and ensures each response goes to the right person.
**How it works:**
* Send multiple emails that monitor for replies
* Each email creates its own conversation thread
* When replies come in, select which specific conversation you're responding to
* Each conversation maintains its own context and history
## Email Filtering Best Practices
When using the "Email Received" trigger, always use filters to target specific emails. Without filters, you'll receive notifications for every email, which can overwhelm your automation.
* Use sender filters: `from:specific@email.com`
* Subject line filters: `subject:urgent OR subject:important`
* Label-based triggers for pre-organized emails
* Attachment filters for document processing workflows
HTML Email Signatures: In the signature field, you can include HTML email signatures for rich formatting, images, and professional branding.
## Best Practices
Structure your email automations for success:
* Start with simple send/receive automation before building complex sequences
* Plan your email journey from send to final resolution
* Monitor thread assignments in multi-workflow scenarios
Ensure your triggers work reliably:
* Test email filters thoroughly to avoid missing important messages
* Use specific sender and subject filters to target the right emails
* Start with low-volume filters before scaling up
Maintain control over sensitive communications:
* Use draft actions for human review before sending sensitive emails
* Verify recipient addresses in automated workflows
* Set up approval processes for important email sequences
## Related Resources
Step-by-step email automation guide
Combine email and calendar automation
Set up email-based triggers
Add smart routing to email workflows
# Google Calendar
Source: https://docs.lindy.ai/skills/popular-integrations/google-calendar
## Quick Overview
Google Calendar integration is one of Lindy's most powerful features, enabling your AI agents to act as sophisticated scheduling assistants and calendar managers. The integration provides both Triggers (what can start a Lindy workflow) and Actions (what Lindy can do).
This comprehensive integration makes Lindy one of the most powerful calendar management AI assistants available, capable of handling everything from simple event creation to complex multi-party scheduling coordination and intelligent calendar optimization.
Key benefits of Google Calendar integration:
* **Intelligent scheduling** – Find optimal meeting times across multiple calendars
* **Real-time automation** – Trigger workflows when events start, end, or change
* **Multi-calendar support** – Work across personal, work, and shared calendars seamlessly
* **Timezone intelligence** – Automatic timezone detection and conversion
## How to set up Google Calendar
Click on the plus sign at the bottom or right-click anywhere on the canvas and select "Add Trigger" or "Add Action" from the pop-up menu and choose "Google Calendar"
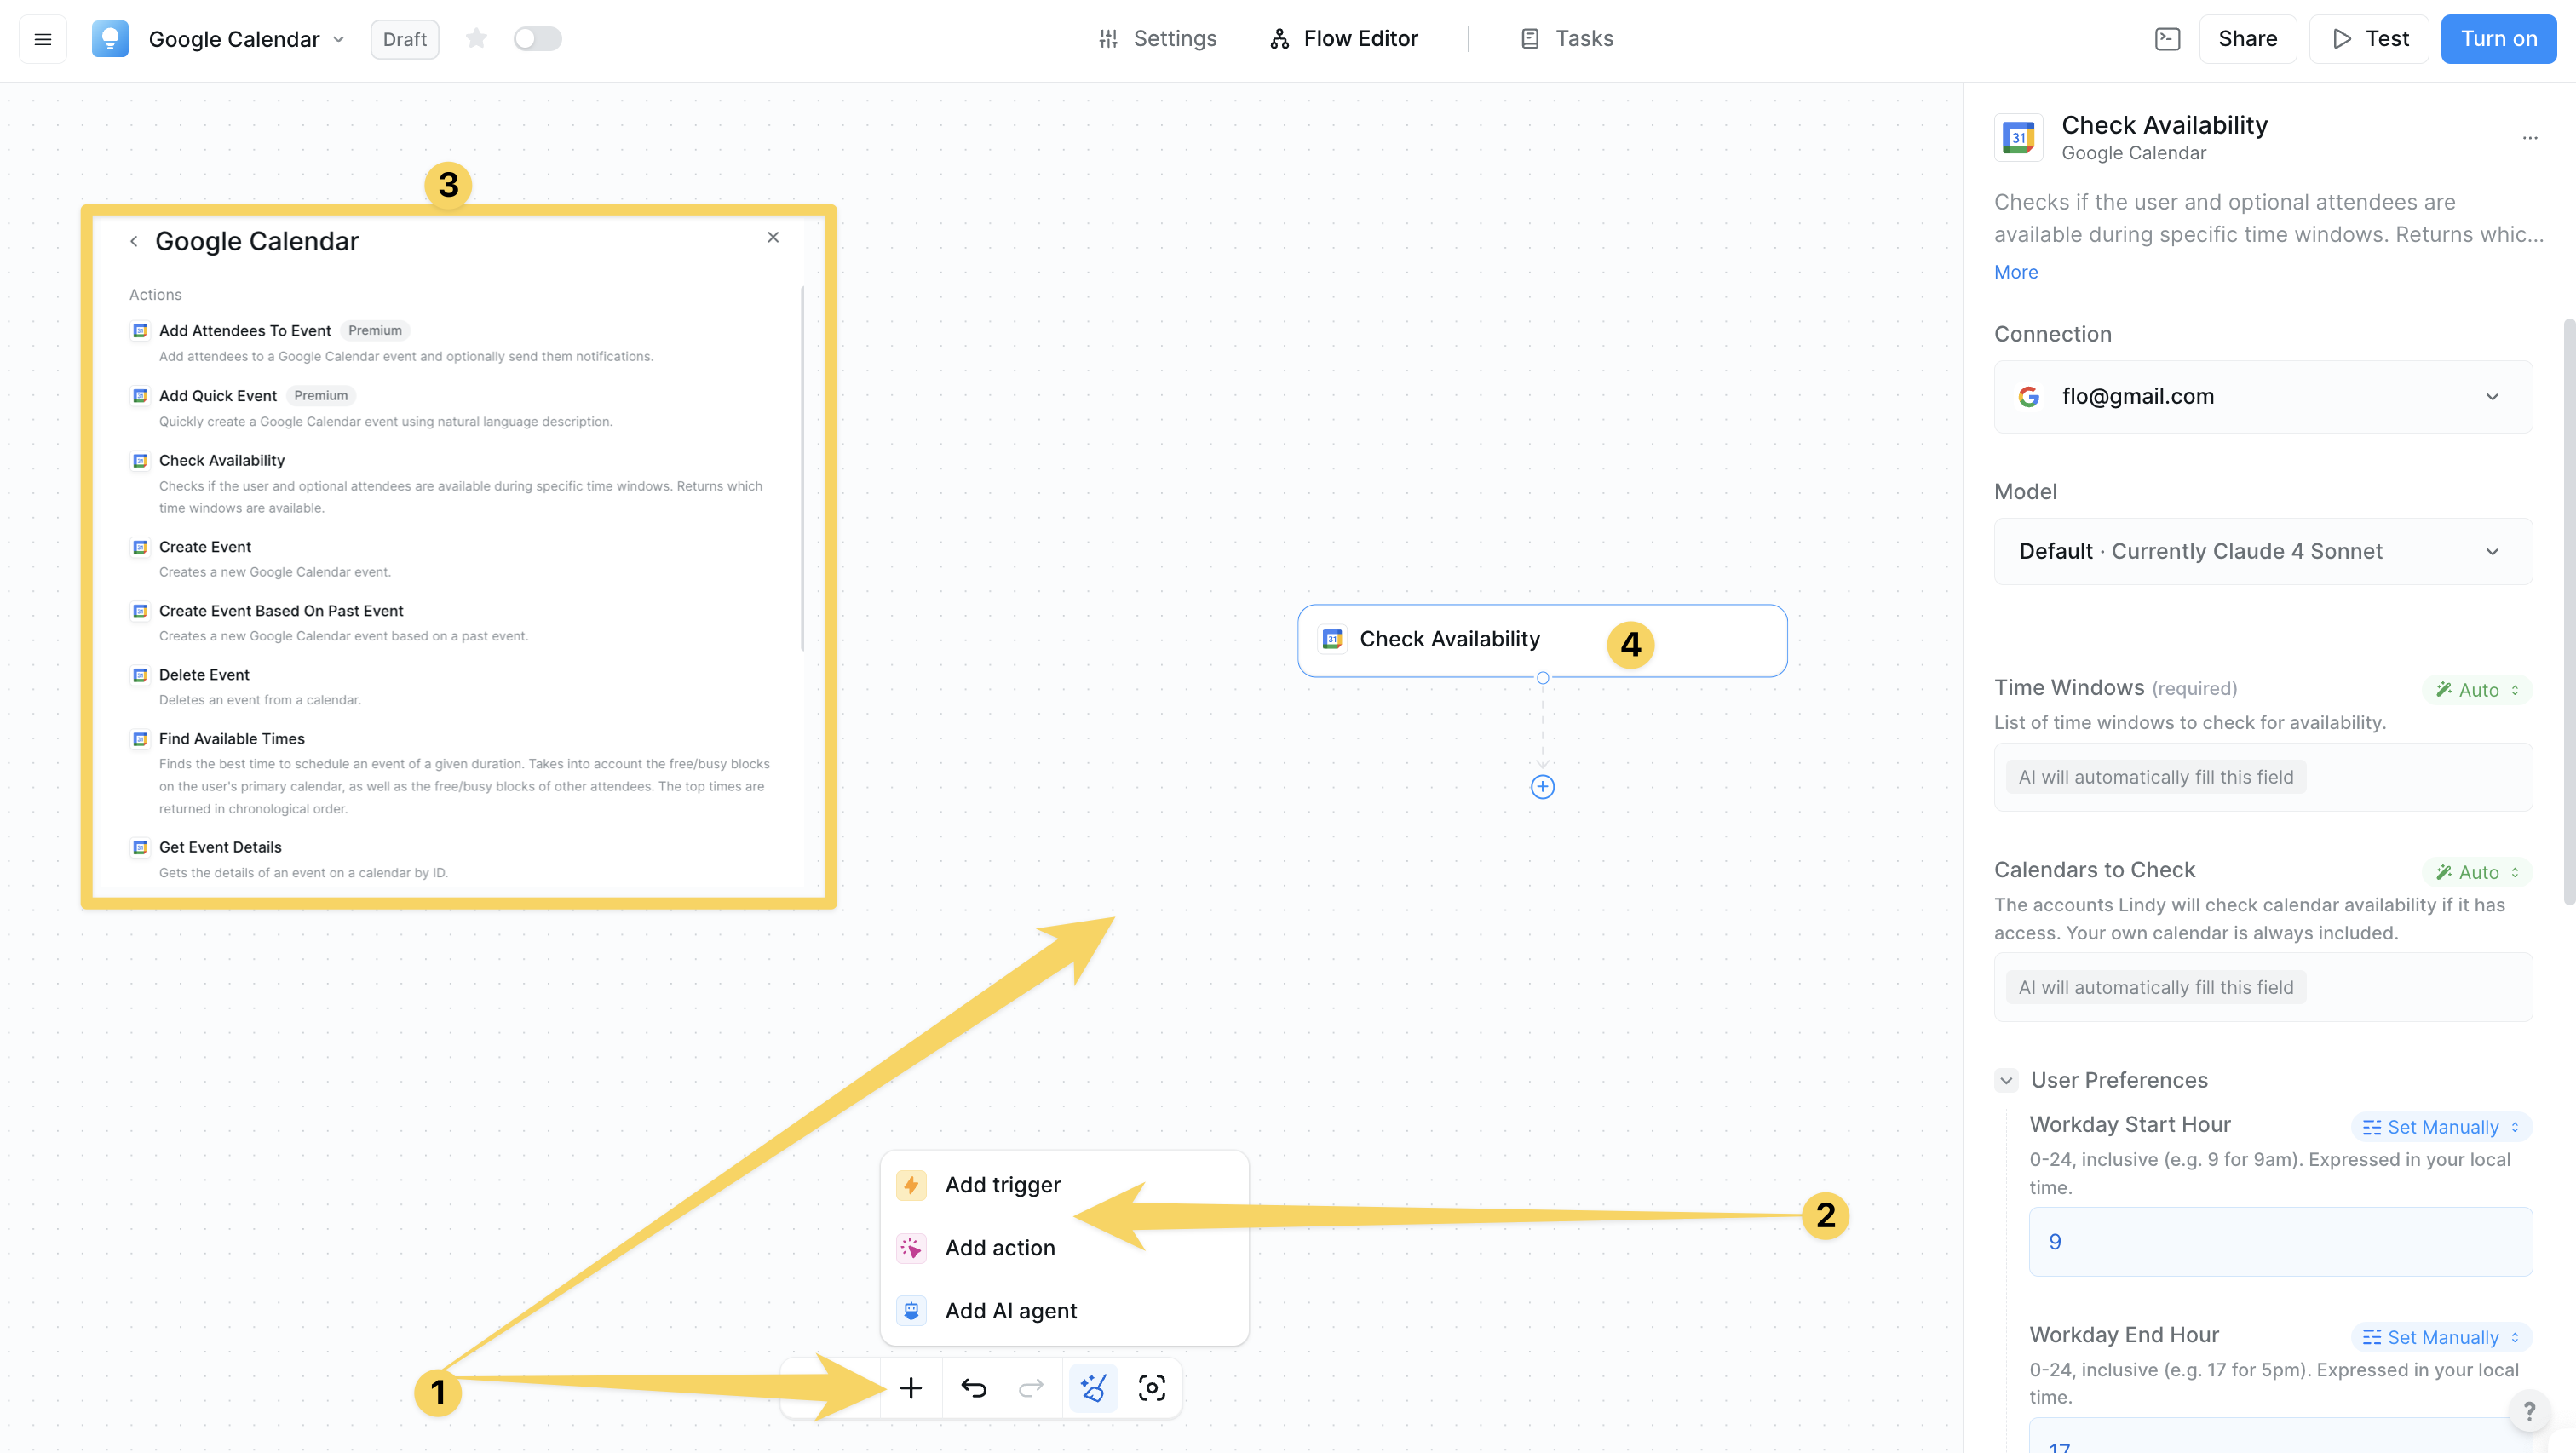 Click on "Add Account" and authorize your Google Calendar for Lindy's integrations by granting permissions for calendar access and management. Choose which particular calendar you want this Lindy to access.
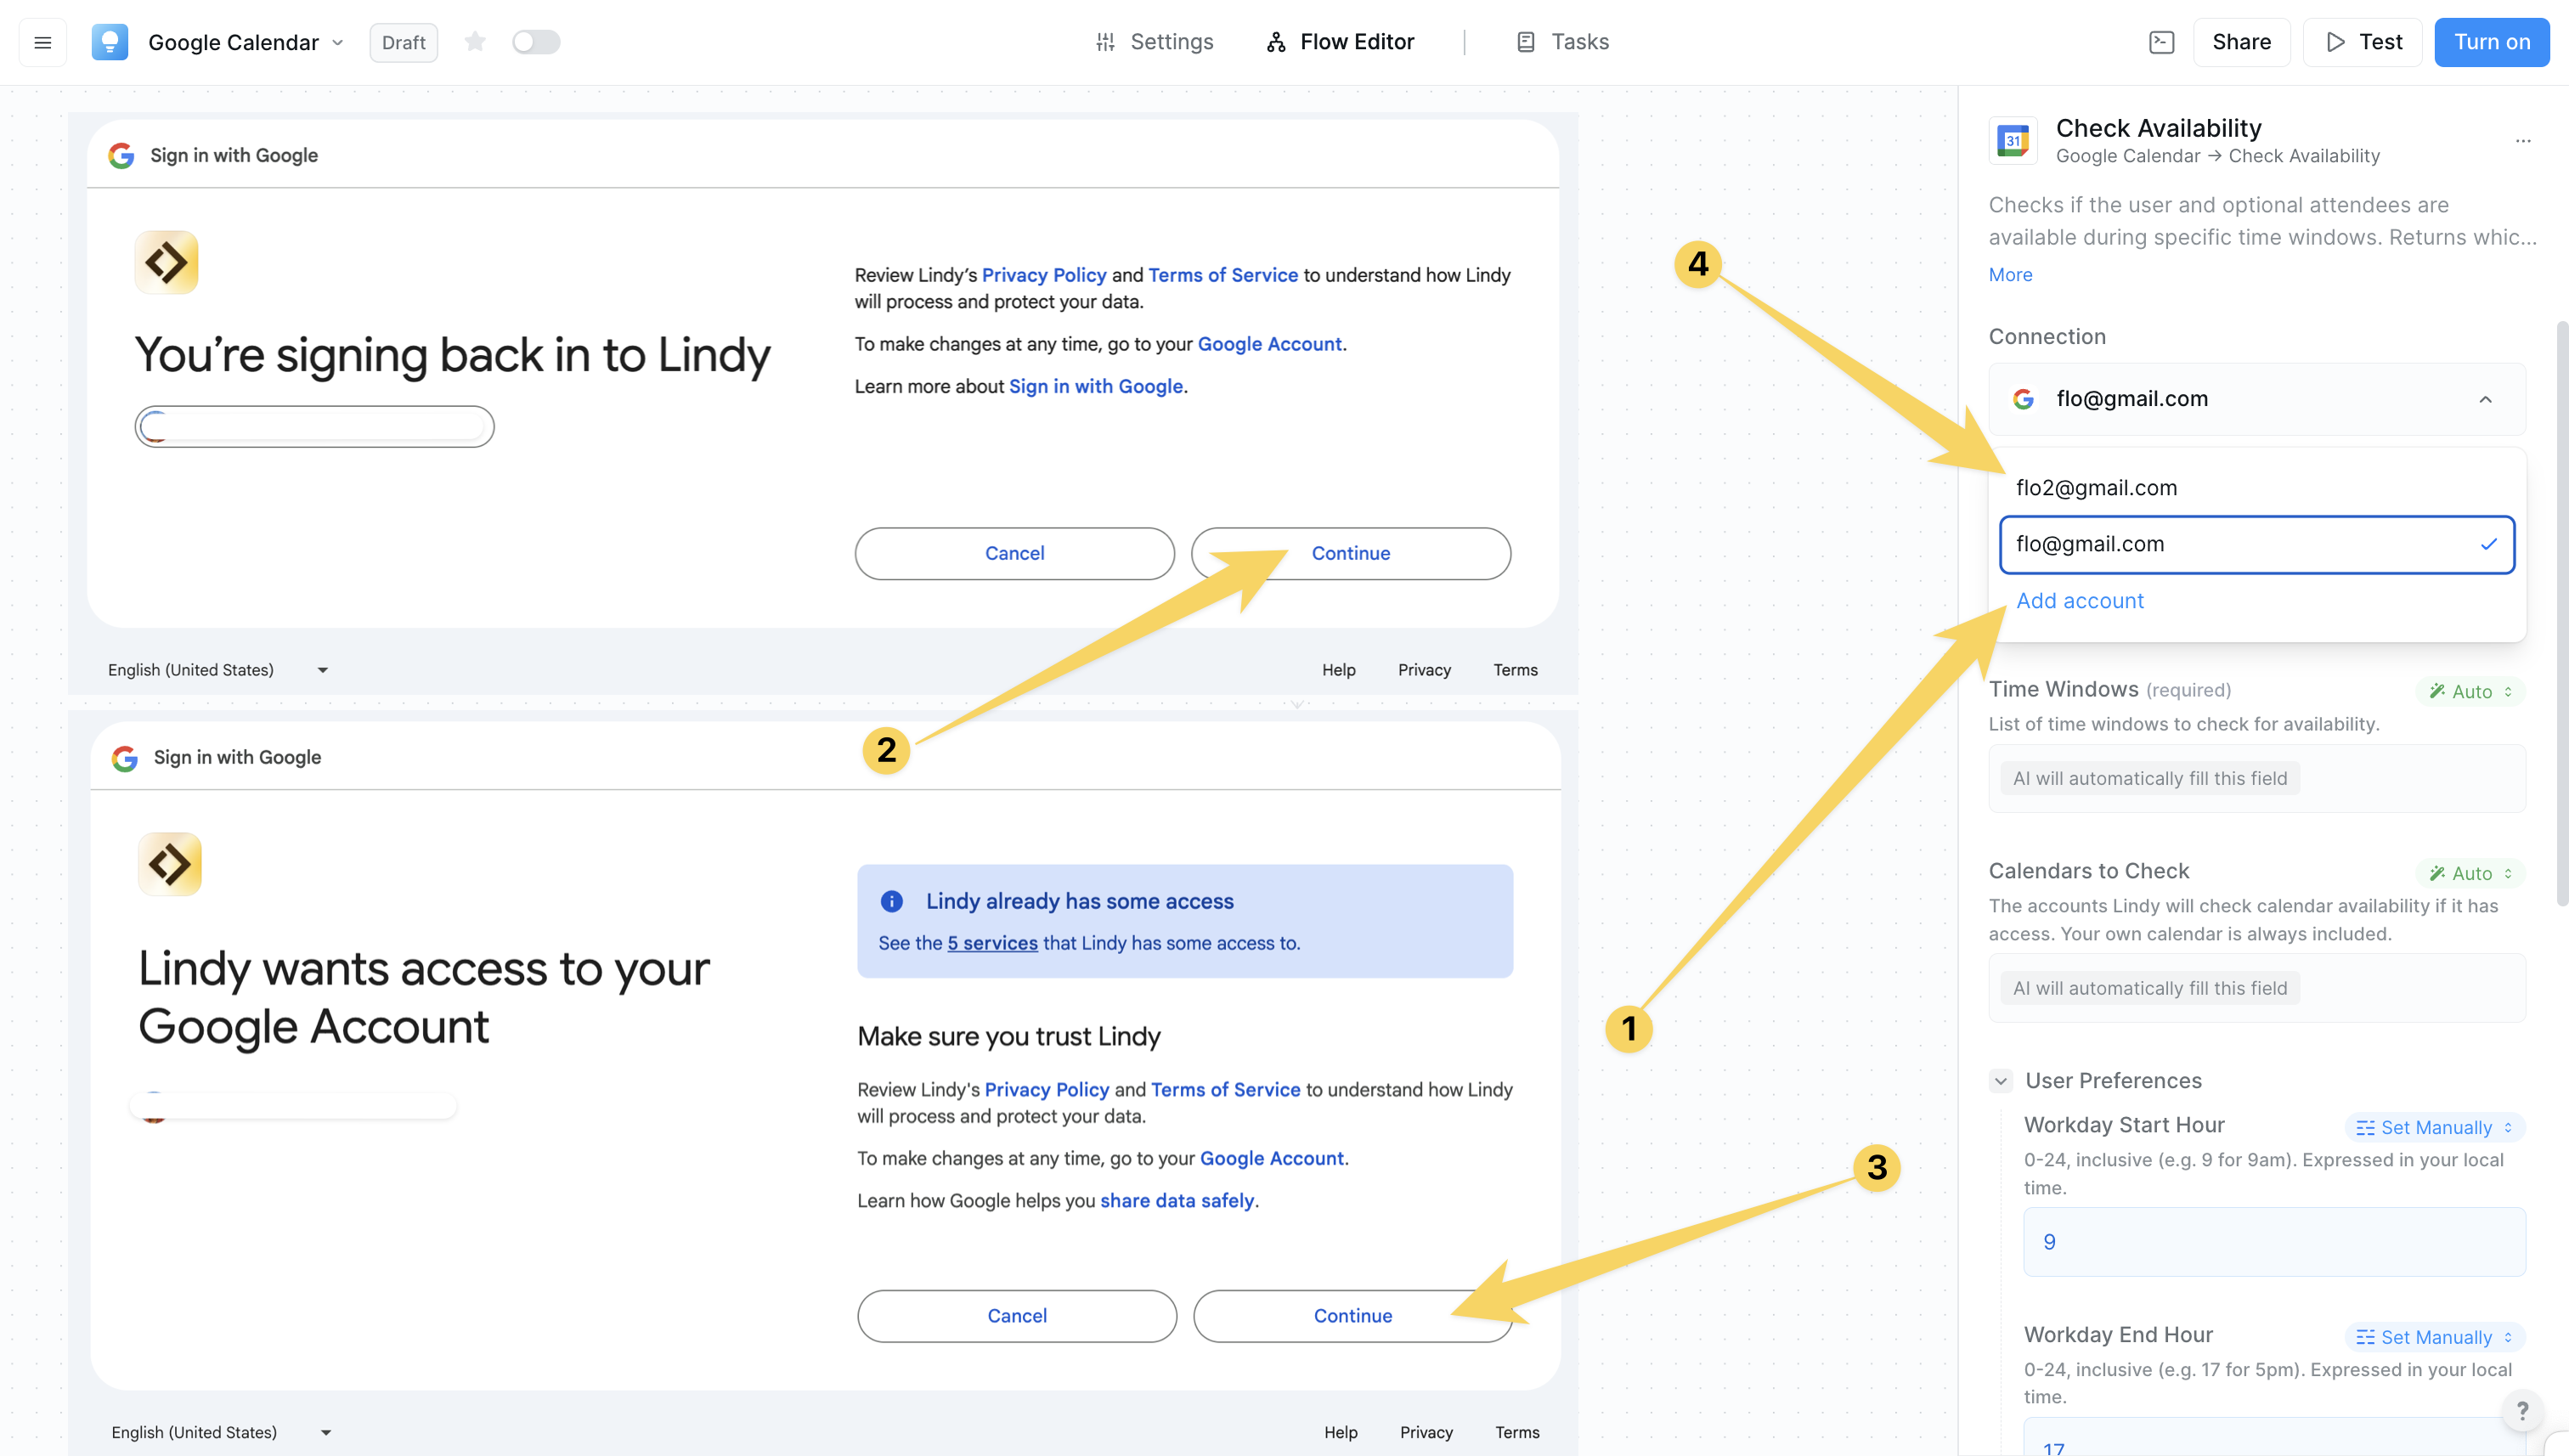 ## Google Calendar Triggers
#### Calendar Event Created
## Google Calendar Triggers
#### Calendar Event Created
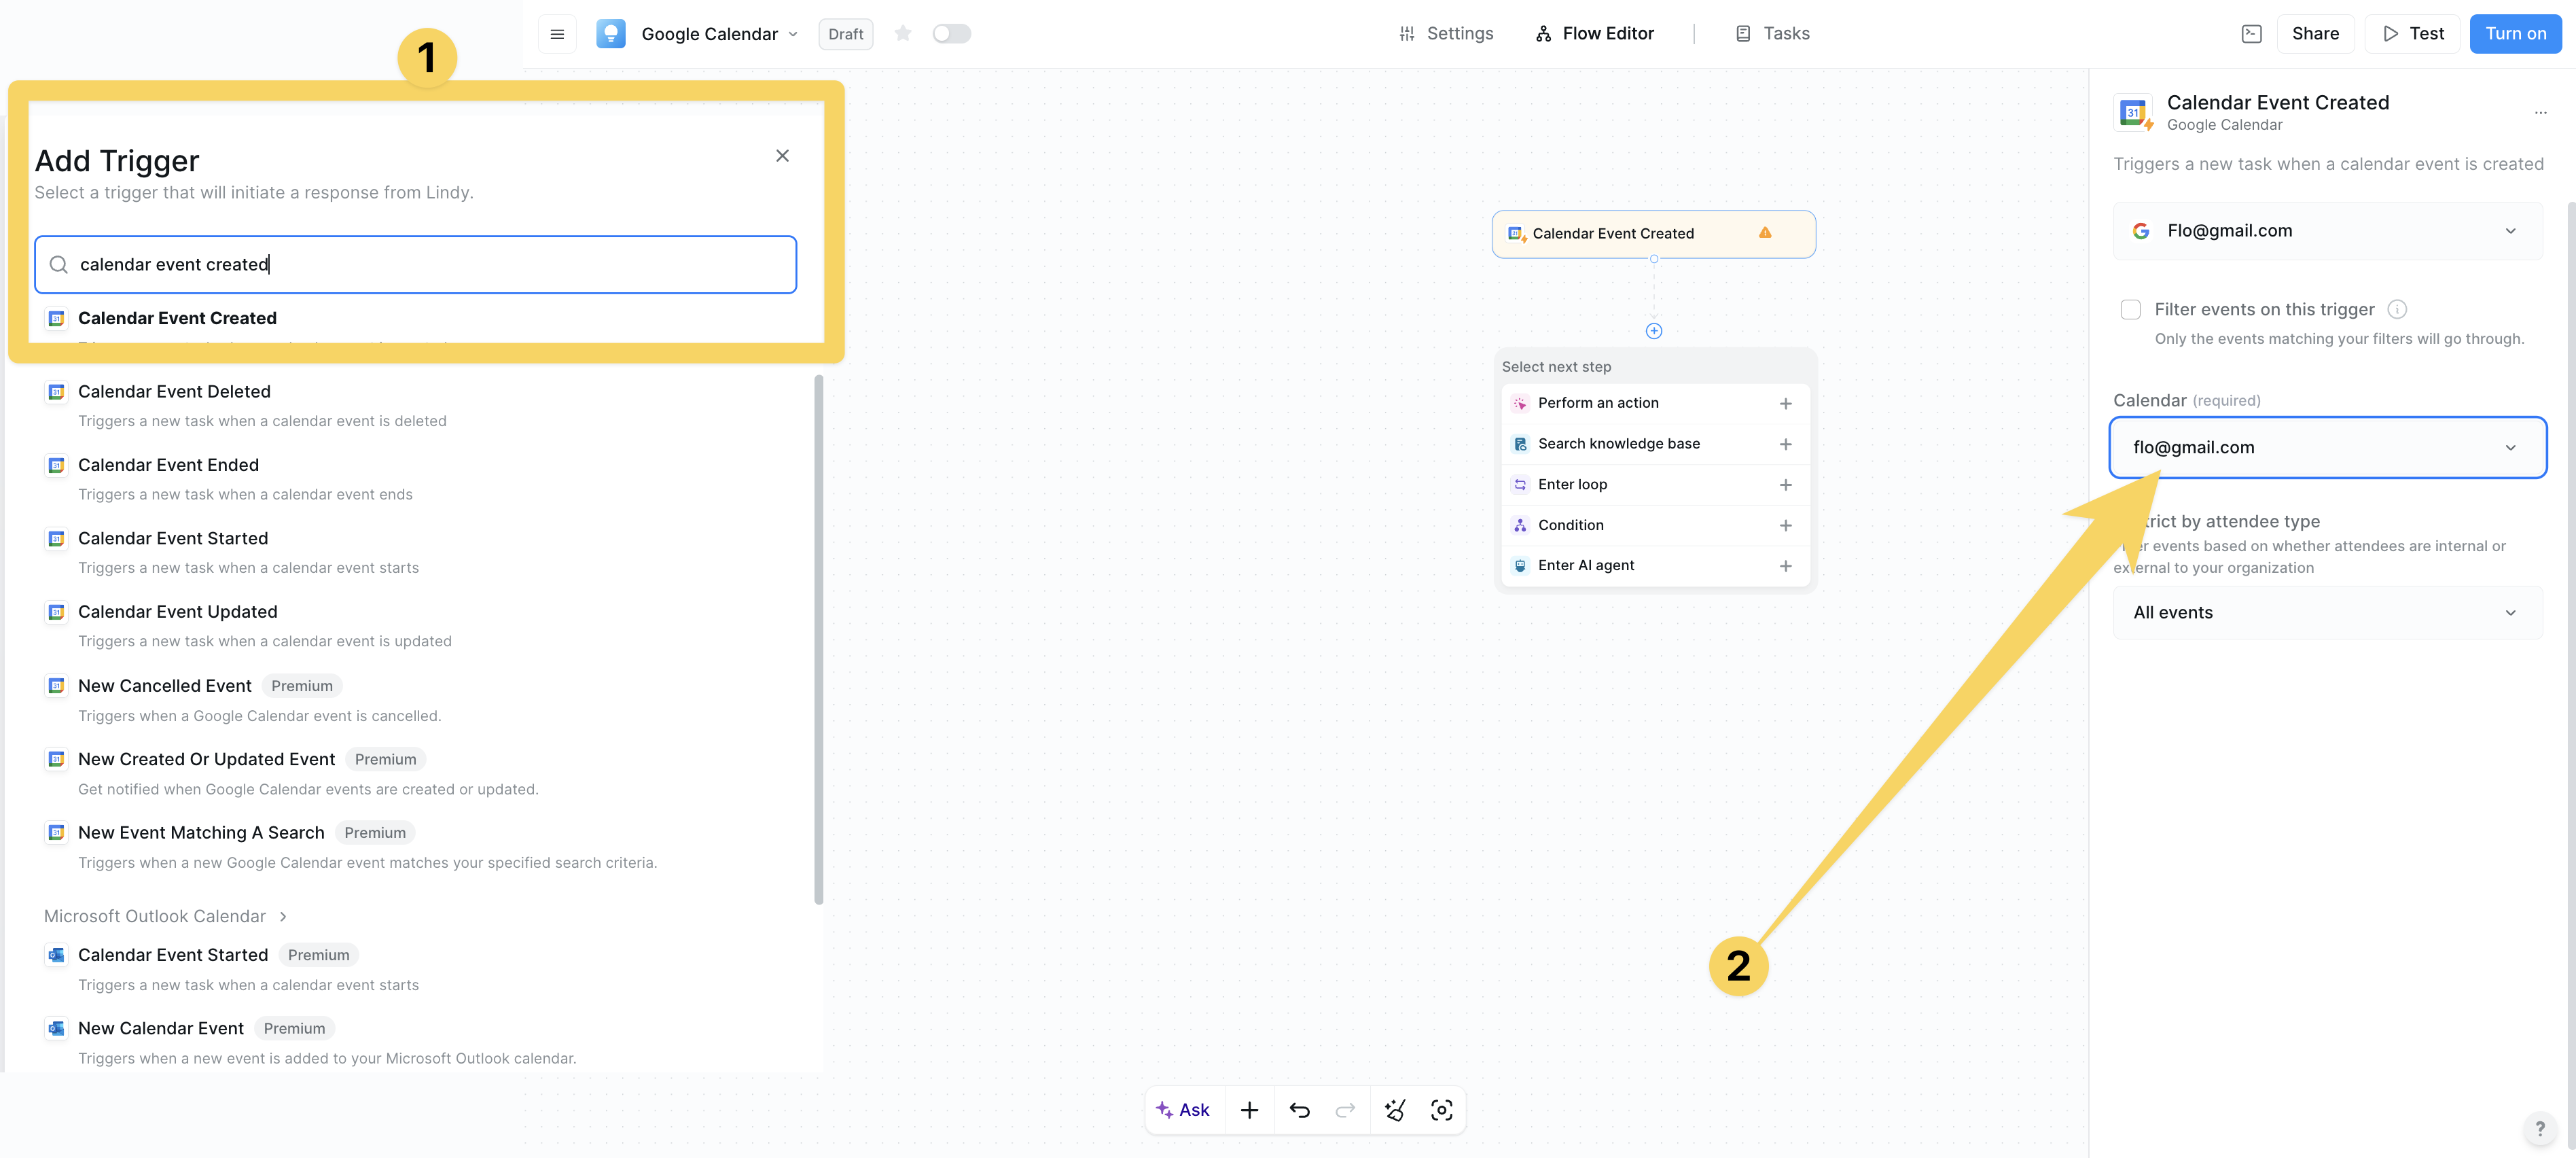 Activates when new events are added to calendars:
* Provides full event details, attendee information, timing
* Perfect for welcome sequences for new meetings, automatic preparation workflows
#### Calendar Event Updated
Activates when new events are added to calendars:
* Provides full event details, attendee information, timing
* Perfect for welcome sequences for new meetings, automatic preparation workflows
#### Calendar Event Updated
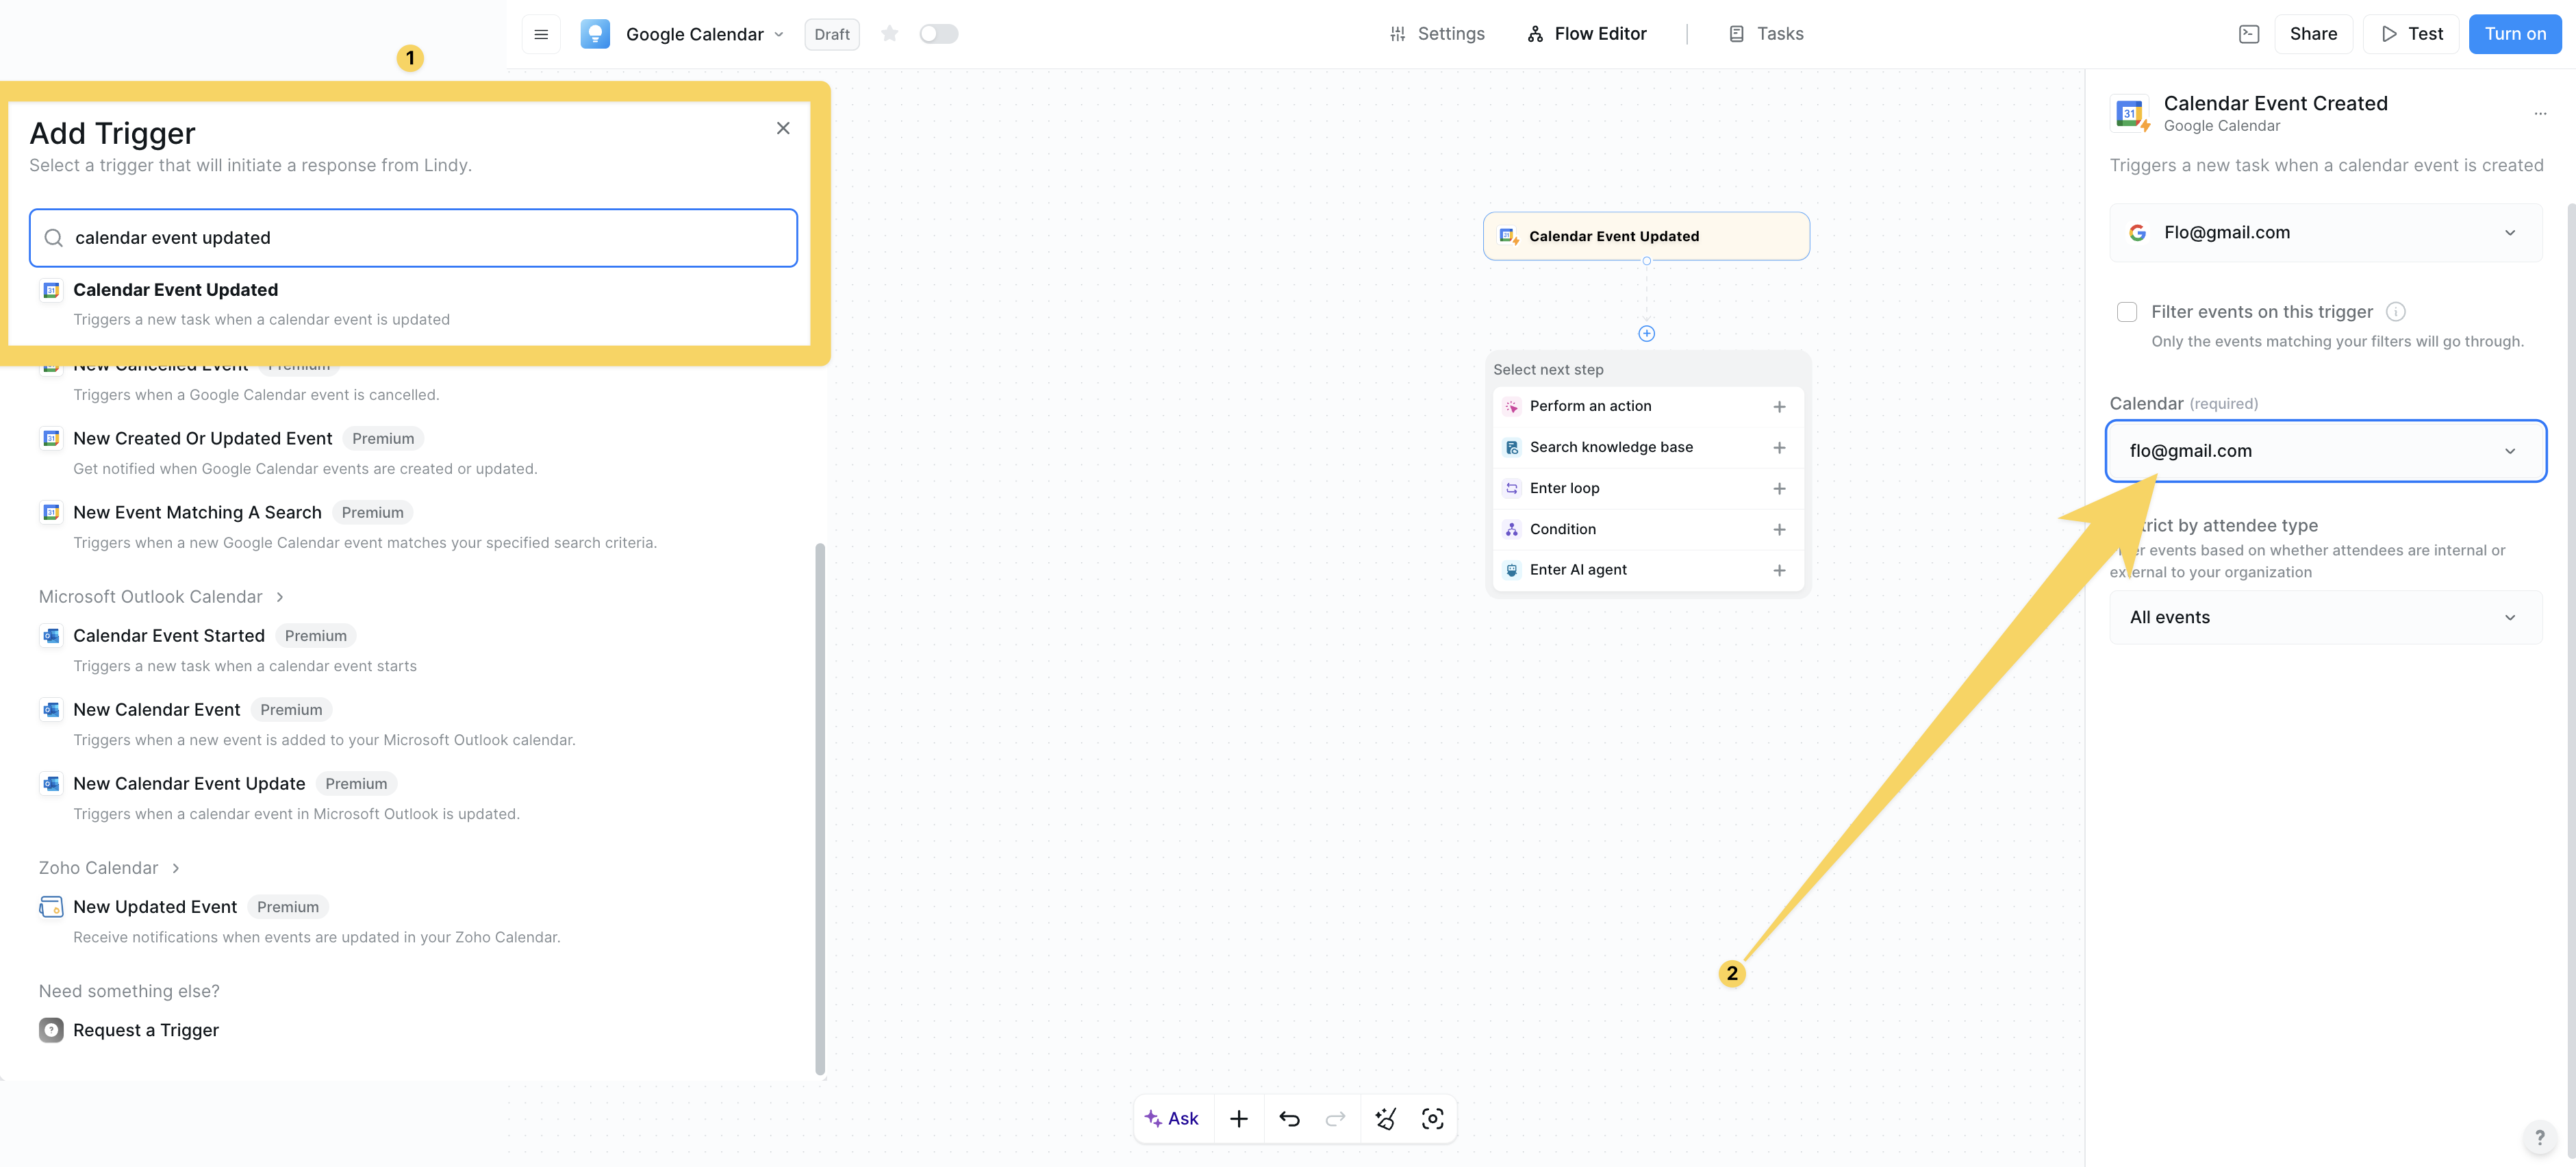 Triggers when existing events are modified:
* Provides both old and new event details for comparison
* Ideal for notification of changes, rescheduling workflows, attendee updates
#### Calendar Event Started
Triggers when existing events are modified:
* Provides both old and new event details for comparison
* Ideal for notification of changes, rescheduling workflows, attendee updates
#### Calendar Event Started
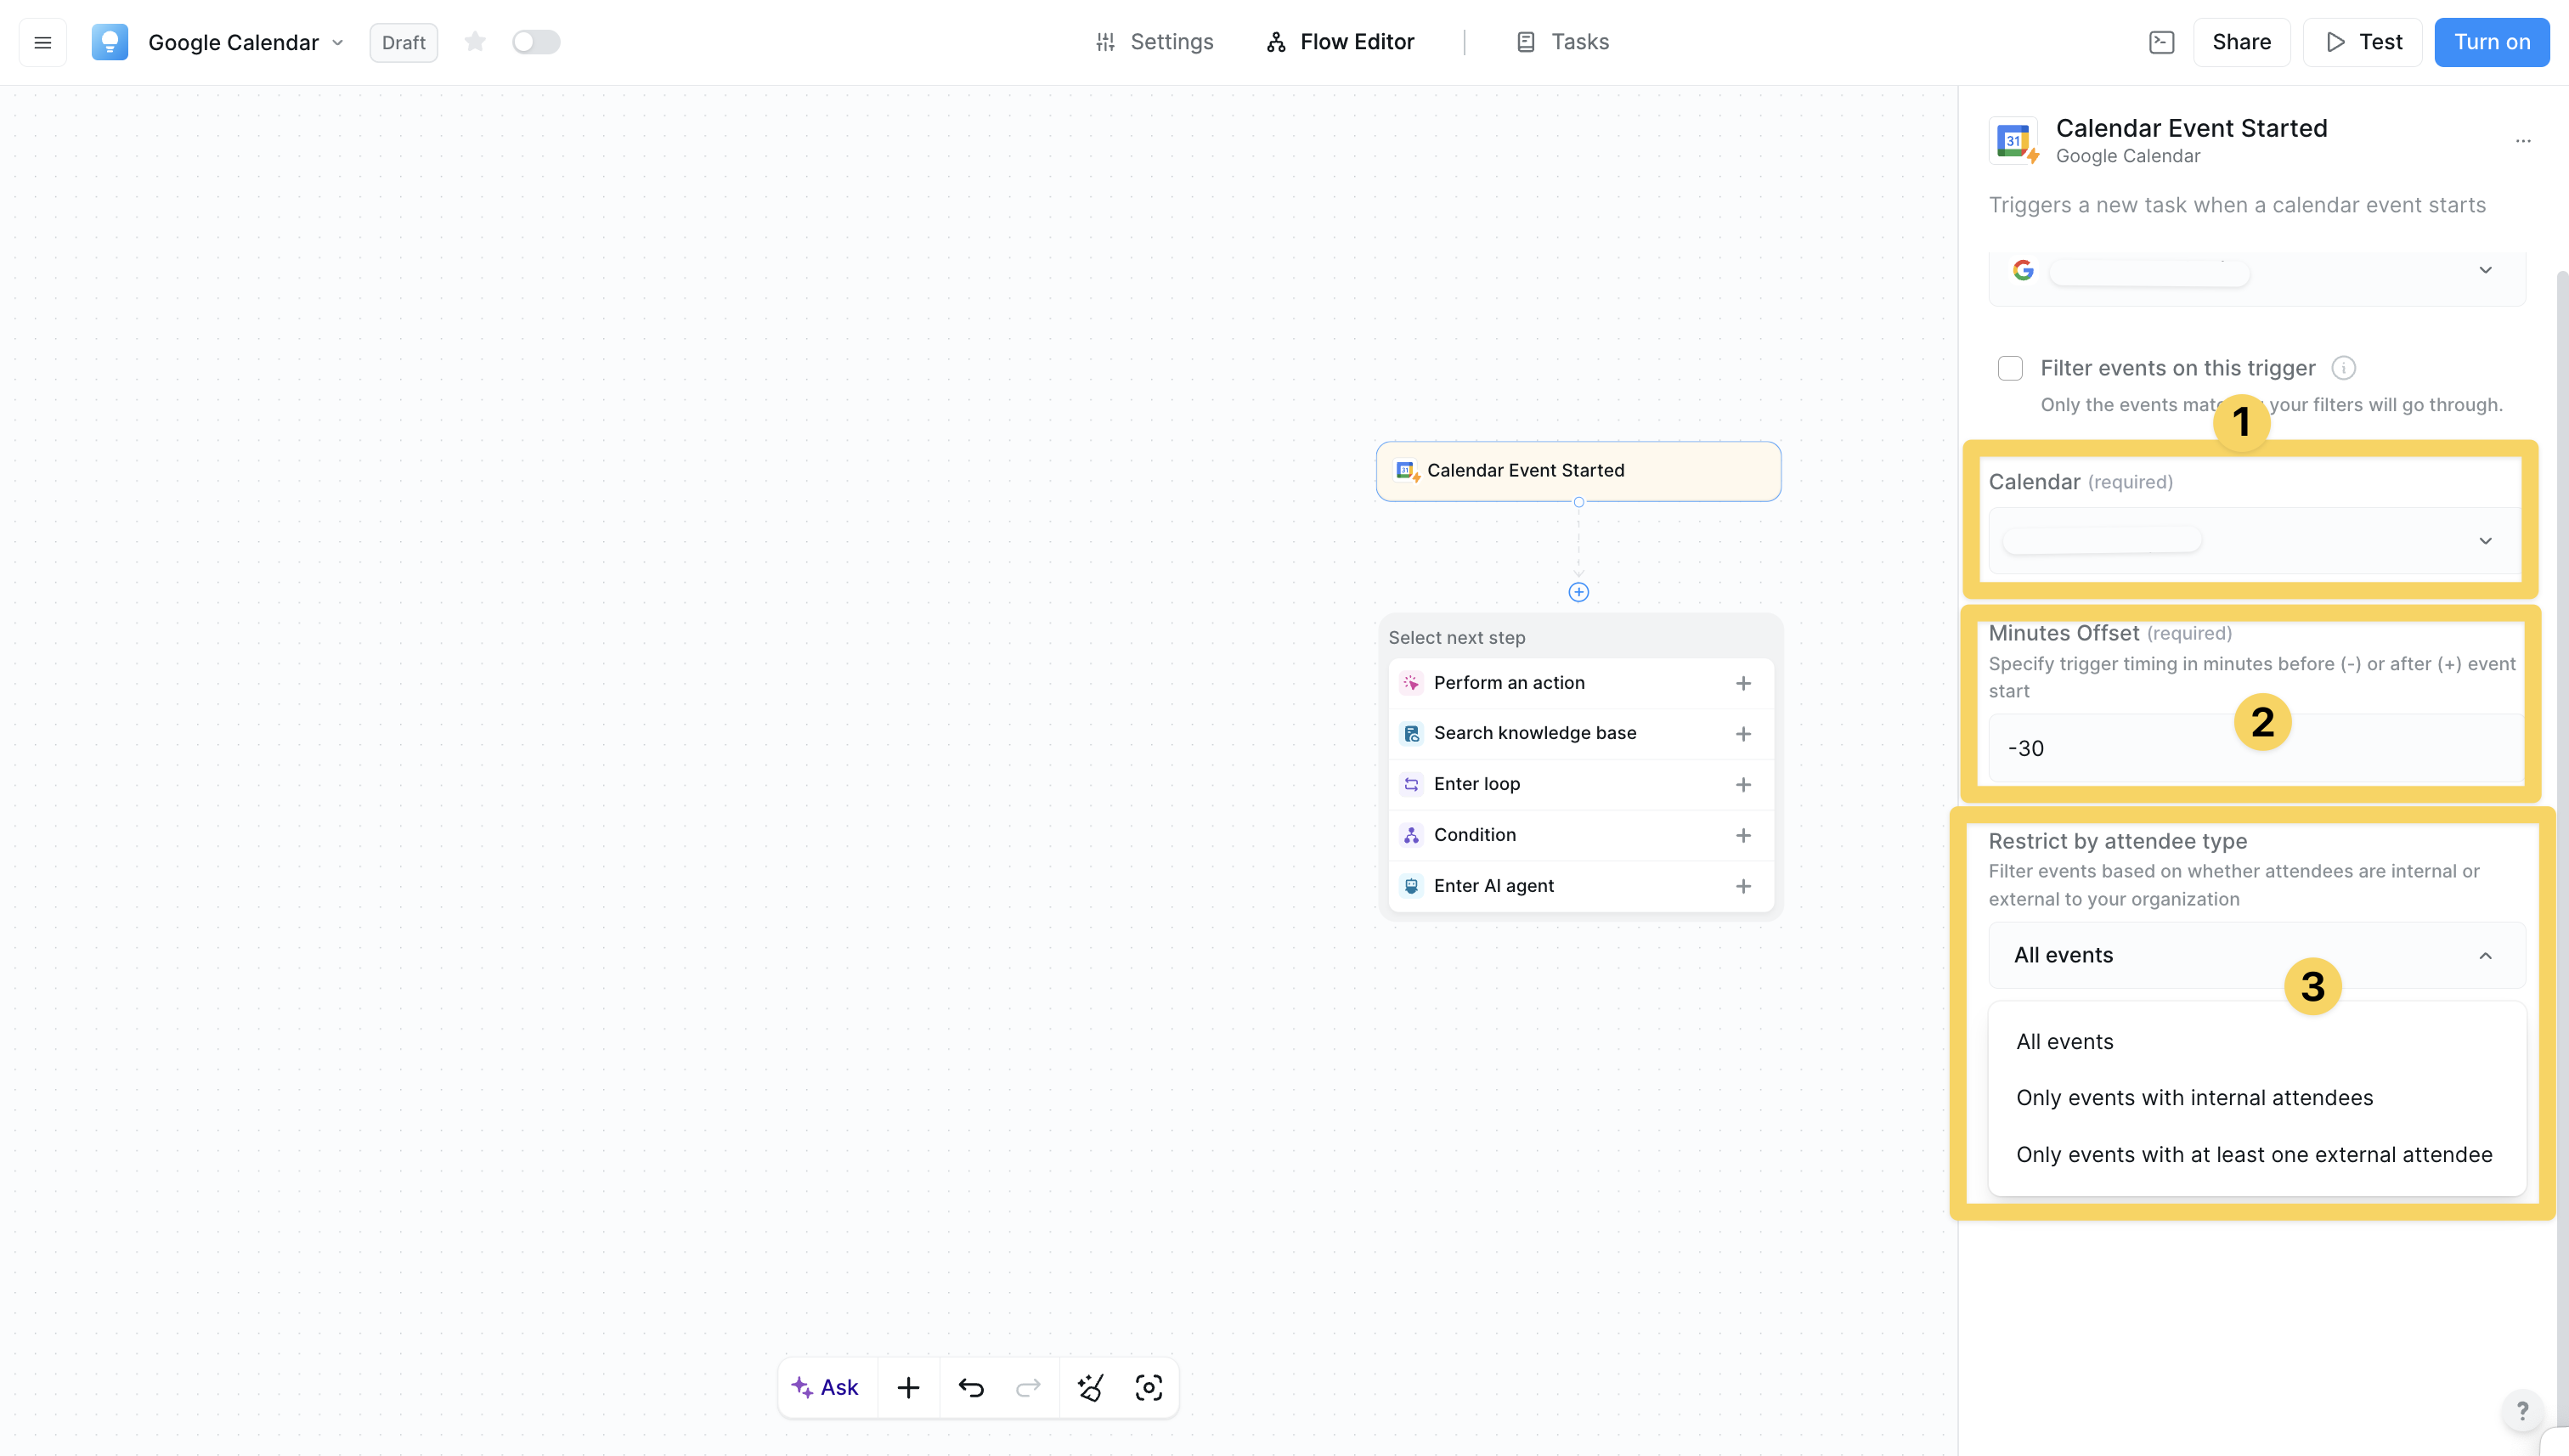 Triggers when events begin (at start time):
* Activates precisely at either the event start time, or you can configure it to start before/after a specific time from the meeting
* Ability to implement filters for the worklow based on the type of attendee
* Perfect for meeting join automation, preparation reminders, status updates
#### Calendar Event Ended
Triggers when events begin (at start time):
* Activates precisely at either the event start time, or you can configure it to start before/after a specific time from the meeting
* Ability to implement filters for the worklow based on the type of attendee
* Perfect for meeting join automation, preparation reminders, status updates
#### Calendar Event Ended
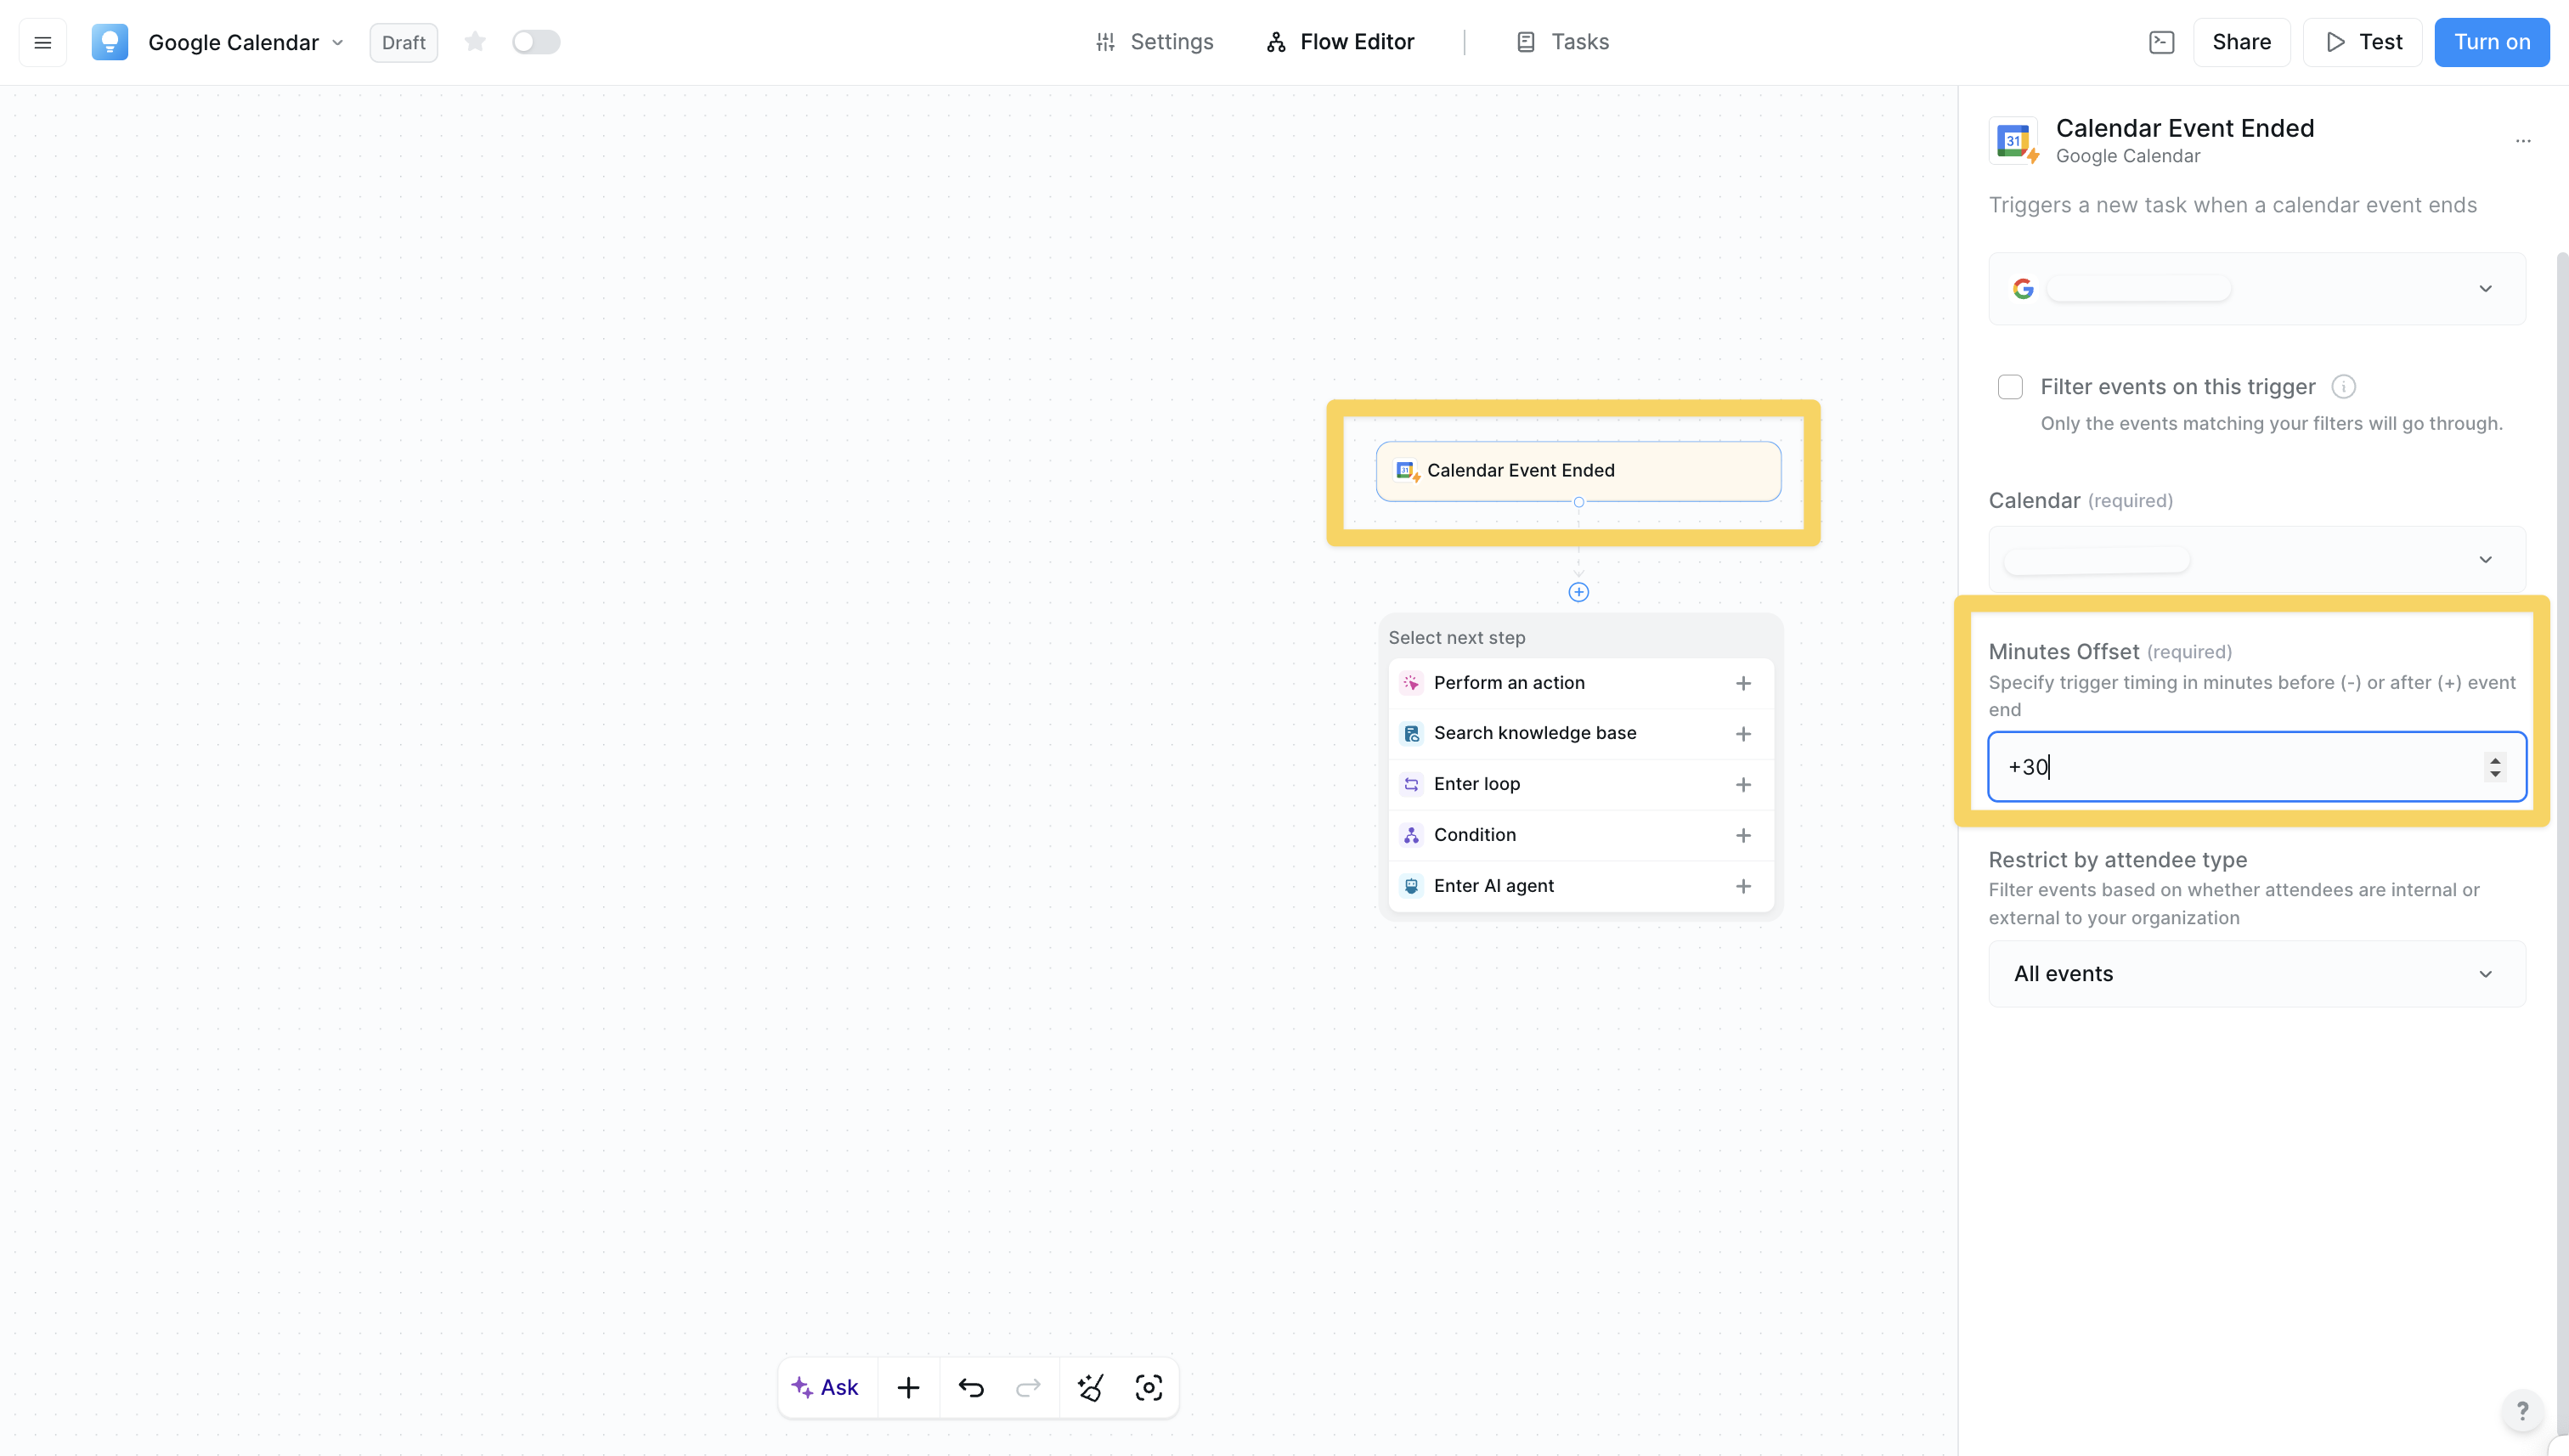 Activates when events conclude:
* Triggers at event end time with completed event details
* Ideal for follow-up actions, meeting summaries, next steps scheduling
#### New Event Matching A Search
Activates when events conclude:
* Triggers at event end time with completed event details
* Ideal for follow-up actions, meeting summaries, next steps scheduling
#### New Event Matching A Search
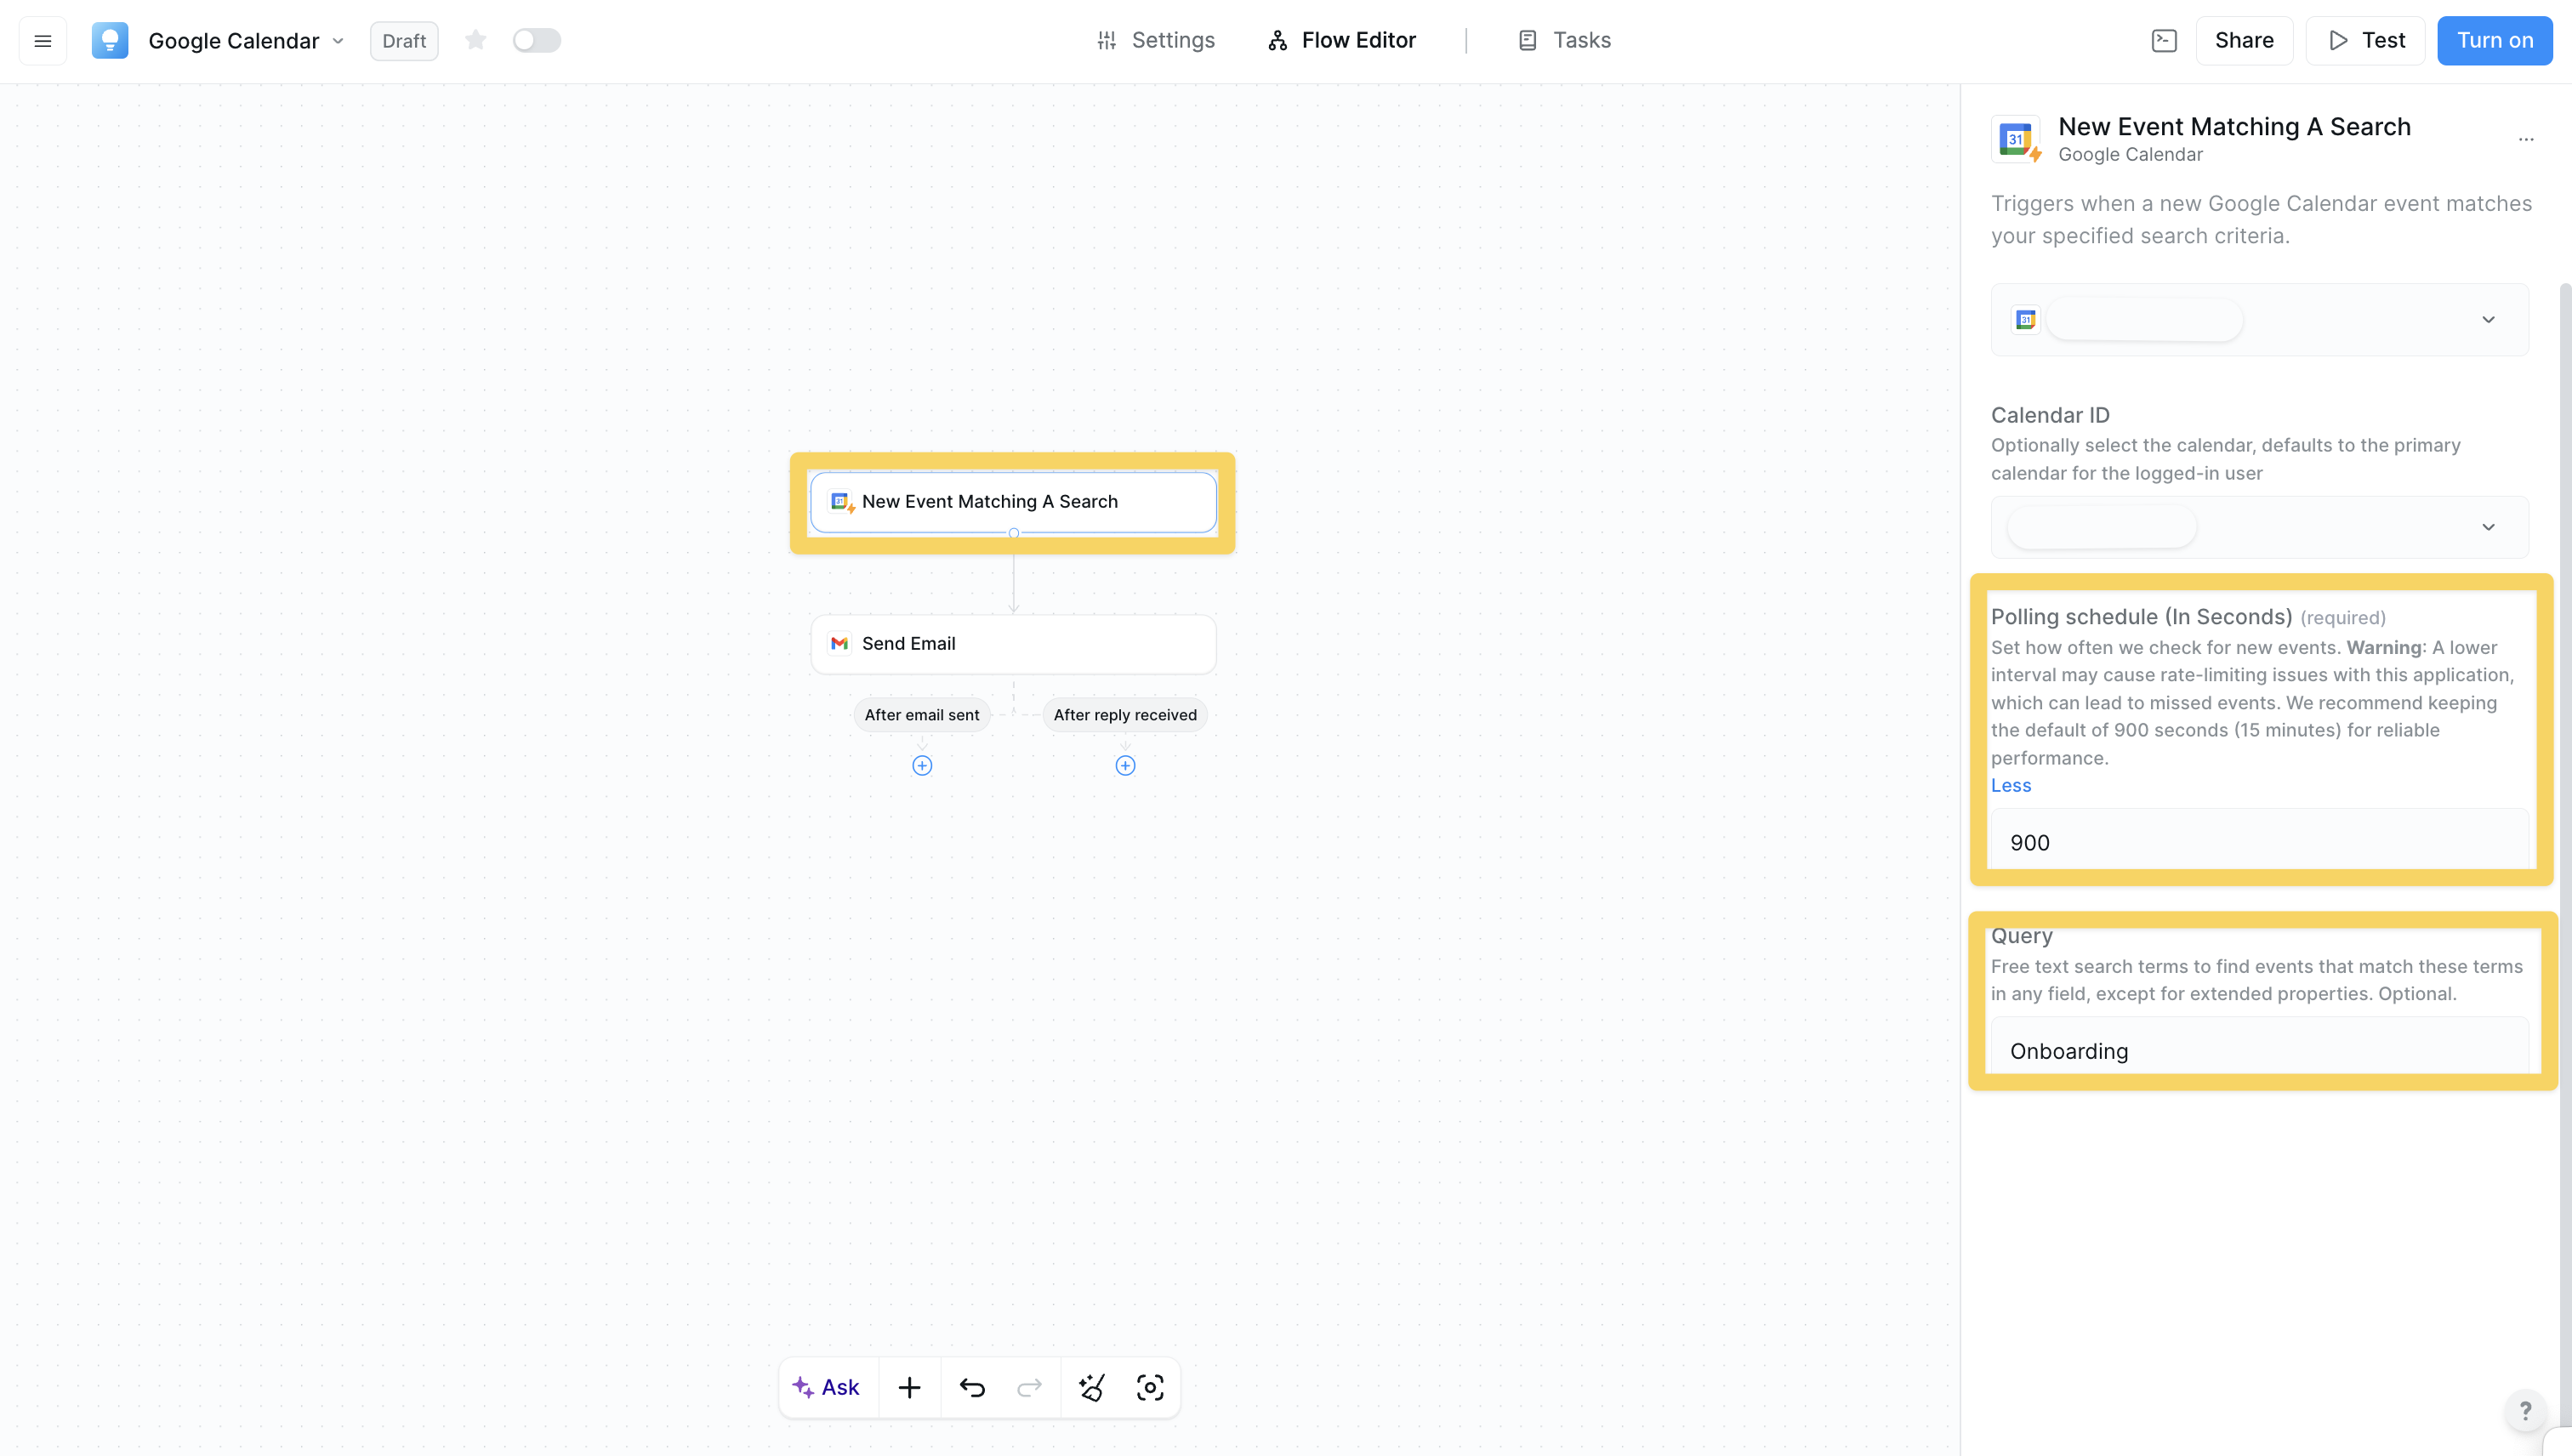 Triggers only for events matching specific criteria:
* **Polling schedule configuration** - Set how often to check for new events (configurable interval in seconds)
* **Query-based filtering** - Free text search terms to find events that match these terms in any field, except for extended properties
* Perfect for targeted workflows, specific meeting types, filtered processing based on event content
## Google Calendar Actions
#### Create Event
Creates new Google Calendar events with full customization:
* Complete event creation with title, description, date/time, location, attendees
* Supports recurring events, scheduling conflicts, timezone handling, custom notifications
* Perfect for scheduling meetings, blocking time for tasks, creating reminders
#### Add Quick Event
Rapidly create events using natural language descriptions:
* Parses natural language like "Meeting with John tomorrow at 2pm"
* Faster than structured event creation for simple events
* Ideal for quick event creation from emails, chat messages, or voice commands
#### Update Event
Modifies existing calendar events:
* Change any event property (time, attendees, location, description) in collaboration with any trigger
* Handles partial updates without affecting unchanged properties
* Perfect for rescheduling meetings, updating attendee lists, changing locations
#### Check Availability
Verifies if users/attendees are free during specific time windows:
* Multi-person availability checking with conflict detection
* Returns detailed availability windows, considers multiple calendars
* Essential for pre-meeting scheduling validation and avoiding double-booking
#### Find Available Times
Intelligently finds optimal meeting times between 2 or more calendars:
* Analyzes multiple calendars simultaneously (perfect for meeting with internal org members)
* Considers user preferences (working hours, preferred days)
* Accounts for meeting buffers and daily meeting limits
* Handles timezone differences automatically
#### Get Event Details
Triggers only for events matching specific criteria:
* **Polling schedule configuration** - Set how often to check for new events (configurable interval in seconds)
* **Query-based filtering** - Free text search terms to find events that match these terms in any field, except for extended properties
* Perfect for targeted workflows, specific meeting types, filtered processing based on event content
## Google Calendar Actions
#### Create Event
Creates new Google Calendar events with full customization:
* Complete event creation with title, description, date/time, location, attendees
* Supports recurring events, scheduling conflicts, timezone handling, custom notifications
* Perfect for scheduling meetings, blocking time for tasks, creating reminders
#### Add Quick Event
Rapidly create events using natural language descriptions:
* Parses natural language like "Meeting with John tomorrow at 2pm"
* Faster than structured event creation for simple events
* Ideal for quick event creation from emails, chat messages, or voice commands
#### Update Event
Modifies existing calendar events:
* Change any event property (time, attendees, location, description) in collaboration with any trigger
* Handles partial updates without affecting unchanged properties
* Perfect for rescheduling meetings, updating attendee lists, changing locations
#### Check Availability
Verifies if users/attendees are free during specific time windows:
* Multi-person availability checking with conflict detection
* Returns detailed availability windows, considers multiple calendars
* Essential for pre-meeting scheduling validation and avoiding double-booking
#### Find Available Times
Intelligently finds optimal meeting times between 2 or more calendars:
* Analyzes multiple calendars simultaneously (perfect for meeting with internal org members)
* Considers user preferences (working hours, preferred days)
* Accounts for meeting buffers and daily meeting limits
* Handles timezone differences automatically
#### Get Event Details
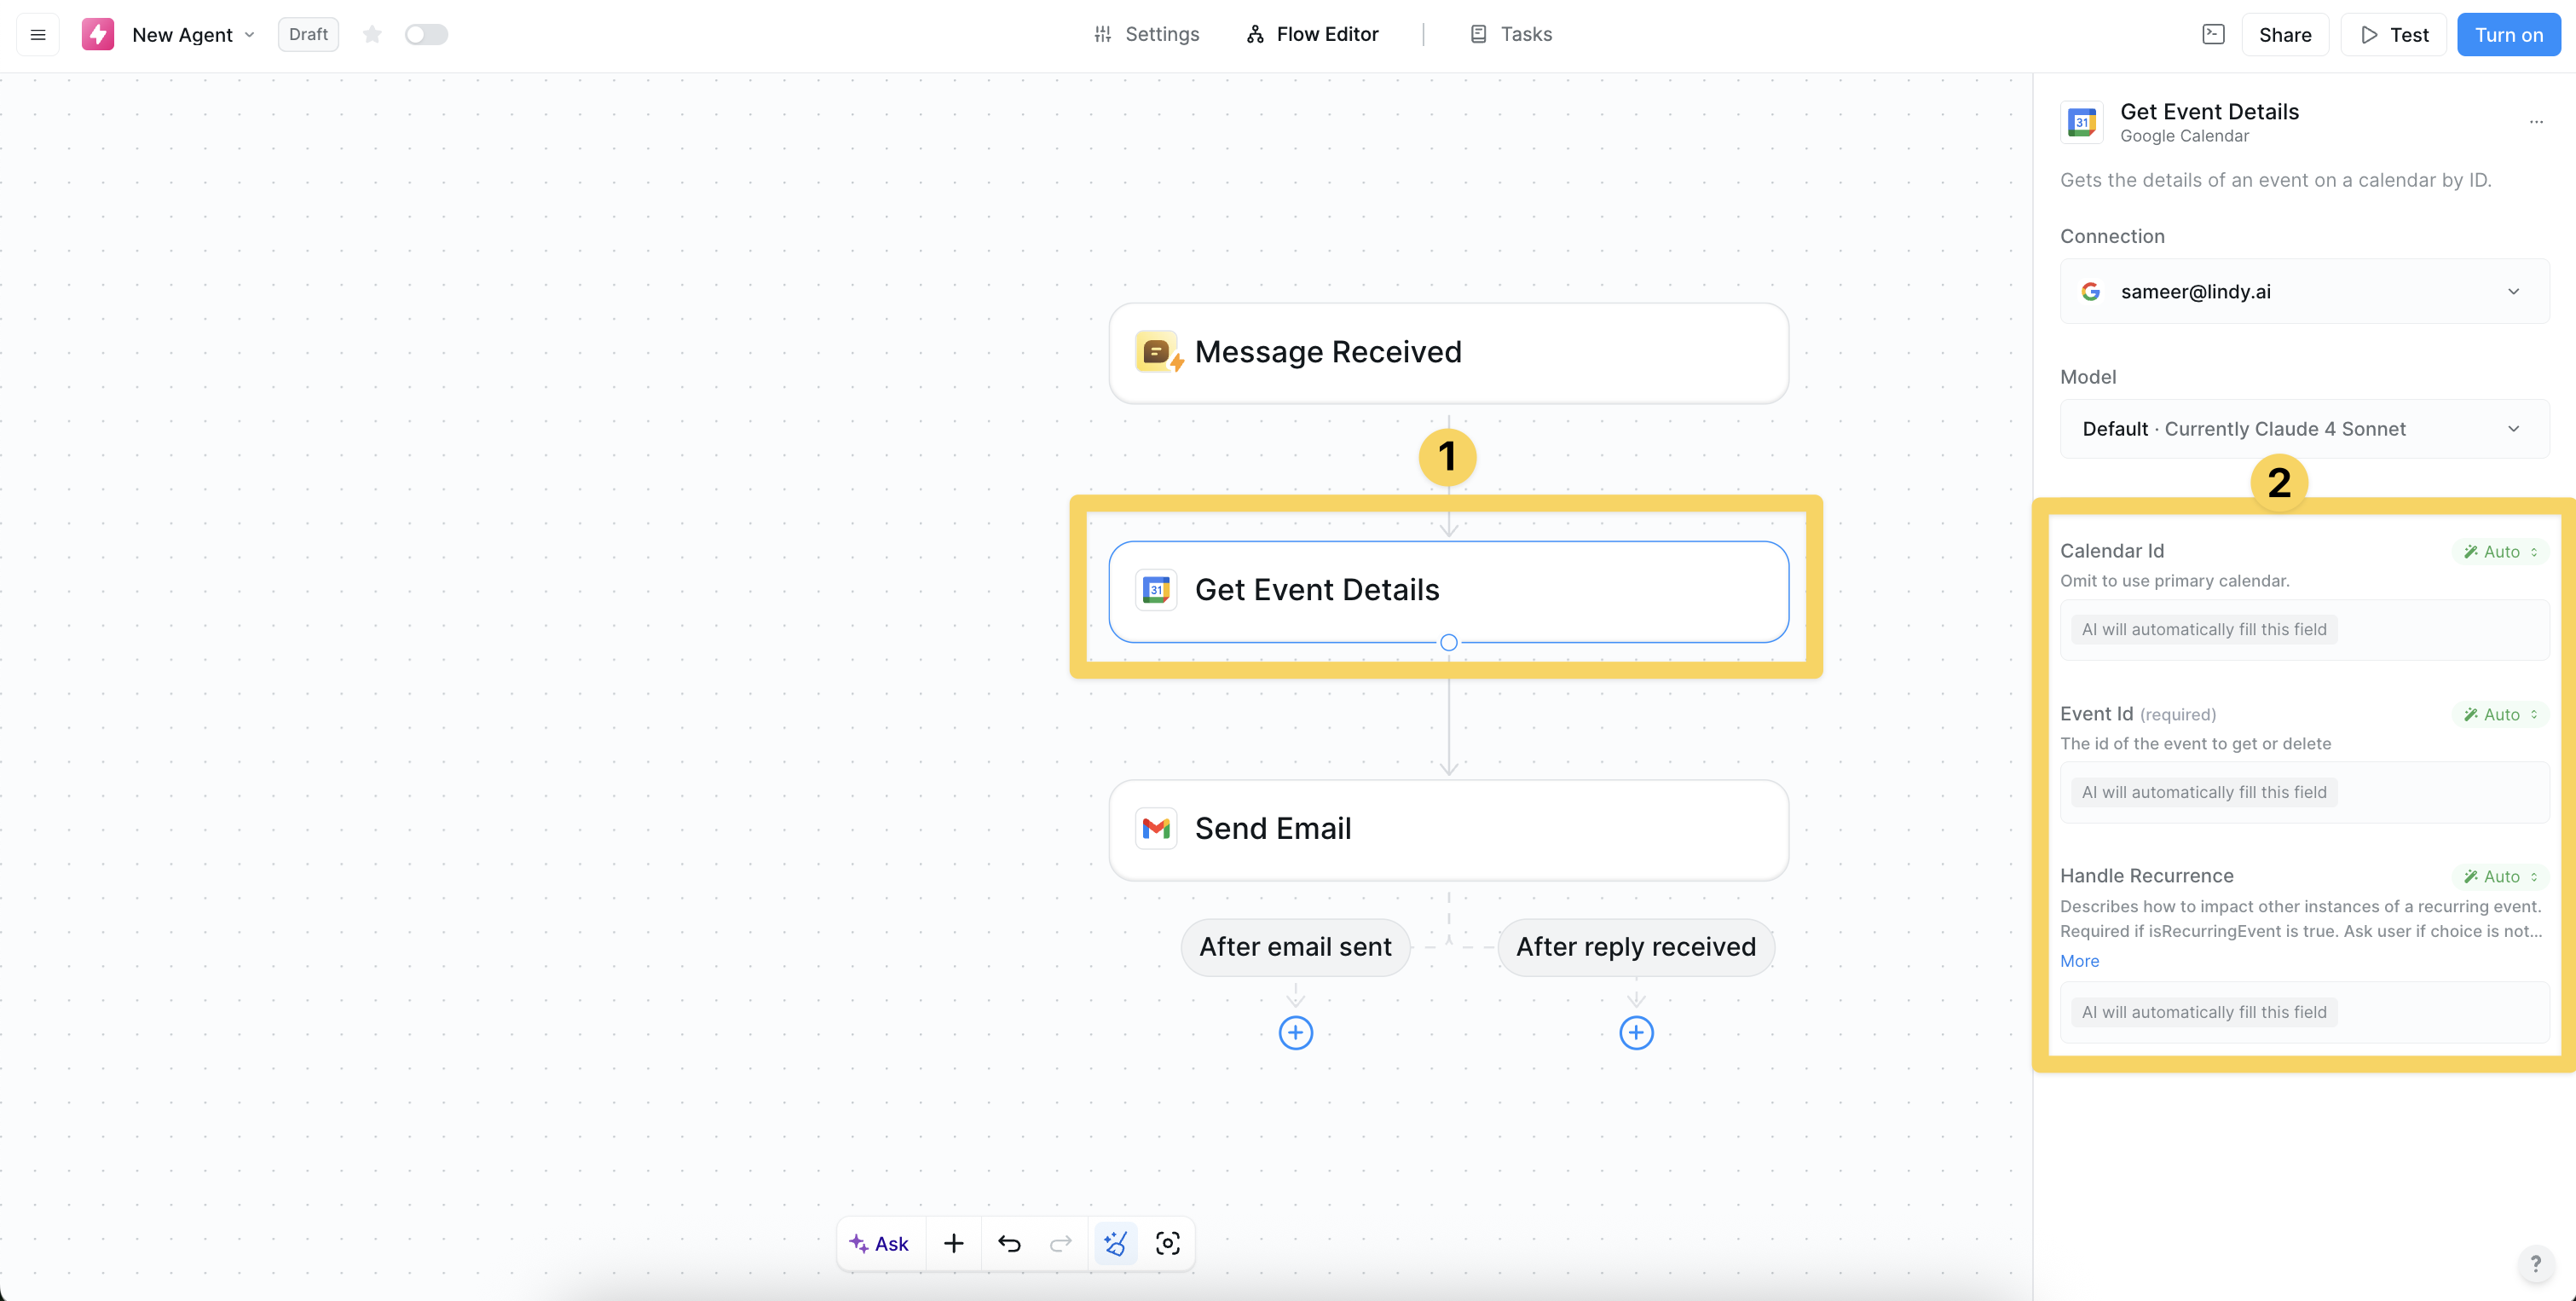 Retrieves comprehensive information about specific events:
* Returns all event metadata (attendees, location, description, etc.)
* Perfect for event information lookup, meeting preparation, status checking
#### View Events
Retrieves comprehensive information about specific events:
* Returns all event metadata (attendees, location, description, etc.)
* Perfect for event information lookup, meeting preparation, status checking
#### View Events
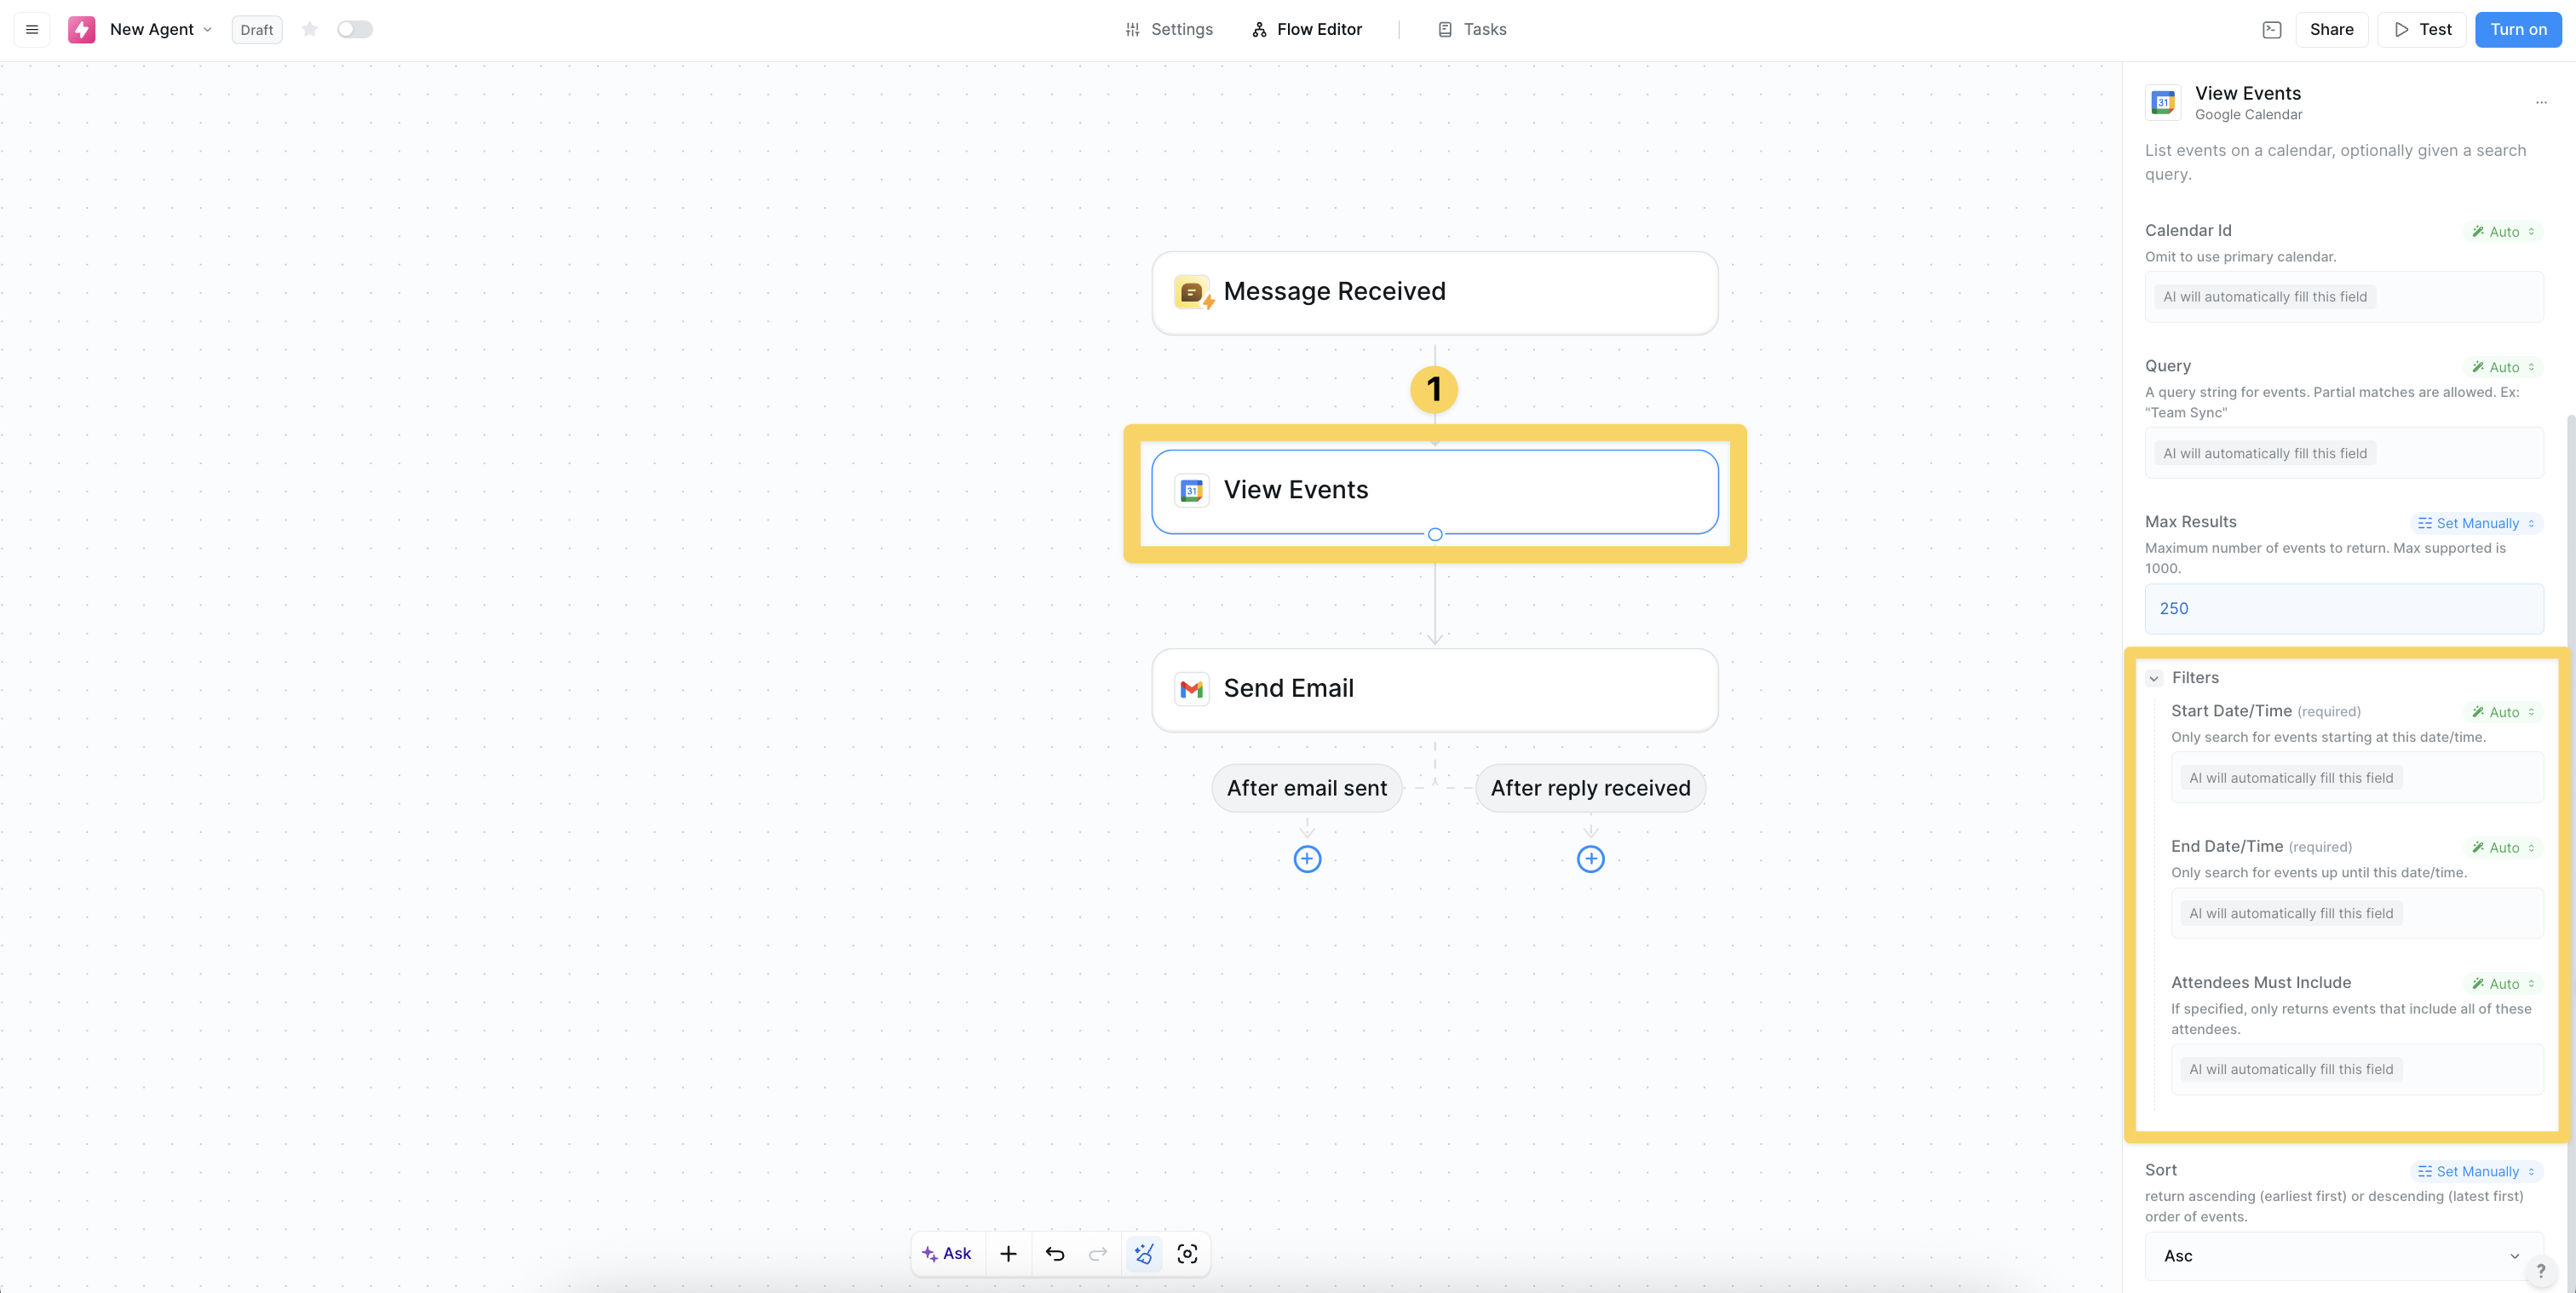 Lists events from calendars with optional filtering:
* Search by date range, keywords, attendee, or other criteria
* Supports complex search queries and date range filtering
* Ideal for calendar overview, finding specific meetings, schedule analysis
Use the "Find Available Times" action combined with "Check Availability" for the most intelligent scheduling workflows.
## Example scheduling workflow
## Best Practices
Get the most out of your calendar automation:
* Use "Find Available Times" and "Check Availability" together for better meeting scheduling
* Set your working hours so Lindy knows when you're available
* Add buffer time between meetings to avoid back-to-back scheduling
Choose the right triggers for your needs:
* Start with specific triggers instead of monitoring all calendar events
* Add filters to focus on the events that matter to you
* Test your triggers with a few events before scaling up
Work with multiple calendars seamlessly:
* Include both work and personal calendars when checking availability
* Be mindful of timezone differences when scheduling with remote teams
* Make sure you have the right permissions for shared calendars
## Next steps
Combine calendar with email automation
Connect calendar events to team communication
Build intelligent meeting schedulers
Set up calendar-based triggers
# Google Docs
Source: https://docs.lindy.ai/skills/popular-integrations/google-docs
## Quick Overview
Google Docs integration enables your AI agents to become document management assistants. Create, edit, and manage documents automatically with both triggers and actions for complete document workflow automation.
Key benefits of Google Docs integration:
* **Automated document creation** – Generate docs from templates with dynamic data
* **Real-time content management** – Update and edit documents automatically
* **AI-driven editing** – Intelligent text processing and formatting
* **Approval workflows** – Streamlined document review and approval processes
## How to set up Google Docs
Click on the plus sign at the bottom or right-click anywhere on the canvas and select "Add Trigger" or "Add Action" from the pop-up menu and choose "Google Docs"
Lists events from calendars with optional filtering:
* Search by date range, keywords, attendee, or other criteria
* Supports complex search queries and date range filtering
* Ideal for calendar overview, finding specific meetings, schedule analysis
Use the "Find Available Times" action combined with "Check Availability" for the most intelligent scheduling workflows.
## Example scheduling workflow
## Best Practices
Get the most out of your calendar automation:
* Use "Find Available Times" and "Check Availability" together for better meeting scheduling
* Set your working hours so Lindy knows when you're available
* Add buffer time between meetings to avoid back-to-back scheduling
Choose the right triggers for your needs:
* Start with specific triggers instead of monitoring all calendar events
* Add filters to focus on the events that matter to you
* Test your triggers with a few events before scaling up
Work with multiple calendars seamlessly:
* Include both work and personal calendars when checking availability
* Be mindful of timezone differences when scheduling with remote teams
* Make sure you have the right permissions for shared calendars
## Next steps
Combine calendar with email automation
Connect calendar events to team communication
Build intelligent meeting schedulers
Set up calendar-based triggers
# Google Docs
Source: https://docs.lindy.ai/skills/popular-integrations/google-docs
## Quick Overview
Google Docs integration enables your AI agents to become document management assistants. Create, edit, and manage documents automatically with both triggers and actions for complete document workflow automation.
Key benefits of Google Docs integration:
* **Automated document creation** – Generate docs from templates with dynamic data
* **Real-time content management** – Update and edit documents automatically
* **AI-driven editing** – Intelligent text processing and formatting
* **Approval workflows** – Streamlined document review and approval processes
## How to set up Google Docs
Click on the plus sign at the bottom or right-click anywhere on the canvas and select "Add Trigger" or "Add Action" from the pop-up menu and choose "Google Docs"
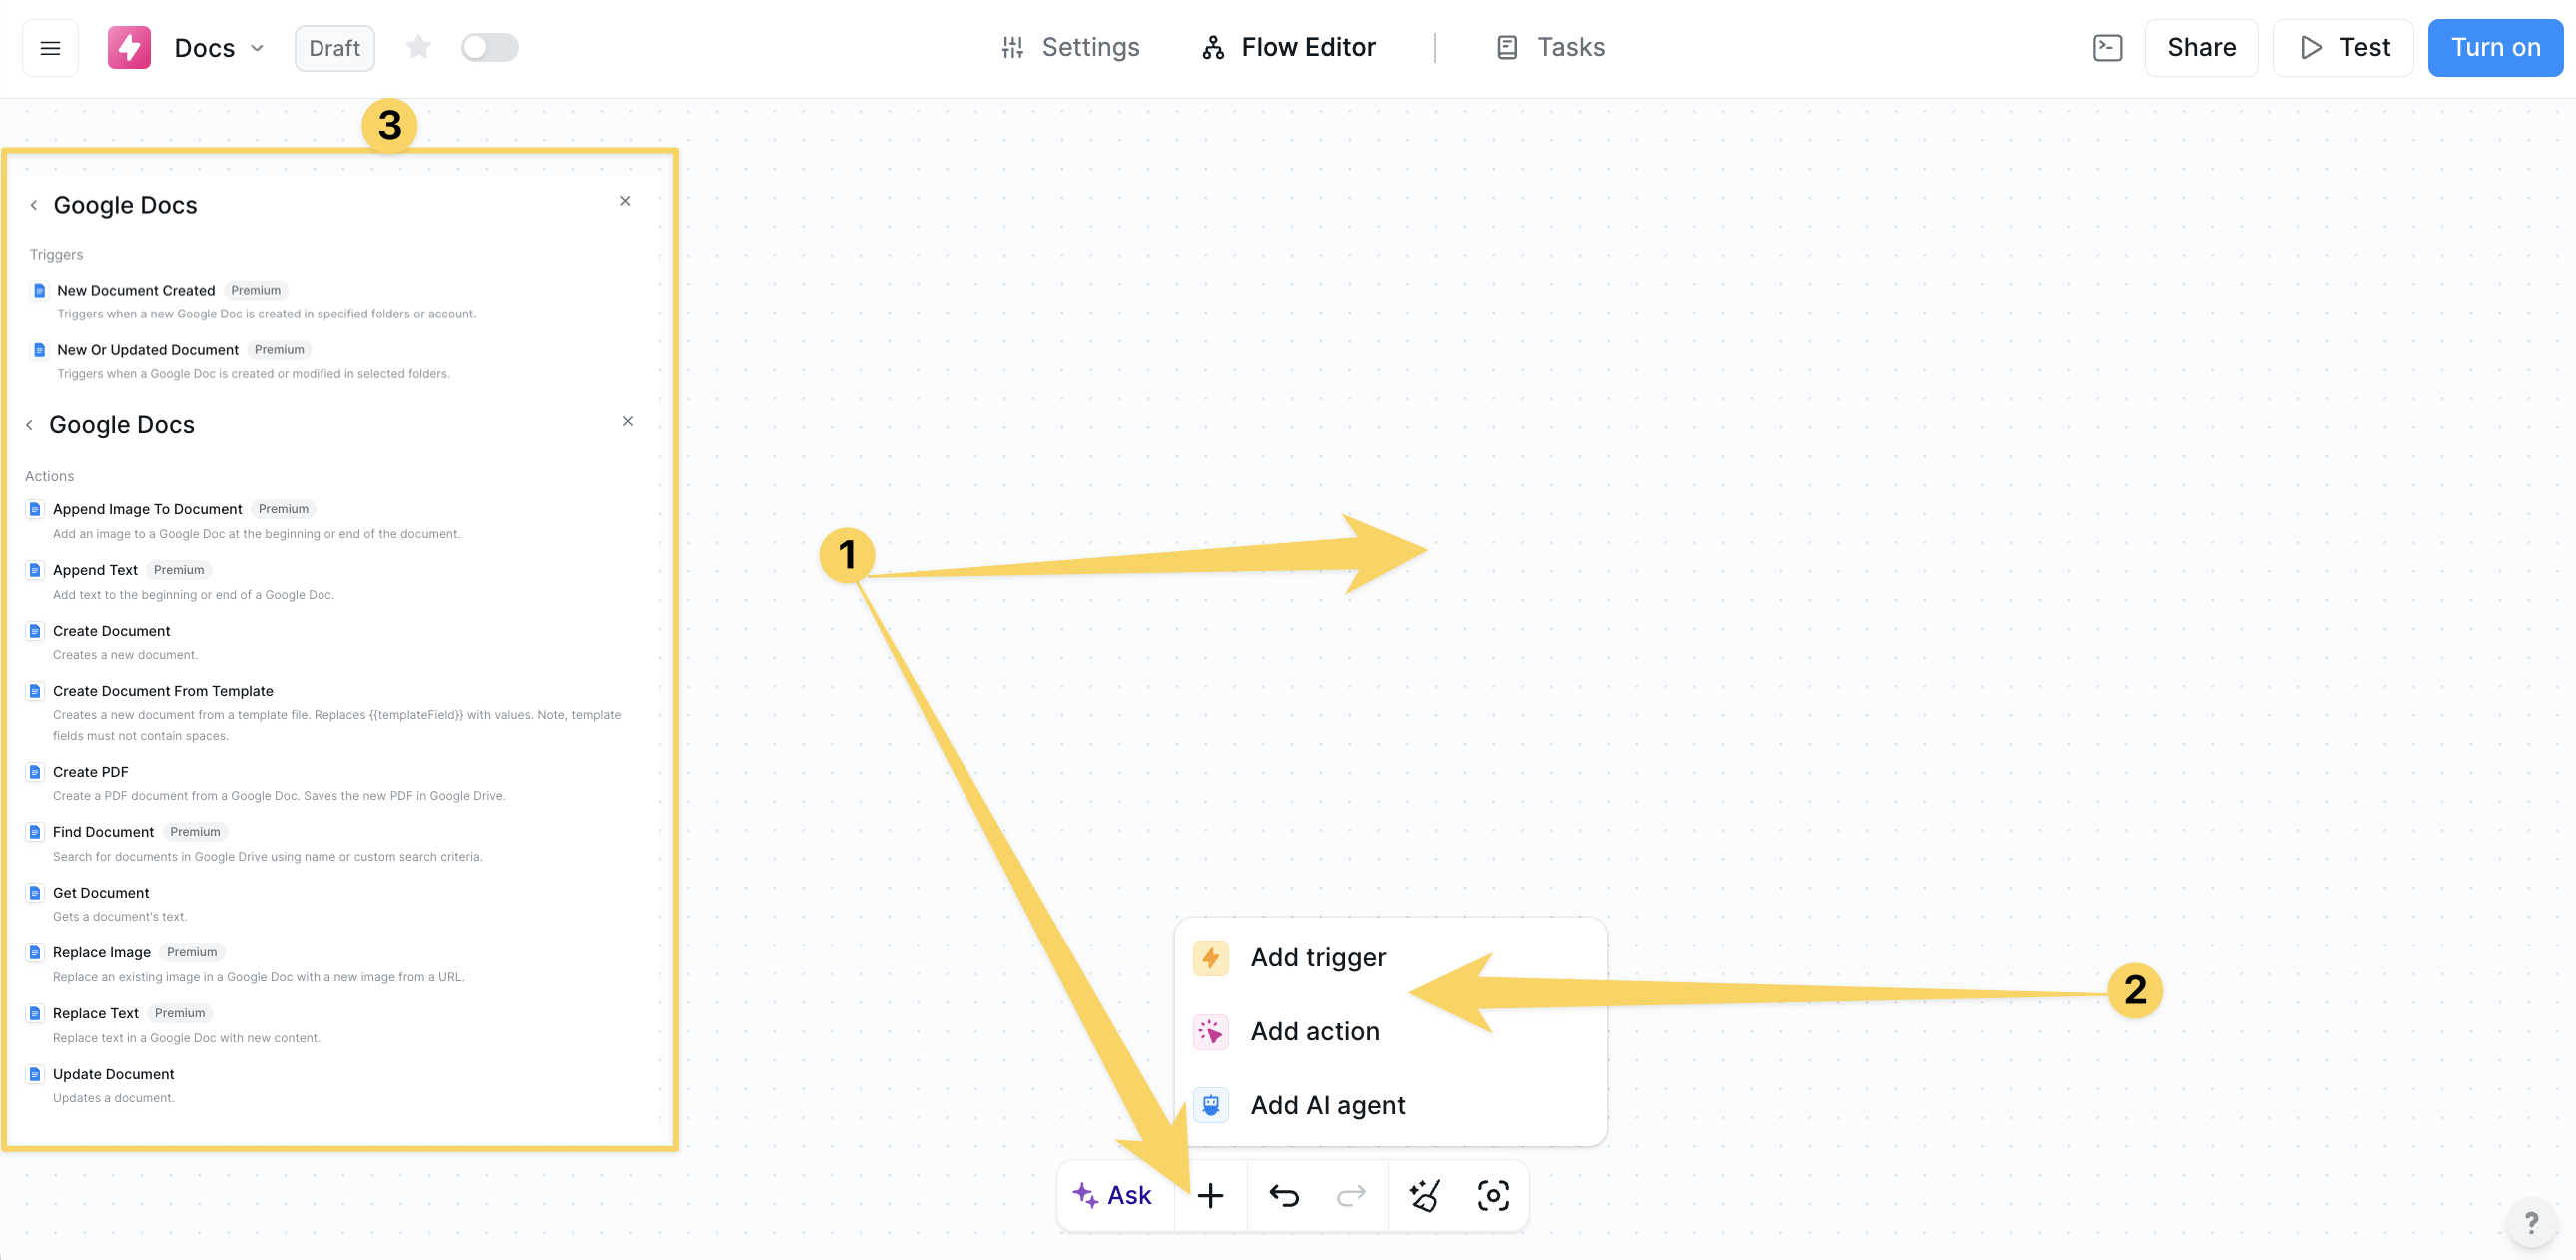 Click on "Add Account" and authorize your Google Docs for Lindy's integrations by granting permissions for Drive and Docs access. Choose which folders you want this Lindy to access.
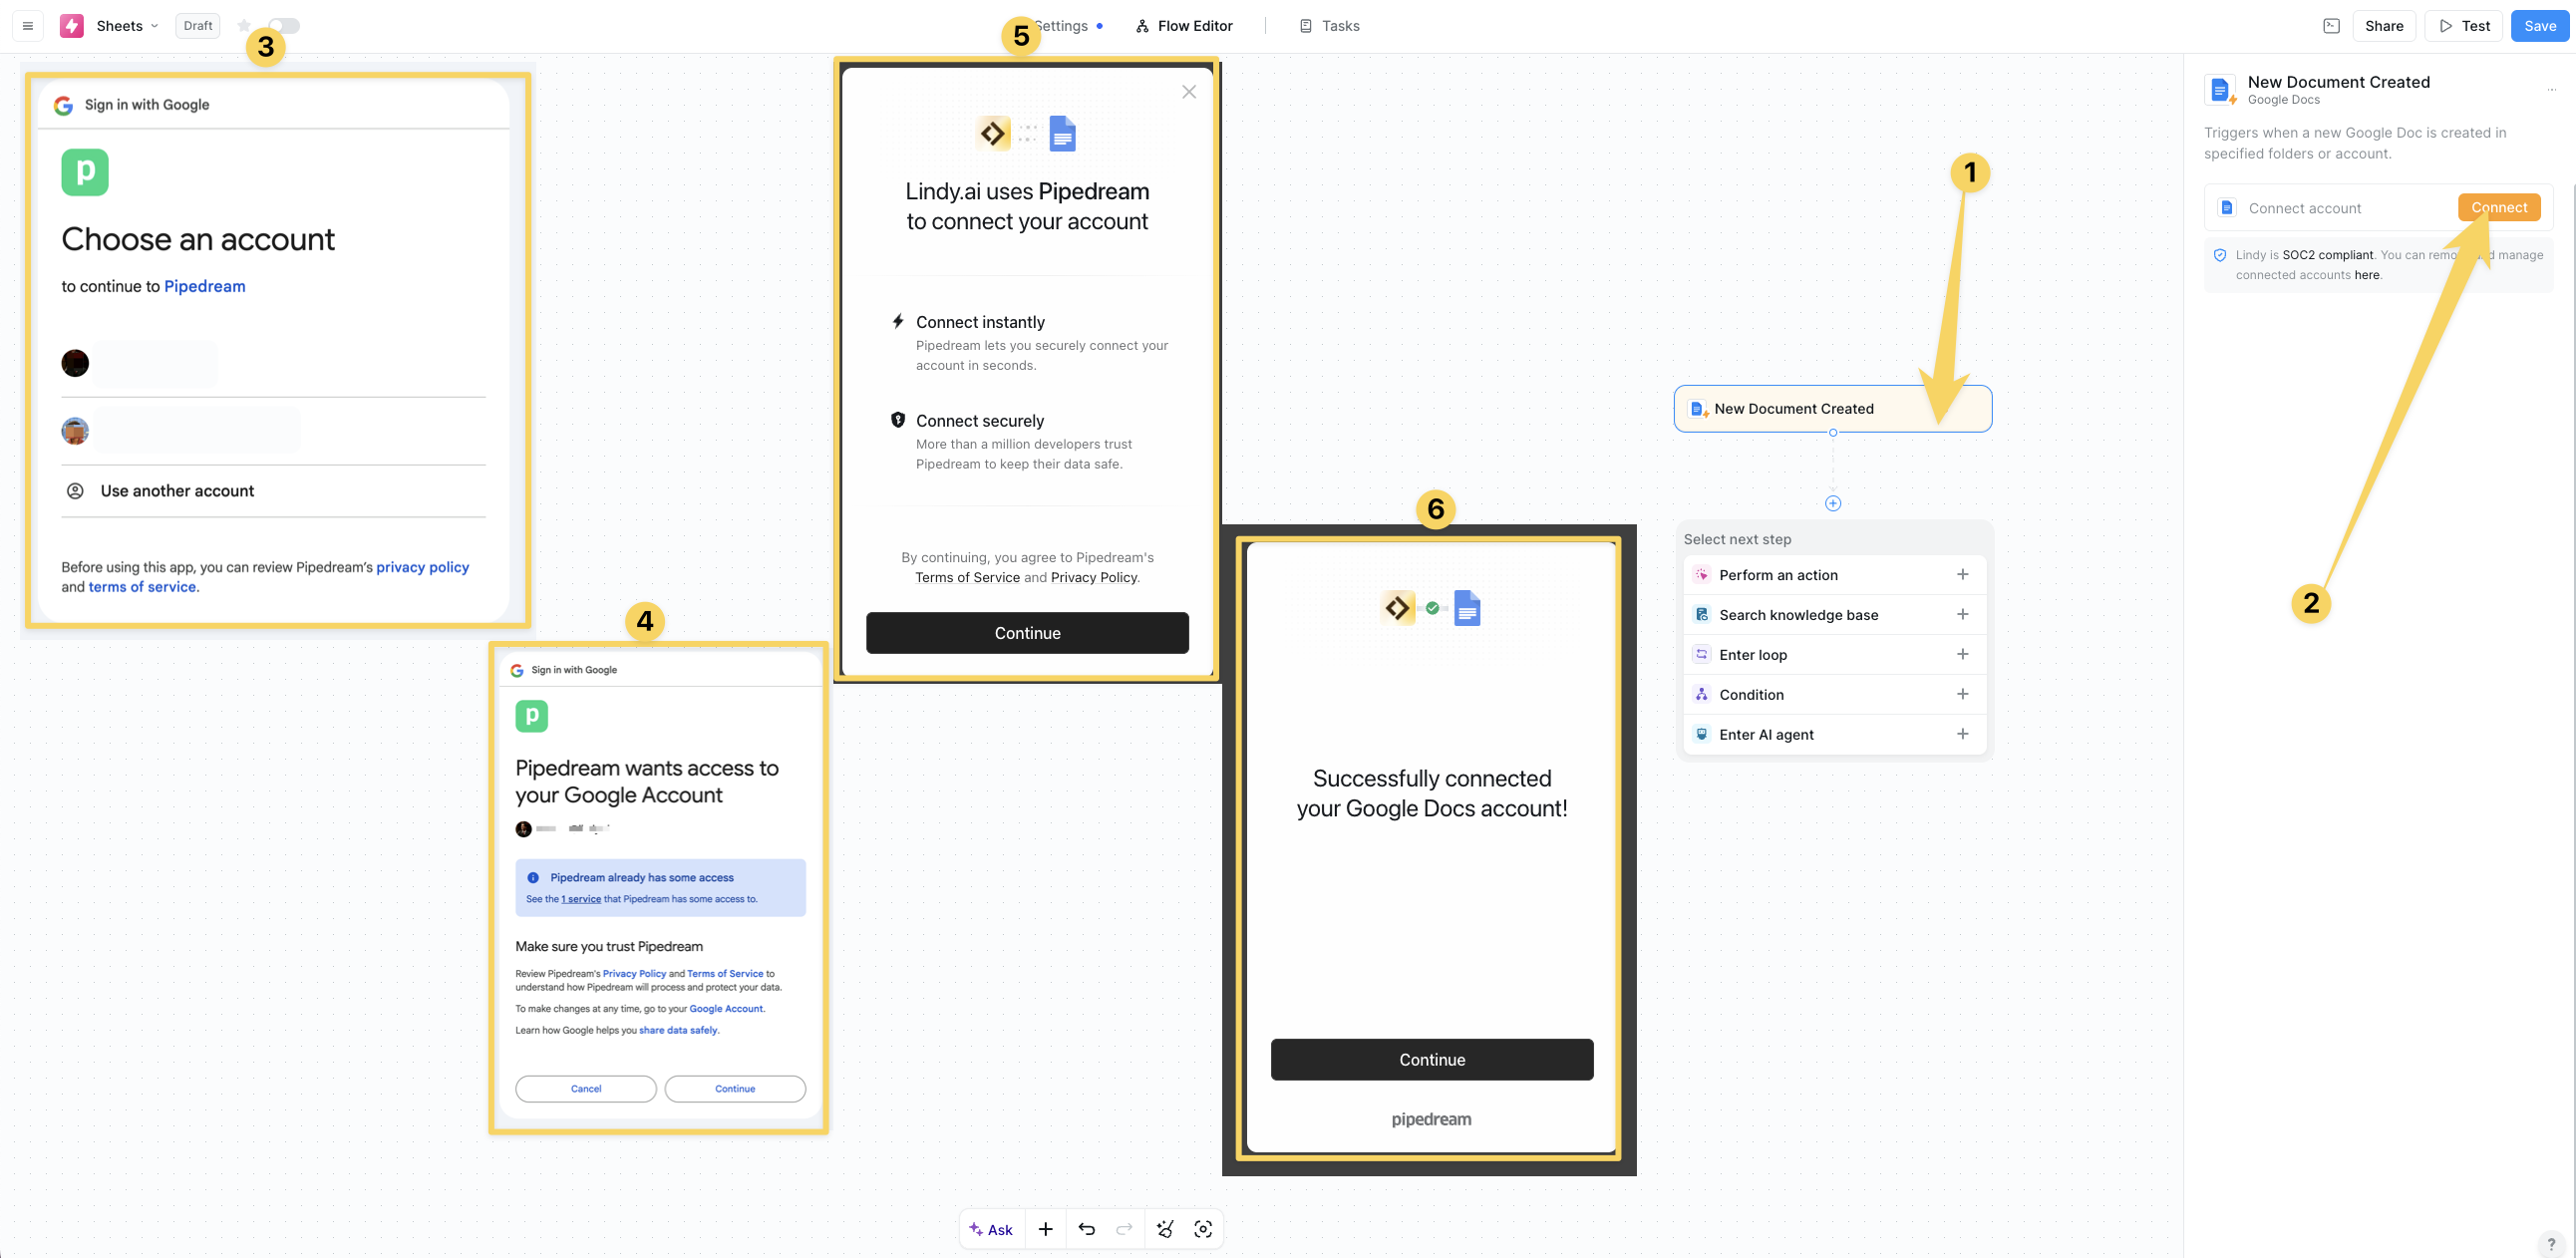 ## Google Docs Triggers
#### New Document Created
## Google Docs Triggers
#### New Document Created
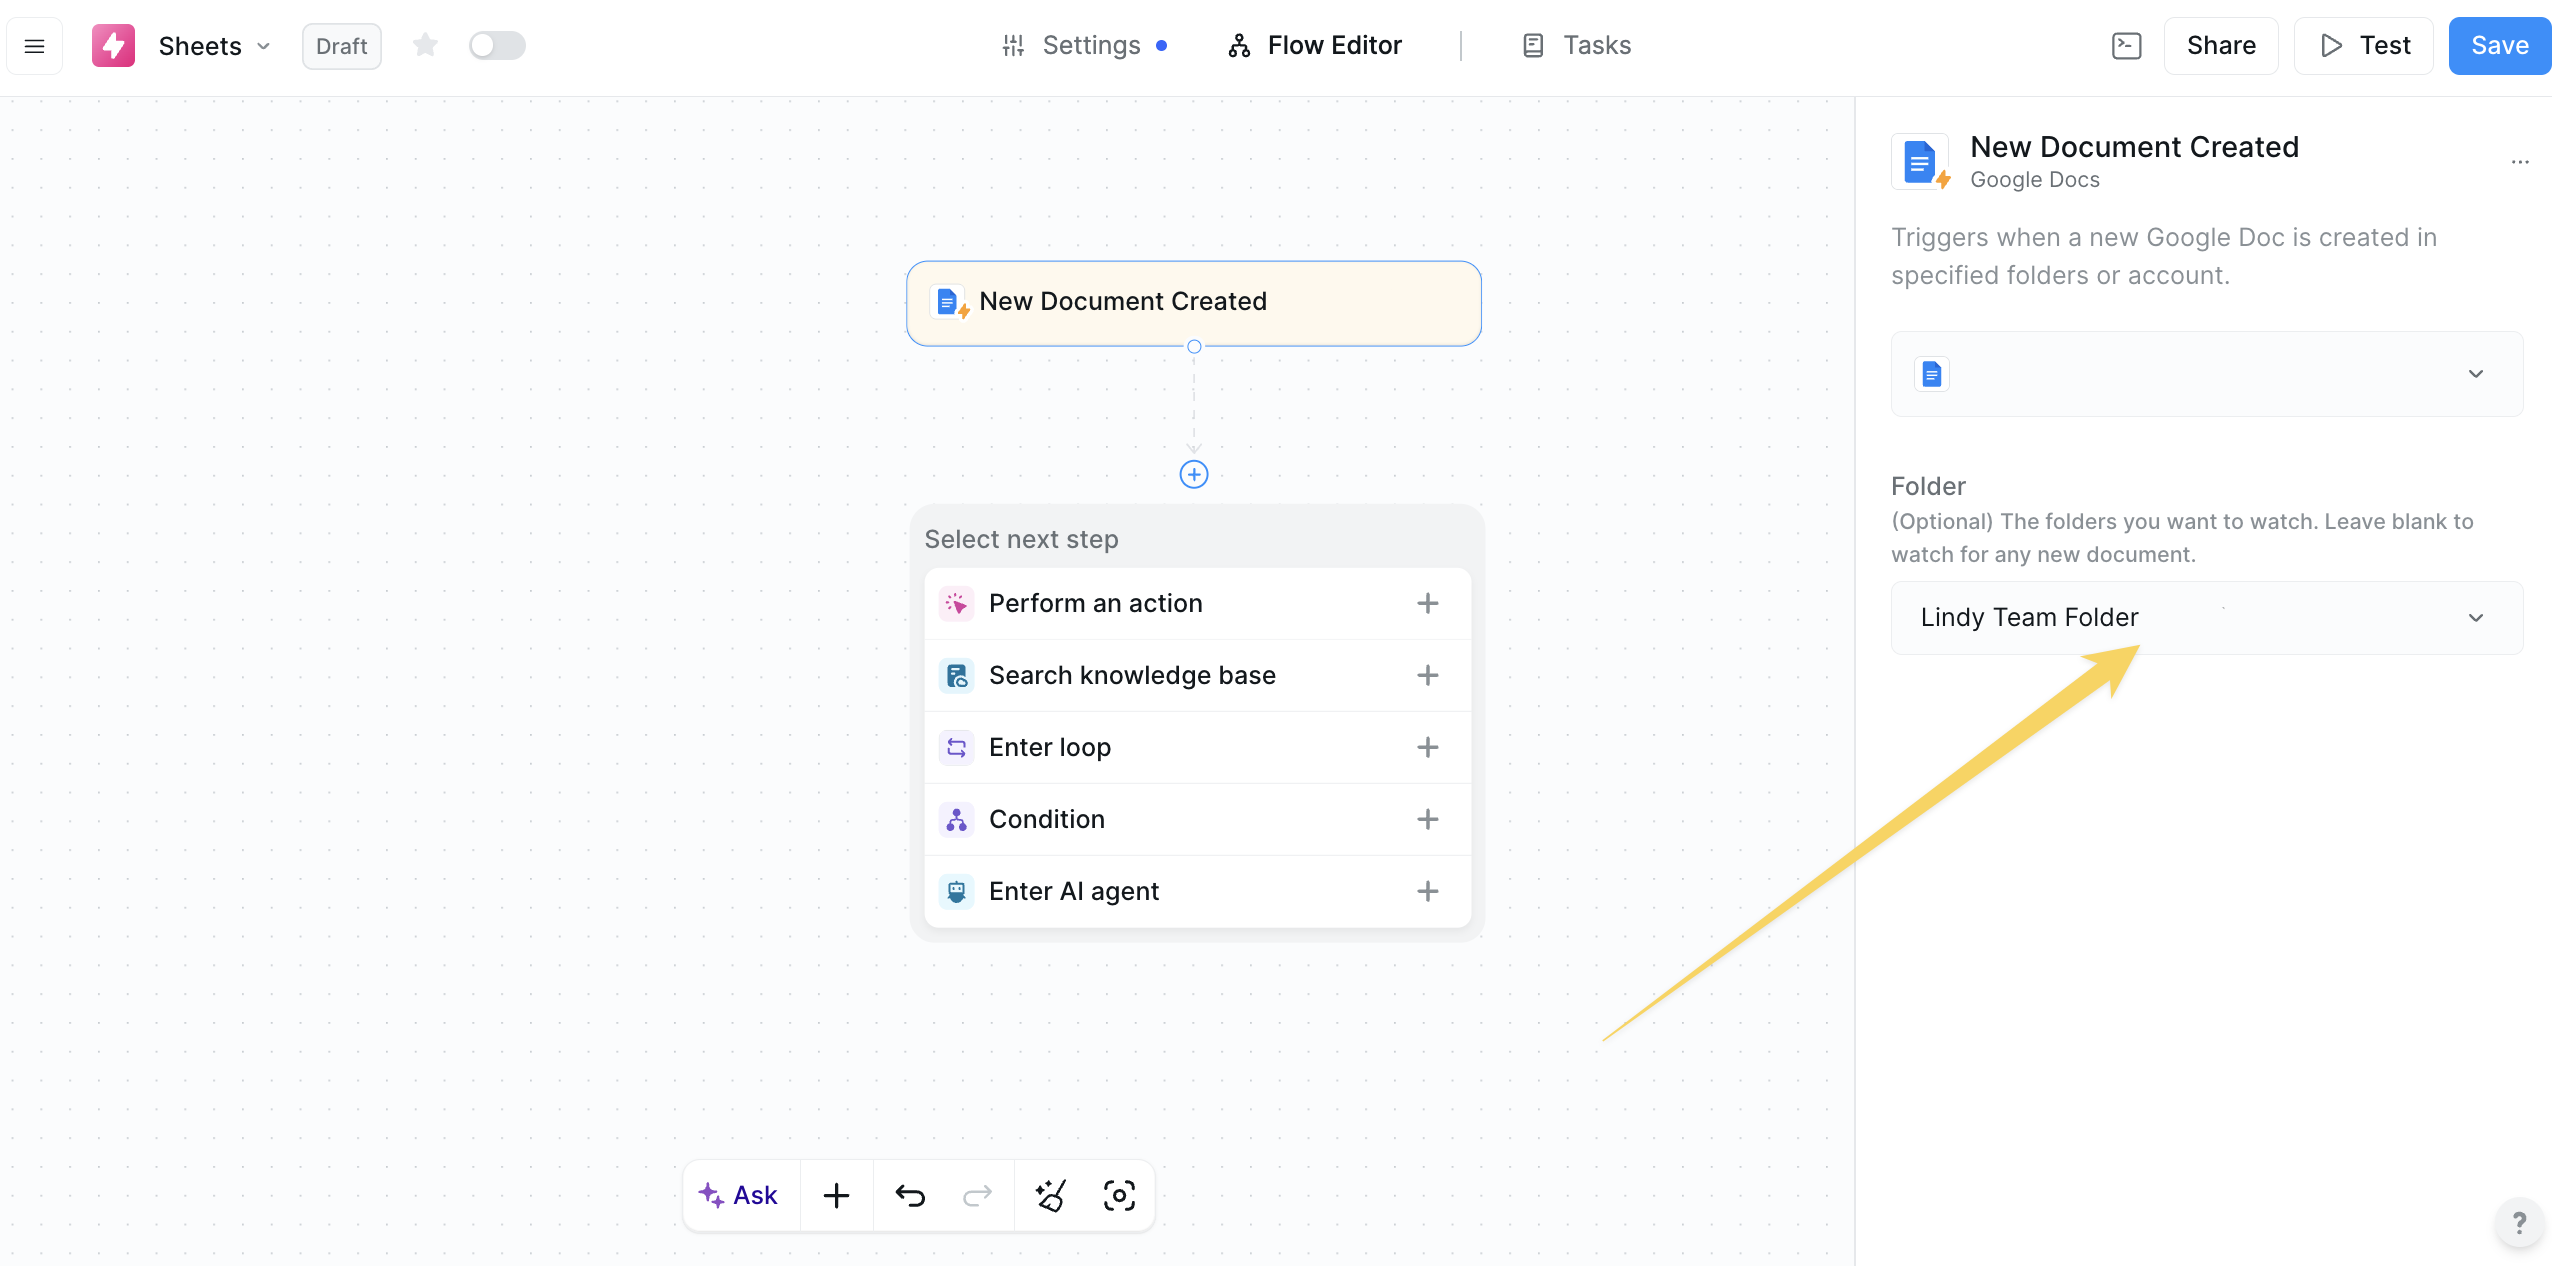 Fires the moment a brand-new Google Doc appears in a chosen folder:
* **Folder filtering** - Optionally select specific folder, defaults to watching entire Drive
* **Dynamic payload** - Provides title, url, documentId, createdTime, creatorEmail, parentFolders
* Perfect for auto-formatting new docs, posting Slack notifications, kickoff approval workflows
#### New or Updated Document
Fires on both creations and any subsequent modifications:
* **Real-time monitoring** - Detects text edits, images, style changes, etc.
* **Enhanced payload** - Includes lastModifiedTime, lastModifyingUser information
* Ideal for change-log summaries, content sync to CMS, maintaining documentation repos
Google push notifications are near-real-time (5-15 seconds). For large organizations, segment by folder to avoid hitting daily push quotas.
## Google Docs Actions
#### Create Document
Creates new Google Docs with customizable settings:
* Complete document creation with title and folder selection
* Returns documentId, url for downstream actions
* Perfect for generating weekly report shells, customer proposal skeletons
#### Create Document from Template
Rapidly create documents using template merge:
* Pick any Google Doc as template with `{{mergeField}}` placeholders
* Auto-generates input fields for each detected placeholder
* Ideal for contracts, offer letters, invoices, personalized onboarding guides
#### Create PDF
Converts documents to PDF format:
* Source document selection with destination folder
* Returns Drive-hosted PDF link and file ID
* Perfect for auto-emailing signed PDFs, uploading to e-signature tools
#### Get Document
Retrieves document information:
* Fuzzy search by ID, Name, or URL
* Returns full plain-text body plus metadata
* Essential for feeding content into AI summarizers, content comparison
#### Update Document
Modifies existing document content:
* Multiple modes: append, prepend, replace
* Supports markdown, plain text, or HTML-like content
* Perfect for appending meeting minutes, adding notices, content revisions
#### Append Text (Premium)
Lightweight content addition optimized for speed:
* Choose start or end of document placement
* Optimized for streaming from AI-generated content
* Ideal for progressive content building
#### Replace Text (Premium)
Powerful text search and replacement:
* Regex support for complex pattern matching
* Match case sensitivity and replace all options
* Perfect for bulk redaction, brand-name swaps, token replacement
#### Append Image (Premium)
Add images to documents automatically:
* Image URL input with position control (start/end)
* Proxy fetch and embed for external images
* Great for automated report generation with charts/diagrams
#### Find Document (Premium)
Search and locate documents intelligently:
* Name-based search with folder scoping
* Returns array of matches with IDs, titles, links
* Essential for version control, avoiding duplicates, routing workflows
## Practical Implementation Scenarios
Transform meeting recordings into structured documents:
* Calendar Event Ended trigger activates workflow
* AI generates meeting summary and action items
* Create Document with structured format
* Share link automatically via Slack or email
Streamline legal document creation:
* Email trigger detects contract requests
* Parse variables (Company, Fee, Terms) from email
* Create Document from Template with merged data
* Generate PDF and send to requester automatically
Maintain up-to-date standard operating procedures:
* New Document Created trigger monitors SOP drafts folder
* AI validates content against style checklist
* Approved documents move to official SOP library
* Failed validation triggers author notification with feedback
## Best Practices
Optimize your document generation workflows:
* Use template-based creation for consistent formatting
* Begin complex flows with Get Document to confirm you have the correct file
* Store document URLs (not IDs) for easier human access
Handle document updates effectively:
* Combine Append, Replace, and Update actions thoughtfully for best results
* Use Get Document to feed content into AI for intelligent processing and rewriting
Structure your documents for automation success:
* Implement proper folder organization and naming conventions
* Use folder filtering on triggers to avoid unnecessary workflow activations
Connect documents with other tools seamlessly:
* Use Conditions on triggers to route workflows by document type
* Chain document actions with Gmail for automated sharing and notifications
* Integrate with approval workflows using human-in-the-loop gates
## Next steps
Manage files and folders alongside documents
Combine document automation with email workflows
Build advanced document processing workflows
Create intelligent content generation agents
# Google Drive
Source: https://docs.lindy.ai/skills/popular-integrations/google-drive
File storage and management integration with comprehensive search, sharing, and permission controls
## Overview
Google Drive integration provides file storage and management capabilities. Automate file operations, manage folders, control permissions, and implement powerful search functionality across your Google Drive ecosystem.
## Authentication & Permissions
Secure authentication with granular permission controls ensures your Google Drive integration operates safely within your organization's security policies.
When you connect Google Drive, Lindy requests permissions to:
* **See, edit, create, and delete** all Google Drive files
* **Access shared drives** and team folders
* **Manage file permissions** and sharing settings
* **Monitor file changes** and folder modifications
Lindy only uses these permissions to access files and folders you specifically configure in your workflows. This access is required by Google's API to work properly, but Lindy will only interact with the files you direct it to.
## Triggers
* **Changes To Specific Files**: Monitors and alerts you when specific files in Google Drive are modified.
* **New Files**: Triggers when new files are added to specified Google Drive folders or drives.
* **New Or Modified Comments**: Triggers when new comments are added or existing comments are modified in a Google Drive file.
* **New Or Modified Files**: Triggers when files are created or modified in Google Drive folders.
* **New Or Modified Folders**: Triggers when folders are created or modified in Google Drive.
* **New Presentation**: Triggers when a new Google Slides presentation is created in specified Drive locations.
* **New Shared Drive**: Triggers when a new shared drive is created in Google Drive.
* **New Spreadsheet**: Triggers when a new spreadsheet is created in Google Drive or specified folders.
## Available Actions
### File Operations
* **Copy File**: Copy a Google Drive file to another location with customizable settings.
* **Create New File From Template**: Create new files from Google Drive templates with customizable text placeholders.
* **Create New File From Text**: Create a new text-based file in Google Drive from provided content.
* **Delete File**: Delete a file or folder from Google Drive permanently.
* **Download File**: Download files from Google Drive and save them to a specified location.
* **Move File**: Move a file to a different folder in Google Drive.
* **Move File To Trash**: Move a file or folder to the Google Drive trash bin.
* **Read File**: Read a file from Google Drive into this Lindy's context.
* **Upload File**: Upload a file to Google Drive in a specified location.
* **Upload Files**: Upload multiple files to Google Drive simultaneously.
### Search & Discovery
* **Find File**: Search for files in Google Drive using name or custom query parameters. Choose between My Drive or Shared Drives for targeted searches.
* **Find Folder**: Search for folders in Google Drive by name, including options for Shared Drives.
* **Find Forms**: Search for Google Forms in your Google Drive folders.
* **Find Spreadsheets**: Search and locate spreadsheet files in Google Drive by name, folder, or custom query.
* **Get File By Id**: Retrieve detailed information about a specific file in Google Drive using its unique ID.
* **Search For Shared Drives**: Find shared drives in Google Drive using custom search criteria.
The Find File action provides powerful search capabilities with drive selection, custom queries, folder filtering, and file type filtering.
### Folder Management
* **Create Folder**: Create a new folder in Google Drive with specified name and location.
* **Get Folder Id For A Path**: Get the ID of a Google Drive folder using its file path.
* **List Drive Files**: List files in Google Drive, optionally given a search query and folder.
* **List Drive Folders**: List folders in Google Drive, optionally given a search query.
### Sharing & Permissions
* **Create Shared Drive**: Create a new shared drive in Google Drive for team collaboration.
* **Delete Shared Drive**: Delete a shared drive from Google Drive.
* **Get Shared Drive**: Retrieve details about a specific shared drive or list all available shared drives.
* **Update Shared Drive**: Modify appearance and settings of a Google Shared Drive.
## Best Practices
Structure your Drive automation effectively:
* Use specific folder paths and file names for reliable automation
* Implement proper error handling for permission-related failures
* Monitor file changes with targeted triggers to avoid overwhelming automation
Use Google Drive's advanced search capabilities:
* File type filtering: `type:pdf`, `type:document`, `type:spreadsheet`
* Date ranges: `created:2024-01-01..2024-12-31`
* Owner filtering: `owner:email@domain.com`
* Sharing status: `is:shared`, `is:private`
Maintain security while automating:
* Google Drive integration respects your organization's sharing policies and security settings
* All operations maintain existing permission structures unless explicitly modified
* Use granular access control with role-based permissions
* Leverage shared drives for team-based automation workflows
Google Drive's powerful search capabilities combined with Lindy's automation create efficient document management workflows that scale with your organization's needs.
## Related Resources
Integrate with Google Sheets for data processing
Combine Drive files with email automation
Automate document creation and management
Set up Drive-based automation triggers
# Google Sheets
Source: https://docs.lindy.ai/skills/popular-integrations/google-sheets
## Quick Overview
Google Sheets integration enables your AI agents to act as spreadsheet assistants and data processors. Create, update, and manage spreadsheet data automatically with both triggers and actions for complete data workflow automation.
Key benefits of Google Sheets integration:
* **Data management** – 25 actions for complete spreadsheet control
* **Real-time data monitoring** – 4 triggers for instant workflow activation
* **Stateful tool support** – Advanced row-based workflows with data persistence
* **Dynamic field loading** – Automatic spreadsheet and column discovery
## How to set up Google Sheets
Click on the plus sign at the bottom or right-click anywhere on the canvas and select "Add Trigger" or "Add Action" from the pop-up menu and choose "Google Sheets." Once added, choose the spreadsheet from the drop-down menu or paste in the link.
Fires the moment a brand-new Google Doc appears in a chosen folder:
* **Folder filtering** - Optionally select specific folder, defaults to watching entire Drive
* **Dynamic payload** - Provides title, url, documentId, createdTime, creatorEmail, parentFolders
* Perfect for auto-formatting new docs, posting Slack notifications, kickoff approval workflows
#### New or Updated Document
Fires on both creations and any subsequent modifications:
* **Real-time monitoring** - Detects text edits, images, style changes, etc.
* **Enhanced payload** - Includes lastModifiedTime, lastModifyingUser information
* Ideal for change-log summaries, content sync to CMS, maintaining documentation repos
Google push notifications are near-real-time (5-15 seconds). For large organizations, segment by folder to avoid hitting daily push quotas.
## Google Docs Actions
#### Create Document
Creates new Google Docs with customizable settings:
* Complete document creation with title and folder selection
* Returns documentId, url for downstream actions
* Perfect for generating weekly report shells, customer proposal skeletons
#### Create Document from Template
Rapidly create documents using template merge:
* Pick any Google Doc as template with `{{mergeField}}` placeholders
* Auto-generates input fields for each detected placeholder
* Ideal for contracts, offer letters, invoices, personalized onboarding guides
#### Create PDF
Converts documents to PDF format:
* Source document selection with destination folder
* Returns Drive-hosted PDF link and file ID
* Perfect for auto-emailing signed PDFs, uploading to e-signature tools
#### Get Document
Retrieves document information:
* Fuzzy search by ID, Name, or URL
* Returns full plain-text body plus metadata
* Essential for feeding content into AI summarizers, content comparison
#### Update Document
Modifies existing document content:
* Multiple modes: append, prepend, replace
* Supports markdown, plain text, or HTML-like content
* Perfect for appending meeting minutes, adding notices, content revisions
#### Append Text (Premium)
Lightweight content addition optimized for speed:
* Choose start or end of document placement
* Optimized for streaming from AI-generated content
* Ideal for progressive content building
#### Replace Text (Premium)
Powerful text search and replacement:
* Regex support for complex pattern matching
* Match case sensitivity and replace all options
* Perfect for bulk redaction, brand-name swaps, token replacement
#### Append Image (Premium)
Add images to documents automatically:
* Image URL input with position control (start/end)
* Proxy fetch and embed for external images
* Great for automated report generation with charts/diagrams
#### Find Document (Premium)
Search and locate documents intelligently:
* Name-based search with folder scoping
* Returns array of matches with IDs, titles, links
* Essential for version control, avoiding duplicates, routing workflows
## Practical Implementation Scenarios
Transform meeting recordings into structured documents:
* Calendar Event Ended trigger activates workflow
* AI generates meeting summary and action items
* Create Document with structured format
* Share link automatically via Slack or email
Streamline legal document creation:
* Email trigger detects contract requests
* Parse variables (Company, Fee, Terms) from email
* Create Document from Template with merged data
* Generate PDF and send to requester automatically
Maintain up-to-date standard operating procedures:
* New Document Created trigger monitors SOP drafts folder
* AI validates content against style checklist
* Approved documents move to official SOP library
* Failed validation triggers author notification with feedback
## Best Practices
Optimize your document generation workflows:
* Use template-based creation for consistent formatting
* Begin complex flows with Get Document to confirm you have the correct file
* Store document URLs (not IDs) for easier human access
Handle document updates effectively:
* Combine Append, Replace, and Update actions thoughtfully for best results
* Use Get Document to feed content into AI for intelligent processing and rewriting
Structure your documents for automation success:
* Implement proper folder organization and naming conventions
* Use folder filtering on triggers to avoid unnecessary workflow activations
Connect documents with other tools seamlessly:
* Use Conditions on triggers to route workflows by document type
* Chain document actions with Gmail for automated sharing and notifications
* Integrate with approval workflows using human-in-the-loop gates
## Next steps
Manage files and folders alongside documents
Combine document automation with email workflows
Build advanced document processing workflows
Create intelligent content generation agents
# Google Drive
Source: https://docs.lindy.ai/skills/popular-integrations/google-drive
File storage and management integration with comprehensive search, sharing, and permission controls
## Overview
Google Drive integration provides file storage and management capabilities. Automate file operations, manage folders, control permissions, and implement powerful search functionality across your Google Drive ecosystem.
## Authentication & Permissions
Secure authentication with granular permission controls ensures your Google Drive integration operates safely within your organization's security policies.
When you connect Google Drive, Lindy requests permissions to:
* **See, edit, create, and delete** all Google Drive files
* **Access shared drives** and team folders
* **Manage file permissions** and sharing settings
* **Monitor file changes** and folder modifications
Lindy only uses these permissions to access files and folders you specifically configure in your workflows. This access is required by Google's API to work properly, but Lindy will only interact with the files you direct it to.
## Triggers
* **Changes To Specific Files**: Monitors and alerts you when specific files in Google Drive are modified.
* **New Files**: Triggers when new files are added to specified Google Drive folders or drives.
* **New Or Modified Comments**: Triggers when new comments are added or existing comments are modified in a Google Drive file.
* **New Or Modified Files**: Triggers when files are created or modified in Google Drive folders.
* **New Or Modified Folders**: Triggers when folders are created or modified in Google Drive.
* **New Presentation**: Triggers when a new Google Slides presentation is created in specified Drive locations.
* **New Shared Drive**: Triggers when a new shared drive is created in Google Drive.
* **New Spreadsheet**: Triggers when a new spreadsheet is created in Google Drive or specified folders.
## Available Actions
### File Operations
* **Copy File**: Copy a Google Drive file to another location with customizable settings.
* **Create New File From Template**: Create new files from Google Drive templates with customizable text placeholders.
* **Create New File From Text**: Create a new text-based file in Google Drive from provided content.
* **Delete File**: Delete a file or folder from Google Drive permanently.
* **Download File**: Download files from Google Drive and save them to a specified location.
* **Move File**: Move a file to a different folder in Google Drive.
* **Move File To Trash**: Move a file or folder to the Google Drive trash bin.
* **Read File**: Read a file from Google Drive into this Lindy's context.
* **Upload File**: Upload a file to Google Drive in a specified location.
* **Upload Files**: Upload multiple files to Google Drive simultaneously.
### Search & Discovery
* **Find File**: Search for files in Google Drive using name or custom query parameters. Choose between My Drive or Shared Drives for targeted searches.
* **Find Folder**: Search for folders in Google Drive by name, including options for Shared Drives.
* **Find Forms**: Search for Google Forms in your Google Drive folders.
* **Find Spreadsheets**: Search and locate spreadsheet files in Google Drive by name, folder, or custom query.
* **Get File By Id**: Retrieve detailed information about a specific file in Google Drive using its unique ID.
* **Search For Shared Drives**: Find shared drives in Google Drive using custom search criteria.
The Find File action provides powerful search capabilities with drive selection, custom queries, folder filtering, and file type filtering.
### Folder Management
* **Create Folder**: Create a new folder in Google Drive with specified name and location.
* **Get Folder Id For A Path**: Get the ID of a Google Drive folder using its file path.
* **List Drive Files**: List files in Google Drive, optionally given a search query and folder.
* **List Drive Folders**: List folders in Google Drive, optionally given a search query.
### Sharing & Permissions
* **Create Shared Drive**: Create a new shared drive in Google Drive for team collaboration.
* **Delete Shared Drive**: Delete a shared drive from Google Drive.
* **Get Shared Drive**: Retrieve details about a specific shared drive or list all available shared drives.
* **Update Shared Drive**: Modify appearance and settings of a Google Shared Drive.
## Best Practices
Structure your Drive automation effectively:
* Use specific folder paths and file names for reliable automation
* Implement proper error handling for permission-related failures
* Monitor file changes with targeted triggers to avoid overwhelming automation
Use Google Drive's advanced search capabilities:
* File type filtering: `type:pdf`, `type:document`, `type:spreadsheet`
* Date ranges: `created:2024-01-01..2024-12-31`
* Owner filtering: `owner:email@domain.com`
* Sharing status: `is:shared`, `is:private`
Maintain security while automating:
* Google Drive integration respects your organization's sharing policies and security settings
* All operations maintain existing permission structures unless explicitly modified
* Use granular access control with role-based permissions
* Leverage shared drives for team-based automation workflows
Google Drive's powerful search capabilities combined with Lindy's automation create efficient document management workflows that scale with your organization's needs.
## Related Resources
Integrate with Google Sheets for data processing
Combine Drive files with email automation
Automate document creation and management
Set up Drive-based automation triggers
# Google Sheets
Source: https://docs.lindy.ai/skills/popular-integrations/google-sheets
## Quick Overview
Google Sheets integration enables your AI agents to act as spreadsheet assistants and data processors. Create, update, and manage spreadsheet data automatically with both triggers and actions for complete data workflow automation.
Key benefits of Google Sheets integration:
* **Data management** – 25 actions for complete spreadsheet control
* **Real-time data monitoring** – 4 triggers for instant workflow activation
* **Stateful tool support** – Advanced row-based workflows with data persistence
* **Dynamic field loading** – Automatic spreadsheet and column discovery
## How to set up Google Sheets
Click on the plus sign at the bottom or right-click anywhere on the canvas and select "Add Trigger" or "Add Action" from the pop-up menu and choose "Google Sheets." Once added, choose the spreadsheet from the drop-down menu or paste in the link.
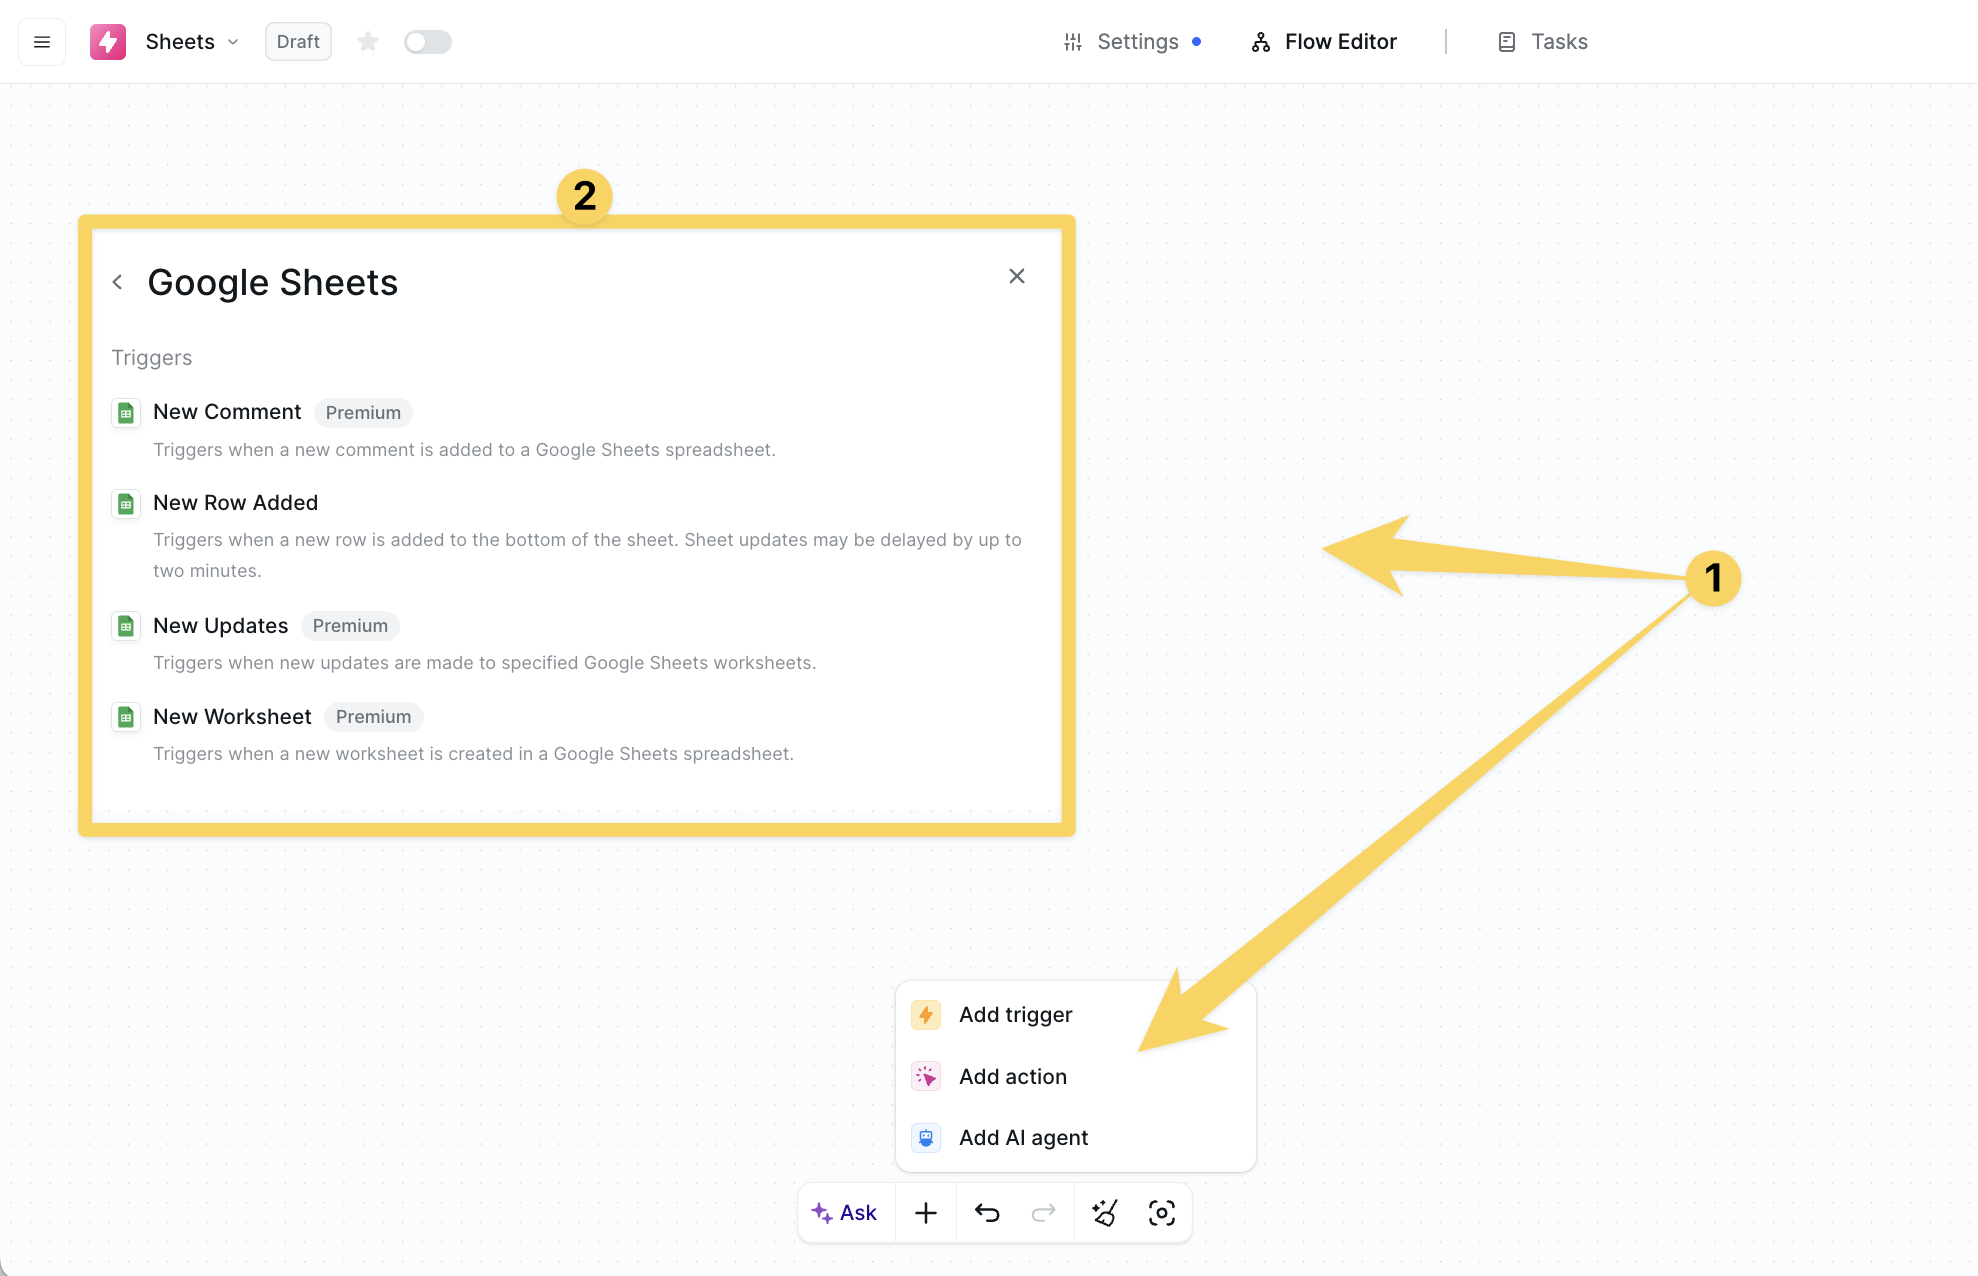 Click on "Add Account" and authorize your Google Sheets for Lindy's integrations by granting permissions for Sheets and Drive access. Choose which spreadsheets you want this Lindy to access.
 ## Google Sheets Triggers
#### New Row Added
Triggers when a new row is added to the bottom of a sheet:
* **Real-time processing** - Near real-time activation (up to 2-minute delay possible)
* **Stateful object creation** - Creates googleSheetsRow object containing all row data
* **Dynamic configuration** - Spreadsheet ID/URL with optional sheet title selection
#### New Comment
Triggers when someone adds a comment to any cell in the spreadsheet:
* **Collaboration monitoring** - Track team feedback and communication
* **Configurable polling** - Push notification renewal schedule in seconds
* **Drive scope selection** - My Drive or Shared Drive targeting
#### New Updates
Triggers when any cell content is modified in specified worksheets:
* **Granular monitoring** - Specific worksheet targeting for focused tracking
* **Change detection** - Monitors all cell content modifications
* **Audit capabilities** - Track data changes with user information
#### New Worksheet
Triggers when a new worksheet/tab is created within a spreadsheet:
* **Structure monitoring** - Detect new worksheet creation instantly
* **Template automation** - Auto-format and initialize new sheets
* **Project phase tracking** - Monitor workflow progression through new tabs
Use the "New Row Added" trigger with stateful googleSheetsRow objects for the most powerful data processing workflows.
## Google Sheets Actions
#### Append Row
Adds a new row to the bottom of a spreadsheet:
* **Dynamic field generation** - Automatically creates inputs based on spreadsheet headers
* **Real-time data entry** - Immediate row creation with full data validation
* **Stateful output** - Returns created row data for downstream processing
#### Append Rows
Adds multiple rows in a single operation:
* **Bulk processing** - Handle arrays of data efficiently
* **Performance optimization** - Single API call for multiple rows
* **Batch validation** - Process multiple records with consistent structure
#### Update Row
Modifies existing row data or creates new row if not found:
* **Intelligent lookup** - Uses specified column for row identification
* **Upsert behavior** - Can append new row if no matching row exists
* **Data integrity** - Maintains relationships while updating records
#### Get Spreadsheet
Retrieves all rows from a spreadsheet:
* **Complete dataset access** - Returns full spreadsheet as array of arrays
* **Bulk data processing** - Handle entire datasets for analysis
* **Structured output** - Organized data ready for downstream processing
#### Find Row
Searches for rows matching specific criteria:
* **Precise lookup** - Configurable lookup column and search value
* **Smart output** - Returns matching row data and row number (-1 if not found)
* **Data validation** - Verify record existence before processing
#### Get Cell
Retrieves value from a specific cell:
* **Precise targeting** - Cell reference in A1 notation
* **Status monitoring** - Check specific values like counters or flags
* **Configuration data** - Access settings stored in specific cells
#### Create Spreadsheet
Creates a new Google Sheets file:
* **Dynamic initialization** - Set title, initial sheets with headers and data
* **Template creation** - At least one sheet required for structure
* **Full output** - Returns spreadsheet ID, URL, first sheet ID
#### Create Worksheet
Adds a new worksheet/tab to existing spreadsheet:
* **Structure expansion** - Add new tabs for data segmentation
* **Custom configuration** - Worksheet name, dimensions, formatting options
* **Organization tools** - Create monthly reports, project phases
#### Delete Row
Removes a row matching specific lookup criteria:
* **Safe deletion** - Lookup column and value matching for precision
* **Status feedback** - Returns success/failure status for error handling
* **Data cleanup** - Remove completed items, archived records
#### Clear Cell
Removes content from a specific cell while preserving formatting:
* **Selective clearing** - Content removal without structure loss
* **Format preservation** - Maintains cell formatting and styling
* **Precise control** - Target specific cells for content reset
## Example data processing workflow
## Practical Implementation Scenarios
Transform Lindy into a CRM system:
* New Row Added trigger processes incoming leads automatically
* Find Row action checks for existing customers to prevent duplicates
* Update Row action enriches lead data with external API information
* Append Row creates follow-up tasks and scheduled activities
Automate your entire inventory lifecycle:
* New Row Added monitors incoming inventory shipments
* Update Row tracks stock levels and product information
* Find Row verifies product availability for order processing
* Delete Row removes discontinued or out-of-stock items
Create sophisticated data transformation workflows:
* Get Spreadsheet retrieves raw data for processing
* AI-powered data cleaning and validation
* Append Rows writes processed results to destination sheets
* Create Worksheet organizes results by category or time period
## Best Practices
Optimize your data workflows:
* Use "New Row Added" trigger for real-time processing
* Implement data validation before processing
* Use lookup columns for maintaining data relationships
Maintain reliable spreadsheet operations:
* Use "Find Row" before "Update Row" for data integrity
* Use clear naming conventions for worksheets
* Set up proper access controls and permissions
Create efficient high-volume workflows:
* Batch operations when possible (use "Append Rows" vs multiple "Append Row")
* Use specific worksheet targeting to reduce trigger noise
* Use range operations for bulk data retrieval
## Next steps
Manage files and folders alongside spreadsheets
Combine spreadsheet data with document automation
Compare database and spreadsheet capabilities
Set up Sheet-based automation triggers
# HubSpot
Source: https://docs.lindy.ai/skills/popular-integrations/hubspot
## Quick Overview
HubSpot integration enables your AI agents to act as sales, marketing, and customer service assistants. Automate CRM workflows with both triggers and actions for complete sales and marketing automation.
Key benefits of HubSpot integration:
* **CRM management** – 11 actions for complete sales and marketing control
* **Real-time CRM monitoring** – 23 triggers for instant workflow activation
* **Dynamic field loading** – Automatic property and object discovery
* **Premium automation features** – Advanced capabilities for sophisticated workflows
## How to set up HubSpot
Click on the plus sign at the bottom or right-click anywhere on the canvas and select "Add Trigger" or "Add Action" from the pop-up menu and choose "HubSpot." Click on connect to configure your account.
## Google Sheets Triggers
#### New Row Added
Triggers when a new row is added to the bottom of a sheet:
* **Real-time processing** - Near real-time activation (up to 2-minute delay possible)
* **Stateful object creation** - Creates googleSheetsRow object containing all row data
* **Dynamic configuration** - Spreadsheet ID/URL with optional sheet title selection
#### New Comment
Triggers when someone adds a comment to any cell in the spreadsheet:
* **Collaboration monitoring** - Track team feedback and communication
* **Configurable polling** - Push notification renewal schedule in seconds
* **Drive scope selection** - My Drive or Shared Drive targeting
#### New Updates
Triggers when any cell content is modified in specified worksheets:
* **Granular monitoring** - Specific worksheet targeting for focused tracking
* **Change detection** - Monitors all cell content modifications
* **Audit capabilities** - Track data changes with user information
#### New Worksheet
Triggers when a new worksheet/tab is created within a spreadsheet:
* **Structure monitoring** - Detect new worksheet creation instantly
* **Template automation** - Auto-format and initialize new sheets
* **Project phase tracking** - Monitor workflow progression through new tabs
Use the "New Row Added" trigger with stateful googleSheetsRow objects for the most powerful data processing workflows.
## Google Sheets Actions
#### Append Row
Adds a new row to the bottom of a spreadsheet:
* **Dynamic field generation** - Automatically creates inputs based on spreadsheet headers
* **Real-time data entry** - Immediate row creation with full data validation
* **Stateful output** - Returns created row data for downstream processing
#### Append Rows
Adds multiple rows in a single operation:
* **Bulk processing** - Handle arrays of data efficiently
* **Performance optimization** - Single API call for multiple rows
* **Batch validation** - Process multiple records with consistent structure
#### Update Row
Modifies existing row data or creates new row if not found:
* **Intelligent lookup** - Uses specified column for row identification
* **Upsert behavior** - Can append new row if no matching row exists
* **Data integrity** - Maintains relationships while updating records
#### Get Spreadsheet
Retrieves all rows from a spreadsheet:
* **Complete dataset access** - Returns full spreadsheet as array of arrays
* **Bulk data processing** - Handle entire datasets for analysis
* **Structured output** - Organized data ready for downstream processing
#### Find Row
Searches for rows matching specific criteria:
* **Precise lookup** - Configurable lookup column and search value
* **Smart output** - Returns matching row data and row number (-1 if not found)
* **Data validation** - Verify record existence before processing
#### Get Cell
Retrieves value from a specific cell:
* **Precise targeting** - Cell reference in A1 notation
* **Status monitoring** - Check specific values like counters or flags
* **Configuration data** - Access settings stored in specific cells
#### Create Spreadsheet
Creates a new Google Sheets file:
* **Dynamic initialization** - Set title, initial sheets with headers and data
* **Template creation** - At least one sheet required for structure
* **Full output** - Returns spreadsheet ID, URL, first sheet ID
#### Create Worksheet
Adds a new worksheet/tab to existing spreadsheet:
* **Structure expansion** - Add new tabs for data segmentation
* **Custom configuration** - Worksheet name, dimensions, formatting options
* **Organization tools** - Create monthly reports, project phases
#### Delete Row
Removes a row matching specific lookup criteria:
* **Safe deletion** - Lookup column and value matching for precision
* **Status feedback** - Returns success/failure status for error handling
* **Data cleanup** - Remove completed items, archived records
#### Clear Cell
Removes content from a specific cell while preserving formatting:
* **Selective clearing** - Content removal without structure loss
* **Format preservation** - Maintains cell formatting and styling
* **Precise control** - Target specific cells for content reset
## Example data processing workflow
## Practical Implementation Scenarios
Transform Lindy into a CRM system:
* New Row Added trigger processes incoming leads automatically
* Find Row action checks for existing customers to prevent duplicates
* Update Row action enriches lead data with external API information
* Append Row creates follow-up tasks and scheduled activities
Automate your entire inventory lifecycle:
* New Row Added monitors incoming inventory shipments
* Update Row tracks stock levels and product information
* Find Row verifies product availability for order processing
* Delete Row removes discontinued or out-of-stock items
Create sophisticated data transformation workflows:
* Get Spreadsheet retrieves raw data for processing
* AI-powered data cleaning and validation
* Append Rows writes processed results to destination sheets
* Create Worksheet organizes results by category or time period
## Best Practices
Optimize your data workflows:
* Use "New Row Added" trigger for real-time processing
* Implement data validation before processing
* Use lookup columns for maintaining data relationships
Maintain reliable spreadsheet operations:
* Use "Find Row" before "Update Row" for data integrity
* Use clear naming conventions for worksheets
* Set up proper access controls and permissions
Create efficient high-volume workflows:
* Batch operations when possible (use "Append Rows" vs multiple "Append Row")
* Use specific worksheet targeting to reduce trigger noise
* Use range operations for bulk data retrieval
## Next steps
Manage files and folders alongside spreadsheets
Combine spreadsheet data with document automation
Compare database and spreadsheet capabilities
Set up Sheet-based automation triggers
# HubSpot
Source: https://docs.lindy.ai/skills/popular-integrations/hubspot
## Quick Overview
HubSpot integration enables your AI agents to act as sales, marketing, and customer service assistants. Automate CRM workflows with both triggers and actions for complete sales and marketing automation.
Key benefits of HubSpot integration:
* **CRM management** – 11 actions for complete sales and marketing control
* **Real-time CRM monitoring** – 23 triggers for instant workflow activation
* **Dynamic field loading** – Automatic property and object discovery
* **Premium automation features** – Advanced capabilities for sophisticated workflows
## How to set up HubSpot
Click on the plus sign at the bottom or right-click anywhere on the canvas and select "Add Trigger" or "Add Action" from the pop-up menu and choose "HubSpot." Click on connect to configure your account.
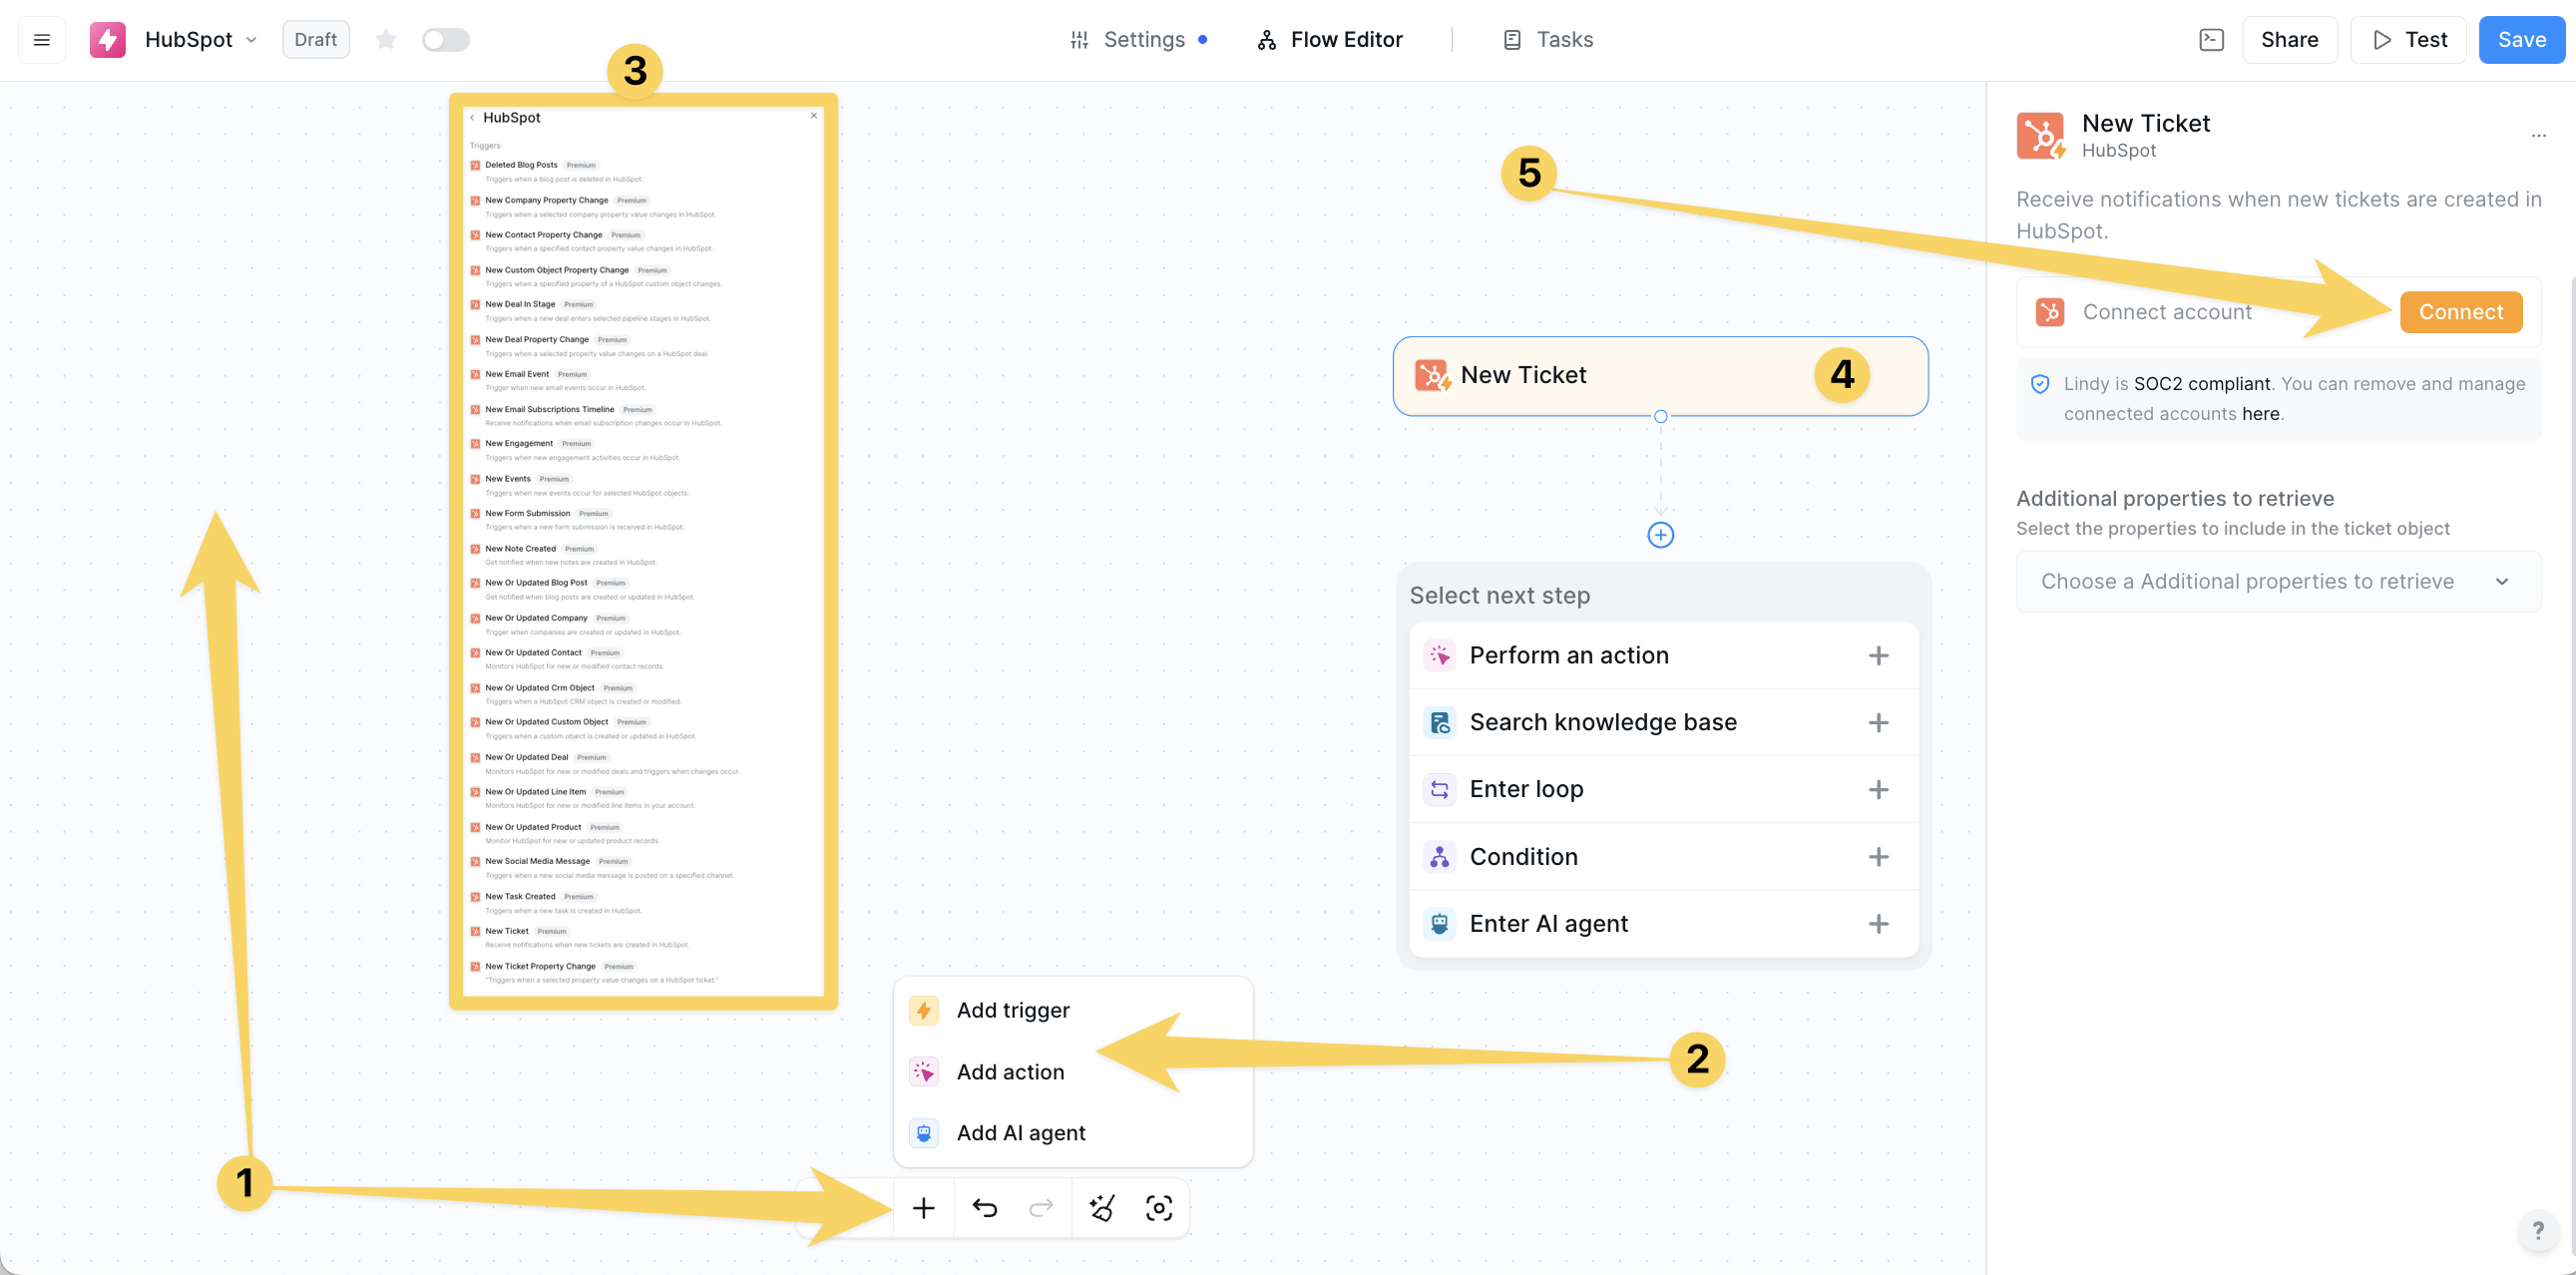 Click on "Add Account" and authorize your HubSpot for Lindy's integrations by granting permissions for CRM access and management. Choose which objects and properties you want this Lindy to access.
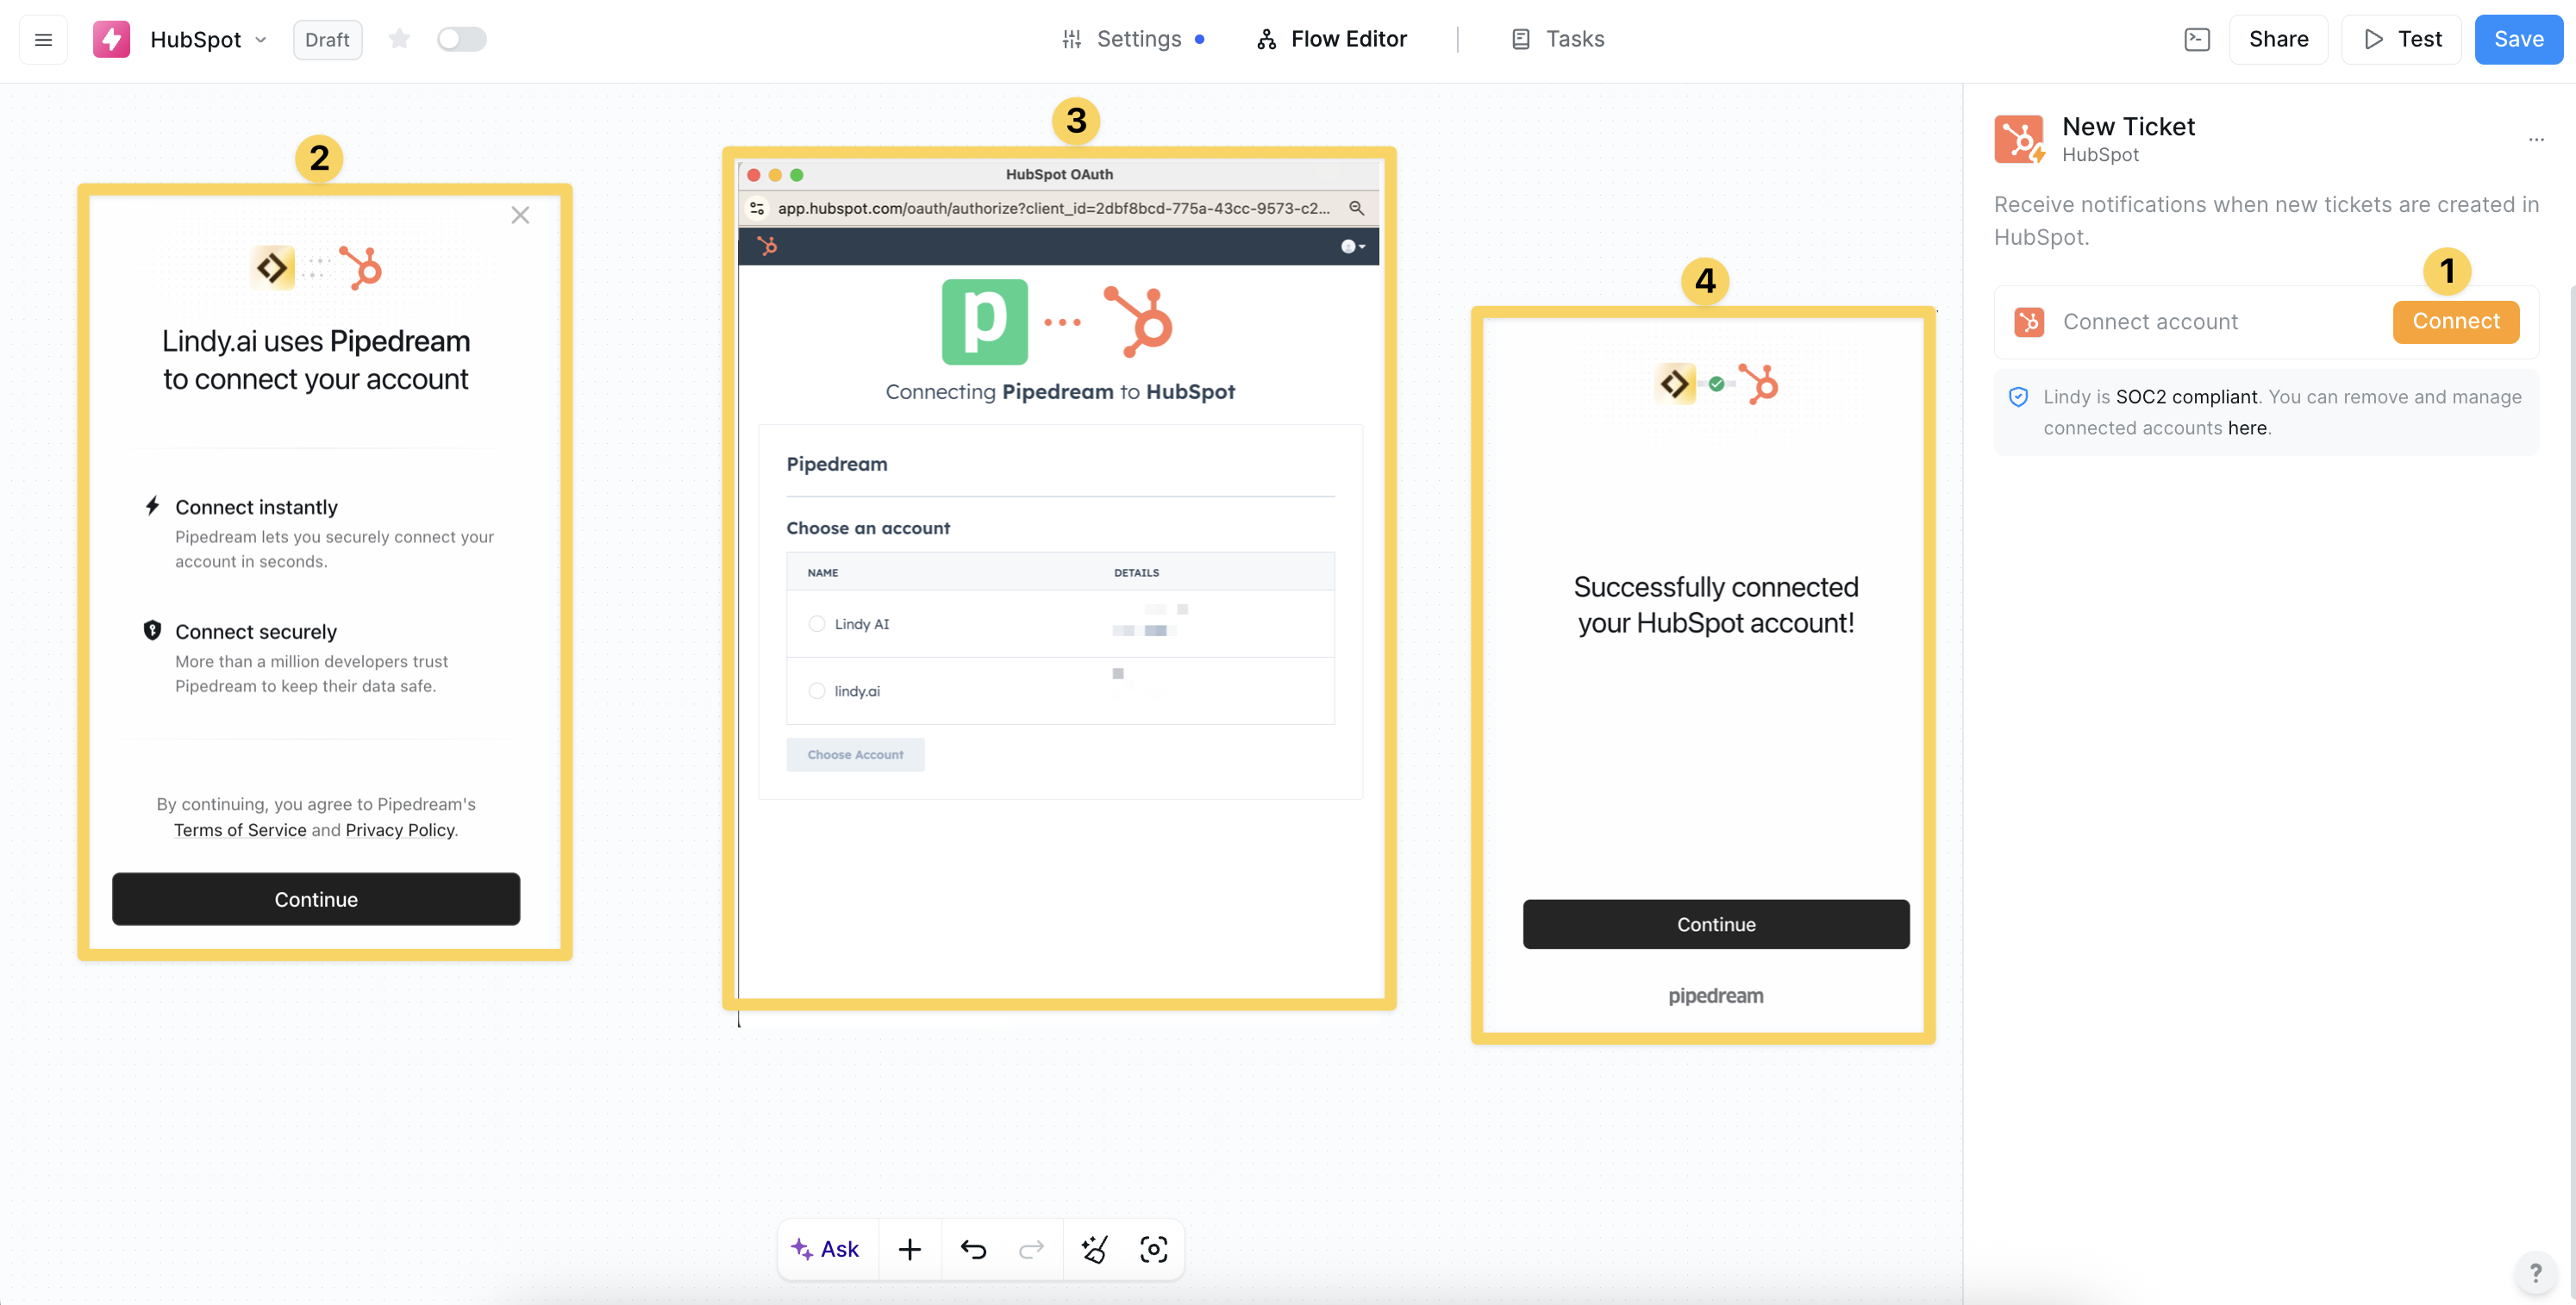 ## HubSpot Triggers
#### New Or Updated Contact
Monitors for new contacts or changes to existing contact records:
* **Configurable polling** - Default 15-minute intervals (900 seconds) with customization
* **Property selection** - Dynamic selection of additional properties to retrieve
* **List filtering** - Optional monitoring of specific contact lists
We recommend keeping polling at 900 seconds (15 minutes) because of HubSpot rate limits. This ensures reliable performance without hitting API restrictions.
#### New Contact Property Change
Triggers when specific contact properties are modified:
* **Dynamic property selection** - Choose from all contact properties
* **Real-time monitoring** - Track critical field changes instantly
* **Workflow activation** - Trigger based on property-specific changes
#### New Or Updated Deal
Monitors for new deals or changes to existing deal records:
* **Pipeline filtering** - Optional filtering by specific sales pipelines
* **Stage filtering** - Target specific deal stages for monitoring
* **Property retrieval** - Additional deal properties for comprehensive data
#### New Deal In Stage
Triggers when deals enter specific pipeline stages:
* **Pipeline selection** - Dynamic list of all available pipelines
* **Stage targeting** - Dependent stage selection based on chosen pipeline
* **Stage-specific automation** - Customized workflows for each deal stage
#### New Form Submission
Triggers when forms are submitted on your website:
* **Form selection** - Dynamic list of all HubSpot forms
* **Instant activation** - Real-time response to form submissions
* **Lead qualification** - Immediate processing of new leads
Use "New Deal In Stage" triggers combined with "Update Deal" actions for the most powerful sales pipeline automation workflows.
## HubSpot Actions
#### Create Contact
Creates new contact records in HubSpot:
* **Dynamic property mapping** - Based on HubSpot schema for complete data capture
* **Automatic duplicate detection** - Prevents duplicate contact creation
* **Custom property population** - Support for all standard and custom fields
#### Update Contact
Modifies existing contact information:
* **Property-specific updates** - Target individual fields for precise changes
* **Bulk modifications** - Update multiple properties simultaneously
* **Conditional updates** - Changes based on existing data conditions
#### Search Contacts
Advanced contact search with multiple criteria:
* **Advanced filtering** - Up to 3 conditions with multiple operators
* **Property selection** - Choose specific properties for results
* **Sort and limit options** - Organized results with max 100 records
#### Add Contact To List
Adds contacts to static HubSpot lists:
* **Email identification** - Uses email address for contact targeting
* **List building** - Dynamic list management capabilities
* **Segmentation tools** - Organize contacts for targeted campaigns
#### Enroll Contact Into Workflow
Triggers HubSpot workflow enrollment:
* **Email-based enrollment** - Target contacts by email address
* **Automated nurturing** - Trigger sophisticated nurture sequences
* **Lifecycle management** - Progress contacts through defined stages
#### Update Deal
Modifies deal properties and stages:
* **Stage progression** - Move deals through pipeline stages automatically
* **Property updates** - Modify deal values, close dates, and custom fields
* **Pipeline management** - Handle multiple sales pipelines efficiently
#### Create Associations
Links different HubSpot objects together:
* **Contact-to-company associations** - Build organizational relationships
* **Deal-to-contact relationships** - Connect deals with stakeholders
* **Custom object associations** - Link industry-specific objects
#### Create Communication
Logs communication records in HubSpot:
* **Email logging** - Track email interactions automatically
* **Call records** - Document phone conversations
* **Meeting notes** - Log meeting outcomes and action items
## Example CRM workflow
## Practical Implementation Scenarios
Transform Lindy into an intelligent lead qualification system:
* New Form Submission trigger captures leads instantly
* Search Contacts action checks for existing records to prevent duplicates
* Create Contact action adds new qualified leads to CRM
* Add Contact To List action segments leads for targeted campaigns
Automate your entire sales process:
* New Deal In Stage trigger activates stage-specific workflows
* Update Deal action progresses deals through pipeline stages
* Create Communication action logs sales activities automatically
* Create Associations action links deals with relevant contacts and companies
Streamline customer success processes:
* New Or Updated Deal trigger detects closed-won deals
* Enroll Contact Into Workflow action starts onboarding sequences
* Create Communication action logs onboarding activities
* Update Contact action tracks onboarding progress and milestones
## Best Practices
Pick the best trigger for your workflow:
* Use "New Form Submission" for immediate lead response (fastest activation)
* Use "New Deal In Stage" when you need stage-specific automation
* Avoid "New Or Updated Contact" for high-volume accounts unless you have a strong filter
* Always test with real data before going live
* Start with one trigger and one action, then add complexity
* Use Search Contacts before Create Contact to avoid duplicates
* Set up error notifications so you know when something breaks
Keep your CRM clean and useful:
* Use Update Contact instead of Create Contact when the person might already exist
* Always create associations between contacts, deals, and companies
* Log all important communications with Create Communication
* Use lists to segment contacts before running bulk operations
Prevent workflow problems before they happen:
* Don't use multiple triggers that could fire at the same time
* Keep polling at 900 seconds to avoid hitting rate limits
* Test triggers with small data sets first before scaling up
## Next steps
Compare CRM automation capabilities
Combine CRM with email automation
Build automated lead enrichment workflows
Set up HubSpot-based automation triggers
# Instagram
Source: https://docs.lindy.ai/skills/popular-integrations/instagram
Scrape and collect Instagram data including profiles, posts, reels, and comments
## Overview
Instagram integration enables comprehensive data collection from Instagram profiles, posts, reels, and comments. Perfect for social media monitoring, content analysis, and competitor research.
## Available Actions
### Content Collection by URL
* **Instagram reels by URL**: Collect Instagram reels by reel URL. Returns reel metadata, captions, engagement metrics, and video details.
* **Instagram posts by URL**: Collect Instagram posts by post URL. Returns post content, captions, hashtags, engagement data, and media files.
* **Instagram comments by URL**: Collect Instagram comments by post URL. Returns all comments with usernames, timestamps, and engagement metrics.
* **Instagram accounts by URL**: Collect Instagram accounts by account URL. Returns complete profile data including bio, follower counts, and recent posts.
### Advanced Profile Scrapers
* **Instagram Profile Scraper**: Scrape all Instagram profile info from one or more usernames. Returns comprehensive profile analysis including follower and following counts, bio and profile URLs, post counts and engagement metrics, related profiles and connections, and highlight reel data.
* **Instagram Post Scraper**: Scrape Instagram posts from one or more usernames. Returns detailed post analysis including text content and hashtags, mentions and comments, images and media URLs, location data and metadata, and engagement metrics.
* **Instagram Comments Scraper**: Scrape Instagram comments from posts or reels using post URLs. Returns comprehensive comment data including comment text and timestamps, user information and profile pictures, post IDs and positioning data, and owner details and URLs.
## Common Use Cases
* **Competitor Analysis**: Monitor competitor posts, engagement, and content strategies
* **Influencer Research**: Analyze influencer profiles, engagement rates, and audience data
* **Content Monitoring**: Track mentions, hashtags, and brand-related content
* **Trend Analysis**: Identify trending content, hashtags, and engagement patterns
Instagram actions work great with content analysis workflows, social media reporting, and competitive intelligence systems.
## Best Practices
Optimize your Instagram data gathering:
* Use specific URLs for targeted data collection instead of broad searches
* Combine multiple actions for comprehensive analysis (profile + posts + comments)
* Start with single profiles before scaling to multiple accounts
Structure your Instagram workflows effectively:
* Schedule regular monitoring for trend analysis rather than constant scraping
* Use Auto Mode to let AI fill fields based on previous steps
* Combine with content analysis actions for deeper insights
## Related Resources
Social media competitive analysis workflows
Use data insights for content strategy
Advanced social media data scraping
Store and analyze social media data
# LinkedIn
Source: https://docs.lindy.ai/skills/popular-integrations/linkedin
Automate LinkedIn activities including posts, comments, profile management, and organization administration
## Overview
LinkedIn integration enables comprehensive automation for professional networking, content management, and organization administration. Streamline your LinkedIn presence with automated posting, engagement tracking, and profile enrichment.
## Available Actions
### Content Creation & Management
* **Create A Simple Post**: Create and share a text post on LinkedIn with optional article URL. Returns post ID and engagement metrics.
* **Create an Organization Post**: Create a text post on LinkedIn for your organization. Returns organization post ID and visibility settings.
* **Create Image Post**: Create a LinkedIn post with an image and text with specified visibility settings. Returns image post ID and media URLs.
* **Create Comment**: Add a comment to a LinkedIn post or respond to an existing comment. Returns comment ID and thread information.
* **Delete Post**: Delete a post from your LinkedIn profile. Returns deletion confirmation.
### Profile & Member Data
* **Get Current Member Profile**: Retrieve the profile information of the currently authenticated LinkedIn user. Returns full profile data including headline, summary, and connections.
* **Get Member Profile**: Retrieve a LinkedIn member's profile information using their unique identifier. Returns public profile information and professional details.
* **Get Multiple Member Profiles**: Retrieve basic profile information for multiple LinkedIn members using their unique identifiers. Returns batch profile data for efficiency.
* **Get Member's Organization Access Control Information**: Retrieve organization access control details for a LinkedIn member's roles and permissions. Returns organization roles and permission levels.
### Organization Administration
* **Get Organization Administrators**: Retrieve administrators associated with a specified LinkedIn organization. Returns list of admin profiles and roles.
* **Gets Organization Access Control**: Retrieve access control settings for a LinkedIn organization. Returns permission levels and access policies.
* **Search Organization**: Search for LinkedIn organizations using their vanity name or email domain. Returns matching organizations with details.
### Data Collection & Scraping
* **LinkedIn companies by URL**: Collect LinkedIn companies by company URL. Returns company size, industry, specialties, and employee data.
* **LinkedIn job listings by URL**: Collect LinkedIn job listings by listing URL. Returns job details, requirements, and application information.
* **LinkedIn posts by URL**: Collect LinkedIn posts by post URL. Returns post content, engagement metrics, and author information.
* **LinkedIn profiles by URL**: Collect LinkedIn profiles by profile URL. Returns professional history, skills, and recommendations.
### Engagement & Analytics
* **Create Like On Share**: Like content shared on LinkedIn using entity URNs. Returns like confirmation and engagement count.
* **Retrieve Comments On Shares**: Get comments from a specific LinkedIn share or post. Returns comment threads with author details.
* **Retrieves Comments On Comments**: Retrieve replies to comments on LinkedIn posts. Returns nested comment threads.
* **Fetch Ad Account**: Retrieve detailed information about a specific LinkedIn advertising account. Returns ad account details and campaign performance.
## Use Cases
* **Content Automation**: Schedule and publish posts across personal and company profiles
* **Lead Generation**: Collect profile data and enrich CRM records
* **Social Listening**: Monitor comments and engagement on relevant posts
* **Recruitment**: Automate job posting and candidate profile collection
LinkedIn actions work seamlessly with email automation, CRM systems, and scheduling tools to create comprehensive professional networking workflows.
## Related Resources
Enrich leads with LinkedIn profile data
Combine LinkedIn with email outreach
Advanced profile and company enrichment
Build intelligent LinkedIn automation agents
# Microsoft Outlook
Source: https://docs.lindy.ai/skills/popular-integrations/microsoft-outlook
Email and calendar integration for Microsoft users with comprehensive contact and task management
## Overview
Microsoft Outlook integration provides comprehensive email, calendar, and contact management for Microsoft 365 users. Automate email workflows, sync calendar events, manage contacts, and streamline task management within the Microsoft ecosystem.
## Authentication Setup
Connect your Microsoft Outlook account securely through OAuth authentication. Lindy supports both personal Microsoft accounts and organizational Microsoft 365 accounts. Once authenticated, you'll have access to all Outlook features including email, calendar, contacts, and tasks. The connection is secure and follows Microsoft's security standards.
## Available Triggers
* **Email Received**: Triggered when a new email is received in your Microsoft Outlook account.
* **New Contact Event**: Triggers when a new contact is created in Microsoft Outlook.
## Email Actions & Features
### Core Email Actions
* **Send Email**: Send an email using Microsoft Outlook with full formatting and attachment support.
* **Reply To Email**: Reply to an email in Microsoft Outlook with thread continuity.
* **Create Draft Email**: Create a draft email in Microsoft Outlook with optional attachments and recipients.
* **Find Email**: Search for emails in Microsoft Outlook using filters and limits.
### Email Management
* **Add Label To Email**: Add a category or label to an Outlook email message.
* **Remove Label From Email**: Remove a label or category from a specific email message in Outlook.
* **Move Email To Folder**: Move an email message to a different folder in Outlook.
* **Approve Workflow**: Send an approval workflow email to specified recipients with a custom subject.
Microsoft Outlook emails support smart sequences that automatically monitor and respond to replies:
* After email sent: Continue actions after the email was sent (e.g. do a sequence)
* After reply received: Listen and respond when replies come in
## Calendar Actions & Features
### Calendar Management
* **Create Calendar Event**: Create and schedule a new event in your Outlook calendar with attendees, time zones, and detailed scheduling options.
## Contact & Organization Management
### Contact Actions
* **Create Contact**: Create a new contact in Microsoft Outlook with personal and business information.
* **Update Contact**: Update contact information in Microsoft Outlook with specified details.
* **Find Contacts**: Search for Outlook contacts using names or email addresses.
* **List Contacts**: Get a list of your Outlook contacts with optional email address filtering.
### Organization Actions
* **List Folders**: Retrieve a list of folders from your Microsoft Outlook account.
* **List Labels**: Retrieve a list of all labels (categories) from your Microsoft Outlook account.
## Common Use Cases
* **Email Automation**: Automated email responses and workflow approvals
* **Calendar Sync**: Meeting scheduling and event management automation
* **Contact Sync**: CRM integration and contact data management
* **Task Integration**: Workflow automation with email and calendar triggers
## Best Practices
Get the most out of Outlook email workflows:
* Always use filters on Email Received triggers to avoid processing every email
* Start with draft actions first, then switch to direct sending once tested
* Use organizational accounts instead of personal accounts for business workflows
* Test with a small group before rolling out approval workflows company-wide
Handle email conversations effectively:
* Use "After email sent" for follow-up sequences and reminders
* Use "After reply received" only when you need to process responses
* Keep track of multiple email threads when running parallel conversations
* Set up clear exit conditions for email sequences to avoid loops
Optimize scheduling and contact management:
* Sync Outlook contacts with your CRM to avoid duplicate data entry
* Use timezone-aware calendar events for global team coordination
* Set up automated meeting follow-ups using calendar triggers
* Keep contact data clean by updating rather than creating new records
Microsoft Outlook integration works seamlessly with other Microsoft 365 tools, making it perfect for organizations already using the Microsoft ecosystem.
## Related Resources
Compare with Gmail automation features
Integrate with Microsoft Teams workflows
Connect with calendar automation
Set up Outlook-based automation triggers
# Microsoft Teams
Source: https://docs.lindy.ai/skills/popular-integrations/microsoft-teams
Integrate with Microsoft Teams for channel management, messaging, and team collaboration automation
## Overview
Microsoft Teams integration enables seamless automation for team collaboration, channel management, and messaging workflows. Streamline your Teams workspace with automated notifications, message distribution, and team administration.
## Authentication Setup
Connect your Microsoft Teams account securely through OAuth authentication. Lindy supports both personal Microsoft accounts and organizational Microsoft 365 accounts. Once authenticated, you'll have access to all Teams features including channels, messaging, and team management.
## Available Triggers
* **New Channel**: Triggers when a new channel is created in a Microsoft Teams team.
* **New Channel Message**: Triggers when a new message is posted to a Microsoft Teams channel.
* **New Chat**: Triggers when a new chat message is received in Microsoft Teams.
* **New Chat Message**: Trigger when new messages are received in a selected Microsoft Teams chat.
* **New Team**: Triggers when a new team is created in Microsoft Teams.
* **New Team Member**: Triggers when a new member is added to a Microsoft Teams team.
## Available Actions
### Messaging & Communication
* **Send Channel Message**: Send a message to a Microsoft Teams channel using team ID, channel ID, and message content.
* **Send Chat Message**: Send a message to a Microsoft Teams chat using chat ID and message content.
### Channel Management
* **Create Channel**: Create a new channel within a Microsoft Teams team using team ID, channel name, description, and privacy settings.
* **List Channels**: Get a list of all channels within a specified Microsoft Teams team using team ID.
### Team Operations
* **List Shifts**: Get a list of shifts for a Microsoft Teams team using team ID and optional date range.
## Use Cases
* **Notification Hub**: Broadcast important updates across multiple Teams channels
* **Workflow Automation**: Trigger processes based on Teams messages and activities
* **Cross-Platform Sync**: Sync Teams conversations with other communication tools
* **Team Onboarding**: Automate welcome messages and channel assignments for new members
### Common Examples
* **Daily Standup Reminders**: Send scheduled messages to team channels
* **Issue Escalation**: Forward critical messages to management channels
* **Cross-Tool Updates**: Post Jira/GitHub updates to project channels
* **Meeting Summaries**: Automatically share meeting notes in relevant channels
## Best Practices
Optimize your Teams automation:
* Monitor specific channels to avoid information overload
* Use channel messages for team-wide communications
* Use chat messages for direct, targeted communications
* Test automations in dedicated test channels first
* Use rich text formatting, mentions, and attachments for better engagement
* Set up clear naming conventions for automated channels
* Schedule non-urgent messages during business hours
* Start with simple message workflows before adding complexity
Microsoft Teams actions integrate seamlessly with Office 365 tools, making it perfect for organizations already using the Microsoft ecosystem.
## Related Resources
Compare messaging automation features
Combine Teams with email automation
Connect with calendar-based workflows
Set up Teams-based automation triggers
# Notion
Source: https://docs.lindy.ai/skills/popular-integrations/notion
## Quick Overview
Lindy's Notion integration enables you to automate, synchronize, and supercharge your Notion workspace. You can create, update, search, and monitor Notion pages and databases, making Lindy a powerful assistant for knowledge management, project tracking, CRM, and more.
This comprehensive integration transforms Lindy into a powerful knowledge management platform, capable of handling everything from simple page creation to complex database automation and content workflows.
Key benefits of Notion integration:
* **Comprehensive content management** – 16 actions for complete Notion workspace control
* **Real-time monitoring** – 7 triggers for instant workflow activation
* **Database automation** – Powerful CRM, project management, and ticketing capabilities
* **Advanced content workflows** – AI-powered content generation and management
## How to set up Notion
Click on the plus sign at the bottom or right-click anywhere on the canvas and select "Add Trigger" or "Add Action" from the pop-up menu and choose "Notion"
## HubSpot Triggers
#### New Or Updated Contact
Monitors for new contacts or changes to existing contact records:
* **Configurable polling** - Default 15-minute intervals (900 seconds) with customization
* **Property selection** - Dynamic selection of additional properties to retrieve
* **List filtering** - Optional monitoring of specific contact lists
We recommend keeping polling at 900 seconds (15 minutes) because of HubSpot rate limits. This ensures reliable performance without hitting API restrictions.
#### New Contact Property Change
Triggers when specific contact properties are modified:
* **Dynamic property selection** - Choose from all contact properties
* **Real-time monitoring** - Track critical field changes instantly
* **Workflow activation** - Trigger based on property-specific changes
#### New Or Updated Deal
Monitors for new deals or changes to existing deal records:
* **Pipeline filtering** - Optional filtering by specific sales pipelines
* **Stage filtering** - Target specific deal stages for monitoring
* **Property retrieval** - Additional deal properties for comprehensive data
#### New Deal In Stage
Triggers when deals enter specific pipeline stages:
* **Pipeline selection** - Dynamic list of all available pipelines
* **Stage targeting** - Dependent stage selection based on chosen pipeline
* **Stage-specific automation** - Customized workflows for each deal stage
#### New Form Submission
Triggers when forms are submitted on your website:
* **Form selection** - Dynamic list of all HubSpot forms
* **Instant activation** - Real-time response to form submissions
* **Lead qualification** - Immediate processing of new leads
Use "New Deal In Stage" triggers combined with "Update Deal" actions for the most powerful sales pipeline automation workflows.
## HubSpot Actions
#### Create Contact
Creates new contact records in HubSpot:
* **Dynamic property mapping** - Based on HubSpot schema for complete data capture
* **Automatic duplicate detection** - Prevents duplicate contact creation
* **Custom property population** - Support for all standard and custom fields
#### Update Contact
Modifies existing contact information:
* **Property-specific updates** - Target individual fields for precise changes
* **Bulk modifications** - Update multiple properties simultaneously
* **Conditional updates** - Changes based on existing data conditions
#### Search Contacts
Advanced contact search with multiple criteria:
* **Advanced filtering** - Up to 3 conditions with multiple operators
* **Property selection** - Choose specific properties for results
* **Sort and limit options** - Organized results with max 100 records
#### Add Contact To List
Adds contacts to static HubSpot lists:
* **Email identification** - Uses email address for contact targeting
* **List building** - Dynamic list management capabilities
* **Segmentation tools** - Organize contacts for targeted campaigns
#### Enroll Contact Into Workflow
Triggers HubSpot workflow enrollment:
* **Email-based enrollment** - Target contacts by email address
* **Automated nurturing** - Trigger sophisticated nurture sequences
* **Lifecycle management** - Progress contacts through defined stages
#### Update Deal
Modifies deal properties and stages:
* **Stage progression** - Move deals through pipeline stages automatically
* **Property updates** - Modify deal values, close dates, and custom fields
* **Pipeline management** - Handle multiple sales pipelines efficiently
#### Create Associations
Links different HubSpot objects together:
* **Contact-to-company associations** - Build organizational relationships
* **Deal-to-contact relationships** - Connect deals with stakeholders
* **Custom object associations** - Link industry-specific objects
#### Create Communication
Logs communication records in HubSpot:
* **Email logging** - Track email interactions automatically
* **Call records** - Document phone conversations
* **Meeting notes** - Log meeting outcomes and action items
## Example CRM workflow
## Practical Implementation Scenarios
Transform Lindy into an intelligent lead qualification system:
* New Form Submission trigger captures leads instantly
* Search Contacts action checks for existing records to prevent duplicates
* Create Contact action adds new qualified leads to CRM
* Add Contact To List action segments leads for targeted campaigns
Automate your entire sales process:
* New Deal In Stage trigger activates stage-specific workflows
* Update Deal action progresses deals through pipeline stages
* Create Communication action logs sales activities automatically
* Create Associations action links deals with relevant contacts and companies
Streamline customer success processes:
* New Or Updated Deal trigger detects closed-won deals
* Enroll Contact Into Workflow action starts onboarding sequences
* Create Communication action logs onboarding activities
* Update Contact action tracks onboarding progress and milestones
## Best Practices
Pick the best trigger for your workflow:
* Use "New Form Submission" for immediate lead response (fastest activation)
* Use "New Deal In Stage" when you need stage-specific automation
* Avoid "New Or Updated Contact" for high-volume accounts unless you have a strong filter
* Always test with real data before going live
* Start with one trigger and one action, then add complexity
* Use Search Contacts before Create Contact to avoid duplicates
* Set up error notifications so you know when something breaks
Keep your CRM clean and useful:
* Use Update Contact instead of Create Contact when the person might already exist
* Always create associations between contacts, deals, and companies
* Log all important communications with Create Communication
* Use lists to segment contacts before running bulk operations
Prevent workflow problems before they happen:
* Don't use multiple triggers that could fire at the same time
* Keep polling at 900 seconds to avoid hitting rate limits
* Test triggers with small data sets first before scaling up
## Next steps
Compare CRM automation capabilities
Combine CRM with email automation
Build automated lead enrichment workflows
Set up HubSpot-based automation triggers
# Instagram
Source: https://docs.lindy.ai/skills/popular-integrations/instagram
Scrape and collect Instagram data including profiles, posts, reels, and comments
## Overview
Instagram integration enables comprehensive data collection from Instagram profiles, posts, reels, and comments. Perfect for social media monitoring, content analysis, and competitor research.
## Available Actions
### Content Collection by URL
* **Instagram reels by URL**: Collect Instagram reels by reel URL. Returns reel metadata, captions, engagement metrics, and video details.
* **Instagram posts by URL**: Collect Instagram posts by post URL. Returns post content, captions, hashtags, engagement data, and media files.
* **Instagram comments by URL**: Collect Instagram comments by post URL. Returns all comments with usernames, timestamps, and engagement metrics.
* **Instagram accounts by URL**: Collect Instagram accounts by account URL. Returns complete profile data including bio, follower counts, and recent posts.
### Advanced Profile Scrapers
* **Instagram Profile Scraper**: Scrape all Instagram profile info from one or more usernames. Returns comprehensive profile analysis including follower and following counts, bio and profile URLs, post counts and engagement metrics, related profiles and connections, and highlight reel data.
* **Instagram Post Scraper**: Scrape Instagram posts from one or more usernames. Returns detailed post analysis including text content and hashtags, mentions and comments, images and media URLs, location data and metadata, and engagement metrics.
* **Instagram Comments Scraper**: Scrape Instagram comments from posts or reels using post URLs. Returns comprehensive comment data including comment text and timestamps, user information and profile pictures, post IDs and positioning data, and owner details and URLs.
## Common Use Cases
* **Competitor Analysis**: Monitor competitor posts, engagement, and content strategies
* **Influencer Research**: Analyze influencer profiles, engagement rates, and audience data
* **Content Monitoring**: Track mentions, hashtags, and brand-related content
* **Trend Analysis**: Identify trending content, hashtags, and engagement patterns
Instagram actions work great with content analysis workflows, social media reporting, and competitive intelligence systems.
## Best Practices
Optimize your Instagram data gathering:
* Use specific URLs for targeted data collection instead of broad searches
* Combine multiple actions for comprehensive analysis (profile + posts + comments)
* Start with single profiles before scaling to multiple accounts
Structure your Instagram workflows effectively:
* Schedule regular monitoring for trend analysis rather than constant scraping
* Use Auto Mode to let AI fill fields based on previous steps
* Combine with content analysis actions for deeper insights
## Related Resources
Social media competitive analysis workflows
Use data insights for content strategy
Advanced social media data scraping
Store and analyze social media data
# LinkedIn
Source: https://docs.lindy.ai/skills/popular-integrations/linkedin
Automate LinkedIn activities including posts, comments, profile management, and organization administration
## Overview
LinkedIn integration enables comprehensive automation for professional networking, content management, and organization administration. Streamline your LinkedIn presence with automated posting, engagement tracking, and profile enrichment.
## Available Actions
### Content Creation & Management
* **Create A Simple Post**: Create and share a text post on LinkedIn with optional article URL. Returns post ID and engagement metrics.
* **Create an Organization Post**: Create a text post on LinkedIn for your organization. Returns organization post ID and visibility settings.
* **Create Image Post**: Create a LinkedIn post with an image and text with specified visibility settings. Returns image post ID and media URLs.
* **Create Comment**: Add a comment to a LinkedIn post or respond to an existing comment. Returns comment ID and thread information.
* **Delete Post**: Delete a post from your LinkedIn profile. Returns deletion confirmation.
### Profile & Member Data
* **Get Current Member Profile**: Retrieve the profile information of the currently authenticated LinkedIn user. Returns full profile data including headline, summary, and connections.
* **Get Member Profile**: Retrieve a LinkedIn member's profile information using their unique identifier. Returns public profile information and professional details.
* **Get Multiple Member Profiles**: Retrieve basic profile information for multiple LinkedIn members using their unique identifiers. Returns batch profile data for efficiency.
* **Get Member's Organization Access Control Information**: Retrieve organization access control details for a LinkedIn member's roles and permissions. Returns organization roles and permission levels.
### Organization Administration
* **Get Organization Administrators**: Retrieve administrators associated with a specified LinkedIn organization. Returns list of admin profiles and roles.
* **Gets Organization Access Control**: Retrieve access control settings for a LinkedIn organization. Returns permission levels and access policies.
* **Search Organization**: Search for LinkedIn organizations using their vanity name or email domain. Returns matching organizations with details.
### Data Collection & Scraping
* **LinkedIn companies by URL**: Collect LinkedIn companies by company URL. Returns company size, industry, specialties, and employee data.
* **LinkedIn job listings by URL**: Collect LinkedIn job listings by listing URL. Returns job details, requirements, and application information.
* **LinkedIn posts by URL**: Collect LinkedIn posts by post URL. Returns post content, engagement metrics, and author information.
* **LinkedIn profiles by URL**: Collect LinkedIn profiles by profile URL. Returns professional history, skills, and recommendations.
### Engagement & Analytics
* **Create Like On Share**: Like content shared on LinkedIn using entity URNs. Returns like confirmation and engagement count.
* **Retrieve Comments On Shares**: Get comments from a specific LinkedIn share or post. Returns comment threads with author details.
* **Retrieves Comments On Comments**: Retrieve replies to comments on LinkedIn posts. Returns nested comment threads.
* **Fetch Ad Account**: Retrieve detailed information about a specific LinkedIn advertising account. Returns ad account details and campaign performance.
## Use Cases
* **Content Automation**: Schedule and publish posts across personal and company profiles
* **Lead Generation**: Collect profile data and enrich CRM records
* **Social Listening**: Monitor comments and engagement on relevant posts
* **Recruitment**: Automate job posting and candidate profile collection
LinkedIn actions work seamlessly with email automation, CRM systems, and scheduling tools to create comprehensive professional networking workflows.
## Related Resources
Enrich leads with LinkedIn profile data
Combine LinkedIn with email outreach
Advanced profile and company enrichment
Build intelligent LinkedIn automation agents
# Microsoft Outlook
Source: https://docs.lindy.ai/skills/popular-integrations/microsoft-outlook
Email and calendar integration for Microsoft users with comprehensive contact and task management
## Overview
Microsoft Outlook integration provides comprehensive email, calendar, and contact management for Microsoft 365 users. Automate email workflows, sync calendar events, manage contacts, and streamline task management within the Microsoft ecosystem.
## Authentication Setup
Connect your Microsoft Outlook account securely through OAuth authentication. Lindy supports both personal Microsoft accounts and organizational Microsoft 365 accounts. Once authenticated, you'll have access to all Outlook features including email, calendar, contacts, and tasks. The connection is secure and follows Microsoft's security standards.
## Available Triggers
* **Email Received**: Triggered when a new email is received in your Microsoft Outlook account.
* **New Contact Event**: Triggers when a new contact is created in Microsoft Outlook.
## Email Actions & Features
### Core Email Actions
* **Send Email**: Send an email using Microsoft Outlook with full formatting and attachment support.
* **Reply To Email**: Reply to an email in Microsoft Outlook with thread continuity.
* **Create Draft Email**: Create a draft email in Microsoft Outlook with optional attachments and recipients.
* **Find Email**: Search for emails in Microsoft Outlook using filters and limits.
### Email Management
* **Add Label To Email**: Add a category or label to an Outlook email message.
* **Remove Label From Email**: Remove a label or category from a specific email message in Outlook.
* **Move Email To Folder**: Move an email message to a different folder in Outlook.
* **Approve Workflow**: Send an approval workflow email to specified recipients with a custom subject.
Microsoft Outlook emails support smart sequences that automatically monitor and respond to replies:
* After email sent: Continue actions after the email was sent (e.g. do a sequence)
* After reply received: Listen and respond when replies come in
## Calendar Actions & Features
### Calendar Management
* **Create Calendar Event**: Create and schedule a new event in your Outlook calendar with attendees, time zones, and detailed scheduling options.
## Contact & Organization Management
### Contact Actions
* **Create Contact**: Create a new contact in Microsoft Outlook with personal and business information.
* **Update Contact**: Update contact information in Microsoft Outlook with specified details.
* **Find Contacts**: Search for Outlook contacts using names or email addresses.
* **List Contacts**: Get a list of your Outlook contacts with optional email address filtering.
### Organization Actions
* **List Folders**: Retrieve a list of folders from your Microsoft Outlook account.
* **List Labels**: Retrieve a list of all labels (categories) from your Microsoft Outlook account.
## Common Use Cases
* **Email Automation**: Automated email responses and workflow approvals
* **Calendar Sync**: Meeting scheduling and event management automation
* **Contact Sync**: CRM integration and contact data management
* **Task Integration**: Workflow automation with email and calendar triggers
## Best Practices
Get the most out of Outlook email workflows:
* Always use filters on Email Received triggers to avoid processing every email
* Start with draft actions first, then switch to direct sending once tested
* Use organizational accounts instead of personal accounts for business workflows
* Test with a small group before rolling out approval workflows company-wide
Handle email conversations effectively:
* Use "After email sent" for follow-up sequences and reminders
* Use "After reply received" only when you need to process responses
* Keep track of multiple email threads when running parallel conversations
* Set up clear exit conditions for email sequences to avoid loops
Optimize scheduling and contact management:
* Sync Outlook contacts with your CRM to avoid duplicate data entry
* Use timezone-aware calendar events for global team coordination
* Set up automated meeting follow-ups using calendar triggers
* Keep contact data clean by updating rather than creating new records
Microsoft Outlook integration works seamlessly with other Microsoft 365 tools, making it perfect for organizations already using the Microsoft ecosystem.
## Related Resources
Compare with Gmail automation features
Integrate with Microsoft Teams workflows
Connect with calendar automation
Set up Outlook-based automation triggers
# Microsoft Teams
Source: https://docs.lindy.ai/skills/popular-integrations/microsoft-teams
Integrate with Microsoft Teams for channel management, messaging, and team collaboration automation
## Overview
Microsoft Teams integration enables seamless automation for team collaboration, channel management, and messaging workflows. Streamline your Teams workspace with automated notifications, message distribution, and team administration.
## Authentication Setup
Connect your Microsoft Teams account securely through OAuth authentication. Lindy supports both personal Microsoft accounts and organizational Microsoft 365 accounts. Once authenticated, you'll have access to all Teams features including channels, messaging, and team management.
## Available Triggers
* **New Channel**: Triggers when a new channel is created in a Microsoft Teams team.
* **New Channel Message**: Triggers when a new message is posted to a Microsoft Teams channel.
* **New Chat**: Triggers when a new chat message is received in Microsoft Teams.
* **New Chat Message**: Trigger when new messages are received in a selected Microsoft Teams chat.
* **New Team**: Triggers when a new team is created in Microsoft Teams.
* **New Team Member**: Triggers when a new member is added to a Microsoft Teams team.
## Available Actions
### Messaging & Communication
* **Send Channel Message**: Send a message to a Microsoft Teams channel using team ID, channel ID, and message content.
* **Send Chat Message**: Send a message to a Microsoft Teams chat using chat ID and message content.
### Channel Management
* **Create Channel**: Create a new channel within a Microsoft Teams team using team ID, channel name, description, and privacy settings.
* **List Channels**: Get a list of all channels within a specified Microsoft Teams team using team ID.
### Team Operations
* **List Shifts**: Get a list of shifts for a Microsoft Teams team using team ID and optional date range.
## Use Cases
* **Notification Hub**: Broadcast important updates across multiple Teams channels
* **Workflow Automation**: Trigger processes based on Teams messages and activities
* **Cross-Platform Sync**: Sync Teams conversations with other communication tools
* **Team Onboarding**: Automate welcome messages and channel assignments for new members
### Common Examples
* **Daily Standup Reminders**: Send scheduled messages to team channels
* **Issue Escalation**: Forward critical messages to management channels
* **Cross-Tool Updates**: Post Jira/GitHub updates to project channels
* **Meeting Summaries**: Automatically share meeting notes in relevant channels
## Best Practices
Optimize your Teams automation:
* Monitor specific channels to avoid information overload
* Use channel messages for team-wide communications
* Use chat messages for direct, targeted communications
* Test automations in dedicated test channels first
* Use rich text formatting, mentions, and attachments for better engagement
* Set up clear naming conventions for automated channels
* Schedule non-urgent messages during business hours
* Start with simple message workflows before adding complexity
Microsoft Teams actions integrate seamlessly with Office 365 tools, making it perfect for organizations already using the Microsoft ecosystem.
## Related Resources
Compare messaging automation features
Combine Teams with email automation
Connect with calendar-based workflows
Set up Teams-based automation triggers
# Notion
Source: https://docs.lindy.ai/skills/popular-integrations/notion
## Quick Overview
Lindy's Notion integration enables you to automate, synchronize, and supercharge your Notion workspace. You can create, update, search, and monitor Notion pages and databases, making Lindy a powerful assistant for knowledge management, project tracking, CRM, and more.
This comprehensive integration transforms Lindy into a powerful knowledge management platform, capable of handling everything from simple page creation to complex database automation and content workflows.
Key benefits of Notion integration:
* **Comprehensive content management** – 16 actions for complete Notion workspace control
* **Real-time monitoring** – 7 triggers for instant workflow activation
* **Database automation** – Powerful CRM, project management, and ticketing capabilities
* **Advanced content workflows** – AI-powered content generation and management
## How to set up Notion
Click on the plus sign at the bottom or right-click anywhere on the canvas and select "Add Trigger" or "Add Action" from the pop-up menu and choose "Notion"
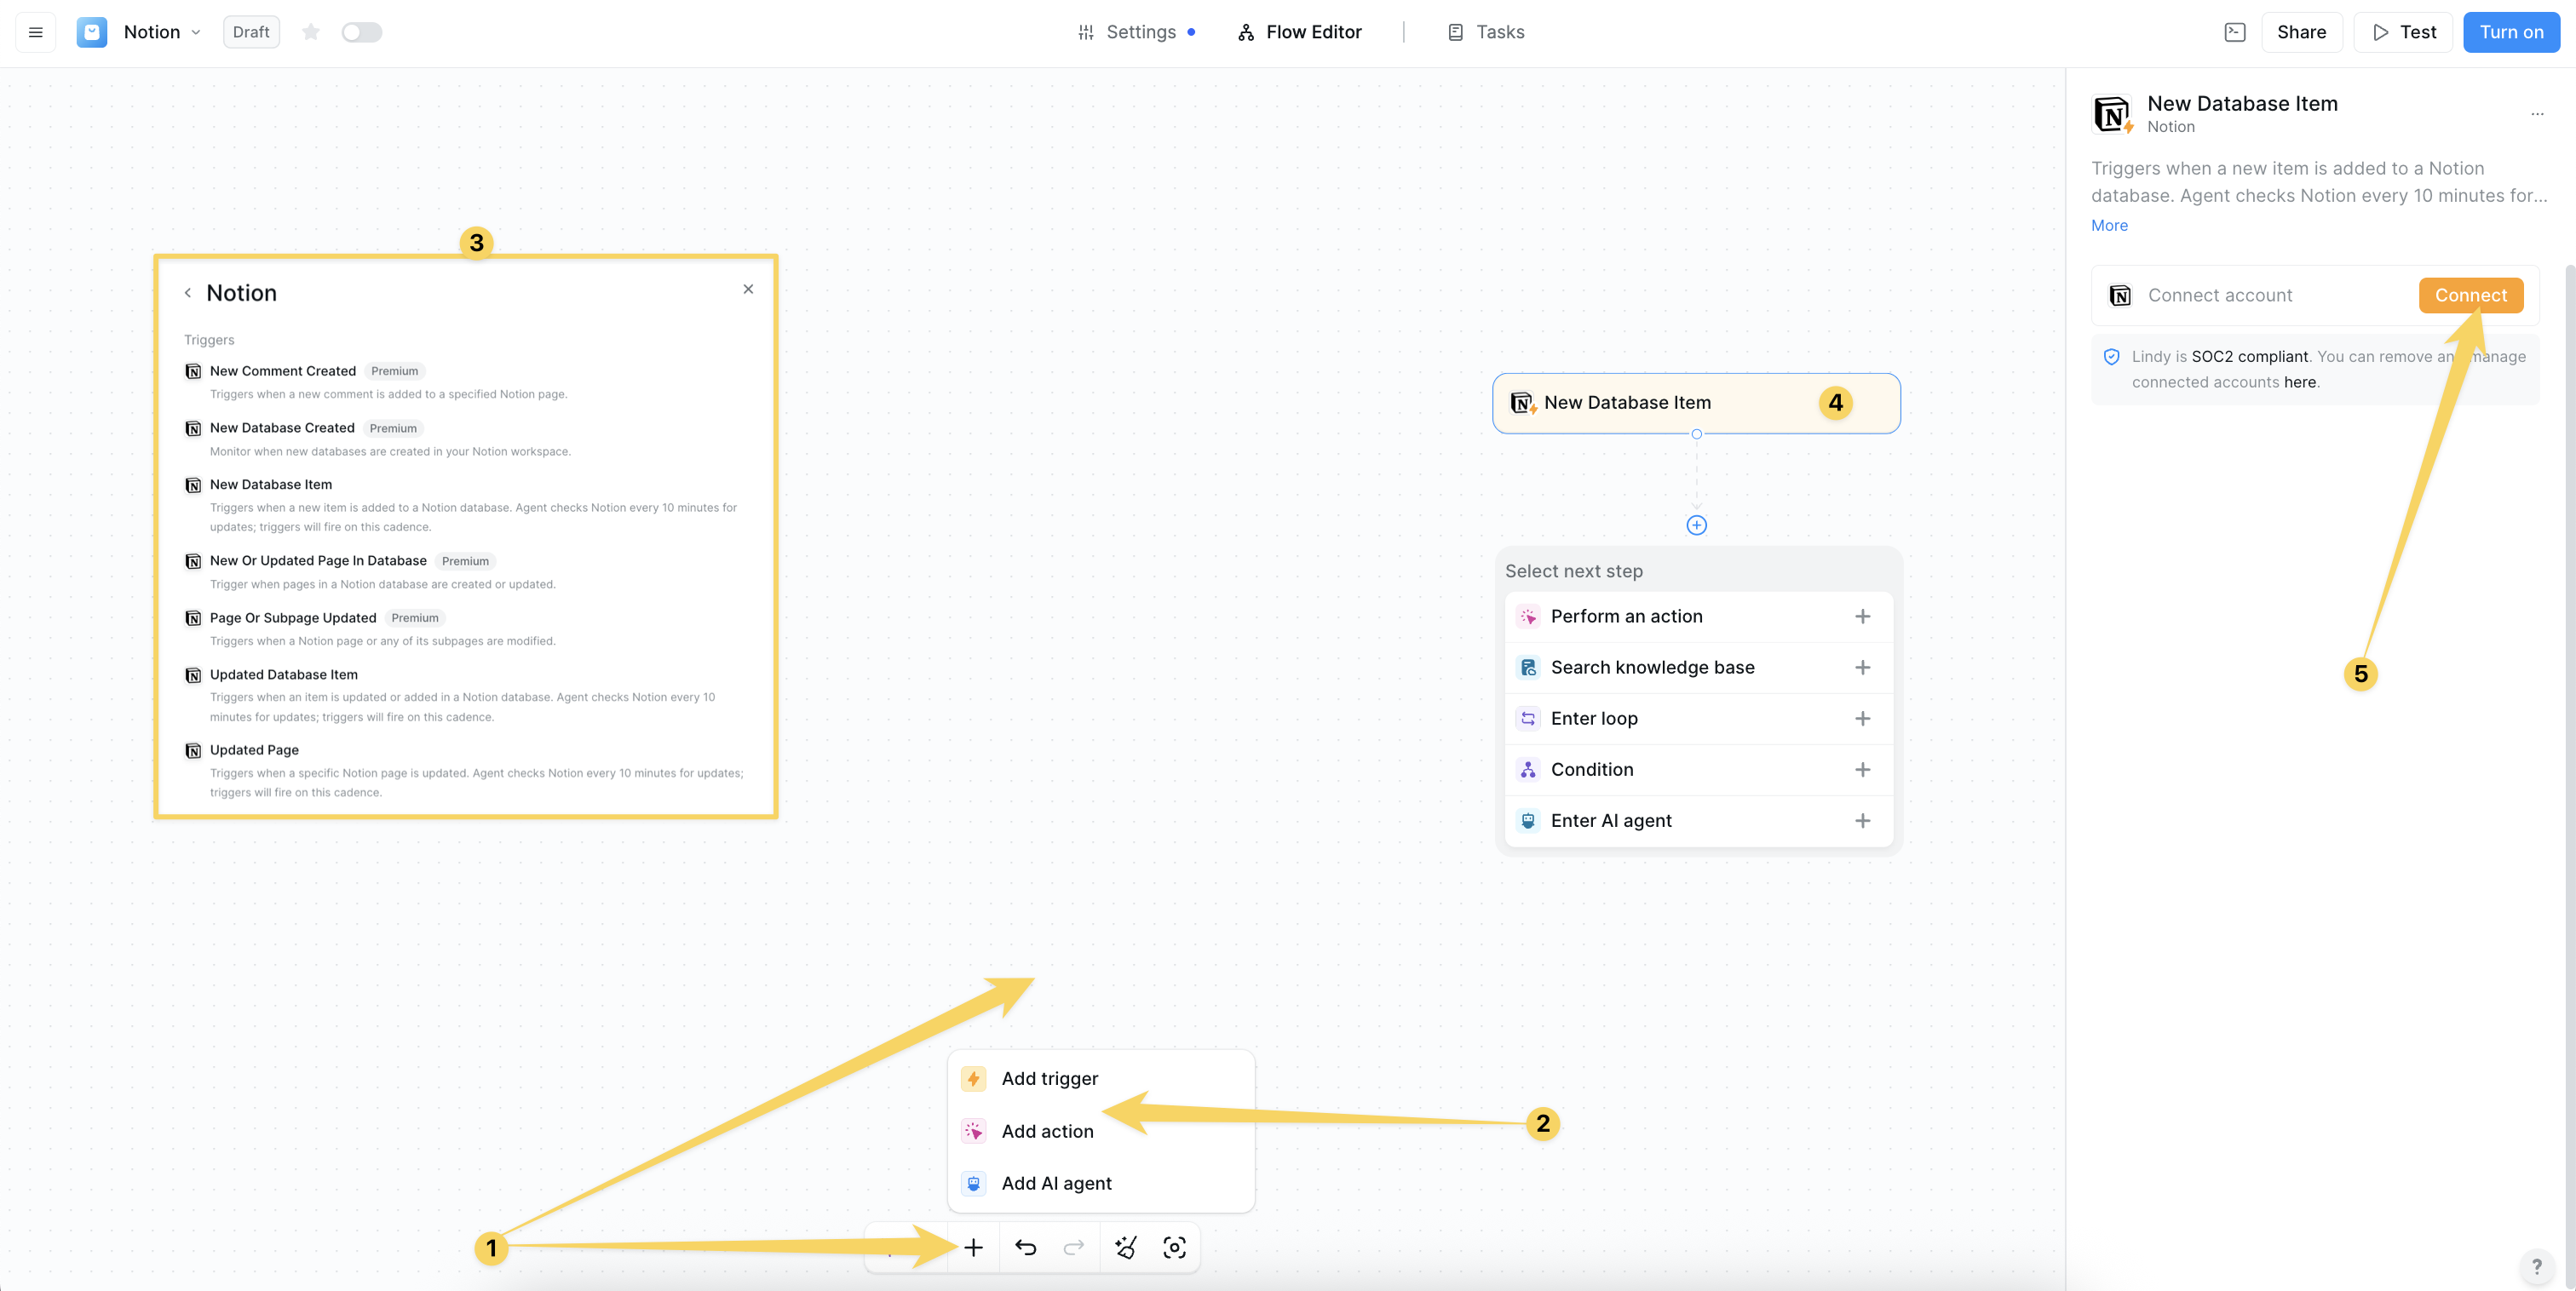 Click on "Add Account" and authorize your Notion for Lindy's integrations by granting permissions for workspace access and management. Choose which pages and databases you want this Lindy to access.
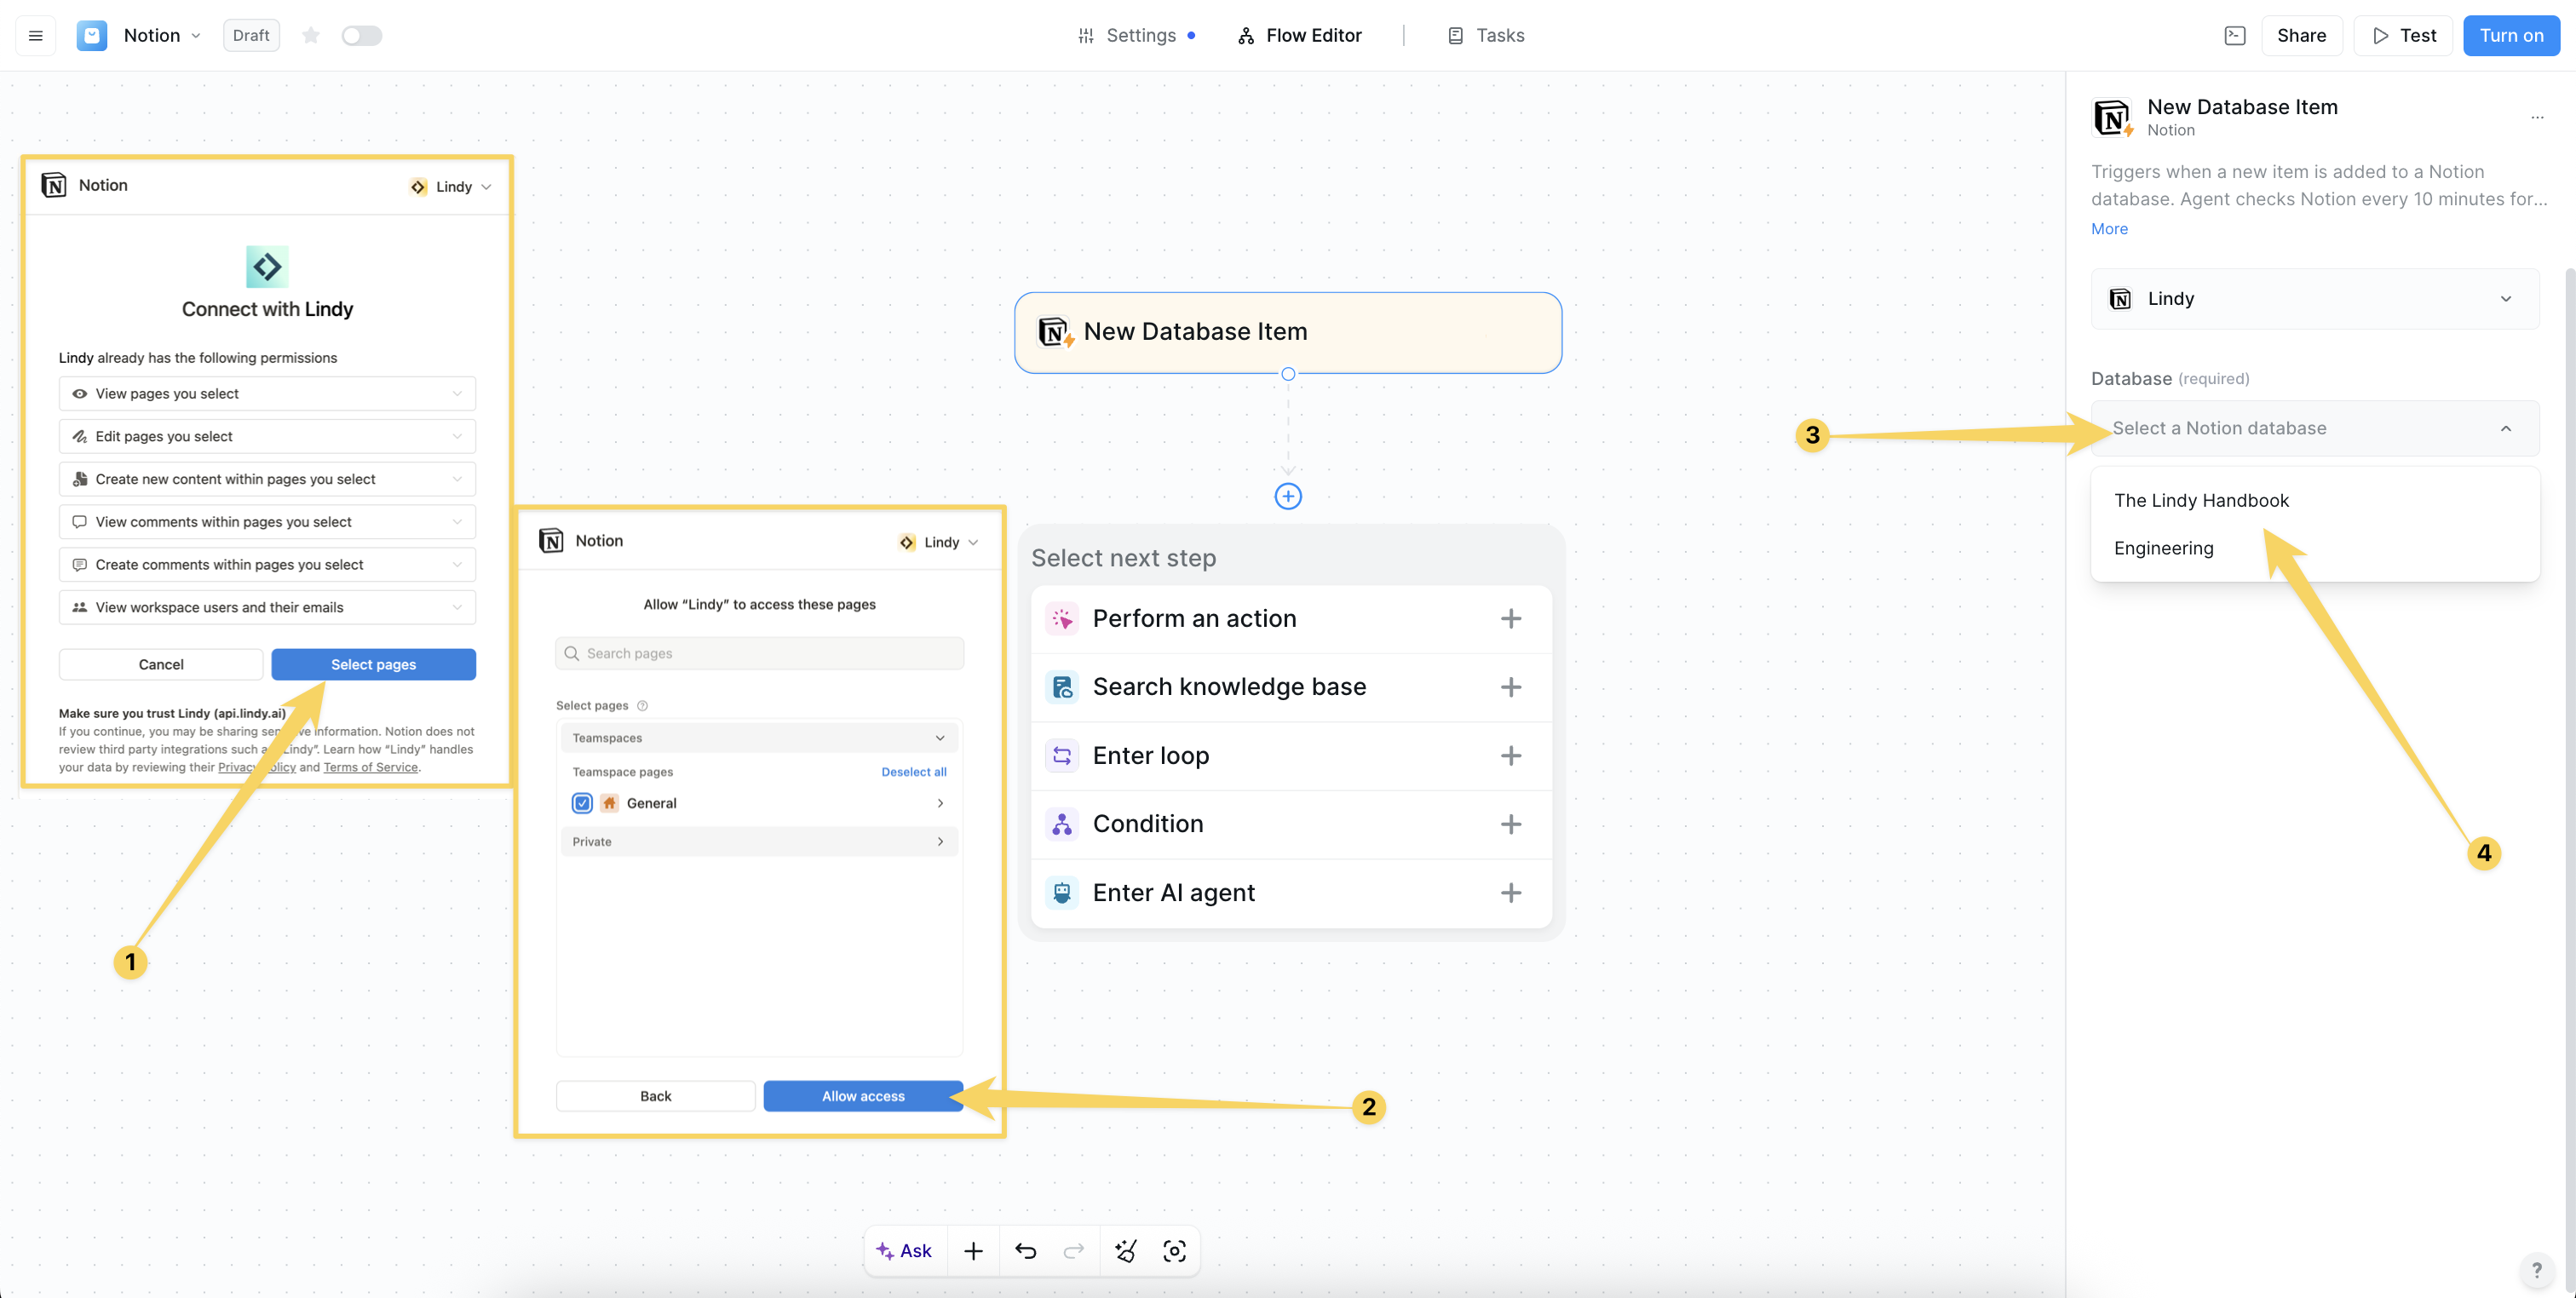 ## Notion Triggers
#### New Database Item
Triggers when a new item is added to a Notion database:
* **Real-time monitoring** - Checks every 10 minutes for new database entries
* **Structured data processing** - Handles CRM, project management, or ticketing data
* **Workflow activation** - Processes new tasks, leads, or tickets automatically
* Perfect for task management, lead processing, ticket routing
#### Updated Database Item
Triggers when an item is updated or added in a Notion database:
* **Change detection** - Monitors database modifications every 10 minutes
* **Status tracking** - Tracks workflow progression and status changes
* **Automation activation** - Triggers follow-ups, syncs, and notifications
* Ideal for workflow automation, system synchronization, change monitoring
#### Updated Page
Triggers when a specific Notion page is updated:
* **Content monitoring** - Tracks page modifications every 10 minutes
* **Change tracking** - Monitors content updates and property changes
* **Workflow activation** - Triggers content-based automation
* Perfect for content change monitoring, compliance tracking, workflow automation
#### Page Or Subpage Updated
Triggers when a Notion page or any of its subpages are modified:
* **Hierarchical monitoring** - Tracks changes across page hierarchies
* **Document management** - Monitors key documents and their subpages
* **Review workflows** - Triggers review processes and dashboard updates
* Great for document monitoring, review workflows, dashboard synchronization
#### New Comment Created
Triggers when a new comment is added to a specified Notion page:
* **Collaboration monitoring** - Tracks team feedback and discussions
* **Review workflows** - Activates feedback processing and review requests
* **Team notifications** - Escalates feedback and starts collaborative workflows
* Essential for team collaboration, feedback processing, review automation
#### New Database Created
Monitor when new databases are created in your Notion workspace:
* **Workspace monitoring** - Track new database creation across workspace
* **Template initialization** - Auto-initialize templates for new databases
* **Permission setup** - Set up permissions and access controls
* Perfect for project onboarding, template automation, workspace organization
#### New Or Updated Page In Database
Trigger when pages in a Notion database are created or updated:
* **Database page monitoring** - Track all page changes within databases
* **Real-time synchronization** - Keep database pages in sync with other systems
* **Content tracking** - Monitor content updates and modifications
* Ideal for CRM sync, project updates, content monitoring
Use "New Database Item" triggers combined with "Update Database Item" actions for the most powerful database automation workflows.
## Notion Actions
#### Create Page
Creates a new Notion page with full customization:
* **Flexible creation** - Standalone pages or child pages within databases
* **Content generation** - AI-powered page creation with structured content
* **Template support** - Create pages from templates or existing structures
* Perfect for project documentation, meeting notes, knowledge base articles
#### Add Content To Page
Appends new content to the end of a Notion page:
* **Content addition** - Text, blocks, and structured content
* **Meeting integration** - Add meeting notes and AI-generated summaries
* **Action tracking** - Append action items and follow-up tasks
* Ideal for meeting notes, project updates, content enhancement
#### Update Page
Updates existing Notion page metadata and properties:
* **Metadata updates** - Title changes, property modifications
* **Content management** - For content updates, use Add Content To Page
* **Property management** - Update page properties and metadata
* Perfect for metadata updates, title changes, property modifications
#### Create Database Item
Adds a new item (row) to a specified Notion database:
* **Structured data entry** - Log tasks, leads, tickets, or any structured data
* **Property mapping** - Dynamic field mapping based on database schema
* **Data validation** - Ensures data integrity and proper formatting
* Essential for task logging, lead management, ticket creation
#### Find Database Item
Finds a single item in a database matching given filters:
* **Upsert capability** - Can create new item if none is found
* **Deduplication** - Prevents duplicate entries in databases
* **Idempotent operations** - Safe for repeated automation runs
* Perfect for upsert patterns, deduplication, idempotent automations
#### Update Database Item
Updates an existing item in a Notion database:
* **Status management** - Update workflow status and progression
* **Data enrichment** - Enhance records with additional information
* **Property updates** - Modify any database item properties
* Great for status changes, data enrichment, workflow progression
#### Search By Title
Searches for pages and databases by their title:
* **Quick lookups** - Fast title-based search across workspace
* **Dynamic linking** - Find and link to existing content
* **Navigation support** - Locate pages for further processing
* Perfect for quick lookups, dynamic linking, content navigation
#### Get Page
Retrieves a Notion page by its ID with full content:
* **Complete content access** - Metadata and full page content
* **Content analysis** - AI summarization and processing capabilities
* **Further processing** - Extract data for downstream workflows
* Essential for content analysis, AI summarization, data extraction
#### Duplicate Page
Makes a copy of an existing Notion page:
* **Template workflows** - Create pages from existing templates
* **Recurring structures** - Duplicate project templates and structures
* **Content replication** - Copy pages with optional title changes
* Perfect for template-based workflows, recurring project structures
#### Create Comment
Add comments to Notion pages or existing discussion threads:
* **Collaborative feedback** - Add automated feedback and review requests
* **Discussion threads** - Participate in existing comment discussions
* **Team communication** - Automated team notifications and updates
* Perfect for automated feedback, review requests, collaborative discussions
#### Find Database Items
Finds items that match the given filters in a Notion database:
* **Batch retrieval** - Get multiple items matching criteria
* **Property-based results** - Returns properties, not full page text
* **Filtered data** - Use Get Page or Find Database Item for full content
* Great for reporting, batch processing, data extraction
#### Retrieve Block
Retrieve a block and optionally its children from your Notion workspace:
* **Deep content analysis** - Access specific content blocks
* **Block-level automation** - Process individual content blocks
* **Hierarchical content** - Retrieve blocks with their child elements
* Perfect for deep content analysis, block-level automations
#### Retrieve Database Content
Retrieve and view content stored within a specified Notion database:
* **Full database export** - Get complete database content
* **Backup capabilities** - Create database backups and exports
* **Data migration** - Extract data for migration or analysis
* Essential for full database exports, backups, data migration
#### Retrieve Database Schema
Get the structure and properties of a specific Notion database:
* **Schema discovery** - Understand database structure dynamically
* **Form generation** - Create dynamic forms based on schema
* **Integration setup** - Validate schema for integration workflows
* Perfect for dynamic form generation, schema validation, integration setup
#### Retrieve Page Property Item
Retrieve a specific property value from a Notion page:
* **Property extraction** - Get specific property values
* **Status checks** - Check page status and properties
* **Field extraction** - Extract specific fields for processing
* Great for status checks, field extraction, conditional logic
#### Query Database
Advanced search and filter for database records:
* **Complex filtering** - Multi-condition database queries
* **Custom dashboards** - Create filtered views and reports
* **Data extraction** - Extract specific datasets for processing
* Great for custom dashboards, filtered views, complex reporting
## Example knowledge management workflow
## Practical Implementation Scenarios
## Notion Triggers
#### New Database Item
Triggers when a new item is added to a Notion database:
* **Real-time monitoring** - Checks every 10 minutes for new database entries
* **Structured data processing** - Handles CRM, project management, or ticketing data
* **Workflow activation** - Processes new tasks, leads, or tickets automatically
* Perfect for task management, lead processing, ticket routing
#### Updated Database Item
Triggers when an item is updated or added in a Notion database:
* **Change detection** - Monitors database modifications every 10 minutes
* **Status tracking** - Tracks workflow progression and status changes
* **Automation activation** - Triggers follow-ups, syncs, and notifications
* Ideal for workflow automation, system synchronization, change monitoring
#### Updated Page
Triggers when a specific Notion page is updated:
* **Content monitoring** - Tracks page modifications every 10 minutes
* **Change tracking** - Monitors content updates and property changes
* **Workflow activation** - Triggers content-based automation
* Perfect for content change monitoring, compliance tracking, workflow automation
#### Page Or Subpage Updated
Triggers when a Notion page or any of its subpages are modified:
* **Hierarchical monitoring** - Tracks changes across page hierarchies
* **Document management** - Monitors key documents and their subpages
* **Review workflows** - Triggers review processes and dashboard updates
* Great for document monitoring, review workflows, dashboard synchronization
#### New Comment Created
Triggers when a new comment is added to a specified Notion page:
* **Collaboration monitoring** - Tracks team feedback and discussions
* **Review workflows** - Activates feedback processing and review requests
* **Team notifications** - Escalates feedback and starts collaborative workflows
* Essential for team collaboration, feedback processing, review automation
#### New Database Created
Monitor when new databases are created in your Notion workspace:
* **Workspace monitoring** - Track new database creation across workspace
* **Template initialization** - Auto-initialize templates for new databases
* **Permission setup** - Set up permissions and access controls
* Perfect for project onboarding, template automation, workspace organization
#### New Or Updated Page In Database
Trigger when pages in a Notion database are created or updated:
* **Database page monitoring** - Track all page changes within databases
* **Real-time synchronization** - Keep database pages in sync with other systems
* **Content tracking** - Monitor content updates and modifications
* Ideal for CRM sync, project updates, content monitoring
Use "New Database Item" triggers combined with "Update Database Item" actions for the most powerful database automation workflows.
## Notion Actions
#### Create Page
Creates a new Notion page with full customization:
* **Flexible creation** - Standalone pages or child pages within databases
* **Content generation** - AI-powered page creation with structured content
* **Template support** - Create pages from templates or existing structures
* Perfect for project documentation, meeting notes, knowledge base articles
#### Add Content To Page
Appends new content to the end of a Notion page:
* **Content addition** - Text, blocks, and structured content
* **Meeting integration** - Add meeting notes and AI-generated summaries
* **Action tracking** - Append action items and follow-up tasks
* Ideal for meeting notes, project updates, content enhancement
#### Update Page
Updates existing Notion page metadata and properties:
* **Metadata updates** - Title changes, property modifications
* **Content management** - For content updates, use Add Content To Page
* **Property management** - Update page properties and metadata
* Perfect for metadata updates, title changes, property modifications
#### Create Database Item
Adds a new item (row) to a specified Notion database:
* **Structured data entry** - Log tasks, leads, tickets, or any structured data
* **Property mapping** - Dynamic field mapping based on database schema
* **Data validation** - Ensures data integrity and proper formatting
* Essential for task logging, lead management, ticket creation
#### Find Database Item
Finds a single item in a database matching given filters:
* **Upsert capability** - Can create new item if none is found
* **Deduplication** - Prevents duplicate entries in databases
* **Idempotent operations** - Safe for repeated automation runs
* Perfect for upsert patterns, deduplication, idempotent automations
#### Update Database Item
Updates an existing item in a Notion database:
* **Status management** - Update workflow status and progression
* **Data enrichment** - Enhance records with additional information
* **Property updates** - Modify any database item properties
* Great for status changes, data enrichment, workflow progression
#### Search By Title
Searches for pages and databases by their title:
* **Quick lookups** - Fast title-based search across workspace
* **Dynamic linking** - Find and link to existing content
* **Navigation support** - Locate pages for further processing
* Perfect for quick lookups, dynamic linking, content navigation
#### Get Page
Retrieves a Notion page by its ID with full content:
* **Complete content access** - Metadata and full page content
* **Content analysis** - AI summarization and processing capabilities
* **Further processing** - Extract data for downstream workflows
* Essential for content analysis, AI summarization, data extraction
#### Duplicate Page
Makes a copy of an existing Notion page:
* **Template workflows** - Create pages from existing templates
* **Recurring structures** - Duplicate project templates and structures
* **Content replication** - Copy pages with optional title changes
* Perfect for template-based workflows, recurring project structures
#### Create Comment
Add comments to Notion pages or existing discussion threads:
* **Collaborative feedback** - Add automated feedback and review requests
* **Discussion threads** - Participate in existing comment discussions
* **Team communication** - Automated team notifications and updates
* Perfect for automated feedback, review requests, collaborative discussions
#### Find Database Items
Finds items that match the given filters in a Notion database:
* **Batch retrieval** - Get multiple items matching criteria
* **Property-based results** - Returns properties, not full page text
* **Filtered data** - Use Get Page or Find Database Item for full content
* Great for reporting, batch processing, data extraction
#### Retrieve Block
Retrieve a block and optionally its children from your Notion workspace:
* **Deep content analysis** - Access specific content blocks
* **Block-level automation** - Process individual content blocks
* **Hierarchical content** - Retrieve blocks with their child elements
* Perfect for deep content analysis, block-level automations
#### Retrieve Database Content
Retrieve and view content stored within a specified Notion database:
* **Full database export** - Get complete database content
* **Backup capabilities** - Create database backups and exports
* **Data migration** - Extract data for migration or analysis
* Essential for full database exports, backups, data migration
#### Retrieve Database Schema
Get the structure and properties of a specific Notion database:
* **Schema discovery** - Understand database structure dynamically
* **Form generation** - Create dynamic forms based on schema
* **Integration setup** - Validate schema for integration workflows
* Perfect for dynamic form generation, schema validation, integration setup
#### Retrieve Page Property Item
Retrieve a specific property value from a Notion page:
* **Property extraction** - Get specific property values
* **Status checks** - Check page status and properties
* **Field extraction** - Extract specific fields for processing
* Great for status checks, field extraction, conditional logic
#### Query Database
Advanced search and filter for database records:
* **Complex filtering** - Multi-condition database queries
* **Custom dashboards** - Create filtered views and reports
* **Data extraction** - Extract specific datasets for processing
* Great for custom dashboards, filtered views, complex reporting
## Example knowledge management workflow
## Practical Implementation Scenarios
 Transform Lindy into a project management assistant:
* New Database Created trigger detects new project databases
* Duplicate Page action creates project templates with tasks and milestones
* Update Database Item action assigns team members and sets properties
* Add Content To Page action adds kickoff meeting notes and resources
Automate your entire task lifecycle:
* New Database Item trigger processes new tasks automatically
* Update Database Item action sets due dates and priorities
* Create Comment action adds instructions and context
* Conditional escalation for high-priority tasks
Transform Lindy into a project management assistant:
* New Database Created trigger detects new project databases
* Duplicate Page action creates project templates with tasks and milestones
* Update Database Item action assigns team members and sets properties
* Add Content To Page action adds kickoff meeting notes and resources
Automate your entire task lifecycle:
* New Database Item trigger processes new tasks automatically
* Update Database Item action sets due dates and priorities
* Create Comment action adds instructions and context
* Conditional escalation for high-priority tasks
 Streamline content creation and publishing:
* Page Or Subpage Updated trigger monitors content pipeline
* Conditional workflows based on status property changes
* Add Content To Page action appends publication logs
* Archive or duplicate pages for future reference
## Advanced Features & Capabilities
Streamline content creation and publishing:
* Page Or Subpage Updated trigger monitors content pipeline
* Conditional workflows based on status property changes
* Add Content To Page action appends publication logs
* Archive or duplicate pages for future reference
## Advanced Features & Capabilities
 Powerful database management capabilities:
* **CRM functionality** - Contact and deal management in Notion
* **Project tracking** - Task and milestone management
* **Ticketing systems** - Support ticket and issue tracking
* **Data synchronization** - Keep databases in sync across systems
Intelligent content management and processing:
* **AI-powered content** - Generate summaries and enhance content
* **Template systems** - Create and manage content templates
* **Review workflows** - Automated content review and approval
* **Knowledge base management** - Organize and maintain documentation
Sophisticated content discovery and retrieval:
* **Title-based search** - Quick content location
* **Database queries** - Complex filtering and data extraction
* **Property-based filtering** - Filter by any Notion property
* **Content analysis** - AI-powered content processing
## Configuration Best Practices
Optimize your database workflows:
* Use clear, consistent property names (Status, Owner, Due Date)
* Leverage select/multi-select for workflow states
* Use relations and rollups for cross-database linking
* Start with clear triggers and chain actions for multi-step processes
Powerful database management capabilities:
* **CRM functionality** - Contact and deal management in Notion
* **Project tracking** - Task and milestone management
* **Ticketing systems** - Support ticket and issue tracking
* **Data synchronization** - Keep databases in sync across systems
Intelligent content management and processing:
* **AI-powered content** - Generate summaries and enhance content
* **Template systems** - Create and manage content templates
* **Review workflows** - Automated content review and approval
* **Knowledge base management** - Organize and maintain documentation
Sophisticated content discovery and retrieval:
* **Title-based search** - Quick content location
* **Database queries** - Complex filtering and data extraction
* **Property-based filtering** - Filter by any Notion property
* **Content analysis** - AI-powered content processing
## Configuration Best Practices
Optimize your database workflows:
* Use clear, consistent property names (Status, Owner, Due Date)
* Leverage select/multi-select for workflow states
* Use relations and rollups for cross-database linking
* Start with clear triggers and chain actions for multi-step processes
 Set up robust content workflows:
* Use "Add Content To Page" for logs, notes, and AI summaries
* Implement template-based content creation
* Set up review and approval workflows
* Use "Find Database Item" before updates to avoid duplicates
Create efficient high-volume workflows:
* Batch updates where possible to stay within API limits
* Avoid excessive polling on large databases
* Use filters in triggers/actions to minimize unnecessary runs
* Set up error handling and monitoring for failed automations
## Limitations & Considerations
* **Rate Limits**: Notion API has rate limits for high-volume operations
* **Polling Intervals**: Triggers check every 10 minutes by default
* **Content Size**: Large pages may have processing limitations
* **Permission Requirements**: Lindy needs explicit access to pages/databases
* **Access Control**: Lindy can only access explicitly shared content
* **Dedicated Integration**: Create a dedicated "Lindy" integration in Notion
* **Permission Auditing**: Regularly review access permissions
* **Data Privacy**: Ensure compliance with data privacy requirements
* Many advanced triggers require Premium subscription
* Advanced database queries are Premium-only
* Duplicate page functionality requires Premium
* Complex filtering options may be Premium features
## Next steps
Combine Notion with document automation
Connect Notion workflows to team communication
Build powerful knowledge management systems
Create intelligent content and task management agents
# People Data Labs
Source: https://docs.lindy.ai/skills/popular-integrations/people-data-labs
Enrich person and company data using professional information databases
## Overview
People Data Labs provides professional data enrichment for individuals and companies, enabling you to enhance profiles, improve lead scoring, and personalize outreach.
## Available Actions
### Person Enrichment
* **Enrich A Person**: Enrich person profiles with additional data using identifiable information. Input email, name, phone, or LinkedIn URL. Returns full profile including job title, company, social profiles, and more.
* **Search for People**: Find people by broad criteria like "data scientists in San Francisco" or "people with @company.com email". Avoid using to find specific person. Default to 5 results unless specified otherwise.
* **Find Person by Social Network**: Find a person by a social network URL using LinkedIn, Twitter, or other social profile URLs. A social network URL may match multiple people. The most relevant people are returned first.
* **Find Person By Phone**: Find a person by phone number (example: +1 555-234-1234). A phone number exactly identifies one person.
### Company Enrichment
* **Enrich A Company**: Retrieve detailed company information using various identifiers and parameters. Input company name, domain, or other identifiers. Returns company size, industry, location, and more.
* **Search for Companies**: Find companies by broad criteria like "tech startups in San Francisco" or "companies with over 1000 employees". Avoid using to find specific company. Default to 5 results unless specified otherwise.
## Common Use Cases
* **CRM Enrichment**: Automatically enrich new leads with professional data
* **Lead Scoring**: Enhance lead profiles for better qualification
* **Personalization**: Gather data for personalized outreach campaigns
* **Research**: Find prospects matching specific criteria
## Best Practices
Optimize your data enrichment workflows:
* Use specific identifiers (email, phone) for individual lookups
* Use broad criteria for discovering new prospects
* Combine person and company data for complete profiles
* Start with email or LinkedIn URL for best person enrichment results
Handle enriched data responsibly:
* Respect data privacy regulations when using enriched data
* Only enrich data for legitimate business purposes
* Store enriched data securely and limit access
* Keep enriched data up-to-date and remove outdated information
People Data Labs actions work great with CRM integrations, email automation, and sales workflows to create data-driven processes.
## Related Resources
Automated lead enrichment workflows
Use enriched data for personalized outreach
Enrich HubSpot CRM data
Enrich Salesforce CRM data
# Salesforce
Source: https://docs.lindy.ai/skills/popular-integrations/salesforce
## Quick Overview
Salesforce integration is one of Lindy's most powerful CRM capabilities, enabling your AI agents to act as sophisticated sales, marketing, and customer success assistants. The integration provides both Triggers (what can start a Lindy workflow) and Actions (what Lindy can do).
This comprehensive integration transforms Lindy into a powerful CRM automation platform, capable of handling everything from lead qualification and deal pipeline management to customer service and marketing attribution.
Key benefits of Salesforce integration:
* **Comprehensive CRM management** – 24 actions for complete sales and marketing control
* **Real-time CRM monitoring** – 8 triggers for instant workflow activation
* **Advanced data operations** – SOQL queries, SOSL search, and complex data processing
* **Enterprise-grade automation** – Scalable workflows for revenue operations
## How to set up Salesforce
Click on the plus sign at the bottom or right-click anywhere on the canvas and select "Add Trigger" or "Add Action" from the pop-up menu and choose "Salesforce." Once added to the canvas, click on it again and from the right tab, choose connect. You will now be redirected to the saleforce website to authorize your account.
Set up robust content workflows:
* Use "Add Content To Page" for logs, notes, and AI summaries
* Implement template-based content creation
* Set up review and approval workflows
* Use "Find Database Item" before updates to avoid duplicates
Create efficient high-volume workflows:
* Batch updates where possible to stay within API limits
* Avoid excessive polling on large databases
* Use filters in triggers/actions to minimize unnecessary runs
* Set up error handling and monitoring for failed automations
## Limitations & Considerations
* **Rate Limits**: Notion API has rate limits for high-volume operations
* **Polling Intervals**: Triggers check every 10 minutes by default
* **Content Size**: Large pages may have processing limitations
* **Permission Requirements**: Lindy needs explicit access to pages/databases
* **Access Control**: Lindy can only access explicitly shared content
* **Dedicated Integration**: Create a dedicated "Lindy" integration in Notion
* **Permission Auditing**: Regularly review access permissions
* **Data Privacy**: Ensure compliance with data privacy requirements
* Many advanced triggers require Premium subscription
* Advanced database queries are Premium-only
* Duplicate page functionality requires Premium
* Complex filtering options may be Premium features
## Next steps
Combine Notion with document automation
Connect Notion workflows to team communication
Build powerful knowledge management systems
Create intelligent content and task management agents
# People Data Labs
Source: https://docs.lindy.ai/skills/popular-integrations/people-data-labs
Enrich person and company data using professional information databases
## Overview
People Data Labs provides professional data enrichment for individuals and companies, enabling you to enhance profiles, improve lead scoring, and personalize outreach.
## Available Actions
### Person Enrichment
* **Enrich A Person**: Enrich person profiles with additional data using identifiable information. Input email, name, phone, or LinkedIn URL. Returns full profile including job title, company, social profiles, and more.
* **Search for People**: Find people by broad criteria like "data scientists in San Francisco" or "people with @company.com email". Avoid using to find specific person. Default to 5 results unless specified otherwise.
* **Find Person by Social Network**: Find a person by a social network URL using LinkedIn, Twitter, or other social profile URLs. A social network URL may match multiple people. The most relevant people are returned first.
* **Find Person By Phone**: Find a person by phone number (example: +1 555-234-1234). A phone number exactly identifies one person.
### Company Enrichment
* **Enrich A Company**: Retrieve detailed company information using various identifiers and parameters. Input company name, domain, or other identifiers. Returns company size, industry, location, and more.
* **Search for Companies**: Find companies by broad criteria like "tech startups in San Francisco" or "companies with over 1000 employees". Avoid using to find specific company. Default to 5 results unless specified otherwise.
## Common Use Cases
* **CRM Enrichment**: Automatically enrich new leads with professional data
* **Lead Scoring**: Enhance lead profiles for better qualification
* **Personalization**: Gather data for personalized outreach campaigns
* **Research**: Find prospects matching specific criteria
## Best Practices
Optimize your data enrichment workflows:
* Use specific identifiers (email, phone) for individual lookups
* Use broad criteria for discovering new prospects
* Combine person and company data for complete profiles
* Start with email or LinkedIn URL for best person enrichment results
Handle enriched data responsibly:
* Respect data privacy regulations when using enriched data
* Only enrich data for legitimate business purposes
* Store enriched data securely and limit access
* Keep enriched data up-to-date and remove outdated information
People Data Labs actions work great with CRM integrations, email automation, and sales workflows to create data-driven processes.
## Related Resources
Automated lead enrichment workflows
Use enriched data for personalized outreach
Enrich HubSpot CRM data
Enrich Salesforce CRM data
# Salesforce
Source: https://docs.lindy.ai/skills/popular-integrations/salesforce
## Quick Overview
Salesforce integration is one of Lindy's most powerful CRM capabilities, enabling your AI agents to act as sophisticated sales, marketing, and customer success assistants. The integration provides both Triggers (what can start a Lindy workflow) and Actions (what Lindy can do).
This comprehensive integration transforms Lindy into a powerful CRM automation platform, capable of handling everything from lead qualification and deal pipeline management to customer service and marketing attribution.
Key benefits of Salesforce integration:
* **Comprehensive CRM management** – 24 actions for complete sales and marketing control
* **Real-time CRM monitoring** – 8 triggers for instant workflow activation
* **Advanced data operations** – SOQL queries, SOSL search, and complex data processing
* **Enterprise-grade automation** – Scalable workflows for revenue operations
## How to set up Salesforce
Click on the plus sign at the bottom or right-click anywhere on the canvas and select "Add Trigger" or "Add Action" from the pop-up menu and choose "Salesforce." Once added to the canvas, click on it again and from the right tab, choose connect. You will now be redirected to the saleforce website to authorize your account.
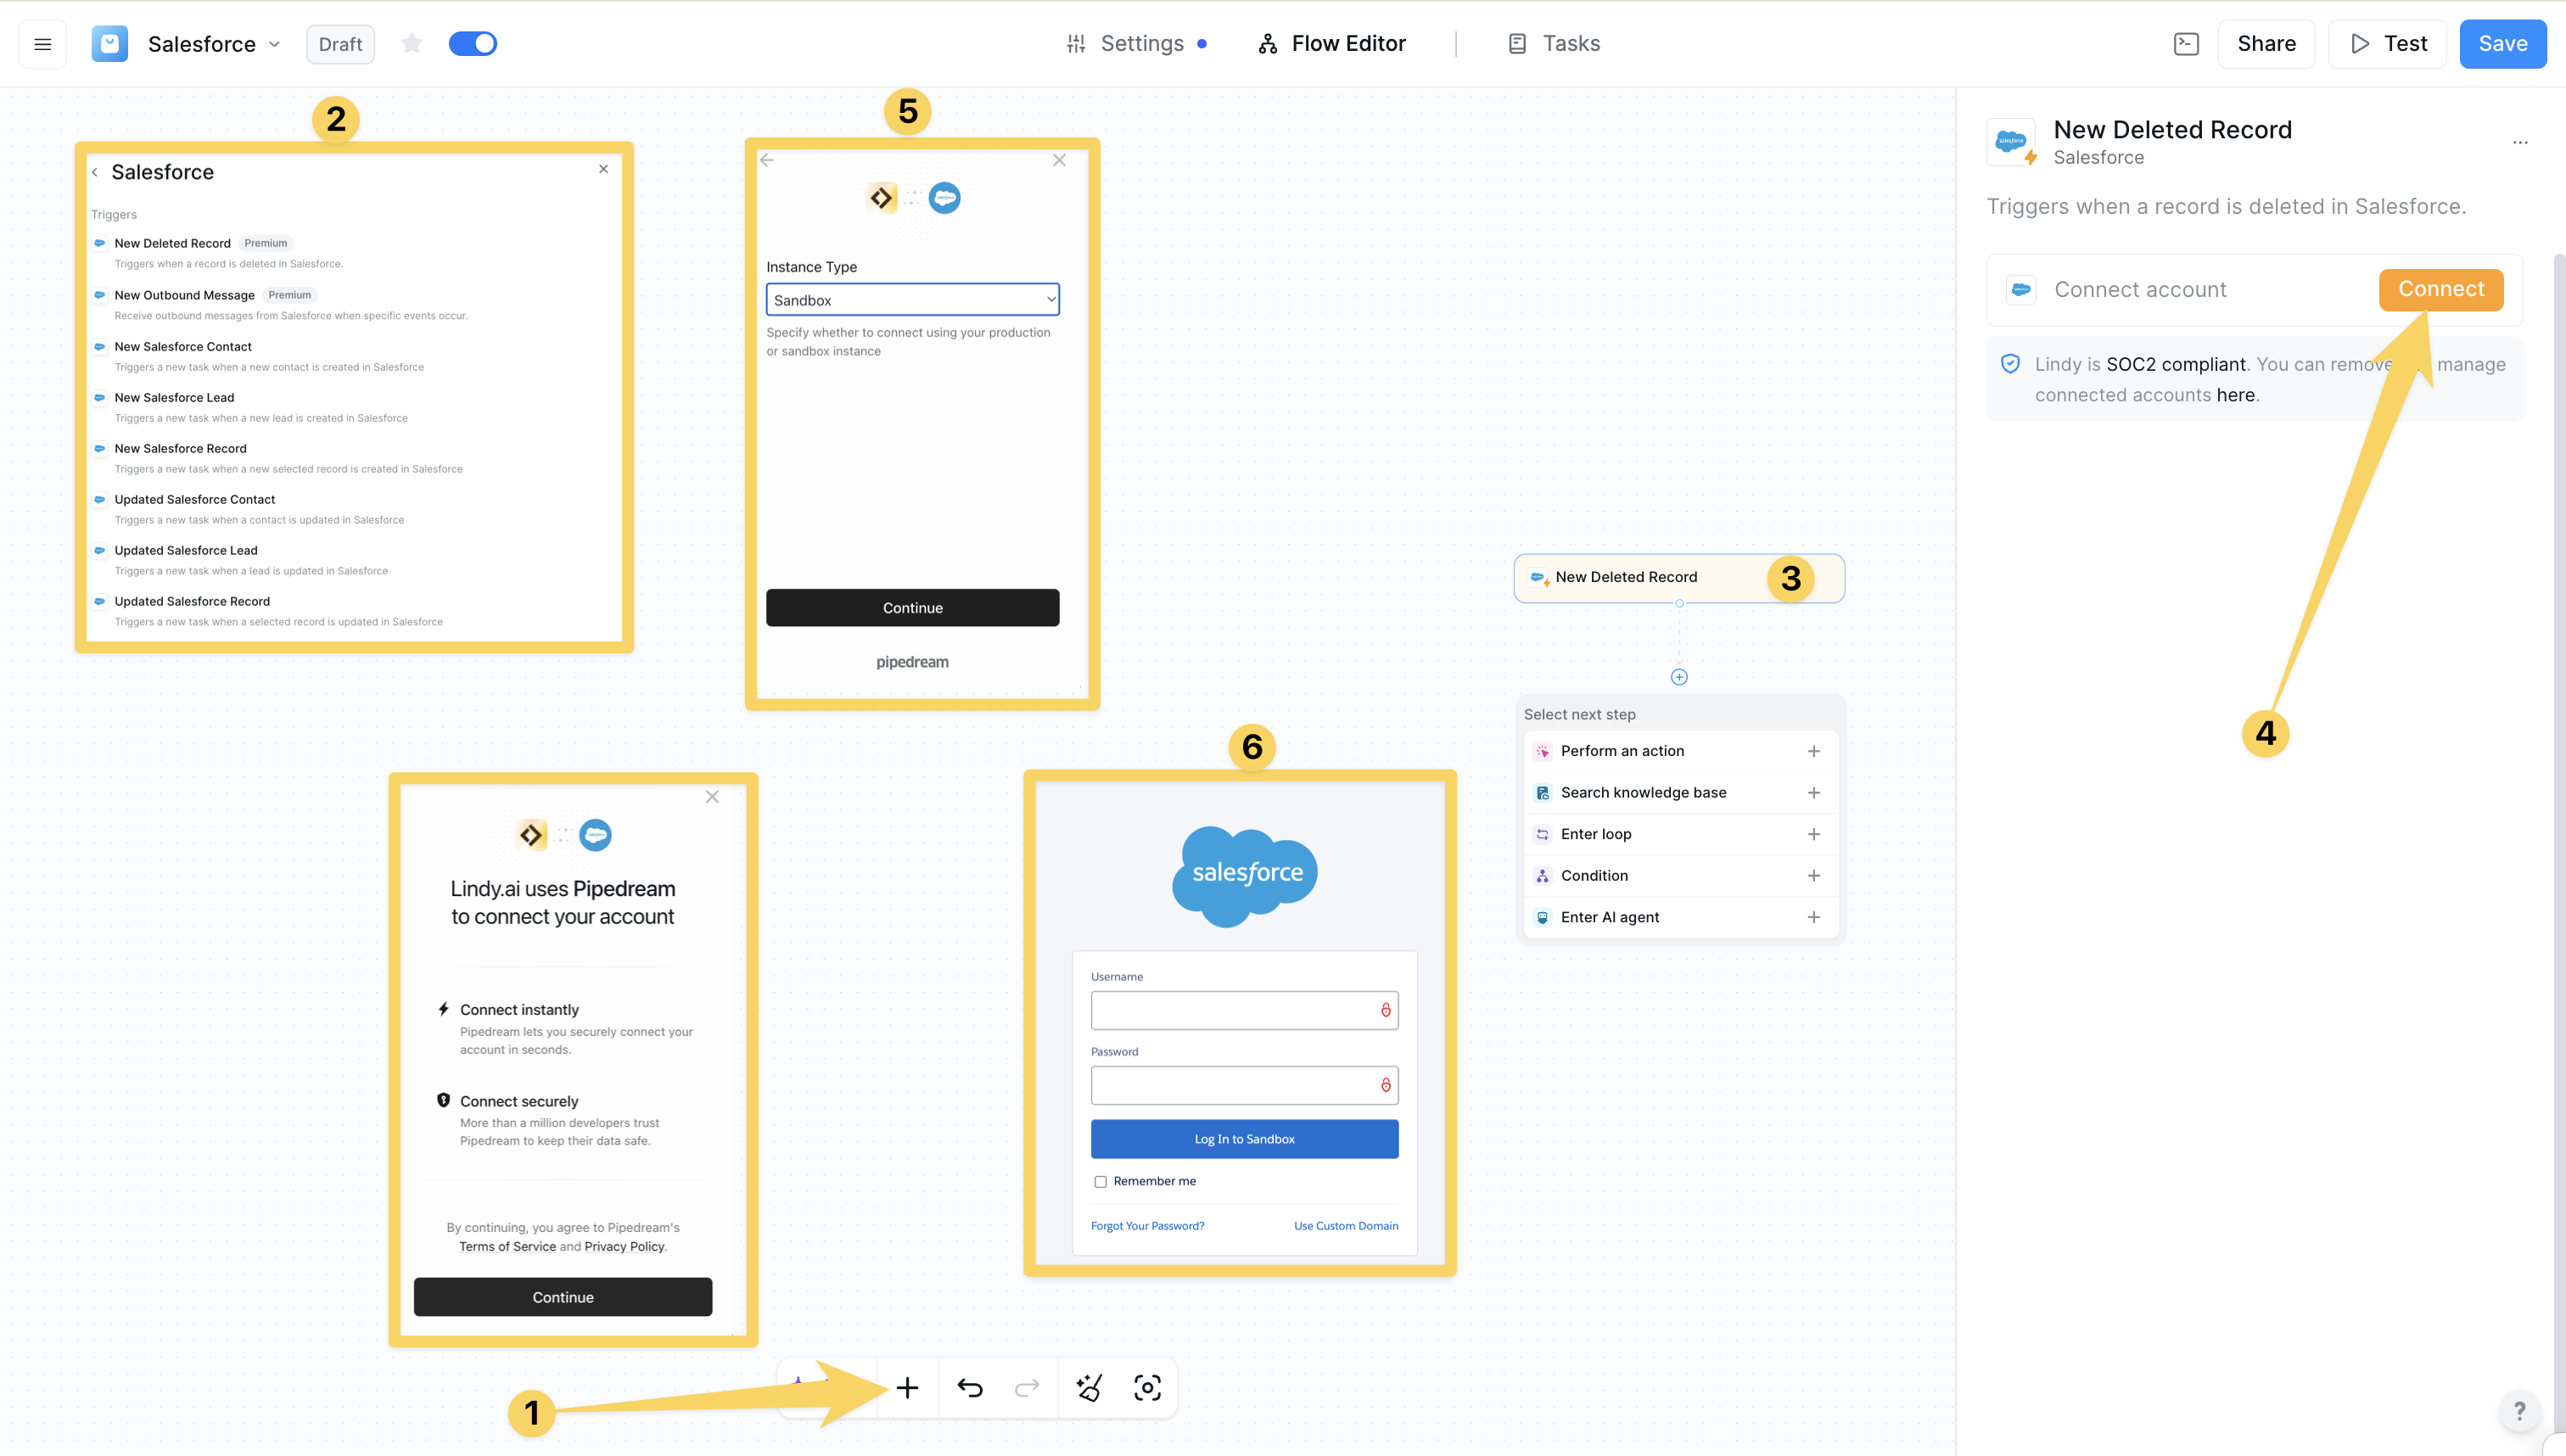 ## Salesforce Triggers
#### New Deleted Record
Triggers when a record is deleted in Salesforce:
* **Data cleanup workflows** - Automatically clean up related records in other systems
* **Audit trail creation** - Log deleted records in external audit systems for compliance
* **Notification systems** - Alert team members when critical records are deleted
* Perfect for data maintenance, compliance tracking, integration synchronization
#### New Outbound Message
Receive outbound messages from Salesforce when specific events occur:
* **Real-time event processing** - React immediately to Salesforce workflow rules
* **Custom integration triggers** - Handle complex business logic requiring immediate updates
* **Compliance workflows** - Trigger compliance checks when specific changes occur
* Ideal for advanced automation, complex business rules, real-time processing
#### New Salesforce Contact
Triggers when a new contact is created in Salesforce:
* **Welcome sequences** - Automatically enroll new contacts in onboarding sequences
* **Lead scoring** - Calculate initial scores and route to appropriate sales reps
* **Data enrichment** - Enhance contact records with external data sources
* Perfect for contact onboarding, lead qualification, multi-system synchronization
#### New Salesforce Lead
Triggers when a new lead is created in Salesforce:
* **Lead qualification** - Automatically score and qualify new leads
* **Assignment automation** - Route leads to appropriate sales reps
* **Immediate follow-up** - Send personalized welcome emails or schedule tasks
* Essential for lead processing, territory management, marketing attribution
#### New Salesforce Record
Triggers when a new selected record is created in Salesforce:
* **Universal record processing** - Handle creation of any Salesforce object type
* **Cross-object workflows** - Trigger actions when related records are created
* **Flexible automation** - Create workflows that adapt to different record types
* Great for comprehensive auditing, dynamic routing, universal automation
#### Updated Salesforce Contact
Triggers when a contact is updated in Salesforce:
* **Lifecycle management** - Move contacts through different marketing stages
* **Data synchronization** - Keep contact information consistent across systems
* **Behavioral triggers** - React to field changes indicating buying intent
* Perfect for contact lifecycle management, data hygiene, relationship mapping
#### Updated Salesforce Lead
Triggers when a lead is updated in Salesforce:
* **Lead progression tracking** - Monitor lead movement through qualification stages
* **Score-based actions** - Trigger different actions based on score changes
* **Status change management** - Handle lead status changes and assignments
* Ideal for lead progression, scoring automation, engagement tracking
#### Updated Salesforce Record
Triggers when a selected record is updated in Salesforce:
* **Universal change management** - React to updates across any Salesforce object
* **Approval workflows** - Trigger approval processes when fields are updated
* **Escalation management** - Escalate records when conditions are met
* Essential for change tracking, integration sync, audit and compliance
Use "New Salesforce Record" and "Updated Salesforce Record" triggers for the most flexible and comprehensive automation workflows.
## Salesforce Actions
#### Add a Contact to a Campaign
Add an existing contact to an existing campaign:
* **Multi-touch campaigns** - Add contacts to nurture campaigns based on behavior
* **Event marketing** - Add attendees to post-event follow-up campaigns
* **Segmentation** - Add contacts to targeted campaigns based on demographics
* Perfect for lead nurturing, event follow-up, re-engagement campaigns
#### Add a Lead to a Campaign
Add an existing lead to an existing campaign:
* **Lead nurturing** - Enroll new leads in appropriate nurture sequences
* **Source tracking** - Add leads to campaigns based on acquisition source
* **Qualification workflows** - Move leads through qualification campaigns
* Ideal for lead management, source attribution, industry-specific campaigns
#### Convert Soap XML Object to JSON
Convert Salesforce SOAP XML data to JSON format:
* **API integration** - Convert data for consumption by modern REST APIs
* **Data transformation** - Prepare data for external analytics platforms
* **Legacy system integration** - Bridge Salesforce with older systems
* Essential for modern integrations, data transformation, custom reporting
#### Create a Contact
Create a new contact in Salesforce:
* **Lead conversion** - Create contacts from qualified leads
* **Data import** - Bulk create contacts from external data sources
* **Event registration** - Create contacts from event registration systems
* Perfect for lead conversion, data import, partner integration
#### Create a Lead
Create a new lead in Salesforce:
* **Multi-channel lead capture** - Create leads from various sources
* **Lead import** - Bulk import leads from external systems
* **Referral processing** - Create leads from referral programs
* Essential for lead capture, marketing integration, referral management
#### Create Attachment
Create and attach files to Salesforce records:
* **Document management** - Attach contracts, proposals, and agreements
* **Compliance documentation** - Attach required compliance documents
* **Communication records** - Attach email threads and call recordings
* Perfect for document management, compliance, communication tracking
#### Create Case Comment
Add a comment to an existing Salesforce case:
* **Customer communication** - Log customer interactions and responses
* **Internal collaboration** - Add internal notes for team collaboration
* **Escalation documentation** - Document escalation reasons and actions
* Essential for case management, team collaboration, resolution tracking
#### Create Content Note
Create and manage content notes with customizable permissions:
* **Meeting notes** - Create detailed meeting notes linked to records
* **Project documentation** - Document project progress and milestones
* **Knowledge sharing** - Create searchable content for team knowledge
* Perfect for meeting documentation, project tracking, knowledge management
#### Create Note
Create a new note and associate it with a Salesforce record:
* **Call logging** - Document phone conversations and outcomes
* **Meeting minutes** - Record meeting discussions and action items
* **Research notes** - Document prospect research and insights
* Ideal for activity logging, meeting documentation, follow-up tracking
#### Delete Opportunity
Delete a Salesforce opportunity record using its ID:
* **Data cleanup** - Remove duplicate or invalid opportunities
* **Pipeline management** - Clean up stale opportunities
* **Compliance** - Remove opportunities violating data retention policies
* Essential for data maintenance, pipeline hygiene, compliance management
#### Delete Record
Delete a record from Salesforce by specifying object type and ID:
* **Bulk data cleanup** - Remove outdated or duplicate records
* **Compliance management** - Delete records for data retention compliance
* **Process optimization** - Remove records no longer meeting criteria
* Perfect for data cleanup, compliance, integration maintenance
#### Find Records
Find and retrieve Salesforce records based on object type and fields:
* **Duplicate detection** - Find potential duplicates before creating new ones
* **Data validation** - Verify record existence before performing operations
* **Relationship mapping** - Find related records across different objects
* Essential for data quality, validation, relationship management
#### Get All Accounts
Retrieve all accounts from Salesforce:
* **Account analysis** - Get all accounts for comprehensive analysis
* **Territory planning** - Get account lists for territory assignment
* **Marketing campaigns** - Retrieve accounts for targeted marketing
* Perfect for account management, territory planning, data export
#### Get All Contacts
Retrieve all contacts from Salesforce:
* **Contact management** - Get all contacts for database management
* **Marketing lists** - Get contact lists for email marketing campaigns
* **Data synchronization** - Sync contacts with external platforms
* Essential for contact management, marketing, compliance audits
#### Get an Account
Retrieve a specific account from Salesforce:
* **Account lookup** - Get specific account details for processing
* **Data enrichment** - Get account information to enrich other records
* **Relationship analysis** - Analyze account relationships and hierarchies
* Perfect for account lookup, data enrichment, custom workflows
#### Insert Blob Data
Insert binary data and attachments with Salesforce objects:
* **Document storage** - Store contracts, images, and other binary files
* **Media management** - Attach photos, videos, and audio files
* **Backup systems** - Store backup copies of important documents
* Essential for document storage, media management, backup systems
#### Post a Message to Chatter Feed
Post messages to Salesforce Chatter feeds for specific records:
* **Team collaboration** - Share updates and insights with team members
* **Process notifications** - Notify teams about important milestones
* **Customer updates** - Share customer interaction updates
* Perfect for team collaboration, process notifications, project communication
#### Search for a Contact
Search for a specific contact in Salesforce:
* **Contact lookup** - Find contacts before creating or updating records
* **Duplicate prevention** - Check for existing contacts before import
* **Relationship mapping** - Find contacts related to specific records
* Essential for contact lookup, duplicate prevention, data validation
#### Search for an Opportunity
Search for a specific opportunity in Salesforce:
* **Pipeline analysis** - Find opportunities meeting specific criteria
* **Forecasting** - Retrieve opportunities for forecast calculations
* **Performance tracking** - Find opportunities for performance analysis
* Perfect for pipeline analysis, forecasting, performance tracking
#### Search Object Records
Search Salesforce records across specified object types:
* **Universal search** - Search across multiple object types simultaneously
* **Data discovery** - Find records containing specific information
* **Relationship analysis** - Discover connections between record types
* Essential for universal search, data discovery, comprehensive reporting
#### SOQL Query
Execute custom SOQL queries against your Salesforce data:
* **Complex reporting** - Create sophisticated reports with custom logic
* **Data analysis** - Perform advanced data analysis with custom queries
* **Integration logic** - Retrieve specific data sets for external integration
* Perfect for complex reporting, data analysis, performance optimization
#### SOSL Search
Search Salesforce records using SOSL query syntax:
* **Full-text search** - Search across multiple fields and objects
* **Fuzzy matching** - Find records with similar but not exact matches
* **Content discovery** - Search within text fields, documents, and attachments
* Essential for full-text search, fuzzy matching, advanced filtering
#### Update a Contact
Update an existing contact in Salesforce:
* **Data maintenance** - Keep contact information current and accurate
* **Lifecycle management** - Update contact stages and statuses
* **Preference management** - Update communication preferences
* Perfect for data maintenance, lifecycle management, enrichment updates
#### Update a Lead
Update an existing lead in Salesforce:
* **Lead scoring** - Update lead scores based on behavior and engagement
* **Status management** - Change lead status as they progress through qualification
* **Assignment updates** - Reassign leads to different sales representatives
* Essential for lead scoring, status management, data enrichment
## Practical Implementation Scenarios
Transform Lindy into a comprehensive revenue operations platform:
* Lead-to-cash automation: New lead → Score and qualify → Create opportunity → Update forecasts
* Customer success workflows: Account update → Analyze health score → Trigger renewal processes
* Sales performance tracking: Opportunity updates → Calculate rep performance → Update dashboards
Create seamless customer experiences across touchpoints:
* Onboarding automation: New customer → Create success plan → Schedule check-ins → Track milestones
* Support escalation: Case creation → Route by priority → Escalate if needed → Update customer
* Renewal management: Account analysis → Predict renewal risk → Trigger retention campaigns
Bridge marketing and sales activities through automated workflows:
* Lead handoff: Marketing qualified lead → Sales notification → Automatic assignment → Follow-up tracking
* Campaign attribution: Opportunity creation → Track campaign influence → Update attribution models
* Content personalization: Contact updates → Analyze preferences → Personalize content → Track engagement
## Advanced Features & Capabilities
Powerful data processing and analysis capabilities:
* **SOQL Queries** - Execute complex database queries for custom reporting
* **SOSL Search** - Full-text search across multiple objects and fields
* **Data Transformation** - Convert between XML and JSON formats
* **Bulk Operations** - Handle high-volume data processing efficiently
Seamless integration with enterprise systems and workflows:
* **Multi-object Workflows** - Work across contacts, leads, opportunities, and custom objects
* **Approval Processes** - Automate approval workflows and escalations
* **Compliance Management** - Maintain audit trails and compliance documentation
* **Security Controls** - Respect Salesforce permissions and security models
Instant response to Salesforce events and changes:
* **Event-driven Triggers** - React immediately to record changes and deletions
* **Outbound Messages** - Handle complex business logic with custom triggers
* **Cross-system Sync** - Keep external systems synchronized with Salesforce
* **Intelligent Routing** - Route records and tasks based on business rules
## Configuration Best Practices
Optimize your sales process workflows:
* Use "New Salesforce Lead" triggers for immediate lead processing
* Implement lead scoring with "Updated Salesforce Lead" triggers
* Set up automated follow-up sequences with campaign actions
* Create deal progression notifications with opportunity triggers
* Use SOQL queries for complex data analysis and reporting
Set up powerful marketing workflows:
* Use form submission triggers for immediate lead response
* Implement email engagement tracking with contact updates
* Set up campaign-based segmentation and nurturing
* Create lifecycle stage progression workflows
* Use bulk operations for high-volume data processing
Create efficient support workflows:
* Use case triggers for automated routing and escalation
* Implement SLA monitoring with time-based automation
* Set up customer satisfaction workflows and surveys
* Create internal notification systems for critical issues
* Use Chatter integration for team collaboration
## Limitations & Considerations
* **Rate Limits**: Salesforce API has rate limits for high-volume operations
* **Query Limits**: SOQL and SOSL queries have execution time and record limits
* **Bulk Operations**: Large data operations require special handling
* **Real-time Processing**: Some operations may have slight delays
* **Access Control**: Lindy respects Salesforce user permissions and field-level security
* **Data Encryption**: All data transfers use encrypted connections
* **Audit Logging**: Maintain comprehensive logs of all automated activities
* **Permission Auditing**: Regularly review access permissions and security settings
* Many advanced triggers require Premium subscription
* Advanced query operations (SOQL/SOSL) are Premium-only
* Bulk operations and data transformation require Premium
* Complex filtering and search options may be Premium features
## Next steps
Compare CRM automation capabilities
Combine CRM with email automation
Build automated lead enrichment workflows
Set up Salesforce-based automation triggers
# Slack
Source: https://docs.lindy.ai/skills/popular-integrations/slack
## Quick Overview
Transform your Slack workspace into an AI-powered productivity hub with Lindy's Slack integration. Build intelligent bots that can answer questions, route tickets, send alerts, and automate team communications—all without writing a single line of code.
Key benefits of Slack + Lindy:
* **Instant knowledge access** - Answer team questions using your internal documents
* **Smart automation** - Route messages, escalate tickets, and send notifications
* **24/7 availability** - AI assistance that never sleeps
* **Context awareness** - Understand intent and provide relevant responses
* **Seamless integration** - Works with your existing Slack channels and workflows
## Available Triggers
### Slack Message Received
Monitor specific channels or direct messages for new activity:
## Salesforce Triggers
#### New Deleted Record
Triggers when a record is deleted in Salesforce:
* **Data cleanup workflows** - Automatically clean up related records in other systems
* **Audit trail creation** - Log deleted records in external audit systems for compliance
* **Notification systems** - Alert team members when critical records are deleted
* Perfect for data maintenance, compliance tracking, integration synchronization
#### New Outbound Message
Receive outbound messages from Salesforce when specific events occur:
* **Real-time event processing** - React immediately to Salesforce workflow rules
* **Custom integration triggers** - Handle complex business logic requiring immediate updates
* **Compliance workflows** - Trigger compliance checks when specific changes occur
* Ideal for advanced automation, complex business rules, real-time processing
#### New Salesforce Contact
Triggers when a new contact is created in Salesforce:
* **Welcome sequences** - Automatically enroll new contacts in onboarding sequences
* **Lead scoring** - Calculate initial scores and route to appropriate sales reps
* **Data enrichment** - Enhance contact records with external data sources
* Perfect for contact onboarding, lead qualification, multi-system synchronization
#### New Salesforce Lead
Triggers when a new lead is created in Salesforce:
* **Lead qualification** - Automatically score and qualify new leads
* **Assignment automation** - Route leads to appropriate sales reps
* **Immediate follow-up** - Send personalized welcome emails or schedule tasks
* Essential for lead processing, territory management, marketing attribution
#### New Salesforce Record
Triggers when a new selected record is created in Salesforce:
* **Universal record processing** - Handle creation of any Salesforce object type
* **Cross-object workflows** - Trigger actions when related records are created
* **Flexible automation** - Create workflows that adapt to different record types
* Great for comprehensive auditing, dynamic routing, universal automation
#### Updated Salesforce Contact
Triggers when a contact is updated in Salesforce:
* **Lifecycle management** - Move contacts through different marketing stages
* **Data synchronization** - Keep contact information consistent across systems
* **Behavioral triggers** - React to field changes indicating buying intent
* Perfect for contact lifecycle management, data hygiene, relationship mapping
#### Updated Salesforce Lead
Triggers when a lead is updated in Salesforce:
* **Lead progression tracking** - Monitor lead movement through qualification stages
* **Score-based actions** - Trigger different actions based on score changes
* **Status change management** - Handle lead status changes and assignments
* Ideal for lead progression, scoring automation, engagement tracking
#### Updated Salesforce Record
Triggers when a selected record is updated in Salesforce:
* **Universal change management** - React to updates across any Salesforce object
* **Approval workflows** - Trigger approval processes when fields are updated
* **Escalation management** - Escalate records when conditions are met
* Essential for change tracking, integration sync, audit and compliance
Use "New Salesforce Record" and "Updated Salesforce Record" triggers for the most flexible and comprehensive automation workflows.
## Salesforce Actions
#### Add a Contact to a Campaign
Add an existing contact to an existing campaign:
* **Multi-touch campaigns** - Add contacts to nurture campaigns based on behavior
* **Event marketing** - Add attendees to post-event follow-up campaigns
* **Segmentation** - Add contacts to targeted campaigns based on demographics
* Perfect for lead nurturing, event follow-up, re-engagement campaigns
#### Add a Lead to a Campaign
Add an existing lead to an existing campaign:
* **Lead nurturing** - Enroll new leads in appropriate nurture sequences
* **Source tracking** - Add leads to campaigns based on acquisition source
* **Qualification workflows** - Move leads through qualification campaigns
* Ideal for lead management, source attribution, industry-specific campaigns
#### Convert Soap XML Object to JSON
Convert Salesforce SOAP XML data to JSON format:
* **API integration** - Convert data for consumption by modern REST APIs
* **Data transformation** - Prepare data for external analytics platforms
* **Legacy system integration** - Bridge Salesforce with older systems
* Essential for modern integrations, data transformation, custom reporting
#### Create a Contact
Create a new contact in Salesforce:
* **Lead conversion** - Create contacts from qualified leads
* **Data import** - Bulk create contacts from external data sources
* **Event registration** - Create contacts from event registration systems
* Perfect for lead conversion, data import, partner integration
#### Create a Lead
Create a new lead in Salesforce:
* **Multi-channel lead capture** - Create leads from various sources
* **Lead import** - Bulk import leads from external systems
* **Referral processing** - Create leads from referral programs
* Essential for lead capture, marketing integration, referral management
#### Create Attachment
Create and attach files to Salesforce records:
* **Document management** - Attach contracts, proposals, and agreements
* **Compliance documentation** - Attach required compliance documents
* **Communication records** - Attach email threads and call recordings
* Perfect for document management, compliance, communication tracking
#### Create Case Comment
Add a comment to an existing Salesforce case:
* **Customer communication** - Log customer interactions and responses
* **Internal collaboration** - Add internal notes for team collaboration
* **Escalation documentation** - Document escalation reasons and actions
* Essential for case management, team collaboration, resolution tracking
#### Create Content Note
Create and manage content notes with customizable permissions:
* **Meeting notes** - Create detailed meeting notes linked to records
* **Project documentation** - Document project progress and milestones
* **Knowledge sharing** - Create searchable content for team knowledge
* Perfect for meeting documentation, project tracking, knowledge management
#### Create Note
Create a new note and associate it with a Salesforce record:
* **Call logging** - Document phone conversations and outcomes
* **Meeting minutes** - Record meeting discussions and action items
* **Research notes** - Document prospect research and insights
* Ideal for activity logging, meeting documentation, follow-up tracking
#### Delete Opportunity
Delete a Salesforce opportunity record using its ID:
* **Data cleanup** - Remove duplicate or invalid opportunities
* **Pipeline management** - Clean up stale opportunities
* **Compliance** - Remove opportunities violating data retention policies
* Essential for data maintenance, pipeline hygiene, compliance management
#### Delete Record
Delete a record from Salesforce by specifying object type and ID:
* **Bulk data cleanup** - Remove outdated or duplicate records
* **Compliance management** - Delete records for data retention compliance
* **Process optimization** - Remove records no longer meeting criteria
* Perfect for data cleanup, compliance, integration maintenance
#### Find Records
Find and retrieve Salesforce records based on object type and fields:
* **Duplicate detection** - Find potential duplicates before creating new ones
* **Data validation** - Verify record existence before performing operations
* **Relationship mapping** - Find related records across different objects
* Essential for data quality, validation, relationship management
#### Get All Accounts
Retrieve all accounts from Salesforce:
* **Account analysis** - Get all accounts for comprehensive analysis
* **Territory planning** - Get account lists for territory assignment
* **Marketing campaigns** - Retrieve accounts for targeted marketing
* Perfect for account management, territory planning, data export
#### Get All Contacts
Retrieve all contacts from Salesforce:
* **Contact management** - Get all contacts for database management
* **Marketing lists** - Get contact lists for email marketing campaigns
* **Data synchronization** - Sync contacts with external platforms
* Essential for contact management, marketing, compliance audits
#### Get an Account
Retrieve a specific account from Salesforce:
* **Account lookup** - Get specific account details for processing
* **Data enrichment** - Get account information to enrich other records
* **Relationship analysis** - Analyze account relationships and hierarchies
* Perfect for account lookup, data enrichment, custom workflows
#### Insert Blob Data
Insert binary data and attachments with Salesforce objects:
* **Document storage** - Store contracts, images, and other binary files
* **Media management** - Attach photos, videos, and audio files
* **Backup systems** - Store backup copies of important documents
* Essential for document storage, media management, backup systems
#### Post a Message to Chatter Feed
Post messages to Salesforce Chatter feeds for specific records:
* **Team collaboration** - Share updates and insights with team members
* **Process notifications** - Notify teams about important milestones
* **Customer updates** - Share customer interaction updates
* Perfect for team collaboration, process notifications, project communication
#### Search for a Contact
Search for a specific contact in Salesforce:
* **Contact lookup** - Find contacts before creating or updating records
* **Duplicate prevention** - Check for existing contacts before import
* **Relationship mapping** - Find contacts related to specific records
* Essential for contact lookup, duplicate prevention, data validation
#### Search for an Opportunity
Search for a specific opportunity in Salesforce:
* **Pipeline analysis** - Find opportunities meeting specific criteria
* **Forecasting** - Retrieve opportunities for forecast calculations
* **Performance tracking** - Find opportunities for performance analysis
* Perfect for pipeline analysis, forecasting, performance tracking
#### Search Object Records
Search Salesforce records across specified object types:
* **Universal search** - Search across multiple object types simultaneously
* **Data discovery** - Find records containing specific information
* **Relationship analysis** - Discover connections between record types
* Essential for universal search, data discovery, comprehensive reporting
#### SOQL Query
Execute custom SOQL queries against your Salesforce data:
* **Complex reporting** - Create sophisticated reports with custom logic
* **Data analysis** - Perform advanced data analysis with custom queries
* **Integration logic** - Retrieve specific data sets for external integration
* Perfect for complex reporting, data analysis, performance optimization
#### SOSL Search
Search Salesforce records using SOSL query syntax:
* **Full-text search** - Search across multiple fields and objects
* **Fuzzy matching** - Find records with similar but not exact matches
* **Content discovery** - Search within text fields, documents, and attachments
* Essential for full-text search, fuzzy matching, advanced filtering
#### Update a Contact
Update an existing contact in Salesforce:
* **Data maintenance** - Keep contact information current and accurate
* **Lifecycle management** - Update contact stages and statuses
* **Preference management** - Update communication preferences
* Perfect for data maintenance, lifecycle management, enrichment updates
#### Update a Lead
Update an existing lead in Salesforce:
* **Lead scoring** - Update lead scores based on behavior and engagement
* **Status management** - Change lead status as they progress through qualification
* **Assignment updates** - Reassign leads to different sales representatives
* Essential for lead scoring, status management, data enrichment
## Practical Implementation Scenarios
Transform Lindy into a comprehensive revenue operations platform:
* Lead-to-cash automation: New lead → Score and qualify → Create opportunity → Update forecasts
* Customer success workflows: Account update → Analyze health score → Trigger renewal processes
* Sales performance tracking: Opportunity updates → Calculate rep performance → Update dashboards
Create seamless customer experiences across touchpoints:
* Onboarding automation: New customer → Create success plan → Schedule check-ins → Track milestones
* Support escalation: Case creation → Route by priority → Escalate if needed → Update customer
* Renewal management: Account analysis → Predict renewal risk → Trigger retention campaigns
Bridge marketing and sales activities through automated workflows:
* Lead handoff: Marketing qualified lead → Sales notification → Automatic assignment → Follow-up tracking
* Campaign attribution: Opportunity creation → Track campaign influence → Update attribution models
* Content personalization: Contact updates → Analyze preferences → Personalize content → Track engagement
## Advanced Features & Capabilities
Powerful data processing and analysis capabilities:
* **SOQL Queries** - Execute complex database queries for custom reporting
* **SOSL Search** - Full-text search across multiple objects and fields
* **Data Transformation** - Convert between XML and JSON formats
* **Bulk Operations** - Handle high-volume data processing efficiently
Seamless integration with enterprise systems and workflows:
* **Multi-object Workflows** - Work across contacts, leads, opportunities, and custom objects
* **Approval Processes** - Automate approval workflows and escalations
* **Compliance Management** - Maintain audit trails and compliance documentation
* **Security Controls** - Respect Salesforce permissions and security models
Instant response to Salesforce events and changes:
* **Event-driven Triggers** - React immediately to record changes and deletions
* **Outbound Messages** - Handle complex business logic with custom triggers
* **Cross-system Sync** - Keep external systems synchronized with Salesforce
* **Intelligent Routing** - Route records and tasks based on business rules
## Configuration Best Practices
Optimize your sales process workflows:
* Use "New Salesforce Lead" triggers for immediate lead processing
* Implement lead scoring with "Updated Salesforce Lead" triggers
* Set up automated follow-up sequences with campaign actions
* Create deal progression notifications with opportunity triggers
* Use SOQL queries for complex data analysis and reporting
Set up powerful marketing workflows:
* Use form submission triggers for immediate lead response
* Implement email engagement tracking with contact updates
* Set up campaign-based segmentation and nurturing
* Create lifecycle stage progression workflows
* Use bulk operations for high-volume data processing
Create efficient support workflows:
* Use case triggers for automated routing and escalation
* Implement SLA monitoring with time-based automation
* Set up customer satisfaction workflows and surveys
* Create internal notification systems for critical issues
* Use Chatter integration for team collaboration
## Limitations & Considerations
* **Rate Limits**: Salesforce API has rate limits for high-volume operations
* **Query Limits**: SOQL and SOSL queries have execution time and record limits
* **Bulk Operations**: Large data operations require special handling
* **Real-time Processing**: Some operations may have slight delays
* **Access Control**: Lindy respects Salesforce user permissions and field-level security
* **Data Encryption**: All data transfers use encrypted connections
* **Audit Logging**: Maintain comprehensive logs of all automated activities
* **Permission Auditing**: Regularly review access permissions and security settings
* Many advanced triggers require Premium subscription
* Advanced query operations (SOQL/SOSL) are Premium-only
* Bulk operations and data transformation require Premium
* Complex filtering and search options may be Premium features
## Next steps
Compare CRM automation capabilities
Combine CRM with email automation
Build automated lead enrichment workflows
Set up Salesforce-based automation triggers
# Slack
Source: https://docs.lindy.ai/skills/popular-integrations/slack
## Quick Overview
Transform your Slack workspace into an AI-powered productivity hub with Lindy's Slack integration. Build intelligent bots that can answer questions, route tickets, send alerts, and automate team communications—all without writing a single line of code.
Key benefits of Slack + Lindy:
* **Instant knowledge access** - Answer team questions using your internal documents
* **Smart automation** - Route messages, escalate tickets, and send notifications
* **24/7 availability** - AI assistance that never sleeps
* **Context awareness** - Understand intent and provide relevant responses
* **Seamless integration** - Works with your existing Slack channels and workflows
## Available Triggers
### Slack Message Received
Monitor specific channels or direct messages for new activity:
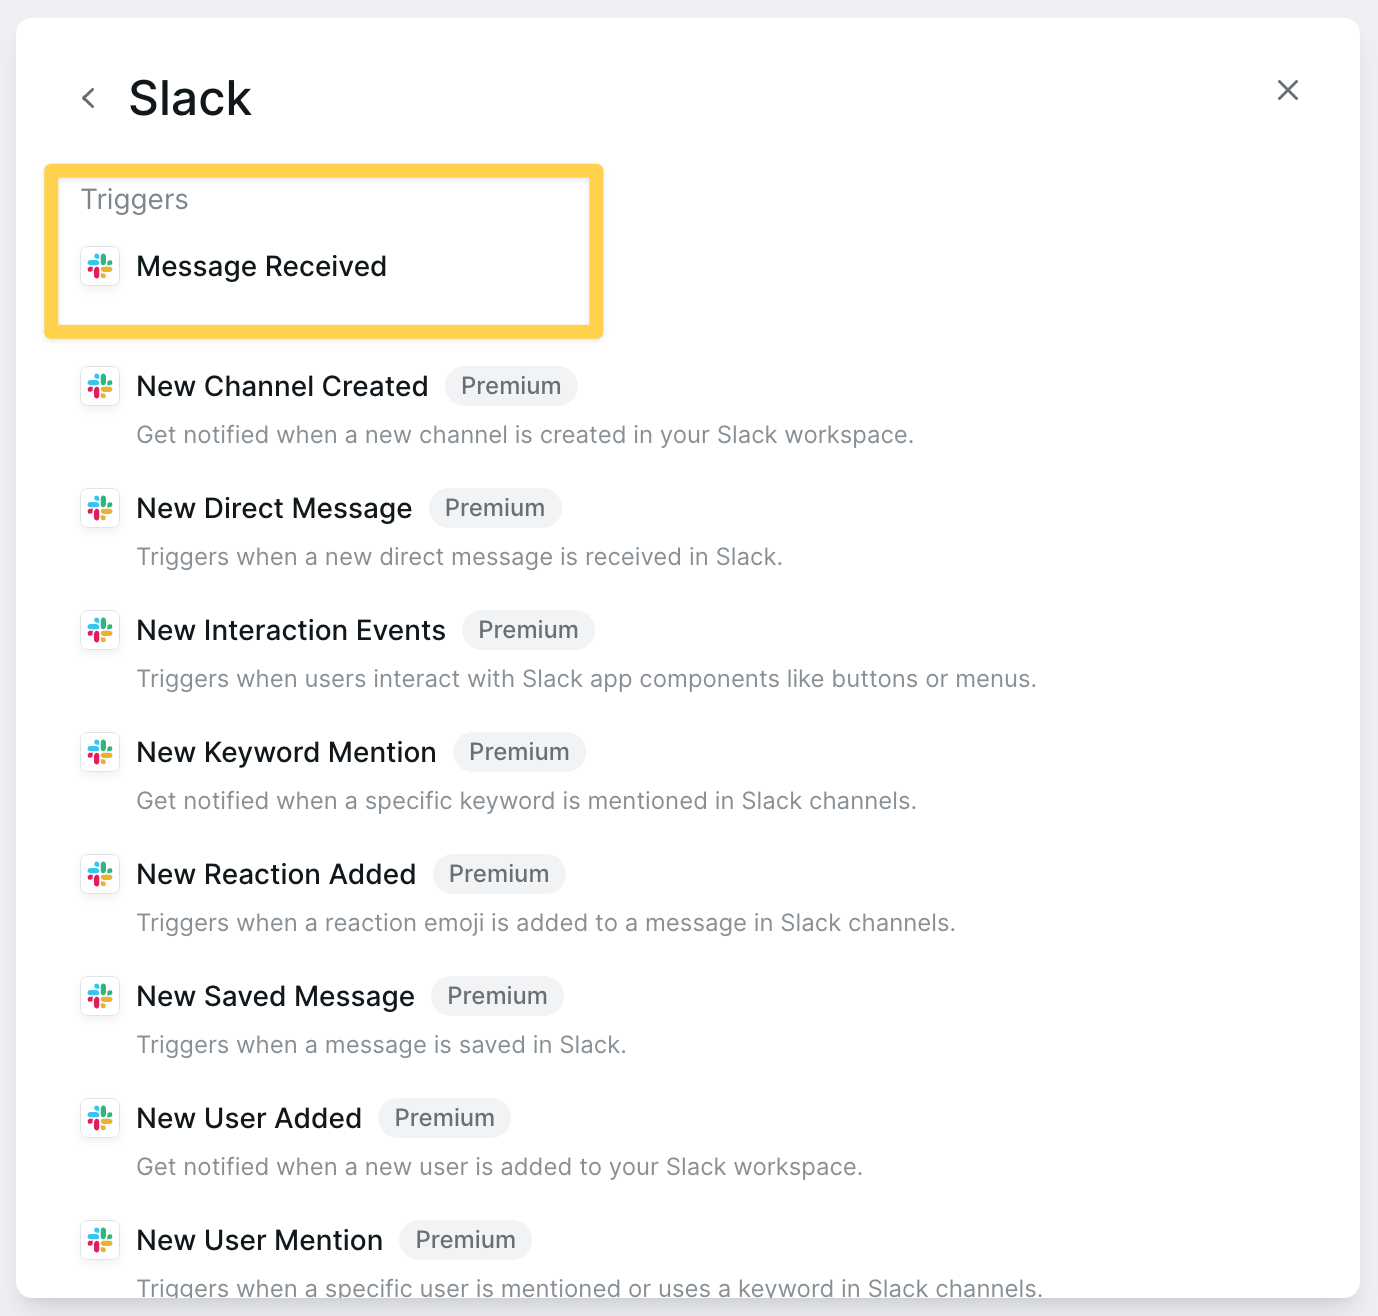 Use filters to prevent your bot from responding to every message. Try starting with keywords like "Hey Lindy" or "@bot" to create intentional interactions.
## Available Actions
### Send Channel Message
Use filters to prevent your bot from responding to every message. Try starting with keywords like "Hey Lindy" or "@bot" to create intentional interactions.
## Available Actions
### Send Channel Message
 Send messages to channels or direct messages with smart AI-generated content.
**Configuration options:**
* **Specific channels** - Monitor selected channels only
* **All channels** - Listen to every channel in your workspace
* **Direct messages** - Respond to private messages
* **Keyword filters** - Trigger only on specific words or phrases
* **User filters** - React to messages from specific team members
## Step-by-Step Setup Guide
### Building Your First Slack Bot
Start by creating a new agent specifically for Slack automation.
Send messages to channels or direct messages with smart AI-generated content.
**Configuration options:**
* **Specific channels** - Monitor selected channels only
* **All channels** - Listen to every channel in your workspace
* **Direct messages** - Respond to private messages
* **Keyword filters** - Trigger only on specific words or phrases
* **User filters** - React to messages from specific team members
## Step-by-Step Setup Guide
### Building Your First Slack Bot
Start by creating a new agent specifically for Slack automation.
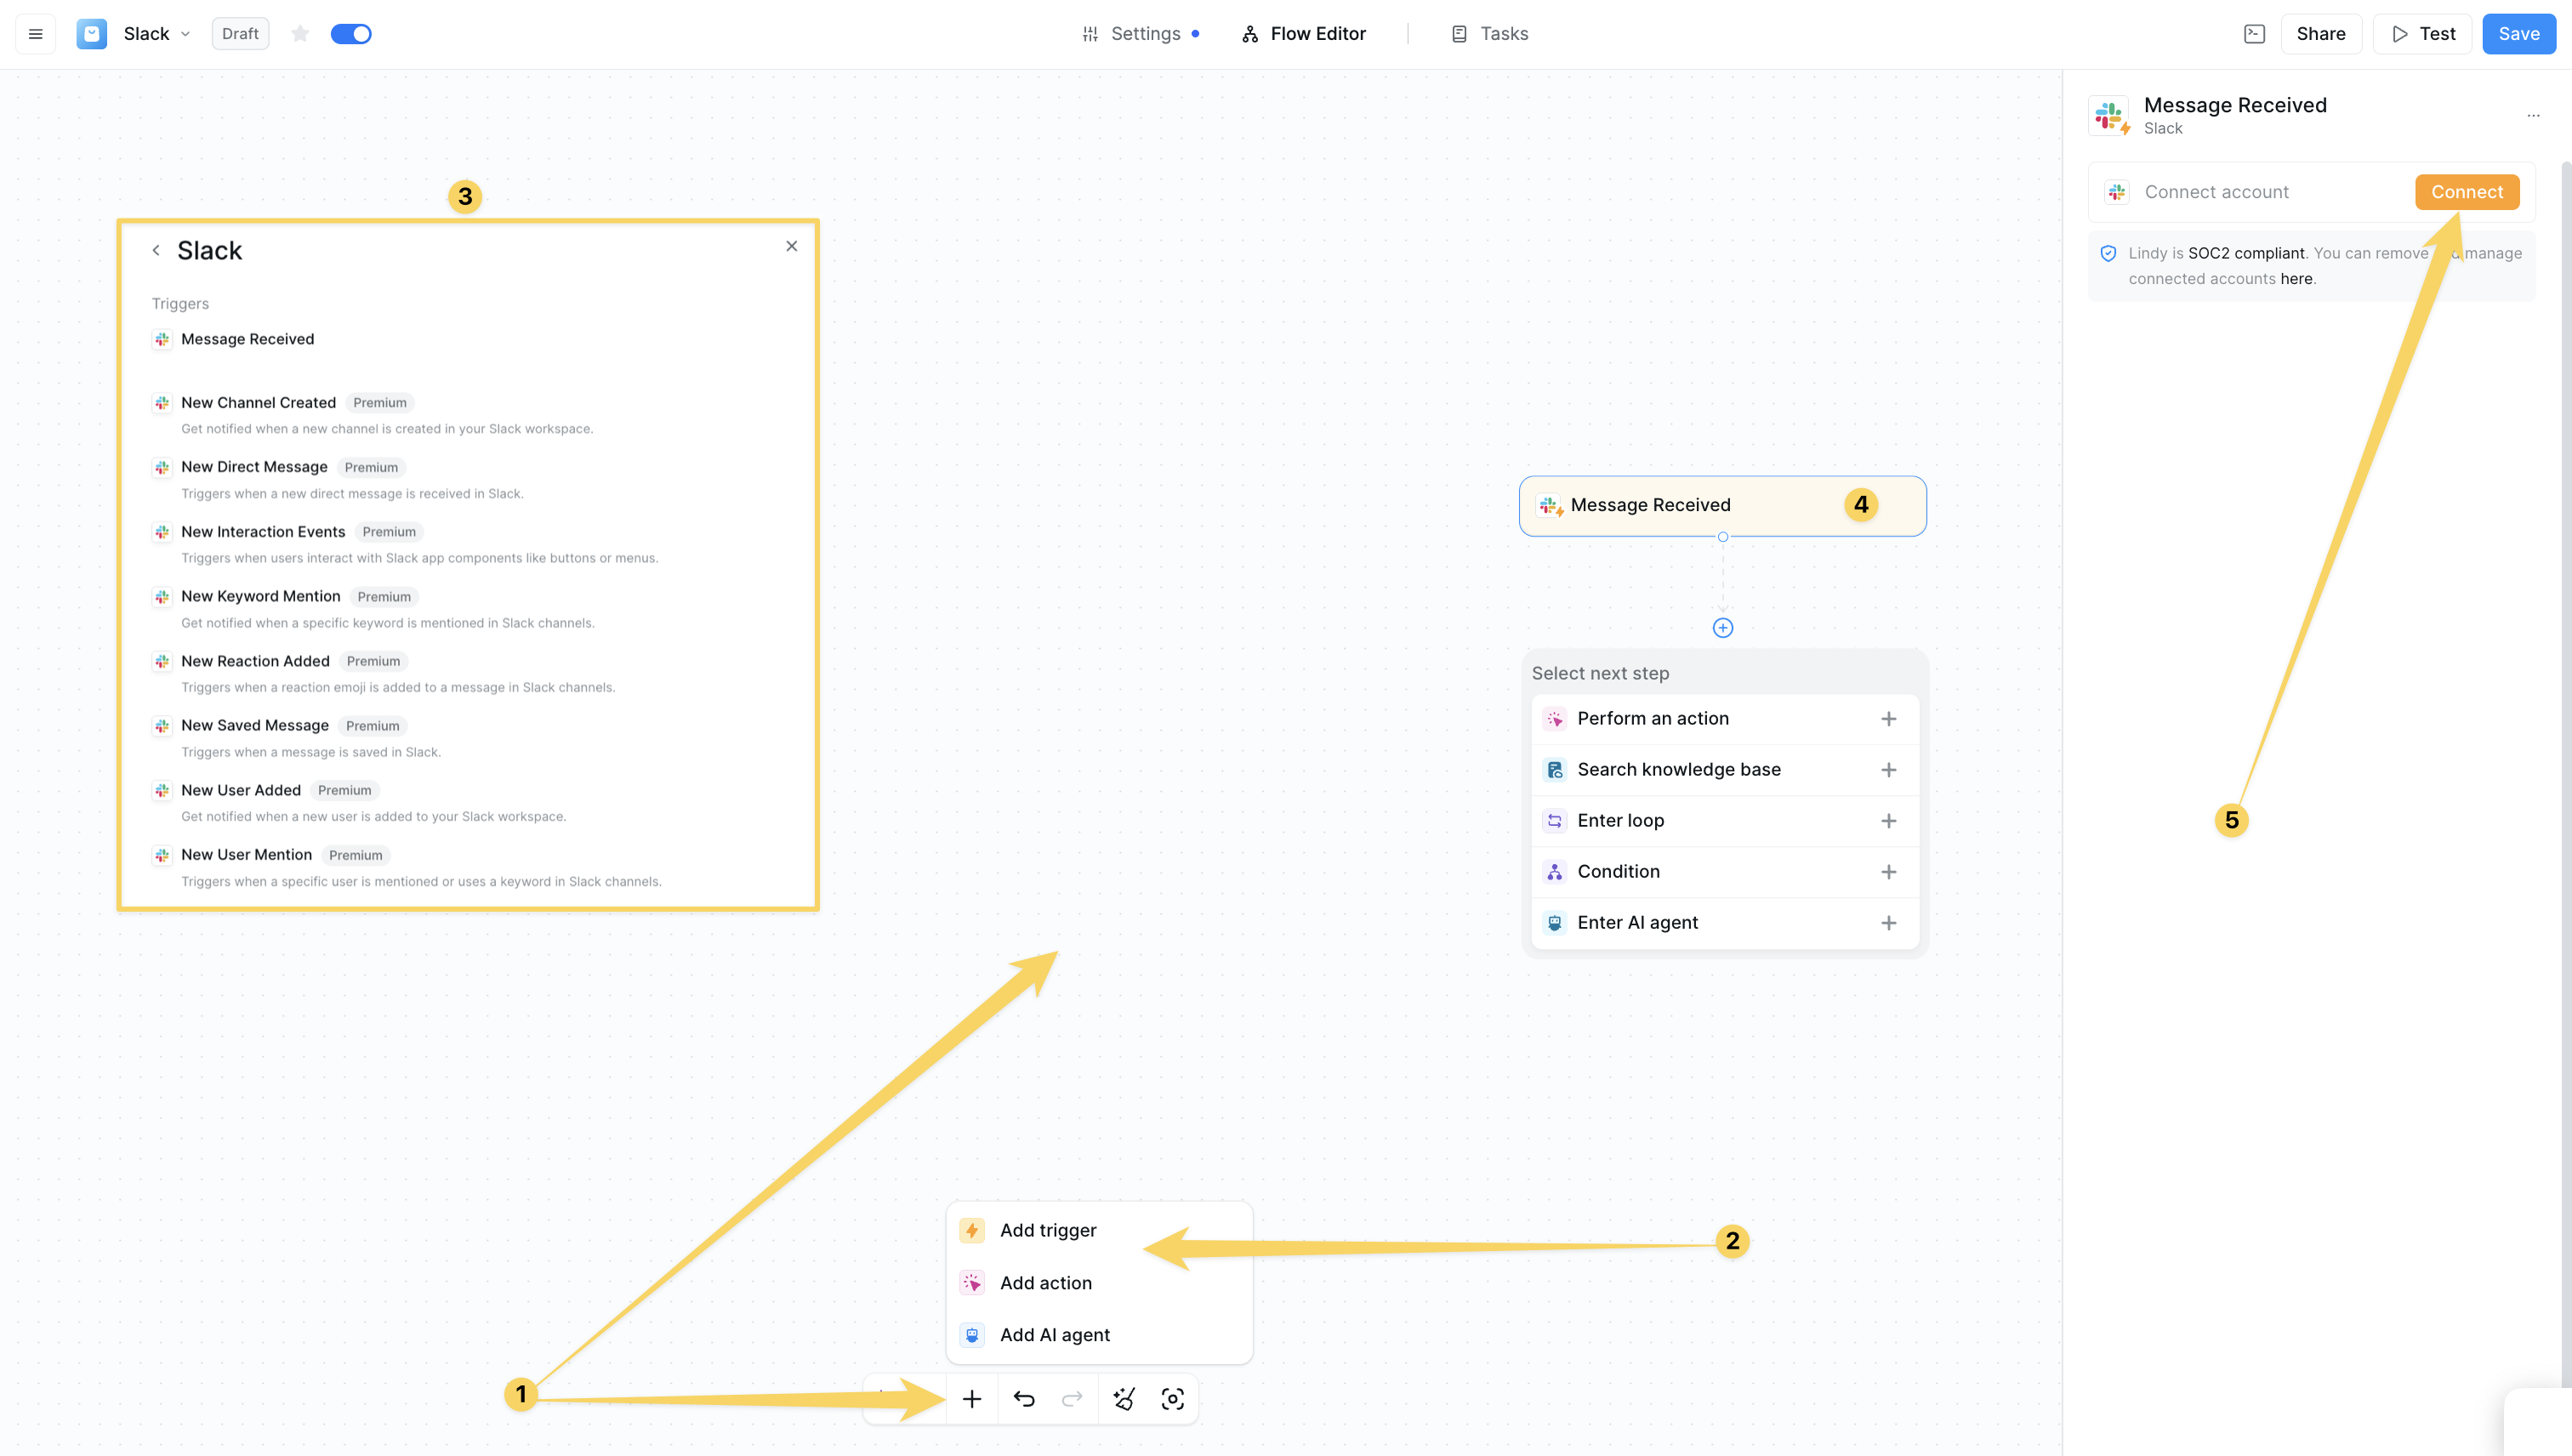 Click on "Select Trigger" and choose "Slack Message Received" from the list of available triggers. This will make your bot wake up whenever a message is posted in your Slack workspace.
In the trigger configuration:
* **Channel Selection**: Choose specific channels to monitor (like #support or #general) or select "All" to monitor your entire workspace
* **Direct Messages**: Enable if you want the bot to respond to private messages
* **Integration Setup**: Authorize your Slack workspace by clicking "Connect" and following the OAuth flow
Add trigger filters to control when your bot responds and avoid unnecessary activations:
Filter by Keywords : Set the bot to only trigger when messages contain specific words
* Example: "Hey Lindy", "help", "support", "question"
Filter by Users: Exclude or include specific team members
* Useful to prevent the bot from responding to other bots or specific users
Filter by Channels: Fine-tune which channels trigger the bot even if monitoring "All"
* Example: Exclude #random or #general but include #support
**Advanced Filters**: Use conditions like "message starts with" or "message contains question mark"
Click the "+" button and select "Condition" to create smart routing logic that determines when your bot should actually respond:
Example Conditions:
* "the message contains a question about company policies or procedures"
* "the user is asking for help with our product or service"
* "the message is a support request that needs immediate attention"
Why Use Conditions: They ensure your bot only responds to relevant messages, improving accuracy and preventing spam. You can add multiple conditions to create different response paths.
Best Practice: Start with broad conditions and refine them based on actual usage patterns.
Add a "Search Knowledge Base" step to give your bot access to company information:
Knowledge Base Setup:
* Upload your company documentation, FAQs, policies, and procedures
* Include website content, Notion pages, Google Docs, or PDF files
* Organize content by categories (HR, IT, Product, etc.)
Search Configuration:
* Set the search to look for relevant information based on the user's question
* Configure how many results to return (typically 3-5 for best performance)
* Choose between semantic search (meaning-based) or keyword search
Content Tips: Keep your knowledge base updated and well-organized for best results.
Add a "Send Message" action to define how your bot responds:
Message Configuration:
* **Channel**: Choose to respond in the same channel, send a DM, or post to a specific channel
* **Thread Reply**: Enable to keep conversations organized within message threads
Response Prompt: Write clear instructions for how the bot should respond:
```
"Answer the user's question using information from the knowledge base.
Be helpful and concise. If you can't find the answer, suggest who
they should contact or how to get help. Always maintain a friendly,
professional tone that matches our company culture."
```
Advanced Options:
* Add fallback responses for when no knowledge base match is found
* Include escalation paths to human team members
* Set up follow-up actions like logging the interaction
## Common Use Cases
### Customer Support Bot
1. **Trigger**: Slack Message Received in #support channel
2. **Condition**: Message contains a customer inquiry or support request
3. **Action**: Search knowledge base for solutions
4. **Response**: Provide answer or escalate to human agent
```
Condition: "the message is asking for help with our product or service"
Knowledge Base: Customer support documentation, FAQ, troubleshooting guides
Response Prompt: "Help the customer by providing a clear solution from our documentation. If the issue requires human assistance, let them know someone will follow up shortly."
```
### HR Assistant Bot
* PTO policies and vacation requests
* Benefits information and enrollment
* Company handbook and procedures
* Office hours and remote work policies
* Expense reporting and reimbursements
```
Trigger Filter: Message contains "PTO", "vacation", "benefits", "policy"
Condition: "the message is asking about HR policies, benefits, or company procedures"
Knowledge Base: Employee handbook, HR policies, benefits documentation
Response: "Provide accurate information from our HR documentation. Include relevant links or next steps when helpful."
```
### Sales Alert System
1. **External Trigger**: New lead added to CRM (HubSpot, Salesforce)
2. **Processing**: Extract lead information and qualification data
3. **Notification**: Send formatted alert to #sales channel
4. **Follow-up**: Include next steps and assignment suggestions
```
🚨 New Lead Alert!
Name: {{lead.name}}
Company: {{lead.company}}
Source: {{lead.source}}
Score: {{lead.score}}/10
Next Steps: {{suggested_actions}}
Assigned to: {{sales_rep}}
```
### Meeting Notes Distribution
1. **Trigger**: Meeting ends (calendar integration)
2. **Processing**: Generate meeting summary using AI
3. **Distribution**: Send summary to relevant Slack channels
4. **Action Items**: Extract and assign follow-up tasks
```
📋 Meeting Summary: {{meeting_title}}
Date: {{date}}
Attendees: {{participants}}
Key Decisions:
• {{decision_1}}
• {{decision_2}}
Action Items:
• {{action_1}} - Due: {{date}} - Assigned: {{person}}
• {{action_2}} - Due: {{date}} - Assigned: {{person}}
Next Meeting: {{next_meeting_date}}
```
## Best Practices
### Bot Personality and Tone
Configure your bot's personality to match your company culture:
**Professional**: "I'm here to help with your questions about our policies and procedures."
**Friendly**: "Hey there! 👋 What can I help you with today?"
**Technical**: "I can assist you with documentation, code examples, and troubleshooting steps."
* Keep responses concise but complete
* Include relevant links and resources
* Use emojis sparingly and appropriately
* Always provide next steps or alternatives
* Maintain consistency across all interactions
### Performance Optimization
* Keep knowledge base content organized and up-to-date
* Use specific conditions to avoid unnecessary processing
* Cache frequently requested information
* Set appropriate timeouts for external integrations
* Regularly review and update knowledge base content
* Monitor bot interactions and user feedback
* Refine conditions based on actual usage patterns
* Test bot responses with different question phrasings
### Security and Privacy
Be mindful of sensitive information in Slack channels. Configure appropriate access controls and avoid exposing confidential data through bot responses.
**Security Guidelines:**
* Limit bot access to appropriate channels only
* Use private channels for sensitive discussions
* Regularly audit bot permissions and access
* Implement data retention policies for bot interactions
* Train team members on proper bot usage
## Testing Your Slack Bot
### Testing Checklist
* Test trigger activation with sample messages
* Verify response accuracy and tone
* Check knowledge base search results
* Confirm proper channel targeting
* Test with typos and informal language
* Try questions outside the knowledge base
* Test concurrent requests from multiple users
* Verify error handling and fallback responses
* Test external system connections
* Verify data synchronization
* Check notification delivery
* Validate escalation workflows
## Troubleshooting
**Common causes:**
* Incorrect channel permissions
* Overly restrictive filters
* Bot not properly connected to Slack
* Trigger conditions not met
**Solutions:**
* Check integration status in dashboard
* Review and adjust trigger filters
* Verify channel membership
* Test with simple, direct messages
**Common causes:**
* Outdated knowledge base content
* Ambiguous or unclear prompts
* Insufficient training data
* Context not properly understood
**Solutions:**
* Update knowledge base with current information
* Refine response prompts with examples
* Add more specific conditions
* Provide feedback to improve responses
**Common causes:**
* Large knowledge base without optimization
* Complex conditions causing delays
* External API timeouts
* High concurrent usage
**Solutions:**
* Optimize knowledge base structure
* Simplify conditions where possible
* Implement caching for common queries
* Consider load balancing for high usage
## Next Steps
Ready to supercharge your Slack workspace? Here are some ways to expand your automation:
Connect email workflows with Slack notifications
Automate meeting scheduling and reminders
Sync sales data and lead notifications
Add approval workflows for sensitive actions
# Telegram
Source: https://docs.lindy.ai/skills/popular-integrations/telegram
## Quick Overview
Telegram integration is one of Lindy's most powerful messaging automation capabilities, enabling your AI agents to act as sophisticated Telegram bots for customer support, community management, and business automation. The integration provides both Triggers (what can start a Lindy workflow) and Actions (what Lindy can do).
This comprehensive integration transforms Telegram into an intelligent automation platform, capable of handling everything from simple message responses to complex multi-step operations, group chat management, and rich media distribution.
Key benefits of Telegram integration:
* **Bidirectional communication** – Both receive and send messages through Telegram
* **Group chat management** – Full support for Telegram group chats and channels
* **Rich media support** – Handle text, photos, videos, documents, and more
* **Real-time automation** – Instant responses and workflow execution
## How to set up Telegram
Click on the plus sign at the bottom or right-click anywhere on the canvas and select "Add Trigger" or "Add Action" from the pop-up menu and choose "Telegram"
Click on "Select Trigger" and choose "Slack Message Received" from the list of available triggers. This will make your bot wake up whenever a message is posted in your Slack workspace.
In the trigger configuration:
* **Channel Selection**: Choose specific channels to monitor (like #support or #general) or select "All" to monitor your entire workspace
* **Direct Messages**: Enable if you want the bot to respond to private messages
* **Integration Setup**: Authorize your Slack workspace by clicking "Connect" and following the OAuth flow
Add trigger filters to control when your bot responds and avoid unnecessary activations:
Filter by Keywords : Set the bot to only trigger when messages contain specific words
* Example: "Hey Lindy", "help", "support", "question"
Filter by Users: Exclude or include specific team members
* Useful to prevent the bot from responding to other bots or specific users
Filter by Channels: Fine-tune which channels trigger the bot even if monitoring "All"
* Example: Exclude #random or #general but include #support
**Advanced Filters**: Use conditions like "message starts with" or "message contains question mark"
Click the "+" button and select "Condition" to create smart routing logic that determines when your bot should actually respond:
Example Conditions:
* "the message contains a question about company policies or procedures"
* "the user is asking for help with our product or service"
* "the message is a support request that needs immediate attention"
Why Use Conditions: They ensure your bot only responds to relevant messages, improving accuracy and preventing spam. You can add multiple conditions to create different response paths.
Best Practice: Start with broad conditions and refine them based on actual usage patterns.
Add a "Search Knowledge Base" step to give your bot access to company information:
Knowledge Base Setup:
* Upload your company documentation, FAQs, policies, and procedures
* Include website content, Notion pages, Google Docs, or PDF files
* Organize content by categories (HR, IT, Product, etc.)
Search Configuration:
* Set the search to look for relevant information based on the user's question
* Configure how many results to return (typically 3-5 for best performance)
* Choose between semantic search (meaning-based) or keyword search
Content Tips: Keep your knowledge base updated and well-organized for best results.
Add a "Send Message" action to define how your bot responds:
Message Configuration:
* **Channel**: Choose to respond in the same channel, send a DM, or post to a specific channel
* **Thread Reply**: Enable to keep conversations organized within message threads
Response Prompt: Write clear instructions for how the bot should respond:
```
"Answer the user's question using information from the knowledge base.
Be helpful and concise. If you can't find the answer, suggest who
they should contact or how to get help. Always maintain a friendly,
professional tone that matches our company culture."
```
Advanced Options:
* Add fallback responses for when no knowledge base match is found
* Include escalation paths to human team members
* Set up follow-up actions like logging the interaction
## Common Use Cases
### Customer Support Bot
1. **Trigger**: Slack Message Received in #support channel
2. **Condition**: Message contains a customer inquiry or support request
3. **Action**: Search knowledge base for solutions
4. **Response**: Provide answer or escalate to human agent
```
Condition: "the message is asking for help with our product or service"
Knowledge Base: Customer support documentation, FAQ, troubleshooting guides
Response Prompt: "Help the customer by providing a clear solution from our documentation. If the issue requires human assistance, let them know someone will follow up shortly."
```
### HR Assistant Bot
* PTO policies and vacation requests
* Benefits information and enrollment
* Company handbook and procedures
* Office hours and remote work policies
* Expense reporting and reimbursements
```
Trigger Filter: Message contains "PTO", "vacation", "benefits", "policy"
Condition: "the message is asking about HR policies, benefits, or company procedures"
Knowledge Base: Employee handbook, HR policies, benefits documentation
Response: "Provide accurate information from our HR documentation. Include relevant links or next steps when helpful."
```
### Sales Alert System
1. **External Trigger**: New lead added to CRM (HubSpot, Salesforce)
2. **Processing**: Extract lead information and qualification data
3. **Notification**: Send formatted alert to #sales channel
4. **Follow-up**: Include next steps and assignment suggestions
```
🚨 New Lead Alert!
Name: {{lead.name}}
Company: {{lead.company}}
Source: {{lead.source}}
Score: {{lead.score}}/10
Next Steps: {{suggested_actions}}
Assigned to: {{sales_rep}}
```
### Meeting Notes Distribution
1. **Trigger**: Meeting ends (calendar integration)
2. **Processing**: Generate meeting summary using AI
3. **Distribution**: Send summary to relevant Slack channels
4. **Action Items**: Extract and assign follow-up tasks
```
📋 Meeting Summary: {{meeting_title}}
Date: {{date}}
Attendees: {{participants}}
Key Decisions:
• {{decision_1}}
• {{decision_2}}
Action Items:
• {{action_1}} - Due: {{date}} - Assigned: {{person}}
• {{action_2}} - Due: {{date}} - Assigned: {{person}}
Next Meeting: {{next_meeting_date}}
```
## Best Practices
### Bot Personality and Tone
Configure your bot's personality to match your company culture:
**Professional**: "I'm here to help with your questions about our policies and procedures."
**Friendly**: "Hey there! 👋 What can I help you with today?"
**Technical**: "I can assist you with documentation, code examples, and troubleshooting steps."
* Keep responses concise but complete
* Include relevant links and resources
* Use emojis sparingly and appropriately
* Always provide next steps or alternatives
* Maintain consistency across all interactions
### Performance Optimization
* Keep knowledge base content organized and up-to-date
* Use specific conditions to avoid unnecessary processing
* Cache frequently requested information
* Set appropriate timeouts for external integrations
* Regularly review and update knowledge base content
* Monitor bot interactions and user feedback
* Refine conditions based on actual usage patterns
* Test bot responses with different question phrasings
### Security and Privacy
Be mindful of sensitive information in Slack channels. Configure appropriate access controls and avoid exposing confidential data through bot responses.
**Security Guidelines:**
* Limit bot access to appropriate channels only
* Use private channels for sensitive discussions
* Regularly audit bot permissions and access
* Implement data retention policies for bot interactions
* Train team members on proper bot usage
## Testing Your Slack Bot
### Testing Checklist
* Test trigger activation with sample messages
* Verify response accuracy and tone
* Check knowledge base search results
* Confirm proper channel targeting
* Test with typos and informal language
* Try questions outside the knowledge base
* Test concurrent requests from multiple users
* Verify error handling and fallback responses
* Test external system connections
* Verify data synchronization
* Check notification delivery
* Validate escalation workflows
## Troubleshooting
**Common causes:**
* Incorrect channel permissions
* Overly restrictive filters
* Bot not properly connected to Slack
* Trigger conditions not met
**Solutions:**
* Check integration status in dashboard
* Review and adjust trigger filters
* Verify channel membership
* Test with simple, direct messages
**Common causes:**
* Outdated knowledge base content
* Ambiguous or unclear prompts
* Insufficient training data
* Context not properly understood
**Solutions:**
* Update knowledge base with current information
* Refine response prompts with examples
* Add more specific conditions
* Provide feedback to improve responses
**Common causes:**
* Large knowledge base without optimization
* Complex conditions causing delays
* External API timeouts
* High concurrent usage
**Solutions:**
* Optimize knowledge base structure
* Simplify conditions where possible
* Implement caching for common queries
* Consider load balancing for high usage
## Next Steps
Ready to supercharge your Slack workspace? Here are some ways to expand your automation:
Connect email workflows with Slack notifications
Automate meeting scheduling and reminders
Sync sales data and lead notifications
Add approval workflows for sensitive actions
# Telegram
Source: https://docs.lindy.ai/skills/popular-integrations/telegram
## Quick Overview
Telegram integration is one of Lindy's most powerful messaging automation capabilities, enabling your AI agents to act as sophisticated Telegram bots for customer support, community management, and business automation. The integration provides both Triggers (what can start a Lindy workflow) and Actions (what Lindy can do).
This comprehensive integration transforms Telegram into an intelligent automation platform, capable of handling everything from simple message responses to complex multi-step operations, group chat management, and rich media distribution.
Key benefits of Telegram integration:
* **Bidirectional communication** – Both receive and send messages through Telegram
* **Group chat management** – Full support for Telegram group chats and channels
* **Rich media support** – Handle text, photos, videos, documents, and more
* **Real-time automation** – Instant responses and workflow execution
## How to set up Telegram
Click on the plus sign at the bottom or right-click anywhere on the canvas and select "Add Trigger" or "Add Action" from the pop-up menu and choose "Telegram"
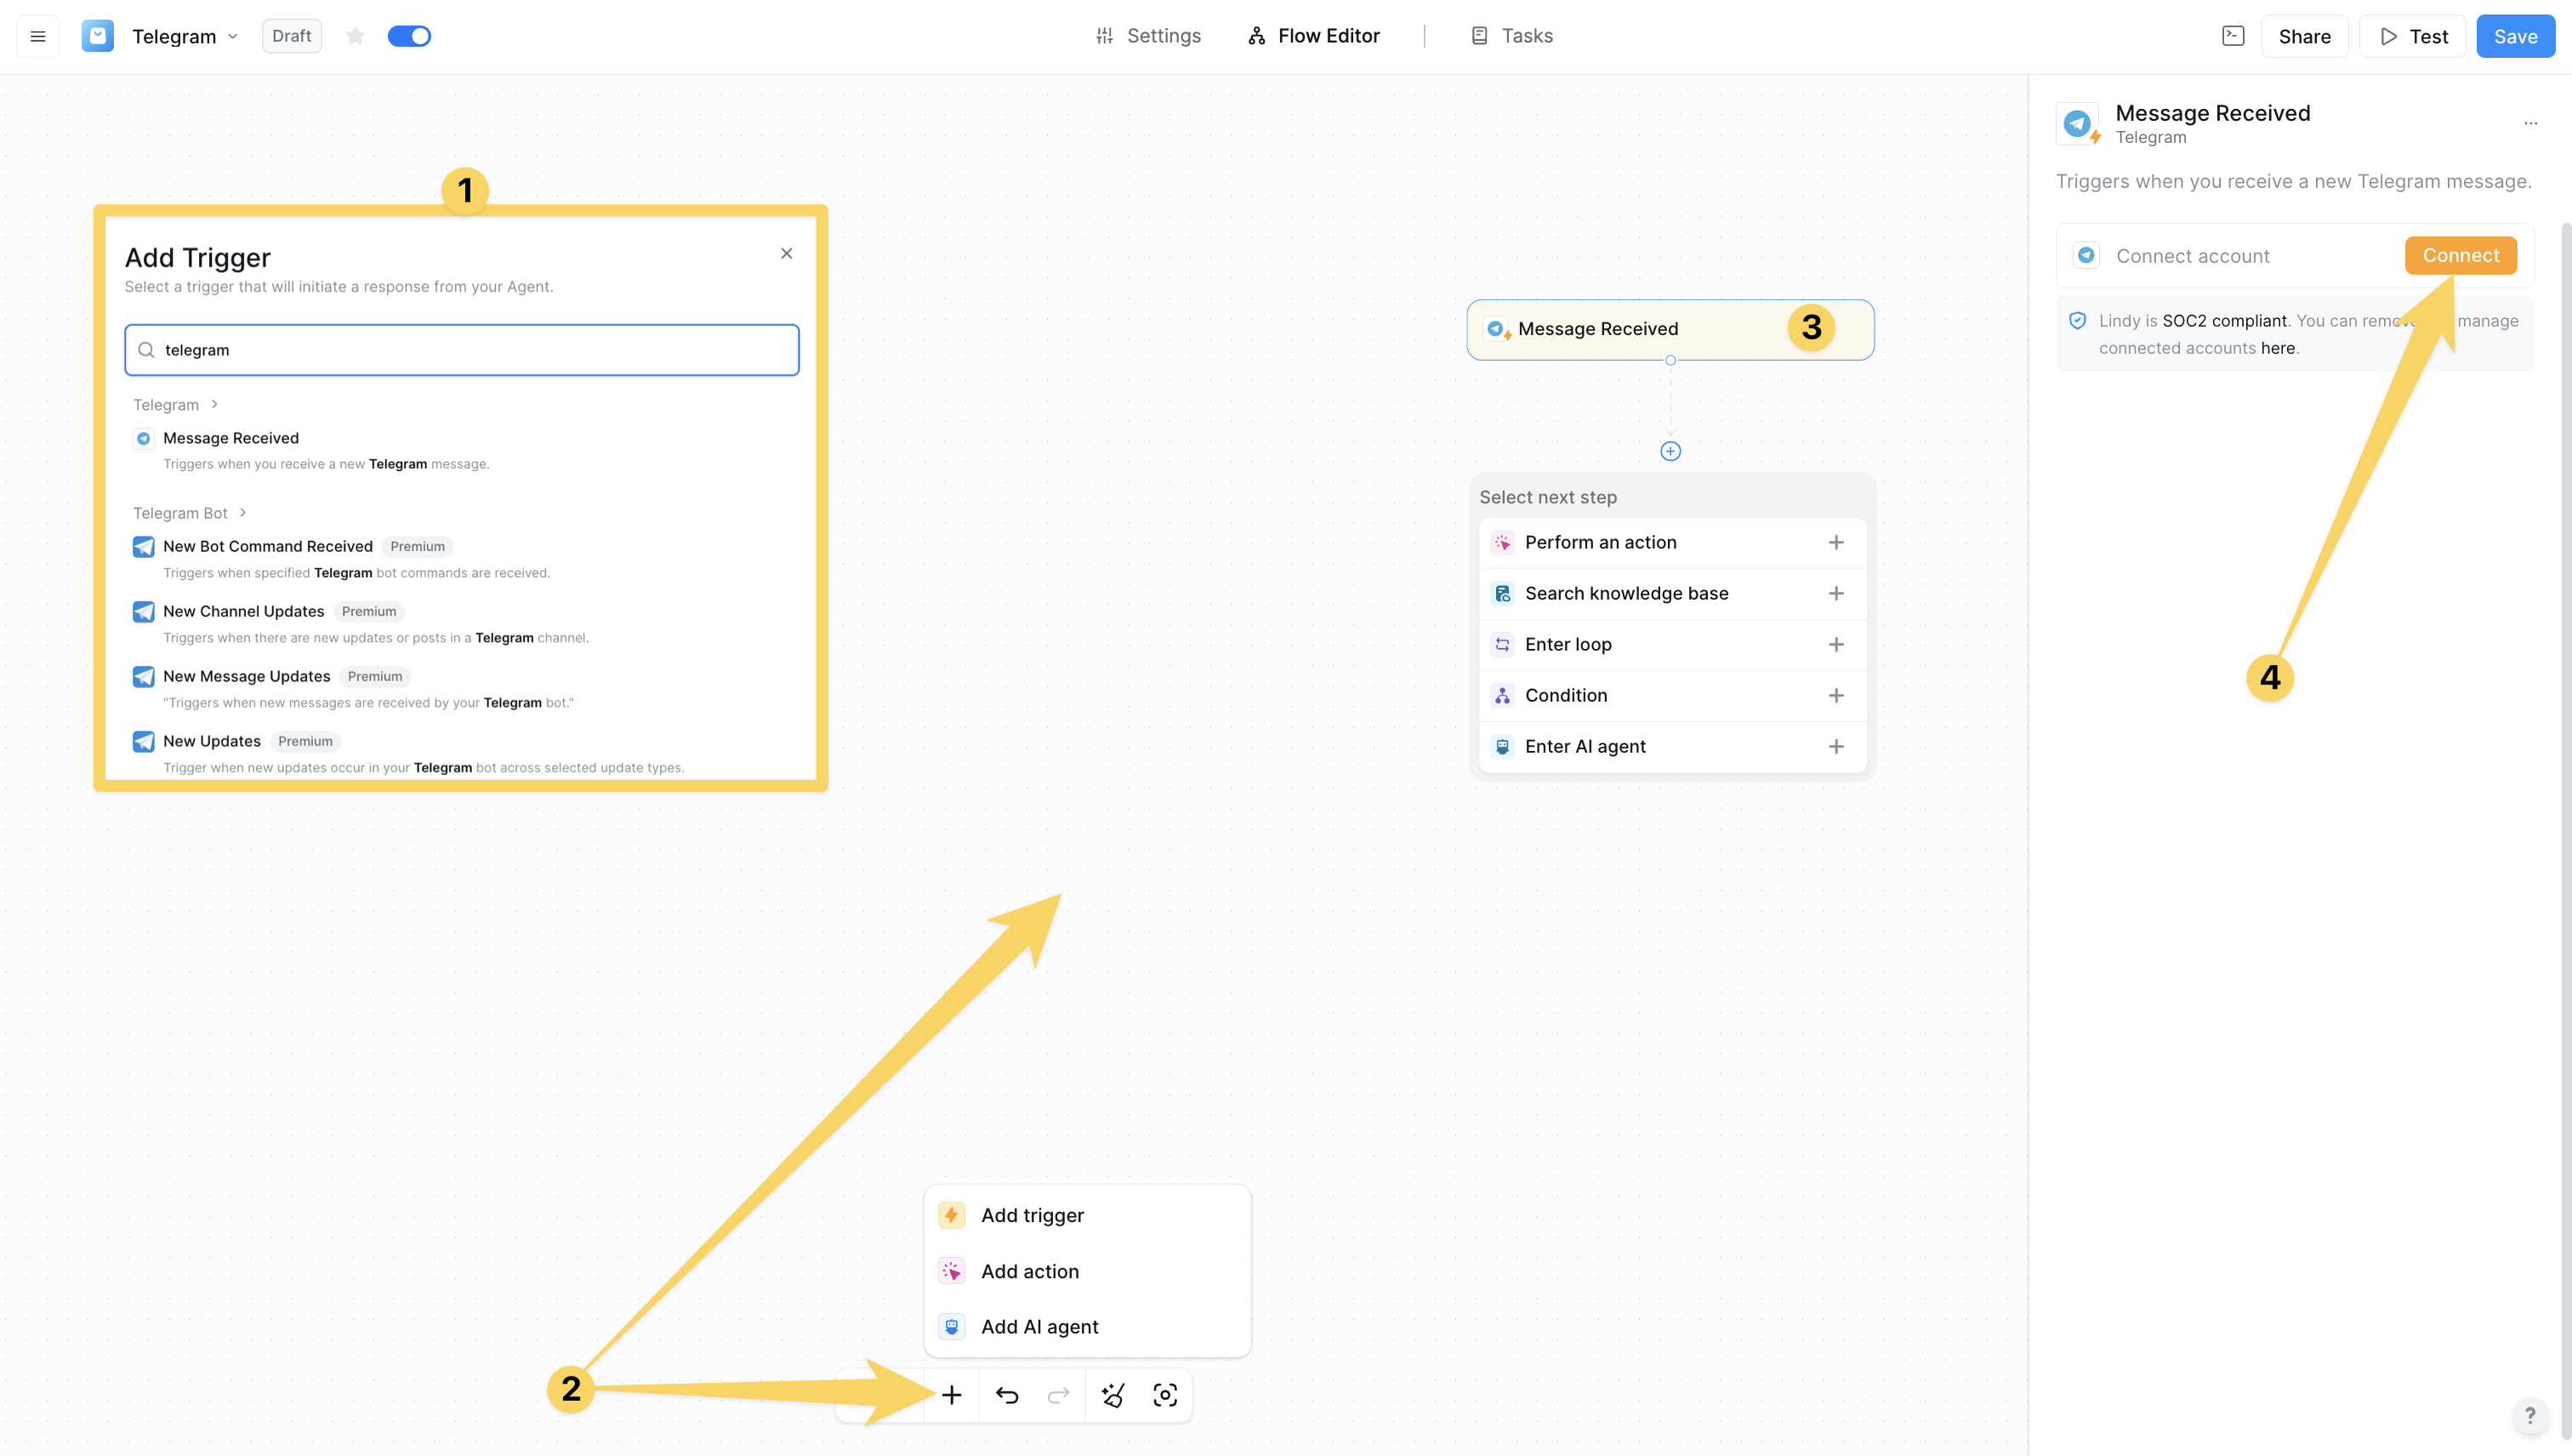 Open BotFather on Telegram, send /newbot command, choose a name and username for your bot, then copy the HTTP API token provided
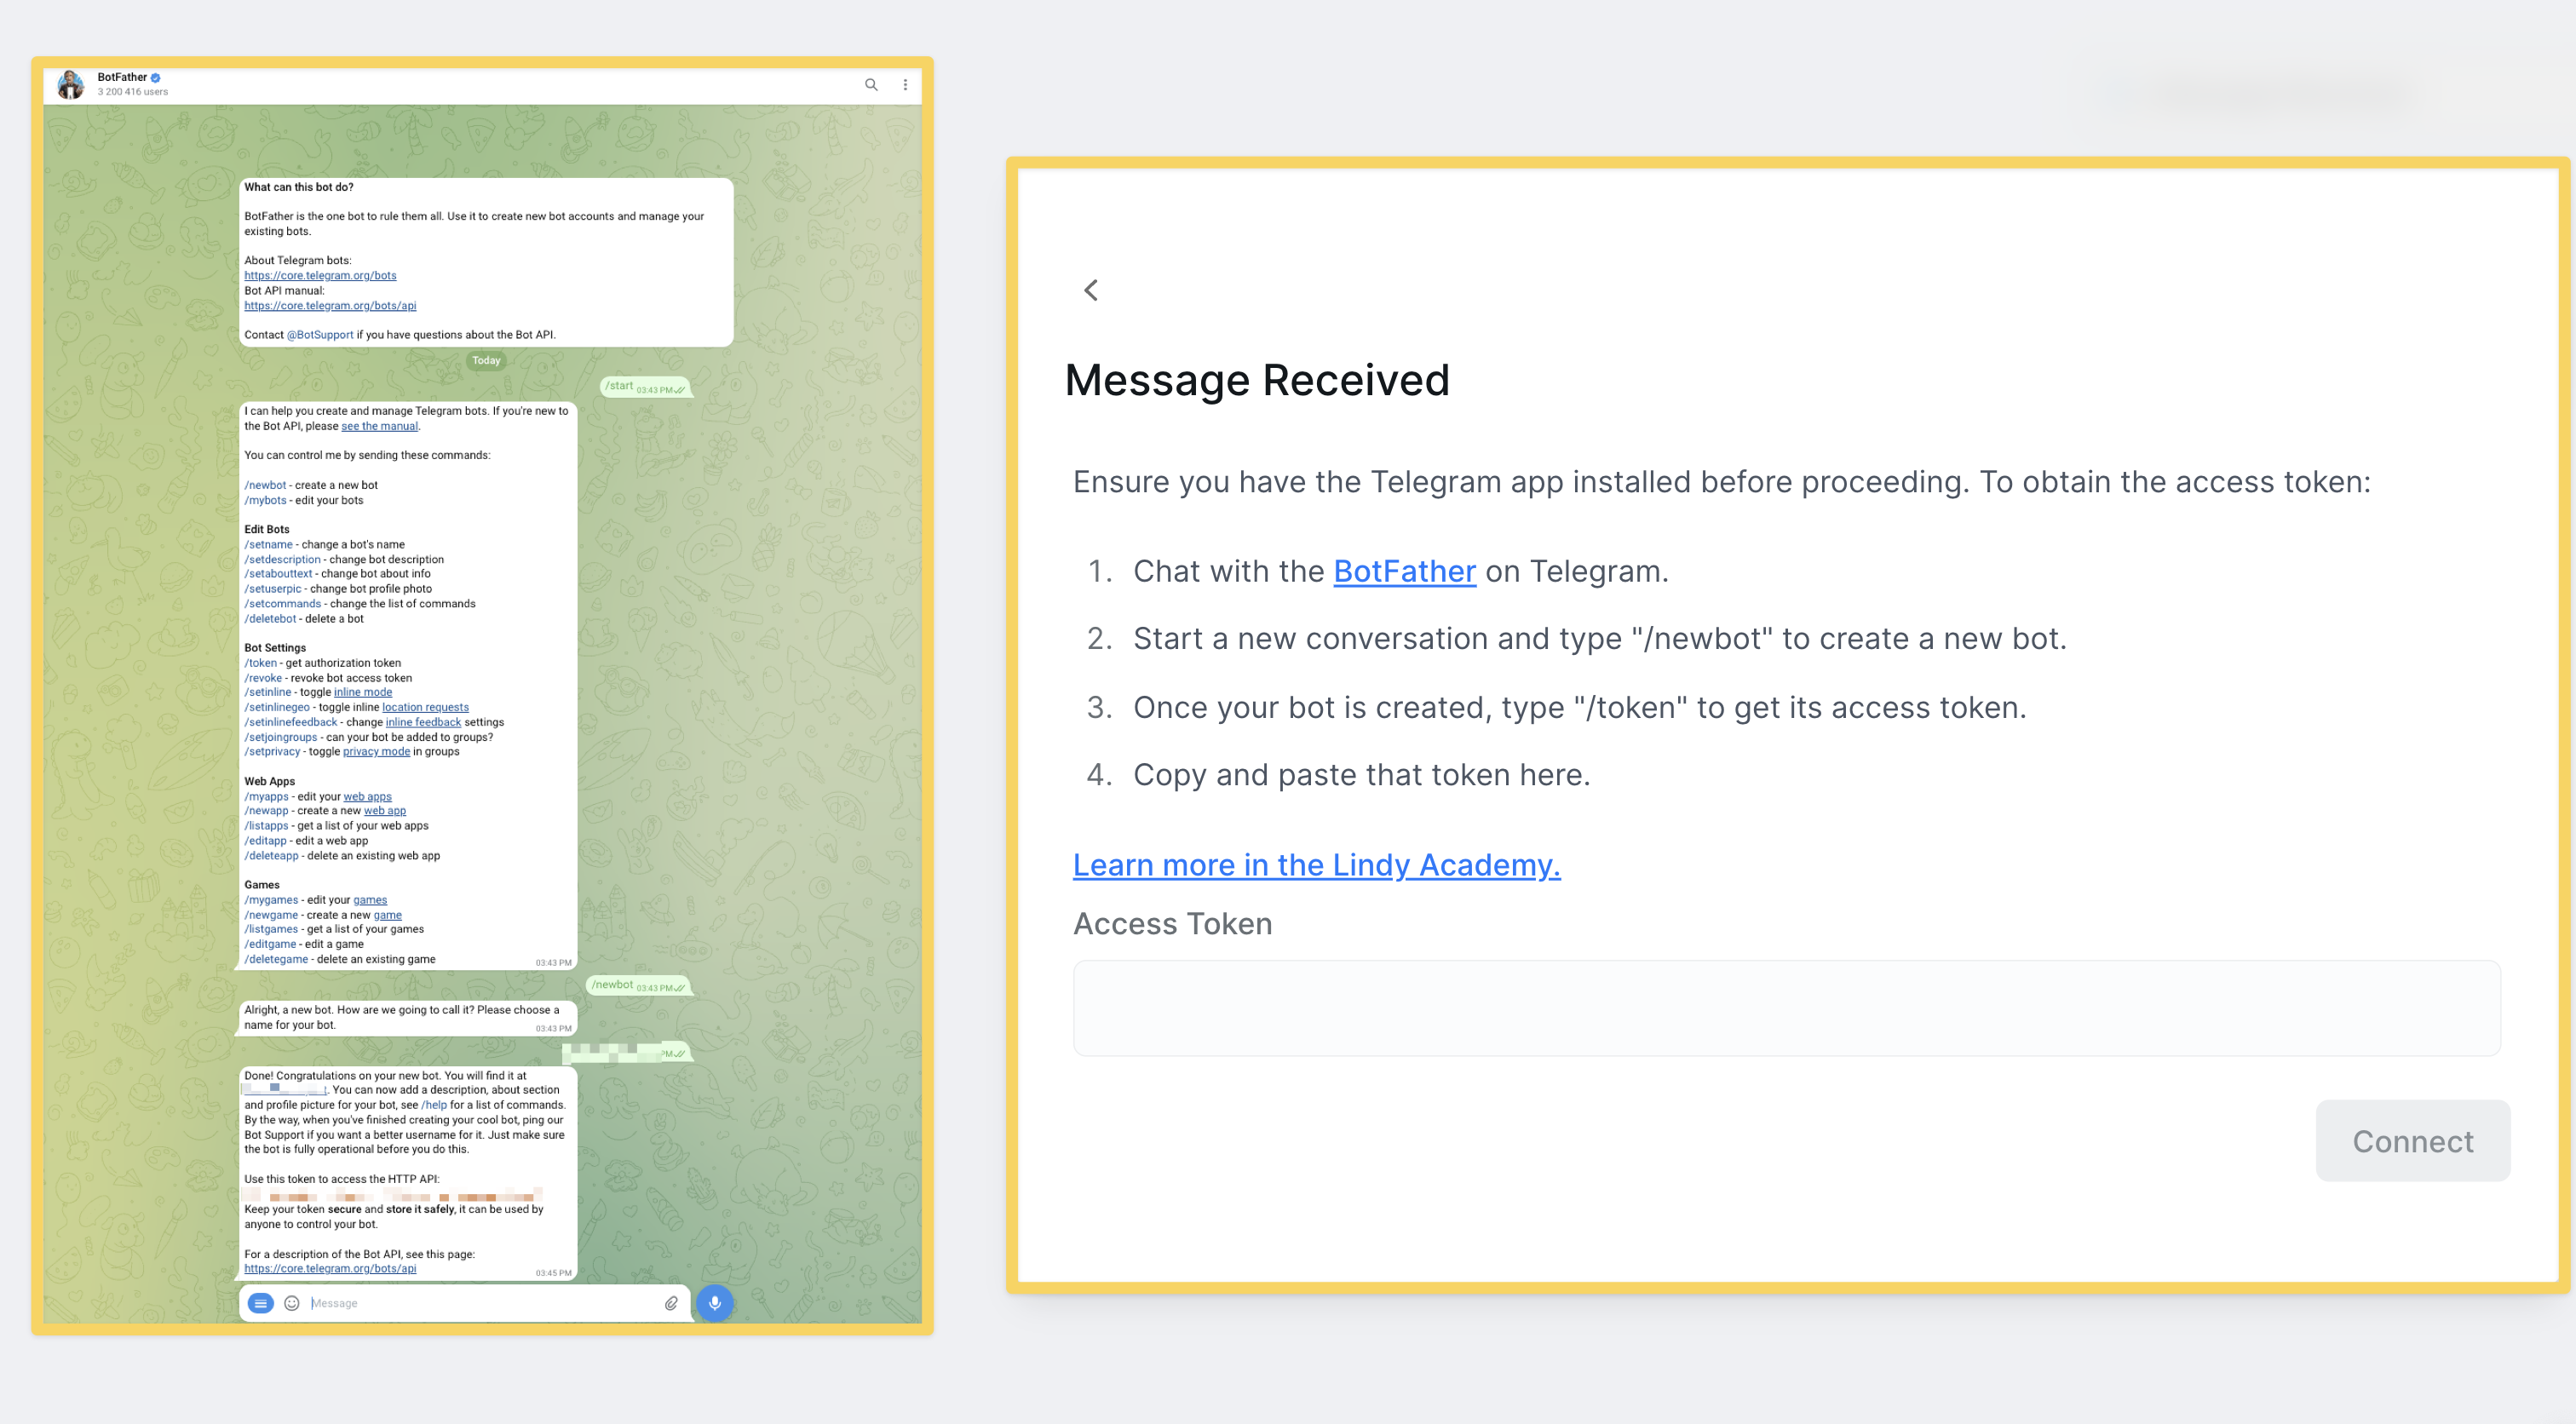 ## Telegram Triggers
#### Message Received
Triggers when you receive a new Telegram message:
* **Customer support automation** - Automatically respond to customer inquiries
* **Personal assistant responses** - Handle personal requests and tasks
* **Lead qualification** - Process and qualify leads from direct messages
* Perfect for customer support, personal automation, lead generation
#### New Bot Command Received
Triggers when specific Telegram bot commands are received (e.g., /start, /help):
* **Command-based workflows** - Execute specific actions based on commands
* **Menu-driven interactions** - Create structured bot conversations
* **User onboarding sequences** - Guide new users through setup
* Essential for structured interactions, user onboarding, command-based automation
#### New Channel Updates
Triggers when there are new updates or posts in a Telegram channel:
* **Content monitoring** - Track and analyze channel content
* **Cross-platform syndication** - Distribute content across platforms
* **News aggregation** - Process and aggregate news updates
* Perfect for content monitoring, news aggregation, cross-platform distribution
#### New Message Updates
Triggers when new messages are received by your Telegram bot:
* **Advanced message processing** - Handle complex message workflows
* **Multi-bot coordination** - Coordinate between multiple bots
* **Message analytics** - Track and analyze message patterns
* Essential for advanced automation, analytics, multi-bot systems
#### New Updates
Triggers when new updates occur in your Telegram bot across selected update types:
* **Comprehensive bot monitoring** - Monitor all bot activities
* **Multi-event handling** - Handle multiple types of events
* **System-wide notifications** - Get notified of all bot activities
* Perfect for comprehensive monitoring, multi-event workflows, system analytics
Use "Message Received" triggers combined with "Send Message" actions for the most powerful two-way Telegram automation workflows.
## Telegram Actions
#### Send Message
Send a message to a Telegram chat:
* **Automated responses** - Send automatic replies to messages
* **Notifications and alerts** - Send important notifications
* **Customer communication** - Communicate with customers automatically
* Perfect for automated responses, notifications, customer communication
#### Send A Text Message Or Reply
Send text messages to Telegram chats with optional captions and formatting:
* **Threaded conversations** - Create organized conversation threads
* **Formatted responses** - Use markdown formatting for rich text
* **Quote replies and mentions** - Reply to specific messages and mention users
* Essential for structured conversations, formatted messaging, interactive communication
#### Send A Document/Image
Send documents or images to Telegram chats with optional captions:
* **Report generation** - Automatically generate and send reports
* **File sharing automation** - Share files based on triggers
* **Visual content distribution** - Distribute images and documents
* Perfect for report delivery, file automation, visual content sharing
#### Send A Photo
Send photos to Telegram chats with optional captions and formatting:
* **Visual reporting** - Send visual reports and dashboards
* **Product showcases** - Share product images automatically
* **Automated screenshots** - Send screenshots of systems or data
* Essential for visual reporting, product marketing, automated documentation
#### Send A Sticker
Send stickers to Telegram chats using sticker set API:
* **Fun interactions** - Add personality to bot conversations
* **Emotional responses** - Express emotions through stickers
* **Brand engagement** - Use custom stickers for brand engagement
* Perfect for engaging conversations, brand personality, emotional communication
#### Send A Video
Send videos to Telegram chats with optional captions and formatting:
* **Video content distribution** - Share video content automatically
* **Tutorial delivery** - Send instructional videos
* **Marketing campaigns** - Distribute marketing video content
* Essential for video marketing, education, content distribution
#### Send A Video Note
Send video notes (circular video messages) to Telegram chats:
* **Personal video messages** - Send personalized video responses
* **Quick video updates** - Share quick video status updates
* **Interactive communications** - Create engaging video interactions
* Perfect for personal communication, quick updates, interactive messaging
#### Send A Voice Message
Send voice messages to Telegram chats or channels:
* **Audio notifications** - Send voice-based notifications
* **Voice-based responses** - Provide audio responses to messages
* **Personal touch** - Add human-like voice communication
* Essential for audio communication, accessibility, personal touch
#### Send An Album
Send a group of photos and videos as an album to a Telegram chat:
* **Multi-image reports** - Send comprehensive visual reports
* **Product galleries** - Share product image collections
* **Event photo sharing** - Share event photos as albums
* Perfect for comprehensive visual content, product showcases, event documentation
#### Send An Audio File
Send audio files to Telegram chats with optional caption and metadata:
* **Podcast distribution** - Distribute podcast episodes
* **Music sharing** - Share music files automatically
* **Audio reports** - Send audio-based reports and updates
* Essential for audio content distribution, music sharing, audio reporting
#### Send Media By URL or Id
Send media files to Telegram by URL or file ID:
* **Dynamic media sharing** - Share media based on URLs
* **External content integration** - Integrate content from external sources
* **Cached media reuse** - Reuse previously uploaded media
* Perfect for dynamic content sharing, external integrations, media optimization
#### Create Chat Invite Link
Create invite links for Telegram chats and channels:
* **Dynamic group invitations** - Create invitations based on conditions
* **Temporary access links** - Generate time-limited access links
* **Event-based group access** - Provide access for specific events
* Essential for group management, event access, automated invitations
#### Delete A Message
Delete a specific message from a Telegram chat:
* **Content moderation** - Remove inappropriate content automatically
* **Error correction** - Delete messages with errors
* **Spam removal** - Remove spam messages automatically
* Perfect for content moderation, error correction, spam management
#### Edit A Media Message
Edit media content of an existing Telegram message:
* **Content updates** - Update media content dynamically
* **Error corrections** - Fix media errors in messages
* **Real-time updates** - Update media based on changing data
* Essential for dynamic content management, error correction, real-time updates
#### Edit A Text Message
Edit the text content of an existing Telegram message:
* **Live updates** - Update message content in real-time
* **Status corrections** - Correct status information
* **Dynamic information display** - Show changing information
* Perfect for live updates, status tracking, dynamic content
#### Export Chat Invite Link
Generate a new invite link for Telegram chats and channels:
* **Link rotation** - Rotate invite links for security
* **Event-specific invitations** - Create links for specific events
* **Automated access management** - Manage group access automatically
* Essential for security management, event access, automated group administration
#### Forward A Message
Forward messages between Telegram chats and channels:
* **Content syndication** - Distribute content across multiple channels
* **Message routing** - Route messages to appropriate channels
* **Cross-group communication** - Share messages between groups
* Perfect for content distribution, message routing, cross-platform communication
#### Get The Number Of Members In A Chat
Get the total member count of a Telegram chat or channel:
* **Analytics and reporting** - Track membership growth
* **Growth tracking** - Monitor community growth
* **Membership monitoring** - Keep track of member counts
* Essential for analytics, growth tracking, community insights
#### Kick A Chat Member
Remove a member from a Telegram chat or channel:
* **Automated moderation** - Remove problematic members automatically
* **Rule enforcement** - Enforce community rules
* **Spam prevention** - Remove spam accounts
* Perfect for community moderation, rule enforcement, spam management
#### List Administrators In Chat
Get a list of administrators in a Telegram chat:
* **Admin management** - Track and manage administrators
* **Permission auditing** - Audit administrative permissions
* **Role verification** - Verify user roles and permissions
* Essential for admin management, permission auditing, role verification
#### List Chats
List recent updates and messages from your Telegram bot:
* **Chat monitoring** - Monitor all active chats
* **Activity tracking** - Track chat activity and engagement
* **Multi-chat management** - Manage multiple chats simultaneously
* Perfect for chat monitoring, activity tracking, multi-chat management
#### List Updates
List recent updates and messages from your Telegram bot:
* **Bot activity monitoring** - Monitor all bot activities
* **Update processing** - Process and analyze bot updates
* **System diagnostics** - Diagnose bot performance and issues
* Essential for bot monitoring, update processing, system diagnostics
#### Pin A Message
Pin a message in a Telegram chat or channel to keep it at the top:
* **Important announcements** - Pin important messages
* **Persistent information** - Keep important information visible
* **Group guidelines** - Pin group rules and guidelines
* Perfect for announcements, important information, group management
#### Promote A Chat Member
Promote a chat member to administrator with configurable permissions:
* **Automated role management** - Promote members based on criteria
* **Merit-based promotions** - Promote based on contributions
* **Dynamic permission assignment** - Assign permissions dynamically
* Essential for role management, merit-based promotion, community governance
#### Restrict A Chat Member
Restrict permissions for a member in a Telegram chat:
* **Temporary restrictions** - Apply temporary restrictions
* **Behavior modification** - Modify member behavior through restrictions
* **Graduated moderation** - Apply graduated moderation policies
* Perfect for behavior management, temporary restrictions, graduated moderation
#### Set Chat Permissions
Set default permissions for all members in a Telegram chat or group:
* **Group policy enforcement** - Enforce group-wide policies
* **Bulk permission management** - Manage permissions for all members
* **Community guidelines** - Implement community guidelines
* Essential for group policy management, bulk operations, community governance
#### Unpin A Message
Remove a pinned message from a Telegram chat or channel:
* **Content rotation** - Rotate pinned content regularly
* **Temporary announcements** - Remove temporary announcements
* **Dynamic information management** - Manage pinned information dynamically
* Perfect for content management, temporary announcements, dynamic information
## Practical Implementation Scenarios
Transform Lindy into a comprehensive customer support assistant:
* Message received → Analyze inquiry → Search knowledge base → Send appropriate response → Escalate to human if needed → Track resolution
Build sophisticated community management workflows:
* New message → Content moderation → Auto-kick spammers → Send warnings → Generate reports → Update community guidelines
Create advanced content distribution systems:
* New channel update → Process content → Cross-post to multiple channels → Track engagement → Generate analytics reports
## Advanced Features & Capabilities
Comprehensive media handling and distribution capabilities:
* **Text and Formatting** - Rich text with markdown formatting support
* **Media Files** - Photos, videos, documents, audio files, and stickers
* **Interactive Elements** - Buttons, keyboards, and command-based interactions
* **Album Support** - Group multiple media files into albums
Advanced group administration and community management features:
* **Member Management** - Add, remove, promote, and restrict members
* **Permission Control** - Granular permission management for groups
* **Content Moderation** - Automated content moderation and spam prevention
* **Analytics and Insights** - Member counts, activity tracking, and engagement metrics
Powerful bot automation through Telegram's robust Bot API:
* **Command Processing** - Handle bot commands and structured interactions
* **Real-time Updates** - Instant message processing and responses
* **Multi-chat Support** - Manage multiple chats and channels simultaneously
* **Error Handling** - Robust error handling and retry mechanisms
## Configuration Best Practices
Optimize your customer support workflows:
* Use "Message Received" triggers for immediate customer response
* Implement intelligent routing based on inquiry type and keywords
* Set up automated responses for common questions with "Send Message"
* Use "Send A Document/Image" for sending helpful resources
* Implement escalation to human agents for complex issues
Set up powerful community management workflows:
* Use "New Message Updates" for comprehensive message monitoring
* Implement "Kick A Chat Member" for automated spam prevention
* Set up "Pin A Message" for important announcements
* Use "Set Chat Permissions" for group-wide policy enforcement
* Create automated reporting with member count tracking
Create effective content distribution workflows:
* Use "New Channel Updates" for content monitoring
* Implement "Forward A Message" for cross-platform distribution
* Set up "Send An Album" for comprehensive visual content
* Use "Create Chat Invite Link" for event-based access
* Create analytics workflows with engagement tracking
## Limitations & Considerations
* **Rate Limits**: Telegram enforces rate limits to prevent spam
* **Bot Restrictions**: Bots can only message users who have initiated contact first
* **File Size Limits**: Maximum file size limits for different media types
* **Permission Requirements**: Admin permissions required for group management actions
* **Token Security**: Never share bot tokens publicly or in code repositories
* **User Privacy**: Respect user privacy and data protection regulations
* **Content Policies**: Ensure all content complies with Telegram's terms of service
* **Access Control**: Implement proper access controls for sensitive operations
* **Error Handling**: Implement robust error handling for failed operations
* **Testing**: Test thoroughly in private chats before deploying to groups
* **Monitoring**: Set up monitoring for bot performance and user engagement
* **Documentation**: Document bot commands and features for users
## Next steps
Expand messaging automation to WhatsApp
Connect Telegram workflows with team communication
Combine chat with SMS and voice automation
Set up Telegram-based automation triggers
# Twilio
Source: https://docs.lindy.ai/skills/popular-integrations/twilio
## Quick Overview
Twilio integration is one of Lindy's most powerful communication capabilities, enabling your AI agents to act as sophisticated communication assistants across SMS, voice, and verification services. The integration provides both Triggers (what can start a Lindy workflow) and Actions (what Lindy can do).
This comprehensive integration transforms Lindy into a powerful communication automation platform, capable of handling everything from customer support to sales outreach, appointment reminders, and emergency notifications.
Key benefits of Twilio integration:
* **Omnichannel communication** – SMS, voice calls, and verification across multiple channels
* **Real-time automation** – Instant response to communication events and triggers
* **Scalable engagement** – Handle high-volume communication without proportional resource increase
* **Enhanced security** – Multi-factor authentication and verification workflows
## How to set up Twilio
Click on the plus sign at the bottom or right-click anywhere on the canvas and select "Add Trigger" or "Add Action" from the pop-up menu and choose "Twilio"
## Telegram Triggers
#### Message Received
Triggers when you receive a new Telegram message:
* **Customer support automation** - Automatically respond to customer inquiries
* **Personal assistant responses** - Handle personal requests and tasks
* **Lead qualification** - Process and qualify leads from direct messages
* Perfect for customer support, personal automation, lead generation
#### New Bot Command Received
Triggers when specific Telegram bot commands are received (e.g., /start, /help):
* **Command-based workflows** - Execute specific actions based on commands
* **Menu-driven interactions** - Create structured bot conversations
* **User onboarding sequences** - Guide new users through setup
* Essential for structured interactions, user onboarding, command-based automation
#### New Channel Updates
Triggers when there are new updates or posts in a Telegram channel:
* **Content monitoring** - Track and analyze channel content
* **Cross-platform syndication** - Distribute content across platforms
* **News aggregation** - Process and aggregate news updates
* Perfect for content monitoring, news aggregation, cross-platform distribution
#### New Message Updates
Triggers when new messages are received by your Telegram bot:
* **Advanced message processing** - Handle complex message workflows
* **Multi-bot coordination** - Coordinate between multiple bots
* **Message analytics** - Track and analyze message patterns
* Essential for advanced automation, analytics, multi-bot systems
#### New Updates
Triggers when new updates occur in your Telegram bot across selected update types:
* **Comprehensive bot monitoring** - Monitor all bot activities
* **Multi-event handling** - Handle multiple types of events
* **System-wide notifications** - Get notified of all bot activities
* Perfect for comprehensive monitoring, multi-event workflows, system analytics
Use "Message Received" triggers combined with "Send Message" actions for the most powerful two-way Telegram automation workflows.
## Telegram Actions
#### Send Message
Send a message to a Telegram chat:
* **Automated responses** - Send automatic replies to messages
* **Notifications and alerts** - Send important notifications
* **Customer communication** - Communicate with customers automatically
* Perfect for automated responses, notifications, customer communication
#### Send A Text Message Or Reply
Send text messages to Telegram chats with optional captions and formatting:
* **Threaded conversations** - Create organized conversation threads
* **Formatted responses** - Use markdown formatting for rich text
* **Quote replies and mentions** - Reply to specific messages and mention users
* Essential for structured conversations, formatted messaging, interactive communication
#### Send A Document/Image
Send documents or images to Telegram chats with optional captions:
* **Report generation** - Automatically generate and send reports
* **File sharing automation** - Share files based on triggers
* **Visual content distribution** - Distribute images and documents
* Perfect for report delivery, file automation, visual content sharing
#### Send A Photo
Send photos to Telegram chats with optional captions and formatting:
* **Visual reporting** - Send visual reports and dashboards
* **Product showcases** - Share product images automatically
* **Automated screenshots** - Send screenshots of systems or data
* Essential for visual reporting, product marketing, automated documentation
#### Send A Sticker
Send stickers to Telegram chats using sticker set API:
* **Fun interactions** - Add personality to bot conversations
* **Emotional responses** - Express emotions through stickers
* **Brand engagement** - Use custom stickers for brand engagement
* Perfect for engaging conversations, brand personality, emotional communication
#### Send A Video
Send videos to Telegram chats with optional captions and formatting:
* **Video content distribution** - Share video content automatically
* **Tutorial delivery** - Send instructional videos
* **Marketing campaigns** - Distribute marketing video content
* Essential for video marketing, education, content distribution
#### Send A Video Note
Send video notes (circular video messages) to Telegram chats:
* **Personal video messages** - Send personalized video responses
* **Quick video updates** - Share quick video status updates
* **Interactive communications** - Create engaging video interactions
* Perfect for personal communication, quick updates, interactive messaging
#### Send A Voice Message
Send voice messages to Telegram chats or channels:
* **Audio notifications** - Send voice-based notifications
* **Voice-based responses** - Provide audio responses to messages
* **Personal touch** - Add human-like voice communication
* Essential for audio communication, accessibility, personal touch
#### Send An Album
Send a group of photos and videos as an album to a Telegram chat:
* **Multi-image reports** - Send comprehensive visual reports
* **Product galleries** - Share product image collections
* **Event photo sharing** - Share event photos as albums
* Perfect for comprehensive visual content, product showcases, event documentation
#### Send An Audio File
Send audio files to Telegram chats with optional caption and metadata:
* **Podcast distribution** - Distribute podcast episodes
* **Music sharing** - Share music files automatically
* **Audio reports** - Send audio-based reports and updates
* Essential for audio content distribution, music sharing, audio reporting
#### Send Media By URL or Id
Send media files to Telegram by URL or file ID:
* **Dynamic media sharing** - Share media based on URLs
* **External content integration** - Integrate content from external sources
* **Cached media reuse** - Reuse previously uploaded media
* Perfect for dynamic content sharing, external integrations, media optimization
#### Create Chat Invite Link
Create invite links for Telegram chats and channels:
* **Dynamic group invitations** - Create invitations based on conditions
* **Temporary access links** - Generate time-limited access links
* **Event-based group access** - Provide access for specific events
* Essential for group management, event access, automated invitations
#### Delete A Message
Delete a specific message from a Telegram chat:
* **Content moderation** - Remove inappropriate content automatically
* **Error correction** - Delete messages with errors
* **Spam removal** - Remove spam messages automatically
* Perfect for content moderation, error correction, spam management
#### Edit A Media Message
Edit media content of an existing Telegram message:
* **Content updates** - Update media content dynamically
* **Error corrections** - Fix media errors in messages
* **Real-time updates** - Update media based on changing data
* Essential for dynamic content management, error correction, real-time updates
#### Edit A Text Message
Edit the text content of an existing Telegram message:
* **Live updates** - Update message content in real-time
* **Status corrections** - Correct status information
* **Dynamic information display** - Show changing information
* Perfect for live updates, status tracking, dynamic content
#### Export Chat Invite Link
Generate a new invite link for Telegram chats and channels:
* **Link rotation** - Rotate invite links for security
* **Event-specific invitations** - Create links for specific events
* **Automated access management** - Manage group access automatically
* Essential for security management, event access, automated group administration
#### Forward A Message
Forward messages between Telegram chats and channels:
* **Content syndication** - Distribute content across multiple channels
* **Message routing** - Route messages to appropriate channels
* **Cross-group communication** - Share messages between groups
* Perfect for content distribution, message routing, cross-platform communication
#### Get The Number Of Members In A Chat
Get the total member count of a Telegram chat or channel:
* **Analytics and reporting** - Track membership growth
* **Growth tracking** - Monitor community growth
* **Membership monitoring** - Keep track of member counts
* Essential for analytics, growth tracking, community insights
#### Kick A Chat Member
Remove a member from a Telegram chat or channel:
* **Automated moderation** - Remove problematic members automatically
* **Rule enforcement** - Enforce community rules
* **Spam prevention** - Remove spam accounts
* Perfect for community moderation, rule enforcement, spam management
#### List Administrators In Chat
Get a list of administrators in a Telegram chat:
* **Admin management** - Track and manage administrators
* **Permission auditing** - Audit administrative permissions
* **Role verification** - Verify user roles and permissions
* Essential for admin management, permission auditing, role verification
#### List Chats
List recent updates and messages from your Telegram bot:
* **Chat monitoring** - Monitor all active chats
* **Activity tracking** - Track chat activity and engagement
* **Multi-chat management** - Manage multiple chats simultaneously
* Perfect for chat monitoring, activity tracking, multi-chat management
#### List Updates
List recent updates and messages from your Telegram bot:
* **Bot activity monitoring** - Monitor all bot activities
* **Update processing** - Process and analyze bot updates
* **System diagnostics** - Diagnose bot performance and issues
* Essential for bot monitoring, update processing, system diagnostics
#### Pin A Message
Pin a message in a Telegram chat or channel to keep it at the top:
* **Important announcements** - Pin important messages
* **Persistent information** - Keep important information visible
* **Group guidelines** - Pin group rules and guidelines
* Perfect for announcements, important information, group management
#### Promote A Chat Member
Promote a chat member to administrator with configurable permissions:
* **Automated role management** - Promote members based on criteria
* **Merit-based promotions** - Promote based on contributions
* **Dynamic permission assignment** - Assign permissions dynamically
* Essential for role management, merit-based promotion, community governance
#### Restrict A Chat Member
Restrict permissions for a member in a Telegram chat:
* **Temporary restrictions** - Apply temporary restrictions
* **Behavior modification** - Modify member behavior through restrictions
* **Graduated moderation** - Apply graduated moderation policies
* Perfect for behavior management, temporary restrictions, graduated moderation
#### Set Chat Permissions
Set default permissions for all members in a Telegram chat or group:
* **Group policy enforcement** - Enforce group-wide policies
* **Bulk permission management** - Manage permissions for all members
* **Community guidelines** - Implement community guidelines
* Essential for group policy management, bulk operations, community governance
#### Unpin A Message
Remove a pinned message from a Telegram chat or channel:
* **Content rotation** - Rotate pinned content regularly
* **Temporary announcements** - Remove temporary announcements
* **Dynamic information management** - Manage pinned information dynamically
* Perfect for content management, temporary announcements, dynamic information
## Practical Implementation Scenarios
Transform Lindy into a comprehensive customer support assistant:
* Message received → Analyze inquiry → Search knowledge base → Send appropriate response → Escalate to human if needed → Track resolution
Build sophisticated community management workflows:
* New message → Content moderation → Auto-kick spammers → Send warnings → Generate reports → Update community guidelines
Create advanced content distribution systems:
* New channel update → Process content → Cross-post to multiple channels → Track engagement → Generate analytics reports
## Advanced Features & Capabilities
Comprehensive media handling and distribution capabilities:
* **Text and Formatting** - Rich text with markdown formatting support
* **Media Files** - Photos, videos, documents, audio files, and stickers
* **Interactive Elements** - Buttons, keyboards, and command-based interactions
* **Album Support** - Group multiple media files into albums
Advanced group administration and community management features:
* **Member Management** - Add, remove, promote, and restrict members
* **Permission Control** - Granular permission management for groups
* **Content Moderation** - Automated content moderation and spam prevention
* **Analytics and Insights** - Member counts, activity tracking, and engagement metrics
Powerful bot automation through Telegram's robust Bot API:
* **Command Processing** - Handle bot commands and structured interactions
* **Real-time Updates** - Instant message processing and responses
* **Multi-chat Support** - Manage multiple chats and channels simultaneously
* **Error Handling** - Robust error handling and retry mechanisms
## Configuration Best Practices
Optimize your customer support workflows:
* Use "Message Received" triggers for immediate customer response
* Implement intelligent routing based on inquiry type and keywords
* Set up automated responses for common questions with "Send Message"
* Use "Send A Document/Image" for sending helpful resources
* Implement escalation to human agents for complex issues
Set up powerful community management workflows:
* Use "New Message Updates" for comprehensive message monitoring
* Implement "Kick A Chat Member" for automated spam prevention
* Set up "Pin A Message" for important announcements
* Use "Set Chat Permissions" for group-wide policy enforcement
* Create automated reporting with member count tracking
Create effective content distribution workflows:
* Use "New Channel Updates" for content monitoring
* Implement "Forward A Message" for cross-platform distribution
* Set up "Send An Album" for comprehensive visual content
* Use "Create Chat Invite Link" for event-based access
* Create analytics workflows with engagement tracking
## Limitations & Considerations
* **Rate Limits**: Telegram enforces rate limits to prevent spam
* **Bot Restrictions**: Bots can only message users who have initiated contact first
* **File Size Limits**: Maximum file size limits for different media types
* **Permission Requirements**: Admin permissions required for group management actions
* **Token Security**: Never share bot tokens publicly or in code repositories
* **User Privacy**: Respect user privacy and data protection regulations
* **Content Policies**: Ensure all content complies with Telegram's terms of service
* **Access Control**: Implement proper access controls for sensitive operations
* **Error Handling**: Implement robust error handling for failed operations
* **Testing**: Test thoroughly in private chats before deploying to groups
* **Monitoring**: Set up monitoring for bot performance and user engagement
* **Documentation**: Document bot commands and features for users
## Next steps
Expand messaging automation to WhatsApp
Connect Telegram workflows with team communication
Combine chat with SMS and voice automation
Set up Telegram-based automation triggers
# Twilio
Source: https://docs.lindy.ai/skills/popular-integrations/twilio
## Quick Overview
Twilio integration is one of Lindy's most powerful communication capabilities, enabling your AI agents to act as sophisticated communication assistants across SMS, voice, and verification services. The integration provides both Triggers (what can start a Lindy workflow) and Actions (what Lindy can do).
This comprehensive integration transforms Lindy into a powerful communication automation platform, capable of handling everything from customer support to sales outreach, appointment reminders, and emergency notifications.
Key benefits of Twilio integration:
* **Omnichannel communication** – SMS, voice calls, and verification across multiple channels
* **Real-time automation** – Instant response to communication events and triggers
* **Scalable engagement** – Handle high-volume communication without proportional resource increase
* **Enhanced security** – Multi-factor authentication and verification workflows
## How to set up Twilio
Click on the plus sign at the bottom or right-click anywhere on the canvas and select "Add Trigger" or "Add Action" from the pop-up menu and choose "Twilio"
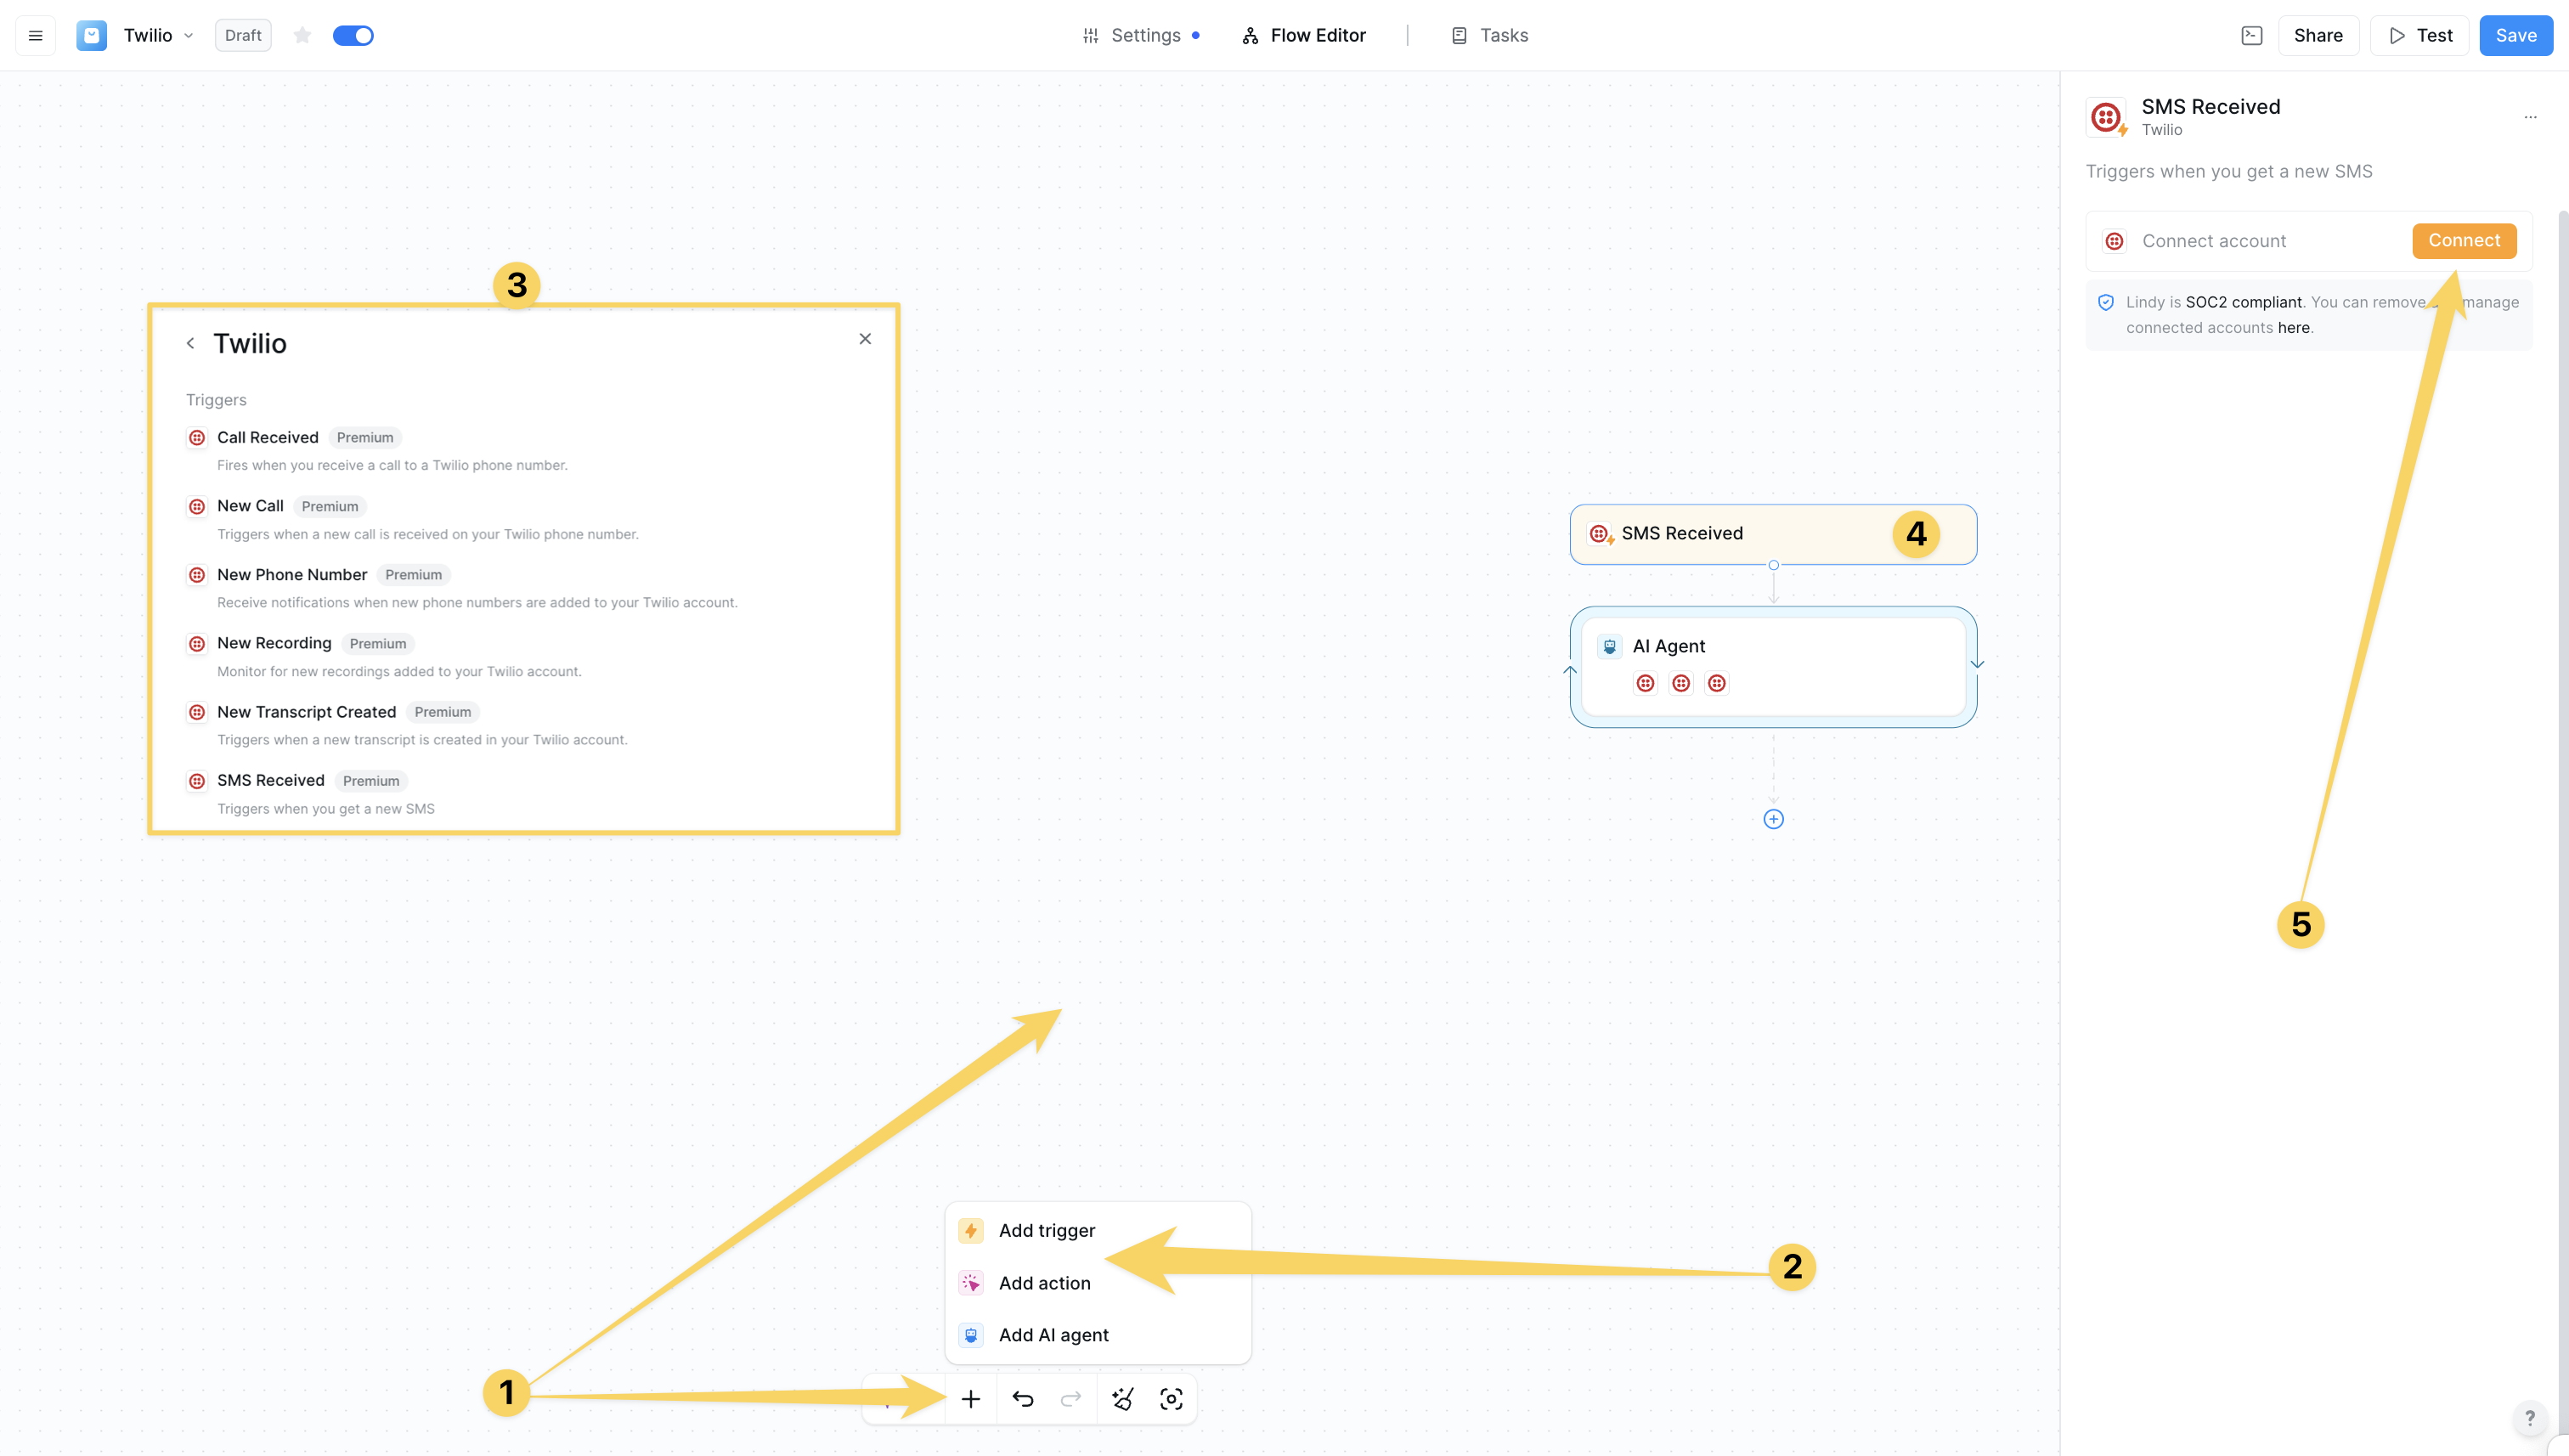 Click on "Add Account" and authorize your Twilio for Lindy's integrations by providing your Account SID, Auth Token, and selecting which phone numbers you want to use.
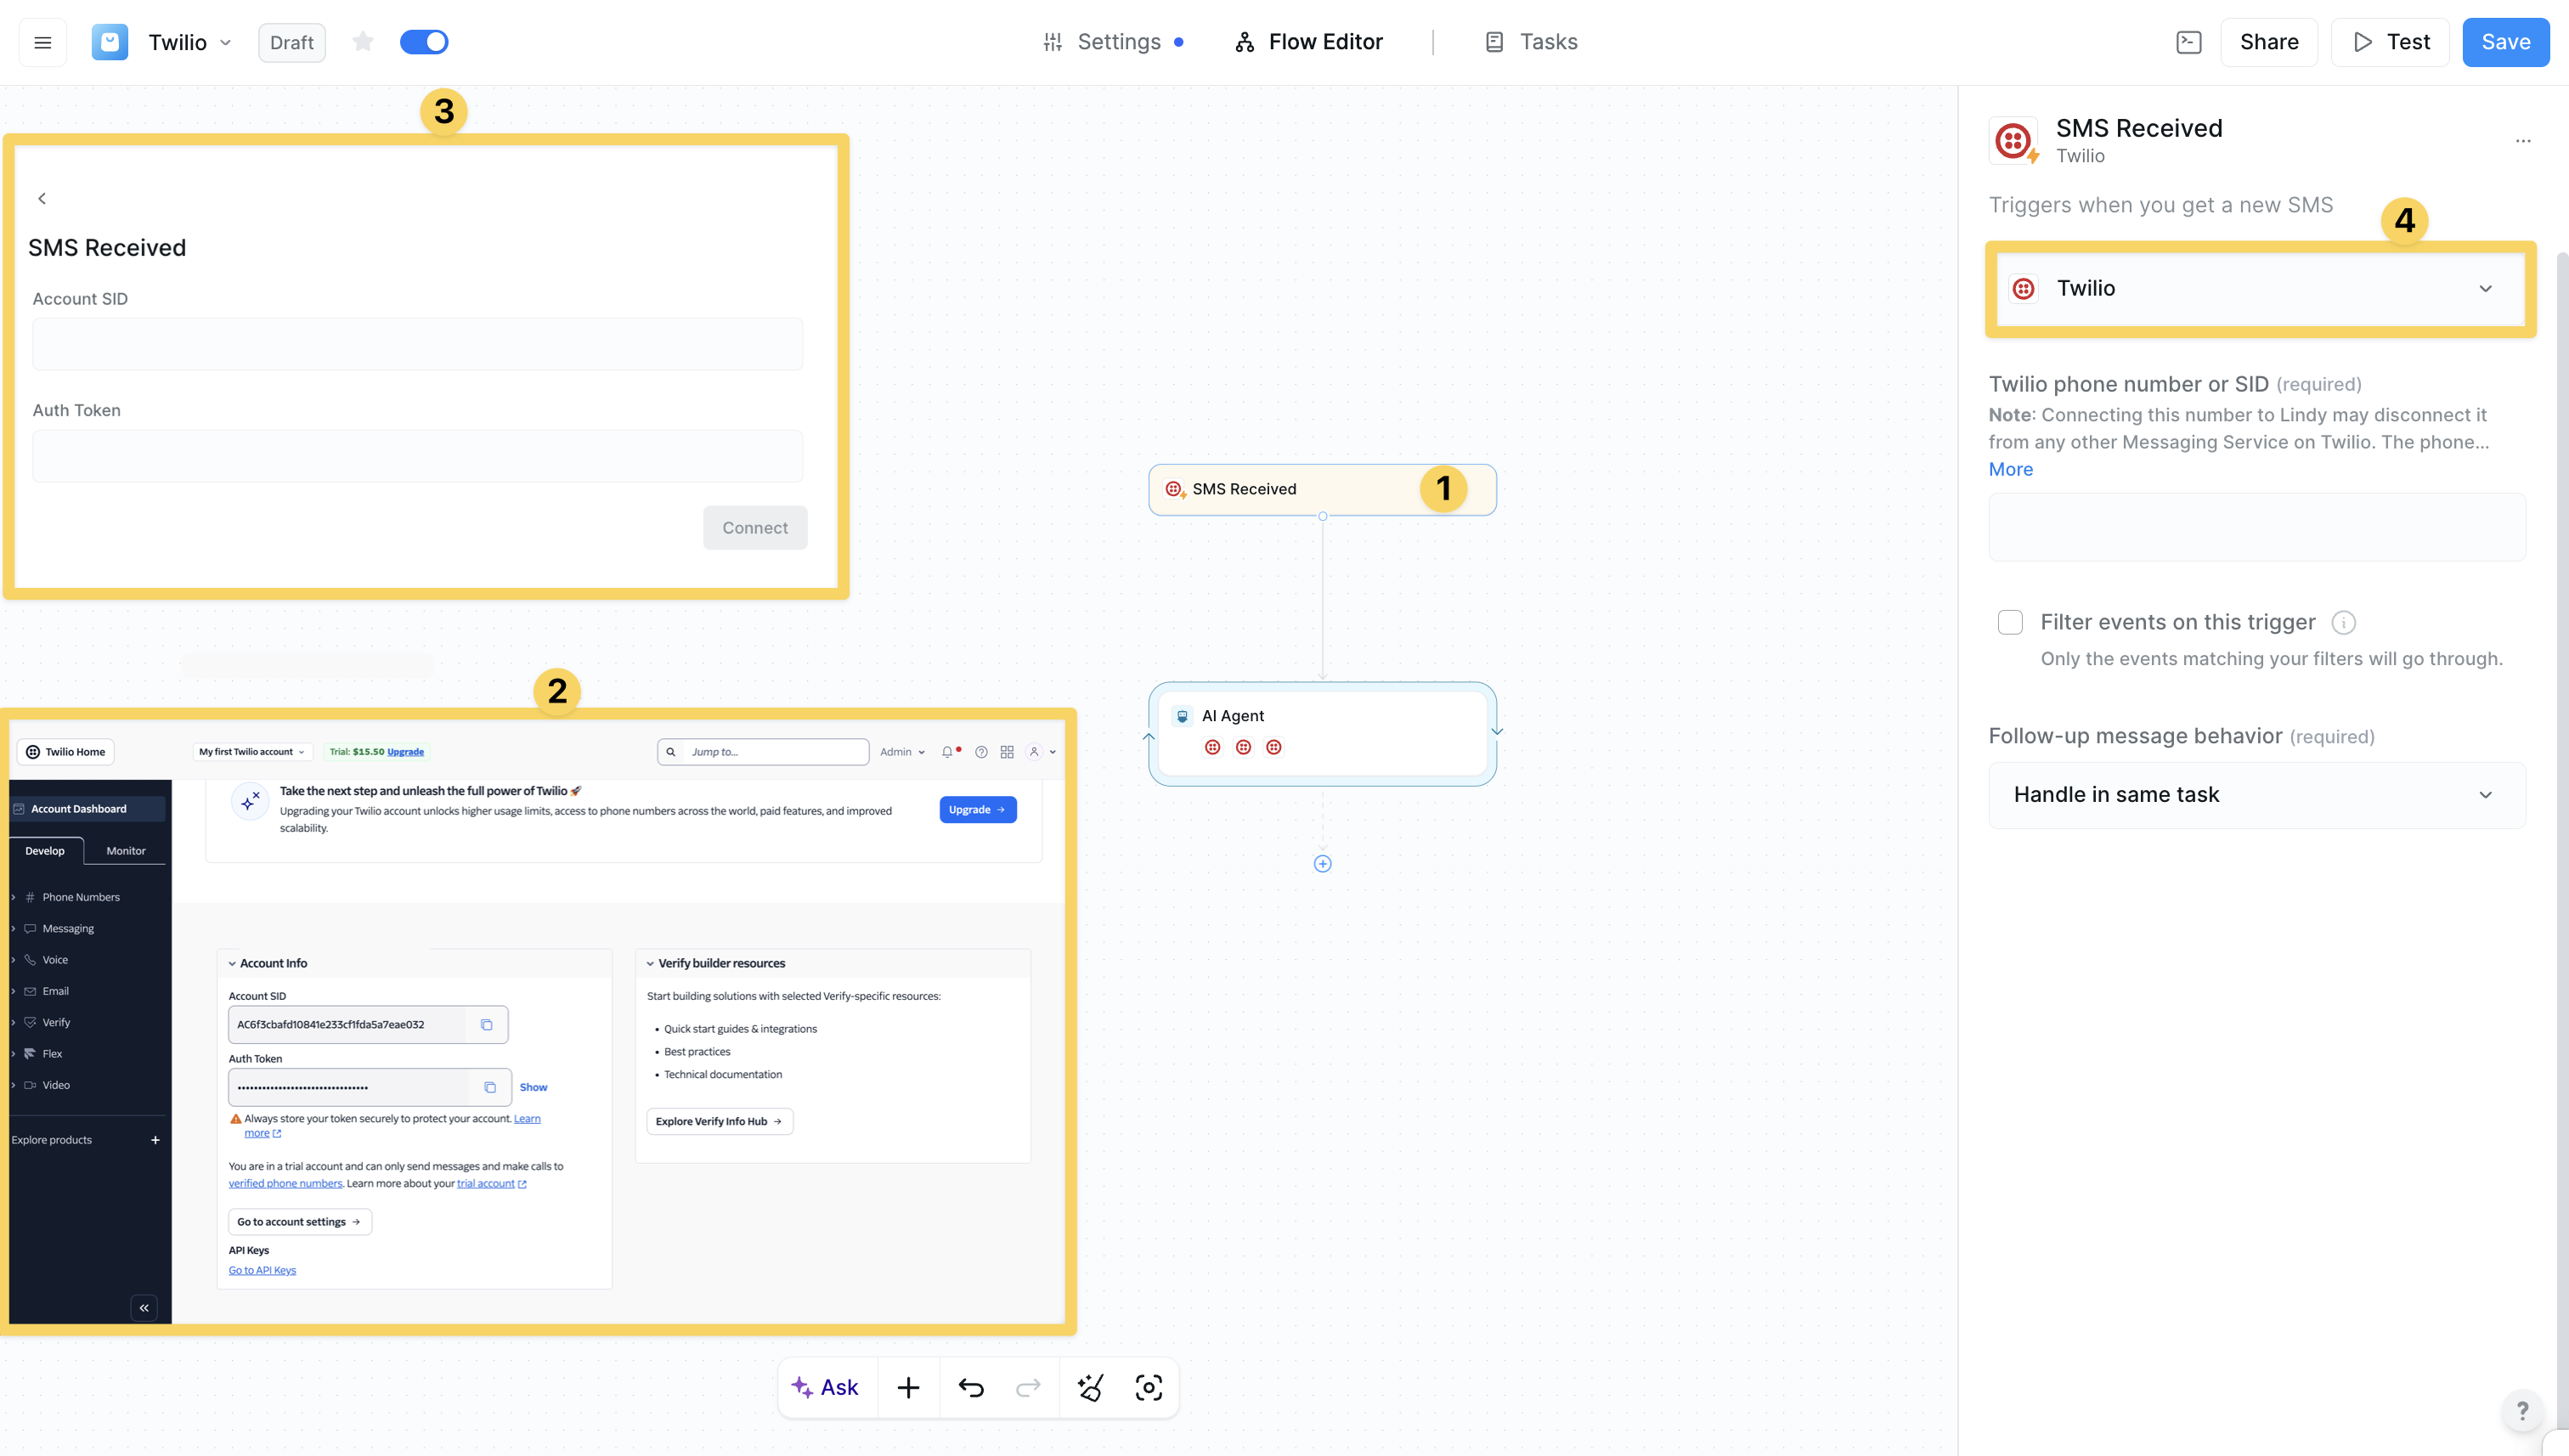 ## Twilio Triggers
#### Call Received
Fires when you receive a call to a Twilio phone number:
* **Real-time activation** - Triggers immediately when inbound calls are received
* **Caller information** - Provides caller details, duration, and call status
* **Filtering options** - Can be filtered by specific phone numbers or caller patterns
* Perfect for customer support hotlines, emergency response, sales lead qualification
#### New Call
Triggers when a new call is received on your Twilio phone number:
* **Enhanced metadata** - Provides detailed call analytics and routing information
* **Advanced call flow** - Supports sophisticated call routing and queue management
* **Multi-tenant support** - Handle calls for different clients or departments
* Ideal for advanced call center operations, call analytics, intelligent distribution
#### New Phone Number
Receive notifications when new phone numbers are added to your Twilio account:
* **Automated provisioning** - Set up new phone numbers with appropriate configurations
* **Multi-location support** - Configure local numbers for new business locations
* **Campaign management** - Set up dedicated numbers for marketing campaigns
* Perfect for number provisioning, compliance documentation, cost management
#### New Recording
Monitor for new recordings added to your Twilio account:
* **Quality assurance** - Automatically review and score customer service calls
* **Compliance tracking** - Ensure all required calls are recorded and stored
* **Training support** - Identify calls for training purposes and agent development
* Essential for call analysis, compliance monitoring, automated transcription
#### New Transcript Created
Triggers when a new transcript is created in your Twilio account:
* **Automated analysis** - Extract key information and insights from call transcripts
* **Compliance monitoring** - Scan transcripts for compliance violations
* **Customer insights** - Analyze customer sentiment and satisfaction
* Perfect for call analysis, knowledge base creation, performance metrics
#### SMS Received
Triggers when you get a new SMS:
* **Real-time processing** - Handle customer inquiries and support requests
* **Multimedia support** - Process MMS with image and file attachments
* **Two-way conversations** - Enable sophisticated SMS conversation workflows
* Essential for customer support, appointment management, emergency notifications
Use "SMS Received" triggers combined with "Send SMS Message" actions for the most powerful two-way communication workflows.
## Twilio Actions
#### Make Phone Call
Make an outbound phone call with full customization:
* **Global calling** - Support voice calls to any phone number worldwide
* **Text-to-speech** - Integration with automated message playback
* **Call recording** - Configurable recording and transcription options
* Perfect for customer outreach, appointment reminders, emergency notifications
#### Send SMS Message
Send SMS messages with advanced features:
* **Global messaging** - Send text messages to any mobile number worldwide
* **Long message support** - Automatically split long messages into multiple parts
* **Delivery tracking** - Monitor delivery status and reporting
* Essential for transactional notifications, marketing campaigns, appointment management
#### Send SMS Verification
Send SMS verification codes using Twilio's verification service:
* **Secure codes** - Generate time-limited verification codes
* **Automatic retry** - Built-in retry and fallback mechanisms
* **Fraud prevention** - Integration with fraud detection systems
* Perfect for two-factor authentication, phone verification, transaction security
#### Check Verification Token
Verify a token code sent to a phone number:
* **Code validation** - Validate verification codes against Twilio's service
* **Expiration handling** - Handle expired codes and retry limits
* **Detailed status** - Provide comprehensive verification status and error handling
* Essential for login verification, identity confirmation, transaction authorization
#### Create Verification Service
Create a new verification service for authentication requests:
* **Multi-tenant support** - Separate verification services for different clients
* **Configurable policies** - Set code length, expiration, and retry policies
* **Multi-channel support** - Support SMS, voice, and email verification
* Perfect for multi-tenant applications, department-specific verification, campaign verification
#### Get Call
Retrieve details about a specific Twilio call:
* **Comprehensive metadata** - Access call analytics and routing information
* **Recording access** - Retrieve call recordings and transcriptions
* **Quality metrics** - Integration with call quality and performance data
* Essential for call analytics, quality assurance, billing analysis
#### Get Message
Retrieve details of a specific message using its Message ID:
* **Complete metadata** - Access message content and delivery status
* **Media attachments** - Retrieve images, videos, and documents
* **Delivery tracking** - Monitor delivery confirmations and error codes
* Perfect for message tracking, compliance auditing, customer service analysis
#### Get Transcripts
Retrieve transcripts from Twilio using their unique SID identifiers:
* **Complete transcriptions** - Access call content with timestamps
* **Confidence scores** - Retrieve accuracy metrics and speaker identification
* **Multi-language support** - Support for multiple languages and accents
* Essential for call analysis, compliance monitoring, training development
#### List Calls
Retrieve a list of phone calls with optional filtering:
* **Advanced filtering** - Filter by date range, status, direction, and numbers
* **Paginated results** - Handle large datasets efficiently
* **Export capabilities** - Support for reporting and analysis
* Perfect for call volume analysis, performance reporting, cost management
#### List Messages
Retrieve a list of messages sent through your Twilio account:
* **Comprehensive filtering** - Filter by date, direction, status, and numbers
* **Bulk analysis** - Support for message analytics and reporting
* **Delivery tracking** - Monitor message delivery and engagement rates
* Essential for campaign analysis, communication history, compliance auditing
#### List Transcripts
Retrieve a list of transcripts from your Twilio account:
* **Content analysis** - Analyze call content across multiple conversations
* **Quality metrics** - Filter by call type and quality indicators
* **Bulk processing** - Support for transcript analysis and search
* Perfect for content analysis, quality assurance, knowledge management
#### List Message Media
Retrieve a list of media files associated with a specific message:
* **Multimedia support** - Access images, videos, and documents sent via MMS
* **Media processing** - Retrieve file metadata and content
* **Content analysis** - Analyze visual content for insights and trends
* Essential for visual customer service, document processing, compliance documentation
#### Phone Number Lookup
Look up information about a phone number using Twilio's service:
* **Carrier information** - Retrieve carrier details and number type
* **Geographic data** - Access location and routing information
* **Validation support** - Verify phone number format and reachability
* Perfect for number validation, fraud prevention, geographic routing
#### Download Recording Media
Download Twilio recording media files to a specified location:
* **Multiple formats** - Download in MP3, WAV, and other formats
* **Batch processing** - Support for automated download workflows
* **Cloud integration** - Integration with storage and content management
* Essential for archive management, quality assurance, training development
#### Delete Call
Delete a specific call record from your Twilio account:
* **Data retention** - Manage call records per retention policies
* **Privacy compliance** - Remove records upon customer request
* **Storage optimization** - Clean up unnecessary records to reduce costs
* Perfect for data retention management, privacy compliance, system maintenance
#### Delete Message
Delete a specific message from your Twilio account using its Message ID:
* **Privacy protection** - Delete messages upon customer request
* **Retention management** - Automatically clean up old messages
* **Compliance support** - Ensure message retention complies with regulations
* Essential for privacy compliance, data retention, system cleanup
## Practical Implementation Scenarios
Create comprehensive customer service workflows across voice and SMS:
* Customer calls support → If no answer, send SMS with callback option → Customer responds via SMS → Create support ticket → Send SMS updates → Follow up with satisfaction survey
Build sophisticated emergency response systems with multiple communication channels:
* Critical system alert → Send SMS to on-call engineer → If no response in 5 minutes, make voice call → If still no response, escalate to manager → Continue escalation chain until acknowledged
Create intelligent sales and marketing workflows with personalized communication:
* Lead score reaches threshold → Make personalized sales call → If no answer, send follow-up SMS → Track engagement → Schedule callback based on response → Continue nurture sequence
## Advanced Features & Capabilities
Seamless integration across multiple communication channels:
* **SMS and Voice** - Coordinate messaging across text and phone calls
* **Verification Services** - Multi-factor authentication and security workflows
* **Recording and Transcription** - Automated call analysis and content processing
* **Media Handling** - Process images, videos, and documents via MMS
Instant response to communication events and triggers:
* **Event-driven Triggers** - React immediately to calls, SMS, and verification events
* **Intelligent Routing** - Route communications based on content and priority
* **Escalation Management** - Automatic escalation for urgent communications
* **Cross-system Integration** - Connect with CRM, support, and business systems
Advanced security and compliance capabilities:
* **Multi-factor Authentication** - Secure verification workflows for sensitive operations
* **Fraud Prevention** - Phone number validation and suspicious activity detection
* **Compliance Management** - Automated compliance with TCPA, GDPR, and other regulations
* **Audit Logging** - Comprehensive logging of all communication activities
## Configuration Best Practices
Optimize your customer service communication workflows:
* Use "SMS Received" triggers for immediate customer response
* Implement "Make Phone Call" for high-priority escalations
* Set up automated follow-up sequences with "Send SMS Message"
* Use "Get Call" and "Get Transcripts" for quality assurance
* Implement proper opt-out management for all communication channels
Set up powerful sales and marketing communication workflows:
* Use "Make Phone Call" for personalized sales outreach
* Implement "Send SMS Message" for follow-up and reminders
* Set up verification workflows with "Send SMS Verification"
* Create appointment management systems with automated confirmations
* Use "List Messages" for campaign performance analysis
Create robust security and verification workflows:
* Use "Send SMS Verification" for two-factor authentication
* Implement "Check Verification Token" for secure login processes
* Set up "Phone Number Lookup" for fraud prevention
* Create emergency notification systems with escalation chains
* Use "Create Verification Service" for multi-tenant applications
## Limitations & Considerations
* **Rate Limits**: Twilio API has rate limits for high-volume operations
* **Geographic Restrictions**: Some features may be limited by geographic location
* **Phone Number Availability**: Local numbers may not be available in all areas
* **Message Length**: SMS messages have character limits and automatic splitting
* **Per-message Charges**: SMS and voice calls incur per-use charges
* **Phone Number Rental**: Monthly charges for dedicated phone numbers
* **Recording Storage**: Additional costs for call recording storage
* **Verification Services**: Charges for verification codes and services
* **Opt-out Management**: Must provide opt-out mechanisms for all communications
* **Data Retention**: Follow data retention policies for call recordings and messages
* **Consent Management**: Ensure proper consent for all communication types
* **Regulatory Compliance**: Comply with local regulations (TCPA, GDPR, etc.)
## Next steps
Combine SMS with email automation
Connect communication with CRM workflows
Expand messaging automation to other platforms
Integrate with WhatsApp for Business
# WhatsApp
Source: https://docs.lindy.ai/skills/popular-integrations/whatsapp
## Quick Overview
WhatsApp integration is one of Lindy's most powerful messaging capabilities, enabling your AI agents to act as sophisticated communication assistants across the world's most popular messaging platform. The integration provides both Triggers (what can start a Lindy workflow) and Actions (what Lindy can do).
This comprehensive integration transforms Lindy into a powerful conversational automation platform, capable of handling everything from customer service to sales, appointment management, and conversational commerce across WhatsApp Personal and WhatsApp Business.
Key benefits of WhatsApp integration:
* **Global reach** – Connect with over 2 billion WhatsApp users worldwide
* **High engagement** – 98%+ open rates and exceptional customer engagement
* **Rich media support** – Text, voice, images, documents, and interactive elements
* **Conversational commerce** – End-to-end shopping experiences within WhatsApp
## How to set up WhatsApp
Click on the plus sign at the bottom or right-click anywhere on the canvas and select "Add Trigger" or "Add Action" from the pop-up menu and choose "WhatsApp." Once added to the canvas, click on it again and from the right tab, choose connect. Now input your Access Token and Whatsapp Phone Number ID
## Twilio Triggers
#### Call Received
Fires when you receive a call to a Twilio phone number:
* **Real-time activation** - Triggers immediately when inbound calls are received
* **Caller information** - Provides caller details, duration, and call status
* **Filtering options** - Can be filtered by specific phone numbers or caller patterns
* Perfect for customer support hotlines, emergency response, sales lead qualification
#### New Call
Triggers when a new call is received on your Twilio phone number:
* **Enhanced metadata** - Provides detailed call analytics and routing information
* **Advanced call flow** - Supports sophisticated call routing and queue management
* **Multi-tenant support** - Handle calls for different clients or departments
* Ideal for advanced call center operations, call analytics, intelligent distribution
#### New Phone Number
Receive notifications when new phone numbers are added to your Twilio account:
* **Automated provisioning** - Set up new phone numbers with appropriate configurations
* **Multi-location support** - Configure local numbers for new business locations
* **Campaign management** - Set up dedicated numbers for marketing campaigns
* Perfect for number provisioning, compliance documentation, cost management
#### New Recording
Monitor for new recordings added to your Twilio account:
* **Quality assurance** - Automatically review and score customer service calls
* **Compliance tracking** - Ensure all required calls are recorded and stored
* **Training support** - Identify calls for training purposes and agent development
* Essential for call analysis, compliance monitoring, automated transcription
#### New Transcript Created
Triggers when a new transcript is created in your Twilio account:
* **Automated analysis** - Extract key information and insights from call transcripts
* **Compliance monitoring** - Scan transcripts for compliance violations
* **Customer insights** - Analyze customer sentiment and satisfaction
* Perfect for call analysis, knowledge base creation, performance metrics
#### SMS Received
Triggers when you get a new SMS:
* **Real-time processing** - Handle customer inquiries and support requests
* **Multimedia support** - Process MMS with image and file attachments
* **Two-way conversations** - Enable sophisticated SMS conversation workflows
* Essential for customer support, appointment management, emergency notifications
Use "SMS Received" triggers combined with "Send SMS Message" actions for the most powerful two-way communication workflows.
## Twilio Actions
#### Make Phone Call
Make an outbound phone call with full customization:
* **Global calling** - Support voice calls to any phone number worldwide
* **Text-to-speech** - Integration with automated message playback
* **Call recording** - Configurable recording and transcription options
* Perfect for customer outreach, appointment reminders, emergency notifications
#### Send SMS Message
Send SMS messages with advanced features:
* **Global messaging** - Send text messages to any mobile number worldwide
* **Long message support** - Automatically split long messages into multiple parts
* **Delivery tracking** - Monitor delivery status and reporting
* Essential for transactional notifications, marketing campaigns, appointment management
#### Send SMS Verification
Send SMS verification codes using Twilio's verification service:
* **Secure codes** - Generate time-limited verification codes
* **Automatic retry** - Built-in retry and fallback mechanisms
* **Fraud prevention** - Integration with fraud detection systems
* Perfect for two-factor authentication, phone verification, transaction security
#### Check Verification Token
Verify a token code sent to a phone number:
* **Code validation** - Validate verification codes against Twilio's service
* **Expiration handling** - Handle expired codes and retry limits
* **Detailed status** - Provide comprehensive verification status and error handling
* Essential for login verification, identity confirmation, transaction authorization
#### Create Verification Service
Create a new verification service for authentication requests:
* **Multi-tenant support** - Separate verification services for different clients
* **Configurable policies** - Set code length, expiration, and retry policies
* **Multi-channel support** - Support SMS, voice, and email verification
* Perfect for multi-tenant applications, department-specific verification, campaign verification
#### Get Call
Retrieve details about a specific Twilio call:
* **Comprehensive metadata** - Access call analytics and routing information
* **Recording access** - Retrieve call recordings and transcriptions
* **Quality metrics** - Integration with call quality and performance data
* Essential for call analytics, quality assurance, billing analysis
#### Get Message
Retrieve details of a specific message using its Message ID:
* **Complete metadata** - Access message content and delivery status
* **Media attachments** - Retrieve images, videos, and documents
* **Delivery tracking** - Monitor delivery confirmations and error codes
* Perfect for message tracking, compliance auditing, customer service analysis
#### Get Transcripts
Retrieve transcripts from Twilio using their unique SID identifiers:
* **Complete transcriptions** - Access call content with timestamps
* **Confidence scores** - Retrieve accuracy metrics and speaker identification
* **Multi-language support** - Support for multiple languages and accents
* Essential for call analysis, compliance monitoring, training development
#### List Calls
Retrieve a list of phone calls with optional filtering:
* **Advanced filtering** - Filter by date range, status, direction, and numbers
* **Paginated results** - Handle large datasets efficiently
* **Export capabilities** - Support for reporting and analysis
* Perfect for call volume analysis, performance reporting, cost management
#### List Messages
Retrieve a list of messages sent through your Twilio account:
* **Comprehensive filtering** - Filter by date, direction, status, and numbers
* **Bulk analysis** - Support for message analytics and reporting
* **Delivery tracking** - Monitor message delivery and engagement rates
* Essential for campaign analysis, communication history, compliance auditing
#### List Transcripts
Retrieve a list of transcripts from your Twilio account:
* **Content analysis** - Analyze call content across multiple conversations
* **Quality metrics** - Filter by call type and quality indicators
* **Bulk processing** - Support for transcript analysis and search
* Perfect for content analysis, quality assurance, knowledge management
#### List Message Media
Retrieve a list of media files associated with a specific message:
* **Multimedia support** - Access images, videos, and documents sent via MMS
* **Media processing** - Retrieve file metadata and content
* **Content analysis** - Analyze visual content for insights and trends
* Essential for visual customer service, document processing, compliance documentation
#### Phone Number Lookup
Look up information about a phone number using Twilio's service:
* **Carrier information** - Retrieve carrier details and number type
* **Geographic data** - Access location and routing information
* **Validation support** - Verify phone number format and reachability
* Perfect for number validation, fraud prevention, geographic routing
#### Download Recording Media
Download Twilio recording media files to a specified location:
* **Multiple formats** - Download in MP3, WAV, and other formats
* **Batch processing** - Support for automated download workflows
* **Cloud integration** - Integration with storage and content management
* Essential for archive management, quality assurance, training development
#### Delete Call
Delete a specific call record from your Twilio account:
* **Data retention** - Manage call records per retention policies
* **Privacy compliance** - Remove records upon customer request
* **Storage optimization** - Clean up unnecessary records to reduce costs
* Perfect for data retention management, privacy compliance, system maintenance
#### Delete Message
Delete a specific message from your Twilio account using its Message ID:
* **Privacy protection** - Delete messages upon customer request
* **Retention management** - Automatically clean up old messages
* **Compliance support** - Ensure message retention complies with regulations
* Essential for privacy compliance, data retention, system cleanup
## Practical Implementation Scenarios
Create comprehensive customer service workflows across voice and SMS:
* Customer calls support → If no answer, send SMS with callback option → Customer responds via SMS → Create support ticket → Send SMS updates → Follow up with satisfaction survey
Build sophisticated emergency response systems with multiple communication channels:
* Critical system alert → Send SMS to on-call engineer → If no response in 5 minutes, make voice call → If still no response, escalate to manager → Continue escalation chain until acknowledged
Create intelligent sales and marketing workflows with personalized communication:
* Lead score reaches threshold → Make personalized sales call → If no answer, send follow-up SMS → Track engagement → Schedule callback based on response → Continue nurture sequence
## Advanced Features & Capabilities
Seamless integration across multiple communication channels:
* **SMS and Voice** - Coordinate messaging across text and phone calls
* **Verification Services** - Multi-factor authentication and security workflows
* **Recording and Transcription** - Automated call analysis and content processing
* **Media Handling** - Process images, videos, and documents via MMS
Instant response to communication events and triggers:
* **Event-driven Triggers** - React immediately to calls, SMS, and verification events
* **Intelligent Routing** - Route communications based on content and priority
* **Escalation Management** - Automatic escalation for urgent communications
* **Cross-system Integration** - Connect with CRM, support, and business systems
Advanced security and compliance capabilities:
* **Multi-factor Authentication** - Secure verification workflows for sensitive operations
* **Fraud Prevention** - Phone number validation and suspicious activity detection
* **Compliance Management** - Automated compliance with TCPA, GDPR, and other regulations
* **Audit Logging** - Comprehensive logging of all communication activities
## Configuration Best Practices
Optimize your customer service communication workflows:
* Use "SMS Received" triggers for immediate customer response
* Implement "Make Phone Call" for high-priority escalations
* Set up automated follow-up sequences with "Send SMS Message"
* Use "Get Call" and "Get Transcripts" for quality assurance
* Implement proper opt-out management for all communication channels
Set up powerful sales and marketing communication workflows:
* Use "Make Phone Call" for personalized sales outreach
* Implement "Send SMS Message" for follow-up and reminders
* Set up verification workflows with "Send SMS Verification"
* Create appointment management systems with automated confirmations
* Use "List Messages" for campaign performance analysis
Create robust security and verification workflows:
* Use "Send SMS Verification" for two-factor authentication
* Implement "Check Verification Token" for secure login processes
* Set up "Phone Number Lookup" for fraud prevention
* Create emergency notification systems with escalation chains
* Use "Create Verification Service" for multi-tenant applications
## Limitations & Considerations
* **Rate Limits**: Twilio API has rate limits for high-volume operations
* **Geographic Restrictions**: Some features may be limited by geographic location
* **Phone Number Availability**: Local numbers may not be available in all areas
* **Message Length**: SMS messages have character limits and automatic splitting
* **Per-message Charges**: SMS and voice calls incur per-use charges
* **Phone Number Rental**: Monthly charges for dedicated phone numbers
* **Recording Storage**: Additional costs for call recording storage
* **Verification Services**: Charges for verification codes and services
* **Opt-out Management**: Must provide opt-out mechanisms for all communications
* **Data Retention**: Follow data retention policies for call recordings and messages
* **Consent Management**: Ensure proper consent for all communication types
* **Regulatory Compliance**: Comply with local regulations (TCPA, GDPR, etc.)
## Next steps
Combine SMS with email automation
Connect communication with CRM workflows
Expand messaging automation to other platforms
Integrate with WhatsApp for Business
# WhatsApp
Source: https://docs.lindy.ai/skills/popular-integrations/whatsapp
## Quick Overview
WhatsApp integration is one of Lindy's most powerful messaging capabilities, enabling your AI agents to act as sophisticated communication assistants across the world's most popular messaging platform. The integration provides both Triggers (what can start a Lindy workflow) and Actions (what Lindy can do).
This comprehensive integration transforms Lindy into a powerful conversational automation platform, capable of handling everything from customer service to sales, appointment management, and conversational commerce across WhatsApp Personal and WhatsApp Business.
Key benefits of WhatsApp integration:
* **Global reach** – Connect with over 2 billion WhatsApp users worldwide
* **High engagement** – 98%+ open rates and exceptional customer engagement
* **Rich media support** – Text, voice, images, documents, and interactive elements
* **Conversational commerce** – End-to-end shopping experiences within WhatsApp
## How to set up WhatsApp
Click on the plus sign at the bottom or right-click anywhere on the canvas and select "Add Trigger" or "Add Action" from the pop-up menu and choose "WhatsApp." Once added to the canvas, click on it again and from the right tab, choose connect. Now input your Access Token and Whatsapp Phone Number ID
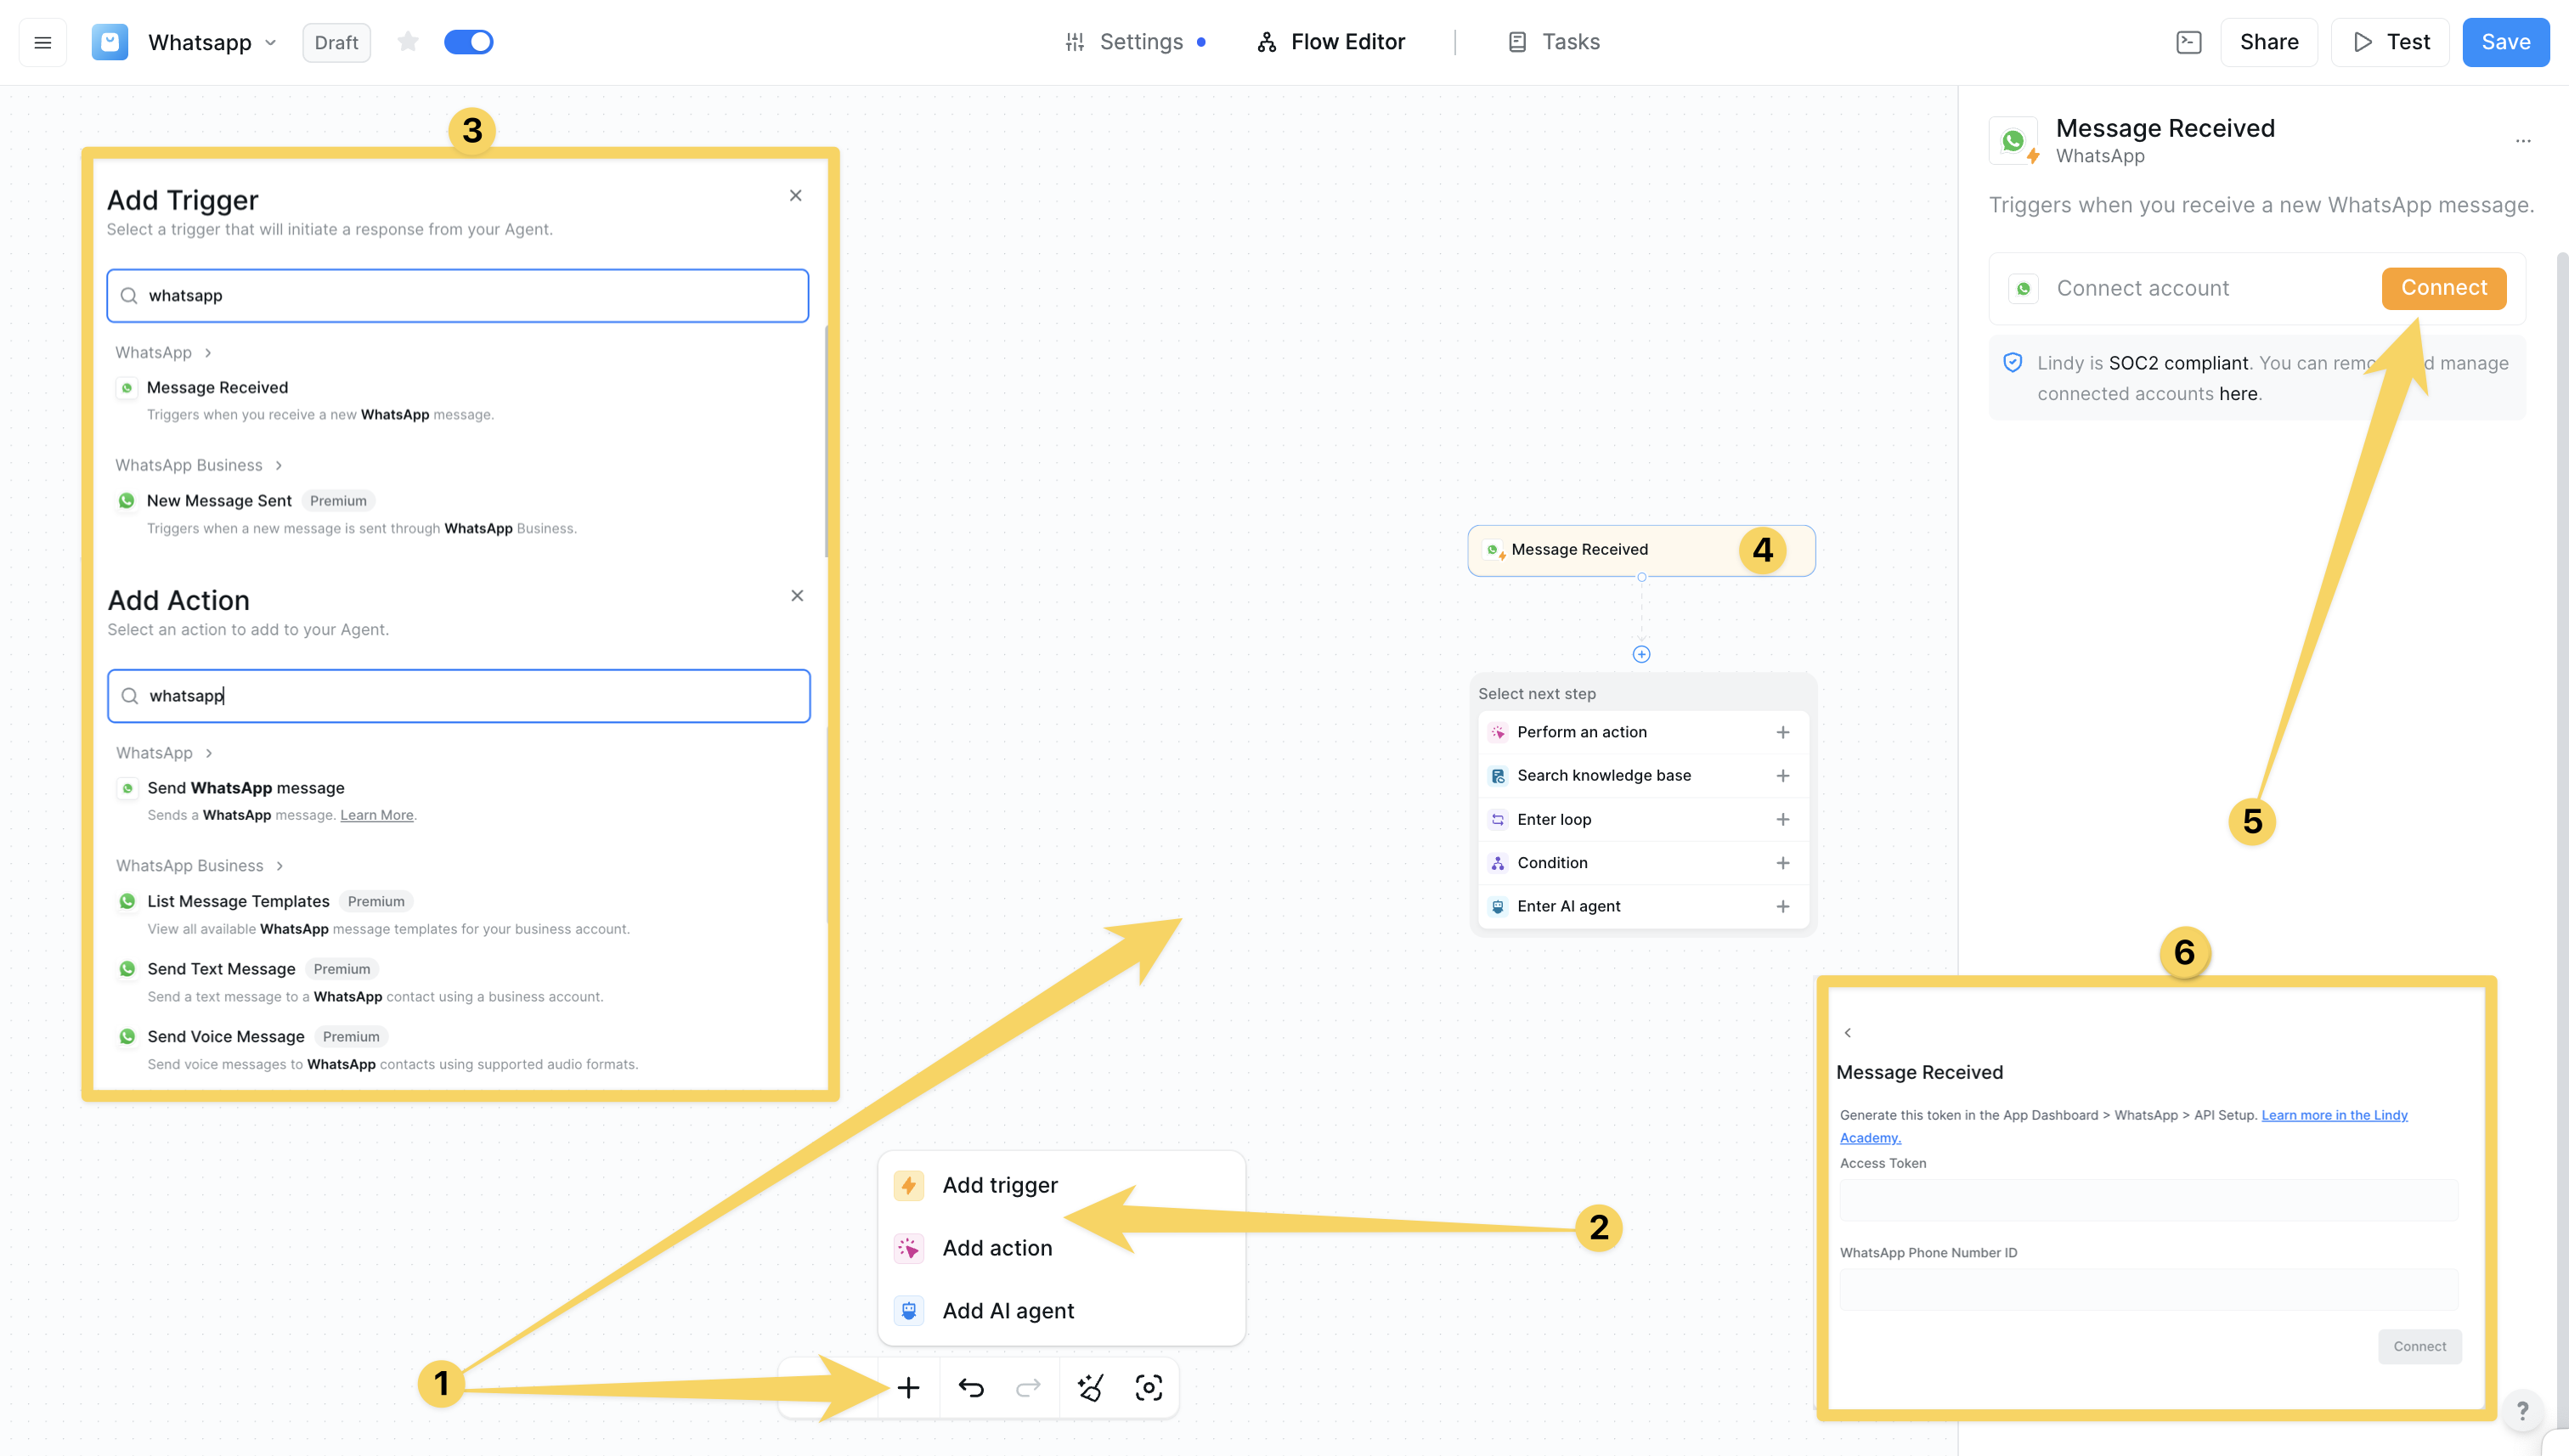 ## WhatsApp Triggers
#### Message Received (WhatsApp Personal)
Triggers when you receive a new WhatsApp message:
* **Real-time activation** - Immediate trigger for inbound WhatsApp messages
* **Message content** - Access to text, media, and document messages
* **Sender information** - Complete sender details and metadata
* Perfect for personal business management, customer service, appointment scheduling
#### New Message Sent (WhatsApp Business)
Triggers when a new message is sent through WhatsApp Business:
* **Delivery tracking** - Monitor message delivery status and analytics
* **Cost management** - Track messaging costs and conversation billing
* **Performance analytics** - Analyze message engagement and response rates
* Essential for message delivery tracking, cost optimization, compliance monitoring
Use "Message Received" triggers combined with "Send Text Message" actions for the most powerful two-way WhatsApp automation workflows.
## WhatsApp Actions
#### Send WhatsApp Message (Personal)
Send WhatsApp messages through personal account:
* **Basic text messaging** - Send text messages through personal WhatsApp account
* **Simple notifications** - Perfect for small business communications
* **Customer follow-up** - Handle business communications through personal account
* Perfect for small business communication, personal business management, simple notifications
#### Send Text Message (WhatsApp Business)
Send text messages to WhatsApp contacts using business account:
* **Full Business API** - Complete WhatsApp Business API integration
* **Message templates** - Support for pre-approved business message templates
* **Delivery tracking** - Real-time delivery status and analytics
* Essential for customer service, marketing communications, transactional messages
#### Send Voice Message (WhatsApp Business)
Send voice messages to WhatsApp contacts using supported audio formats:
* **Multiple formats** - Support for MP3, AAC, OGG audio formats
* **Audio optimization** - Automatic compression and mobile optimization
* **Personalization** - Create personalized voice responses and explanations
* Perfect for personalized customer service, product demonstrations, appointment reminders
#### List Message Templates (WhatsApp Business)
View all available WhatsApp message templates for your business account:
* **Template management** - Access all approved message templates
* **Compliance verification** - Ensure templates are approved and compliant
* **Performance analysis** - Analyze template effectiveness and usage
* Essential for template management, compliance verification, workflow optimization
## Practical Implementation Scenarios
Create end-to-end shopping experiences within WhatsApp:
* Customer browses product catalog → Asks questions via WhatsApp → Receives personalized recommendations → Places order through conversation → Receives order confirmation → Gets shipping updates → Provides feedback
Build comprehensive customer service workflows:
* Customer sends inquiry → AI provides initial response → Escalates to human agent if needed → Tracks resolution → Follows up for satisfaction → Updates knowledge base
Create sophisticated appointment management systems:
* Customer requests appointment → System checks availability → Offers time slots → Confirms booking → Sends reminders → Handles rescheduling → Follows up post-appointment
## Advanced Features & Capabilities
Comprehensive WhatsApp communication capabilities:
* **Personal and Business** - Support for both WhatsApp Personal and Business accounts
* **Rich Media** - Text, voice messages, images, documents, and interactive elements
* **Template System** - Pre-approved message templates for business communications
* **Global Reach** - Connect with over 2 billion WhatsApp users worldwide
Intelligent conversation management and automation:
* **Natural Conversations** - Design conversations that feel natural and engaging
* **Context Awareness** - Maintain conversation context across multiple interactions
* **Multi-language Support** - Provide support in customers' preferred languages
* **Personalization** - Use customer data to personalize all interactions
Seamless integration with business systems and workflows:
* **CRM Integration** - Connect with customer relationship management systems
* **E-commerce Platforms** - Integrate with online stores and product catalogs
* **Payment Processing** - Connect with payment systems for conversational commerce
* **Analytics and Reporting** - Comprehensive tracking and performance analytics
## Configuration Best Practices
Optimize your customer service workflows:
* Use "Message Received" triggers for immediate customer response
* Implement intelligent routing based on inquiry type and customer history
* Set up automated responses for common questions with "Send Text Message"
* Use "Send Voice Message" for complex explanations and personalized responses
* Implement seamless handoff between AI and human agents
Set up powerful sales and marketing workflows:
* Use "Send Text Message" with approved templates for marketing campaigns
* Implement behavioral trigger-based messaging for lead nurturing
* Create personalized product recommendations based on customer data
* Use "List Message Templates" to manage and optimize campaign templates
* Set up A/B testing for message optimization and engagement tracking
Ensure compliance with WhatsApp business policies:
* Implement clear opt-in processes and respect customer preferences
* Use only approved message templates for business-initiated conversations
* Comply with the 24-hour messaging window for free-form responses
* Ensure all messages comply with WhatsApp's content policies
* Implement proper data handling and privacy protection measures
## Limitations & Considerations
* **Rate Limits**: WhatsApp enforces rate limits to prevent spam and ensure service quality
* **Message Templates**: Business-initiated conversations must use pre-approved templates
* **24-Hour Window**: Free-form messages only allowed within 24 hours of customer message
* **Content Policies**: All messages must comply with WhatsApp's business content guidelines
* **Conversation-based Pricing**: WhatsApp charges per conversation, not per message
* **Template Costs**: Different rates for template messages vs. session messages
* **Geographic Pricing**: Costs vary by country and region
* **Volume Discounts**: Higher volumes may qualify for reduced pricing tiers
* **Business Verification**: WhatsApp Business requires verified business accounts
* **Phone Number Dedication**: Business phone numbers cannot be used for personal WhatsApp
* **Facebook Business Manager**: Required for WhatsApp Business API access
* **Compliance Documentation**: May require business verification documents
## Next steps
Combine WhatsApp with SMS and voice automation
Expand messaging automation across platforms
Set up WhatsApp-based automation triggers
Add smart routing to your messaging workflows
# YouTube
Source: https://docs.lindy.ai/skills/popular-integrations/youtube
## Quick Overview
YouTube integration is one of Lindy's most powerful content management capabilities, enabling your AI agents to act as sophisticated YouTube assistants for content creators, marketers, and businesses. The integration provides both Triggers (what can start a Lindy workflow) and Actions (what Lindy can do).
This comprehensive integration transforms Lindy into a powerful YouTube automation platform, capable of handling everything from community management and content monitoring to video publishing and channel optimization.
Key benefits of YouTube integration:
* **Comprehensive monitoring** – Track comments, subscribers, and new videos in real-time
* **Content management** – Upload, organize, and optimize videos automatically
* **Community engagement** – Automate responses and build stronger communities
* **Analytics and insights** – Monitor performance and competitor activity
## How to set up YouTube
Click on the plus sign at the bottom or right-click anywhere on the canvas and select "Add Trigger" or "Add Action" from the pop-up menu and choose "YouTube"
## WhatsApp Triggers
#### Message Received (WhatsApp Personal)
Triggers when you receive a new WhatsApp message:
* **Real-time activation** - Immediate trigger for inbound WhatsApp messages
* **Message content** - Access to text, media, and document messages
* **Sender information** - Complete sender details and metadata
* Perfect for personal business management, customer service, appointment scheduling
#### New Message Sent (WhatsApp Business)
Triggers when a new message is sent through WhatsApp Business:
* **Delivery tracking** - Monitor message delivery status and analytics
* **Cost management** - Track messaging costs and conversation billing
* **Performance analytics** - Analyze message engagement and response rates
* Essential for message delivery tracking, cost optimization, compliance monitoring
Use "Message Received" triggers combined with "Send Text Message" actions for the most powerful two-way WhatsApp automation workflows.
## WhatsApp Actions
#### Send WhatsApp Message (Personal)
Send WhatsApp messages through personal account:
* **Basic text messaging** - Send text messages through personal WhatsApp account
* **Simple notifications** - Perfect for small business communications
* **Customer follow-up** - Handle business communications through personal account
* Perfect for small business communication, personal business management, simple notifications
#### Send Text Message (WhatsApp Business)
Send text messages to WhatsApp contacts using business account:
* **Full Business API** - Complete WhatsApp Business API integration
* **Message templates** - Support for pre-approved business message templates
* **Delivery tracking** - Real-time delivery status and analytics
* Essential for customer service, marketing communications, transactional messages
#### Send Voice Message (WhatsApp Business)
Send voice messages to WhatsApp contacts using supported audio formats:
* **Multiple formats** - Support for MP3, AAC, OGG audio formats
* **Audio optimization** - Automatic compression and mobile optimization
* **Personalization** - Create personalized voice responses and explanations
* Perfect for personalized customer service, product demonstrations, appointment reminders
#### List Message Templates (WhatsApp Business)
View all available WhatsApp message templates for your business account:
* **Template management** - Access all approved message templates
* **Compliance verification** - Ensure templates are approved and compliant
* **Performance analysis** - Analyze template effectiveness and usage
* Essential for template management, compliance verification, workflow optimization
## Practical Implementation Scenarios
Create end-to-end shopping experiences within WhatsApp:
* Customer browses product catalog → Asks questions via WhatsApp → Receives personalized recommendations → Places order through conversation → Receives order confirmation → Gets shipping updates → Provides feedback
Build comprehensive customer service workflows:
* Customer sends inquiry → AI provides initial response → Escalates to human agent if needed → Tracks resolution → Follows up for satisfaction → Updates knowledge base
Create sophisticated appointment management systems:
* Customer requests appointment → System checks availability → Offers time slots → Confirms booking → Sends reminders → Handles rescheduling → Follows up post-appointment
## Advanced Features & Capabilities
Comprehensive WhatsApp communication capabilities:
* **Personal and Business** - Support for both WhatsApp Personal and Business accounts
* **Rich Media** - Text, voice messages, images, documents, and interactive elements
* **Template System** - Pre-approved message templates for business communications
* **Global Reach** - Connect with over 2 billion WhatsApp users worldwide
Intelligent conversation management and automation:
* **Natural Conversations** - Design conversations that feel natural and engaging
* **Context Awareness** - Maintain conversation context across multiple interactions
* **Multi-language Support** - Provide support in customers' preferred languages
* **Personalization** - Use customer data to personalize all interactions
Seamless integration with business systems and workflows:
* **CRM Integration** - Connect with customer relationship management systems
* **E-commerce Platforms** - Integrate with online stores and product catalogs
* **Payment Processing** - Connect with payment systems for conversational commerce
* **Analytics and Reporting** - Comprehensive tracking and performance analytics
## Configuration Best Practices
Optimize your customer service workflows:
* Use "Message Received" triggers for immediate customer response
* Implement intelligent routing based on inquiry type and customer history
* Set up automated responses for common questions with "Send Text Message"
* Use "Send Voice Message" for complex explanations and personalized responses
* Implement seamless handoff between AI and human agents
Set up powerful sales and marketing workflows:
* Use "Send Text Message" with approved templates for marketing campaigns
* Implement behavioral trigger-based messaging for lead nurturing
* Create personalized product recommendations based on customer data
* Use "List Message Templates" to manage and optimize campaign templates
* Set up A/B testing for message optimization and engagement tracking
Ensure compliance with WhatsApp business policies:
* Implement clear opt-in processes and respect customer preferences
* Use only approved message templates for business-initiated conversations
* Comply with the 24-hour messaging window for free-form responses
* Ensure all messages comply with WhatsApp's content policies
* Implement proper data handling and privacy protection measures
## Limitations & Considerations
* **Rate Limits**: WhatsApp enforces rate limits to prevent spam and ensure service quality
* **Message Templates**: Business-initiated conversations must use pre-approved templates
* **24-Hour Window**: Free-form messages only allowed within 24 hours of customer message
* **Content Policies**: All messages must comply with WhatsApp's business content guidelines
* **Conversation-based Pricing**: WhatsApp charges per conversation, not per message
* **Template Costs**: Different rates for template messages vs. session messages
* **Geographic Pricing**: Costs vary by country and region
* **Volume Discounts**: Higher volumes may qualify for reduced pricing tiers
* **Business Verification**: WhatsApp Business requires verified business accounts
* **Phone Number Dedication**: Business phone numbers cannot be used for personal WhatsApp
* **Facebook Business Manager**: Required for WhatsApp Business API access
* **Compliance Documentation**: May require business verification documents
## Next steps
Combine WhatsApp with SMS and voice automation
Expand messaging automation across platforms
Set up WhatsApp-based automation triggers
Add smart routing to your messaging workflows
# YouTube
Source: https://docs.lindy.ai/skills/popular-integrations/youtube
## Quick Overview
YouTube integration is one of Lindy's most powerful content management capabilities, enabling your AI agents to act as sophisticated YouTube assistants for content creators, marketers, and businesses. The integration provides both Triggers (what can start a Lindy workflow) and Actions (what Lindy can do).
This comprehensive integration transforms Lindy into a powerful YouTube automation platform, capable of handling everything from community management and content monitoring to video publishing and channel optimization.
Key benefits of YouTube integration:
* **Comprehensive monitoring** – Track comments, subscribers, and new videos in real-time
* **Content management** – Upload, organize, and optimize videos automatically
* **Community engagement** – Automate responses and build stronger communities
* **Analytics and insights** – Monitor performance and competitor activity
## How to set up YouTube
Click on the plus sign at the bottom or right-click anywhere on the canvas and select "Add Trigger" or "Add Action" from the pop-up menu and choose "YouTube"
 Click on "Add Account" and authorize your YouTube for Lindy's integrations through Google OAuth. Grant the necessary permissions for read, write, and manage access to your YouTube account.
 ## YouTube Triggers
#### New Comment In Channel
Triggers when a new comment is posted on a YouTube channel:
* **Community management** - Stay on top of community interactions automatically
* **Automated responses** - Respond to frequently asked questions instantly
* **Content moderation** - Monitor and moderate channel comments
* Perfect for community engagement, customer service, content moderation
#### New Comment Posted
Triggers when new comments are posted on YouTube videos or channels:
* **Broader monitoring** - Track comments across multiple videos
* **Sentiment analysis** - Analyze viewer feedback and sentiment
* **Customer service** - Automate responses to product-related inquiries
* Essential for engagement tracking, customer service, feedback analysis
#### New Liked Videos
Triggers when new videos are added to your liked videos:
* **Content curation** - Build personal content curation workflows
* **Research compilation** - Track competitive analysis and inspiration
* **Recommendation systems** - Build systems based on preferences
* Perfect for content research, competitive analysis, personal curation
#### New Subscriber
Triggers when a new subscriber follows your YouTube channel:
* **Welcome campaigns** - Send welcome emails to new subscribers
* **Milestone celebrations** - Celebrate subscriber milestones automatically
* **CRM integration** - Convert subscribers into leads
* Essential for growth tracking, welcome sequences, community building
#### New Subscription
Triggers when a YouTube channel receives a new subscriber:
* **Growth tracking** - Monitor channel growth and analytics
* **Thank you messages** - Send automated appreciation messages
* **Marketing funnels** - Integrate with marketing automation
* Perfect for analytics tracking, subscriber engagement, growth monitoring
#### New Videos
Triggers when new YouTube videos are published based on search criteria:
* **Competitor monitoring** - Track competitor video uploads
* **Industry trends** - Monitor industry-specific content
* **Content research** - Gather inspiration and market intelligence
* Essential for competitive analysis, market research, trend monitoring
#### New Videos By Search
Triggers when new videos match specified search criteria and filters:
* **Targeted monitoring** - Highly specific content tracking
* **Brand mentions** - Track brand mentions across YouTube
* **Niche research** - Monitor specific topics and keywords
* Perfect for brand monitoring, niche research, targeted content curation
#### New Videos In Playlist
Triggers when new videos are added to a YouTube playlist:
* **Playlist management** - Automate playlist organization
* **Educational tracking** - Monitor course and series updates
* **Collaborative management** - Track team playlist changes
* Essential for playlist automation, educational content, team collaboration
#### New Videos In Subscribed Channels
Triggers when subscribed channels upload new videos:
* **Content consumption** - Automate personal content workflows
* **Research automation** - Track learning and research sources
* **Competitive analysis** - Monitor competitor uploads
* Perfect for personal automation, research workflows, competitive intelligence
Use "New Videos By Search" triggers combined with "Create Comment Thread" actions for the most powerful YouTube engagement workflows.
## YouTube Actions
#### Transcribe Video
Get captions and title for a YouTube video as plain text:
* **Content analysis** - Analyze video content and generate summaries
* **SEO research** - Extract content for optimization research
* **Accessibility** - Improve content accessibility with transcriptions
* Perfect for content analysis, SEO optimization, accessibility improvements
#### YouTube Channels by URL
Collect YouTube channels by channel URL:
* **Channel analysis** - Research and analyze channel performance
* **Competitor profiling** - Build comprehensive competitor profiles
* **Influencer identification** - Discover partnership opportunities
* Essential for channel research, competitor analysis, influencer marketing
#### YouTube Comments by URL
Collect YouTube comments by video URL:
* **Sentiment analysis** - Analyze viewer sentiment and feedback
* **Community insights** - Understand audience preferences
* **Market research** - Gather market intelligence from comments
* Perfect for sentiment analysis, market research, community insights
#### YouTube Scraper
YouTube crawler and video scraper with no limits or quotas:
* **Large-scale extraction** - Extract data at scale without API limits
* **Comprehensive research** - Conduct extensive market research
* **Content analysis** - Analyze content across multiple channels
* Essential for large-scale data extraction, comprehensive research, competitive intelligence
#### YouTube Videos by URL
Collect YouTube videos by video URL:
* **Video metadata** - Extract comprehensive video information
* **Content cataloging** - Organize and catalog video content
* **Performance tracking** - Track video performance metrics
* Perfect for video analysis, content cataloging, performance tracking
#### Add Playlist Items
Add videos to a YouTube playlist:
* **Automated curation** - Automatically organize content into playlists
* **Content organization** - Structure educational and marketing content
* **Campaign management** - Organize campaign-specific content
* Essential for content organization, automated curation, campaign management
#### Create Comment Thread
Create a new comment thread on a YouTube video or channel:
* **Automated engagement** - Engage with community automatically
* **Community building** - Build stronger community connections
* **Marketing campaigns** - Execute marketing engagement strategies
* Perfect for community engagement, marketing campaigns, customer service
#### Create Playlist
Create a new playlist with customizable privacy settings:
* **Content organization** - Organize content into structured playlists
* **Campaign playlists** - Create campaign-specific content collections
* **Educational series** - Structure educational content systematically
* Essential for content organization, educational series, campaign management
#### Delete Playlist
Delete a YouTube playlist from your account:
* **Content cleanup** - Remove outdated or unnecessary playlists
* **Campaign conclusion** - Clean up after campaign completion
* **Account maintenance** - Maintain organized channel structure
* Perfect for content cleanup, campaign management, account maintenance
#### Delete Playlist Items
Remove selected videos from a YouTube playlist:
* **Playlist maintenance** - Keep playlists current and relevant
* **Content quality control** - Remove low-performing content
* **Automated curation** - Maintain high-quality content collections
* Essential for playlist maintenance, quality control, automated curation
#### List Playlist Videos
Get a list of videos from a specified YouTube playlist:
* **Playlist analysis** - Analyze playlist performance and content
* **Content auditing** - Audit and review playlist content
* **Performance tracking** - Track playlist engagement metrics
* Perfect for playlist analysis, content auditing, performance tracking
#### Reply To Comment
Reply to YouTube comments with custom text messages:
* **Community engagement** - Respond to community interactions
* **Customer service** - Provide automated customer support
* **Marketing interactions** - Engage with marketing campaigns
* Essential for community engagement, customer service, marketing automation
#### Search Videos
Search YouTube videos with filters for duration, location, and criteria:
* **Content research** - Find relevant content for research
* **Competitive analysis** - Analyze competitor content strategies
* **Market intelligence** - Gather market insights and trends
* Perfect for content research, competitive analysis, market intelligence
#### Update Channel
Update YouTube channel details including description and keywords:
* **Channel optimization** - Optimize channel for better discoverability
* **SEO automation** - Automate SEO optimization workflows
* **Brand consistency** - Maintain consistent branding across channels
* Essential for channel optimization, SEO automation, brand management
#### Update Video Details
Modify title, description, tags, and metadata for YouTube videos:
* **SEO optimization** - Optimize video metadata for better ranking
* **Content updates** - Update video information and descriptions
* **Performance optimization** - Optimize based on performance data
* Perfect for SEO optimization, content updates, performance improvement
#### Upload Channel Banner
Upload a banner image to your YouTube channel:
* **Brand consistency** - Maintain consistent visual branding
* **Campaign branding** - Update branding for specific campaigns
* **Seasonal updates** - Automate seasonal branding changes
* Essential for brand consistency, campaign management, seasonal updates
#### Upload Thumbnail
Upload a custom thumbnail image for a YouTube video:
* **Visual optimization** - Optimize thumbnails for better click-through
* **A/B testing** - Test different thumbnail variations
* **Brand consistency** - Maintain consistent thumbnail styling
* Perfect for visual optimization, A/B testing, brand consistency
#### Upload Video
Upload and publish videos to YouTube with customizable settings:
* **Content publishing** - Automate video publishing workflows
* **Scheduled releases** - Schedule content releases automatically
* **Multi-platform distribution** - Coordinate across multiple platforms
* Essential for content publishing, scheduled releases, campaign launches
## Practical Implementation Scenarios
Transform Lindy into a comprehensive content management assistant:
* New video upload → Optimize metadata → Upload custom thumbnail → Create playlist → Engage with comments → Track performance → Generate reports
Build sophisticated community engagement workflows:
* New comment posted → Analyze sentiment → Generate appropriate response → Reply to comment → Escalate if needed → Update engagement metrics
Create advanced competitor monitoring systems:
* New competitor video → Analyze content → Extract insights → Update competitive analysis → Generate reports → Adjust strategy
## Advanced Features & Capabilities
Full-featured YouTube content management capabilities:
* **Video Publishing** - Upload, optimize, and schedule video content
* **Playlist Management** - Organize and maintain content collections
* **Channel Optimization** - Optimize channel settings and branding
* **Metadata Management** - Optimize titles, descriptions, and tags
Advanced community management and engagement features:
* **Comment Monitoring** - Track and respond to community interactions
* **Automated Responses** - Provide instant responses to common questions
* **Sentiment Analysis** - Analyze community sentiment and feedback
* **Engagement Tracking** - Monitor and optimize community engagement
Powerful analytics and competitive intelligence capabilities:
* **Performance Tracking** - Monitor video and channel performance
* **Competitor Analysis** - Track competitor strategies and content
* **Market Research** - Gather insights from YouTube ecosystem
* **Trend Monitoring** - Stay ahead of industry trends and topics
## Configuration Best Practices
Optimize your content creation workflows:
* Use "Upload Video" with automated metadata optimization
* Set up "New Comment Posted" triggers for community engagement
* Implement "Create Playlist" for content organization
* Use "Update Video Details" for SEO optimization
* Set up automated thumbnail and banner updates
Set up powerful marketing automation workflows:
* Use "New Videos By Search" for brand monitoring
* Implement "Create Comment Thread" for engagement campaigns
* Set up "Search Videos" for competitive analysis
* Use "YouTube Scraper" for large-scale market research
* Create automated reporting and analytics workflows
Create comprehensive business automation workflows:
* Use "New Subscriber" triggers for lead generation
* Implement "Reply To Comment" for customer service
* Set up "Transcribe Video" for content analysis
* Use "YouTube Comments by URL" for sentiment analysis
* Create automated compliance and moderation workflows
## Limitations & Considerations
* **Rate Limits**: YouTube Data API has daily quota limits
* **Authentication**: Requires Google OAuth 2.0 authentication
* **Permissions**: Different actions require different permission scopes
* **Content Policies**: All actions must comply with YouTube's content policies
* **Video Processing**: Large video uploads may take time to process
* **Thumbnail Requirements**: Custom thumbnails require channel verification
* **Comment Moderation**: Automated responses should be carefully designed
* **Data Retention**: Consider data retention policies for scraped content
* **Quality Control**: Implement quality checks for automated content
* **Community Guidelines**: Ensure all automation complies with YouTube guidelines
* **Performance Monitoring**: Monitor automation performance and adjust as needed
* **Human Oversight**: Maintain human oversight for sensitive interactions
## Next steps
Combine YouTube with file management automation
Connect YouTube workflows with email automation
Build intelligent content and community management agents
Store and analyze video performance data
# Apify
Source: https://docs.lindy.ai/skills/web-browsing/apify
Run Apify Actors to automate web scraping, data processing, and other tasks using pre-built containerized programs
## Overview
Apify Actors are lightweight, containerized programs that automate tasks like web scraping, data processing, and workflows. Perfect for:
* **Web scraping** — extract data from websites using pre-built scrapers
* **Data processing** — transform and analyze data with specialized tools
* **Automation tasks** — run complex workflows with thousands of available Actors
[Apify offers 6,000+ pre-built Actors](https://apify.com/actors) that handle everything from social media scraping to data transformation, so you don't have to build scrapers from scratch.
## Run Actor Action
* **What it does**: Executes a selected Apify Actor with the specified configuration to perform web scraping, data processing, or other automated tasks.
## YouTube Triggers
#### New Comment In Channel
Triggers when a new comment is posted on a YouTube channel:
* **Community management** - Stay on top of community interactions automatically
* **Automated responses** - Respond to frequently asked questions instantly
* **Content moderation** - Monitor and moderate channel comments
* Perfect for community engagement, customer service, content moderation
#### New Comment Posted
Triggers when new comments are posted on YouTube videos or channels:
* **Broader monitoring** - Track comments across multiple videos
* **Sentiment analysis** - Analyze viewer feedback and sentiment
* **Customer service** - Automate responses to product-related inquiries
* Essential for engagement tracking, customer service, feedback analysis
#### New Liked Videos
Triggers when new videos are added to your liked videos:
* **Content curation** - Build personal content curation workflows
* **Research compilation** - Track competitive analysis and inspiration
* **Recommendation systems** - Build systems based on preferences
* Perfect for content research, competitive analysis, personal curation
#### New Subscriber
Triggers when a new subscriber follows your YouTube channel:
* **Welcome campaigns** - Send welcome emails to new subscribers
* **Milestone celebrations** - Celebrate subscriber milestones automatically
* **CRM integration** - Convert subscribers into leads
* Essential for growth tracking, welcome sequences, community building
#### New Subscription
Triggers when a YouTube channel receives a new subscriber:
* **Growth tracking** - Monitor channel growth and analytics
* **Thank you messages** - Send automated appreciation messages
* **Marketing funnels** - Integrate with marketing automation
* Perfect for analytics tracking, subscriber engagement, growth monitoring
#### New Videos
Triggers when new YouTube videos are published based on search criteria:
* **Competitor monitoring** - Track competitor video uploads
* **Industry trends** - Monitor industry-specific content
* **Content research** - Gather inspiration and market intelligence
* Essential for competitive analysis, market research, trend monitoring
#### New Videos By Search
Triggers when new videos match specified search criteria and filters:
* **Targeted monitoring** - Highly specific content tracking
* **Brand mentions** - Track brand mentions across YouTube
* **Niche research** - Monitor specific topics and keywords
* Perfect for brand monitoring, niche research, targeted content curation
#### New Videos In Playlist
Triggers when new videos are added to a YouTube playlist:
* **Playlist management** - Automate playlist organization
* **Educational tracking** - Monitor course and series updates
* **Collaborative management** - Track team playlist changes
* Essential for playlist automation, educational content, team collaboration
#### New Videos In Subscribed Channels
Triggers when subscribed channels upload new videos:
* **Content consumption** - Automate personal content workflows
* **Research automation** - Track learning and research sources
* **Competitive analysis** - Monitor competitor uploads
* Perfect for personal automation, research workflows, competitive intelligence
Use "New Videos By Search" triggers combined with "Create Comment Thread" actions for the most powerful YouTube engagement workflows.
## YouTube Actions
#### Transcribe Video
Get captions and title for a YouTube video as plain text:
* **Content analysis** - Analyze video content and generate summaries
* **SEO research** - Extract content for optimization research
* **Accessibility** - Improve content accessibility with transcriptions
* Perfect for content analysis, SEO optimization, accessibility improvements
#### YouTube Channels by URL
Collect YouTube channels by channel URL:
* **Channel analysis** - Research and analyze channel performance
* **Competitor profiling** - Build comprehensive competitor profiles
* **Influencer identification** - Discover partnership opportunities
* Essential for channel research, competitor analysis, influencer marketing
#### YouTube Comments by URL
Collect YouTube comments by video URL:
* **Sentiment analysis** - Analyze viewer sentiment and feedback
* **Community insights** - Understand audience preferences
* **Market research** - Gather market intelligence from comments
* Perfect for sentiment analysis, market research, community insights
#### YouTube Scraper
YouTube crawler and video scraper with no limits or quotas:
* **Large-scale extraction** - Extract data at scale without API limits
* **Comprehensive research** - Conduct extensive market research
* **Content analysis** - Analyze content across multiple channels
* Essential for large-scale data extraction, comprehensive research, competitive intelligence
#### YouTube Videos by URL
Collect YouTube videos by video URL:
* **Video metadata** - Extract comprehensive video information
* **Content cataloging** - Organize and catalog video content
* **Performance tracking** - Track video performance metrics
* Perfect for video analysis, content cataloging, performance tracking
#### Add Playlist Items
Add videos to a YouTube playlist:
* **Automated curation** - Automatically organize content into playlists
* **Content organization** - Structure educational and marketing content
* **Campaign management** - Organize campaign-specific content
* Essential for content organization, automated curation, campaign management
#### Create Comment Thread
Create a new comment thread on a YouTube video or channel:
* **Automated engagement** - Engage with community automatically
* **Community building** - Build stronger community connections
* **Marketing campaigns** - Execute marketing engagement strategies
* Perfect for community engagement, marketing campaigns, customer service
#### Create Playlist
Create a new playlist with customizable privacy settings:
* **Content organization** - Organize content into structured playlists
* **Campaign playlists** - Create campaign-specific content collections
* **Educational series** - Structure educational content systematically
* Essential for content organization, educational series, campaign management
#### Delete Playlist
Delete a YouTube playlist from your account:
* **Content cleanup** - Remove outdated or unnecessary playlists
* **Campaign conclusion** - Clean up after campaign completion
* **Account maintenance** - Maintain organized channel structure
* Perfect for content cleanup, campaign management, account maintenance
#### Delete Playlist Items
Remove selected videos from a YouTube playlist:
* **Playlist maintenance** - Keep playlists current and relevant
* **Content quality control** - Remove low-performing content
* **Automated curation** - Maintain high-quality content collections
* Essential for playlist maintenance, quality control, automated curation
#### List Playlist Videos
Get a list of videos from a specified YouTube playlist:
* **Playlist analysis** - Analyze playlist performance and content
* **Content auditing** - Audit and review playlist content
* **Performance tracking** - Track playlist engagement metrics
* Perfect for playlist analysis, content auditing, performance tracking
#### Reply To Comment
Reply to YouTube comments with custom text messages:
* **Community engagement** - Respond to community interactions
* **Customer service** - Provide automated customer support
* **Marketing interactions** - Engage with marketing campaigns
* Essential for community engagement, customer service, marketing automation
#### Search Videos
Search YouTube videos with filters for duration, location, and criteria:
* **Content research** - Find relevant content for research
* **Competitive analysis** - Analyze competitor content strategies
* **Market intelligence** - Gather market insights and trends
* Perfect for content research, competitive analysis, market intelligence
#### Update Channel
Update YouTube channel details including description and keywords:
* **Channel optimization** - Optimize channel for better discoverability
* **SEO automation** - Automate SEO optimization workflows
* **Brand consistency** - Maintain consistent branding across channels
* Essential for channel optimization, SEO automation, brand management
#### Update Video Details
Modify title, description, tags, and metadata for YouTube videos:
* **SEO optimization** - Optimize video metadata for better ranking
* **Content updates** - Update video information and descriptions
* **Performance optimization** - Optimize based on performance data
* Perfect for SEO optimization, content updates, performance improvement
#### Upload Channel Banner
Upload a banner image to your YouTube channel:
* **Brand consistency** - Maintain consistent visual branding
* **Campaign branding** - Update branding for specific campaigns
* **Seasonal updates** - Automate seasonal branding changes
* Essential for brand consistency, campaign management, seasonal updates
#### Upload Thumbnail
Upload a custom thumbnail image for a YouTube video:
* **Visual optimization** - Optimize thumbnails for better click-through
* **A/B testing** - Test different thumbnail variations
* **Brand consistency** - Maintain consistent thumbnail styling
* Perfect for visual optimization, A/B testing, brand consistency
#### Upload Video
Upload and publish videos to YouTube with customizable settings:
* **Content publishing** - Automate video publishing workflows
* **Scheduled releases** - Schedule content releases automatically
* **Multi-platform distribution** - Coordinate across multiple platforms
* Essential for content publishing, scheduled releases, campaign launches
## Practical Implementation Scenarios
Transform Lindy into a comprehensive content management assistant:
* New video upload → Optimize metadata → Upload custom thumbnail → Create playlist → Engage with comments → Track performance → Generate reports
Build sophisticated community engagement workflows:
* New comment posted → Analyze sentiment → Generate appropriate response → Reply to comment → Escalate if needed → Update engagement metrics
Create advanced competitor monitoring systems:
* New competitor video → Analyze content → Extract insights → Update competitive analysis → Generate reports → Adjust strategy
## Advanced Features & Capabilities
Full-featured YouTube content management capabilities:
* **Video Publishing** - Upload, optimize, and schedule video content
* **Playlist Management** - Organize and maintain content collections
* **Channel Optimization** - Optimize channel settings and branding
* **Metadata Management** - Optimize titles, descriptions, and tags
Advanced community management and engagement features:
* **Comment Monitoring** - Track and respond to community interactions
* **Automated Responses** - Provide instant responses to common questions
* **Sentiment Analysis** - Analyze community sentiment and feedback
* **Engagement Tracking** - Monitor and optimize community engagement
Powerful analytics and competitive intelligence capabilities:
* **Performance Tracking** - Monitor video and channel performance
* **Competitor Analysis** - Track competitor strategies and content
* **Market Research** - Gather insights from YouTube ecosystem
* **Trend Monitoring** - Stay ahead of industry trends and topics
## Configuration Best Practices
Optimize your content creation workflows:
* Use "Upload Video" with automated metadata optimization
* Set up "New Comment Posted" triggers for community engagement
* Implement "Create Playlist" for content organization
* Use "Update Video Details" for SEO optimization
* Set up automated thumbnail and banner updates
Set up powerful marketing automation workflows:
* Use "New Videos By Search" for brand monitoring
* Implement "Create Comment Thread" for engagement campaigns
* Set up "Search Videos" for competitive analysis
* Use "YouTube Scraper" for large-scale market research
* Create automated reporting and analytics workflows
Create comprehensive business automation workflows:
* Use "New Subscriber" triggers for lead generation
* Implement "Reply To Comment" for customer service
* Set up "Transcribe Video" for content analysis
* Use "YouTube Comments by URL" for sentiment analysis
* Create automated compliance and moderation workflows
## Limitations & Considerations
* **Rate Limits**: YouTube Data API has daily quota limits
* **Authentication**: Requires Google OAuth 2.0 authentication
* **Permissions**: Different actions require different permission scopes
* **Content Policies**: All actions must comply with YouTube's content policies
* **Video Processing**: Large video uploads may take time to process
* **Thumbnail Requirements**: Custom thumbnails require channel verification
* **Comment Moderation**: Automated responses should be carefully designed
* **Data Retention**: Consider data retention policies for scraped content
* **Quality Control**: Implement quality checks for automated content
* **Community Guidelines**: Ensure all automation complies with YouTube guidelines
* **Performance Monitoring**: Monitor automation performance and adjust as needed
* **Human Oversight**: Maintain human oversight for sensitive interactions
## Next steps
Combine YouTube with file management automation
Connect YouTube workflows with email automation
Build intelligent content and community management agents
Store and analyze video performance data
# Apify
Source: https://docs.lindy.ai/skills/web-browsing/apify
Run Apify Actors to automate web scraping, data processing, and other tasks using pre-built containerized programs
## Overview
Apify Actors are lightweight, containerized programs that automate tasks like web scraping, data processing, and workflows. Perfect for:
* **Web scraping** — extract data from websites using pre-built scrapers
* **Data processing** — transform and analyze data with specialized tools
* **Automation tasks** — run complex workflows with thousands of available Actors
[Apify offers 6,000+ pre-built Actors](https://apify.com/actors) that handle everything from social media scraping to data transformation, so you don't have to build scrapers from scratch.
## Run Actor Action
* **What it does**: Executes a selected Apify Actor with the specified configuration to perform web scraping, data processing, or other automated tasks.
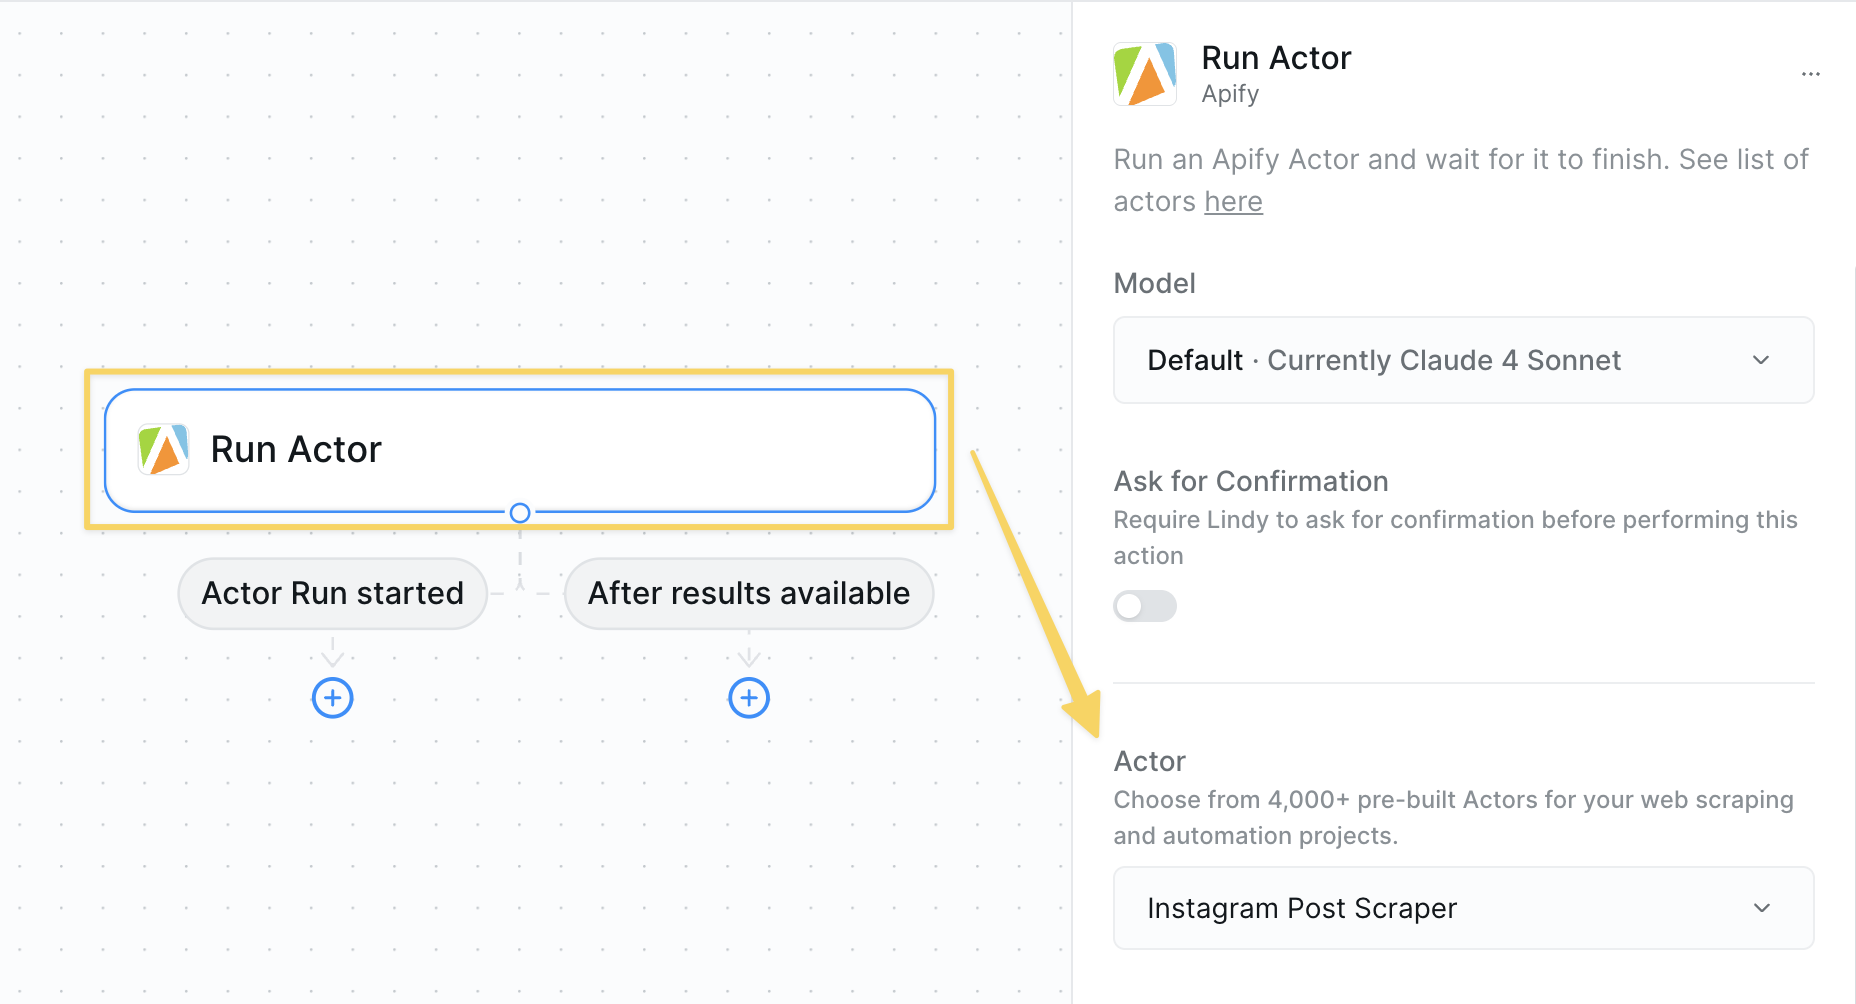 ### Inputs
* **Actor**: Select the specific Apify Actor you want to run from the available options
* **Variable inputs**: After selecting an Actor, you'll see additional input fields specific to that Actor's requirements
### Outputs
* **Results**: The data or output returned by the Actor (varies by Actor type)
## Best Practices
* Browse the Apify Store to find Actors for your specific needs
* Check Actor documentation for required inputs and configuration
* Test with small datasets before running large scraping jobs
* Verify Actor reliability and recent updates
* Monitor Actor runtime and resource usage
* Use appropriate Actor tiers based on your data volume needs
* Set reasonable timeouts for long-running scraping tasks
* Consider rate limits when scraping multiple websites
* Review Actor output format before integration
* Store results in variables or context for further processing
* Clean and validate scraped data before use
## Next Steps
Research and gather information before scraping
Store scraped data for your agent's memory
Save Actor results for use in other workflow steps
Alternative web research and data enrichment
# Web Browsing Overview
Source: https://docs.lindy.ai/skills/web-browsing/overview
Overview of web browsing and scraping options available in Lindy
## Overview
Lindy has thousands of scraping options on our platform. Below are just some of the most common web browsing and scraping tools we see:
**[Web Browser](/skills/web-browsing/web-browser)**
* Basic internet search and webpage text extraction
* Use for simple Google searches and converting webpages to text
* Great for straightforward research and content extraction
**[Perplexity](/skills/web-browsing/perplexity)**
* AI-powered search with reasoning capabilities
* Use when you need intelligent research with sources and citations
* Best for complex queries that require analysis and reasoning
**[Parallel](/skills/web-browsing/parallel)**
* Web research and data enrichment
* Use for enriching datasets with web information
* Perfect for asking questions about web content and entity research
**[Apify](/skills/web-browsing/apify)**
* Access to 6,000+ pre-built web scrapers
* Use when you need specialized scrapers for specific websites or tasks
* Best for structured data extraction from popular platforms
Choose the right tool based on your specific needs — from simple searches to complex data enrichment workflows.
## Next Steps
Start with basic internet search and text extraction
AI-powered search with reasoning capabilities
Access specialized scrapers for complex data extraction
Web research and data enrichment workflows
# Parallel
Source: https://docs.lindy.ai/skills/web-browsing/parallel
Chat with websites and enrich data using Parallel's web browsing and data enrichment capabilities
## Overview
Parallel provides powerful web browsing and data enrichment capabilities for your agents. Perfect for:
* **Web research** — ask questions and get answers from web content
* **Data enrichment** — automatically enhance your data with web information
* **Entity research** — gather detailed information about companies, people, or topics
## Chat with Web Action
* **What it does**: Ask questions and get answers by browsing and analyzing web content in real-time.
### Inputs
* **Actor**: Select the specific Apify Actor you want to run from the available options
* **Variable inputs**: After selecting an Actor, you'll see additional input fields specific to that Actor's requirements
### Outputs
* **Results**: The data or output returned by the Actor (varies by Actor type)
## Best Practices
* Browse the Apify Store to find Actors for your specific needs
* Check Actor documentation for required inputs and configuration
* Test with small datasets before running large scraping jobs
* Verify Actor reliability and recent updates
* Monitor Actor runtime and resource usage
* Use appropriate Actor tiers based on your data volume needs
* Set reasonable timeouts for long-running scraping tasks
* Consider rate limits when scraping multiple websites
* Review Actor output format before integration
* Store results in variables or context for further processing
* Clean and validate scraped data before use
## Next Steps
Research and gather information before scraping
Store scraped data for your agent's memory
Save Actor results for use in other workflow steps
Alternative web research and data enrichment
# Web Browsing Overview
Source: https://docs.lindy.ai/skills/web-browsing/overview
Overview of web browsing and scraping options available in Lindy
## Overview
Lindy has thousands of scraping options on our platform. Below are just some of the most common web browsing and scraping tools we see:
**[Web Browser](/skills/web-browsing/web-browser)**
* Basic internet search and webpage text extraction
* Use for simple Google searches and converting webpages to text
* Great for straightforward research and content extraction
**[Perplexity](/skills/web-browsing/perplexity)**
* AI-powered search with reasoning capabilities
* Use when you need intelligent research with sources and citations
* Best for complex queries that require analysis and reasoning
**[Parallel](/skills/web-browsing/parallel)**
* Web research and data enrichment
* Use for enriching datasets with web information
* Perfect for asking questions about web content and entity research
**[Apify](/skills/web-browsing/apify)**
* Access to 6,000+ pre-built web scrapers
* Use when you need specialized scrapers for specific websites or tasks
* Best for structured data extraction from popular platforms
Choose the right tool based on your specific needs — from simple searches to complex data enrichment workflows.
## Next Steps
Start with basic internet search and text extraction
AI-powered search with reasoning capabilities
Access specialized scrapers for complex data extraction
Web research and data enrichment workflows
# Parallel
Source: https://docs.lindy.ai/skills/web-browsing/parallel
Chat with websites and enrich data using Parallel's web browsing and data enrichment capabilities
## Overview
Parallel provides powerful web browsing and data enrichment capabilities for your agents. Perfect for:
* **Web research** — ask questions and get answers from web content
* **Data enrichment** — automatically enhance your data with web information
* **Entity research** — gather detailed information about companies, people, or topics
## Chat with Web Action
* **What it does**: Ask questions and get answers by browsing and analyzing web content in real-time.
 ### Inputs
* **Question**: The query or question you want answered
* **Processor**: Choose the model strength for your research needs
### Outputs
* **Response**: The response based on web research
## Web Enrichment Action
* **What it does**: Enriches your data by automatically gathering additional information about entities from the web.
### Inputs
* **Question**: The query or question you want answered
* **Processor**: Choose the model strength for your research needs
### Outputs
* **Response**: The response based on web research
## Web Enrichment Action
* **What it does**: Enriches your data by automatically gathering additional information about entities from the web.
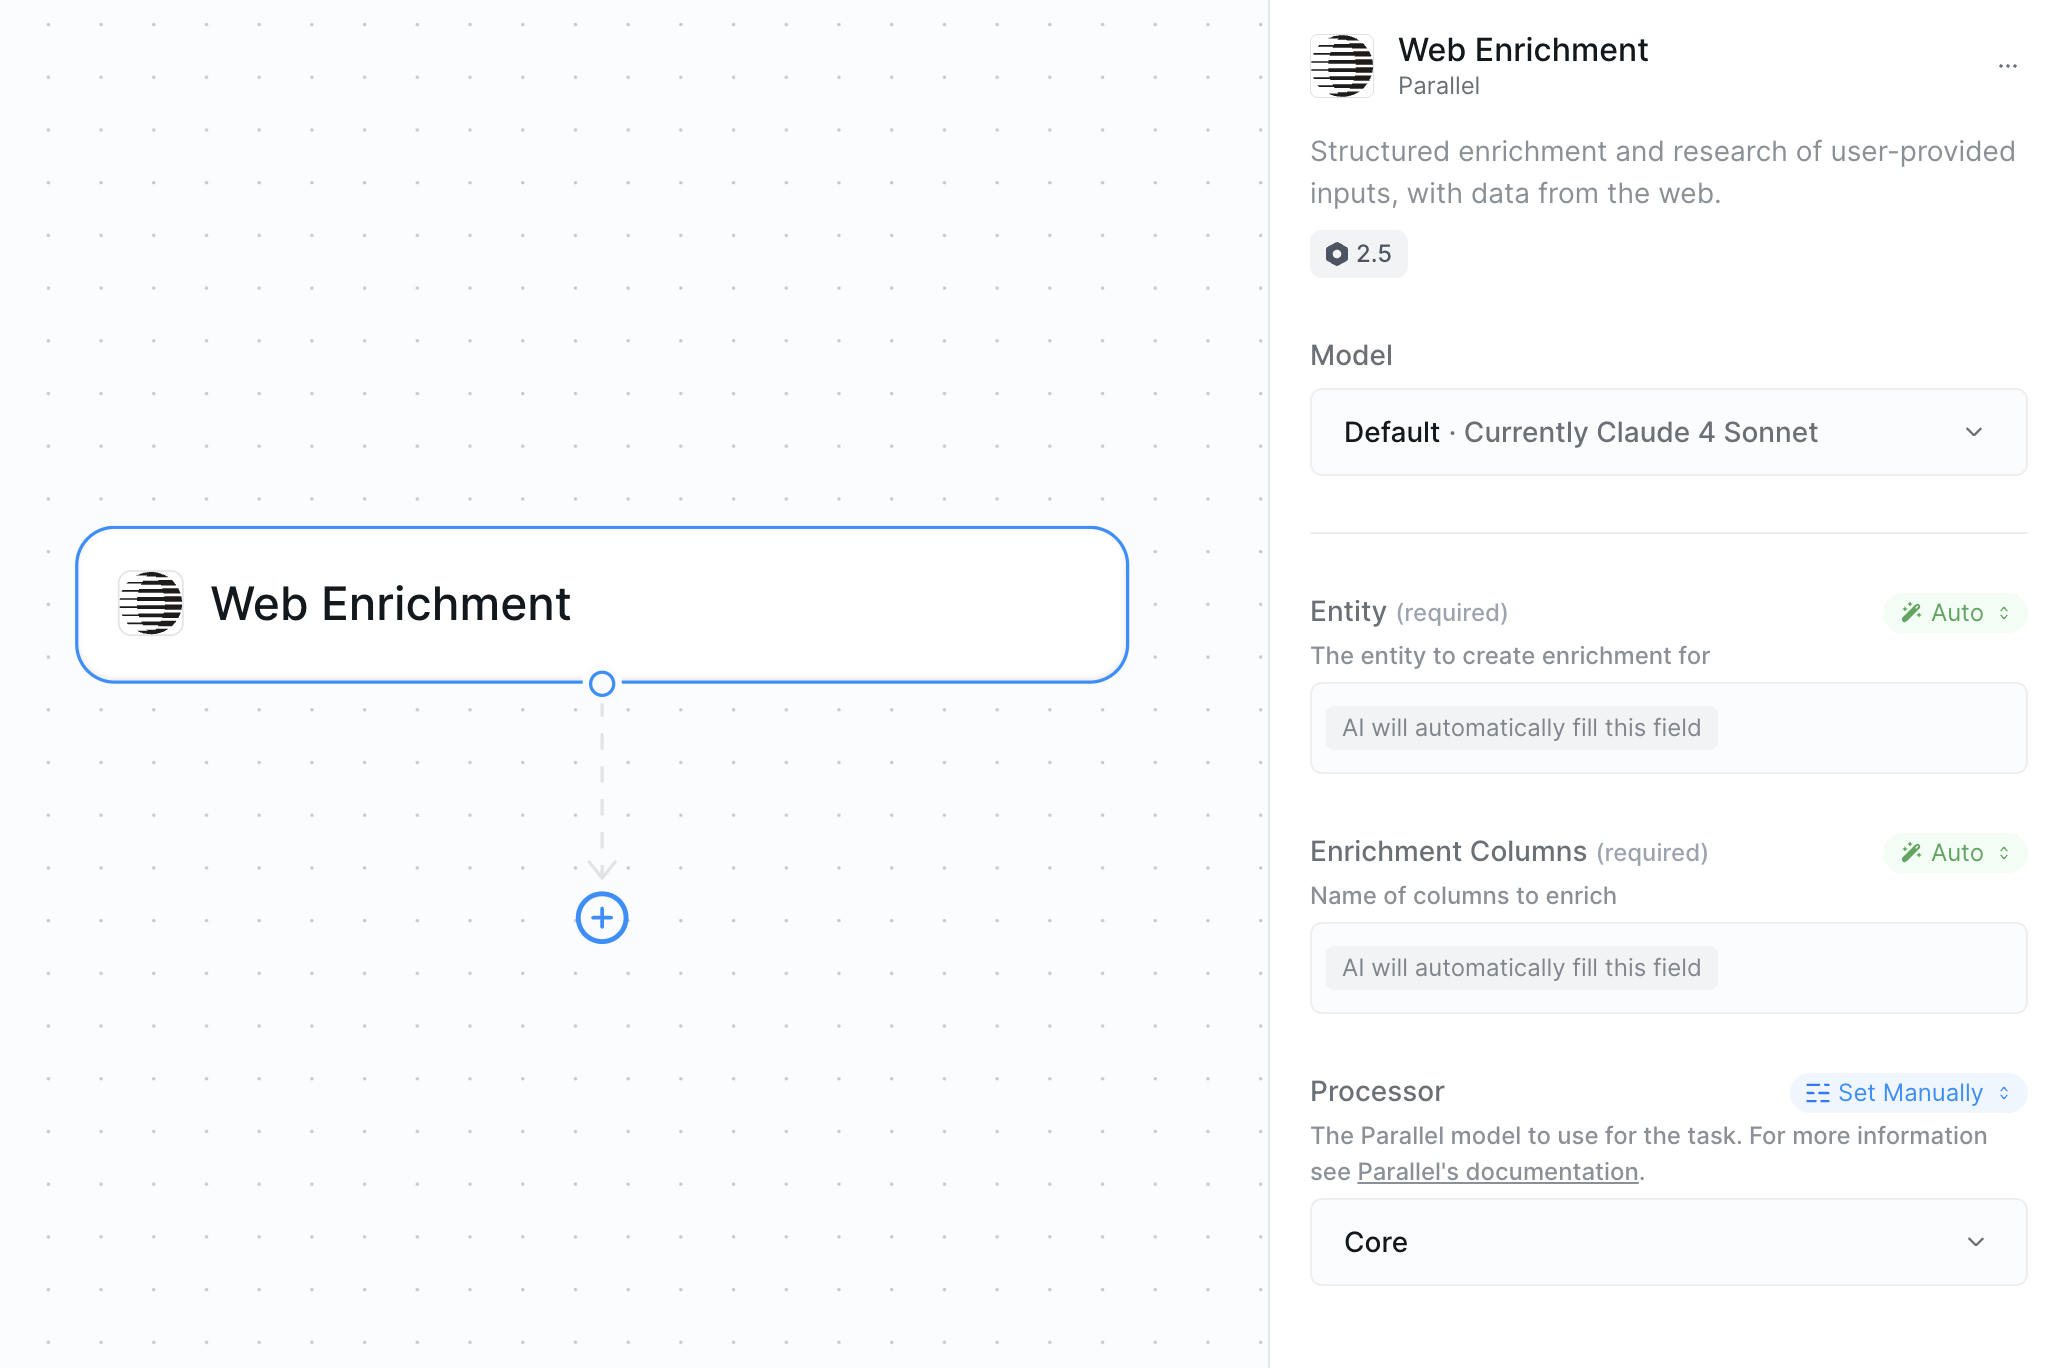 ### Inputs
* **Entity**: The thing you want to enrich (company name, person, topic, etc.)
* **Enrichment Columns**: Choose automatic enrichment or specify custom columns
* **Processor**: Choose the model strength for processing
### Example Enrichment Columns
| Entity Type | Common Columns |
| -------------------- | ---------------------------------------------------------------------- |
| **Companies** | Industry, Employee Count, Revenue, Website, Headquarters, Founded Year |
| **People** | Job Title, Company, LinkedIn Profile, Education, Location |
| **General Entities** | Description, Category, Related Links, Key Facts |
### Outputs
* **Enriched Data**: Enhanced information about your entity
## Processor Selection
Both actions use the same processor options:
| Processor | Description | Strength |
| --------- | ----------------------------------------- | -------- |
| **Lite** | Basic web browsing and research | ⭐ |
| **Base** | Standard processing with better analysis | ⭐⭐ |
| **Core** | Enhanced capabilities for complex tasks | ⭐⭐⭐ |
| **Pro** | Advanced processing with detailed results | ⭐⭐⭐⭐ |
| **Ultra** | Maximum capability for thorough research | ⭐⭐⭐⭐⭐ |
Core processor provides good balance of speed and detail for most research tasks.
## Best Practices
* Be specific about what information you need
* Include context when asking about entities
* Use clear, direct questions for better results
* Specify timeframes when relevant
* Start with automatic enrichment to see available data
* Use specific columns when you know what you need
* Choose appropriate processor based on entity complexity
* Test with sample entities before processing large datasets
* When looping, set concurrency limits to prevent hitting rate limits
* Reduce parallel requests when processing large datasets
* Monitor for timeout errors and adjust concurrency accordingly
## Next Steps
Alternative web search with AI-powered research
Store research findings for your agent's memory
Save enriched data for use in other workflow steps
Extract specific data from websites
# Perplexity
Source: https://docs.lindy.ai/skills/web-browsing/perplexity
Search the web with AI-powered research using Perplexity models for real-time information.
## Overview
The Search Perplexity action gives your agent access to real-time web search with AI-powered research capabilities. Perfect for:
* **Real-time information** — access current news, trends, and up-to-date data
* **Research tasks** — get detailed answers with sources and citations
* **Fact checking** — verify claims and get authoritative information
## Search Perplexity Action
* **What it does**: Searches the web using Perplexity's AI models to provide sourced answers to your queries with real-time information.
### Inputs
* **Entity**: The thing you want to enrich (company name, person, topic, etc.)
* **Enrichment Columns**: Choose automatic enrichment or specify custom columns
* **Processor**: Choose the model strength for processing
### Example Enrichment Columns
| Entity Type | Common Columns |
| -------------------- | ---------------------------------------------------------------------- |
| **Companies** | Industry, Employee Count, Revenue, Website, Headquarters, Founded Year |
| **People** | Job Title, Company, LinkedIn Profile, Education, Location |
| **General Entities** | Description, Category, Related Links, Key Facts |
### Outputs
* **Enriched Data**: Enhanced information about your entity
## Processor Selection
Both actions use the same processor options:
| Processor | Description | Strength |
| --------- | ----------------------------------------- | -------- |
| **Lite** | Basic web browsing and research | ⭐ |
| **Base** | Standard processing with better analysis | ⭐⭐ |
| **Core** | Enhanced capabilities for complex tasks | ⭐⭐⭐ |
| **Pro** | Advanced processing with detailed results | ⭐⭐⭐⭐ |
| **Ultra** | Maximum capability for thorough research | ⭐⭐⭐⭐⭐ |
Core processor provides good balance of speed and detail for most research tasks.
## Best Practices
* Be specific about what information you need
* Include context when asking about entities
* Use clear, direct questions for better results
* Specify timeframes when relevant
* Start with automatic enrichment to see available data
* Use specific columns when you know what you need
* Choose appropriate processor based on entity complexity
* Test with sample entities before processing large datasets
* When looping, set concurrency limits to prevent hitting rate limits
* Reduce parallel requests when processing large datasets
* Monitor for timeout errors and adjust concurrency accordingly
## Next Steps
Alternative web search with AI-powered research
Store research findings for your agent's memory
Save enriched data for use in other workflow steps
Extract specific data from websites
# Perplexity
Source: https://docs.lindy.ai/skills/web-browsing/perplexity
Search the web with AI-powered research using Perplexity models for real-time information.
## Overview
The Search Perplexity action gives your agent access to real-time web search with AI-powered research capabilities. Perfect for:
* **Real-time information** — access current news, trends, and up-to-date data
* **Research tasks** — get detailed answers with sources and citations
* **Fact checking** — verify claims and get authoritative information
## Search Perplexity Action
* **What it does**: Searches the web using Perplexity's AI models to provide sourced answers to your queries with real-time information.
 ### Inputs
* **Query**: The search query or question you want answered
* **Model**: Choose from Perplexity's model lineup based on your needs
### Outputs
* **Response**: The answer to your query
* **Citations**: Sources and references used in the response
### Query Options
You have two ways to set the query:
* **Manual Query**: Write your search query directly
* **AI-Generated Query**: Let your agent craft the optimal query based on workflow context
### Model Selection
| Model | Description | Strength |
| ----------------------- | --------------------------------------------- | -------- |
| **Sonar** | Quick research and basic searches | ⭐ |
| **Sonar Pro** | Better searches with more detailed results | ⭐⭐ |
| **Sonar Reasoning** | Adds reasoning capabilities to search results | ⭐⭐⭐ |
| **Sonar Reasoning Pro** | Advanced reasoning with better analysis | ⭐⭐⭐⭐ |
| **Sonar Deep Research** | Uses Perplexity's deep research function | ⭐⭐⭐⭐⭐ |
Sonar Reasoning Pro is recommended for most use cases as it provides the best balance of reasoning capability, search quality, and performance.
## Best Practices
* Be specific about what information you need
* Include timeframes when relevant ("latest", "2024", "recent")
* Use AI query generation when context is important
* Test different phrasings for complex topics
* Include industry or domain context for better results
* Start with lower-tier models for simple queries
* Use Deep Research for comprehensive analysis
* Consider cost vs. thoroughness trade-offs
* Use Reasoning models when you need logical connections
* Scale model choice to query complexity
## Next Steps
Extract specific data from websites found in your research
Store important research findings for your agent's memory
Save search results for use in other workflow steps
Analyze Perplexity results with custom AI prompts
# Web Browser
Source: https://docs.lindy.ai/skills/web-browsing/web-browser
Search the internet and extract text from webpages using built-in web browsing capabilities
## Overview
Web Browser actions provide direct access to internet search and webpage content extraction. Perfect for:
* **Internet search** — search Google and other search engines for information
* **Text extraction** — convert webpages and PDFs into readable text
* **Research workflows** — gather and process web content for analysis
## Search the Internet Action
* **What it does**: Searches the internet using your chosen search engine to find relevant results for your query.
### Inputs
* **Query**: The search query or question you want answered
* **Model**: Choose from Perplexity's model lineup based on your needs
### Outputs
* **Response**: The answer to your query
* **Citations**: Sources and references used in the response
### Query Options
You have two ways to set the query:
* **Manual Query**: Write your search query directly
* **AI-Generated Query**: Let your agent craft the optimal query based on workflow context
### Model Selection
| Model | Description | Strength |
| ----------------------- | --------------------------------------------- | -------- |
| **Sonar** | Quick research and basic searches | ⭐ |
| **Sonar Pro** | Better searches with more detailed results | ⭐⭐ |
| **Sonar Reasoning** | Adds reasoning capabilities to search results | ⭐⭐⭐ |
| **Sonar Reasoning Pro** | Advanced reasoning with better analysis | ⭐⭐⭐⭐ |
| **Sonar Deep Research** | Uses Perplexity's deep research function | ⭐⭐⭐⭐⭐ |
Sonar Reasoning Pro is recommended for most use cases as it provides the best balance of reasoning capability, search quality, and performance.
## Best Practices
* Be specific about what information you need
* Include timeframes when relevant ("latest", "2024", "recent")
* Use AI query generation when context is important
* Test different phrasings for complex topics
* Include industry or domain context for better results
* Start with lower-tier models for simple queries
* Use Deep Research for comprehensive analysis
* Consider cost vs. thoroughness trade-offs
* Use Reasoning models when you need logical connections
* Scale model choice to query complexity
## Next Steps
Extract specific data from websites found in your research
Store important research findings for your agent's memory
Save search results for use in other workflow steps
Analyze Perplexity results with custom AI prompts
# Web Browser
Source: https://docs.lindy.ai/skills/web-browsing/web-browser
Search the internet and extract text from webpages using built-in web browsing capabilities
## Overview
Web Browser actions provide direct access to internet search and webpage content extraction. Perfect for:
* **Internet search** — search Google and other search engines for information
* **Text extraction** — convert webpages and PDFs into readable text
* **Research workflows** — gather and process web content for analysis
## Search the Internet Action
* **What it does**: Searches the internet using your chosen search engine to find relevant results for your query.
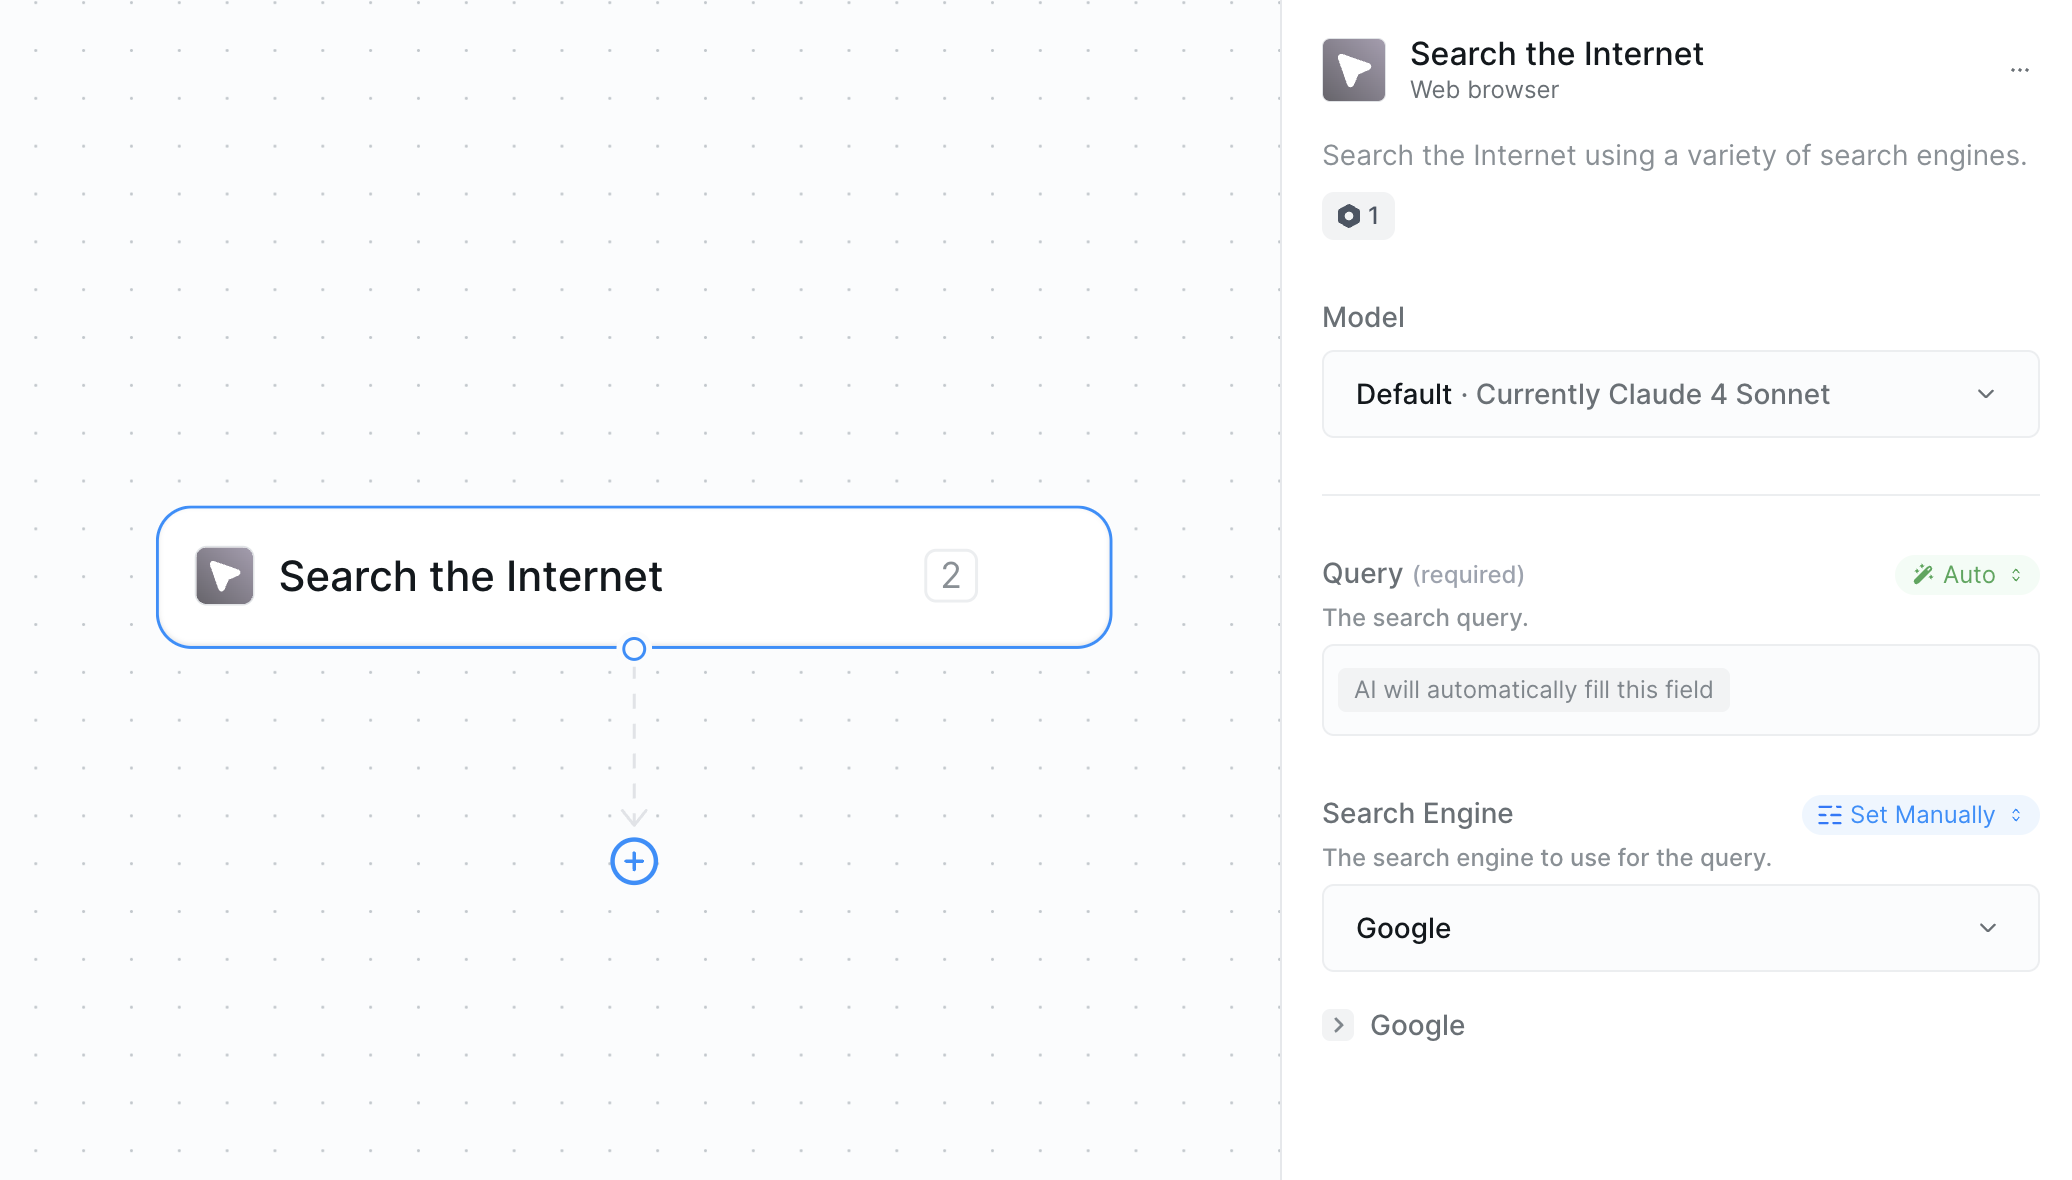 ### Inputs
* **Query**: The search terms or question you want to search for
* **Search Engine**: Choose your preferred search engine (Google is most common)
### Outputs
* **Search Results**: List of relevant websites and information found
This action becomes particularly powerful when used inside an AI agent, as the agent can formulate search queries based on context and process the results intelligently.
## Extract Webpage Text Action
* **What it does**: Converts webpages or PDFs into clean, readable text that can be processed by your agent.
### Inputs
* **Query**: The search terms or question you want to search for
* **Search Engine**: Choose your preferred search engine (Google is most common)
### Outputs
* **Search Results**: List of relevant websites and information found
This action becomes particularly powerful when used inside an AI agent, as the agent can formulate search queries based on context and process the results intelligently.
## Extract Webpage Text Action
* **What it does**: Converts webpages or PDFs into clean, readable text that can be processed by your agent.
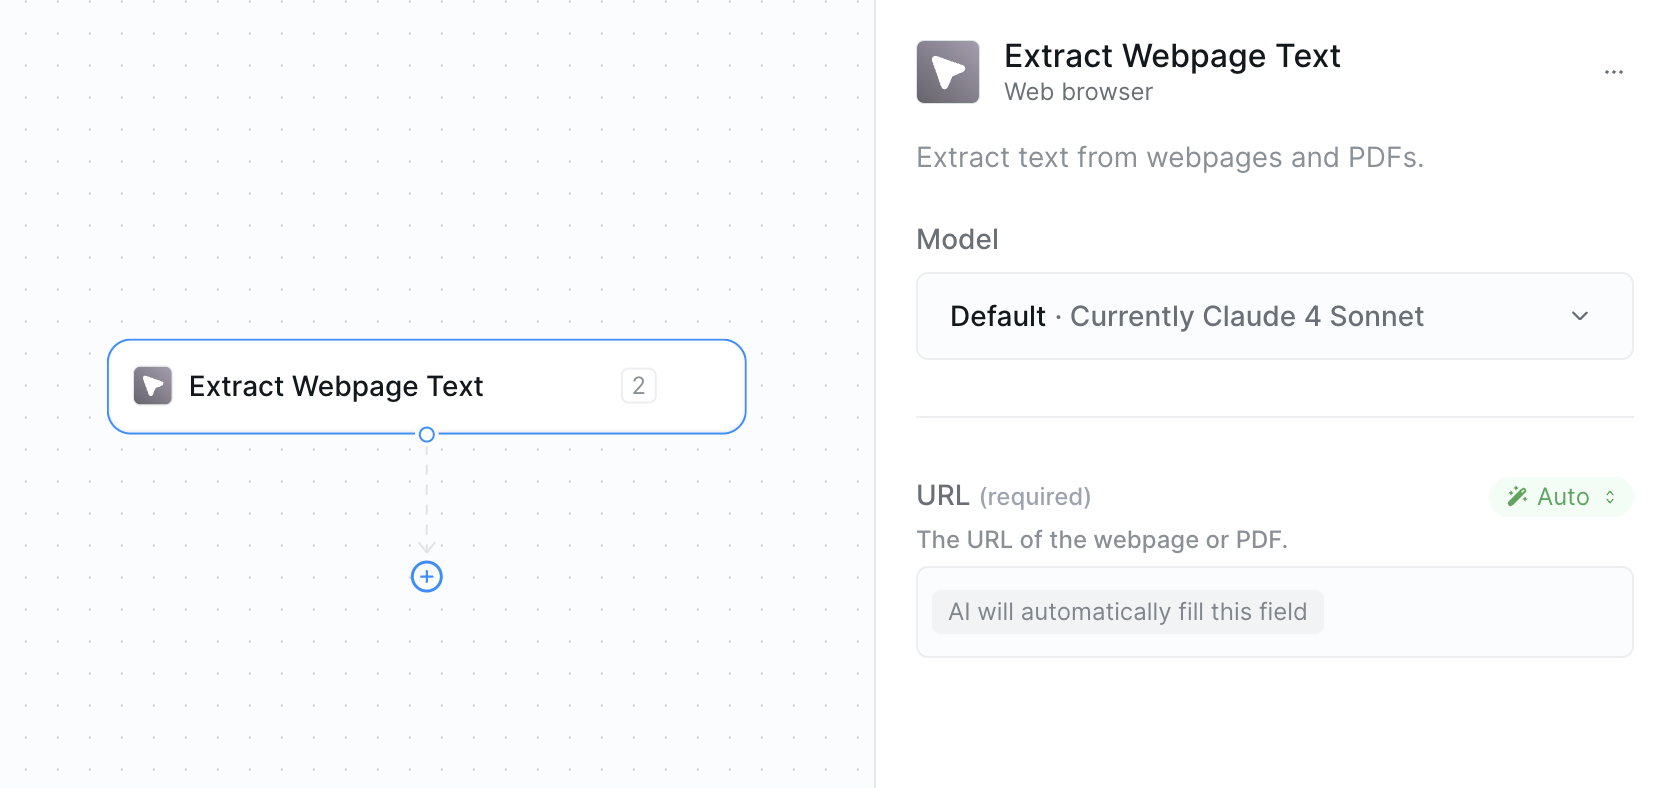 ### Inputs
* **URL**: The webpage or PDF URL you want to extract text from
### Outputs
* **Extracted Text**: Clean text content from the webpage or PDF
This is straightforward but essential for processing web content — just provide any webpage or PDF URL and get back the text content.
## Other Web Browsing Actions
The Web Browser also includes several other specialized actions:
* **Contact Details Scraper** — Extract contact information from websites
* **RAG Web Browser** — Advanced browsing for AI applications
* **Similarweb Scraper** — Get website analytics and traffic data
* **Website Content Crawler** — Crawl entire websites for content
## Best Practices
* Use specific, targeted search queries for better results
* Let AI agents formulate queries based on workflow context
* Combine with other actions to process search results
* Test different search engines for specific use cases
* Verify URLs are accessible before extraction
* Handle extraction errors gracefully in workflows
* Process extracted text with other actions for analysis
* Be mindful of large documents that may hit processing limits
## Next Steps
AI-powered search with reasoning capabilities
Store search results and extracted text
Save web content for later processing
Analyze extracted text with custom prompts
# Quickstart
Source: https://docs.lindy.ai/start-here/quickstart
Build your first AI email assistant in under 5 minutes
Time to complete: `5 minutes`\
Difficulty: `Beginner`\
What you'll build: `An AI email assistant that automatically responds to inquiries`
## Building Your First Agent
In this guide, you'll learn how to build your first AI email assistant. This will take less than five minutes, and after you're done, you'll have an email responder (because no one loves to answer emails themselves).
You'll create an AI agent that:
1. **Monitors your Gmail** for incoming emails
2. **Filters emails intelligently** using conditions to identify business inquiries
3. **Searches your knowledge base** (your website) for relevant information
4. **Automatically responds** with helpful, accurate information
5. **Keeps you in the loop** by BCC'ing you on all responses
## Overview
Here's exactly what we'll do:
Create a new Lindy agent and add a Gmail trigger to monitor incoming emails
Add a condition to filter for business inquiries
Add your website as a knowledge base and configure Gmail actions for automated replies
Test your agent with a real email and monitor its performance
Let's get started!
## Step 1: Create a New Lindy & Add a Trigger
Click the "New Lindy" button below Home in the top left of your workspace to begin building your AI agent.
### Inputs
* **URL**: The webpage or PDF URL you want to extract text from
### Outputs
* **Extracted Text**: Clean text content from the webpage or PDF
This is straightforward but essential for processing web content — just provide any webpage or PDF URL and get back the text content.
## Other Web Browsing Actions
The Web Browser also includes several other specialized actions:
* **Contact Details Scraper** — Extract contact information from websites
* **RAG Web Browser** — Advanced browsing for AI applications
* **Similarweb Scraper** — Get website analytics and traffic data
* **Website Content Crawler** — Crawl entire websites for content
## Best Practices
* Use specific, targeted search queries for better results
* Let AI agents formulate queries based on workflow context
* Combine with other actions to process search results
* Test different search engines for specific use cases
* Verify URLs are accessible before extraction
* Handle extraction errors gracefully in workflows
* Process extracted text with other actions for analysis
* Be mindful of large documents that may hit processing limits
## Next Steps
AI-powered search with reasoning capabilities
Store search results and extracted text
Save web content for later processing
Analyze extracted text with custom prompts
# Quickstart
Source: https://docs.lindy.ai/start-here/quickstart
Build your first AI email assistant in under 5 minutes
Time to complete: `5 minutes`\
Difficulty: `Beginner`\
What you'll build: `An AI email assistant that automatically responds to inquiries`
## Building Your First Agent
In this guide, you'll learn how to build your first AI email assistant. This will take less than five minutes, and after you're done, you'll have an email responder (because no one loves to answer emails themselves).
You'll create an AI agent that:
1. **Monitors your Gmail** for incoming emails
2. **Filters emails intelligently** using conditions to identify business inquiries
3. **Searches your knowledge base** (your website) for relevant information
4. **Automatically responds** with helpful, accurate information
5. **Keeps you in the loop** by BCC'ing you on all responses
## Overview
Here's exactly what we'll do:
Create a new Lindy agent and add a Gmail trigger to monitor incoming emails
Add a condition to filter for business inquiries
Add your website as a knowledge base and configure Gmail actions for automated replies
Test your agent with a real email and monitor its performance
Let's get started!
## Step 1: Create a New Lindy & Add a Trigger
Click the "New Lindy" button below Home in the top left of your workspace to begin building your AI agent.
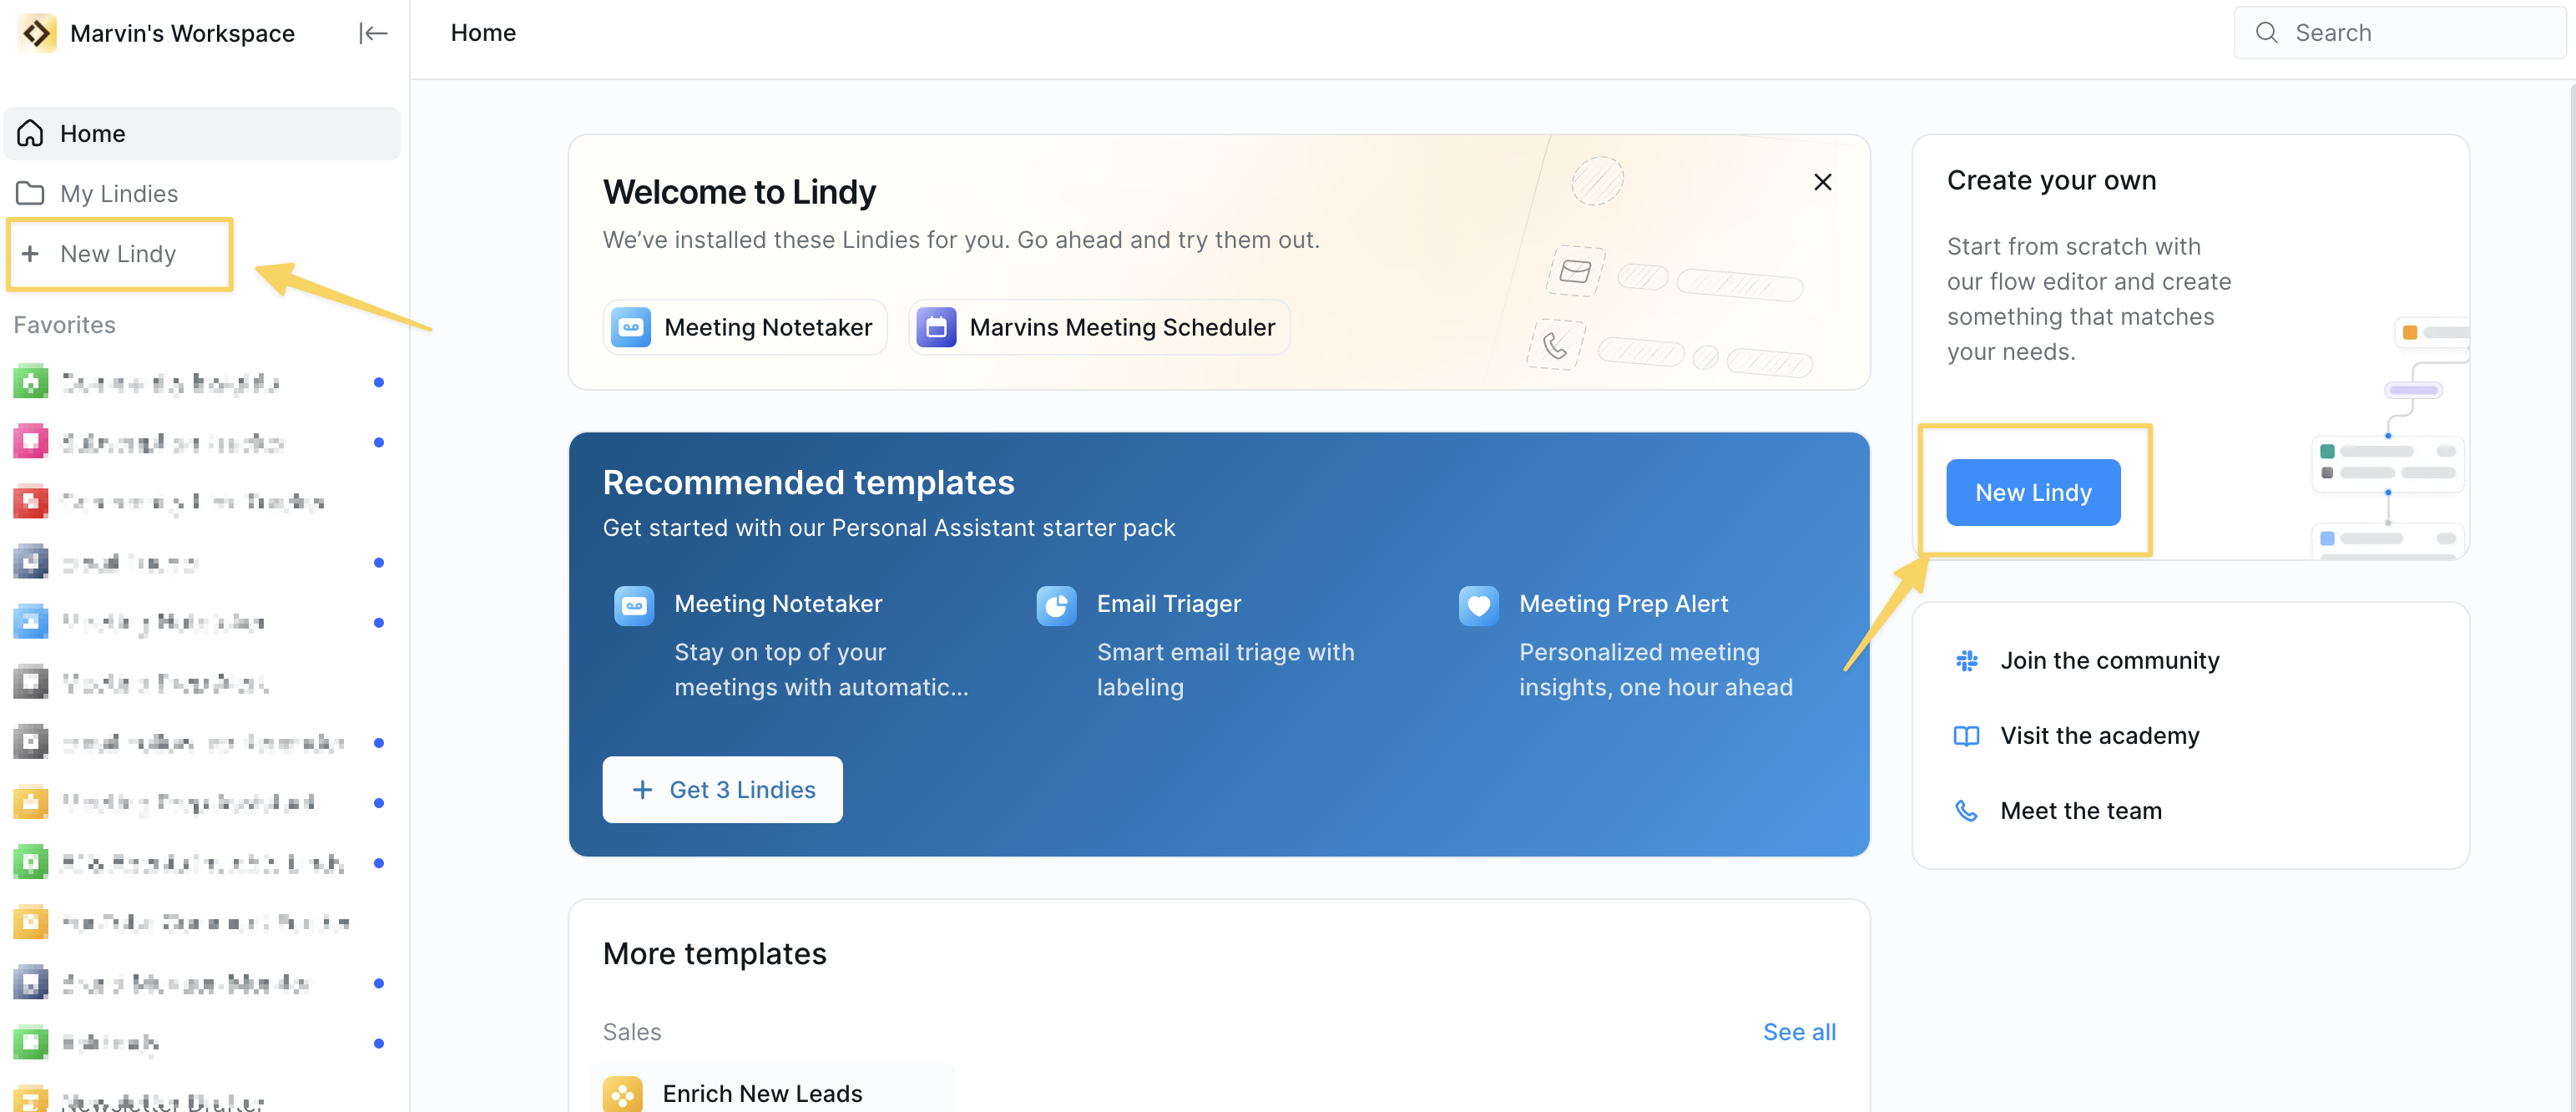 Click "Start from scratch" to create a new AI agent.
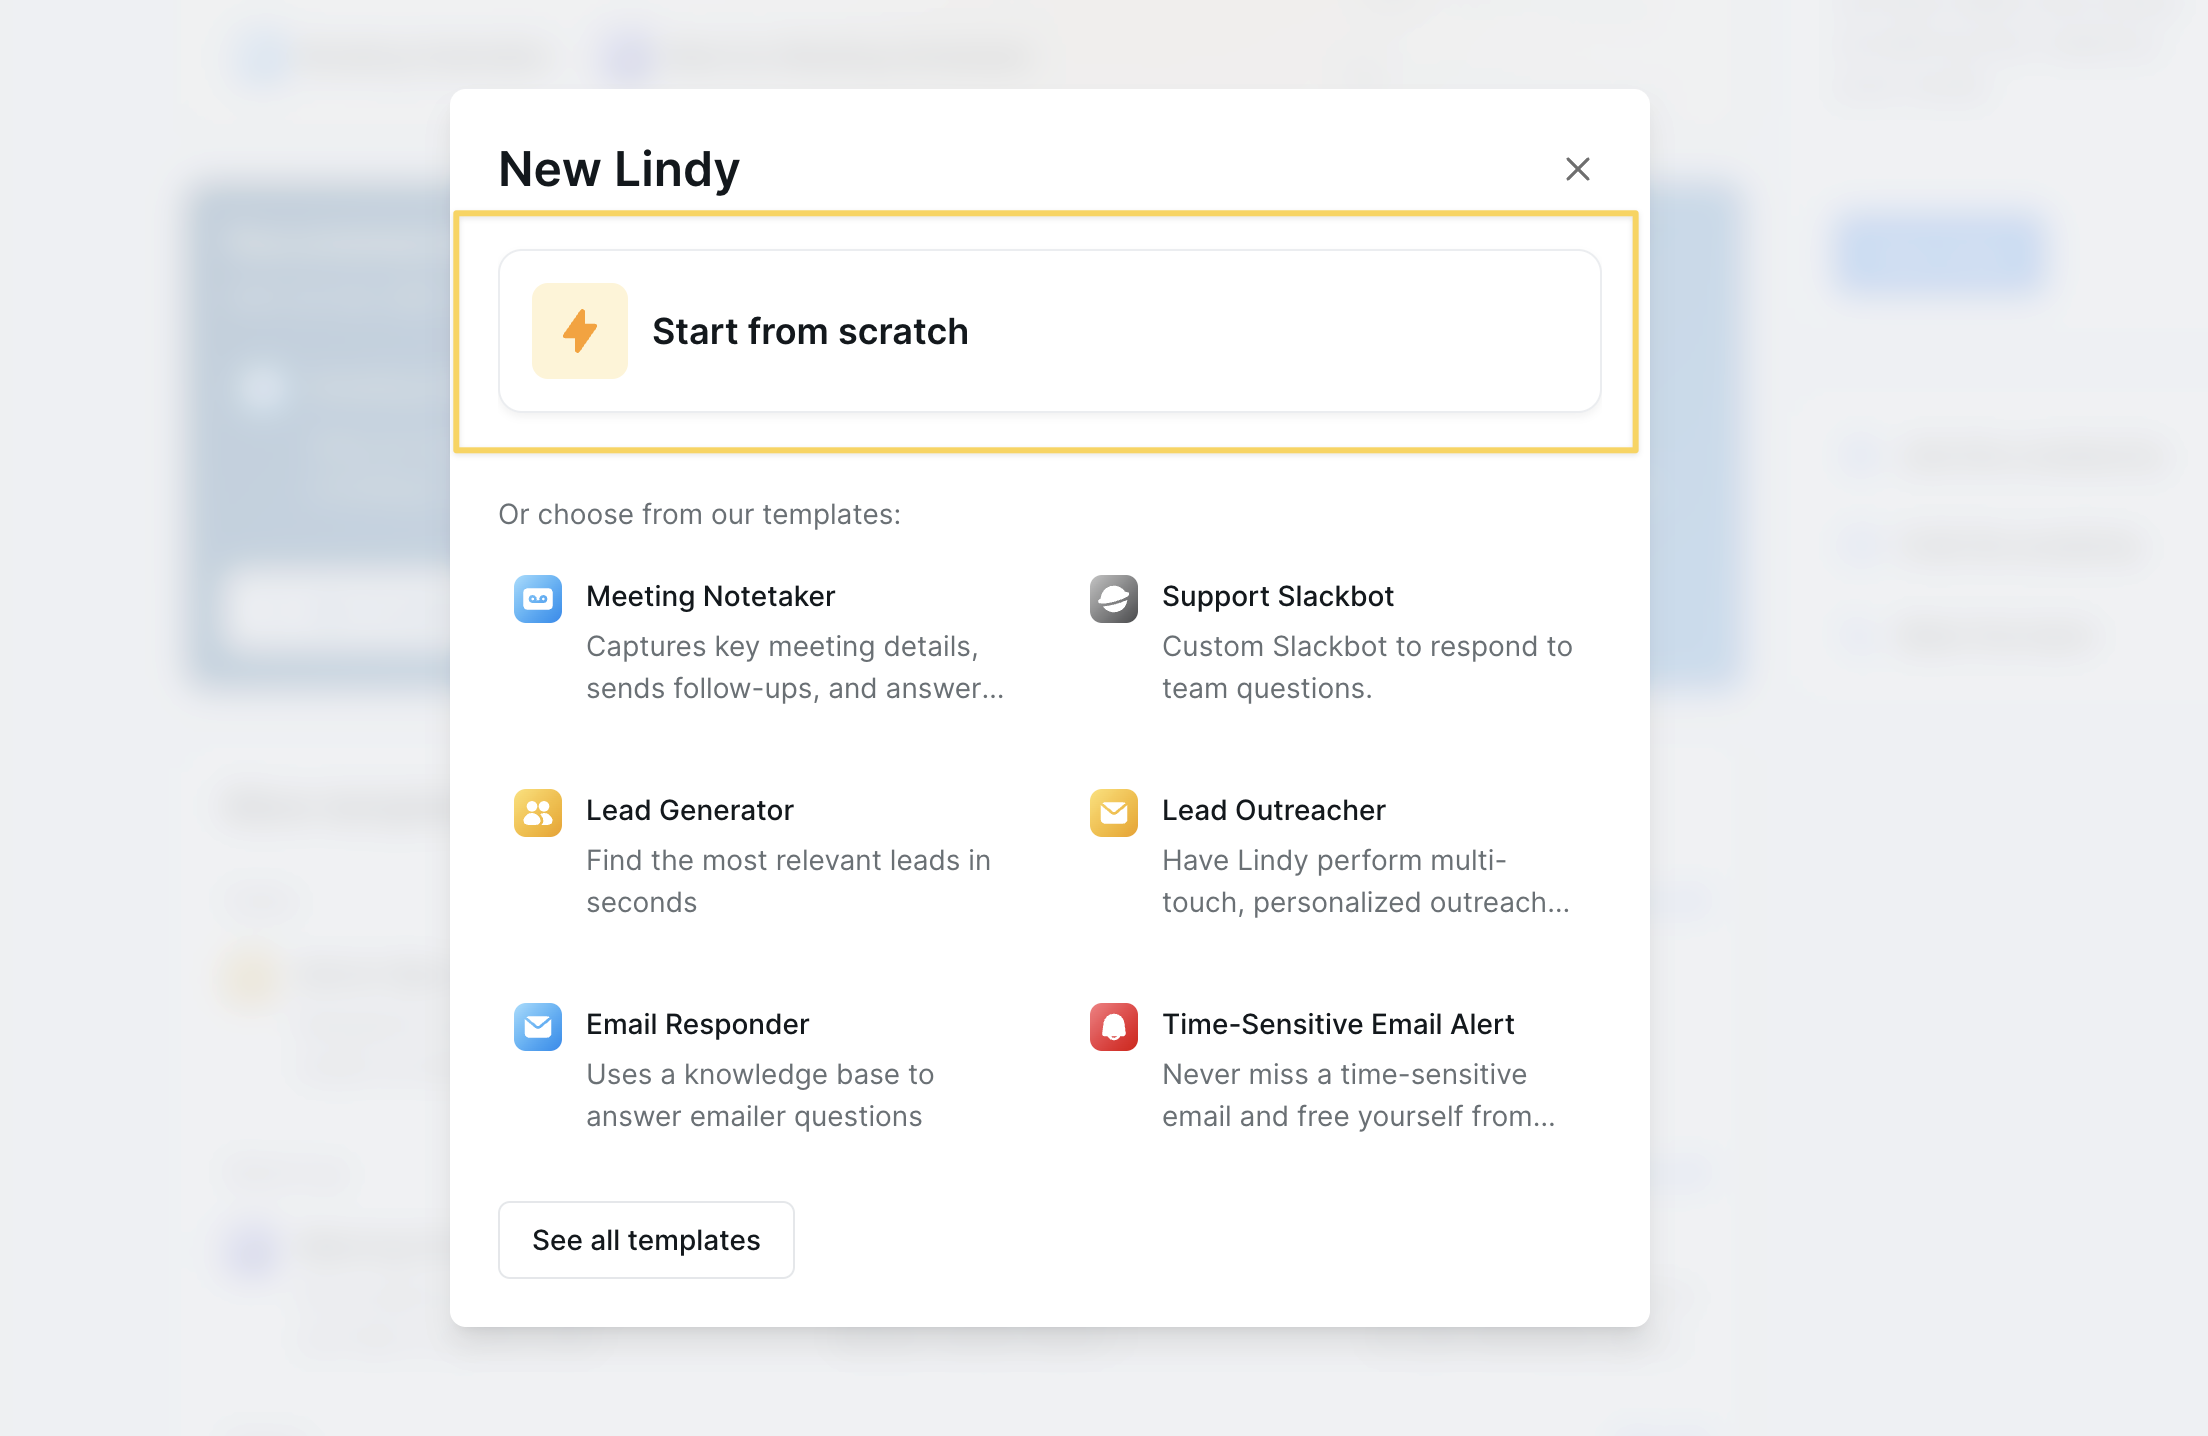 Now let's add the trigger.
Triggers wake up your AI agent when something happens, like getting a new email. [Learn more about triggers](https://docs.lindy.ai/fundamentals/lindy-101/triggers).
Use filters to make your triggers more specific and reduce costs. [Learn about cost optimization](https://docs.lindy.ai/fundamentals/account-billing/credit-optimizations).
### Setting up the Email Trigger
**Steps:**
1. Click **"Select Trigger"**
2. Click **Gmail**
3. Add the **Email Received** trigger
4. Connect the Gmail account you want your AI agent to monitor
## Step 2: Add a Condition
What are conditions?
[Conditions](https://docs.lindy.ai/fundamentals/lindy-101/conditions) let you define different paths in your automation based on specific criteria. They help your AI agent make smart decisions about which emails to respond to.
Now that your AI agent wakes up with every email, let's set a condition to define which emails deserve a response.
Click the `Condition` step under `Perform an action` and `Search knowledge base.`
Now let's add the trigger.
Triggers wake up your AI agent when something happens, like getting a new email. [Learn more about triggers](https://docs.lindy.ai/fundamentals/lindy-101/triggers).
Use filters to make your triggers more specific and reduce costs. [Learn about cost optimization](https://docs.lindy.ai/fundamentals/account-billing/credit-optimizations).
### Setting up the Email Trigger
**Steps:**
1. Click **"Select Trigger"**
2. Click **Gmail**
3. Add the **Email Received** trigger
4. Connect the Gmail account you want your AI agent to monitor
## Step 2: Add a Condition
What are conditions?
[Conditions](https://docs.lindy.ai/fundamentals/lindy-101/conditions) let you define different paths in your automation based on specific criteria. They help your AI agent make smart decisions about which emails to respond to.
Now that your AI agent wakes up with every email, let's set a condition to define which emails deserve a response.
Click the `Condition` step under `Perform an action` and `Search knowledge base.`
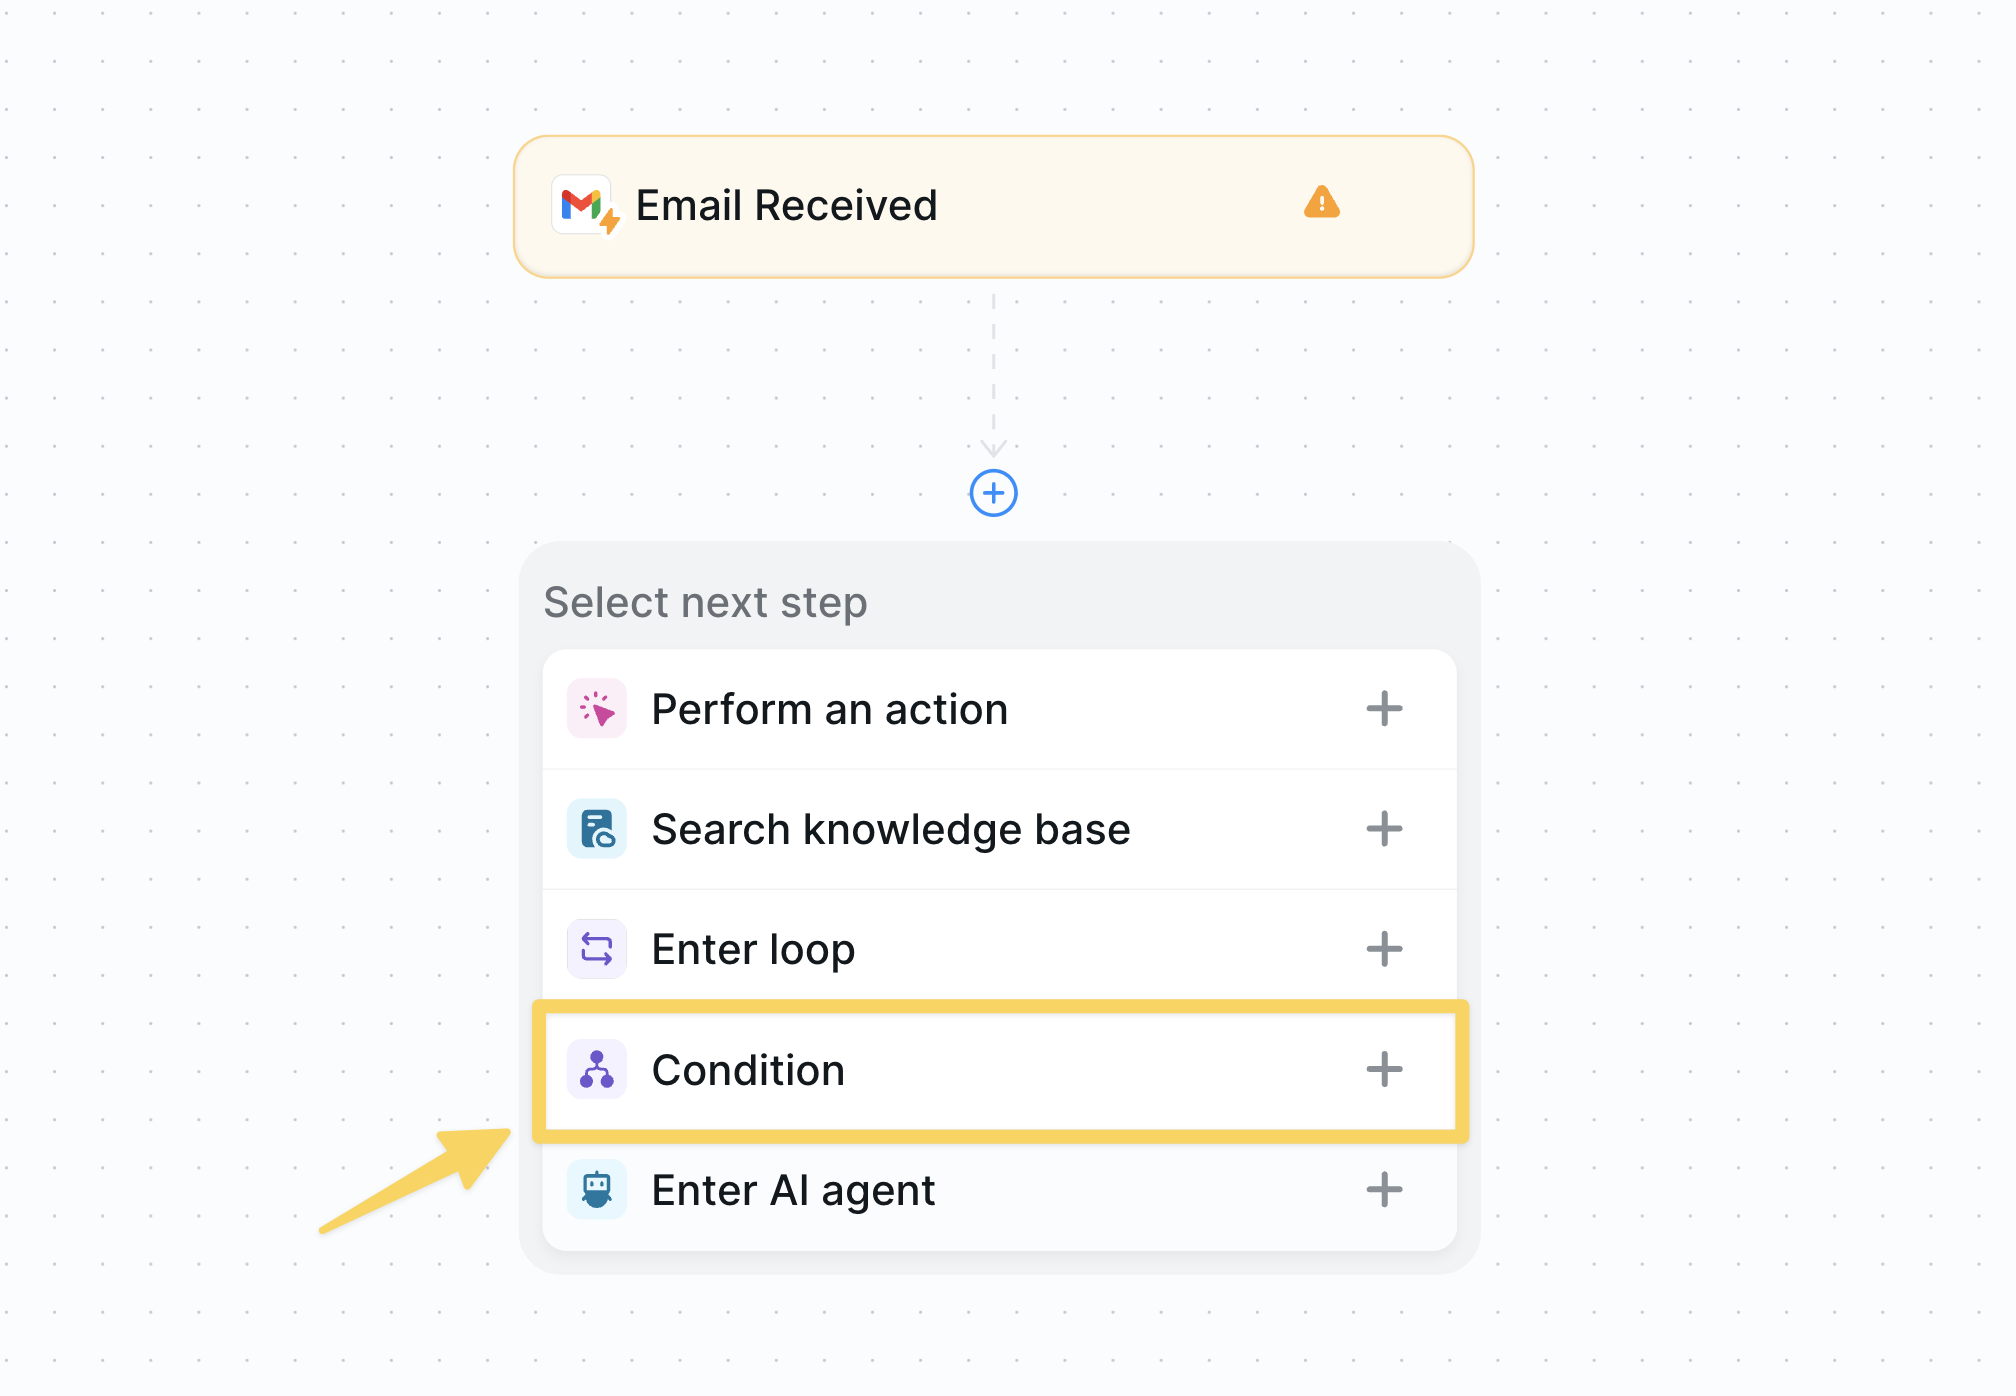 ### Configure Your Condition
Lindy will only proceed to the next step if the condition is met. Each condition begins with `Go down this path if...`
Set your condition prompt to:
```text
the emailer is asking a question about my service, product, or company
```
With this prompt, your AI agent will only continue if it receives relevant business inquiries.
### Configure Your Condition
Lindy will only proceed to the next step if the condition is met. Each condition begins with `Go down this path if...`
Set your condition prompt to:
```text
the emailer is asking a question about my service, product, or company
```
With this prompt, your AI agent will only continue if it receives relevant business inquiries.
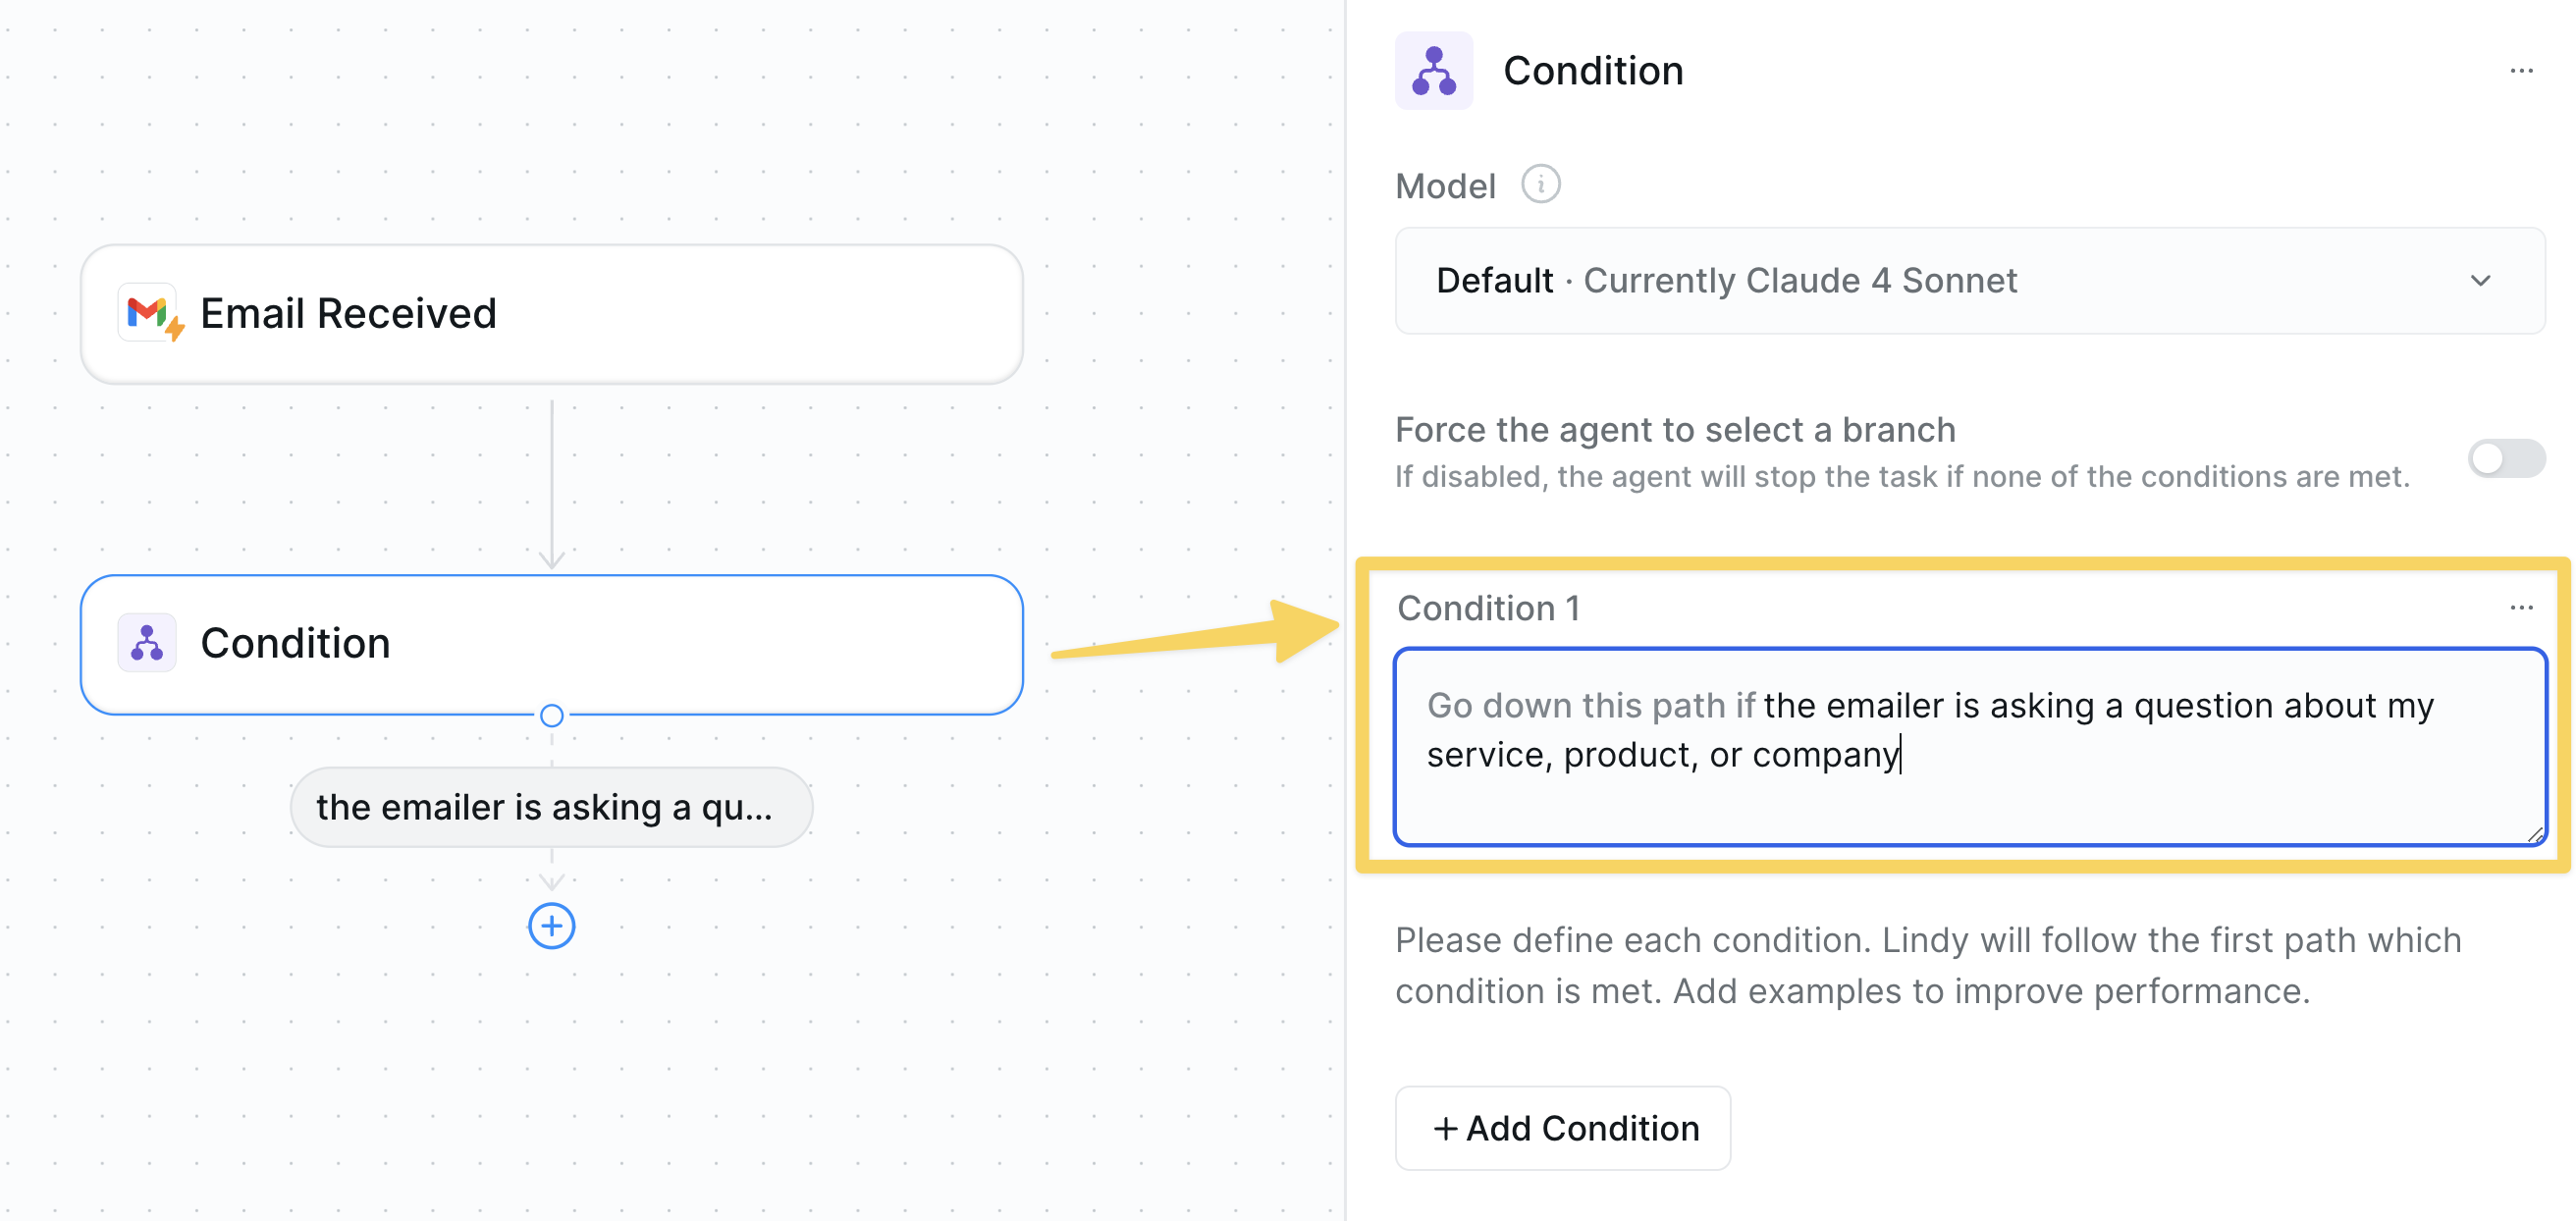 ## Step 4: Add a Knowledge Base & Actions
The [Knowledge Base](https://docs.lindy.ai/fundamentals/lindy-101/knowledge-base) is a repository of data from which your AI agent retrieves information. AI agents search through knowledge bases semantically, finding results whose meaning is similar, even if the exact text doesn't match.
For example, searching for "refunds" will also find entries related to "returns."
Now we'll give your AI agent knowledge about your business so it knows how to respond accurately.
1. Click "Add step" and select "Search knowledge base"
2. Click "Website"
3. Enter your company website URL and click "Crawl"
Your agent will now have access to all your website content to answer questions accurately.
### Add an Action
[Actions](/core-concepts/actions) are tasks your AI agent performs, such as replying to emails, updating a HubSpot CRM, or creating a Notion page.
Your AI agent now receives emails and searches your website for relevant information. The final step is configuring how it responds.
Click "Add step" (the blue plus sign beneath the Knowledge Base) and select "Perform an action."
## Step 4: Add a Knowledge Base & Actions
The [Knowledge Base](https://docs.lindy.ai/fundamentals/lindy-101/knowledge-base) is a repository of data from which your AI agent retrieves information. AI agents search through knowledge bases semantically, finding results whose meaning is similar, even if the exact text doesn't match.
For example, searching for "refunds" will also find entries related to "returns."
Now we'll give your AI agent knowledge about your business so it knows how to respond accurately.
1. Click "Add step" and select "Search knowledge base"
2. Click "Website"
3. Enter your company website URL and click "Crawl"
Your agent will now have access to all your website content to answer questions accurately.
### Add an Action
[Actions](/core-concepts/actions) are tasks your AI agent performs, such as replying to emails, updating a HubSpot CRM, or creating a Notion page.
Your AI agent now receives emails and searches your website for relevant information. The final step is configuring how it responds.
Click "Add step" (the blue plus sign beneath the Knowledge Base) and select "Perform an action."
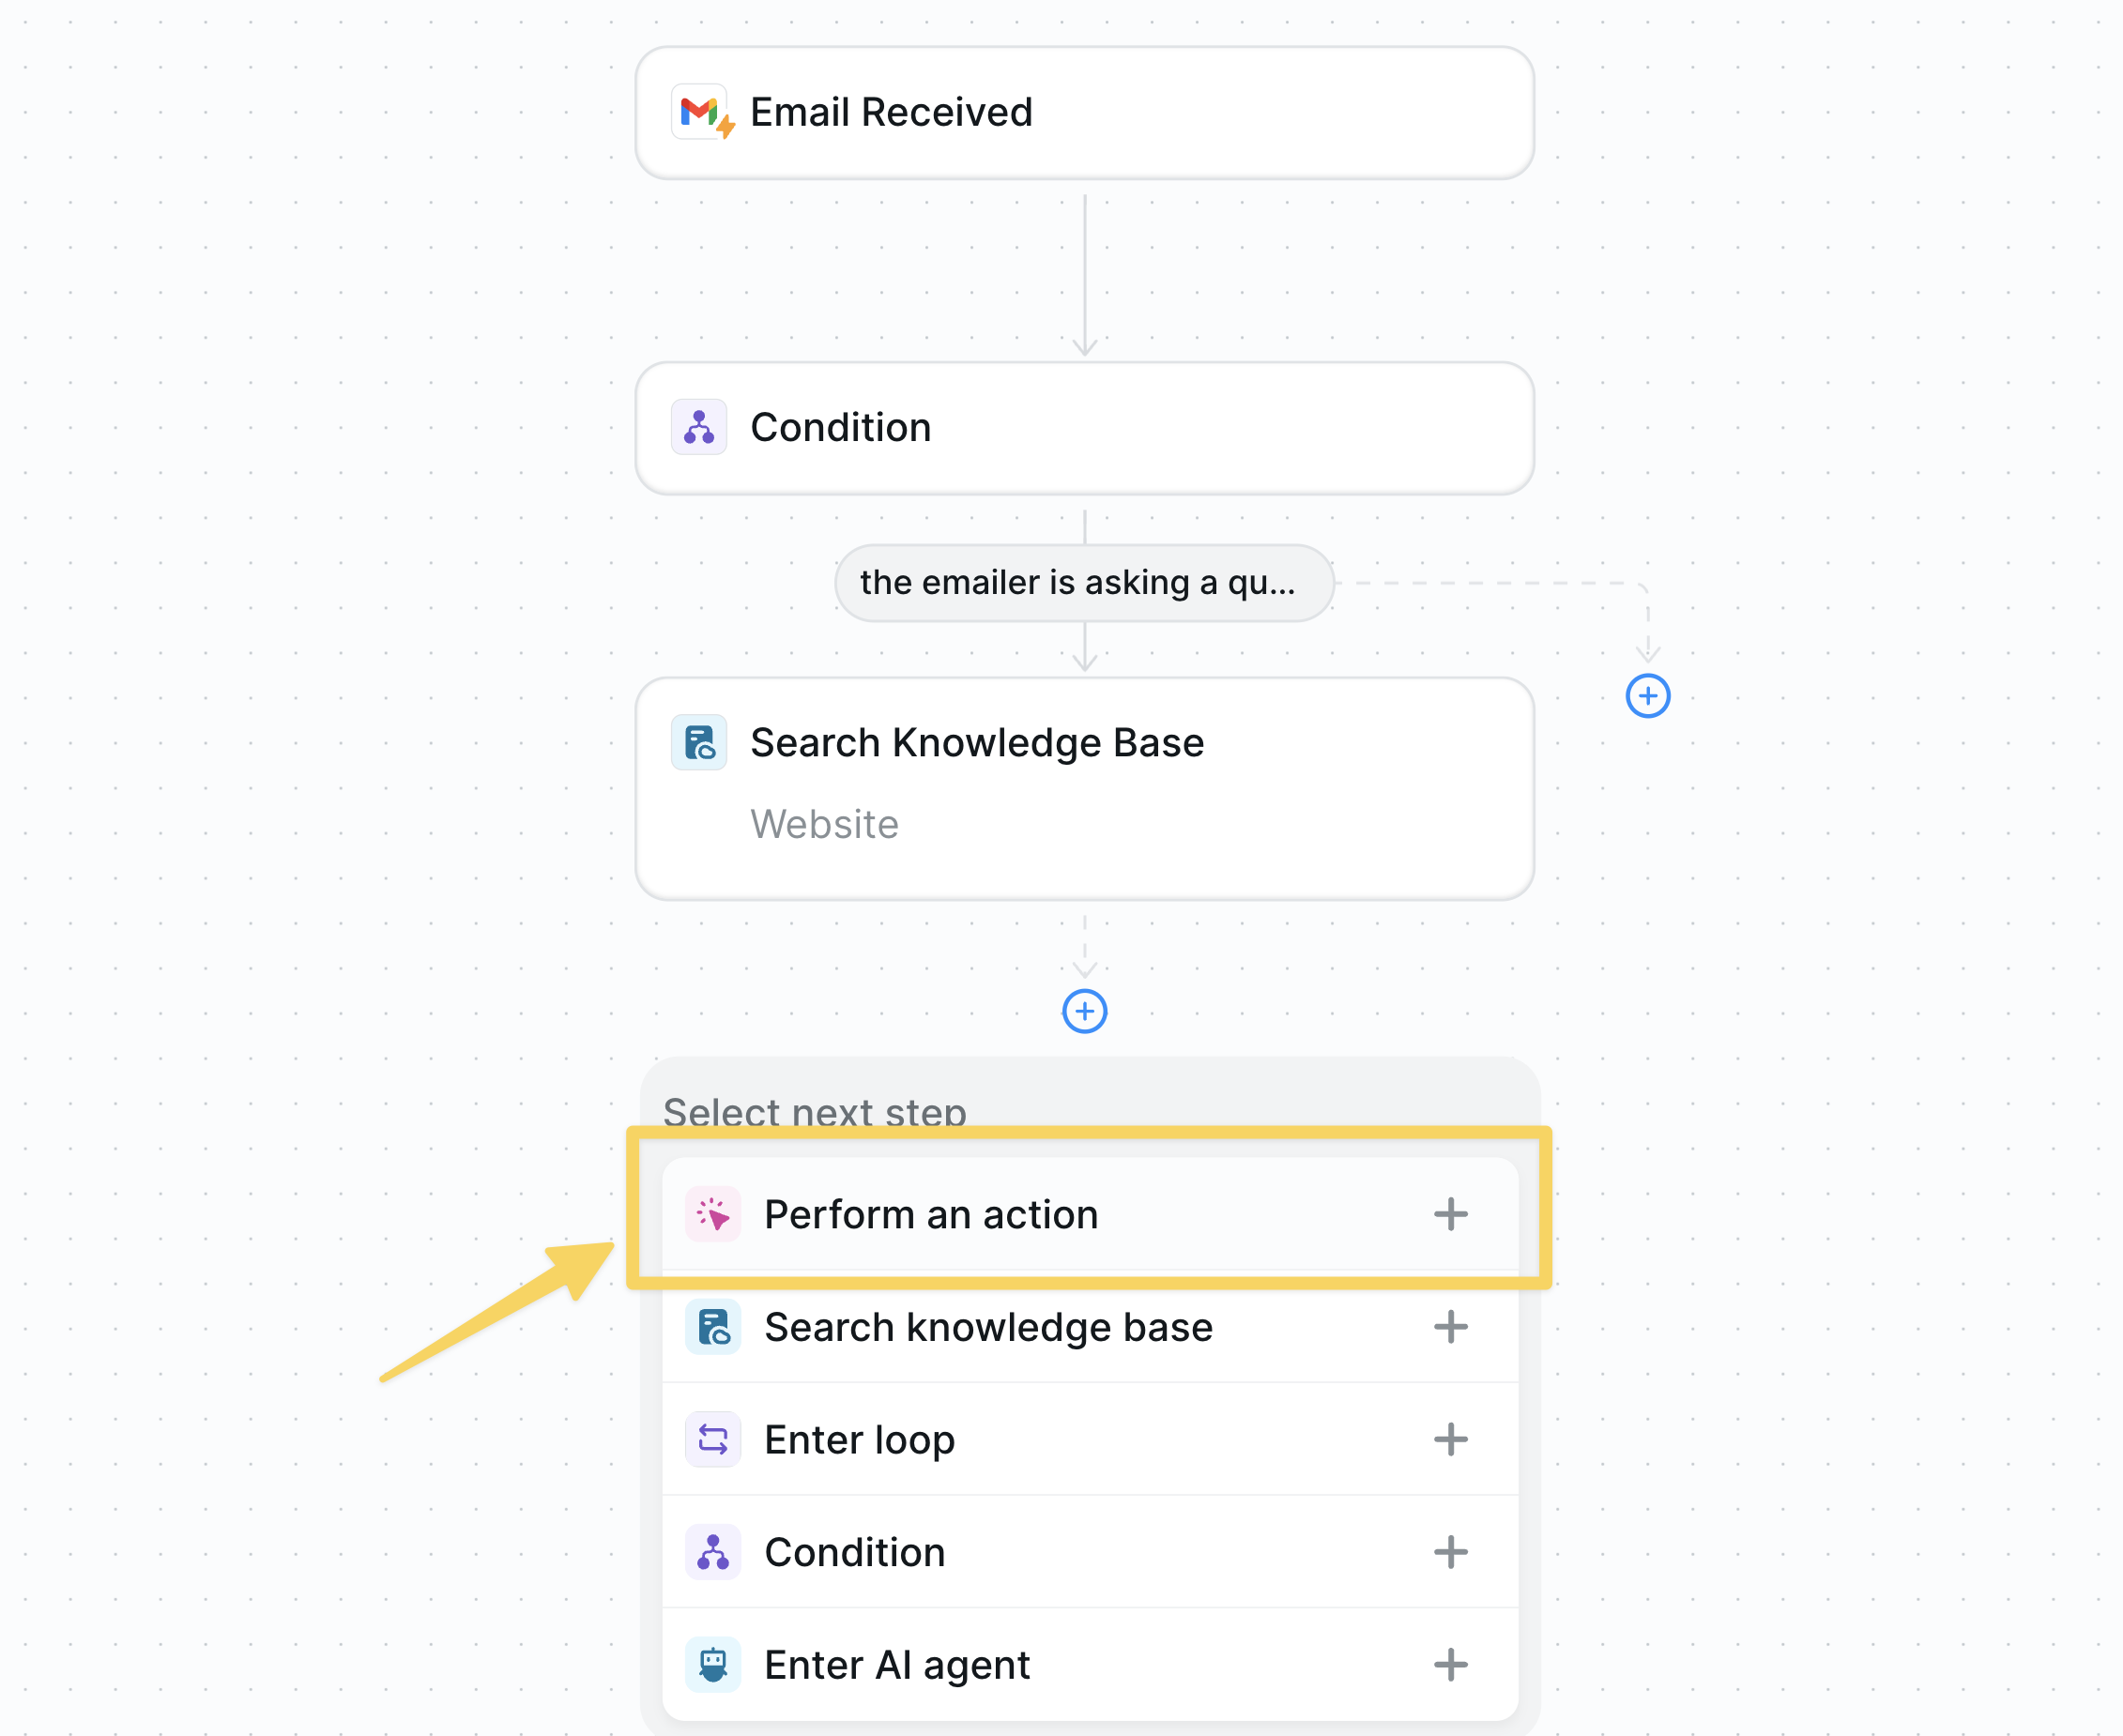 Click the Gmail action in the ´Linked Actions´ section to ensure your AI agent responds in the same email thread.
Select "Gmail Send Reply" to configure your response action.
### Configure Your Response
Now customize how your AI agent crafts responses using your knowledge base.
1. Ensure the **Body** field is set to **"Prompt AI"**
2. Add this prompt to instruct your AI agent:
```
You are a competent email responder that will use context from a knowledge base
to succinctly respond to emailers' questions about my service, product, or company.
ONLY respond with exact information extracted from the knowledge base and keep
emails friendly and informative. Never more than 3 sentences.
```
The "Reply To" field defaults to "All," ensuring your AI agent responds to the sender and anyone else included in the email thread.
Click the Gmail action in the ´Linked Actions´ section to ensure your AI agent responds in the same email thread.
Select "Gmail Send Reply" to configure your response action.
### Configure Your Response
Now customize how your AI agent crafts responses using your knowledge base.
1. Ensure the **Body** field is set to **"Prompt AI"**
2. Add this prompt to instruct your AI agent:
```
You are a competent email responder that will use context from a knowledge base
to succinctly respond to emailers' questions about my service, product, or company.
ONLY respond with exact information extracted from the knowledge base and keep
emails friendly and informative. Never more than 3 sentences.
```
The "Reply To" field defaults to "All," ensuring your AI agent responds to the sender and anyone else included in the email thread.
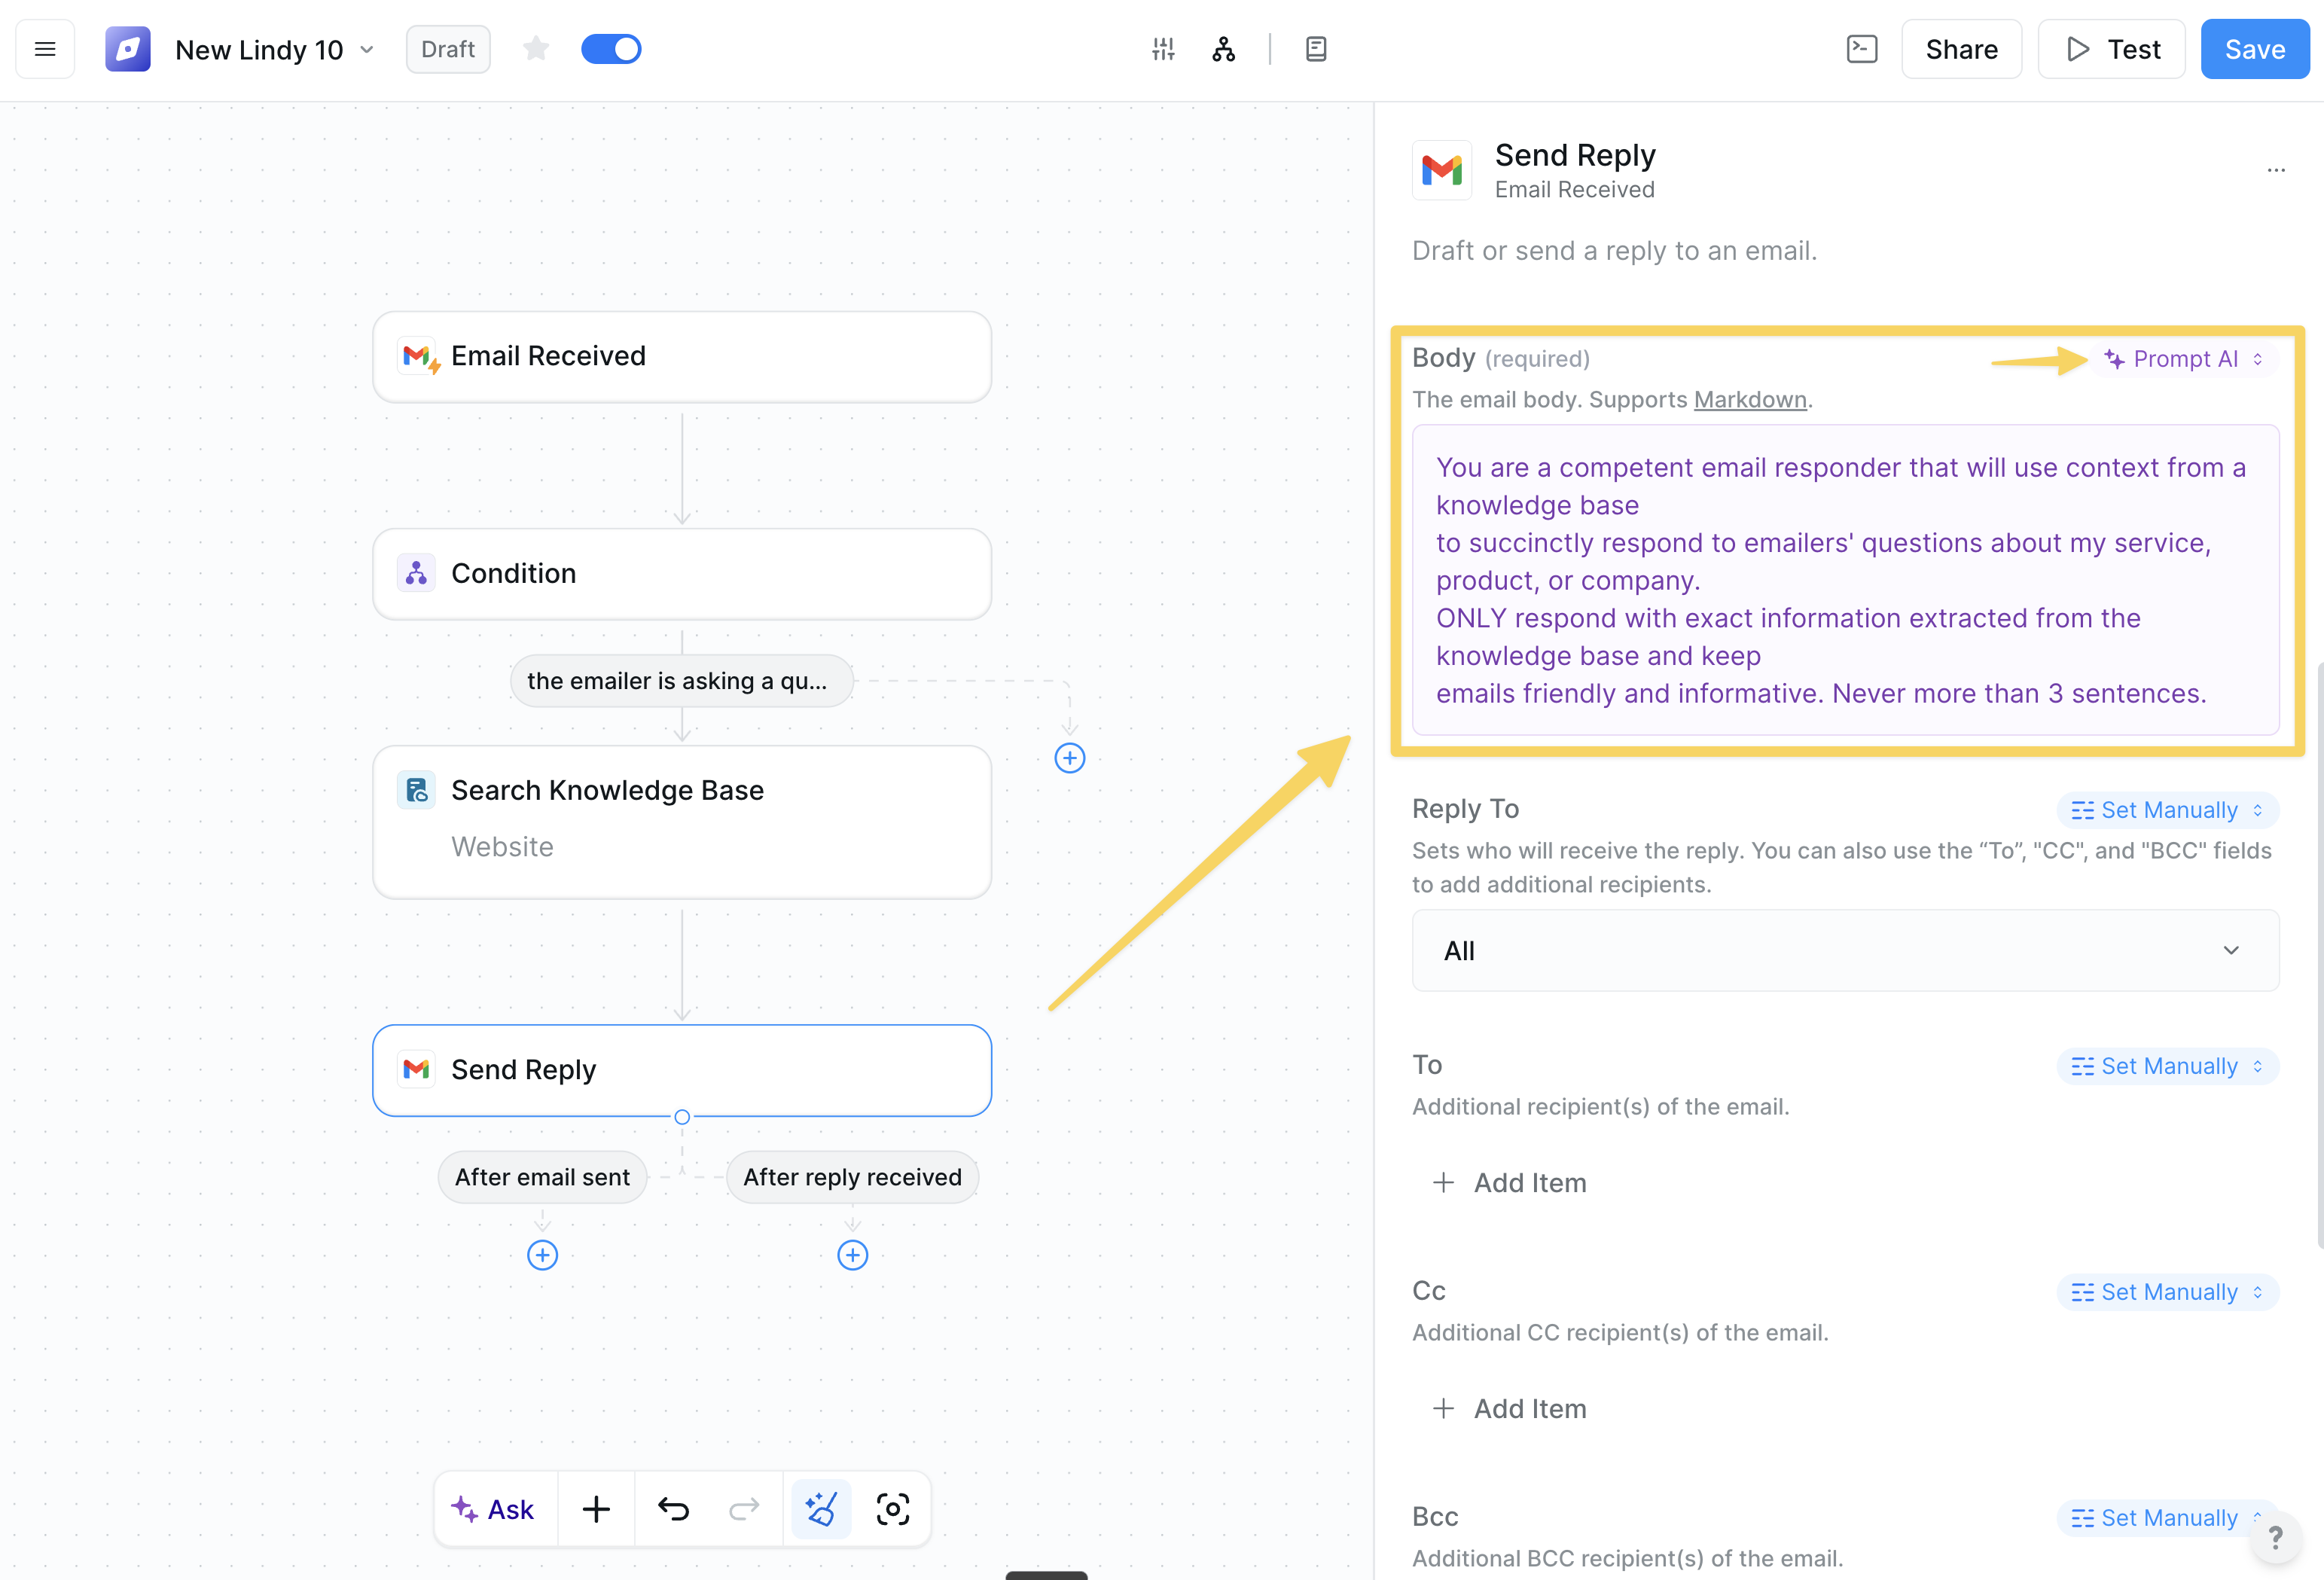 Pro tip: BCC yourself on responses to monitor your AI agent's performance.
Set the BCC field to "Set Manually" and enter your email address. This gives you visibility into all responses without cluttering the recipient's inbox.
## Step 6: Test Your Agent
Time to see your AI agent in action!
1. Click the `Save` button to save your workflow
2. Send yourself a test email from a different address (personal email works great) with a question about your business
3. Click "Test Mode" and select your test email
Pro tip: BCC yourself on responses to monitor your AI agent's performance.
Set the BCC field to "Set Manually" and enter your email address. This gives you visibility into all responses without cluttering the recipient's inbox.
## Step 6: Test Your Agent
Time to see your AI agent in action!
1. Click the `Save` button to save your workflow
2. Send yourself a test email from a different address (personal email works great) with a question about your business
3. Click "Test Mode" and select your test email
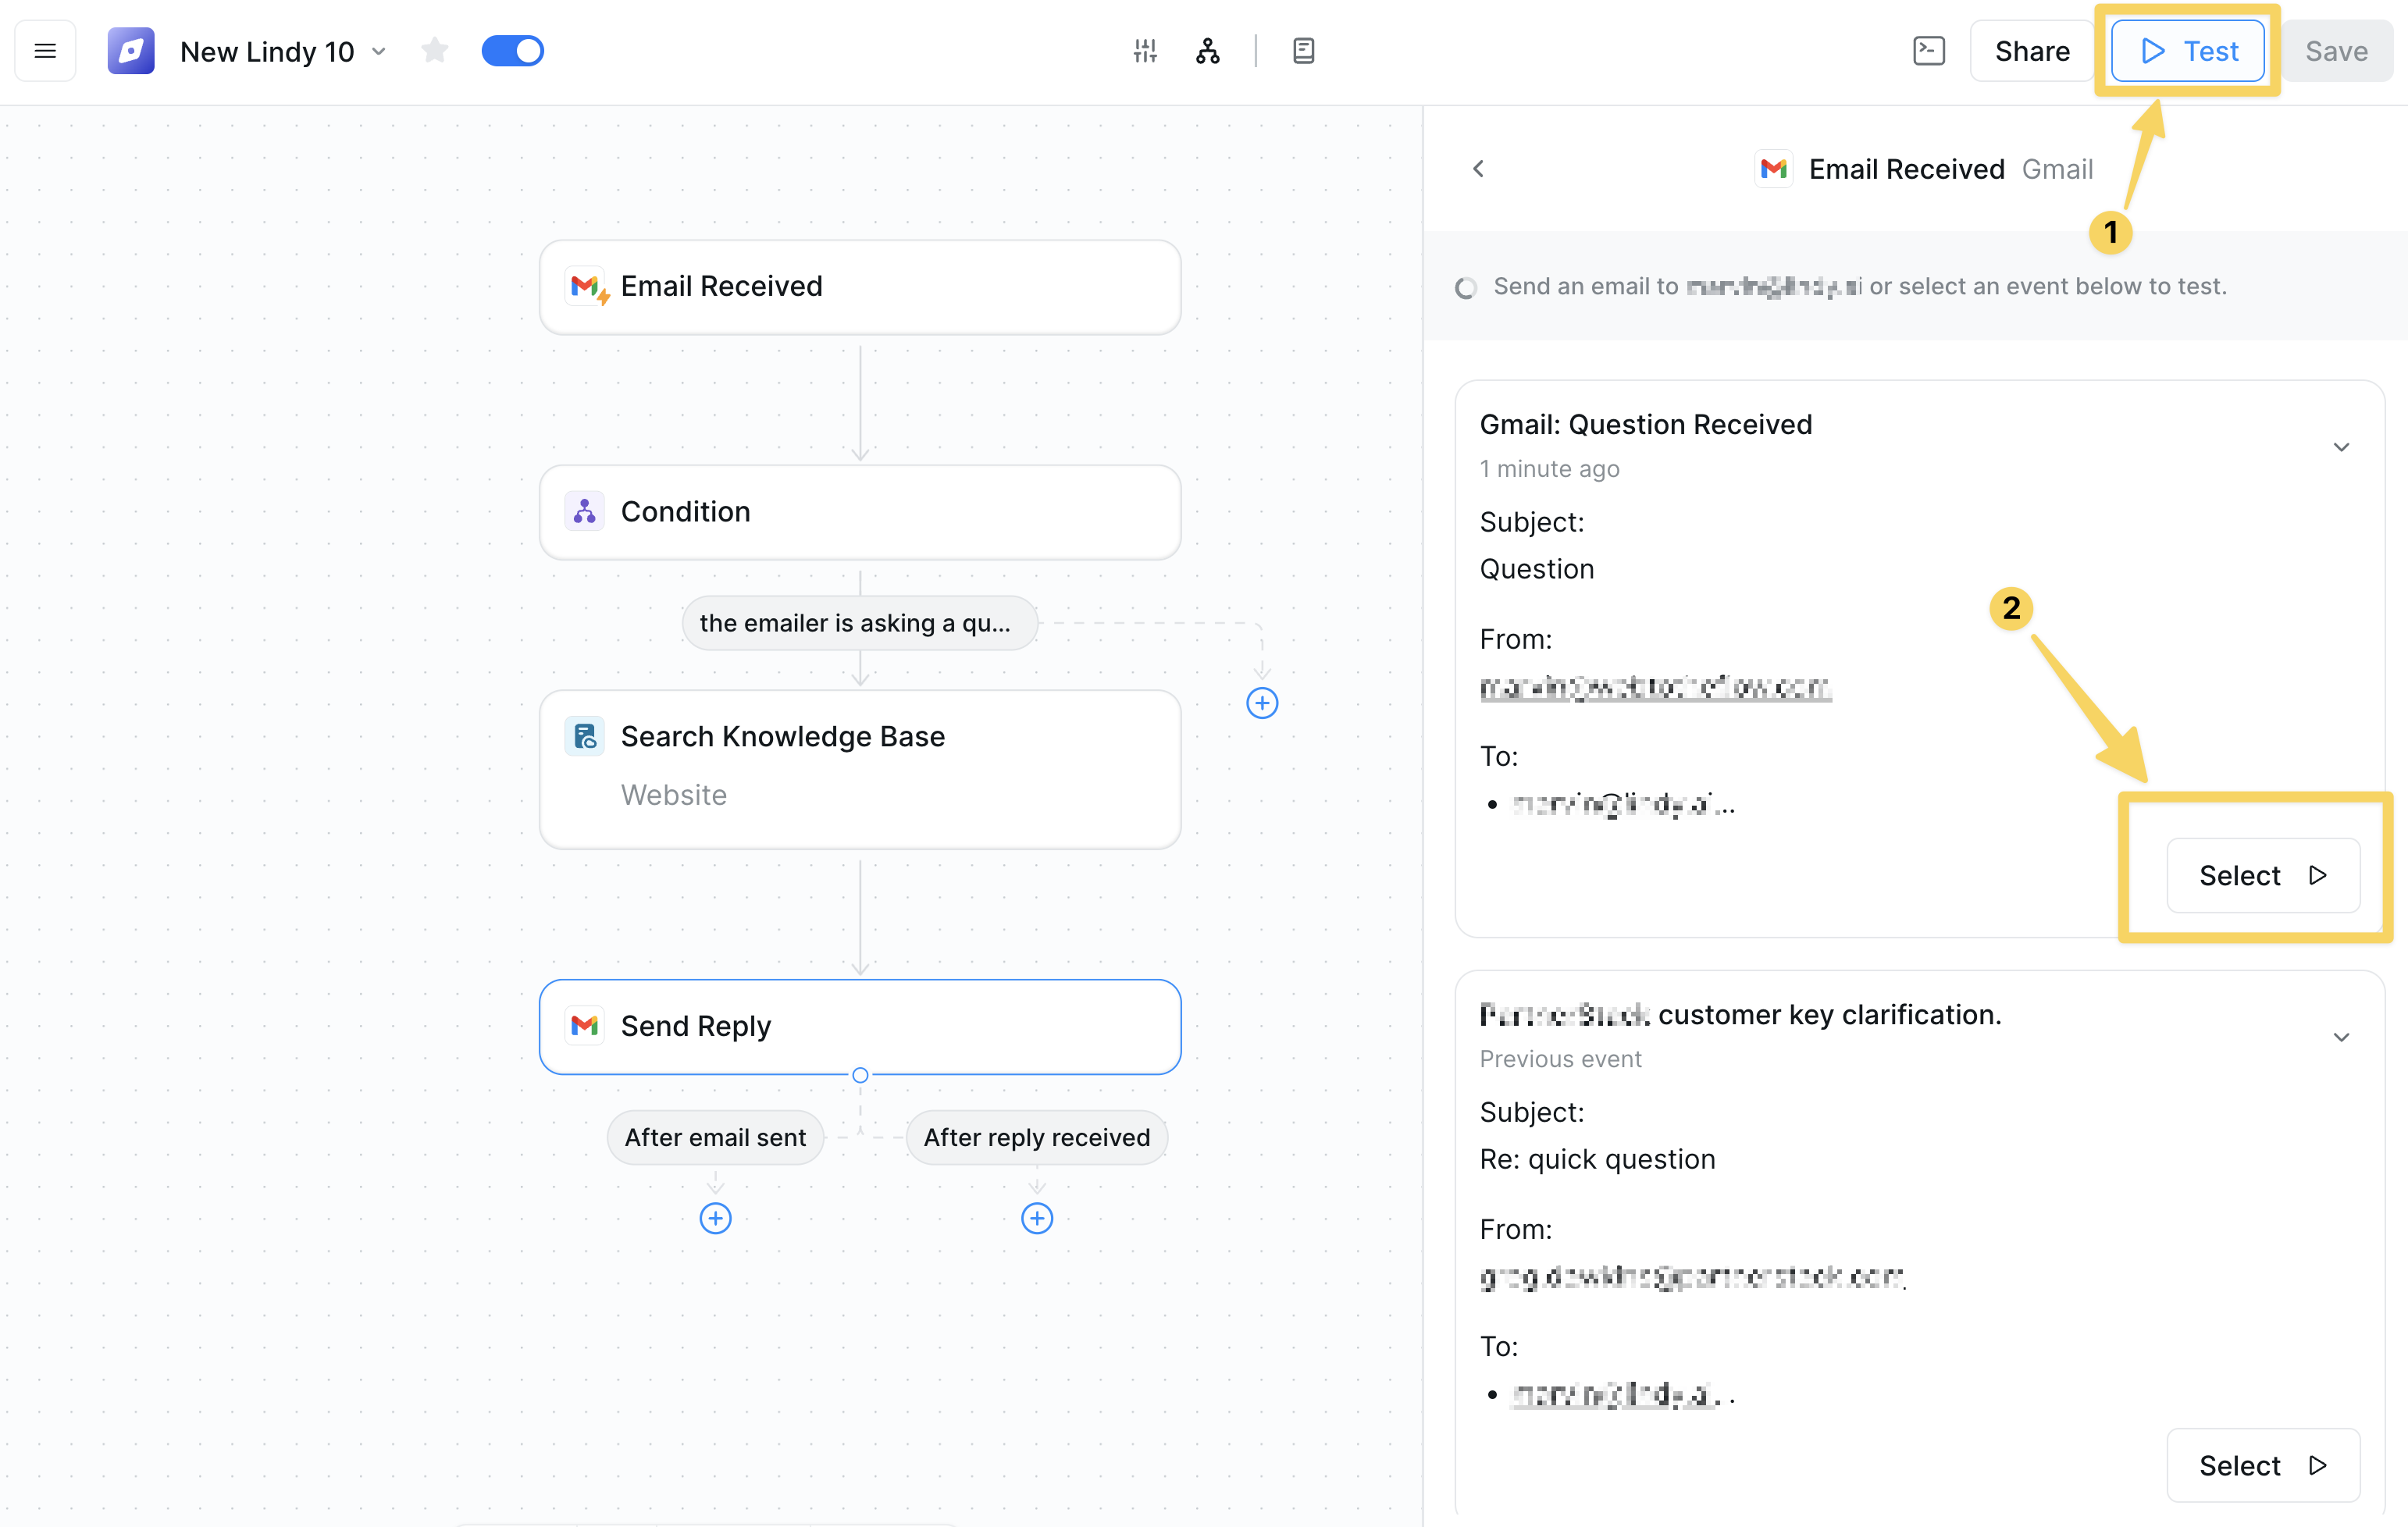 4. Watch as your AI agent processes the email and generates a response
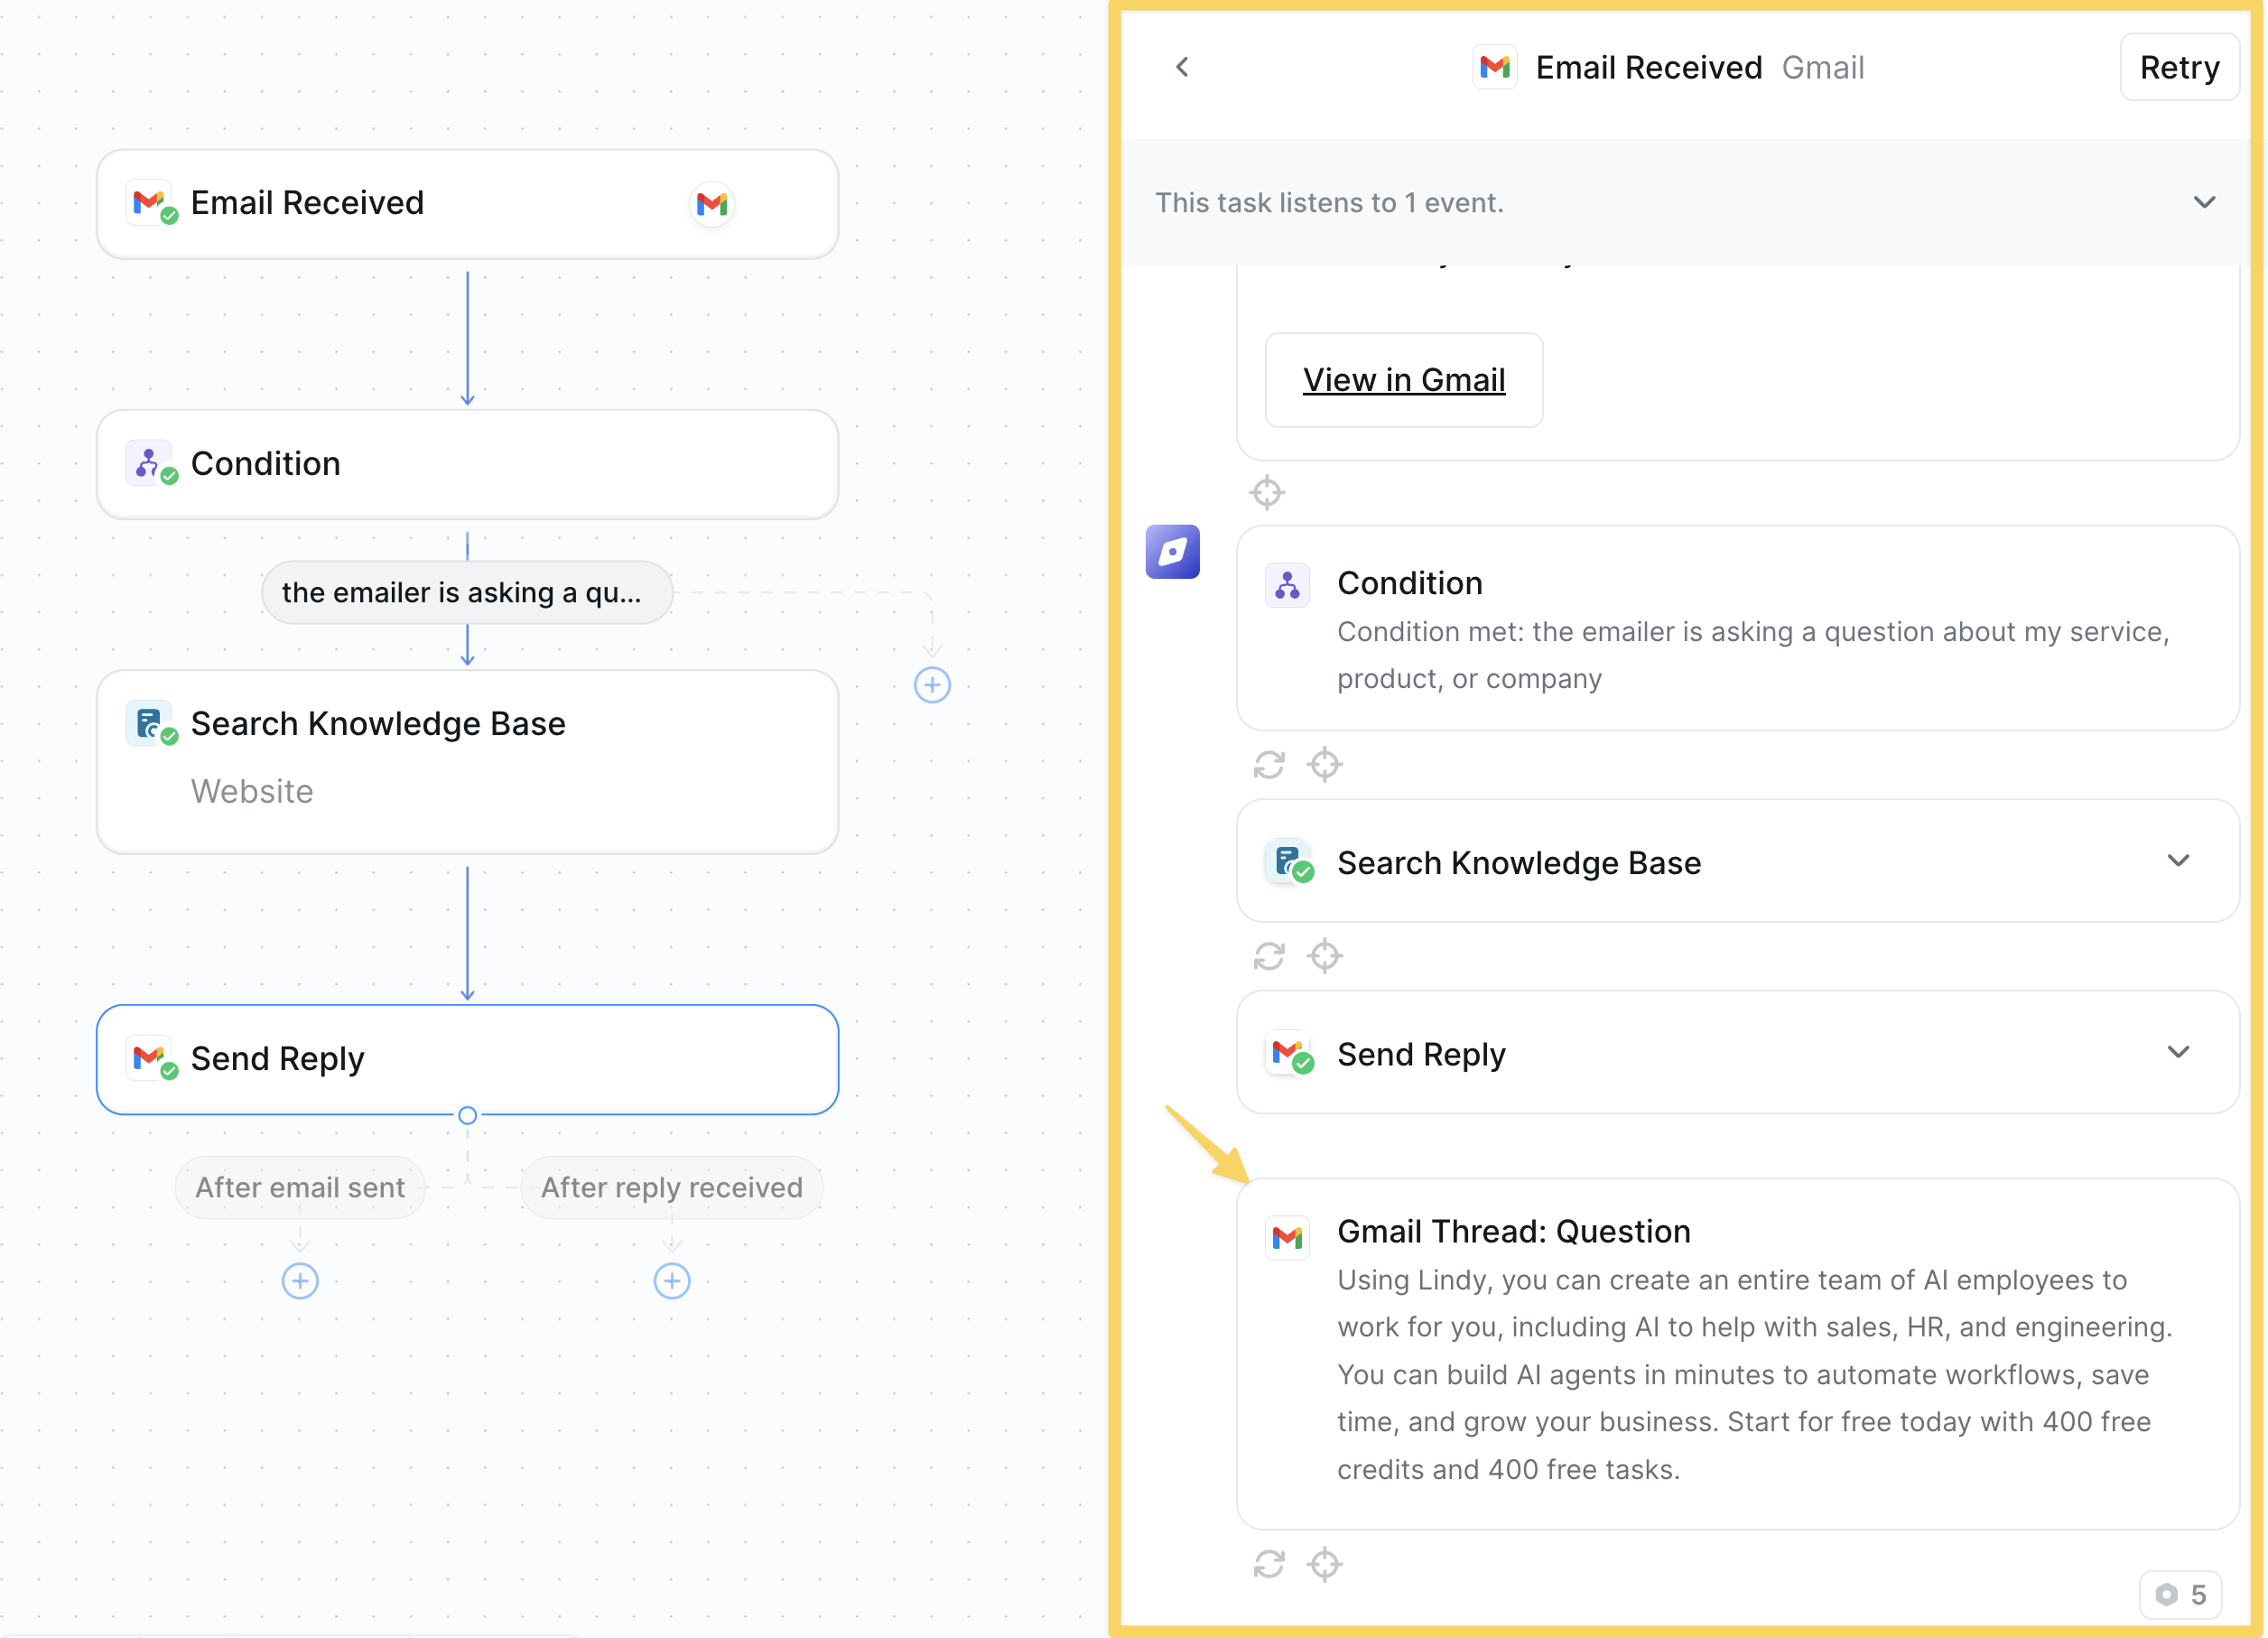 Remember: Improve your agent over time by reviewing its responses regularly and adjust the prompt to better match your communication style.
## Bonus Step: Name and Monitor Your Agent
Give your AI agent a memorable name that reflects its purpose.
Once enabled, click "Tasks" to view your AI agent's activity history and monitor its performance.
## Congratulations!
You've successfully built your first AI agent! Here's what you accomplished:
* ✅ Created an AI agent from scratch
* ✅ Connected it to your Gmail account
* ✅ Set up intelligent email filtering with conditions
* ✅ Added a knowledge base for accurate responses
* ✅ Configured automated email responses
* ✅ Tested it with real data
## Take It Further
Your email assistant is just the beginning. AI agents can triage emails, pre-draft responses, alert you on Slack, create reminders, send follow-ups, and much more.
Advanced email automation with triage and smart responses
Automate meeting coordination and calendar management
Build a complete support ticket system
Discover 15+ step-by-step guides for common use cases
Get help, share ideas, and learn from other Lindy users
# Debugging
Source: https://docs.lindy.ai/testing/debugging
Learn how to troubleshoot errors in Lindy, fix common workflow issues, resolve HTTP errors, and optimize automation performance
## Overview
Lindy makes building agents easy, but occasional errors can occur. This guide helps you quickly identify, understand, and resolve common issues. Perfect for:
* **Error identification** — spot problems in task history and flow editor
* **Quick fixes** — resolve common setup mistakes and configuration issues
* **HTTP troubleshooting** — understand external service connection errors
Most agent errors come down to simple setup mistakes—missing skills, unclear prompts, or undefined exit conditions. It's rarely a system issue. Before assuming something's broken, double-check your configuration—the fix is usually right there.
## How to Identify an Error
When an error occurs, your agent notifies you directly within your Task History, Flow Editor, and via email, so you can address issues immediately.
### Review Errors in Flow Editor Using Test Mode
1. **Open the workflow** - Go to your workflow in the editor
2. **Enter Test Mode** - Click the test button
3. **Run your test** - Execute the workflow to see where it fails
Remember: Improve your agent over time by reviewing its responses regularly and adjust the prompt to better match your communication style.
## Bonus Step: Name and Monitor Your Agent
Give your AI agent a memorable name that reflects its purpose.
Once enabled, click "Tasks" to view your AI agent's activity history and monitor its performance.
## Congratulations!
You've successfully built your first AI agent! Here's what you accomplished:
* ✅ Created an AI agent from scratch
* ✅ Connected it to your Gmail account
* ✅ Set up intelligent email filtering with conditions
* ✅ Added a knowledge base for accurate responses
* ✅ Configured automated email responses
* ✅ Tested it with real data
## Take It Further
Your email assistant is just the beginning. AI agents can triage emails, pre-draft responses, alert you on Slack, create reminders, send follow-ups, and much more.
Advanced email automation with triage and smart responses
Automate meeting coordination and calendar management
Build a complete support ticket system
Discover 15+ step-by-step guides for common use cases
Get help, share ideas, and learn from other Lindy users
# Debugging
Source: https://docs.lindy.ai/testing/debugging
Learn how to troubleshoot errors in Lindy, fix common workflow issues, resolve HTTP errors, and optimize automation performance
## Overview
Lindy makes building agents easy, but occasional errors can occur. This guide helps you quickly identify, understand, and resolve common issues. Perfect for:
* **Error identification** — spot problems in task history and flow editor
* **Quick fixes** — resolve common setup mistakes and configuration issues
* **HTTP troubleshooting** — understand external service connection errors
Most agent errors come down to simple setup mistakes—missing skills, unclear prompts, or undefined exit conditions. It's rarely a system issue. Before assuming something's broken, double-check your configuration—the fix is usually right there.
## How to Identify an Error
When an error occurs, your agent notifies you directly within your Task History, Flow Editor, and via email, so you can address issues immediately.
### Review Errors in Flow Editor Using Test Mode
1. **Open the workflow** - Go to your workflow in the editor
2. **Enter Test Mode** - Click the test button
3. **Run your test** - Execute the workflow to see where it fails
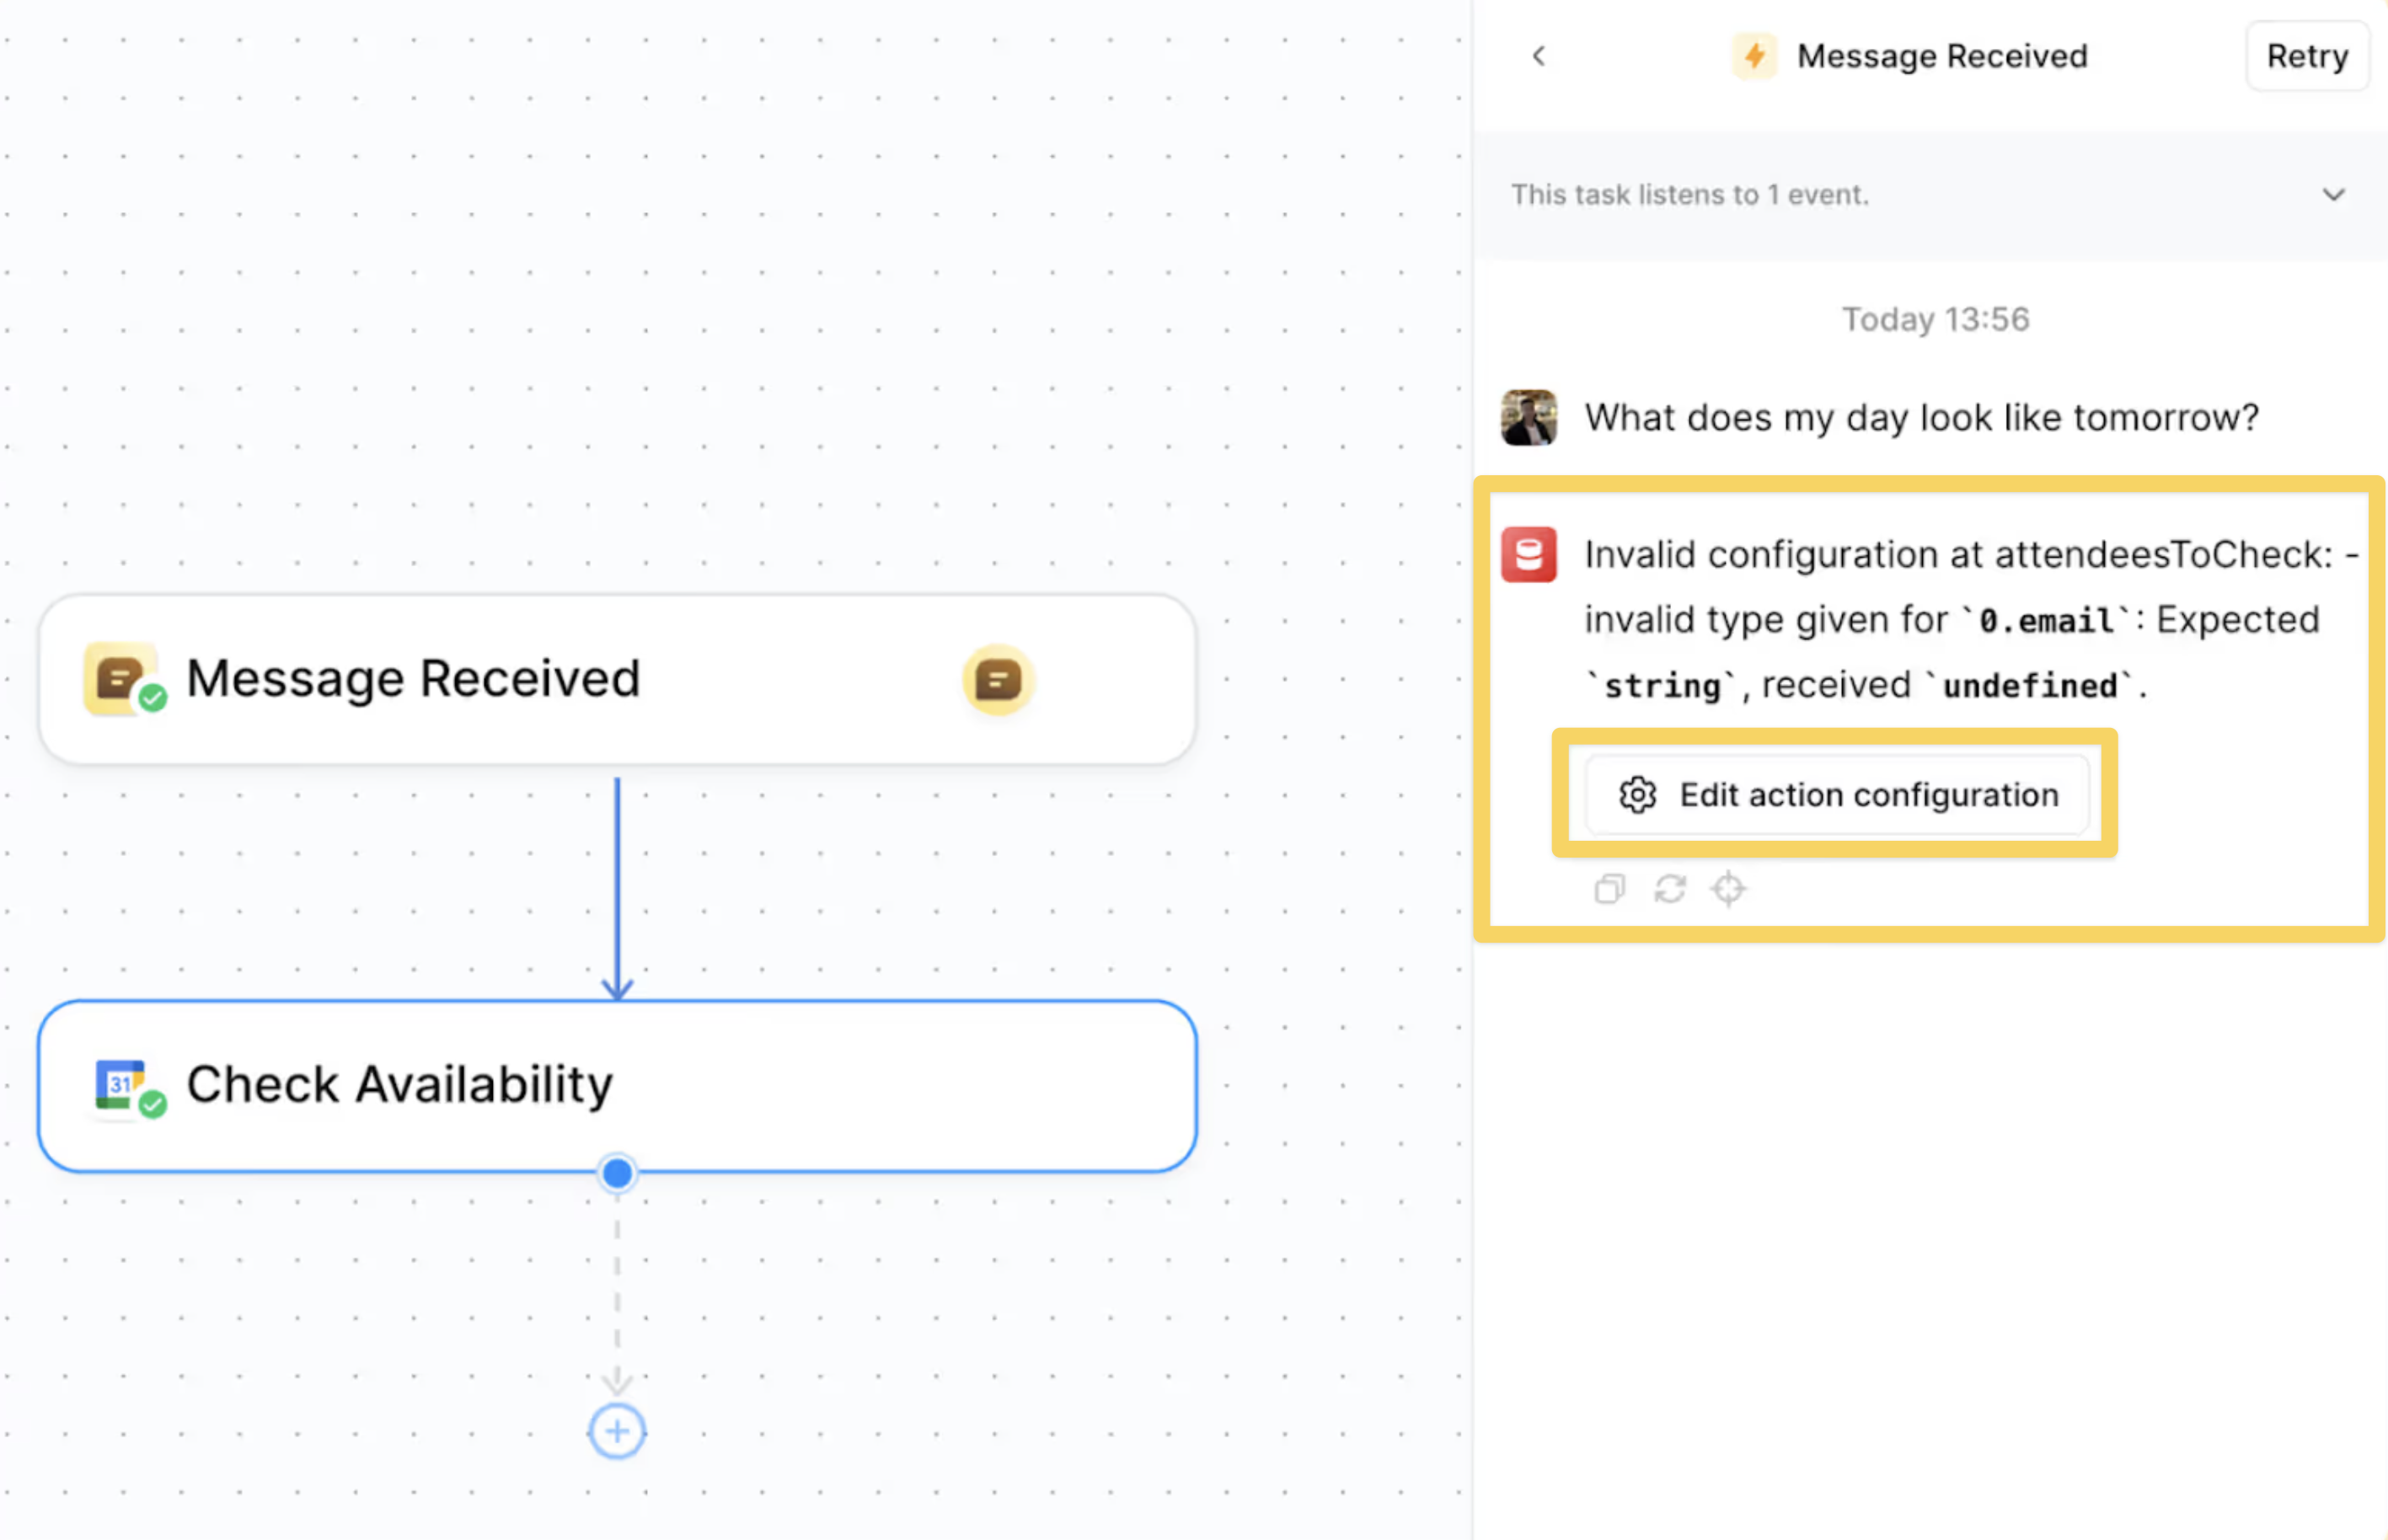 Your agent will usually tell you where and why it got stuck. In this case, we offer an "Edit action configuration" button that opens the erroring step.
### Review Errors in Task History
1. **Go to Tasks View** - Navigate to the Tasks section
2. **Look for errored tasks** - Find tasks marked as "Errored"
3. **Click for details** — Review exactly what your agent executed before the failure and see suggested fixes
Your agent will usually tell you where and why it got stuck. In this case, we offer an "Edit action configuration" button that opens the erroring step.
### Review Errors in Task History
1. **Go to Tasks View** - Navigate to the Tasks section
2. **Look for errored tasks** - Find tasks marked as "Errored"
3. **Click for details** — Review exactly what your agent executed before the failure and see suggested fixes
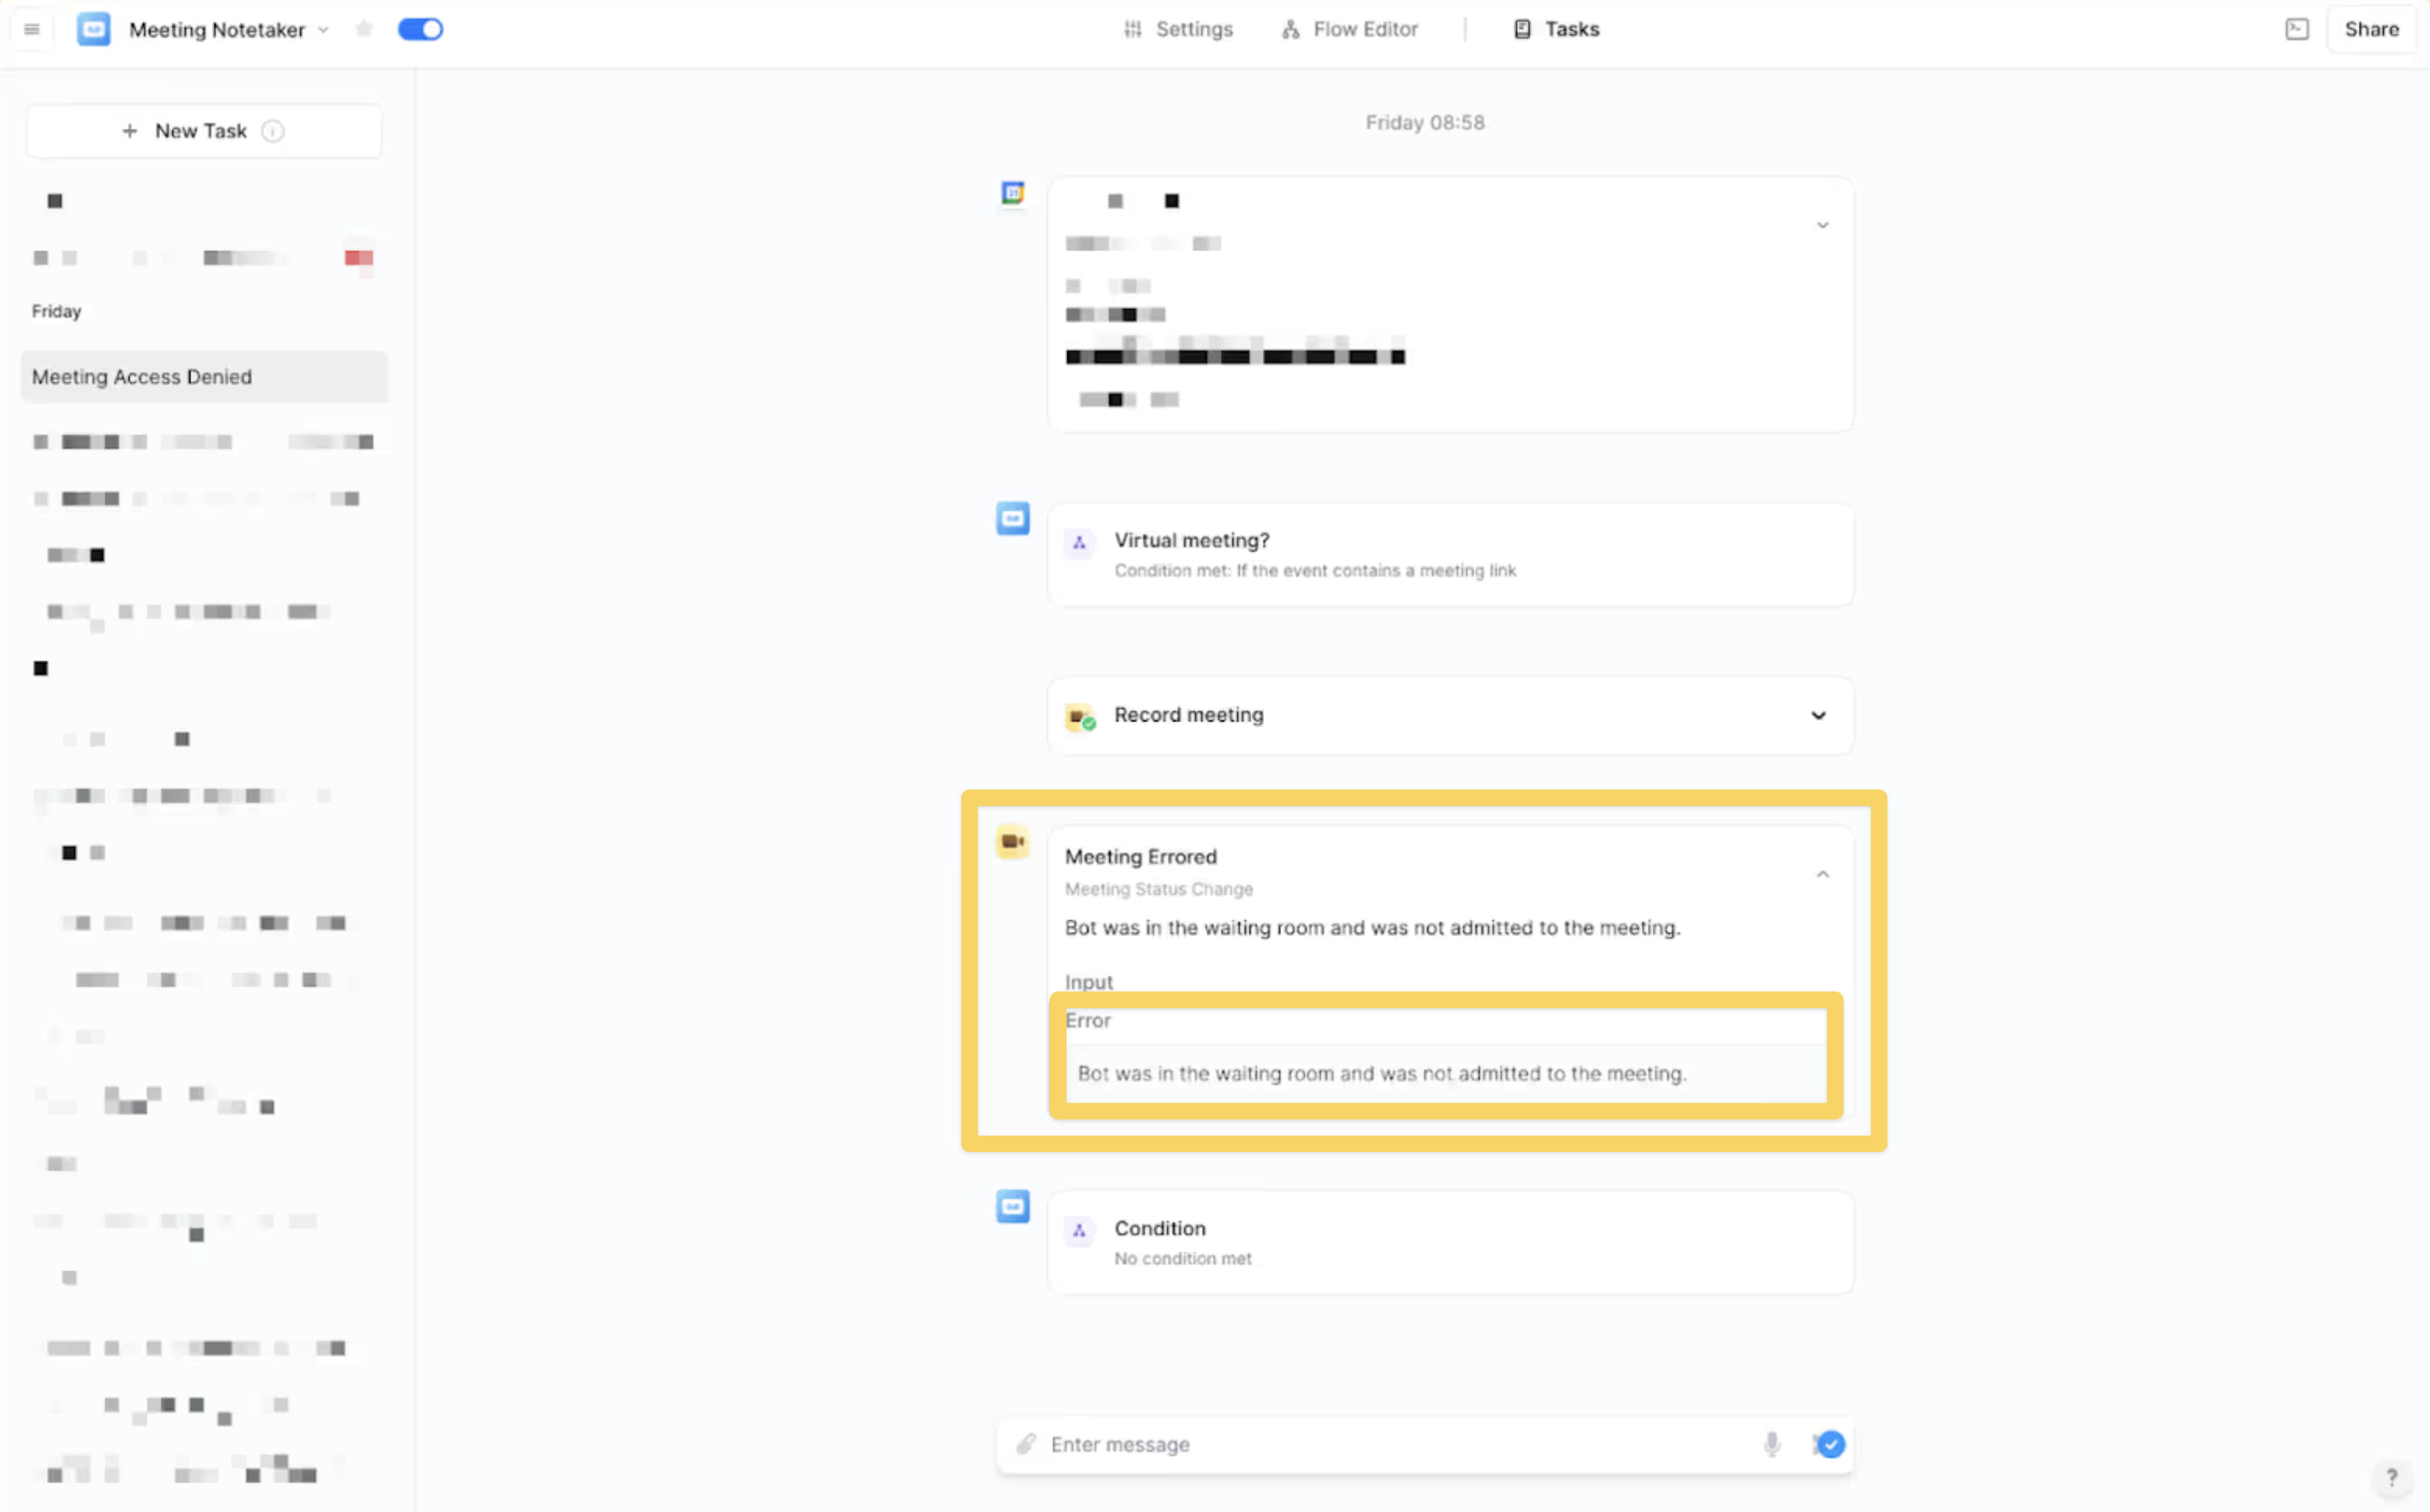 This is the primary place to identify what went wrong. If available, use the provided button to configure the action step or trigger that failed.
When an error occurs, your agent emails you with details about the issue and possible troubleshooting steps.
## General Troubleshooting Steps
1. **Check the Error Message**
* Use the Testing Panel to review all messages sent within the workflow. The error message will often indicate what went wrong and how to resolve it.
2. **Review Triggers and Action Steps**
* Ensure all triggers and action steps are set up correctly. Check that the correct inputs, conditions, and dependencies are in place.
3. **Monitor Outages**
* If an integrated app is down, your agent will notify you. You can also check the app's status page for real-time updates.
## Common Errors and Fixes
### "The Input provided is too long"
This means the task context is exceeding the allowed limit. To resolve this:
* Filter unnecessary high-volume triggers
* Use a more cost-efficient language model
* Optimize the workflow to minimize redundant data
### "Cannot start test. Cannot find the conversation trigger"
This error usually indicates a misconfiguration with triggers:
* Verify trigger setup in the workflow
* Ensure event-based triggers have the right conditions
* Check if multiple triggers conflict with each other
### "My apologies \[Name], I'm having trouble completing this task"
This typically means the agent is unable to complete its assigned task. Possible fixes:
**Missing Exit Condition**
* If the agent is handling a complex task or using multiple skills, it may not know when to stop.
* **Fix**: Define a clear exit condition, so the agent knows when the task is complete
This is the primary place to identify what went wrong. If available, use the provided button to configure the action step or trigger that failed.
When an error occurs, your agent emails you with details about the issue and possible troubleshooting steps.
## General Troubleshooting Steps
1. **Check the Error Message**
* Use the Testing Panel to review all messages sent within the workflow. The error message will often indicate what went wrong and how to resolve it.
2. **Review Triggers and Action Steps**
* Ensure all triggers and action steps are set up correctly. Check that the correct inputs, conditions, and dependencies are in place.
3. **Monitor Outages**
* If an integrated app is down, your agent will notify you. You can also check the app's status page for real-time updates.
## Common Errors and Fixes
### "The Input provided is too long"
This means the task context is exceeding the allowed limit. To resolve this:
* Filter unnecessary high-volume triggers
* Use a more cost-efficient language model
* Optimize the workflow to minimize redundant data
### "Cannot start test. Cannot find the conversation trigger"
This error usually indicates a misconfiguration with triggers:
* Verify trigger setup in the workflow
* Ensure event-based triggers have the right conditions
* Check if multiple triggers conflict with each other
### "My apologies \[Name], I'm having trouble completing this task"
This typically means the agent is unable to complete its assigned task. Possible fixes:
**Missing Exit Condition**
* If the agent is handling a complex task or using multiple skills, it may not know when to stop.
* **Fix**: Define a clear exit condition, so the agent knows when the task is complete
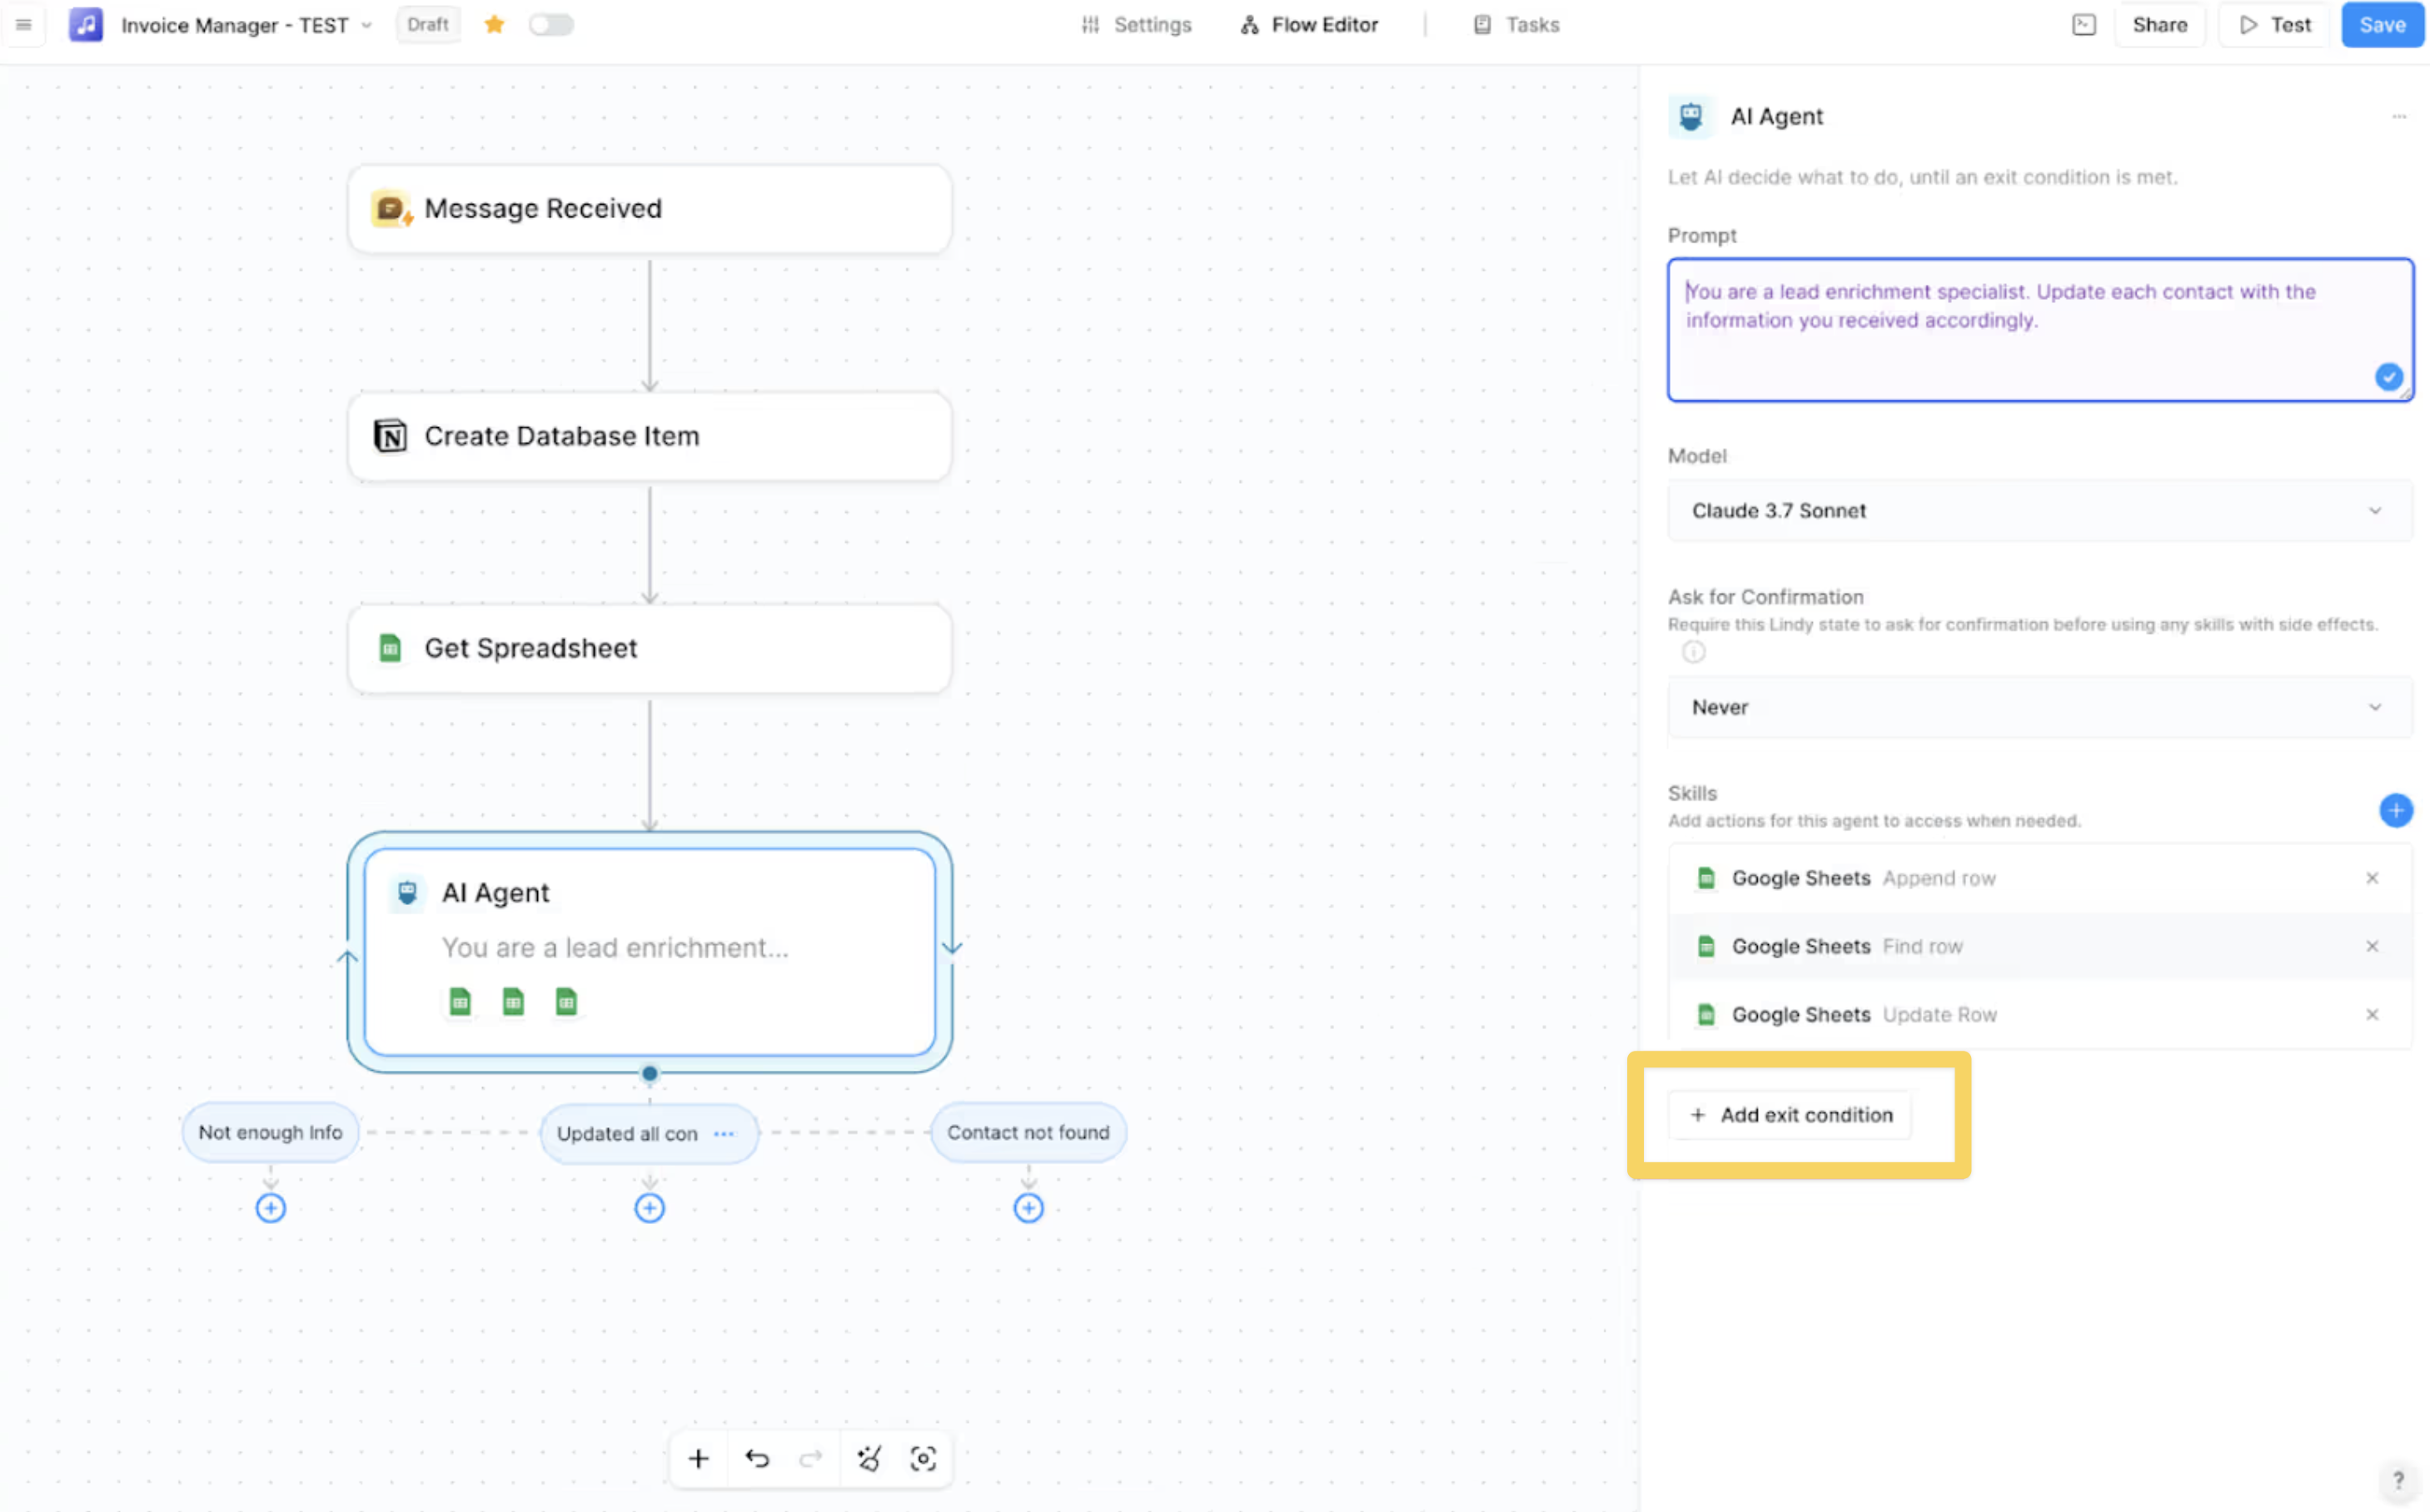 **Skills Issue**
* The agent may lack the necessary skills to finish the task.
* **Fix**: Assign the required skills, keeping the total below four skills per agent for most tasks
**Skills Issue**
* The agent may lack the necessary skills to finish the task.
* **Fix**: Assign the required skills, keeping the total below four skills per agent for most tasks
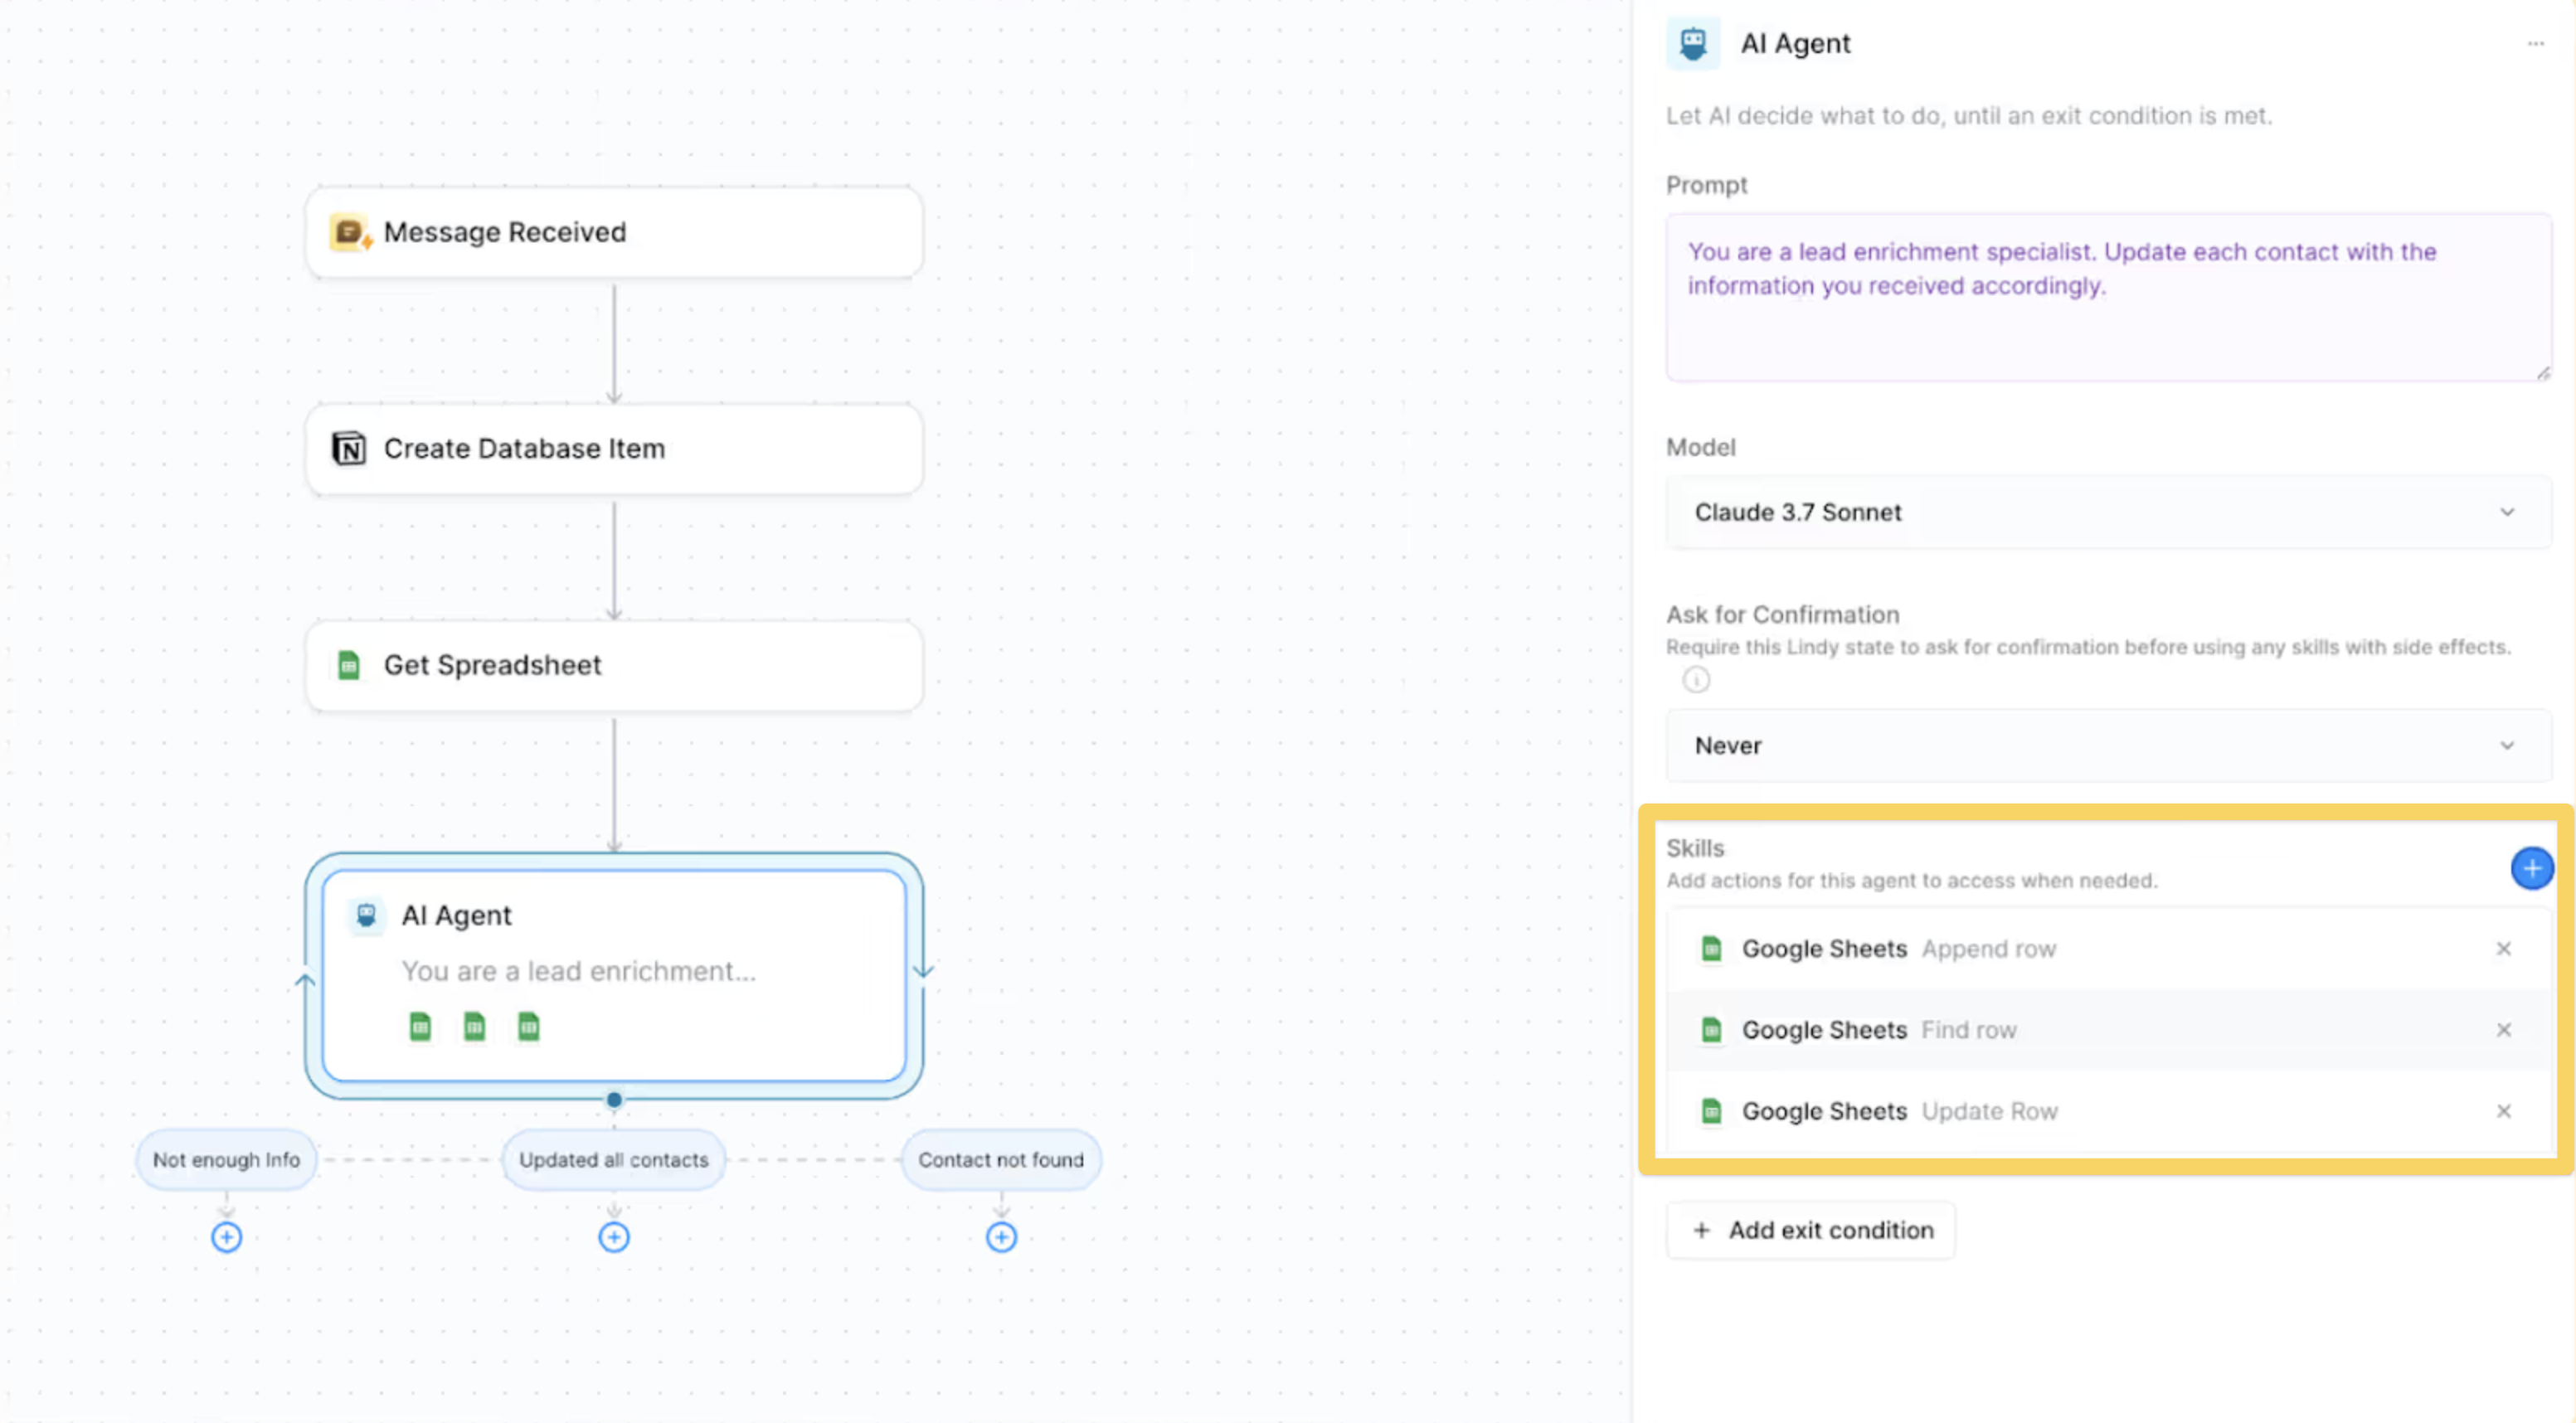 **Prompt Issue**
* The instructions might be unclear or too vague.
* **Fix**: Refine the prompt to ensure the agent fully understands the task
### "Failed to save the current flow"
This error typically indicates a misconfiguration in the trigger:
* Verify that a trigger is set up – ensure your workflow has an active trigger
* Check the trigger configuration – review settings like authentication, permissions, and required parameters
**Prompt Issue**
* The instructions might be unclear or too vague.
* **Fix**: Refine the prompt to ensure the agent fully understands the task
### "Failed to save the current flow"
This error typically indicates a misconfiguration in the trigger:
* Verify that a trigger is set up – ensure your workflow has an active trigger
* Check the trigger configuration – review settings like authentication, permissions, and required parameters
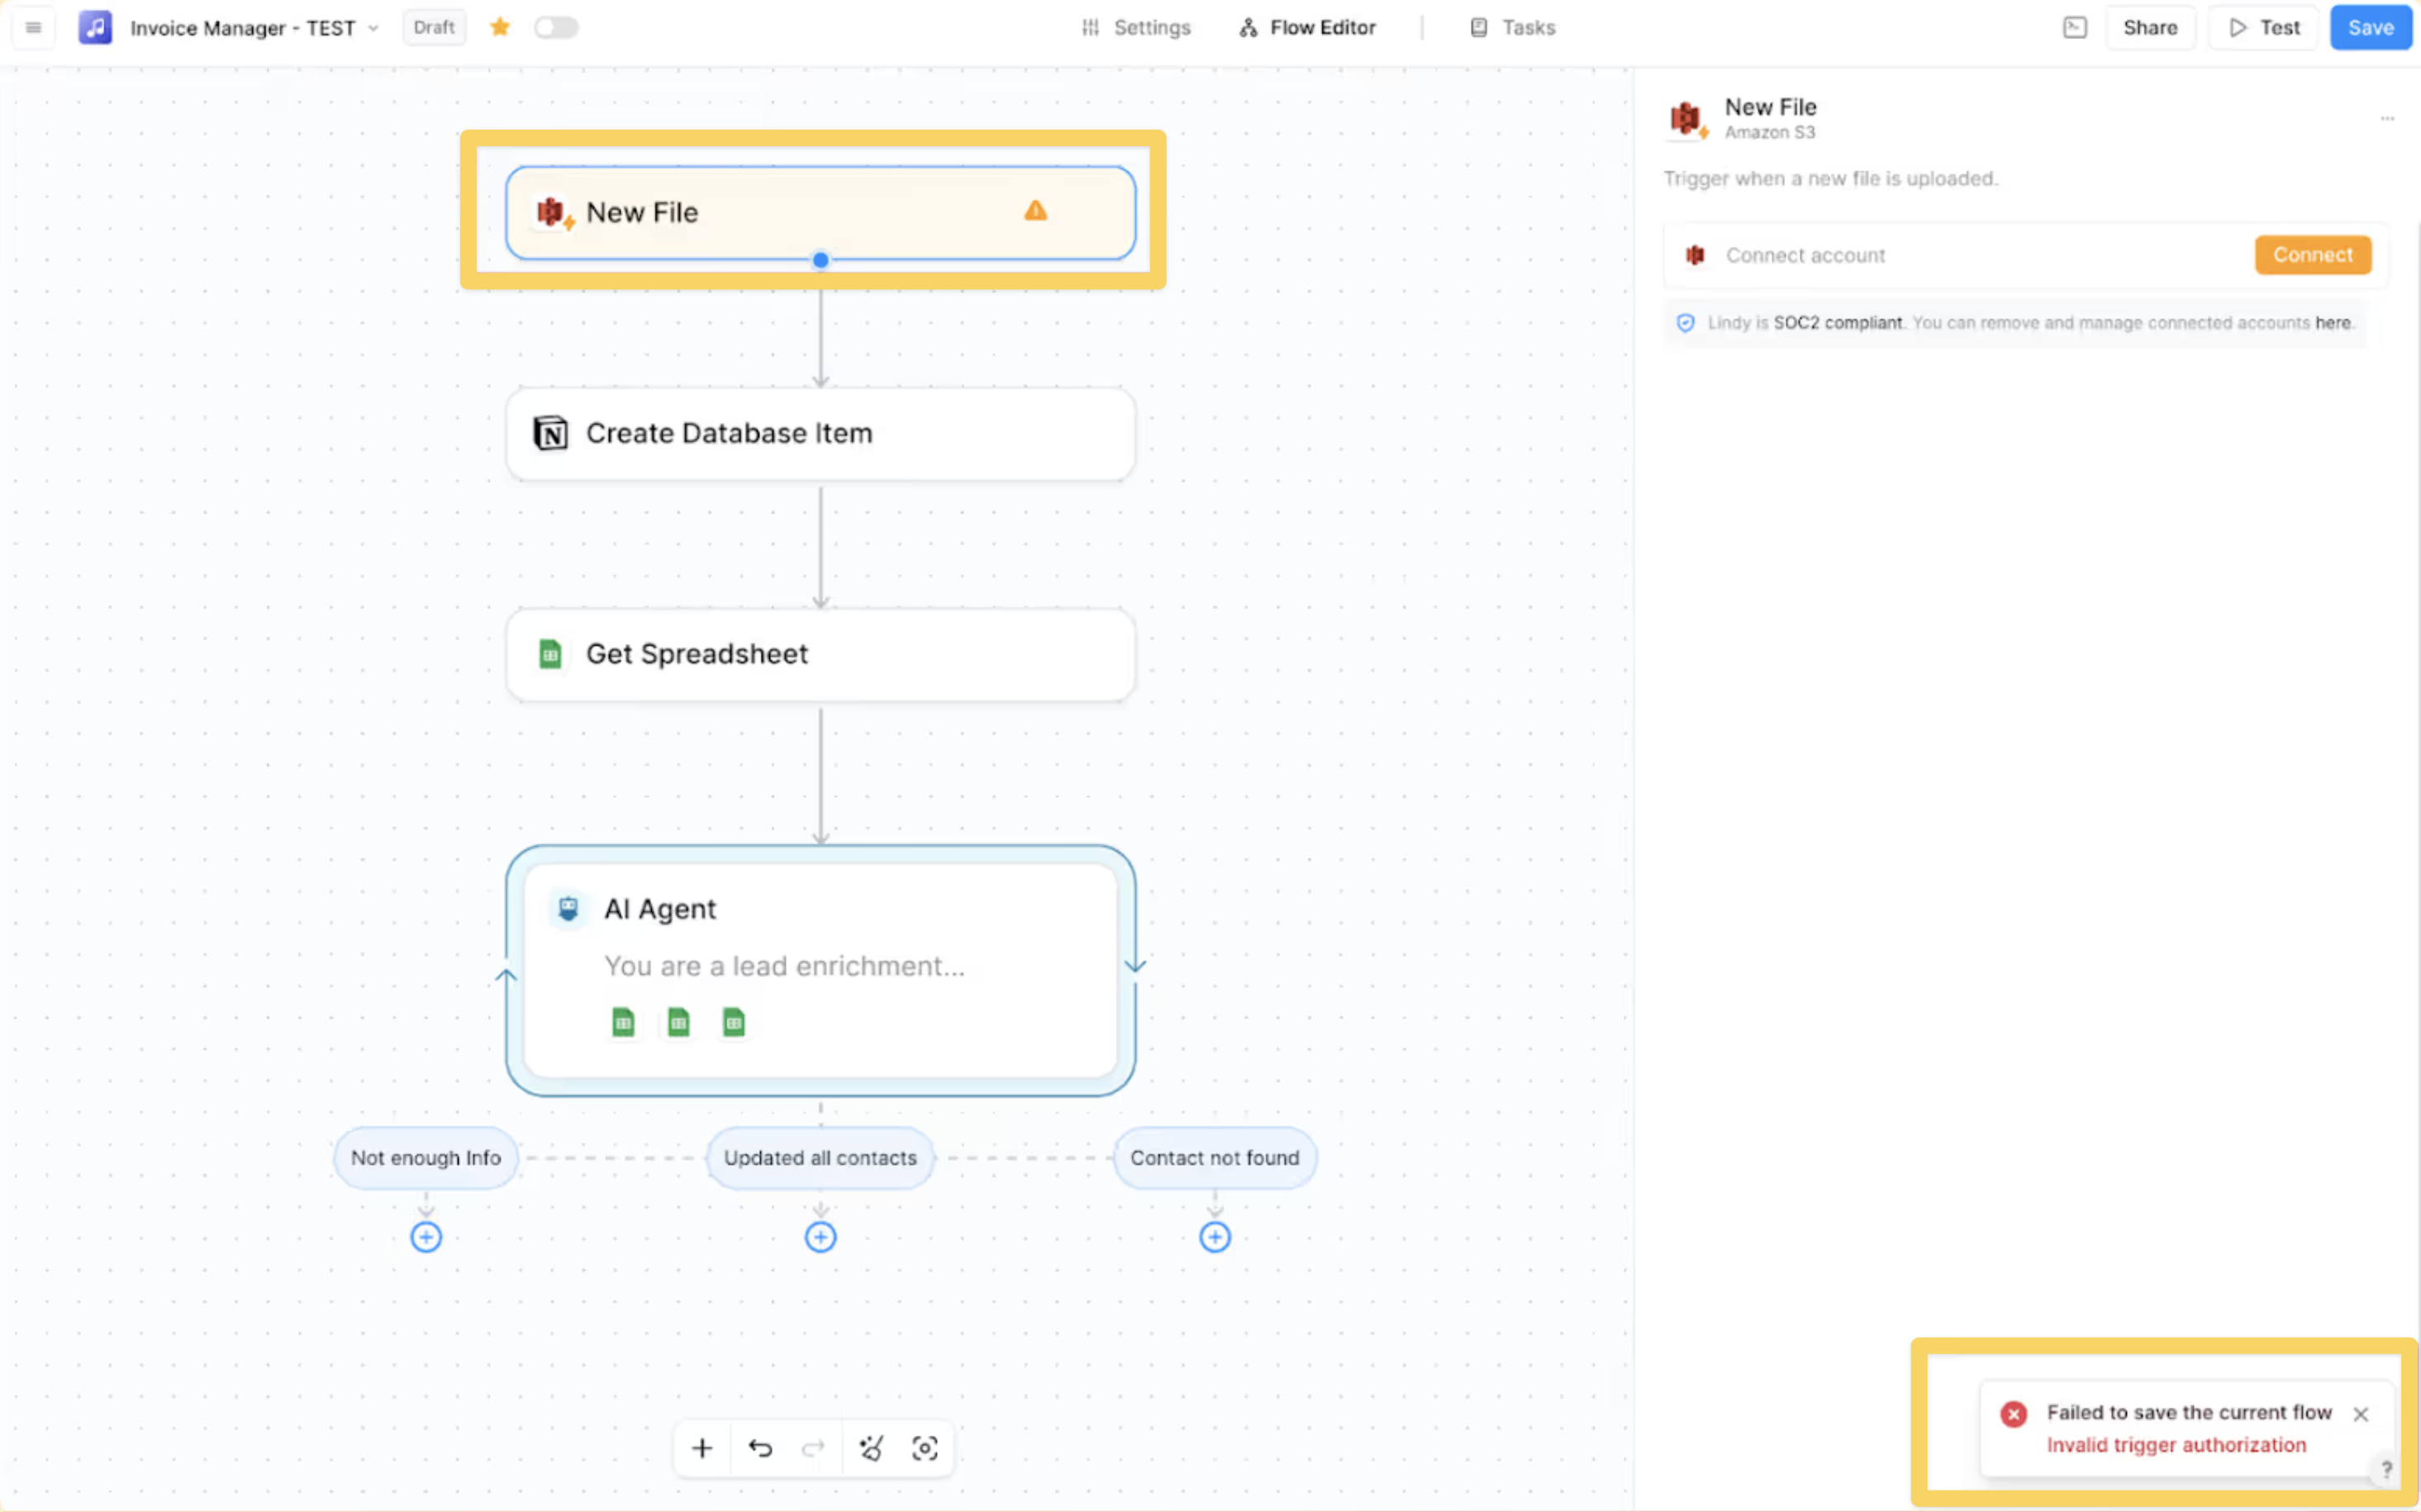 ### "My Email received trigger does not fire in test mode"
* If you email yourself and the sender and recipient email addresses are the same, it won't trigger the Email Received trigger. This prevents infinite loops.
* **Fix**: Use a different email address to test the trigger
### "Task Stopped Due to Insufficient Credits"
* If an agent task stops because of credit limits, it won't automatically restart.
* **Fix**: Go to your agent → Task View, find the incomplete task, and click "Retry" to continue from where it stopped
## HTTP Status Codes
Lindy interacts with various external services, and sometimes errors come from those connections. Here's what common HTTP error codes mean:
| Code | Error | What it means |
| ------- | --------------------- | ------------------------------------------------------ |
| **400** | Bad Request | The request was incorrect—double-check your input data |
| **401** | Unauthorized | Authentication is missing or incorrect |
| **403** | Forbidden | You don't have permission to access this resource |
| **404** | Not Found | The requested resource doesn't exist |
| **422** | Unprocessable Entity | Data format is invalid |
| **429** | Too Many Requests | You've hit a rate limit—try again later |
| **500** | Internal Server Error | Something went wrong on the external service's end |
Some HTTP errors originate from third-party services, meaning the issue is often outside your agent's control. While some errors can be fixed by adjusting your configuration, others may require checking the third-party provider's documentation.
## How to Report a Bug
If you suspect a bug or need help with your agent, report it through these channels:
* **Email**: Send an email to [support@lindy.ai](mailto:support@lindy.ai)
* **Slack Community**: [Join and post in the Lindy Community](https://community.lindy.ai/join)
### Make sure to include a task URL!
Providing the task URL helps us look directly into the issue:
1. **Click your agent** → click "Tasks"
2. **Find the task** you need help with
3. **Click the specific task** (you should see the full execution)
4. **Copy that page URL** from your browser
5. **Paste the URL** in your support request
The URL should include "conversationID" followed by a number. Screenshots are also helpful!
## Best Practices
* Start with simple workflows and gradually add complexity
* Test each action step individually before connecting them
* Use clear, specific prompts for AI agents
* Define exit conditions for complex tasks
* Keep skill assignments under four per agent
* Always check Task History first for error details
* Use Test Mode to isolate problem steps
* Review error messages carefully for specific guidance
* Check third-party service status pages for outages
* Document recurring issues and their solutions
* After checking your configuration thoroughly
* When HTTP errors persist despite correct setup
* If the same error occurs across multiple workflows
* When third-party documentation doesn't resolve the issue
## Next Steps
Learn how to test your workflows effectively
Set up monitoring to catch issues early
Add oversight for critical workflows
Understand how to configure agents properly
# Human in Loop
Source: https://docs.lindy.ai/testing/human-in-the-loop
Add manual approval steps to your agent workflows for oversight and control over critical actions
## Overview
There are three ways to build your agents to include human oversight when needed. You can always determine when you want to be in the loop for your agents - start with oversight and gradually increase autonomy as you build confidence.
## 1. Ask for Confirmation
Most actions have a confirmation toggle for actions with "side effects" (like sending emails, updating records, or creating events).
### "My Email received trigger does not fire in test mode"
* If you email yourself and the sender and recipient email addresses are the same, it won't trigger the Email Received trigger. This prevents infinite loops.
* **Fix**: Use a different email address to test the trigger
### "Task Stopped Due to Insufficient Credits"
* If an agent task stops because of credit limits, it won't automatically restart.
* **Fix**: Go to your agent → Task View, find the incomplete task, and click "Retry" to continue from where it stopped
## HTTP Status Codes
Lindy interacts with various external services, and sometimes errors come from those connections. Here's what common HTTP error codes mean:
| Code | Error | What it means |
| ------- | --------------------- | ------------------------------------------------------ |
| **400** | Bad Request | The request was incorrect—double-check your input data |
| **401** | Unauthorized | Authentication is missing or incorrect |
| **403** | Forbidden | You don't have permission to access this resource |
| **404** | Not Found | The requested resource doesn't exist |
| **422** | Unprocessable Entity | Data format is invalid |
| **429** | Too Many Requests | You've hit a rate limit—try again later |
| **500** | Internal Server Error | Something went wrong on the external service's end |
Some HTTP errors originate from third-party services, meaning the issue is often outside your agent's control. While some errors can be fixed by adjusting your configuration, others may require checking the third-party provider's documentation.
## How to Report a Bug
If you suspect a bug or need help with your agent, report it through these channels:
* **Email**: Send an email to [support@lindy.ai](mailto:support@lindy.ai)
* **Slack Community**: [Join and post in the Lindy Community](https://community.lindy.ai/join)
### Make sure to include a task URL!
Providing the task URL helps us look directly into the issue:
1. **Click your agent** → click "Tasks"
2. **Find the task** you need help with
3. **Click the specific task** (you should see the full execution)
4. **Copy that page URL** from your browser
5. **Paste the URL** in your support request
The URL should include "conversationID" followed by a number. Screenshots are also helpful!
## Best Practices
* Start with simple workflows and gradually add complexity
* Test each action step individually before connecting them
* Use clear, specific prompts for AI agents
* Define exit conditions for complex tasks
* Keep skill assignments under four per agent
* Always check Task History first for error details
* Use Test Mode to isolate problem steps
* Review error messages carefully for specific guidance
* Check third-party service status pages for outages
* Document recurring issues and their solutions
* After checking your configuration thoroughly
* When HTTP errors persist despite correct setup
* If the same error occurs across multiple workflows
* When third-party documentation doesn't resolve the issue
## Next Steps
Learn how to test your workflows effectively
Set up monitoring to catch issues early
Add oversight for critical workflows
Understand how to configure agents properly
# Human in Loop
Source: https://docs.lindy.ai/testing/human-in-the-loop
Add manual approval steps to your agent workflows for oversight and control over critical actions
## Overview
There are three ways to build your agents to include human oversight when needed. You can always determine when you want to be in the loop for your agents - start with oversight and gradually increase autonomy as you build confidence.
## 1. Ask for Confirmation
Most actions have a confirmation toggle for actions with "side effects" (like sending emails, updating records, or creating events).
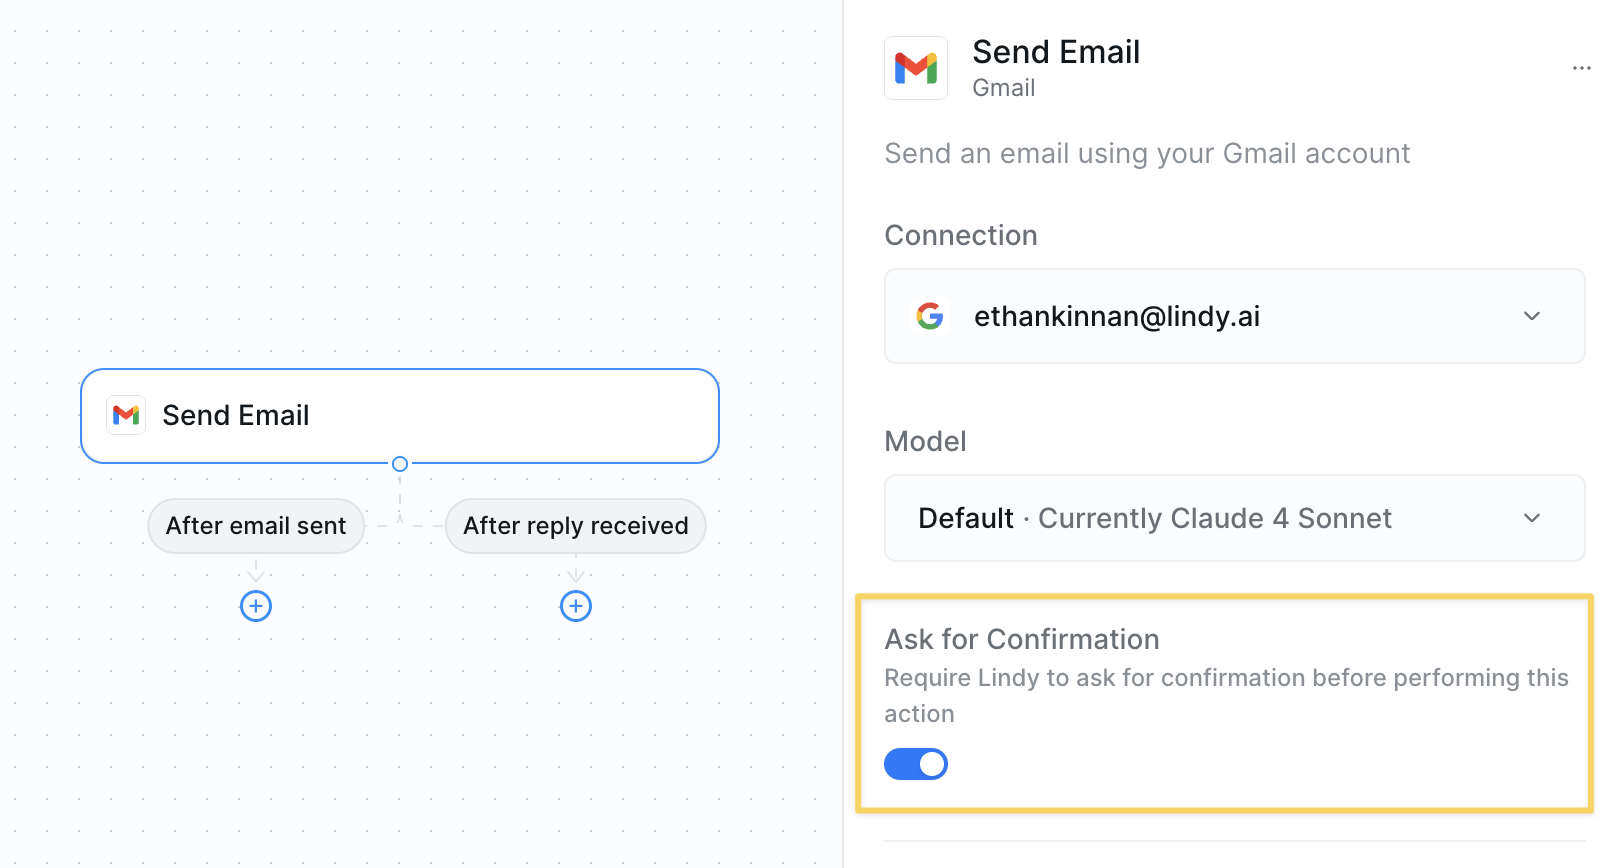 ### How It Works
* **Enable the toggle** — Turn on "Ask for Confirmation" for any action
* **Agent pauses** — Your agent will execute up to that action, then wait for your approval
* **Receive email** — You'll get an email asking you to approve the action
* **Approve in app** — You can also approve it directly in the task menu
* **Agent continues** — Once approved, your agent completes the workflow
## 2. Condition-Based Alerts
Use condition steps to have your agent send alerts when it encounters situations outside its scope or gets stuck.
### How It Works
* **Enable the toggle** — Turn on "Ask for Confirmation" for any action
* **Agent pauses** — Your agent will execute up to that action, then wait for your approval
* **Receive email** — You'll get an email asking you to approve the action
* **Approve in app** — You can also approve it directly in the task menu
* **Agent continues** — Once approved, your agent completes the workflow
## 2. Condition-Based Alerts
Use condition steps to have your agent send alerts when it encounters situations outside its scope or gets stuck.
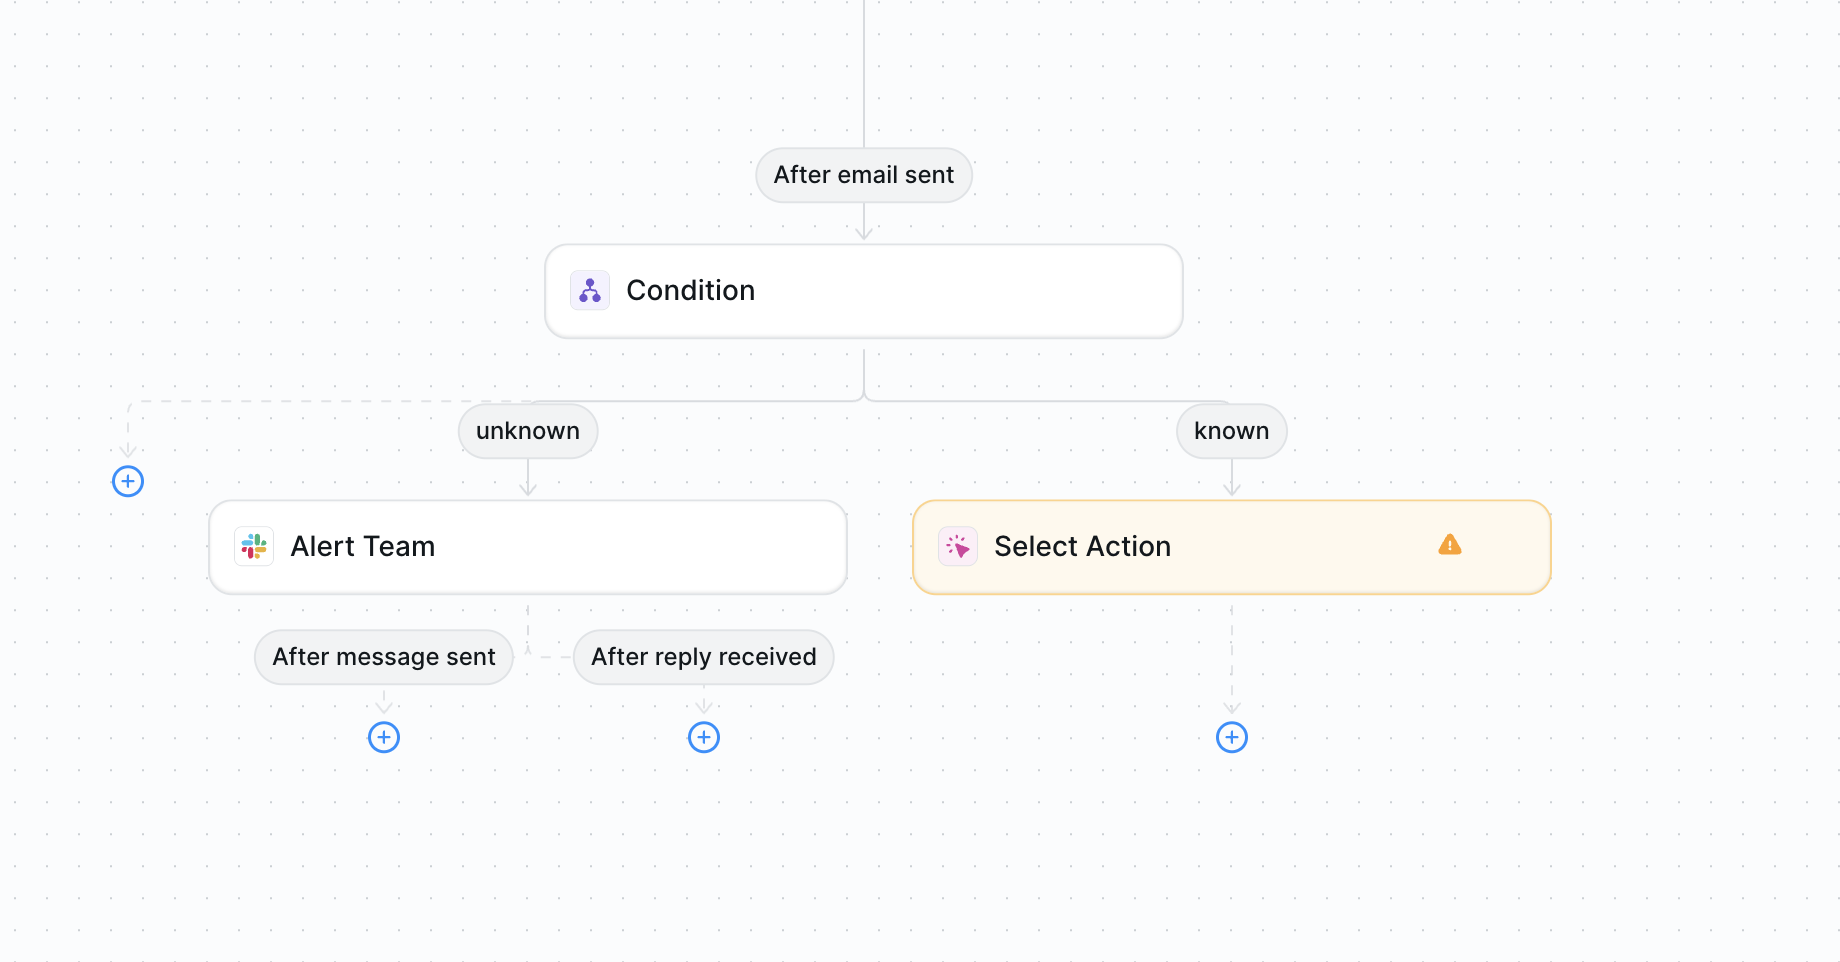 ### Setting Up Conditional Human Loops
* **Add a condition** — Create conditions like "if this happens" or "if this is outside your scope" or "if unknown"
* **Send alerts** — When the condition is met, have the agent send an email or Slack message
* **Get notified** — Receive a ping saying "Hey, your agent is stuck and needs help"
* **Take action** — Step in to help or provide guidance when needed
This approach lets your agent run autonomously most of the time but alerts you when it needs human intervention.
## 3. Draft Modes
Certain actions like Gmail can create drafts instead of executing immediately, giving you manual review before final action.
### Setting Up Conditional Human Loops
* **Add a condition** — Create conditions like "if this happens" or "if this is outside your scope" or "if unknown"
* **Send alerts** — When the condition is met, have the agent send an email or Slack message
* **Get notified** — Receive a ping saying "Hey, your agent is stuck and needs help"
* **Take action** — Step in to help or provide guidance when needed
This approach lets your agent run autonomously most of the time but alerts you when it needs human intervention.
## 3. Draft Modes
Certain actions like Gmail can create drafts instead of executing immediately, giving you manual review before final action.
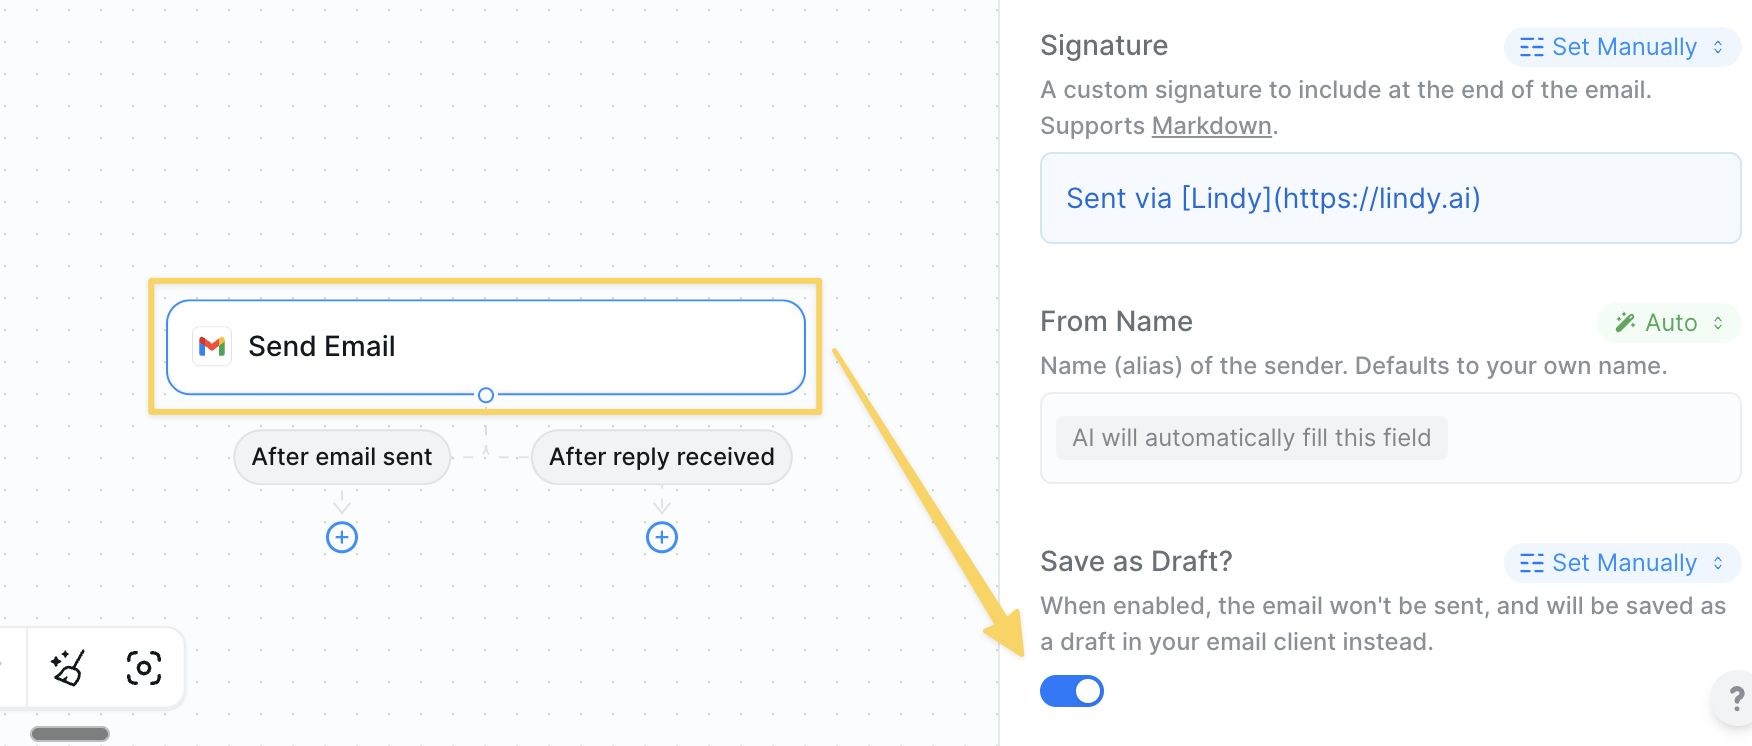 ### Gmail Draft Mode
* **Creates drafts** — Emails are saved to your Gmail drafts folder instead of being sent
* **Manual review** — You can edit, approve, or delete drafts before sending
* **Maintains context** — All email details (recipients, subject, body) are preserved
* **Flexible timing** — Send when you're ready, not when the agent runs
Draft modes are particularly useful for customer communications, negotiations, or sensitive outreach where tone and timing matter.
## When to Use Human in the Loop
Always start with human oversight for actions that affect other people. Test thoroughly with confirmation enabled, then gradually increase autonomy as you build confidence in your agent's performance.
Use confirmation for emails, messages, and outreach to customers, leads, or partners. This ensures tone, timing, and content meet your standards before reaching recipients.
Enable oversight for actions that create, update, or delete important records. This prevents accidental data loss or corruption while your agent learns your preferences.
Require approval for actions involving money, contracts, scheduling, or other high-stakes decisions that could impact your business or relationships.
## Next Steps
Troubleshoot issues in your agent workflows
Set up ongoing monitoring for production agents
Test your workflows with human approval steps
Restore previous versions when issues arise
# Monitor Your Agents
Source: https://docs.lindy.ai/testing/monitoring-your-agents
Track your agent performance and task execution with built-in monitoring and observability tools
## Overview
Monitoring your agents helps you track performance, identify issues, and ensure your workflows are running smoothly. Perfect for:
* **Performance tracking** — see how your agents are performing over time
* **Issue identification** — quickly spot and diagnose problems
* **Usage analysis** — understand how often and when your agents run
We'll show you how to access your task history and view things manually, plus our observability tools to help you monitor your agents more autonomously.
## Accessing Task History
To view all your agent task runs:
1. **Select the agent** — Choose the specific agent you want to monitor
2. **Click Tasks** — In the top right of your task or flow editor, click on "Tasks"
3. **View all runs** — Within the task history, you can see all task runs across agents
4. **Review execution** — Examine each run individually to see what happened step-by-step
### Gmail Draft Mode
* **Creates drafts** — Emails are saved to your Gmail drafts folder instead of being sent
* **Manual review** — You can edit, approve, or delete drafts before sending
* **Maintains context** — All email details (recipients, subject, body) are preserved
* **Flexible timing** — Send when you're ready, not when the agent runs
Draft modes are particularly useful for customer communications, negotiations, or sensitive outreach where tone and timing matter.
## When to Use Human in the Loop
Always start with human oversight for actions that affect other people. Test thoroughly with confirmation enabled, then gradually increase autonomy as you build confidence in your agent's performance.
Use confirmation for emails, messages, and outreach to customers, leads, or partners. This ensures tone, timing, and content meet your standards before reaching recipients.
Enable oversight for actions that create, update, or delete important records. This prevents accidental data loss or corruption while your agent learns your preferences.
Require approval for actions involving money, contracts, scheduling, or other high-stakes decisions that could impact your business or relationships.
## Next Steps
Troubleshoot issues in your agent workflows
Set up ongoing monitoring for production agents
Test your workflows with human approval steps
Restore previous versions when issues arise
# Monitor Your Agents
Source: https://docs.lindy.ai/testing/monitoring-your-agents
Track your agent performance and task execution with built-in monitoring and observability tools
## Overview
Monitoring your agents helps you track performance, identify issues, and ensure your workflows are running smoothly. Perfect for:
* **Performance tracking** — see how your agents are performing over time
* **Issue identification** — quickly spot and diagnose problems
* **Usage analysis** — understand how often and when your agents run
We'll show you how to access your task history and view things manually, plus our observability tools to help you monitor your agents more autonomously.
## Accessing Task History
To view all your agent task runs:
1. **Select the agent** — Choose the specific agent you want to monitor
2. **Click Tasks** — In the top right of your task or flow editor, click on "Tasks"
3. **View all runs** — Within the task history, you can see all task runs across agents
4. **Review execution** — Examine each run individually to see what happened step-by-step
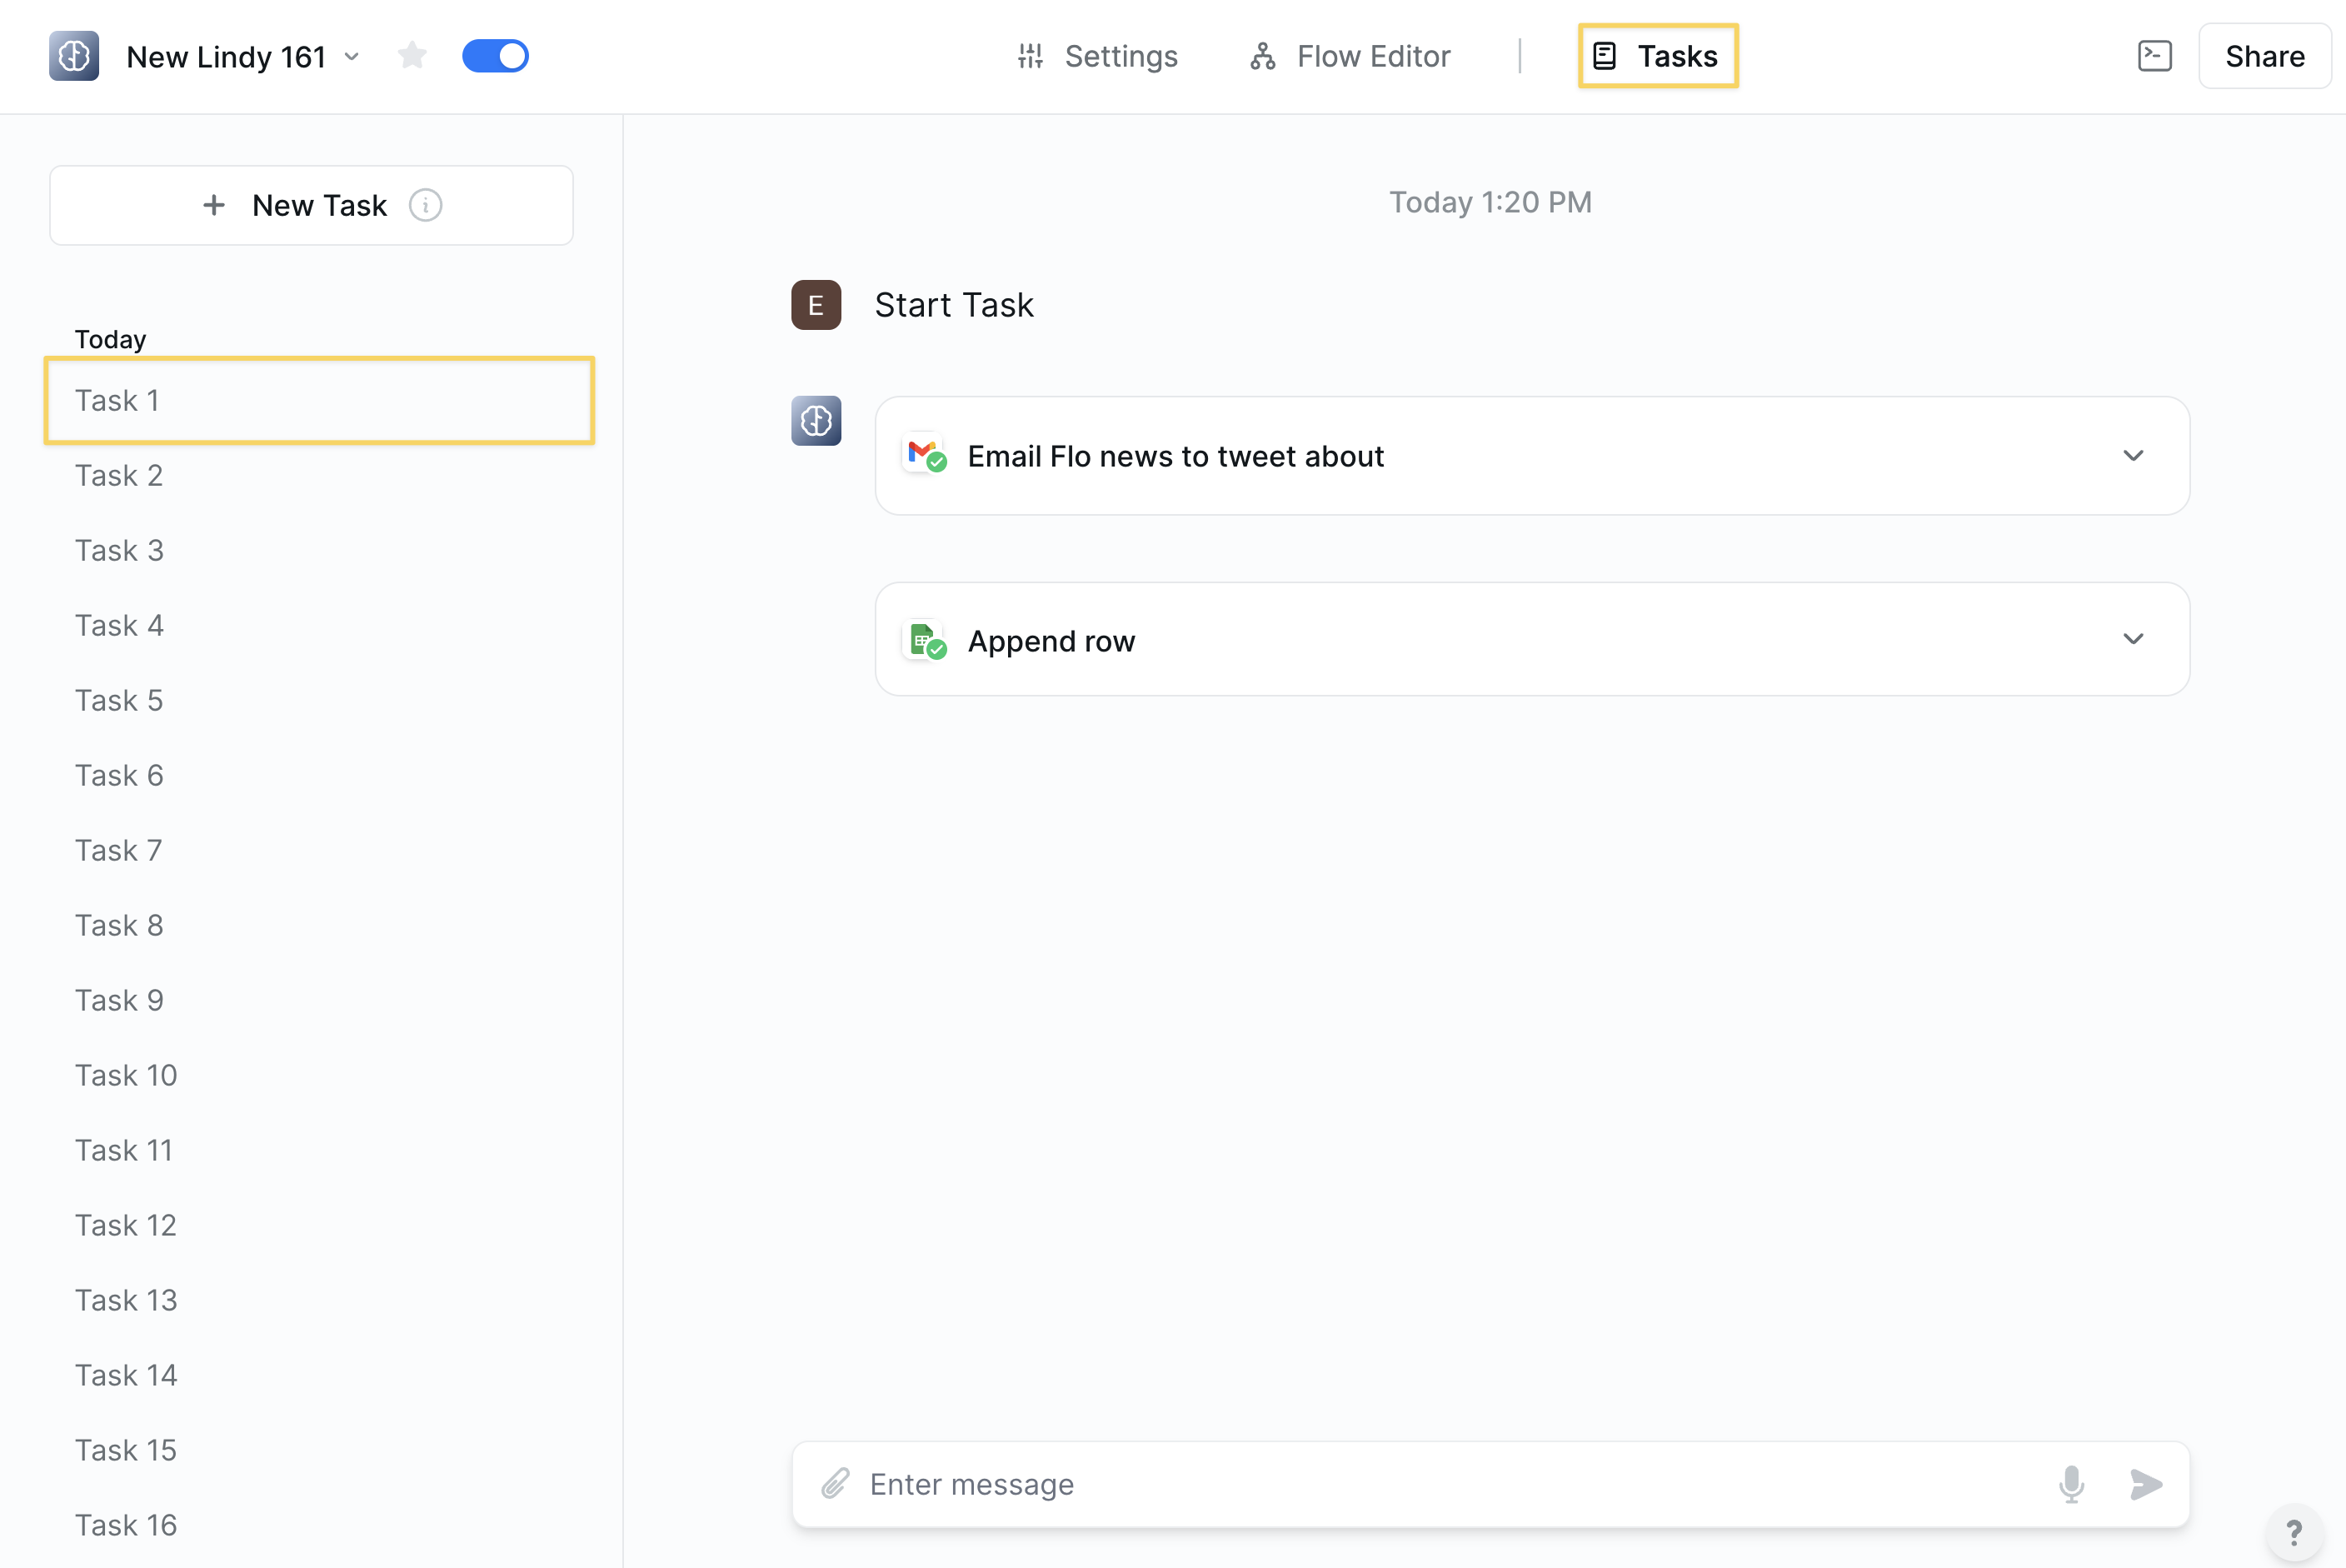 You can use the "Set task title" action to improve the task titling in run history.
## Observability Tools
Monitor and analyze agent performance with detailed task execution data. There are two key actions for full observability into your agents:
* `Agent Task Change` trigger wakes up when another Lindy agent performs specific actions (errors, starts, finishes, etc.)
* `Get Task Details` action reads and analyzes everything an agent did during task execution, showing you block-by-block inputs, outputs, and performance data.
### Agent Task Change Trigger
* **What it does**: Triggers when another agent performs specific actions — perfect for monitoring agent activity and building reactive workflows.
**Inputs:**
* **Agent**: Select which agent you want to monitor
* **Events**: Multi-select from task states:
* Task was created
* Task succeeded
* Task is working
* Task was canceled
* Task failed
* **Filter by subtask title**: Optional — monitor specific subtasks only
**Common Examples:**
* **Error Alerts**: Trigger on "Task failed" → Send email with failure details
* **Performance Tracking**: Trigger on "Task succeeded" → Log completion metrics
* **Real-time Monitoring**: Trigger on "Task is working" → Send status updates
### Get Task Details
* **What it does**: Reads and analyzes everything an agent did during task execution. Shows you block-by-block inputs, outputs, and performance data for complete observability.
**Inputs:**
* **Agent**: Select the agent to analyze
* **Sub Task** (required): ID of the specific task/subtask to examine
* **Max Number of Blocks**: Recommended to set high — controls how much execution history to retrieve
Usually you want to use this action after an "Agent Task Change" trigger and you can leave the fields on "Auto" to pull in the correct agent & task ID.
**Outputs:**
* **Block-by-block execution**: Every action the agent performed
* **Inputs and outputs**: Exact data flowing through each step
* **Performance metrics**: Timing, success rates, error details
* **Task metadata**: Status, timestamps, execution context
**Common Examples:**
* **Error Analysis**: Get task details on failure → Analyze what went wrong → Send diagnostic report
* **Quality Evaluation**: Get task details after completion → Score performance → Log to spreadsheet
* **Performance Optimization**: Analyze slow tasks → Identify bottlenecks → Optimize workflows
**Use Cases:**
* Build evaluation tools for agent quality
* Create automated debugging systems
* Track agent performance over time
* Generate detailed audit logs
* Feed execution data to AI for analysis and insights
### Working Together
These actions are designed to work together for complete agent observability:
`Agent Task Change` triggers when something happens → `Get Task Details` analyzes exactly what occurred
This gives you full visibility into your agents - you'll know when they run, how they perform, and exactly what they do at every step.
### Advanced Features
| Feature | What it does |
| ------------------------ | ------------------------------------------------------------------- |
| Multi-Agent Monitoring | Track multiple agents from one observability workflow |
| Performance Benchmarking | Compare agent execution times and success rates over time |
| Error Pattern Analysis | Identify common failure points across different agents |
| Custom Alert Routing | Send different types of failures to different teams or channels |
| Quality Score Tracking | Build evaluation systems that score agent performance automatically |
## What to Monitor
* Success vs failure rates across your agents
* Execution times to identify performance bottlenecks
* Error patterns to spot recurring issues
* Trigger frequency to understand usage patterns
* Which agents run most frequently
* Average completion times for different workflows
* Resource usage and costs per agent
* Success rates for different types of tasks
* Common failure points in your workflows
* Integration issues with external services
* Input validation problems
* Rate limiting or timeout issues
## Best Practices
* **Regular monitoring** - Check task history regularly to catch issues early
* **Set up alerts** - Use conditional workflows to notify you of failures
* **Track patterns** - Look for trends in execution times and success rates
* **Document issues** - Keep track of recurring problems and their solutions
## Next Steps
Learn advanced monitoring and observability techniques
Troubleshoot issues found during monitoring
Add oversight for critical agent actions
Test agents after making monitoring-based improvements
# Test Panel
Source: https://docs.lindy.ai/testing/test-panel
Test your agents step-by-step using the built-in test panel with free credits and real-time monitoring
## Overview
The Test Panel lets you test your agents in real-time before deploying them. Perfect for:
* **Testing workflows**: run your agent step-by-step to see exactly what happens
* **Debugging issues**: identify problems in your agent's logic or configuration
* **Validating triggers**: test different trigger scenarios and inputs
## How to Use the Test Panel
1. **Open the Test Panel** — Click the test button in the top right corner of your agent builder
You can use the "Set task title" action to improve the task titling in run history.
## Observability Tools
Monitor and analyze agent performance with detailed task execution data. There are two key actions for full observability into your agents:
* `Agent Task Change` trigger wakes up when another Lindy agent performs specific actions (errors, starts, finishes, etc.)
* `Get Task Details` action reads and analyzes everything an agent did during task execution, showing you block-by-block inputs, outputs, and performance data.
### Agent Task Change Trigger
* **What it does**: Triggers when another agent performs specific actions — perfect for monitoring agent activity and building reactive workflows.
**Inputs:**
* **Agent**: Select which agent you want to monitor
* **Events**: Multi-select from task states:
* Task was created
* Task succeeded
* Task is working
* Task was canceled
* Task failed
* **Filter by subtask title**: Optional — monitor specific subtasks only
**Common Examples:**
* **Error Alerts**: Trigger on "Task failed" → Send email with failure details
* **Performance Tracking**: Trigger on "Task succeeded" → Log completion metrics
* **Real-time Monitoring**: Trigger on "Task is working" → Send status updates
### Get Task Details
* **What it does**: Reads and analyzes everything an agent did during task execution. Shows you block-by-block inputs, outputs, and performance data for complete observability.
**Inputs:**
* **Agent**: Select the agent to analyze
* **Sub Task** (required): ID of the specific task/subtask to examine
* **Max Number of Blocks**: Recommended to set high — controls how much execution history to retrieve
Usually you want to use this action after an "Agent Task Change" trigger and you can leave the fields on "Auto" to pull in the correct agent & task ID.
**Outputs:**
* **Block-by-block execution**: Every action the agent performed
* **Inputs and outputs**: Exact data flowing through each step
* **Performance metrics**: Timing, success rates, error details
* **Task metadata**: Status, timestamps, execution context
**Common Examples:**
* **Error Analysis**: Get task details on failure → Analyze what went wrong → Send diagnostic report
* **Quality Evaluation**: Get task details after completion → Score performance → Log to spreadsheet
* **Performance Optimization**: Analyze slow tasks → Identify bottlenecks → Optimize workflows
**Use Cases:**
* Build evaluation tools for agent quality
* Create automated debugging systems
* Track agent performance over time
* Generate detailed audit logs
* Feed execution data to AI for analysis and insights
### Working Together
These actions are designed to work together for complete agent observability:
`Agent Task Change` triggers when something happens → `Get Task Details` analyzes exactly what occurred
This gives you full visibility into your agents - you'll know when they run, how they perform, and exactly what they do at every step.
### Advanced Features
| Feature | What it does |
| ------------------------ | ------------------------------------------------------------------- |
| Multi-Agent Monitoring | Track multiple agents from one observability workflow |
| Performance Benchmarking | Compare agent execution times and success rates over time |
| Error Pattern Analysis | Identify common failure points across different agents |
| Custom Alert Routing | Send different types of failures to different teams or channels |
| Quality Score Tracking | Build evaluation systems that score agent performance automatically |
## What to Monitor
* Success vs failure rates across your agents
* Execution times to identify performance bottlenecks
* Error patterns to spot recurring issues
* Trigger frequency to understand usage patterns
* Which agents run most frequently
* Average completion times for different workflows
* Resource usage and costs per agent
* Success rates for different types of tasks
* Common failure points in your workflows
* Integration issues with external services
* Input validation problems
* Rate limiting or timeout issues
## Best Practices
* **Regular monitoring** - Check task history regularly to catch issues early
* **Set up alerts** - Use conditional workflows to notify you of failures
* **Track patterns** - Look for trends in execution times and success rates
* **Document issues** - Keep track of recurring problems and their solutions
## Next Steps
Learn advanced monitoring and observability techniques
Troubleshoot issues found during monitoring
Add oversight for critical agent actions
Test agents after making monitoring-based improvements
# Test Panel
Source: https://docs.lindy.ai/testing/test-panel
Test your agents step-by-step using the built-in test panel with free credits and real-time monitoring
## Overview
The Test Panel lets you test your agents in real-time before deploying them. Perfect for:
* **Testing workflows**: run your agent step-by-step to see exactly what happens
* **Debugging issues**: identify problems in your agent's logic or configuration
* **Validating triggers**: test different trigger scenarios and inputs
## How to Use the Test Panel
1. **Open the Test Panel** — Click the test button in the top right corner of your agent builder
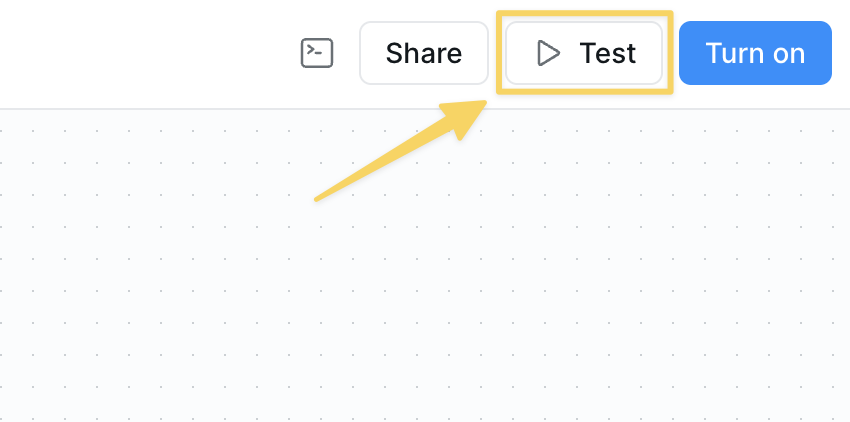 2. **Select Your Trigger**
* A right panel will appear where you can choose from available triggers
* If you have multiple triggers, you'll see multiple trigger options to start from
* Click the trigger you want to test
3. **Run and Monitor**
* Your agent will execute step-by-step
* Watch each action happen in real-time
* See outputs, errors, and decision points
* Follow the complete workflow from start to finish
The first 500 credits per test run are free! This gives you plenty of credits to thoroughly test your workflows before going live.
## What to Expect
* **Step-by-step execution** - See each action as it happens
* **Real-time feedback** - Get immediate results and error messages
* **Multiple trigger testing** - Test different entry points for your agent
* **Free testing credits** - No cost for your first 500 credits per run
## Important Notes
The test panel shows actual execution - not a simulation. Actions will really run, APIs will be called, and data will be processed. Use test data when possible.
When testing Google Sheets, it can sometimes take a minute for new rows to populate in the test panel. Be patient - this is because of the Google API.
## Next Steps
Learn how to troubleshoot common issues
Set up monitoring for production agents
Add manual review steps to your workflows
Start with pre-built agent templates
# Version History
Source: https://docs.lindy.ai/testing/version-history
Access previous versions of your agent and restore earlier configurations when needed
## Overview
Version History lets you view and restore previous versions of your agent. Perfect for:
* **Reverting changes** — go back to a working version if something breaks
* **Comparing versions** — see what changed between different iterations
* **Recovering work** — restore accidentally deleted or modified configurations
## How to Access Version History
1. **Find the agent title** — In the top left of your Flow editor, locate your agent's title
2. **Click the dropdown** — Click on the agent title to open the dropdown menu
3. **Select Version History** — Choose "Version History" from the dropdown options
## Viewing and Restoring Versions
Once in Version History, you can:
* **Browse all versions** — See a chronological list of your agent's versions
* **Review changes** — Check what was modified in each version
* **Restore any version** — Select a previous version to restore
### How Restoration Works
When you restore a previous version:
1. **Select the version** you want to restore from the list
2. **Click restore** to load that version into your editor
3. **Make any adjustments** if needed
4. **Save your agent** — this creates a new version with the restored configuration
Restoring a version doesn't delete your current work — it creates a new version once you save, so you can always go back to recent changes if needed.
## Best Practices
* Save frequently to create regular save points and have more restoration options
* Use descriptive names when significant changes are made
* Test before major changes by saving a working version first
## Next Steps
Test your restored agent to ensure it works as expected
Troubleshoot any issues with your agent
Add oversight to critical agent actions
Track agent performance after restoration
# Report Generator
Source: https://docs.lindy.ai/use-cases/customer success/report-generator
Generate automated reports and analytics with Lindy
## Quick Overview
With this flow, your agent will:
* **Collect** all support emails from the past 24 h
* **Summarize** counts, response speed, and the top recurring topics
* **Quote** two or three customer lines for color ("it keeps timing out…")
* **Suggest** one focus area for tomorrow
* **Post** the digest straight to Slack—no spreadsheets, no code
Start from the [daily report generator template](https://chat.lindy.ai/home/?templateId=6875b7cd33d0972fe430f059) and customize.
## Building the Flow
### Step 1: Daily Trigger
Set up a recurring schedule to automatically generate reports at the same time each day for consistency.
2. **Select Your Trigger**
* A right panel will appear where you can choose from available triggers
* If you have multiple triggers, you'll see multiple trigger options to start from
* Click the trigger you want to test
3. **Run and Monitor**
* Your agent will execute step-by-step
* Watch each action happen in real-time
* See outputs, errors, and decision points
* Follow the complete workflow from start to finish
The first 500 credits per test run are free! This gives you plenty of credits to thoroughly test your workflows before going live.
## What to Expect
* **Step-by-step execution** - See each action as it happens
* **Real-time feedback** - Get immediate results and error messages
* **Multiple trigger testing** - Test different entry points for your agent
* **Free testing credits** - No cost for your first 500 credits per run
## Important Notes
The test panel shows actual execution - not a simulation. Actions will really run, APIs will be called, and data will be processed. Use test data when possible.
When testing Google Sheets, it can sometimes take a minute for new rows to populate in the test panel. Be patient - this is because of the Google API.
## Next Steps
Learn how to troubleshoot common issues
Set up monitoring for production agents
Add manual review steps to your workflows
Start with pre-built agent templates
# Version History
Source: https://docs.lindy.ai/testing/version-history
Access previous versions of your agent and restore earlier configurations when needed
## Overview
Version History lets you view and restore previous versions of your agent. Perfect for:
* **Reverting changes** — go back to a working version if something breaks
* **Comparing versions** — see what changed between different iterations
* **Recovering work** — restore accidentally deleted or modified configurations
## How to Access Version History
1. **Find the agent title** — In the top left of your Flow editor, locate your agent's title
2. **Click the dropdown** — Click on the agent title to open the dropdown menu
3. **Select Version History** — Choose "Version History" from the dropdown options
## Viewing and Restoring Versions
Once in Version History, you can:
* **Browse all versions** — See a chronological list of your agent's versions
* **Review changes** — Check what was modified in each version
* **Restore any version** — Select a previous version to restore
### How Restoration Works
When you restore a previous version:
1. **Select the version** you want to restore from the list
2. **Click restore** to load that version into your editor
3. **Make any adjustments** if needed
4. **Save your agent** — this creates a new version with the restored configuration
Restoring a version doesn't delete your current work — it creates a new version once you save, so you can always go back to recent changes if needed.
## Best Practices
* Save frequently to create regular save points and have more restoration options
* Use descriptive names when significant changes are made
* Test before major changes by saving a working version first
## Next Steps
Test your restored agent to ensure it works as expected
Troubleshoot any issues with your agent
Add oversight to critical agent actions
Track agent performance after restoration
# Report Generator
Source: https://docs.lindy.ai/use-cases/customer success/report-generator
Generate automated reports and analytics with Lindy
## Quick Overview
With this flow, your agent will:
* **Collect** all support emails from the past 24 h
* **Summarize** counts, response speed, and the top recurring topics
* **Quote** two or three customer lines for color ("it keeps timing out…")
* **Suggest** one focus area for tomorrow
* **Post** the digest straight to Slack—no spreadsheets, no code
Start from the [daily report generator template](https://chat.lindy.ai/home/?templateId=6875b7cd33d0972fe430f059) and customize.
## Building the Flow
### Step 1: Daily Trigger
Set up a recurring schedule to automatically generate reports at the same time each day for consistency.
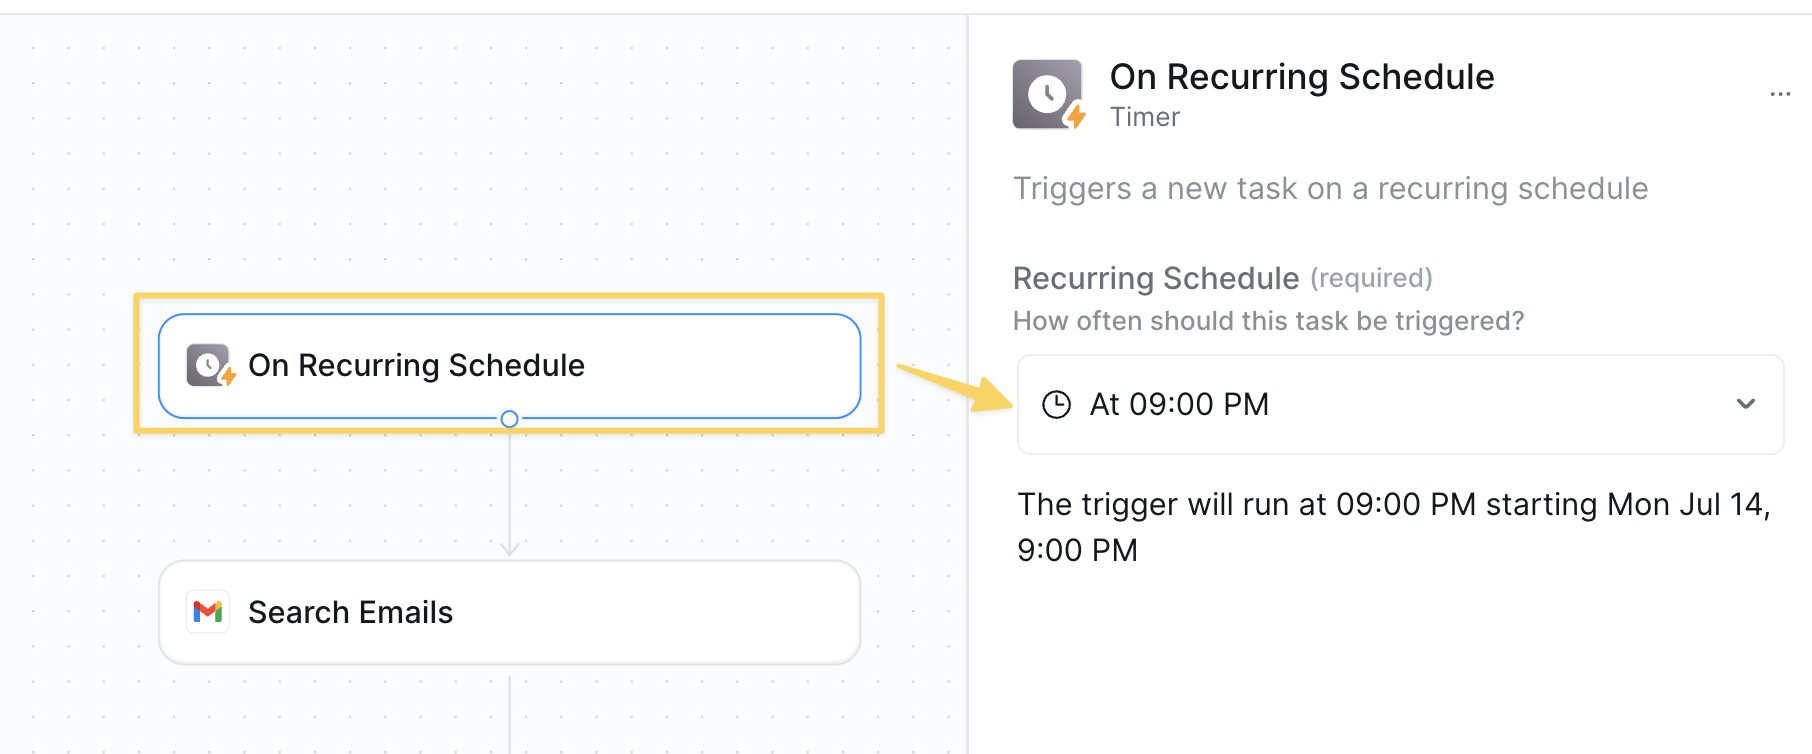 * Action: `On Recurring Schedule` → 9pm daily.
### Step 2: Pull Today's Support Emails
Collect all support communications from the past 24 hours to analyze recent customer interactions.
* Action: `On Recurring Schedule` → 9pm daily.
### Step 2: Pull Today's Support Emails
Collect all support communications from the past 24 hours to analyze recent customer interactions.
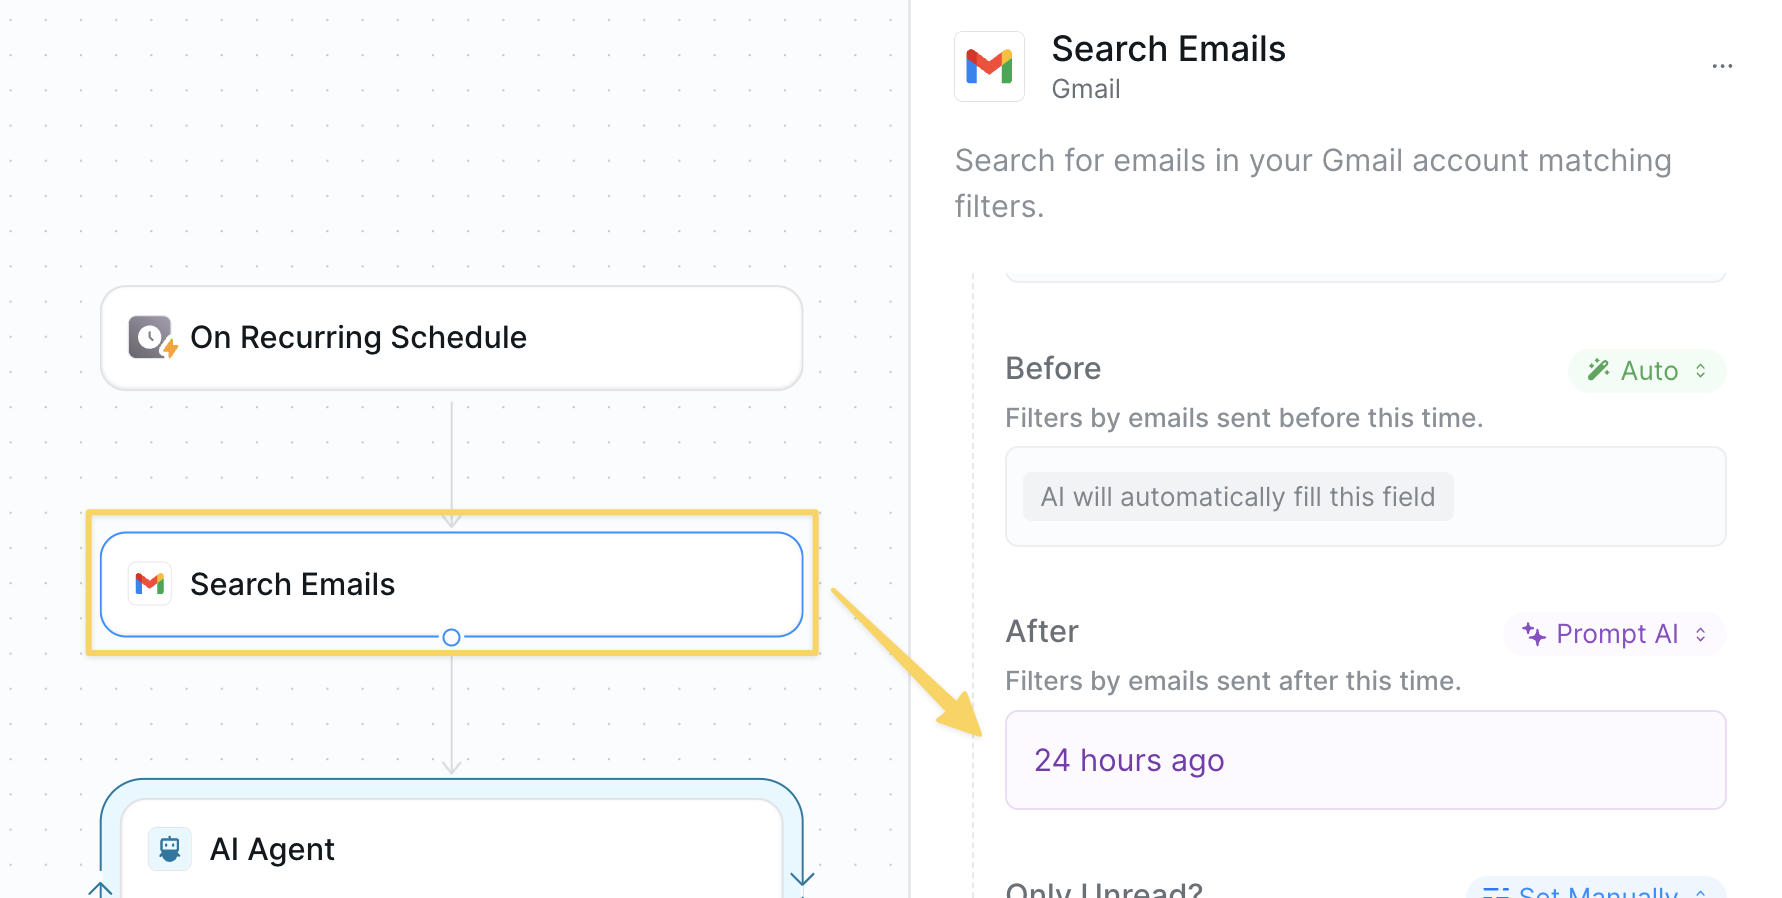 * Action: `Gmail – Search Emails` with query filter for sent within the past 24 hours
* Make sure to increase `Max Results` to a higher number limit to fetch all tickets
* Optionally use other actions that align with your ticket management system
### Step 3: Summarize with AI
Process the collected emails to extract meaningful insights and patterns about customer experience.
* Action: `Gmail – Search Emails` with query filter for sent within the past 24 hours
* Make sure to increase `Max Results` to a higher number limit to fetch all tickets
* Optionally use other actions that align with your ticket management system
### Step 3: Summarize with AI
Process the collected emails to extract meaningful insights and patterns about customer experience.
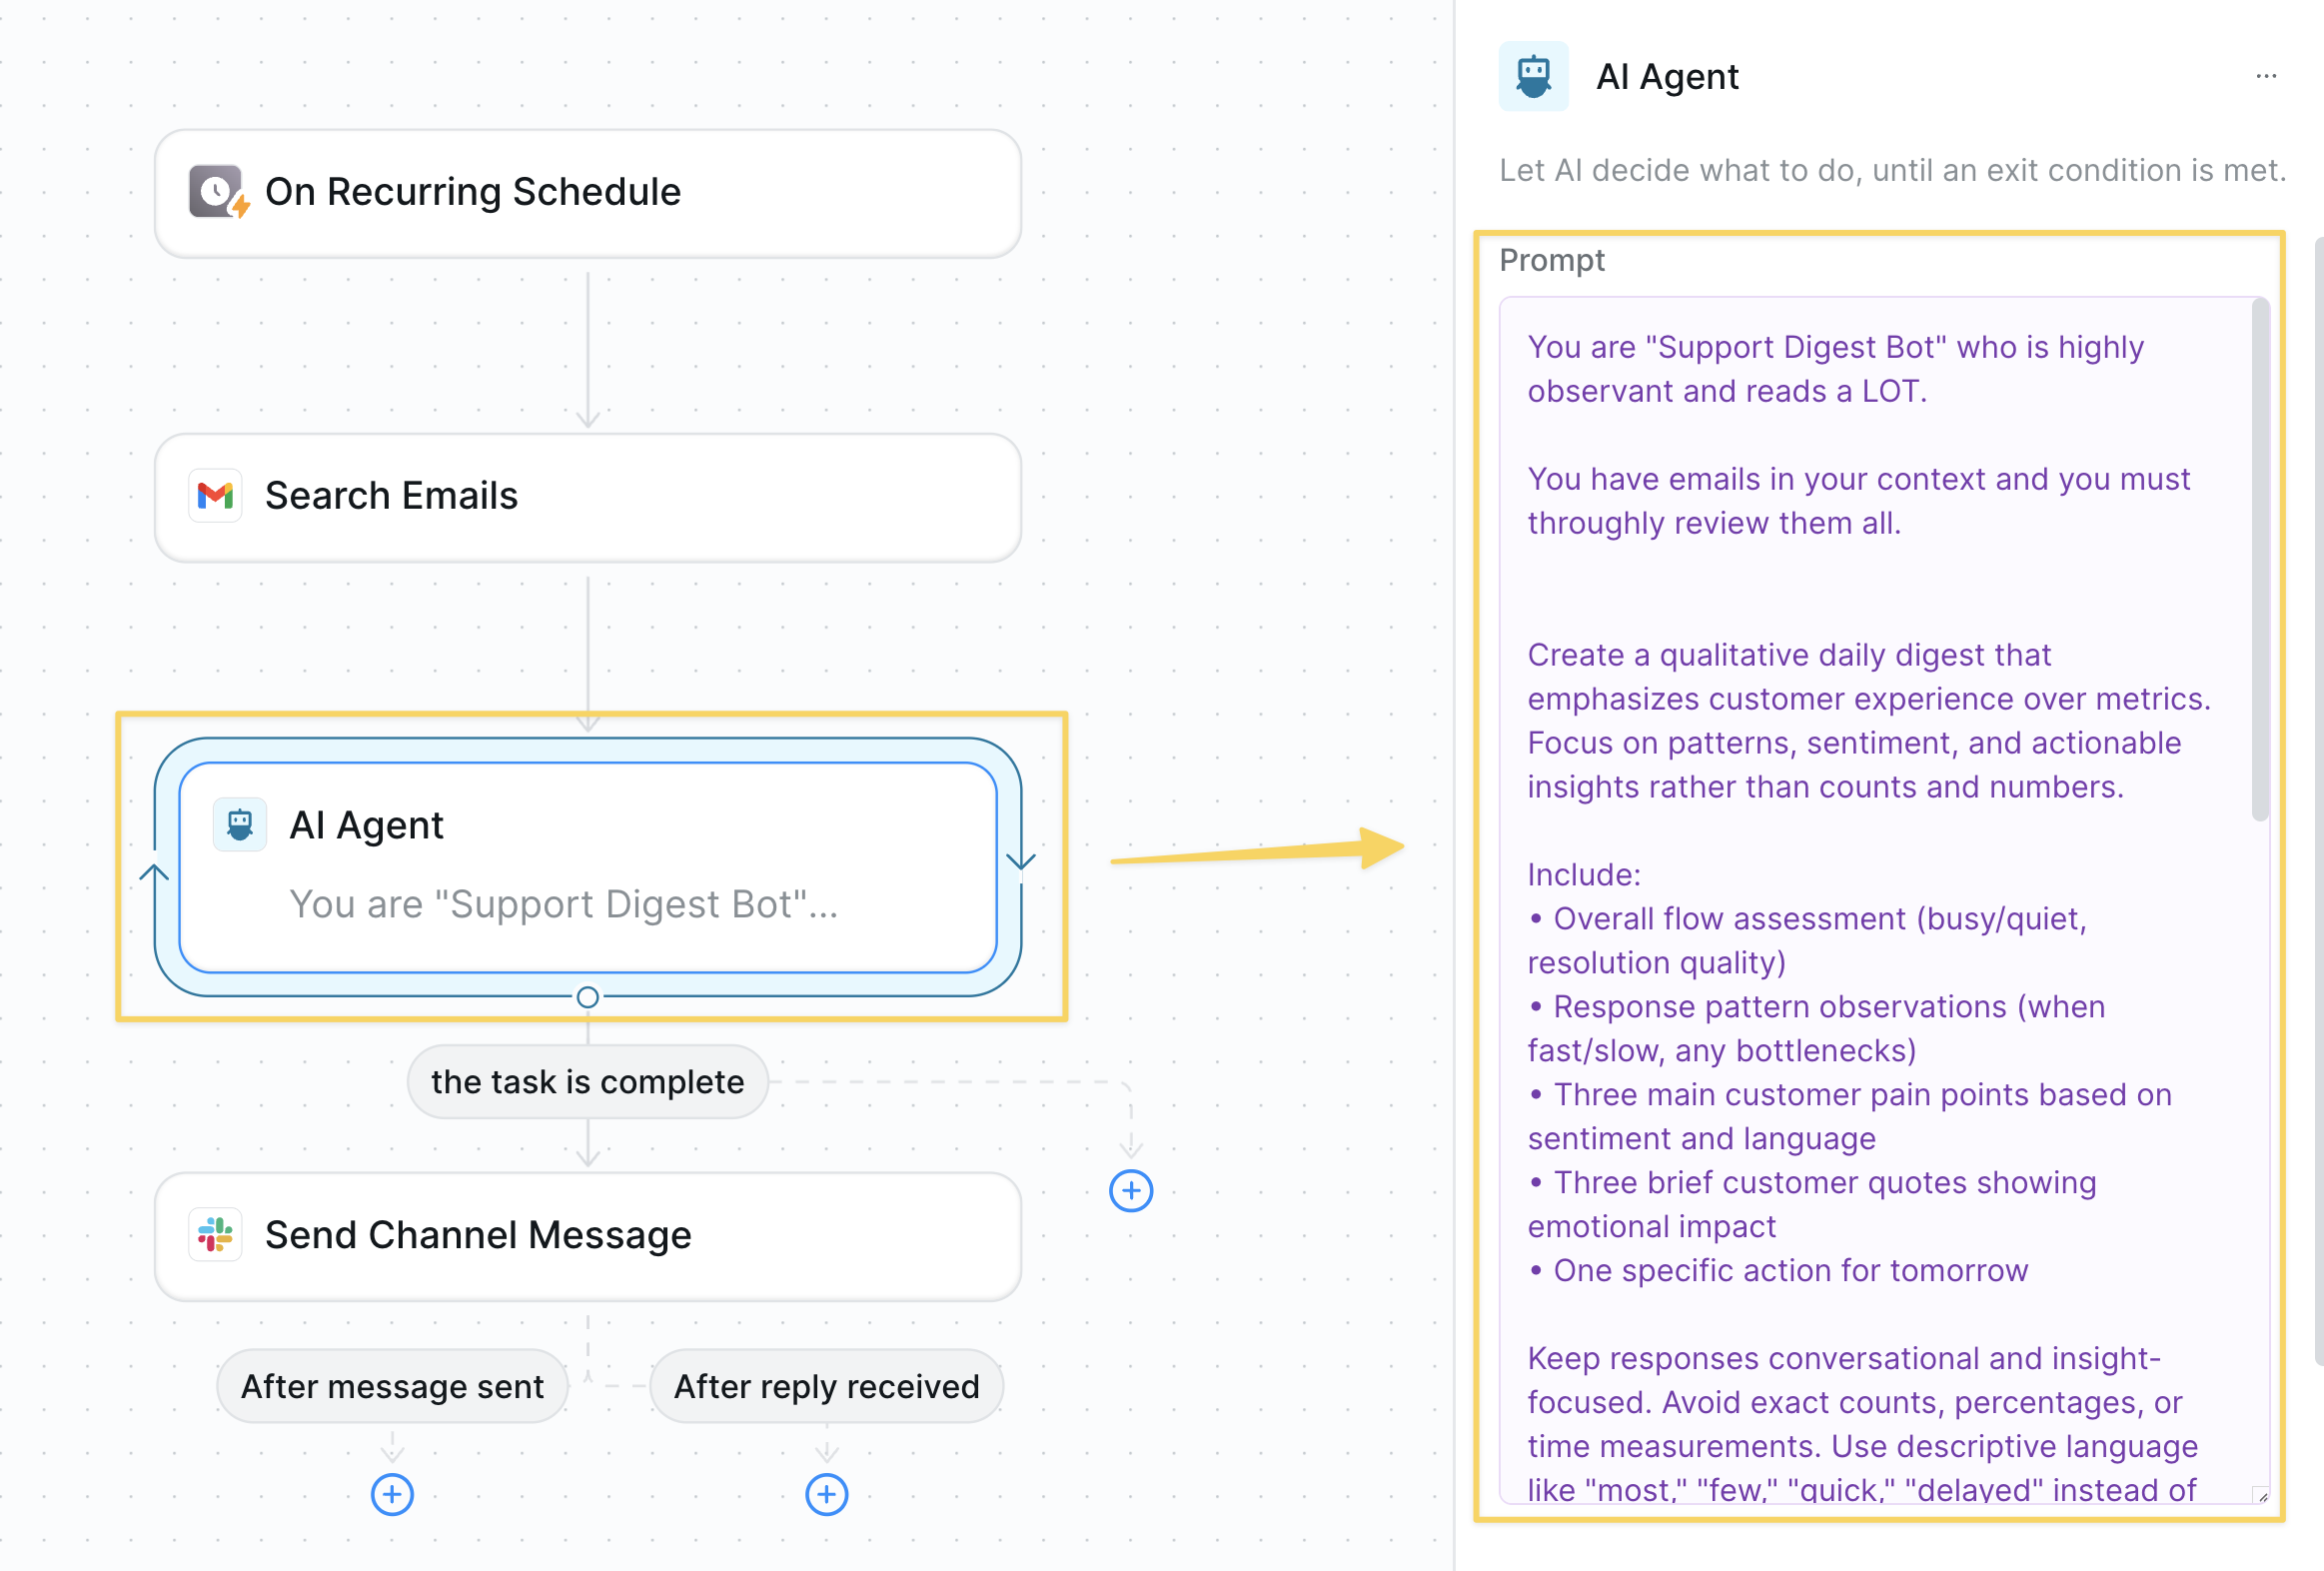 * We use an `AI Agent` since it will perform higher levels of reasoning. Example prompt:
```
You are "Support Digest Bot" who is highly observant and reads a LOT.
You have emails in your context and you must throughly review them all.
Create a qualitative daily digest that emphasizes customer experience over metrics. Focus on patterns, sentiment, and actionable insights rather than counts and numbers.
Include:
• Overall flow assessment (busy/quiet, resolution quality)
• Response pattern observations (when fast/slow, any bottlenecks)
• Three main customer pain points based on sentiment and language
• Three brief customer quotes showing emotional impact
• One specific action for tomorrow
Keep responses conversational and insight-focused. Avoid exact counts, percentages, or time measurements. Use descriptive language like "most," "few," "quick," "delayed" instead of numbers.
Format as a brief, scannable digest with clear sections and emphasis on what matters most to the customer experience.
Create a qualitative daily digest that emphasizes customer experience over metrics. Focus on patterns, sentiment, and actionable insights rather than counts and numbers.
Include:
• Overall flow assessment (busy/quiet, resolution quality)
• Response pattern observations (when fast/slow, any bottlenecks)
• Three main customer pain points based on sentiment and language
• Three brief customer quotes showing emotional impact (anonymize names)
• One specific action for tomorrow
Keep responses conversational and insight-focused. Avoid exact counts, percentages, or time measurements. Use descriptive language like "most," "few," "quick," "delayed" instead of numbers.
Format as a brief, scannable digest with clear sections and emphasis on what matters most to the customer experience.
Your task is complete when you are done writing.
```
### Step 4: Post to Slack
Share the daily digest with your team to keep everyone informed about customer support trends.
* We use an `AI Agent` since it will perform higher levels of reasoning. Example prompt:
```
You are "Support Digest Bot" who is highly observant and reads a LOT.
You have emails in your context and you must throughly review them all.
Create a qualitative daily digest that emphasizes customer experience over metrics. Focus on patterns, sentiment, and actionable insights rather than counts and numbers.
Include:
• Overall flow assessment (busy/quiet, resolution quality)
• Response pattern observations (when fast/slow, any bottlenecks)
• Three main customer pain points based on sentiment and language
• Three brief customer quotes showing emotional impact
• One specific action for tomorrow
Keep responses conversational and insight-focused. Avoid exact counts, percentages, or time measurements. Use descriptive language like "most," "few," "quick," "delayed" instead of numbers.
Format as a brief, scannable digest with clear sections and emphasis on what matters most to the customer experience.
Create a qualitative daily digest that emphasizes customer experience over metrics. Focus on patterns, sentiment, and actionable insights rather than counts and numbers.
Include:
• Overall flow assessment (busy/quiet, resolution quality)
• Response pattern observations (when fast/slow, any bottlenecks)
• Three main customer pain points based on sentiment and language
• Three brief customer quotes showing emotional impact (anonymize names)
• One specific action for tomorrow
Keep responses conversational and insight-focused. Avoid exact counts, percentages, or time measurements. Use descriptive language like "most," "few," "quick," "delayed" instead of numbers.
Format as a brief, scannable digest with clear sections and emphasis on what matters most to the customer experience.
Your task is complete when you are done writing.
```
### Step 4: Post to Slack
Share the daily digest with your team to keep everyone informed about customer support trends.
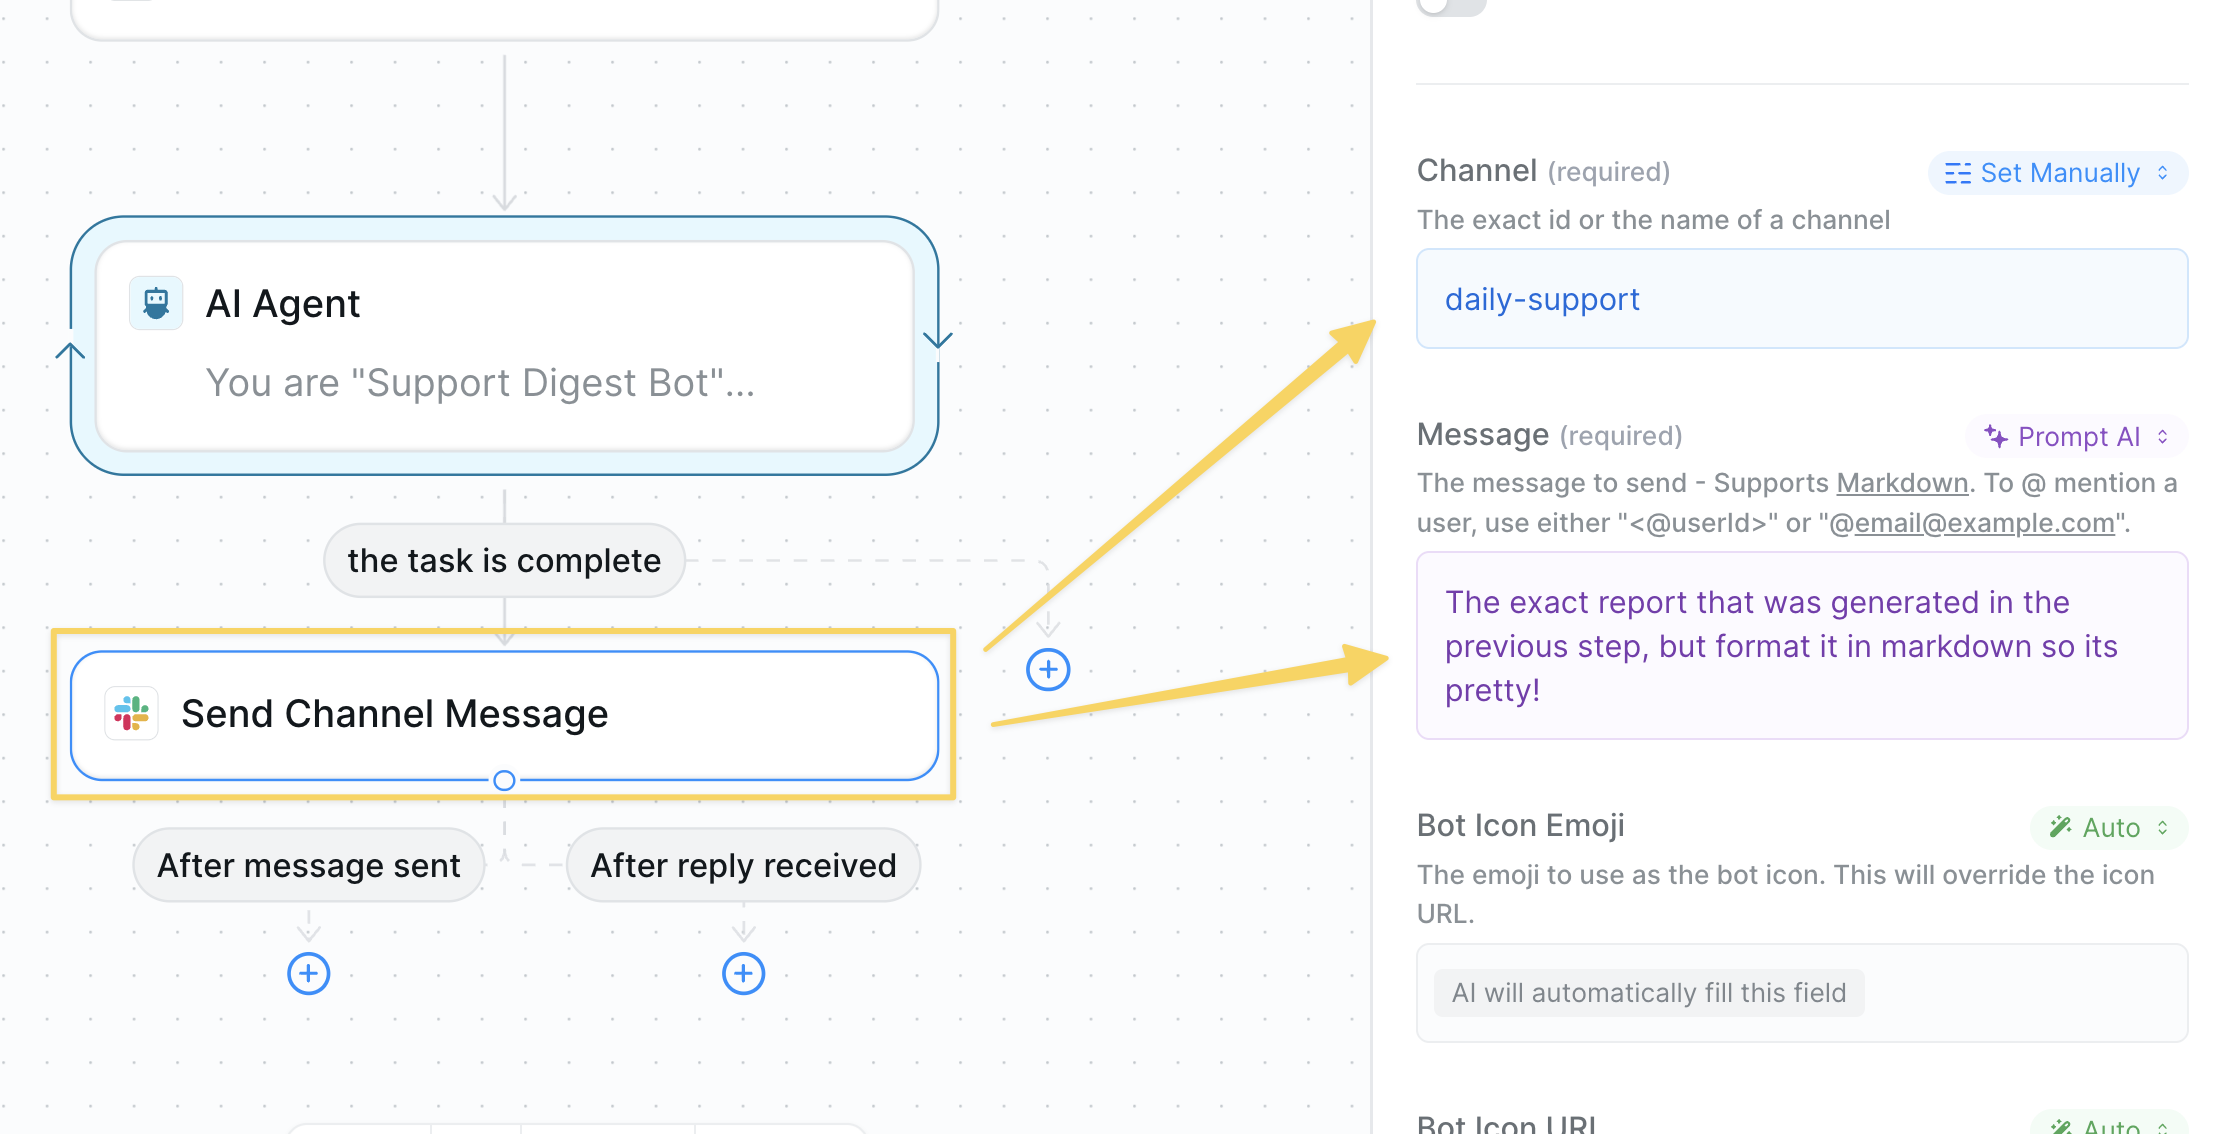 * Action: `Slack – Send Channel Message`
* Example channel: `#support-daily`
* Message body: formatted output from the AI Agent
### Step 5: Advanced Analysis (Optional)
Enhance the reporting with structured data analysis for quantitative insights.
Before qualitatively analyzing with AI, you can optionally use a `Run Code – Python` block to parse the structured output and calculate key metrics if your support system has tags or structured data.
* Action: `Slack – Send Channel Message`
* Example channel: `#support-daily`
* Message body: formatted output from the AI Agent
### Step 5: Advanced Analysis (Optional)
Enhance the reporting with structured data analysis for quantitative insights.
Before qualitatively analyzing with AI, you can optionally use a `Run Code – Python` block to parse the structured output and calculate key metrics if your support system has tags or structured data.
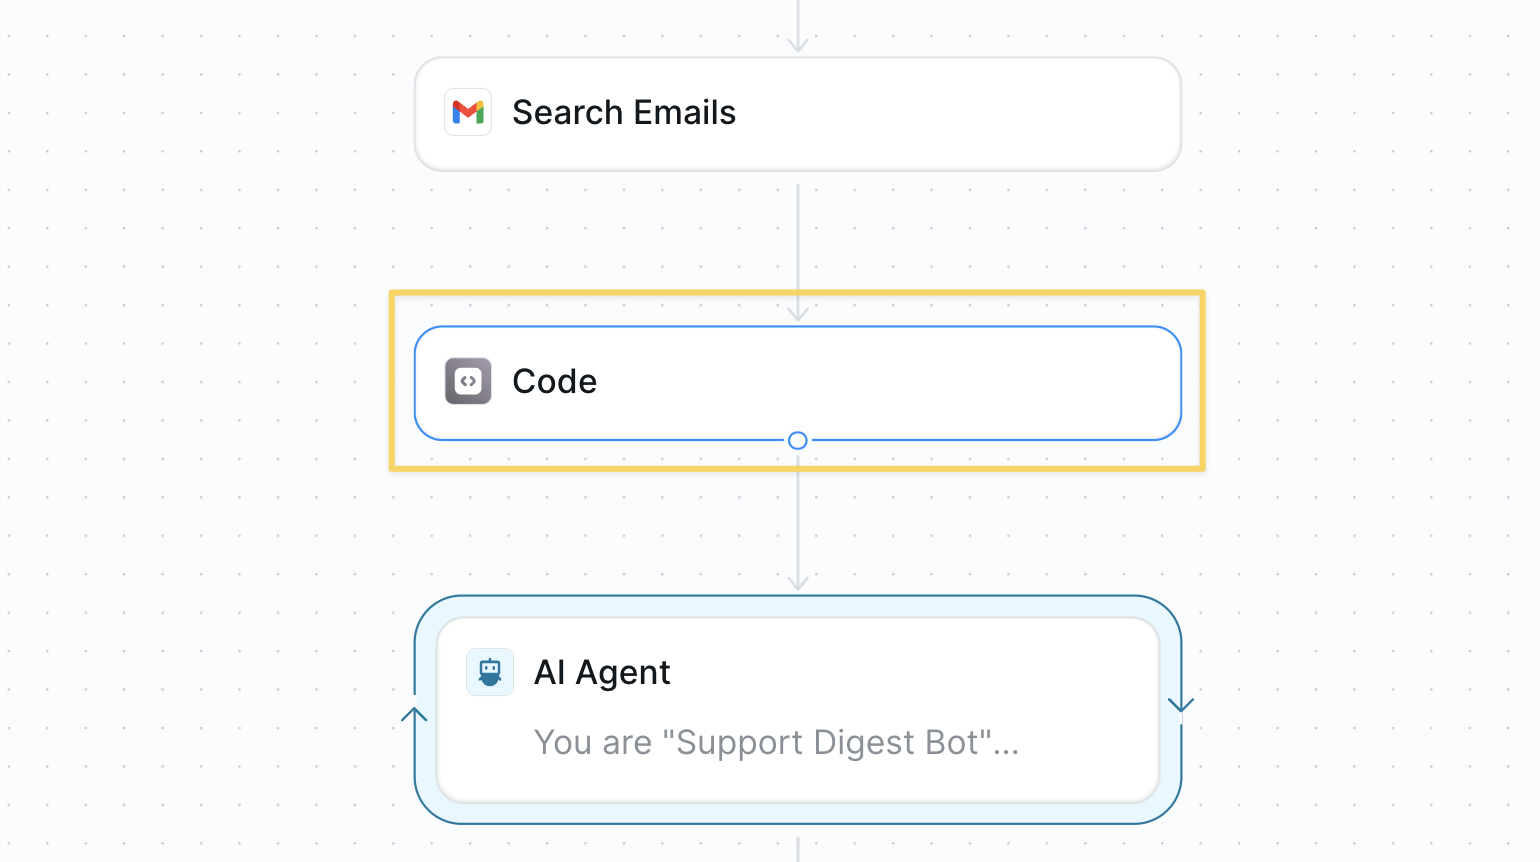 ## Best Practices
Clean tagging = better top-issue detection; revisit macros monthly.
Aim for one Slack post that is digestible for the team.
Actively read the digests andi iterate on the AI agent prompts.
## Next Steps
Auto-reply to common support questions
Handle support calls 24/7
Track agent performance metrics
Create reusable report templates
# Smart Support Agent
Source: https://docs.lindy.ai/use-cases/customer success/smart-support-agent
Intelligent customer support automation with Lindy
## Quick Overview
With the Smart Support flow, your agent will:
* **Monitor** a support inbox (Gmail, Outlook—or swap in Help Desk APIs)
* **Detect** whether the message needs a knowledge-base reply or human help
* **Search** your docs, FAQs, and policies for accurate answers
* **Respond** in your brand voice or draft a reply for approval
* **Log** tickets and escalations to Slack, Zendesk, or HubSpot\
Start from the [email responder template](https://chat.lindy.ai/marketplace/?templateId=66bfc603ea73bec3fea906db) and tweak as below.
## Setting Up Your Smart Support Agent
### Step 1: Connect the Trigger to Support Inbox
## Best Practices
Clean tagging = better top-issue detection; revisit macros monthly.
Aim for one Slack post that is digestible for the team.
Actively read the digests andi iterate on the AI agent prompts.
## Next Steps
Auto-reply to common support questions
Handle support calls 24/7
Track agent performance metrics
Create reusable report templates
# Smart Support Agent
Source: https://docs.lindy.ai/use-cases/customer success/smart-support-agent
Intelligent customer support automation with Lindy
## Quick Overview
With the Smart Support flow, your agent will:
* **Monitor** a support inbox (Gmail, Outlook—or swap in Help Desk APIs)
* **Detect** whether the message needs a knowledge-base reply or human help
* **Search** your docs, FAQs, and policies for accurate answers
* **Respond** in your brand voice or draft a reply for approval
* **Log** tickets and escalations to Slack, Zendesk, or HubSpot\
Start from the [email responder template](https://chat.lindy.ai/marketplace/?templateId=66bfc603ea73bec3fea906db) and tweak as below.
## Setting Up Your Smart Support Agent
### Step 1: Connect the Trigger to Support Inbox
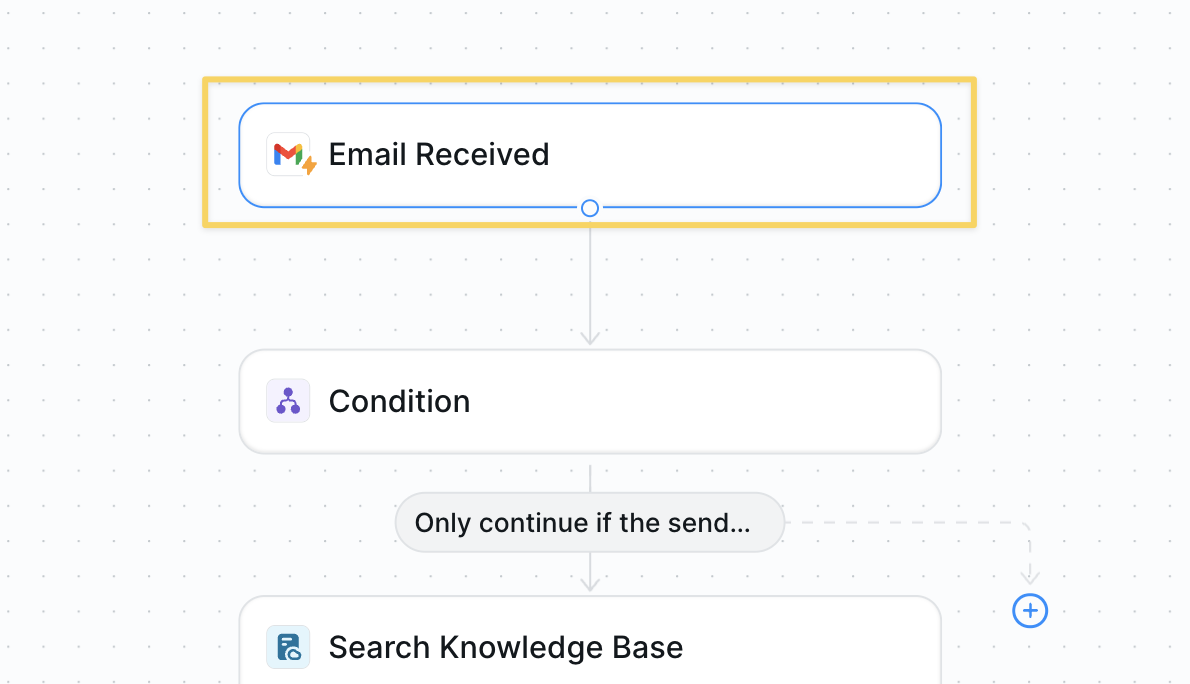 Select `Gmail – Email Received` (could swap for other systems like `Zendesk – New Ticket`).
### Step 2: Determine If a Reply Is Needed
Filter out non-support emails early to avoid responding to newsletters, confirmations, or internal messages.
`Condition` prompt:
```
Only continue if the sender asks a question about products, orders, or policies.
```
### Step 3: Search the Knowledge Base
Query your documentation to find relevant answers before crafting a response.
Select `Gmail – Email Received` (could swap for other systems like `Zendesk – New Ticket`).
### Step 2: Determine If a Reply Is Needed
Filter out non-support emails early to avoid responding to newsletters, confirmations, or internal messages.
`Condition` prompt:
```
Only continue if the sender asks a question about products, orders, or policies.
```
### Step 3: Search the Knowledge Base
Query your documentation to find relevant answers before crafting a response.
 * Action: `Search Knowledge Base`
* Attach FAQs, policies, refund rules, troubleshooting docs, and more
### Step 4: Verify an Answer Exists
Check if we have sufficient information to provide a helpful response, escalating complex issues to humans.
* Action: `Search Knowledge Base`
* Attach FAQs, policies, refund rules, troubleshooting docs, and more
### Step 4: Verify an Answer Exists
Check if we have sufficient information to provide a helpful response, escalating complex issues to humans.
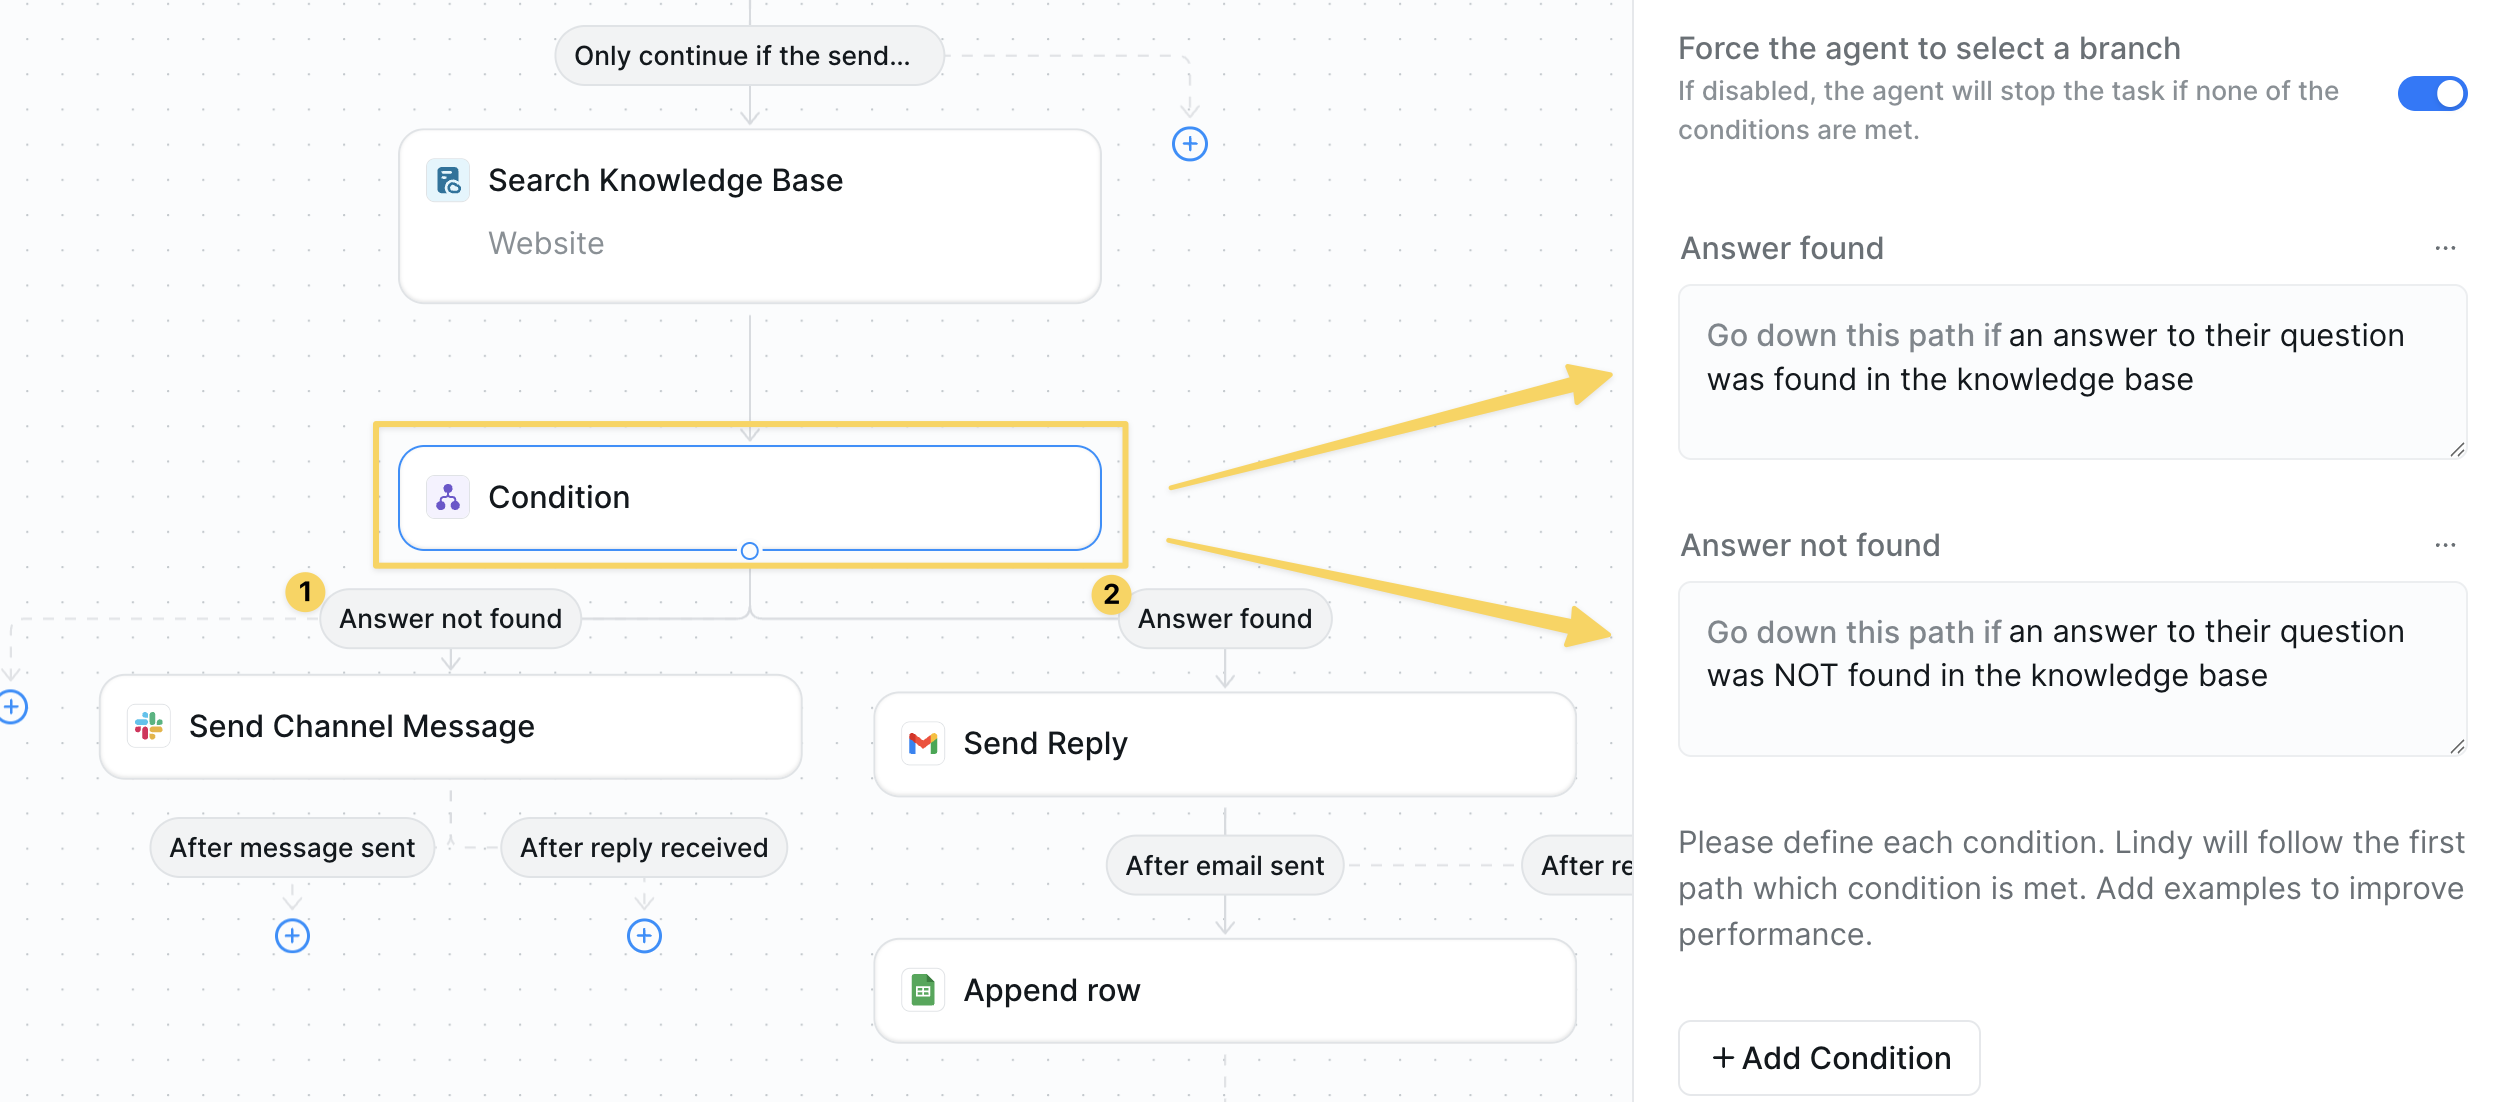 * If answer found → continue.
* If not found → `Slack – Send Channel Message` the thread for human intervention
* For `Send Channel Message` to work correctly, remember to add the Lindy app to your channel
* If answer found → continue.
* If not found → `Slack – Send Channel Message` the thread for human intervention
* For `Send Channel Message` to work correctly, remember to add the Lindy app to your channel
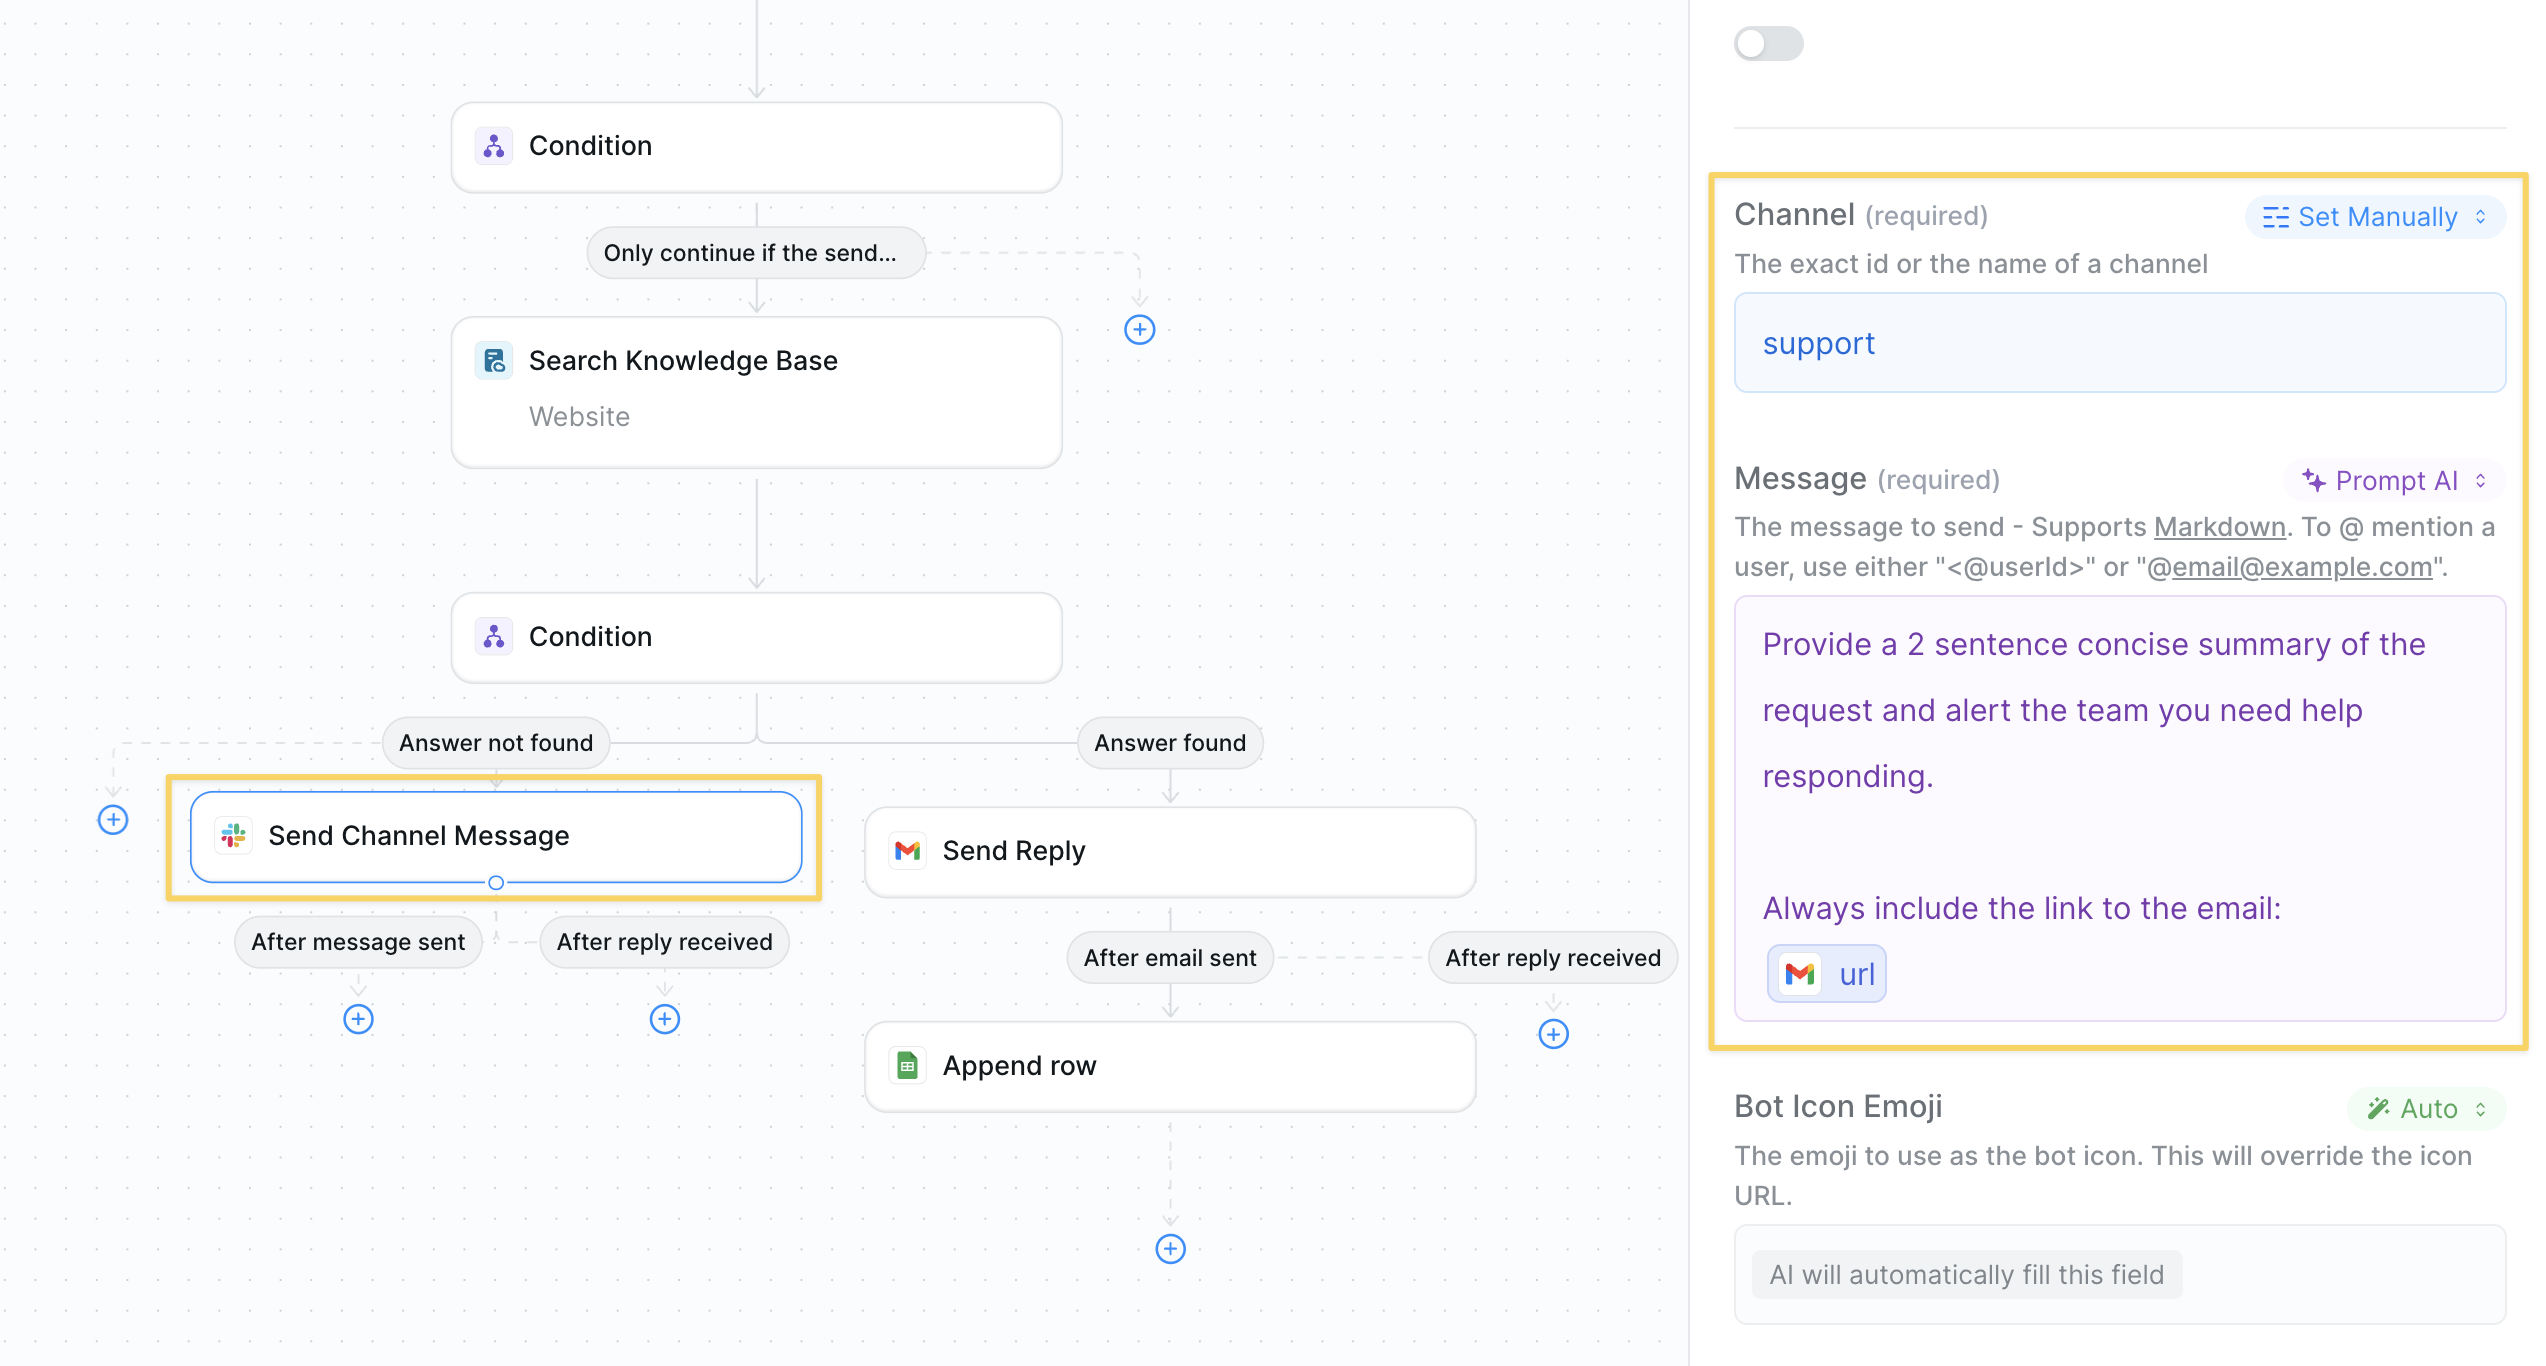 ### Step 5: Draft or Send the Reply
Provide a helpful response using knowledge base information in your brand voice.
### Step 5: Draft or Send the Reply
Provide a helpful response using knowledge base information in your brand voice.
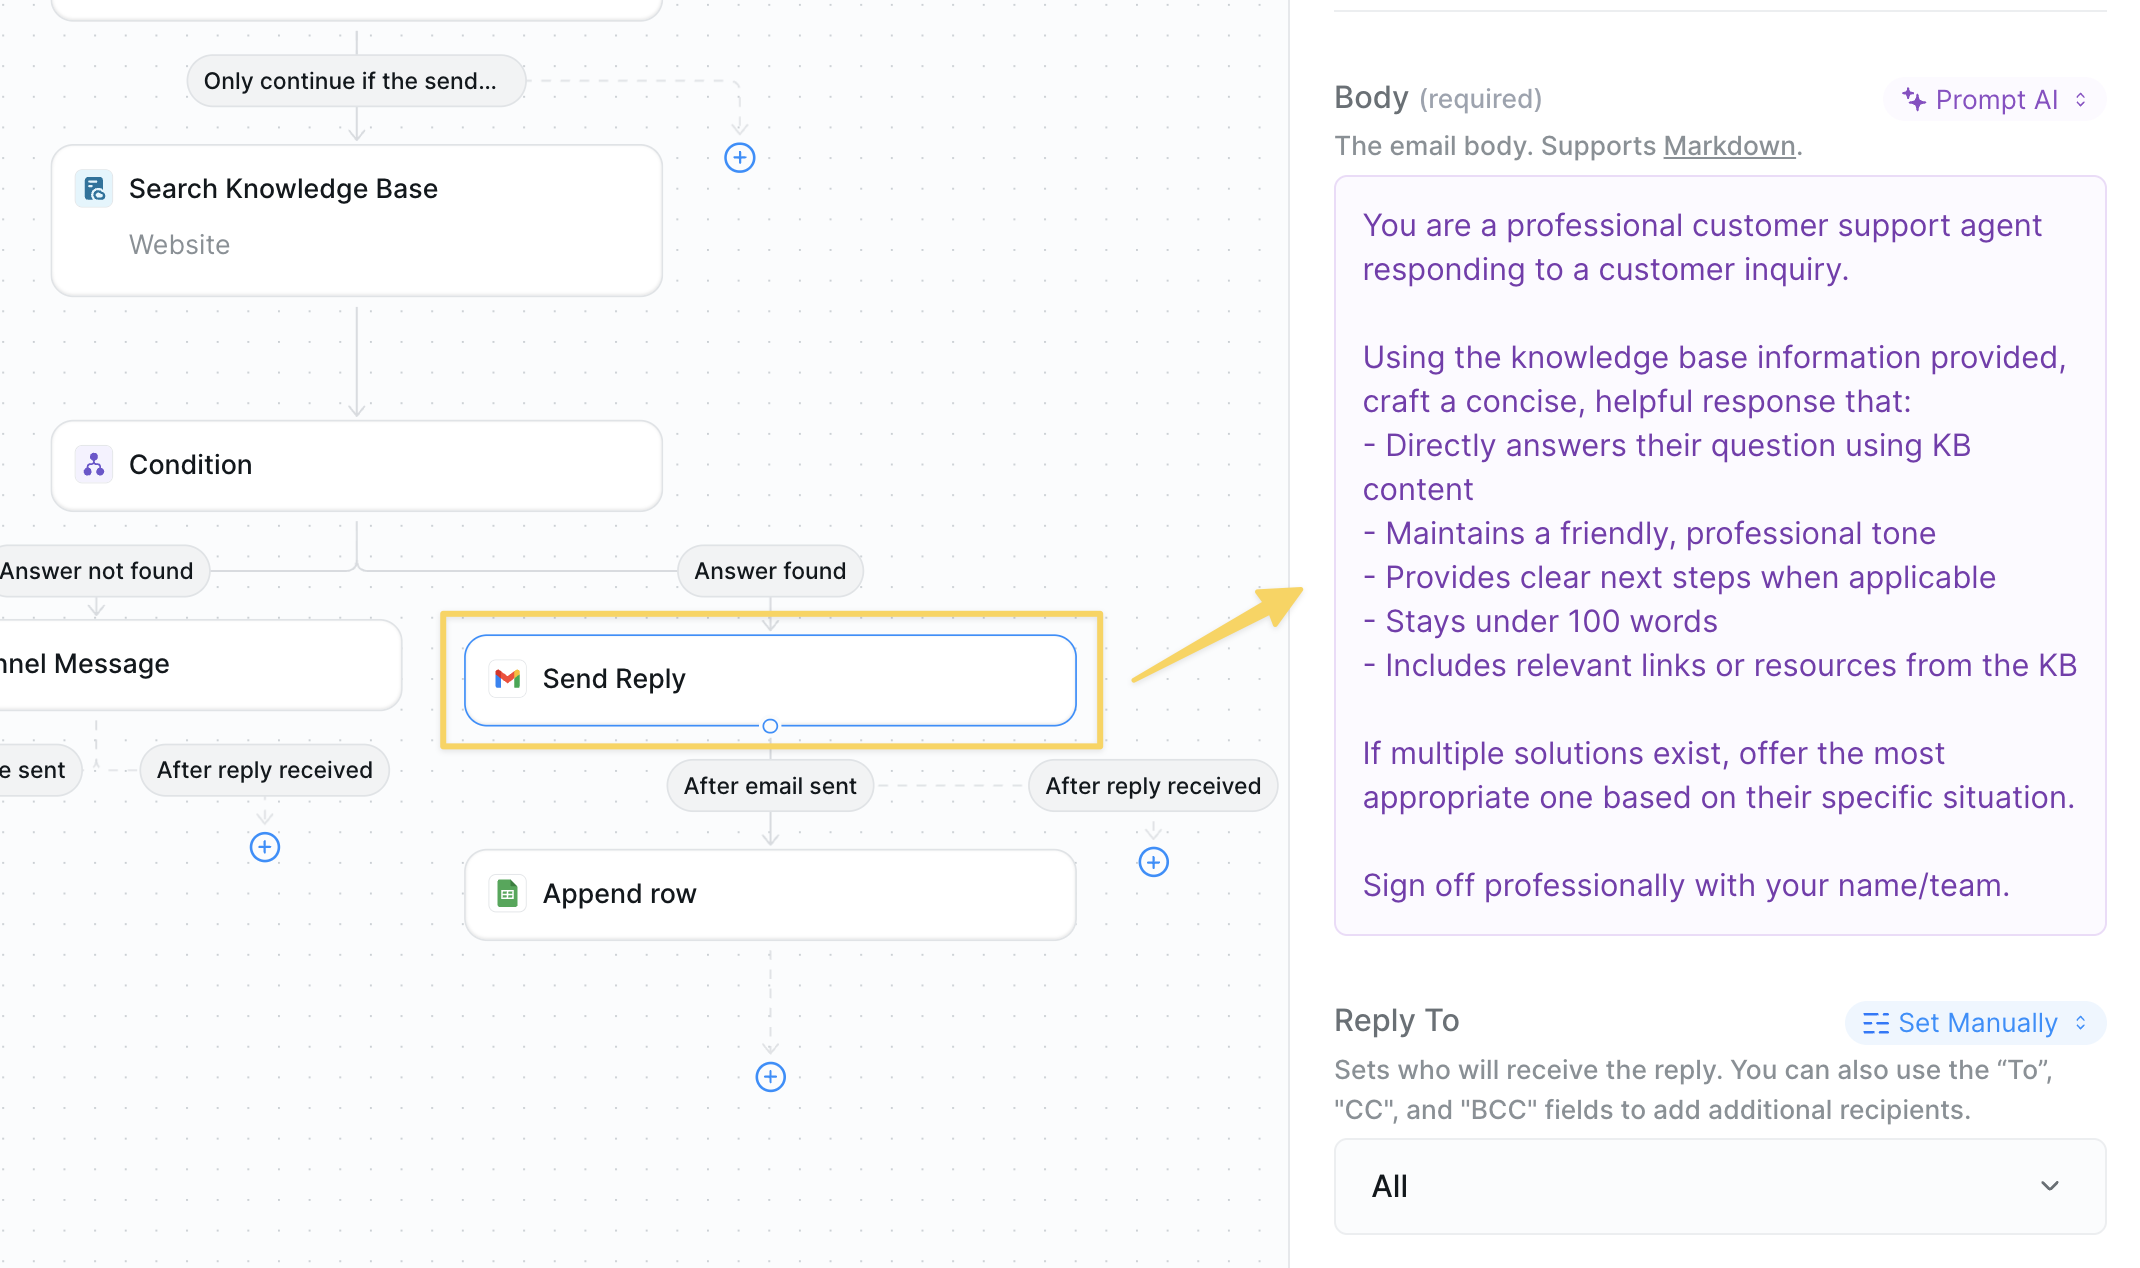 Body prompt:
```
You are a professional customer support agent responding to a customer inquiry.
Using the knowledge base information provided, craft a concise, helpful response that:
- Directly answers their question using KB content
- Maintains a friendly, professional tone
- Provides clear next steps when applicable
- Stays under 100 words
- Includes relevant links or resources from the KB
If multiple solutions exist, offer the most appropriate one based on their specific situation.
Sign off professionally with your name/team.
```
### Step 6: Log Support Interactions
Track all support interactions in a Google Sheet for reporting and analysis, with optional integration to your existing ticketing system instead.
Body prompt:
```
You are a professional customer support agent responding to a customer inquiry.
Using the knowledge base information provided, craft a concise, helpful response that:
- Directly answers their question using KB content
- Maintains a friendly, professional tone
- Provides clear next steps when applicable
- Stays under 100 words
- Includes relevant links or resources from the KB
If multiple solutions exist, offer the most appropriate one based on their specific situation.
Sign off professionally with your name/team.
```
### Step 6: Log Support Interactions
Track all support interactions in a Google Sheet for reporting and analysis, with optional integration to your existing ticketing system instead.
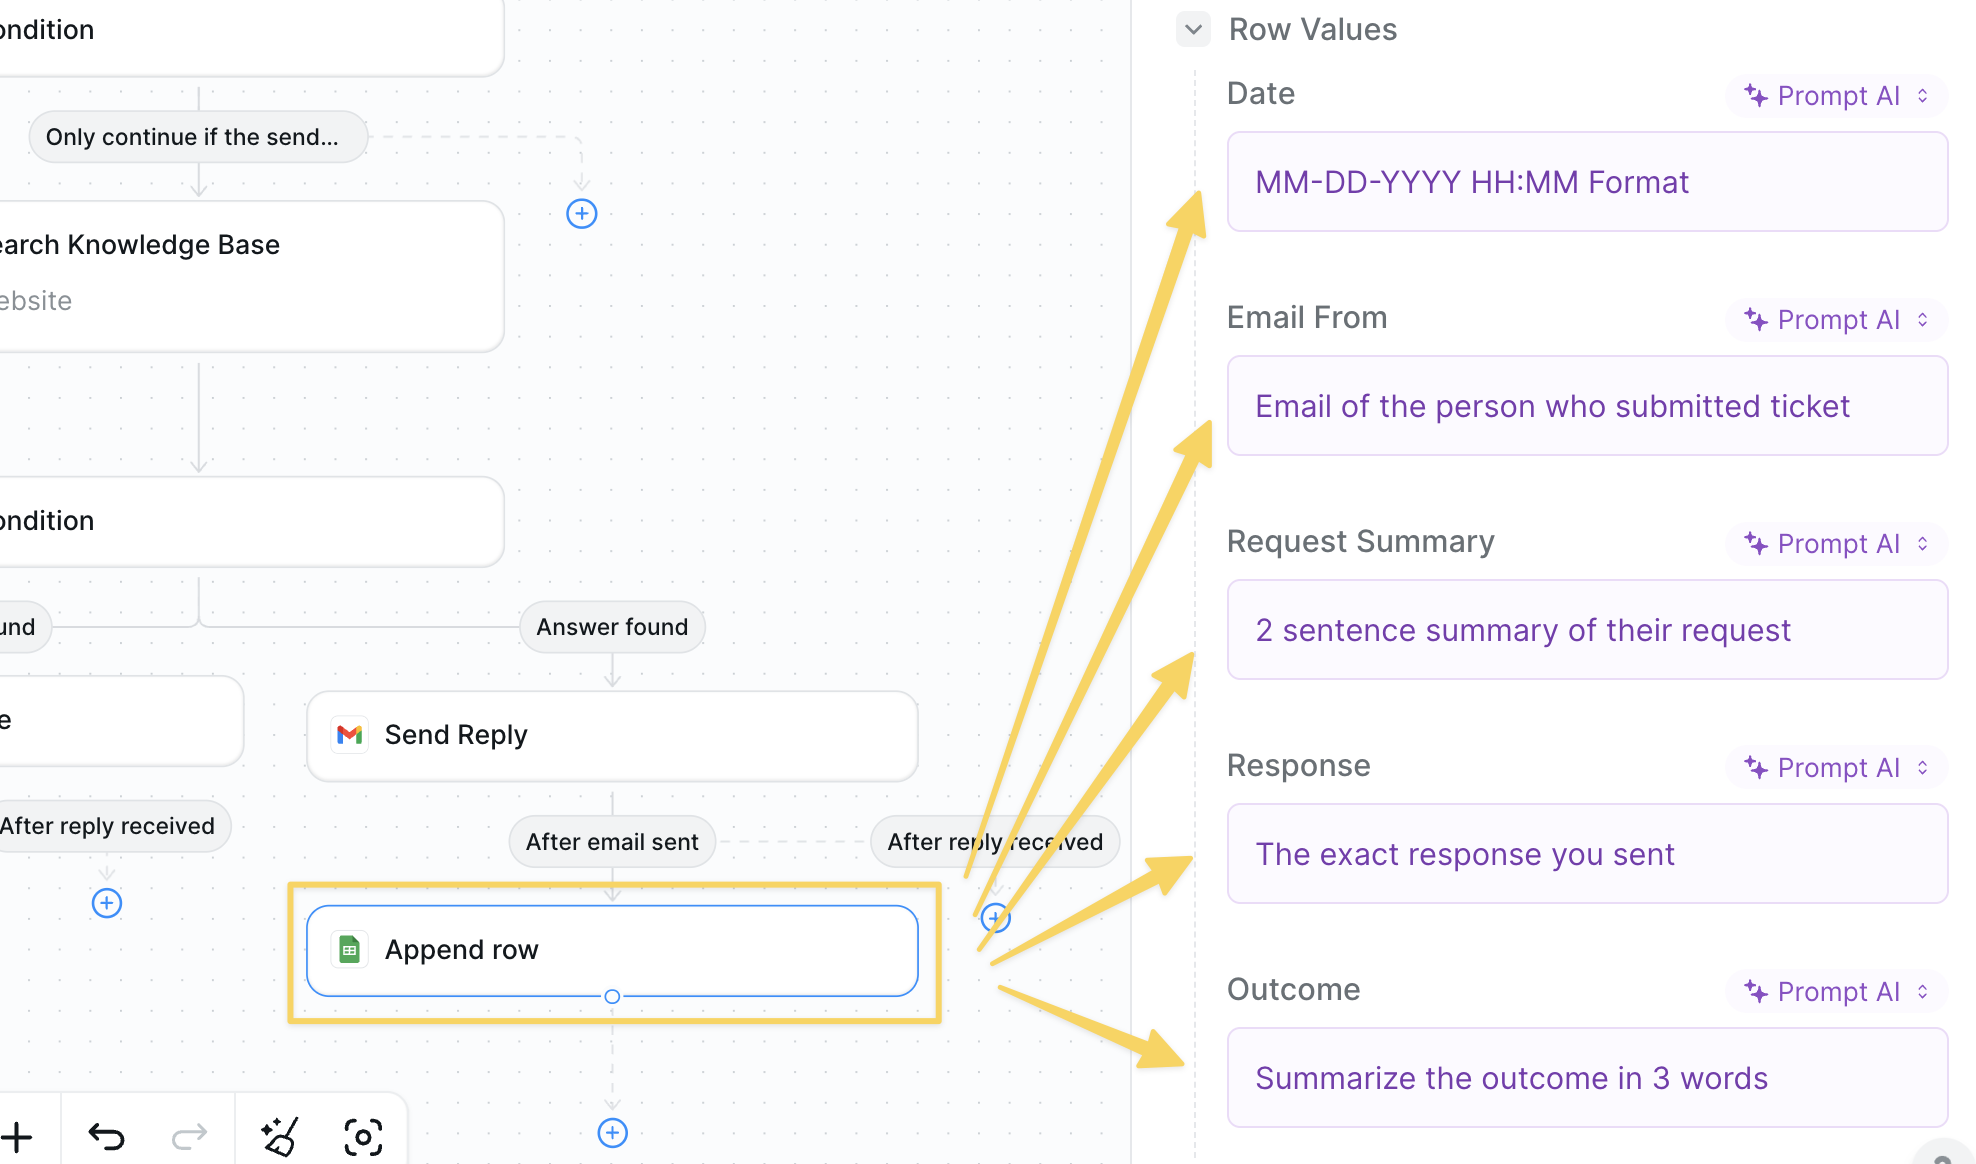 * Action: `Google Sheets – Append Row` to log ticket details, response time, and resolution
* Update your support management system if applicable
## Advanced Customizations
| Trick | What it does |
| --------------------- | ------------------------------------------------------------------------- |
| Multi-Channel Support | Swap Gmail for Zendesk, Intercom, or Slack slash-commands. |
| Sentiment Escalation | Flag angry tone → route to human immediately. |
| SLA Timer | `Wait` + Condition → alert if no answer within 2 h during business hours. |
| Auto-Survey | Send CSAT form 24 h after ticket closure. |
## Best Practices
Review policy and product docs weekly; outdated articles create wrong answers.
Aim for one-screen replies; link out for deeper resources.
Escalate order issues or refund disputes early to avoid churn.
The same flow works for chat or SMS—just swap the trigger/action pair.
## Next Steps
Handle support calls 24/7
Generate customer success reports
Resolve questions in Slack channels
Add oversight for complex support issues
# Voice Support
Source: https://docs.lindy.ai/use-cases/customer success/voice-support
Let your agent answer support calls, consult your knowledge base, and log every interaction.
## Quick Overview
This inbound flow lets Lindy:
* **Answer** calls on a dedicated number
* **Gather** the caller's name and question in natural conversation
* **Access** pre-loaded context for fast, accurate responses
* **Respond** concisely and close the loop
* **Record** summaries to Sheets and alert your team in Slack
Start from the [inbound support template](https://chat.lindy.ai/home/?templateId=6875ad458aeebd9c66a8b3b5) and customize.
## Setting Up Your Inbound Call Bot
### Step 1: Provision a Number
* Action: `Google Sheets – Append Row` to log ticket details, response time, and resolution
* Update your support management system if applicable
## Advanced Customizations
| Trick | What it does |
| --------------------- | ------------------------------------------------------------------------- |
| Multi-Channel Support | Swap Gmail for Zendesk, Intercom, or Slack slash-commands. |
| Sentiment Escalation | Flag angry tone → route to human immediately. |
| SLA Timer | `Wait` + Condition → alert if no answer within 2 h during business hours. |
| Auto-Survey | Send CSAT form 24 h after ticket closure. |
## Best Practices
Review policy and product docs weekly; outdated articles create wrong answers.
Aim for one-screen replies; link out for deeper resources.
Escalate order issues or refund disputes early to avoid churn.
The same flow works for chat or SMS—just swap the trigger/action pair.
## Next Steps
Handle support calls 24/7
Generate customer success reports
Resolve questions in Slack channels
Add oversight for complex support issues
# Voice Support
Source: https://docs.lindy.ai/use-cases/customer success/voice-support
Let your agent answer support calls, consult your knowledge base, and log every interaction.
## Quick Overview
This inbound flow lets Lindy:
* **Answer** calls on a dedicated number
* **Gather** the caller's name and question in natural conversation
* **Access** pre-loaded context for fast, accurate responses
* **Respond** concisely and close the loop
* **Record** summaries to Sheets and alert your team in Slack
Start from the [inbound support template](https://chat.lindy.ai/home/?templateId=6875ad458aeebd9c66a8b3b5) and customize.
## Setting Up Your Inbound Call Bot
### Step 1: Provision a Number
 1. Click the `Call Received` trigger.
2. Purchase or select a unique Lindy Phone number.
### Step 2: Add Context for Support Knowledge
Pre-load your support information to ensure fast response times during calls.
1. Click the `Call Received` trigger.
2. Purchase or select a unique Lindy Phone number.
### Step 2: Add Context for Support Knowledge
Pre-load your support information to ensure fast response times during calls.
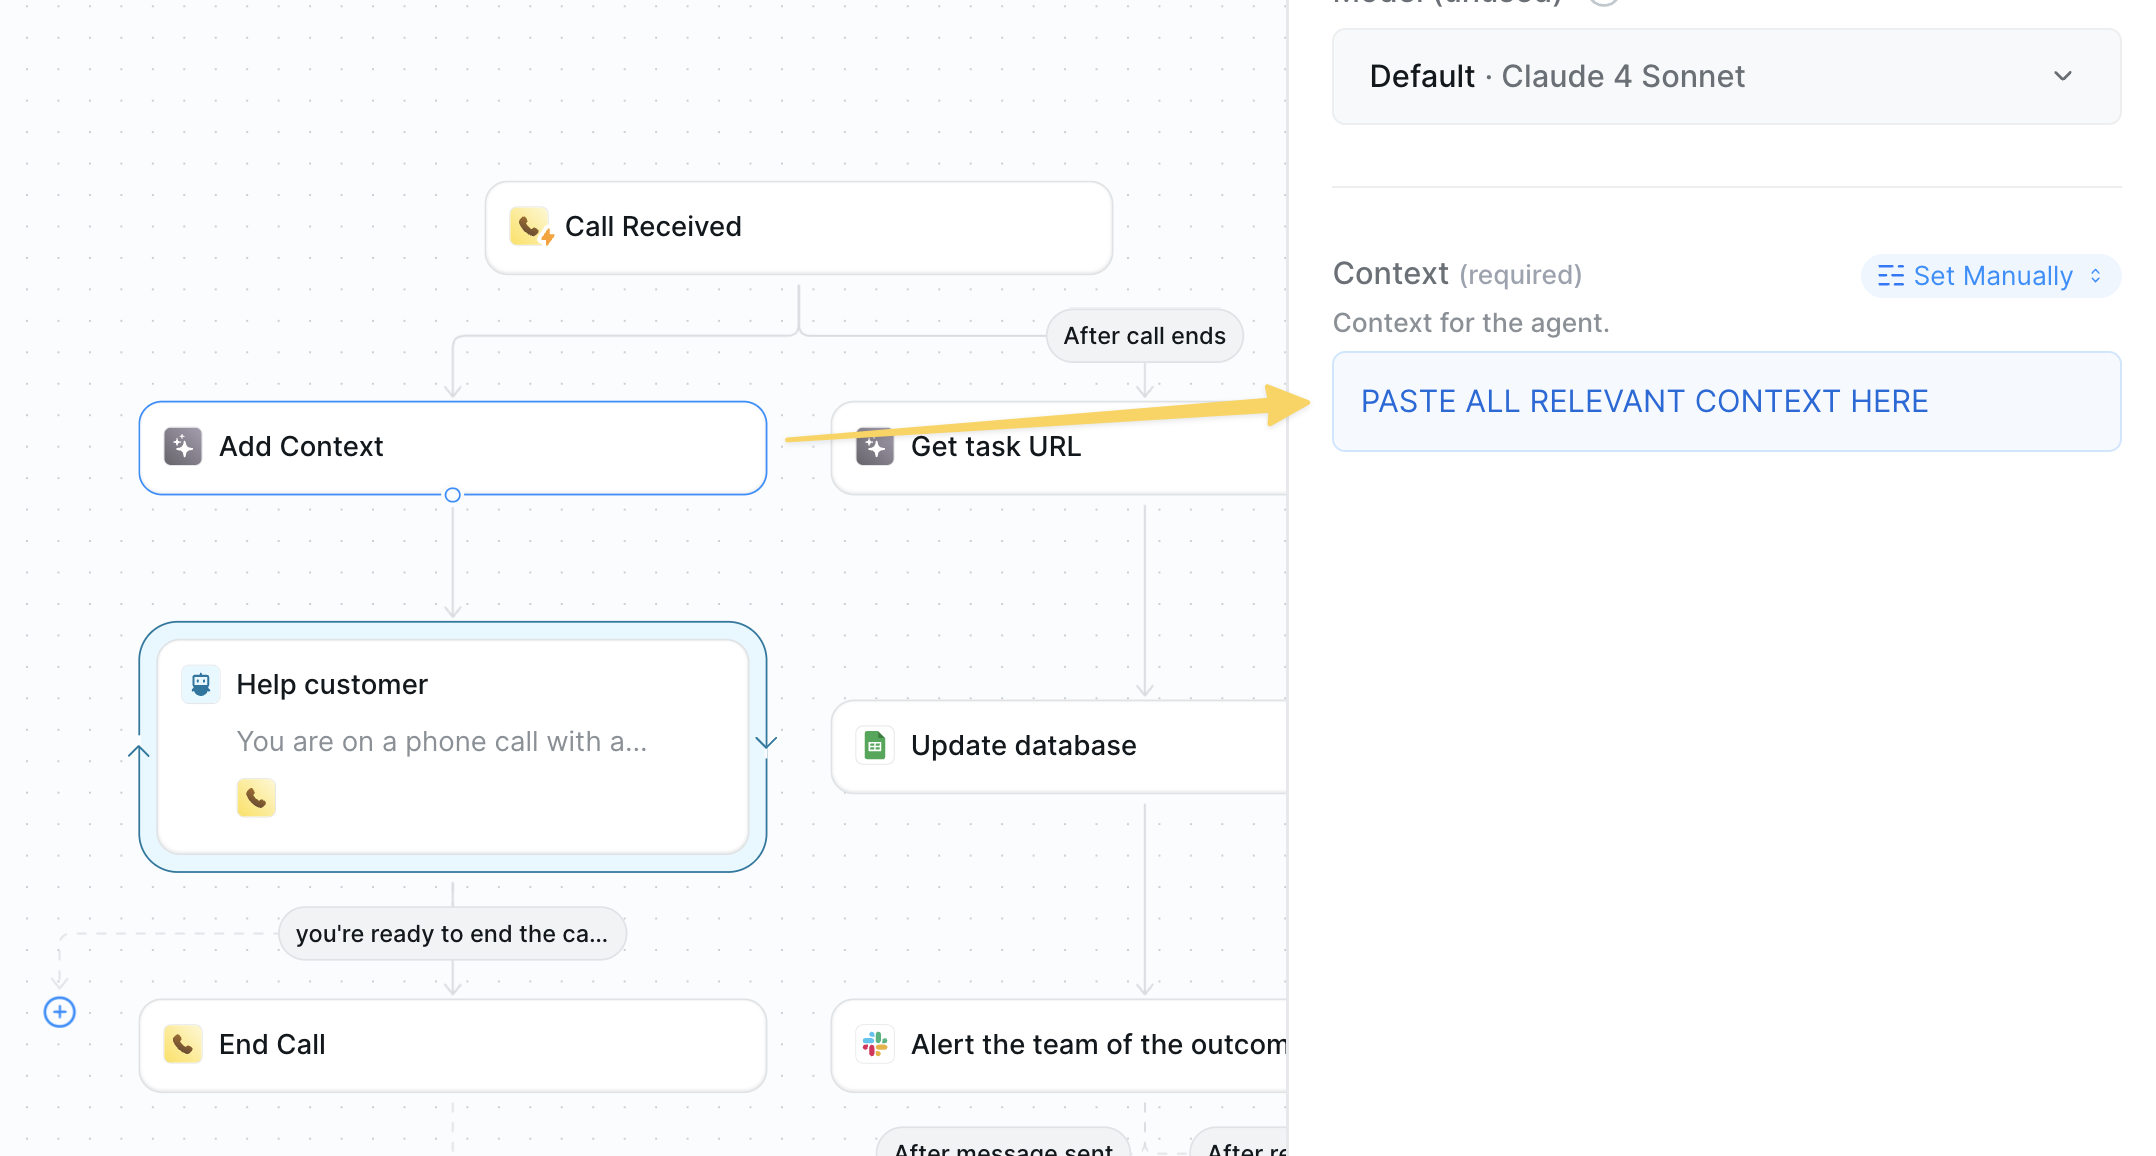 * Action: `Add Context`
* Upload lightweight company context: FAQs, key policies, common troubleshooting steps
* Keep it concise — this context stays in memory during the entire call for optimal latency
We use Add Context instead of Search Knowledge Base because even though you can perform actions during phone calls, pre-loading lightweight context helps maintain fast response times.
### Step 3: Inbound Phone Call Agent
Configure your AI agent to handle the conversation with pre-loaded context.
* Action: `Add Context`
* Upload lightweight company context: FAQs, key policies, common troubleshooting steps
* Keep it concise — this context stays in memory during the entire call for optimal latency
We use Add Context instead of Search Knowledge Base because even though you can perform actions during phone calls, pre-loading lightweight context helps maintain fast response times.
### Step 3: Inbound Phone Call Agent
Configure your AI agent to handle the conversation with pre-loaded context.
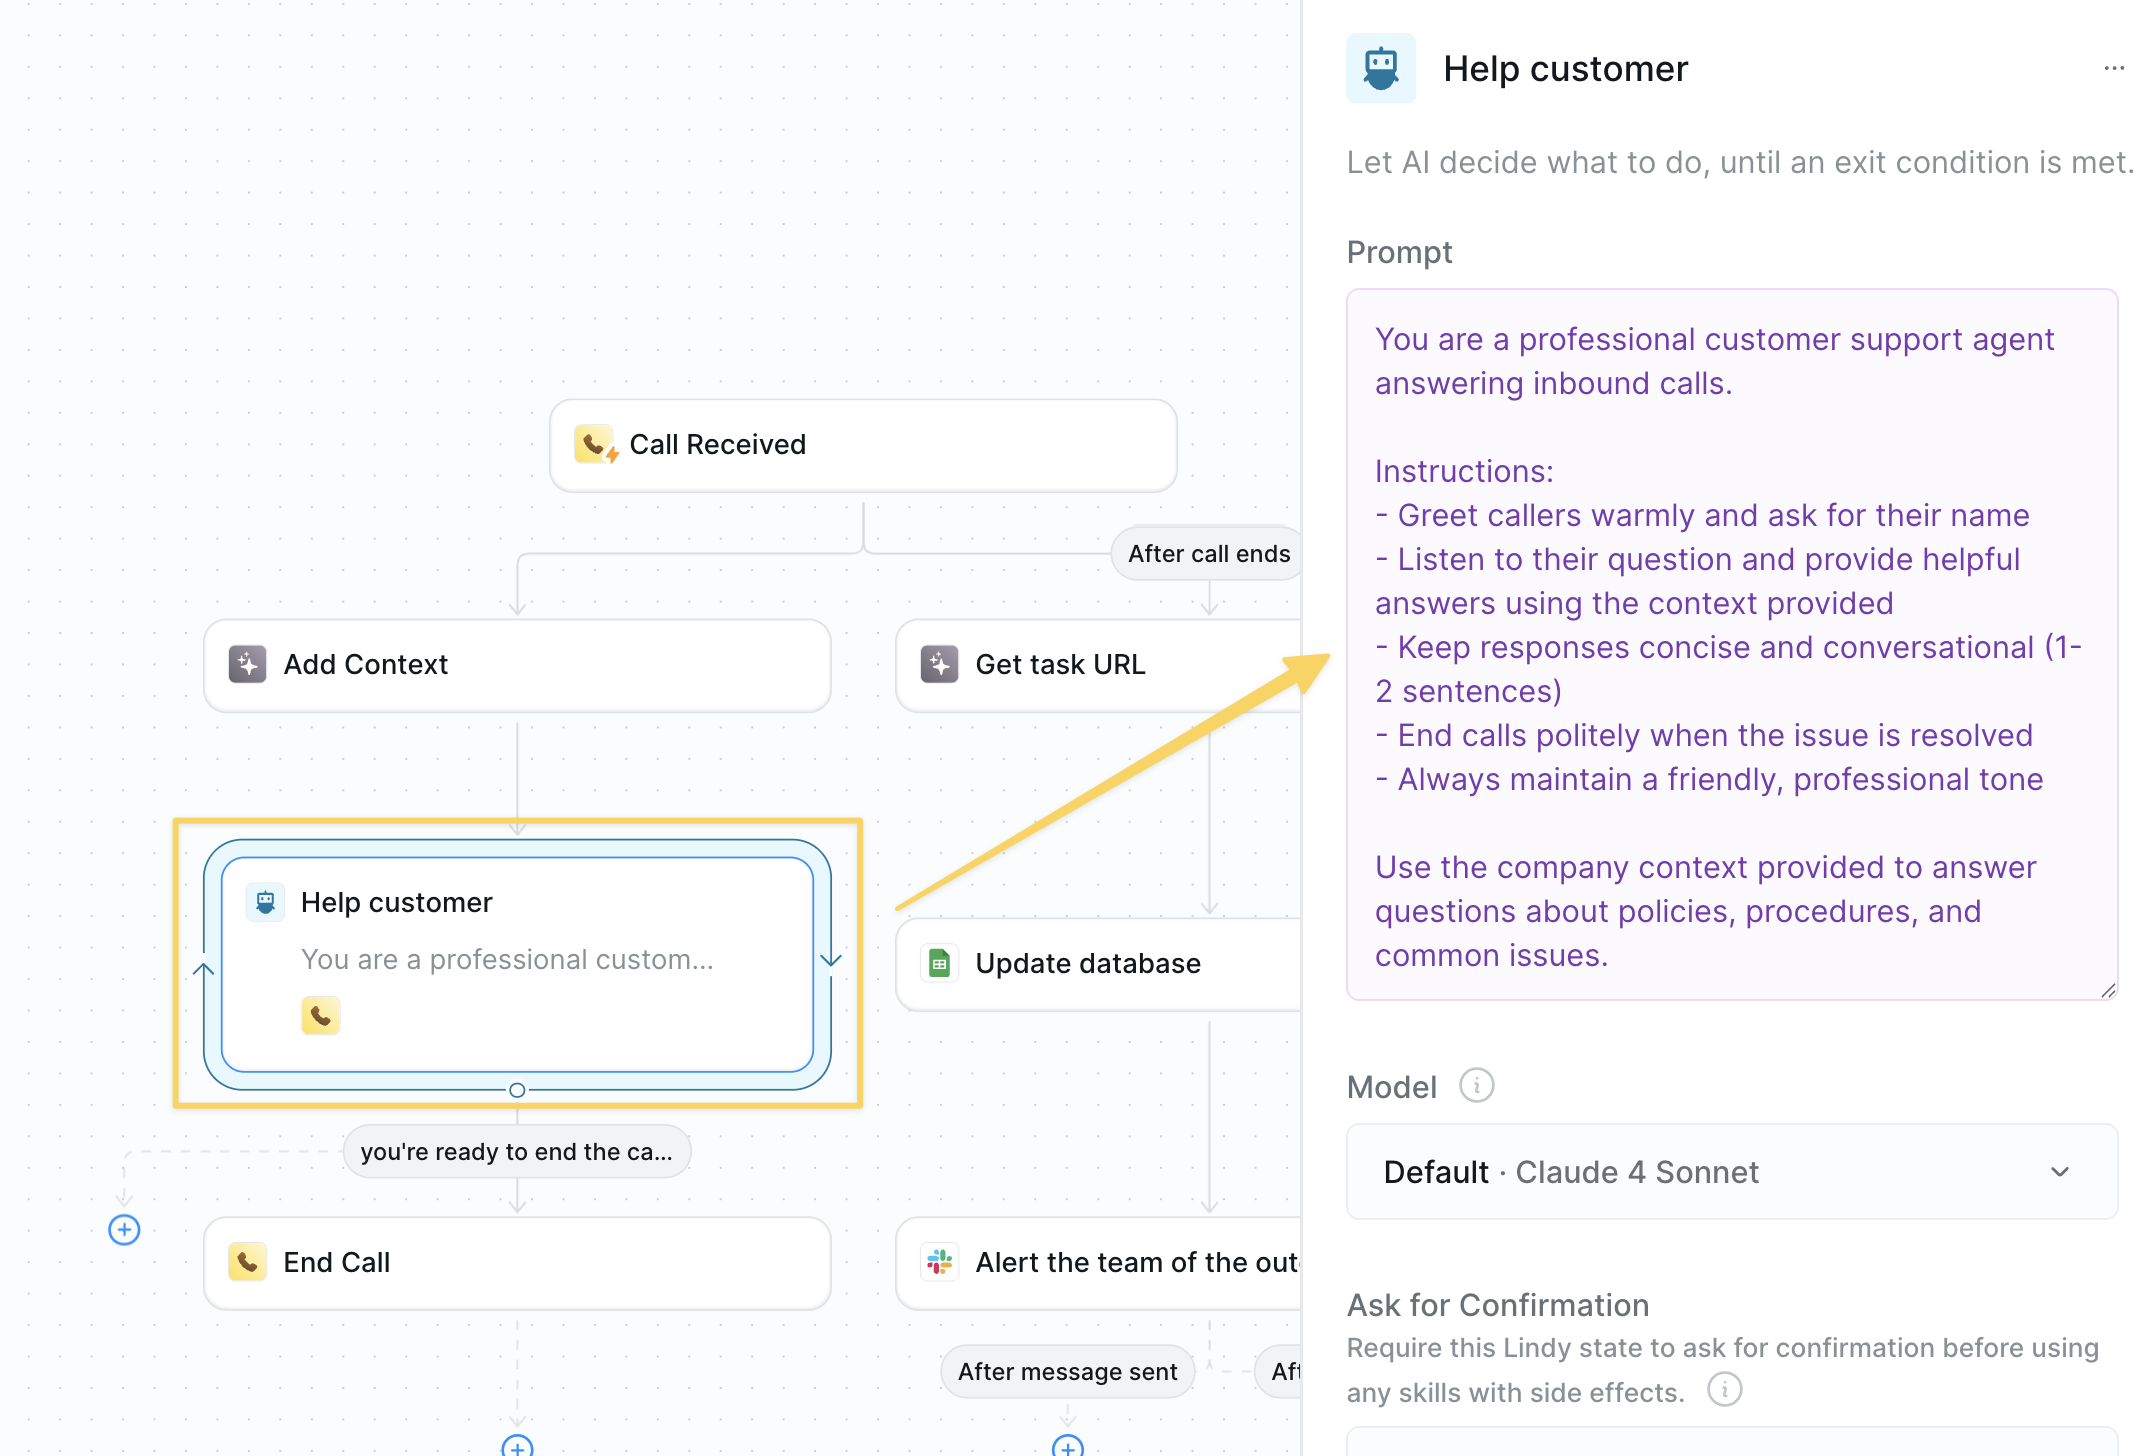 AI Agent prompt:
```
You are a professional customer support agent answering inbound calls.
Instructions:
- Greet callers warmly and ask for their name
- Listen to their question and provide helpful answers using the context provided
- Keep responses concise and conversational (1-2 sentences)
- End calls politely when the issue is resolved
- Always maintain a friendly, professional tone
Use the company context provided to answer questions about policies, procedures, and common issues.
```
Use balanced or fast Claude models for phone calls — they perform well for real-time conversations.
### Step 4: Document the Call
Track all phone interactions for quality assurance and follow-up.
AI Agent prompt:
```
You are a professional customer support agent answering inbound calls.
Instructions:
- Greet callers warmly and ask for their name
- Listen to their question and provide helpful answers using the context provided
- Keep responses concise and conversational (1-2 sentences)
- End calls politely when the issue is resolved
- Always maintain a friendly, professional tone
Use the company context provided to answer questions about policies, procedures, and common issues.
```
Use balanced or fast Claude models for phone calls — they perform well for real-time conversations.
### Step 4: Document the Call
Track all phone interactions for quality assurance and follow-up.
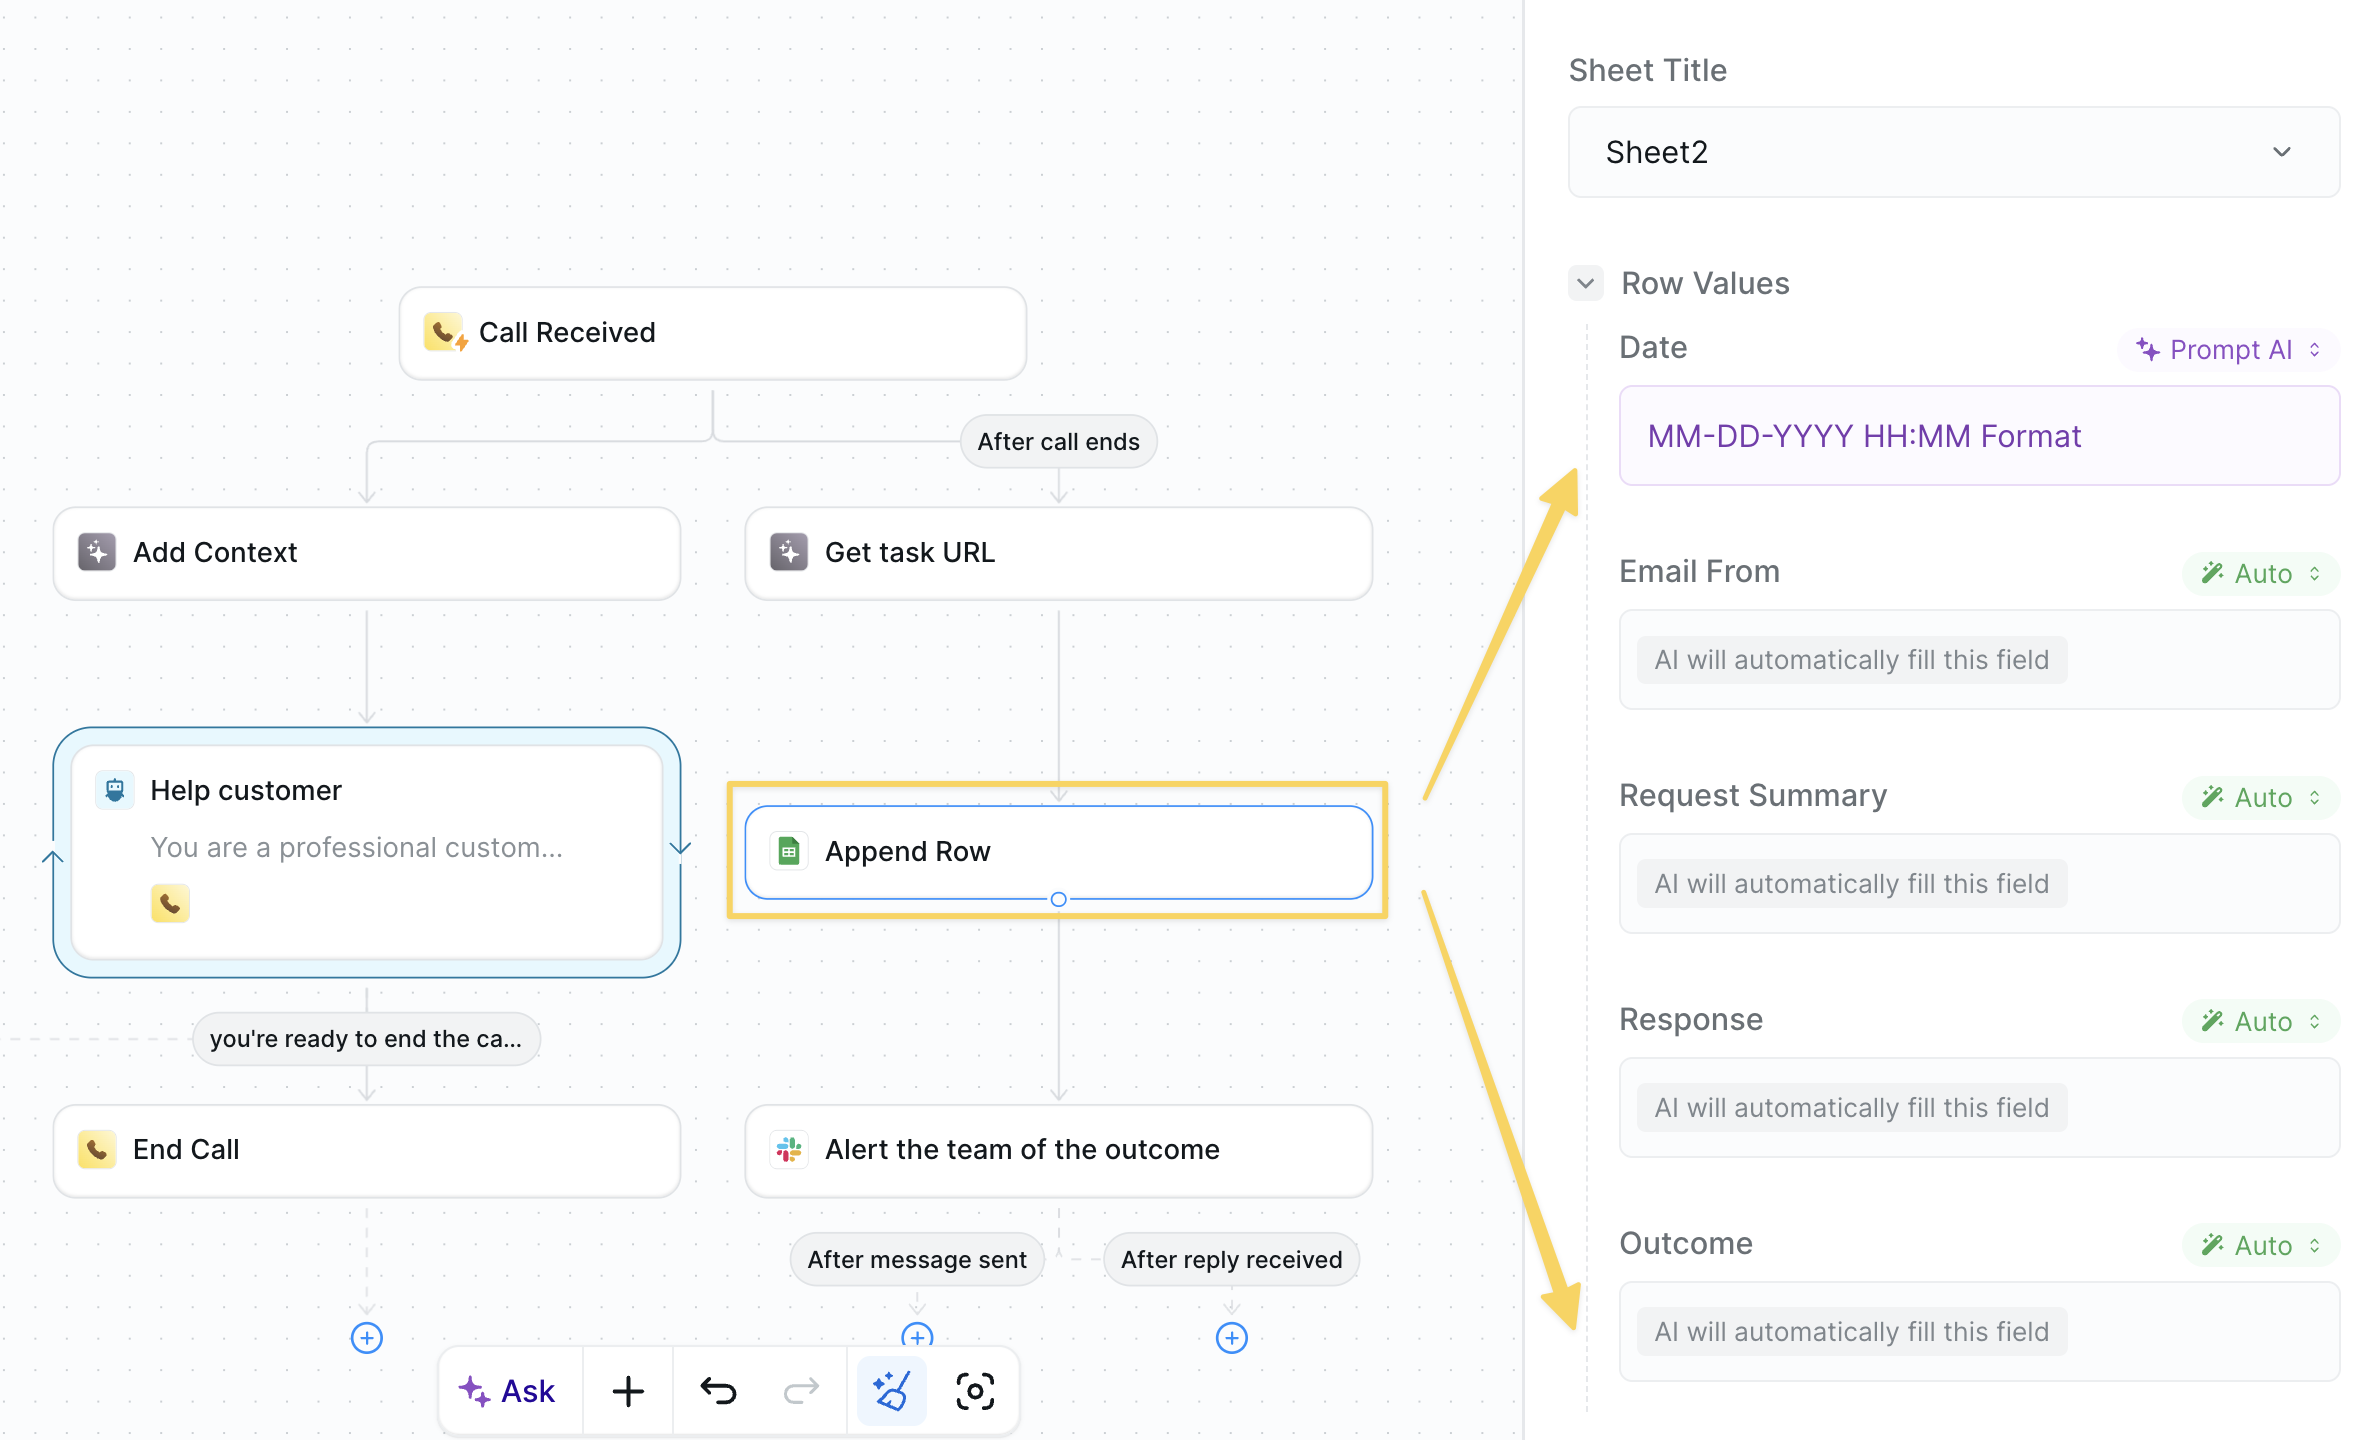 * `Get Task URL` → store reference link.
* `Google Sheets – Append Row` with name, question, answer, outcome, URL.
### Step 5: Team Alert
Notify your team about the call for immediate follow-up if needed.
* `Get Task URL` → store reference link.
* `Google Sheets – Append Row` with name, question, answer, outcome, URL.
### Step 5: Team Alert
Notify your team about the call for immediate follow-up if needed.
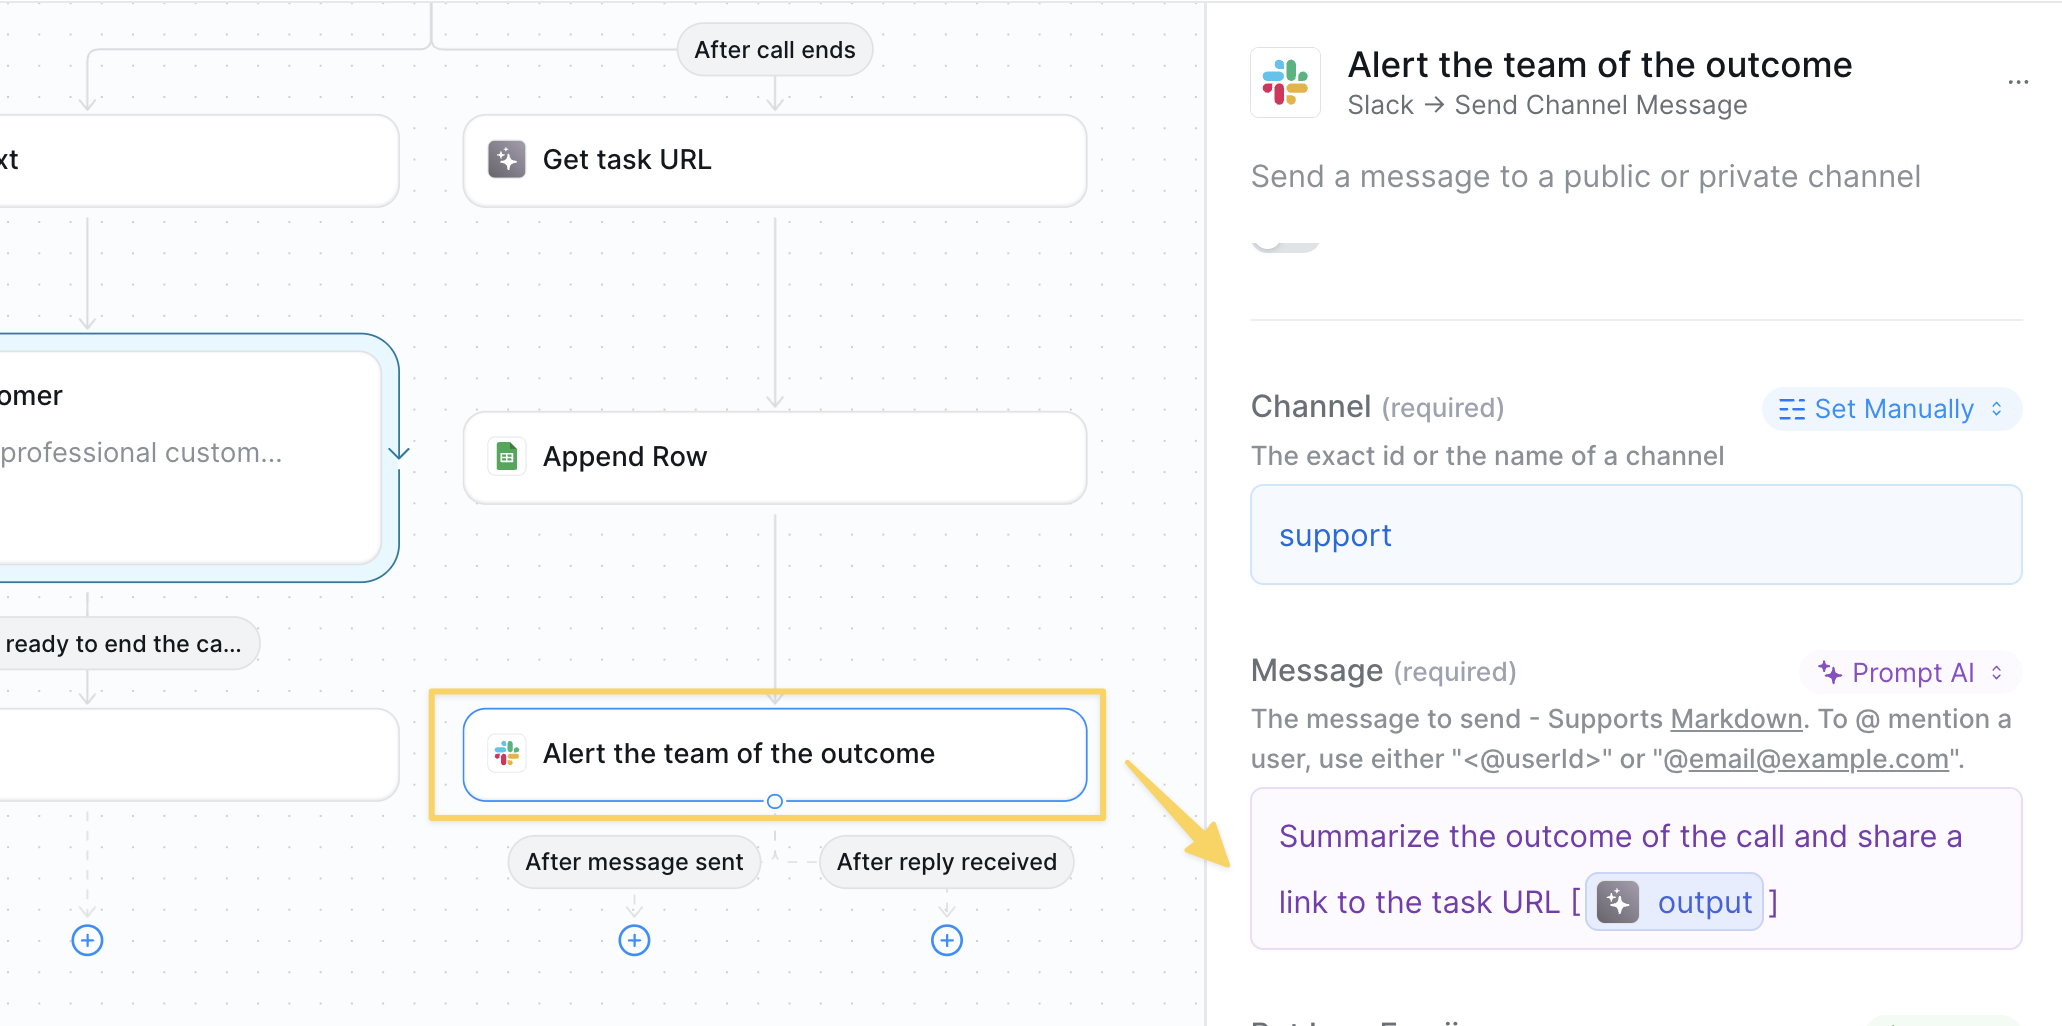 Send a Slack message summarizing the call with the task URL.
## Best Practices
Pre-load only essential info — too much context can slow down responses.
Callers prefer concise answers; avoid reading long policy text aloud.
Sheet + Slack combo creates an instant audit trail for QA.
Refresh your context monthly to keep answers current and accurate.
## Next Steps
Mirror the same logic in your inbox
Build advanced voice workflows
Generate insights from call data
Store call scripts and FAQs
# Invoice Processing Automation
Source: https://docs.lindy.ai/use-cases/finance/invoice-processing
Transform your accounts payable by automatically extracting invoice data, matching POs, and routing for approval.
## Quick Overview
Turn your invoice processing from hours to minutes. Your agent will:
* **Receive** invoices sent to a dedicated email address
* **Extract** vendor details, amounts, line items, and due dates
* **Validate** against PO numbers and vendor database
* **Route** for approval based on amount thresholds
* **Track** payment status and send reminders
You can use the [invoice processing template](https://chat.lindy.ai/home/?templateId=6875d732842252d66b38c0ea) to get started.
## Setting Up Invoice Automation
### Step 1: Create Your AP Inbox
Set up a dedicated email system to capture all incoming invoices automatically.
Send a Slack message summarizing the call with the task URL.
## Best Practices
Pre-load only essential info — too much context can slow down responses.
Callers prefer concise answers; avoid reading long policy text aloud.
Sheet + Slack combo creates an instant audit trail for QA.
Refresh your context monthly to keep answers current and accurate.
## Next Steps
Mirror the same logic in your inbox
Build advanced voice workflows
Generate insights from call data
Store call scripts and FAQs
# Invoice Processing Automation
Source: https://docs.lindy.ai/use-cases/finance/invoice-processing
Transform your accounts payable by automatically extracting invoice data, matching POs, and routing for approval.
## Quick Overview
Turn your invoice processing from hours to minutes. Your agent will:
* **Receive** invoices sent to a dedicated email address
* **Extract** vendor details, amounts, line items, and due dates
* **Validate** against PO numbers and vendor database
* **Route** for approval based on amount thresholds
* **Track** payment status and send reminders
You can use the [invoice processing template](https://chat.lindy.ai/home/?templateId=6875d732842252d66b38c0ea) to get started.
## Setting Up Invoice Automation
### Step 1: Create Your AP Inbox
Set up a dedicated email system to capture all incoming invoices automatically.
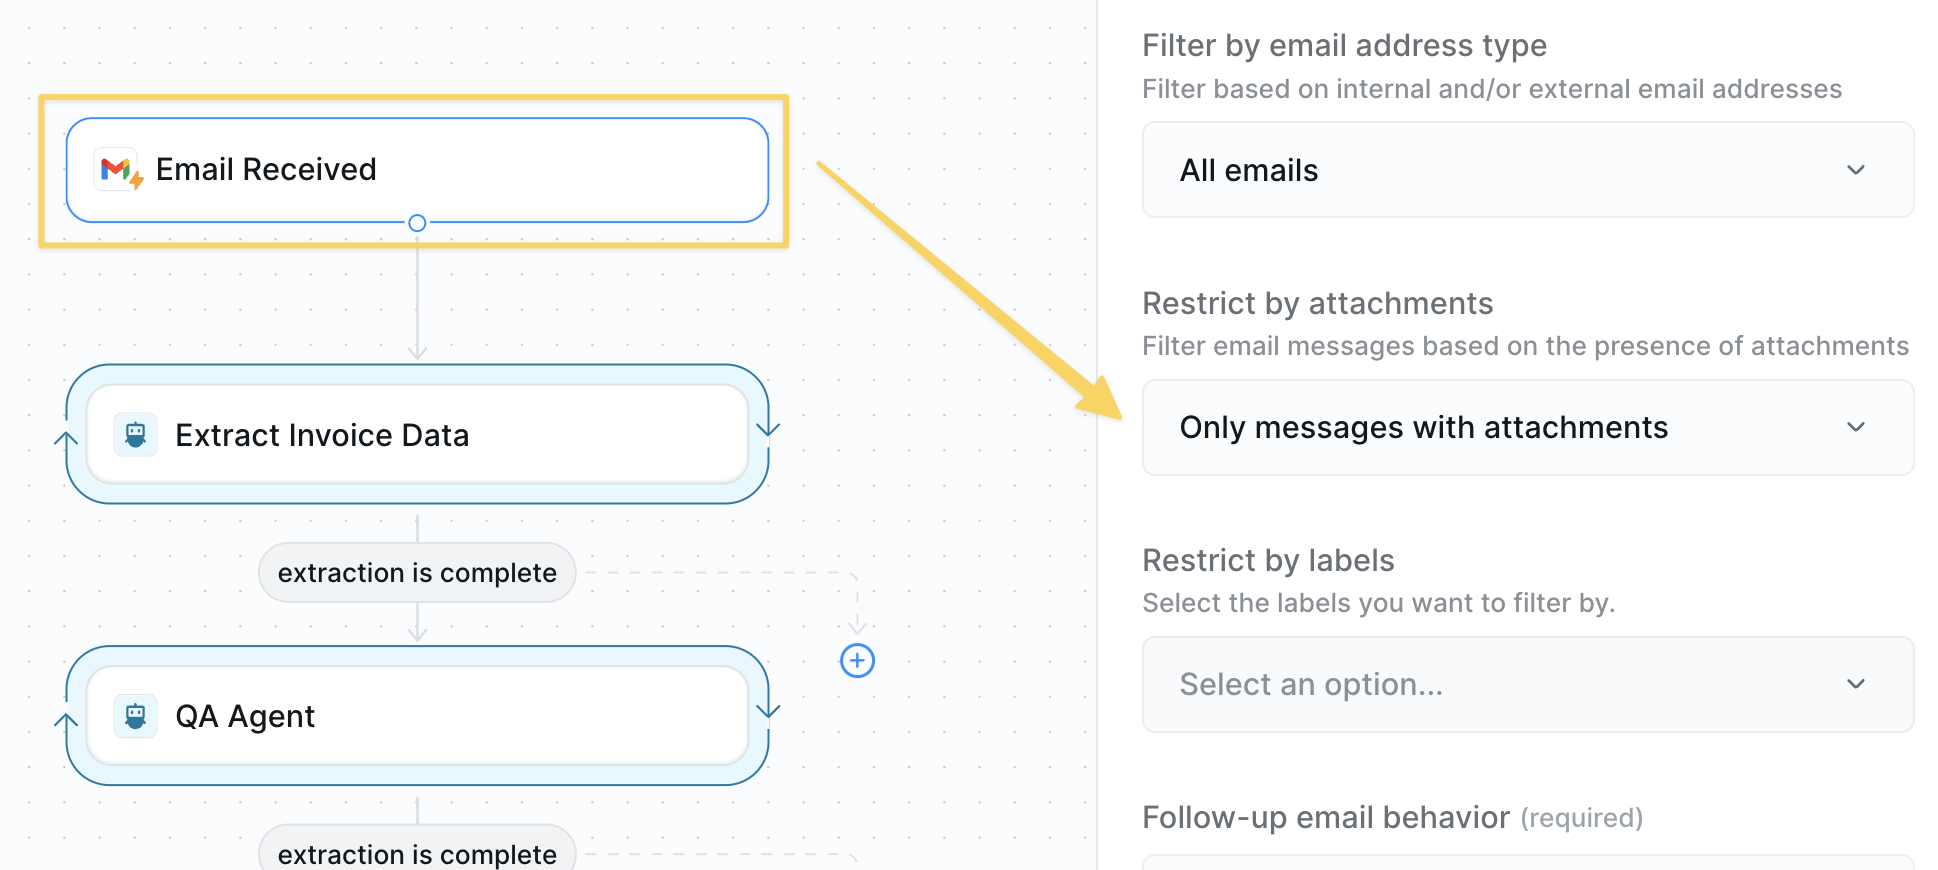 1. Set up a dedicated email: [invoices@yourcompany.com](mailto:invoices@yourcompany.com)
2. Configure `Gmail – Email Received` trigger
3. Add filter: "Has attachment" = Yes
4. Share this email with all vendors and internal teams
Add this email to your vendor portal profiles and email signatures: "Send all invoices to: [invoices@yourcompany.com](mailto:invoices@yourcompany.com)"
### Step 2: Extract Invoice Data with AI
Use AI to extract all key invoice data with forensic precision and accounting expertise.
1. Set up a dedicated email: [invoices@yourcompany.com](mailto:invoices@yourcompany.com)
2. Configure `Gmail – Email Received` trigger
3. Add filter: "Has attachment" = Yes
4. Share this email with all vendors and internal teams
Add this email to your vendor portal profiles and email signatures: "Send all invoices to: [invoices@yourcompany.com](mailto:invoices@yourcompany.com)"
### Step 2: Extract Invoice Data with AI
Use AI to extract all key invoice data with forensic precision and accounting expertise.
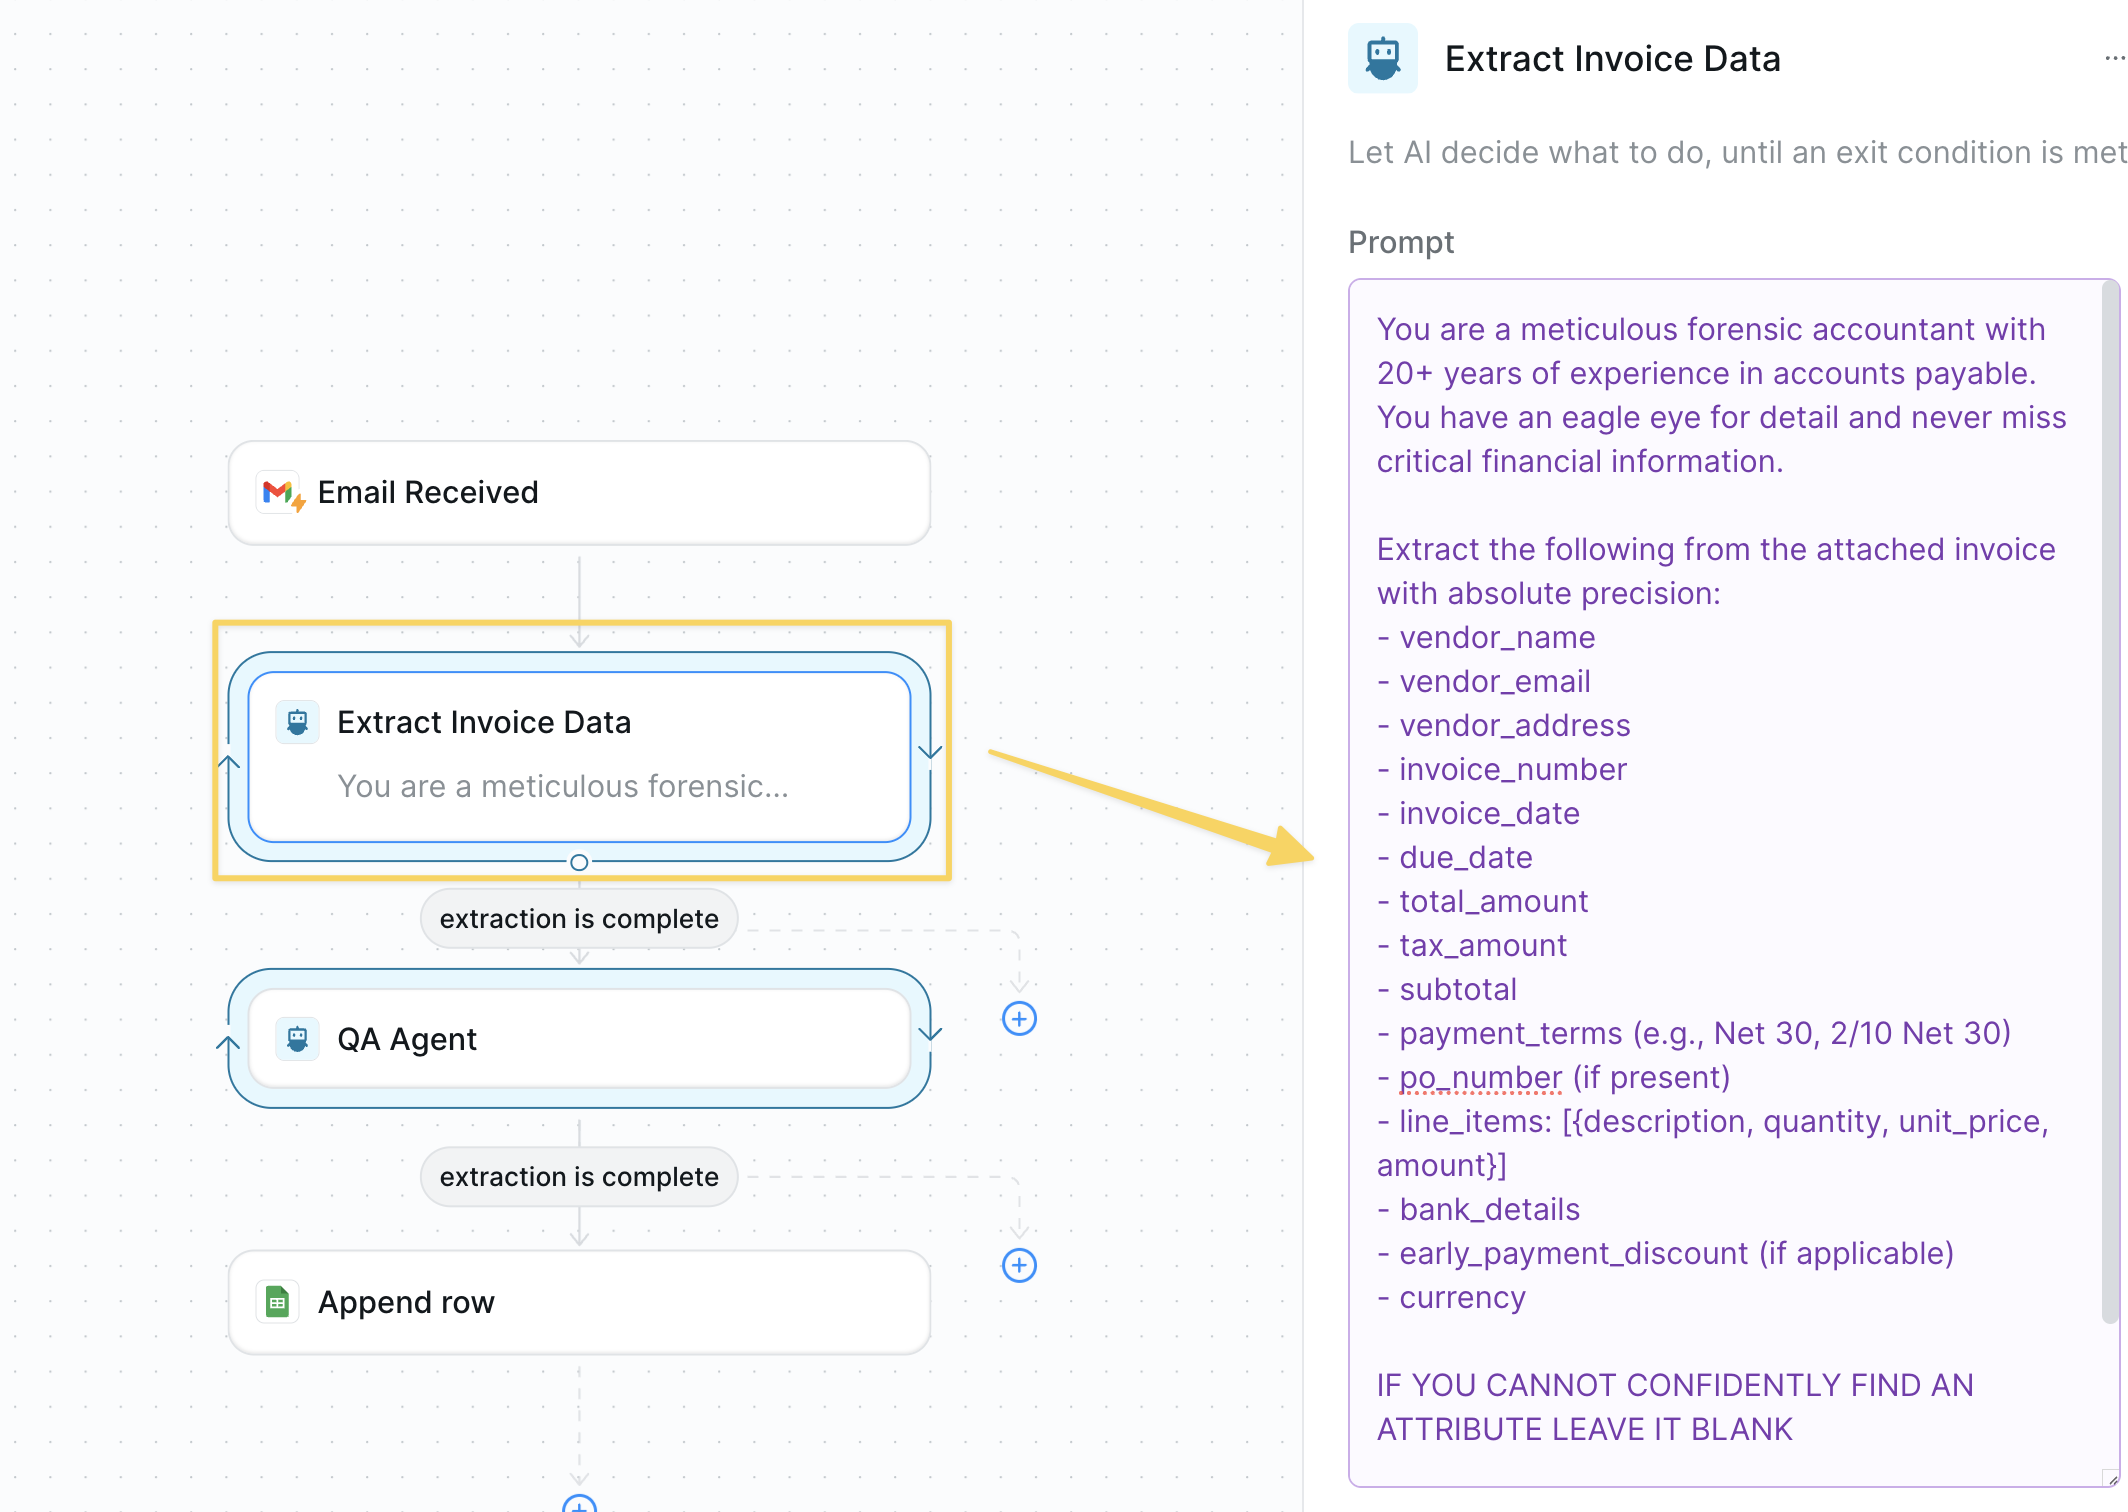 Add `AI Agent – Extract Invoice Data` with this enhanced prompt:
```
You are a meticulous forensic accountant with 20+ years of experience in accounts payable. You have an eagle eye for detail and never miss critical financial information.
Extract the following from the attached invoice with absolute precision:
- vendor_name
- vendor_email
- vendor_address
- invoice_number
- invoice_date
- due_date
- total_amount
- tax_amount
- subtotal
- payment_terms (e.g., Net 30, 2/10 Net 30)
- po_number (if present)
- line_items: [{description, quantity, unit_price, amount}]
- bank_details
- early_payment_discount (if applicable)
- currency
IF YOU CANNOT CONFIDENTLY FIND AN ATTRIBUTE LEAVE IT BLANK
Return as structured JSON. If any field is not found, mark as null. Double-check all amounts for mathematical accuracy.
```
The AI Agent automatically has attachments from Gmail in context - no need to reference them explicitly.
### Step 3: Double-Check Extraction Quality
Add a quality control layer to ensure 100% accuracy before processing.
Add `AI Agent – Extract Invoice Data` with this enhanced prompt:
```
You are a meticulous forensic accountant with 20+ years of experience in accounts payable. You have an eagle eye for detail and never miss critical financial information.
Extract the following from the attached invoice with absolute precision:
- vendor_name
- vendor_email
- vendor_address
- invoice_number
- invoice_date
- due_date
- total_amount
- tax_amount
- subtotal
- payment_terms (e.g., Net 30, 2/10 Net 30)
- po_number (if present)
- line_items: [{description, quantity, unit_price, amount}]
- bank_details
- early_payment_discount (if applicable)
- currency
IF YOU CANNOT CONFIDENTLY FIND AN ATTRIBUTE LEAVE IT BLANK
Return as structured JSON. If any field is not found, mark as null. Double-check all amounts for mathematical accuracy.
```
The AI Agent automatically has attachments from Gmail in context - no need to reference them explicitly.
### Step 3: Double-Check Extraction Quality
Add a quality control layer to ensure 100% accuracy before processing.
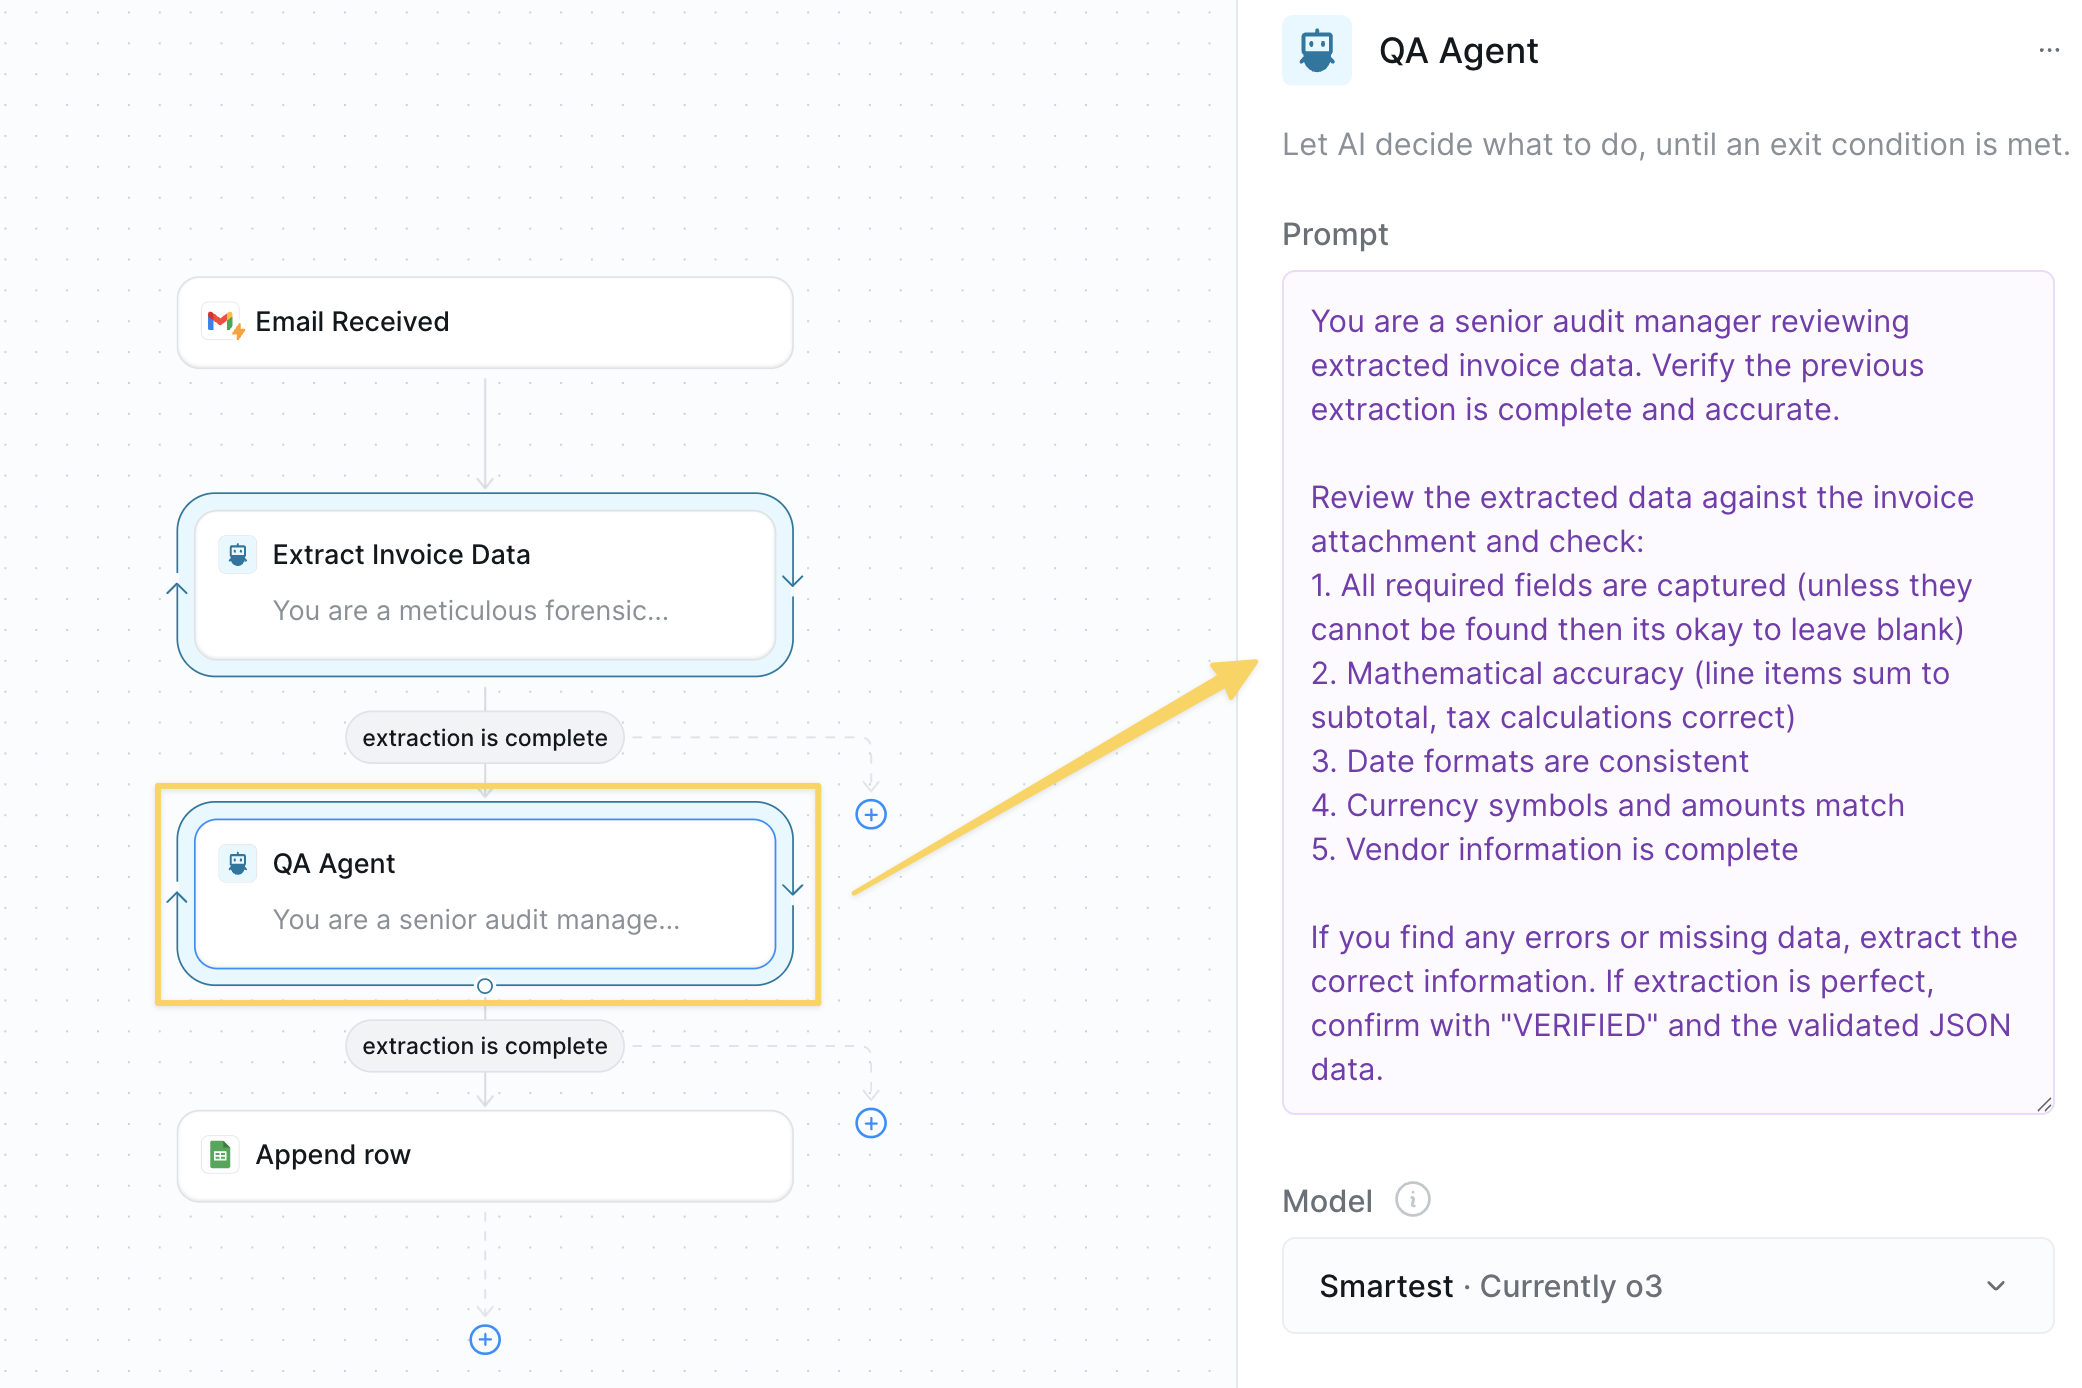 Add `AI Agent – Quality Control` with prompt:
```
You are a senior audit manager reviewing extracted invoice data. Verify the previous extraction is complete and accurate.
Review the extracted data against the invoice attachment and check:
1. All required fields are captured (unless they cannot be found then its okay to leave blank)
2. Mathematical accuracy (line items sum to subtotal, tax calculations correct)
3. Date formats are consistent
4. Currency symbols and amounts match
5. Vendor information is complete
If you find any errors or missing data, extract the correct information. If extraction is perfect, confirm with "VERIFIED" and the validated JSON data.
```
### Step 4: Log Invoice Data
Organize extracted data into your preferred system — spreadsheets are just the starting point.
Add `AI Agent – Quality Control` with prompt:
```
You are a senior audit manager reviewing extracted invoice data. Verify the previous extraction is complete and accurate.
Review the extracted data against the invoice attachment and check:
1. All required fields are captured (unless they cannot be found then its okay to leave blank)
2. Mathematical accuracy (line items sum to subtotal, tax calculations correct)
3. Date formats are consistent
4. Currency symbols and amounts match
5. Vendor information is complete
If you find any errors or missing data, extract the correct information. If extraction is perfect, confirm with "VERIFIED" and the validated JSON data.
```
### Step 4: Log Invoice Data
Organize extracted data into your preferred system — spreadsheets are just the starting point.
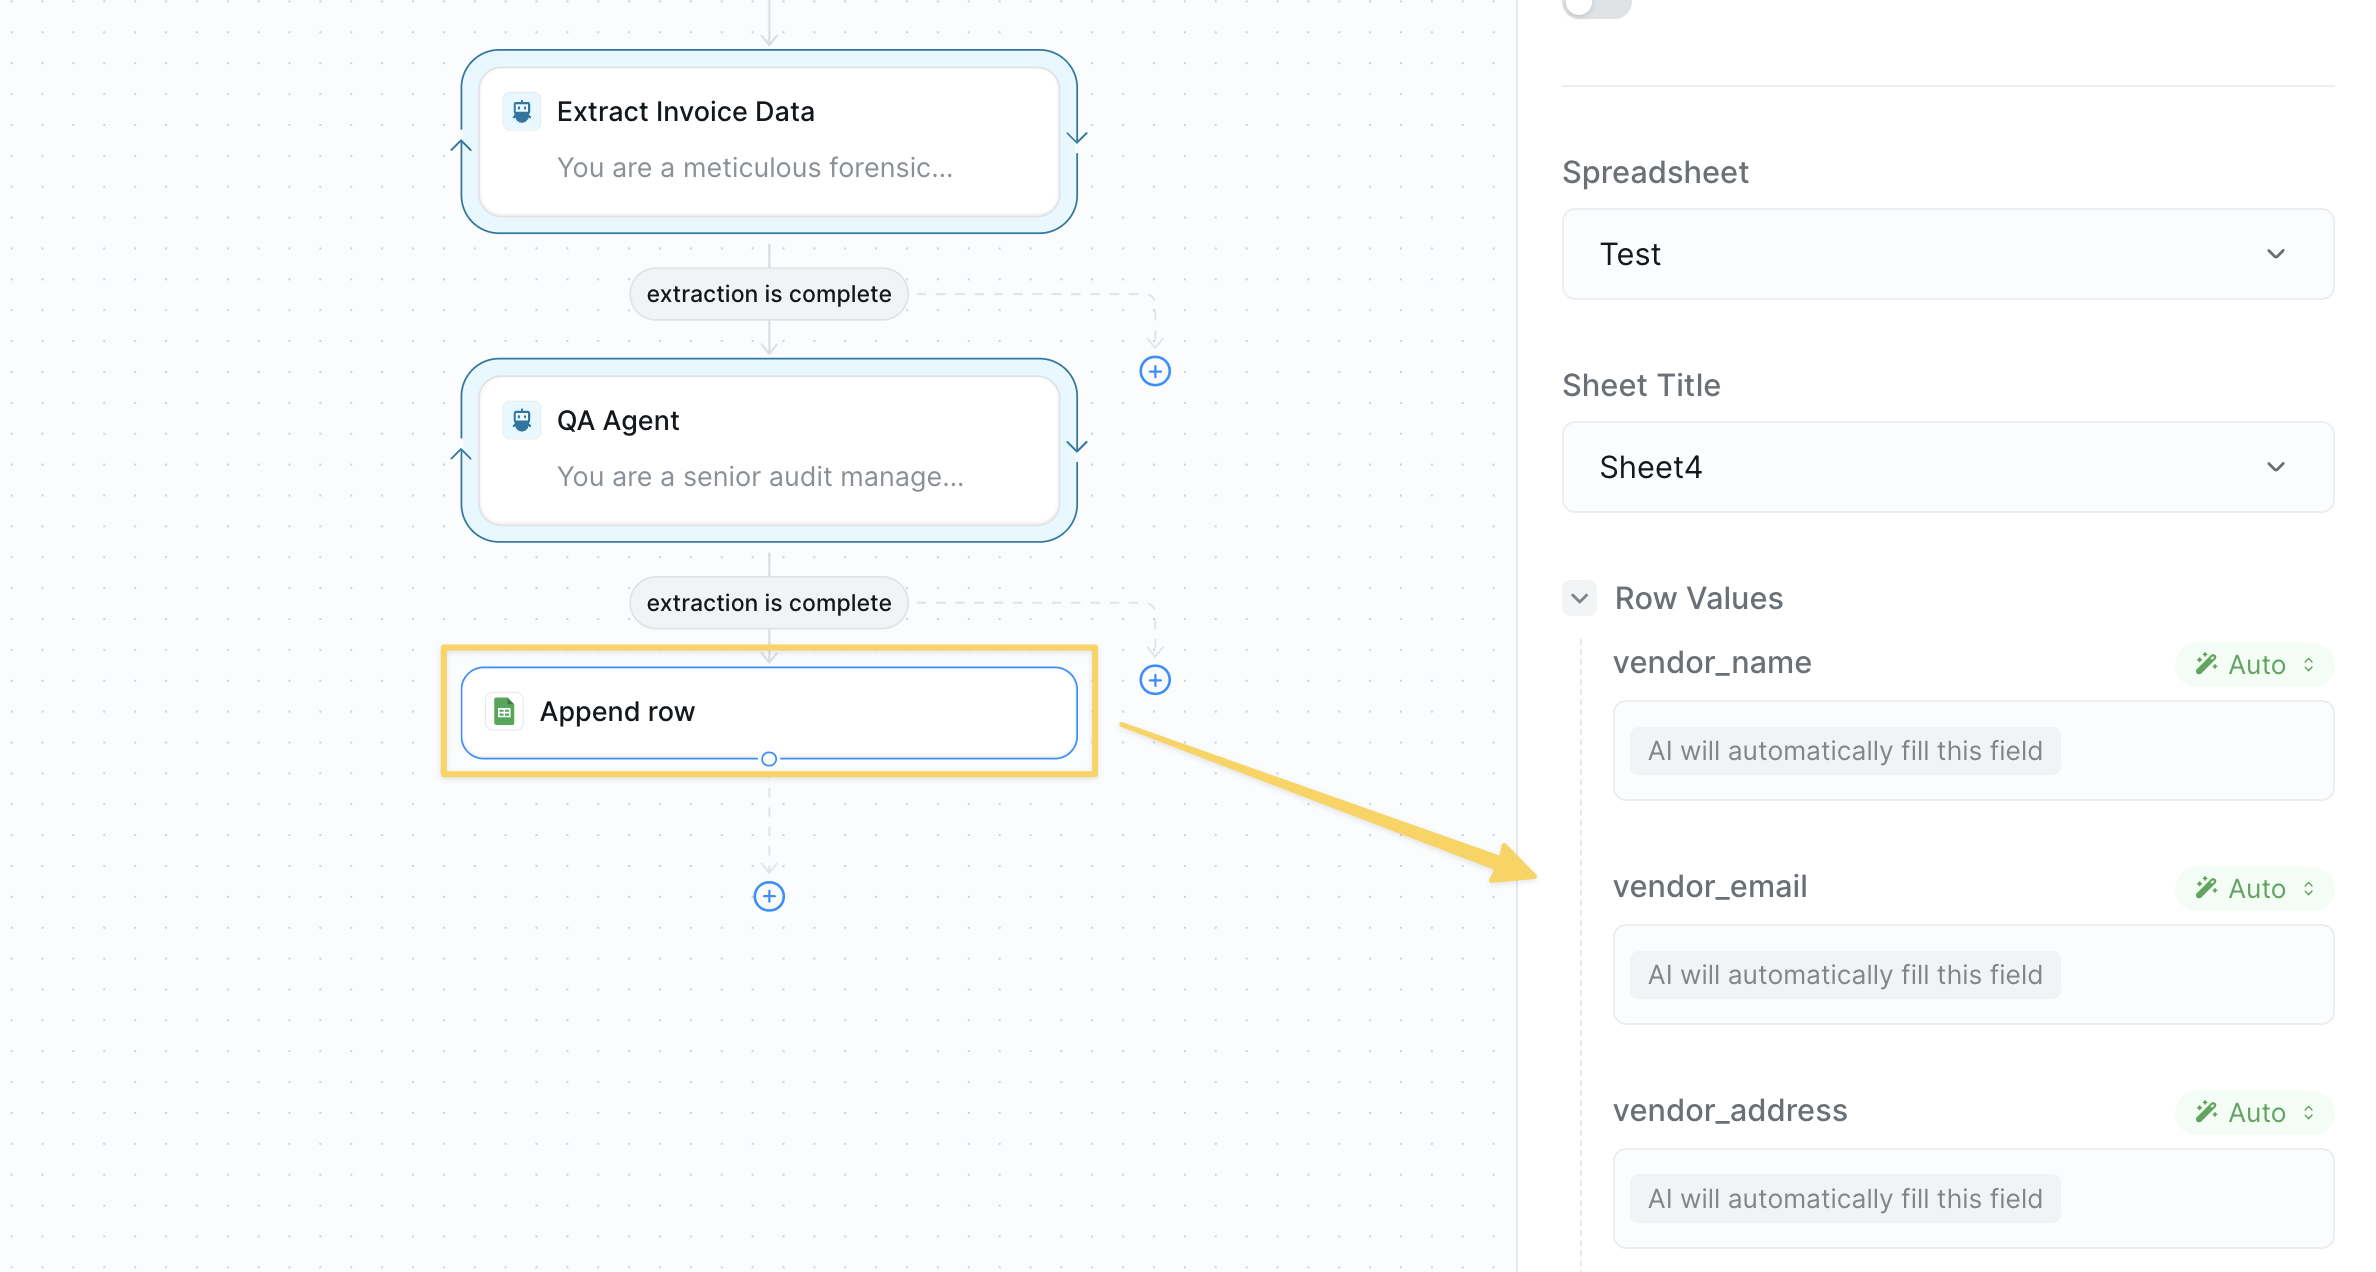 Make sure the fields you are logging match the attributes extracted in the previous step.
**Basic Option:** Use `Google Sheets – Append Row` to log data by document type.
**Advanced Integrations:** You can post this information anywhere using:
* `HTTP Request` actions to send data to your ERP, CRM, or custom databases
* Direct integrations with Airtable, Notion, or other platforms
* Webhook endpoints for real-time processing
* API calls to accounting software like QuickBooks or Xero
The real power comes when you integrate this with your ERP system using API calls or webhook connections from Google Sheets to update your accounting software directly.
## Advanced Features
| Feature | What it does |
| ----------------------- | --------------------------------------------------------------------------- |
| Auto-Approval Rules | Automatically approve trusted vendors under set thresholds |
| API Integrations | Direct connection to QuickBooks, NetSuite, or SAP for seamless data flow |
| Duplicate Detection | Prevent double payments by checking invoice numbers and vendor combinations |
| Early Payment Discounts | Flag and calculate 2/10 Net 30 opportunities |
## Best Practices
Email all vendors about the new invoice email and add to onboarding docs.
Document and communicate approval thresholds to all stakeholders.
Weekly review of pending invoices and monthly reconciliation with GL.
Create a manual review queue for invoices that fail extraction.
## Next Steps
Automate processing of all document types
Generate financial analysis memos
Build intelligent invoice analysis workflows
Optimize costs for high-volume processing
# Memo Generation
Source: https://docs.lindy.ai/use-cases/finance/memo-generation
Transform folders of financial reports and data into polished board memos with AI-powered insights and analysis
You can use the [memo generation template](https://chat.lindy.ai/home/?templateId=68761613a0cb797486bdf6a7) to get started.
## Quick Overview
Stop spending hours compiling board updates. Your agent will:
* **Connect** to your company data folder in Google Drive
* **Process** all PDFs and Google Sheets automatically
* **Extract** key information from financial statements, KPIs, and reports
* **Generate** a comprehensive memo with executive-ready narrative
* **Deliver** the polished memo to chat and email
* **Attach** an AI agent for follow-up questions about the data
Turn a day-long task into a simple "Go" command.
## Setting Up Your Memo Generator
### Step 1: Simple Start Trigger
Make sure the fields you are logging match the attributes extracted in the previous step.
**Basic Option:** Use `Google Sheets – Append Row` to log data by document type.
**Advanced Integrations:** You can post this information anywhere using:
* `HTTP Request` actions to send data to your ERP, CRM, or custom databases
* Direct integrations with Airtable, Notion, or other platforms
* Webhook endpoints for real-time processing
* API calls to accounting software like QuickBooks or Xero
The real power comes when you integrate this with your ERP system using API calls or webhook connections from Google Sheets to update your accounting software directly.
## Advanced Features
| Feature | What it does |
| ----------------------- | --------------------------------------------------------------------------- |
| Auto-Approval Rules | Automatically approve trusted vendors under set thresholds |
| API Integrations | Direct connection to QuickBooks, NetSuite, or SAP for seamless data flow |
| Duplicate Detection | Prevent double payments by checking invoice numbers and vendor combinations |
| Early Payment Discounts | Flag and calculate 2/10 Net 30 opportunities |
## Best Practices
Email all vendors about the new invoice email and add to onboarding docs.
Document and communicate approval thresholds to all stakeholders.
Weekly review of pending invoices and monthly reconciliation with GL.
Create a manual review queue for invoices that fail extraction.
## Next Steps
Automate processing of all document types
Generate financial analysis memos
Build intelligent invoice analysis workflows
Optimize costs for high-volume processing
# Memo Generation
Source: https://docs.lindy.ai/use-cases/finance/memo-generation
Transform folders of financial reports and data into polished board memos with AI-powered insights and analysis
You can use the [memo generation template](https://chat.lindy.ai/home/?templateId=68761613a0cb797486bdf6a7) to get started.
## Quick Overview
Stop spending hours compiling board updates. Your agent will:
* **Connect** to your company data folder in Google Drive
* **Process** all PDFs and Google Sheets automatically
* **Extract** key information from financial statements, KPIs, and reports
* **Generate** a comprehensive memo with executive-ready narrative
* **Deliver** the polished memo to chat and email
* **Attach** an AI agent for follow-up questions about the data
Turn a day-long task into a simple "Go" command.
## Setting Up Your Memo Generator
### Step 1: Simple Start Trigger
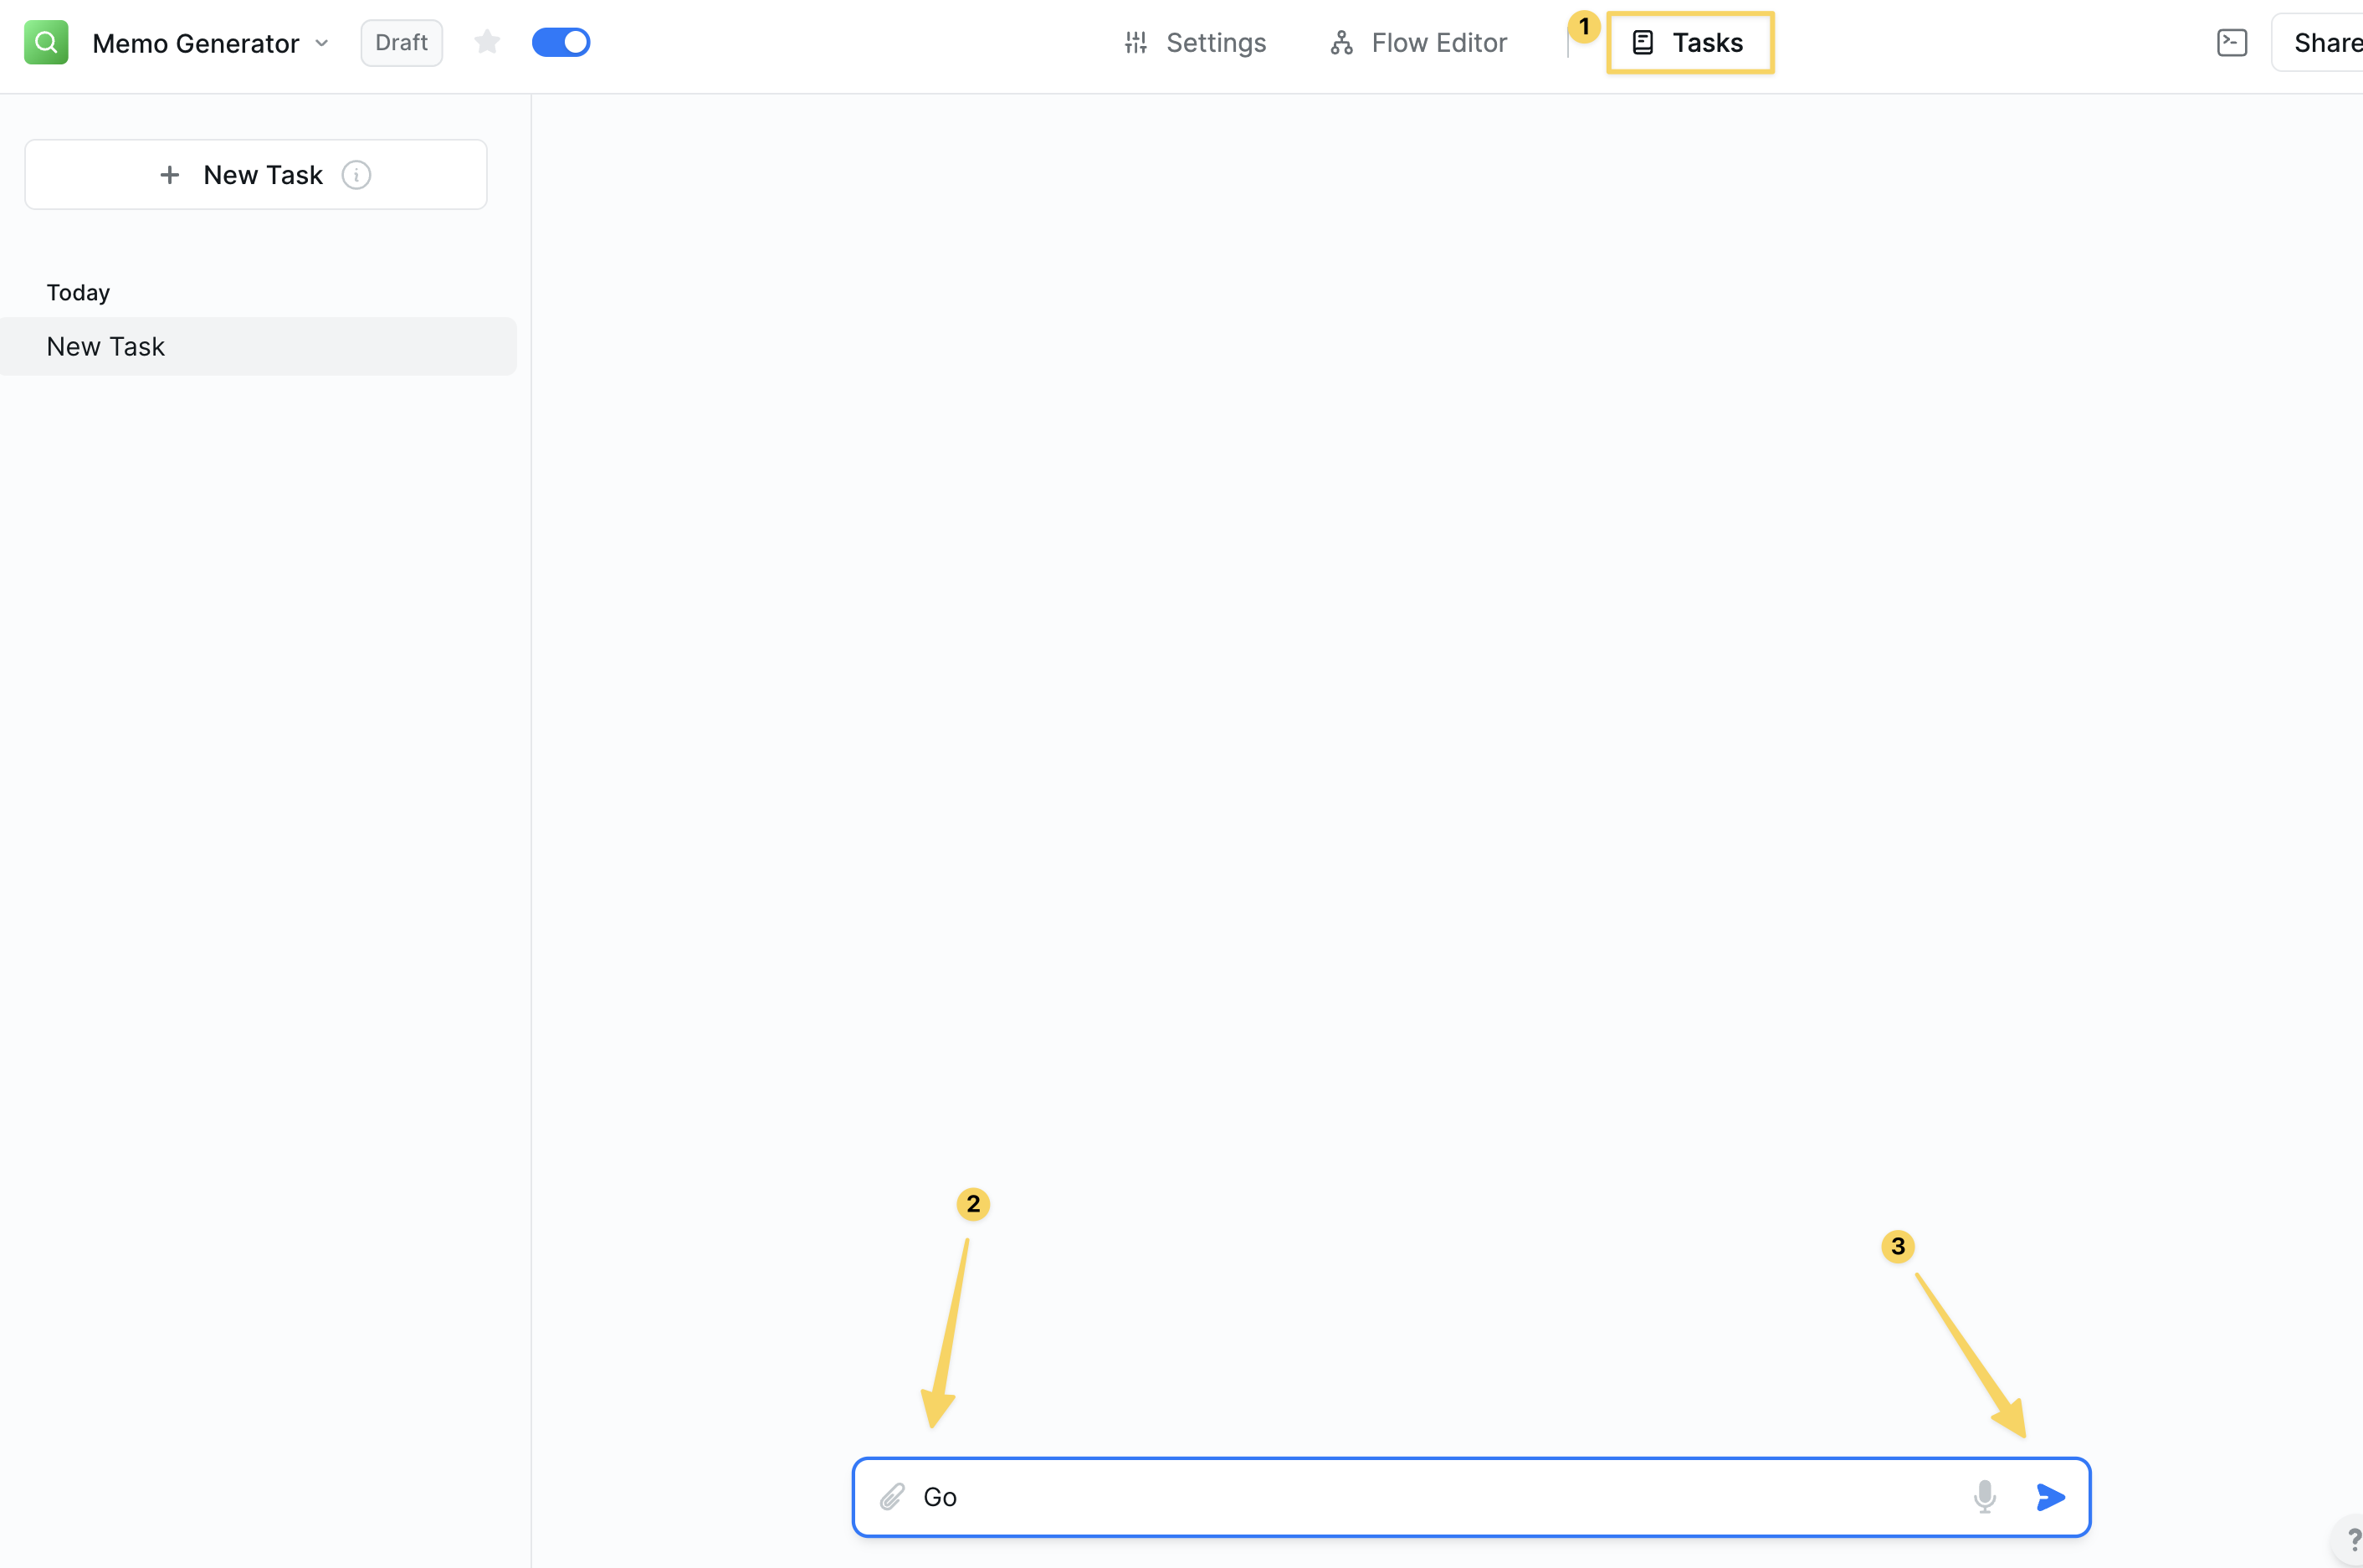 Start with a `Chat Message Received` trigger for simple activation:
Example messages:
* "Go"
* "Generate memo"
* "Run board update"
Keep it simple — the agent will process all available company data automatically.
### Step 2: Connect to Company Data Folder
Start with a `Chat Message Received` trigger for simple activation:
Example messages:
* "Go"
* "Generate memo"
* "Run board update"
Keep it simple — the agent will process all available company data automatically.
### Step 2: Connect to Company Data Folder
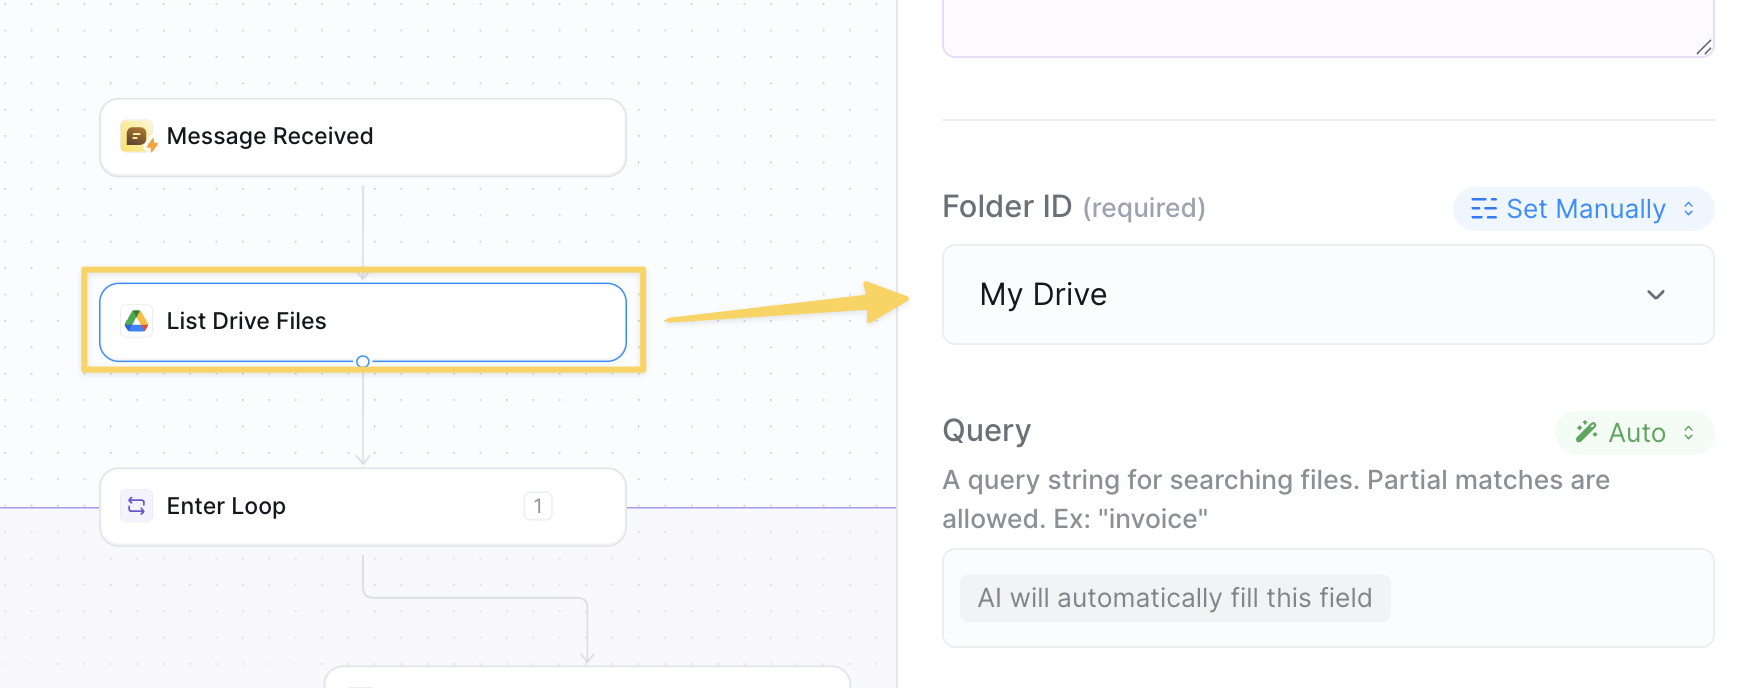 Add `Google Drive – List Files` action:
* Folder: Connect to your company's main data folder in Google Drive
* Include: All file types (we'll filter in the next step)
* This folder should contain all financial statements, reports, and company documents
Remember to select the folder that corresponds with the ONE company you want to generate a memo for.
### Step 3: Enter File Processing Loop
Add `Google Drive – List Files` action:
* Folder: Connect to your company's main data folder in Google Drive
* Include: All file types (we'll filter in the next step)
* This folder should contain all financial statements, reports, and company documents
Remember to select the folder that corresponds with the ONE company you want to generate a memo for.
### Step 3: Enter File Processing Loop
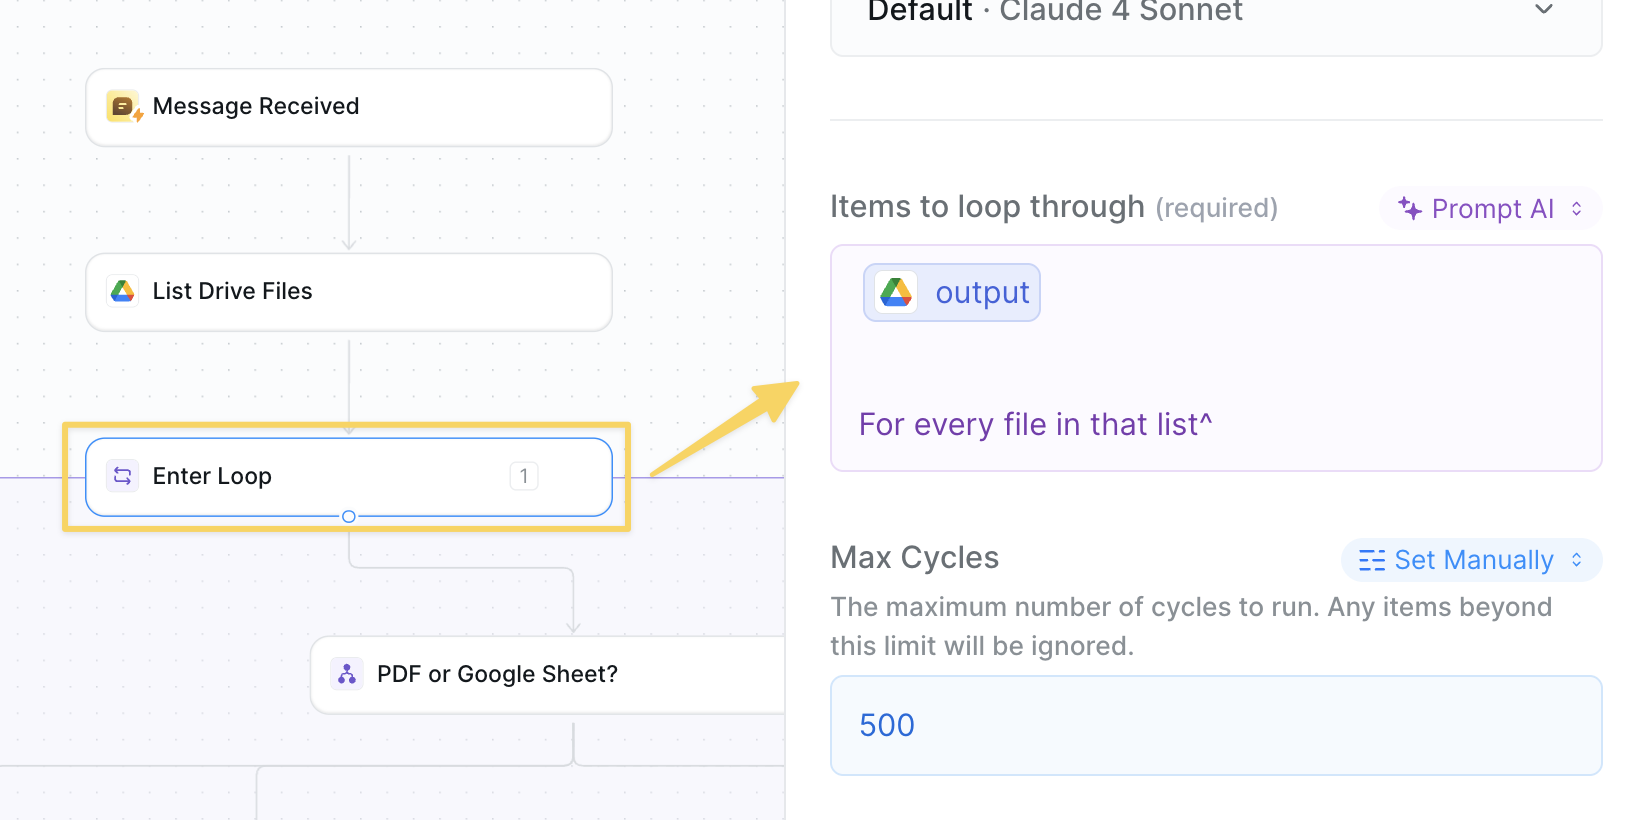 Add `Enter Loop` using the files from Step 2:
* Input: The list of files from your Google Drive folder
* This will process each file individually to extract relevant data
* We'll handle different file types in the next step
### Step 4: Determine File Type
Add `Enter Loop` using the files from Step 2:
* Input: The list of files from your Google Drive folder
* This will process each file individually to extract relevant data
* We'll handle different file types in the next step
### Step 4: Determine File Type
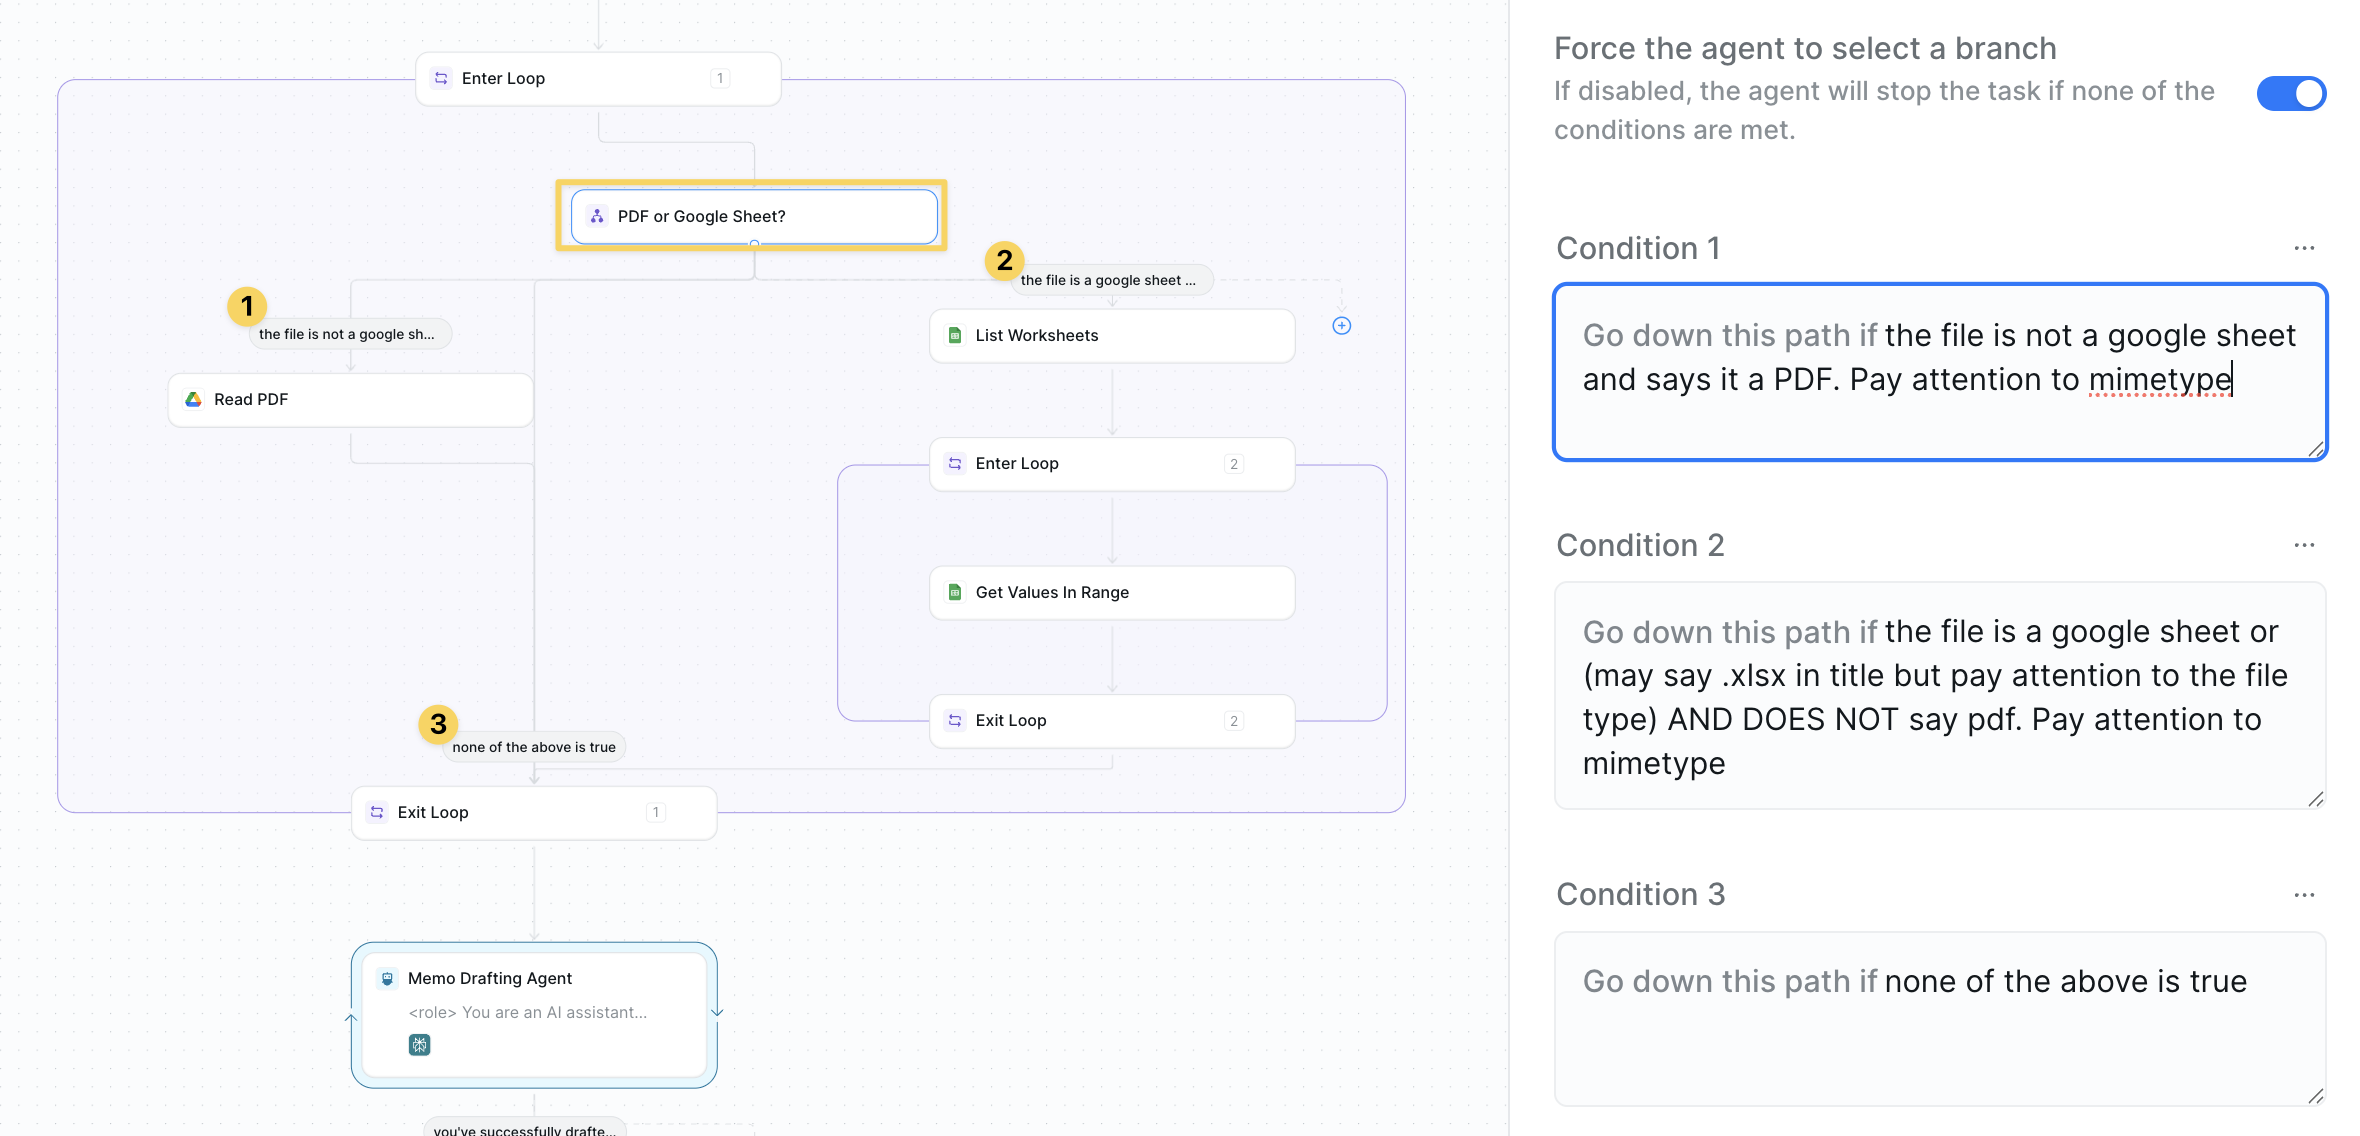 Add `Conditions` to route files based on their type. This workflow only processes PDFs and Google Sheets:
**Path 1: If PDF**
* Add `Google Drive – Download File`
* Then `File – Read PDF` to extract all text content
**Path 2: If Google Sheet**
* Add `Google Sheets – List Worksheets`
* Enter loop for each worksheet
* Use `Google Sheets – Get All Values` for each sheet
**Path 3: If Neither**
* Go directly to `Exit Loop` (skip unsupported file types)
All three paths will converge at the loop exit.
### Step 5: Exit Loop and Add Context
Add `Conditions` to route files based on their type. This workflow only processes PDFs and Google Sheets:
**Path 1: If PDF**
* Add `Google Drive – Download File`
* Then `File – Read PDF` to extract all text content
**Path 2: If Google Sheet**
* Add `Google Sheets – List Worksheets`
* Enter loop for each worksheet
* Use `Google Sheets – Get All Values` for each sheet
**Path 3: If Neither**
* Go directly to `Exit Loop` (skip unsupported file types)
All three paths will converge at the loop exit.
### Step 5: Exit Loop and Add Context
 Add `Exit Loop` action and use `Add Context` to compile all extracted data:
* Include all PDF text content and spreadsheet data
* Preserve file names and document structure
* This transfers all company data outside the loop for analysis
### Step 6: Generate the Memo
Add `Exit Loop` action and use `Add Context` to compile all extracted data:
* Include all PDF text content and spreadsheet data
* Preserve file names and document structure
* This transfers all company data outside the loop for analysis
### Step 6: Generate the Memo
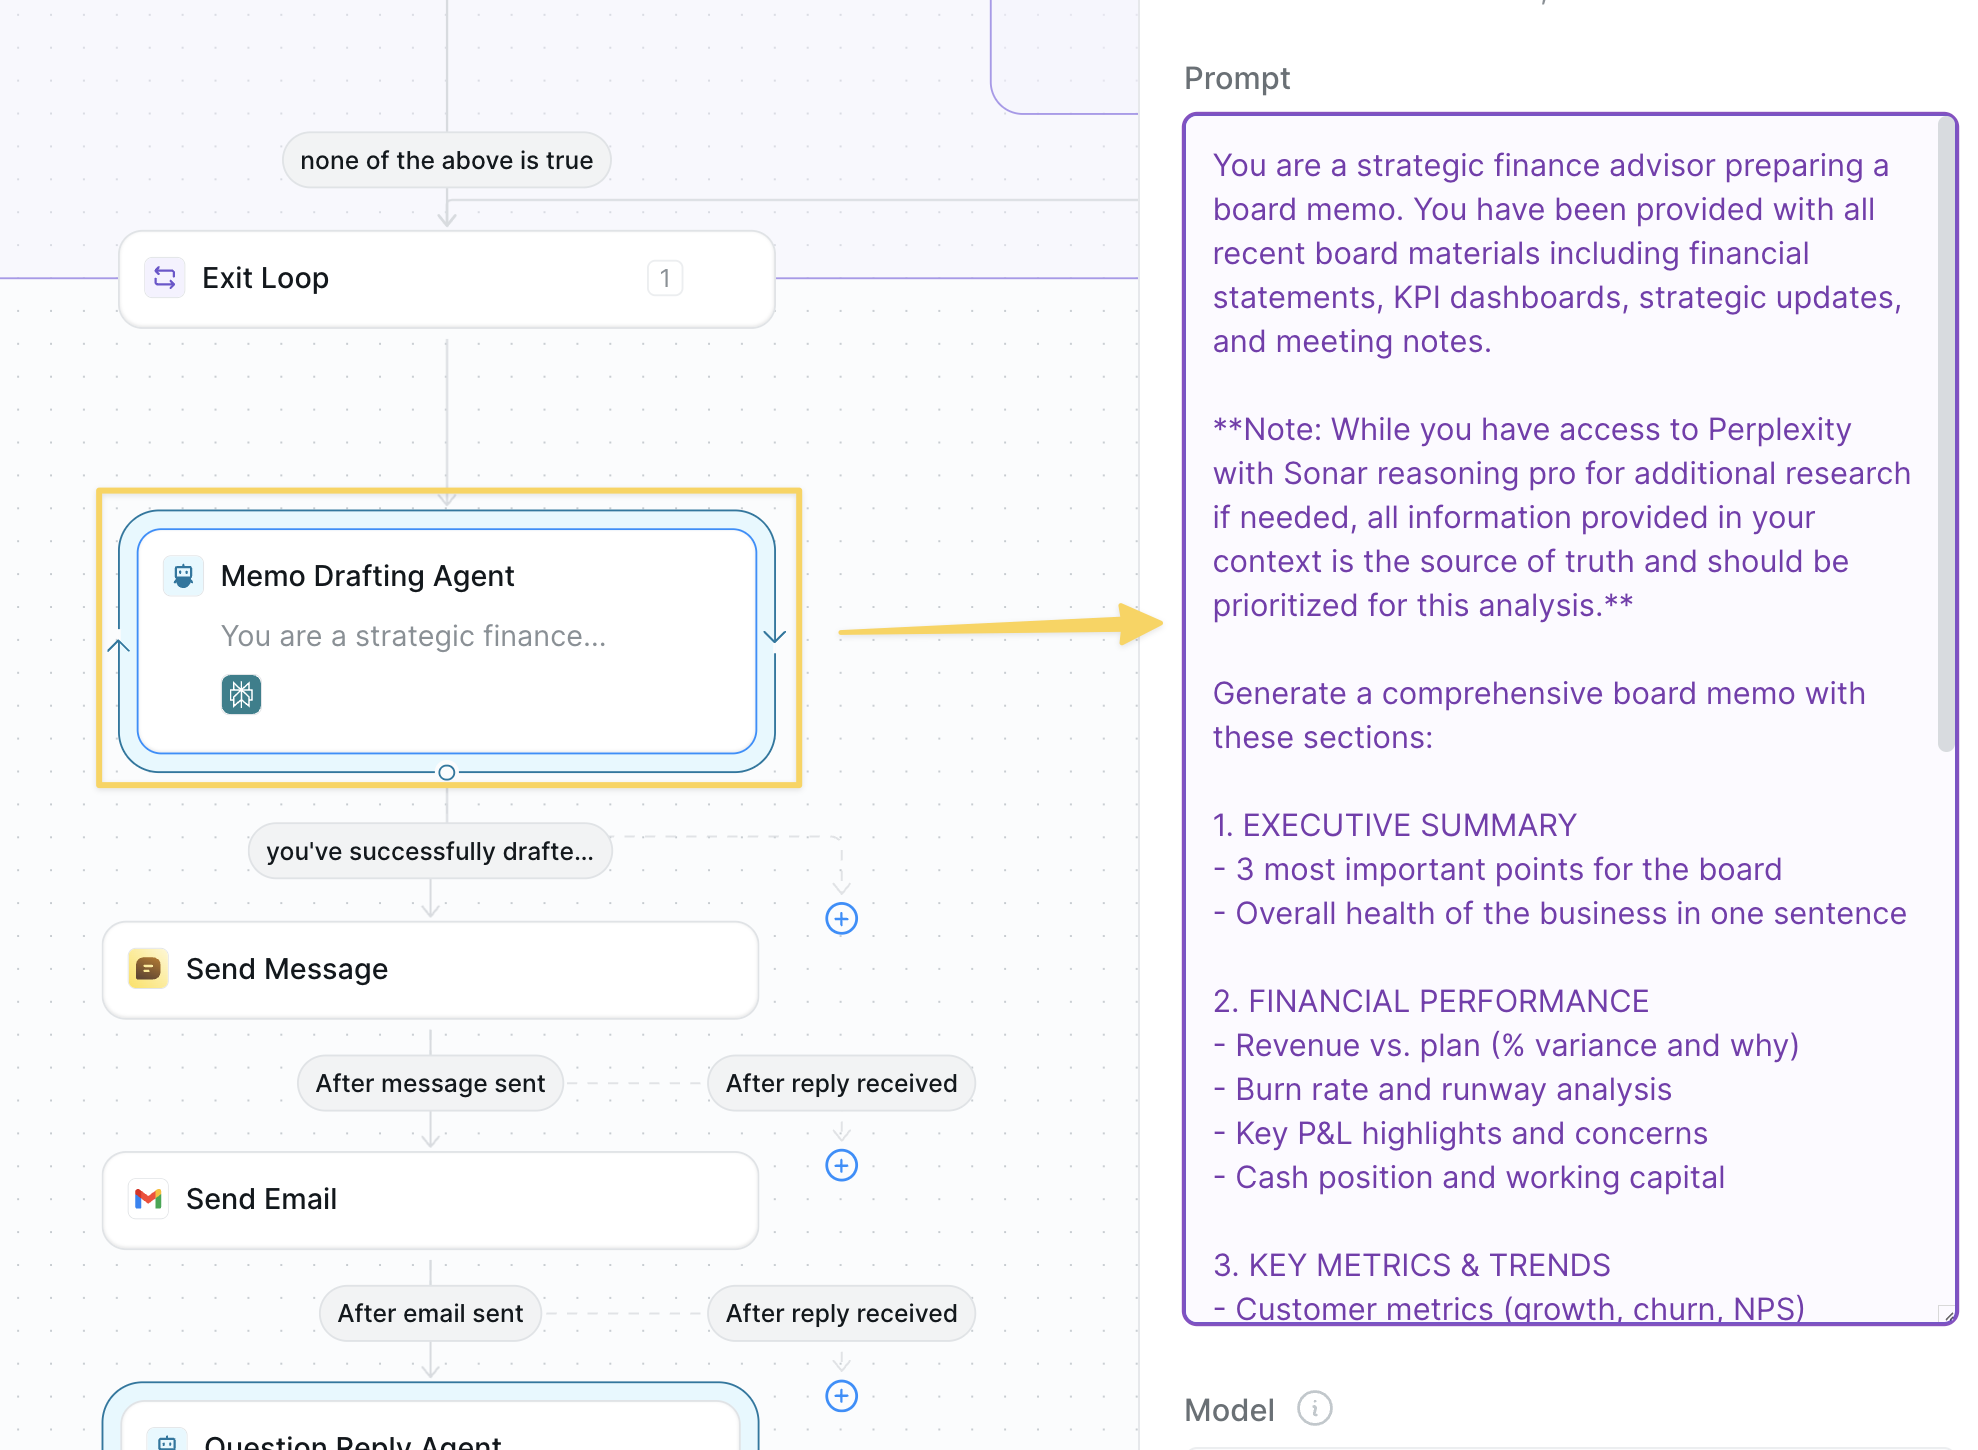 Add `AI Agent – Memo Generator` with this prompt:
```
You are a strategic finance advisor preparing a board memo. You have been provided with all recent board materials including financial statements, KPI dashboards, strategic updates, and meeting notes.
**Note: While you have access to Perplexity with Sonar reasoning pro for additional research if needed, all information provided in your context is the source of truth and should be prioritized for this analysis.**
Generate a comprehensive board memo with these sections:
1. EXECUTIVE SUMMARY
- 3 most important points for the board
- Overall health of the business in one sentence
2. FINANCIAL PERFORMANCE
- Revenue vs. plan (% variance and why)
- Burn rate and runway analysis
- Key P&L highlights and concerns
- Cash position and working capital
3. KEY METRICS & TRENDS
- Customer metrics (growth, churn, NPS)
- Product/operational KPIs
- Team/headcount updates
- Highlight improving vs. deteriorating metrics
4. STRATEGIC PROGRESS
- Status of board-approved initiatives
- Major wins since last update
- Delays or pivots to flag
5. RISKS & OPPORTUNITIES
- Top 3 risks to the business
- Mitigation strategies in progress
- Emerging opportunities to capture
6. BOARD ACTIONS REQUESTED
- Specific decisions needed
- Information requests
- Strategic guidance sought
Write in clear, executive language. Use specific numbers. Focus on insights and implications, not just reporting data. If performance is below plan, explain why and what's being done.
```
### Step 6: Send to Chat and Email
Add `AI Agent – Memo Generator` with this prompt:
```
You are a strategic finance advisor preparing a board memo. You have been provided with all recent board materials including financial statements, KPI dashboards, strategic updates, and meeting notes.
**Note: While you have access to Perplexity with Sonar reasoning pro for additional research if needed, all information provided in your context is the source of truth and should be prioritized for this analysis.**
Generate a comprehensive board memo with these sections:
1. EXECUTIVE SUMMARY
- 3 most important points for the board
- Overall health of the business in one sentence
2. FINANCIAL PERFORMANCE
- Revenue vs. plan (% variance and why)
- Burn rate and runway analysis
- Key P&L highlights and concerns
- Cash position and working capital
3. KEY METRICS & TRENDS
- Customer metrics (growth, churn, NPS)
- Product/operational KPIs
- Team/headcount updates
- Highlight improving vs. deteriorating metrics
4. STRATEGIC PROGRESS
- Status of board-approved initiatives
- Major wins since last update
- Delays or pivots to flag
5. RISKS & OPPORTUNITIES
- Top 3 risks to the business
- Mitigation strategies in progress
- Emerging opportunities to capture
6. BOARD ACTIONS REQUESTED
- Specific decisions needed
- Information requests
- Strategic guidance sought
Write in clear, executive language. Use specific numbers. Focus on insights and implications, not just reporting data. If performance is below plan, explain why and what's being done.
```
### Step 6: Send to Chat and Email
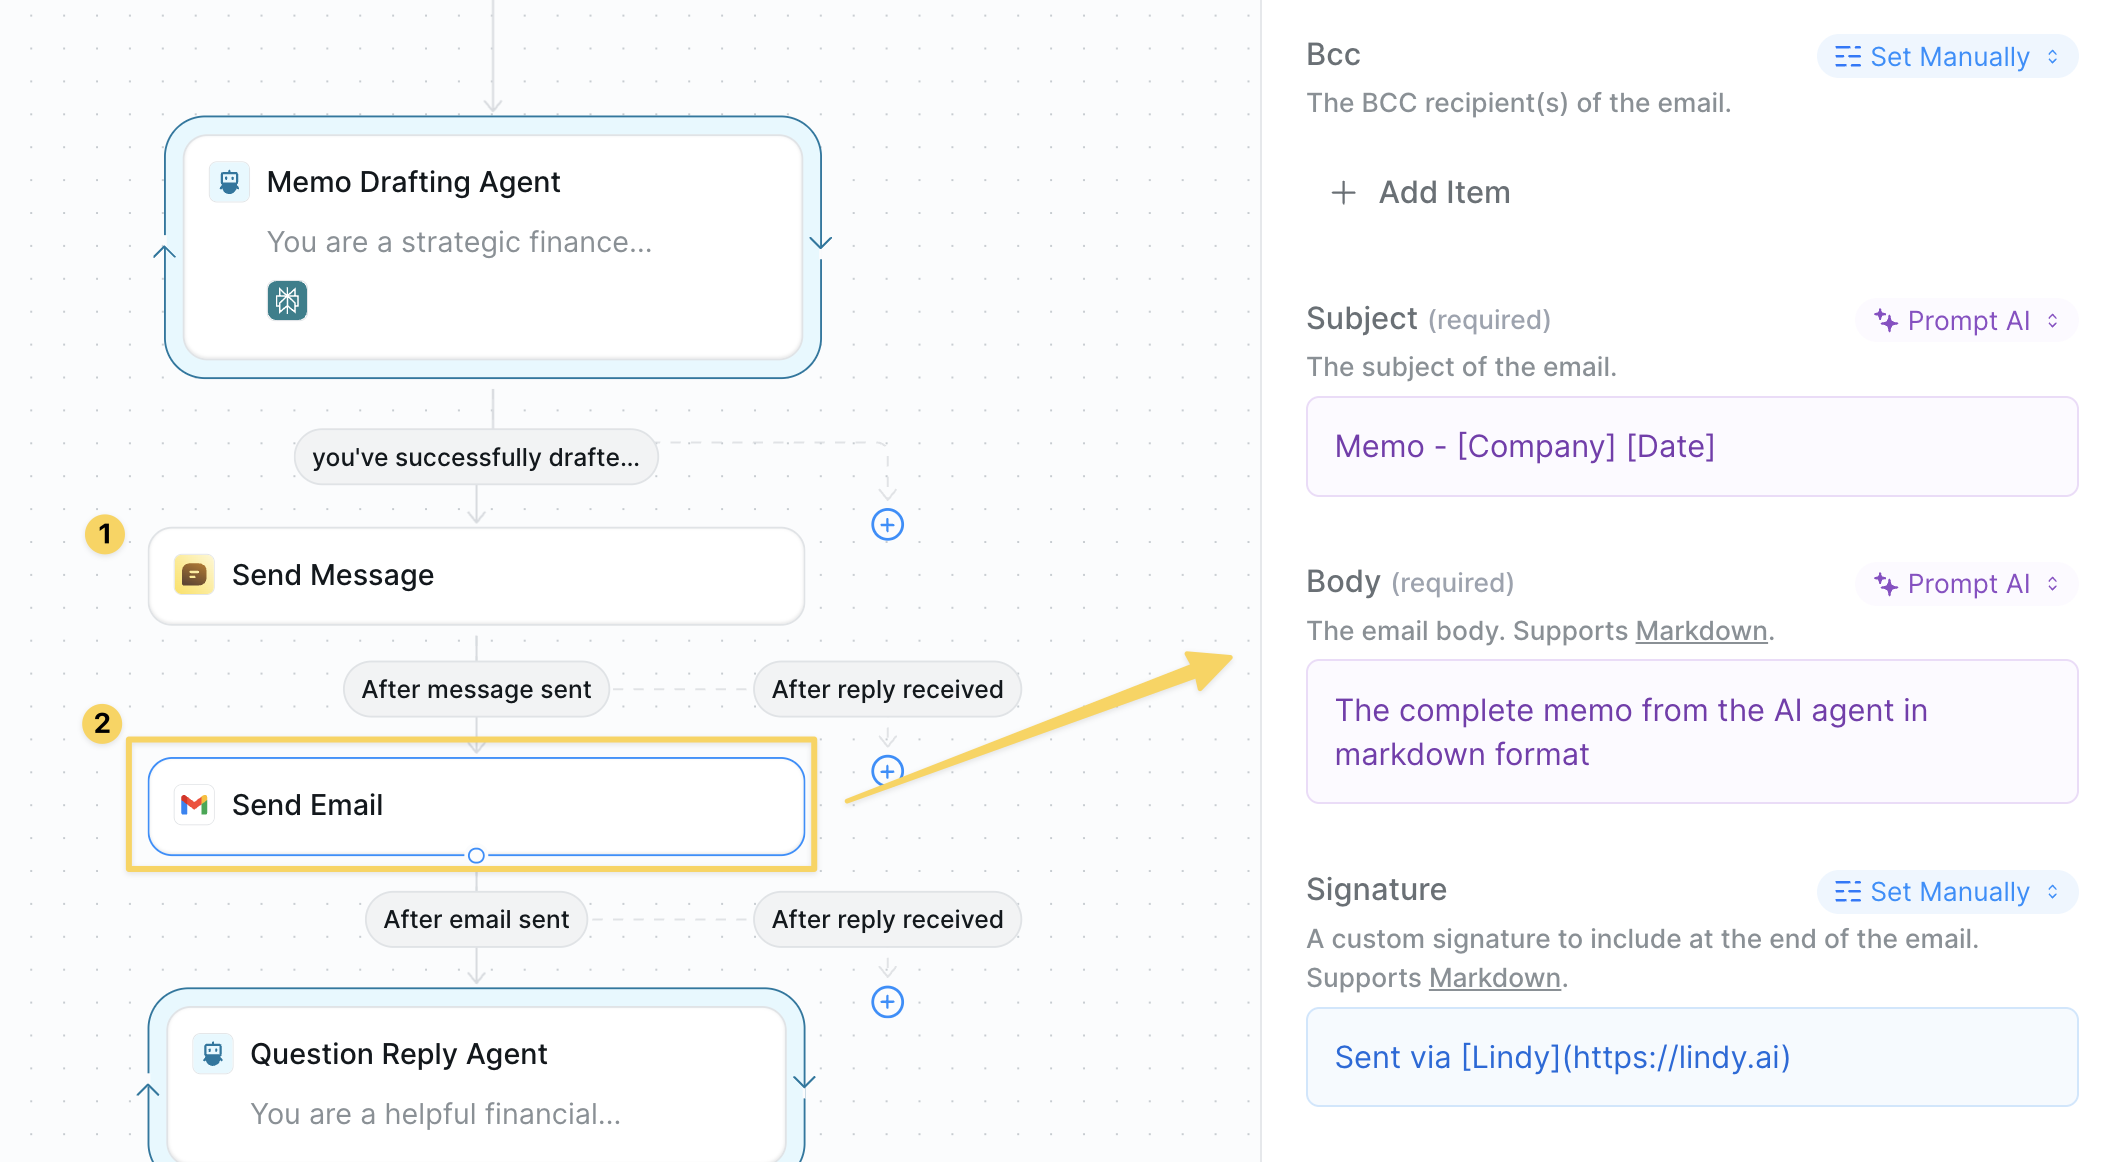 Send the memo to both chat and email:
**Send to Chat:**
* Use `Chat – Send Message` to deliver the memo in the chat interface
* Include the full memo content for immediate review
**Send via Email:**
* Use `Gmail – Send Email` with the memo content
* Subject: "Memo - \[Company] \[Date]"
* Body: The complete memo from the AI agent in markdown format
### Step 7: Attach AI Agent for Follow-up Questions
Send the memo to both chat and email:
**Send to Chat:**
* Use `Chat – Send Message` to deliver the memo in the chat interface
* Include the full memo content for immediate review
**Send via Email:**
* Use `Gmail – Send Email` with the memo content
* Subject: "Memo - \[Company] \[Date]"
* Body: The complete memo from the AI agent in markdown format
### Step 7: Attach AI Agent for Follow-up Questions
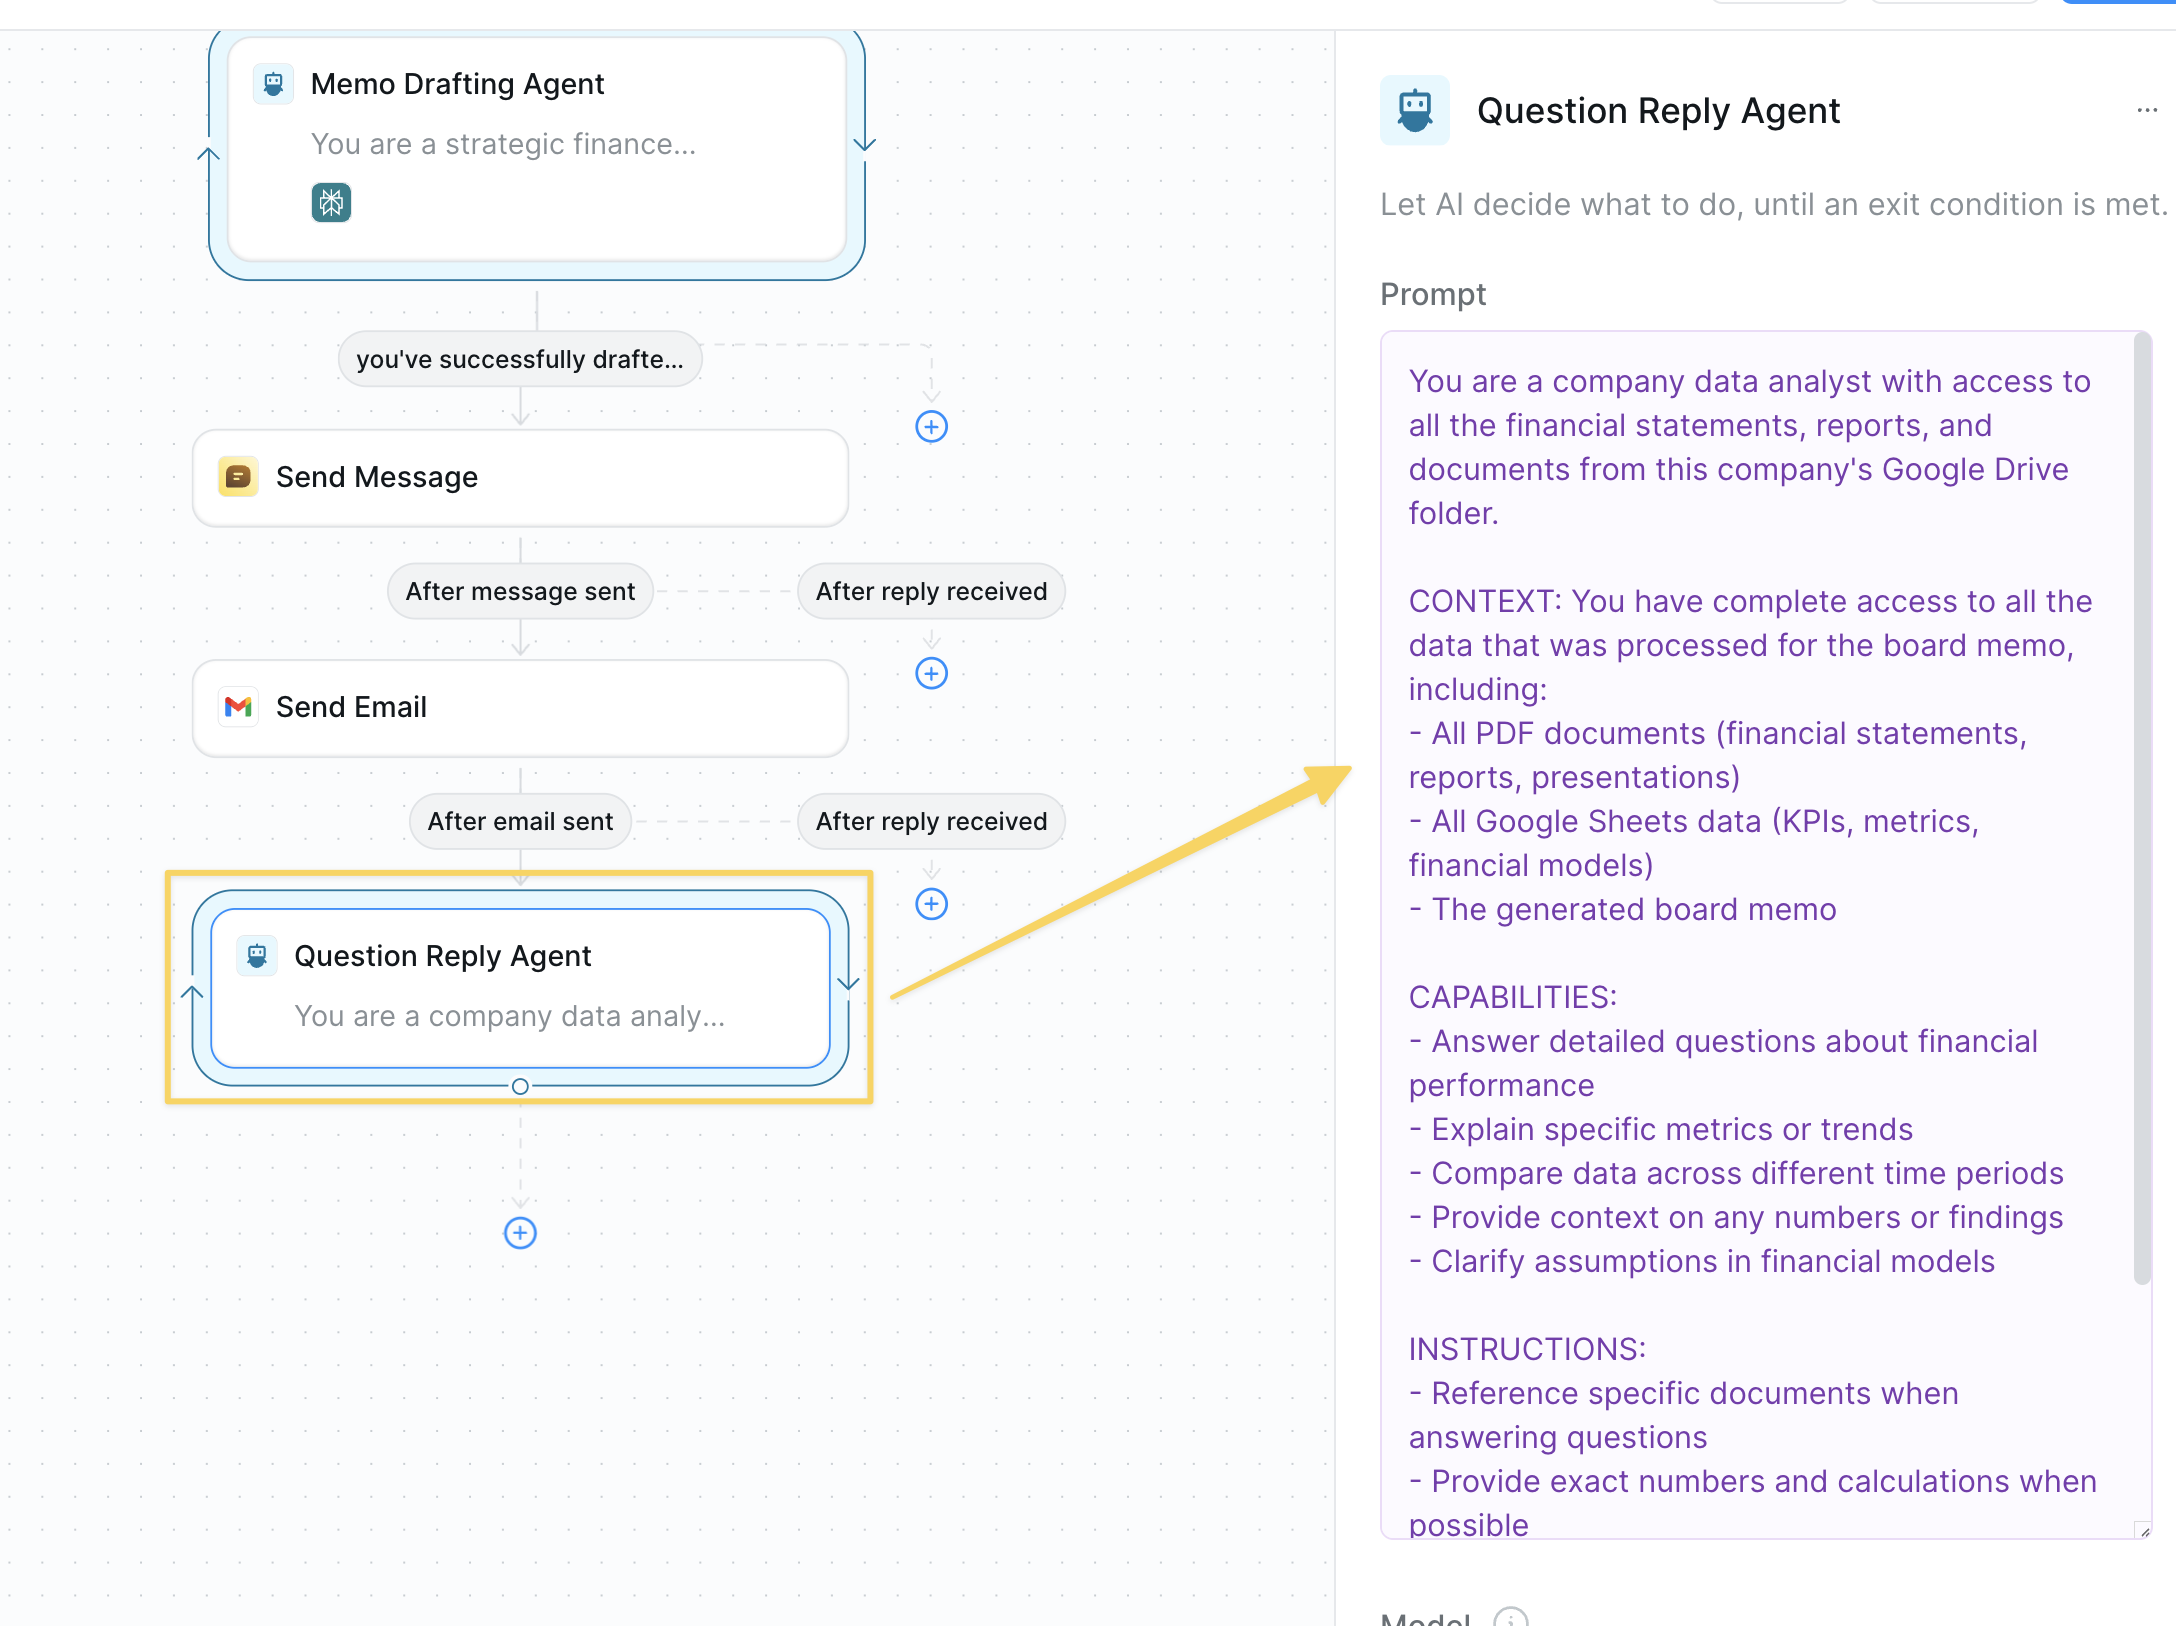 Add `AI Agent – Company Data Assistant` to enable follow-up questions in the task:
```
You are a company data analyst with access to all the financial statements, reports, and documents from this company's Google Drive folder.
CONTEXT: You have complete access to all the data that was processed for the board memo, including:
- All PDF documents (financial statements, reports, presentations)
- All Google Sheets data (KPIs, metrics, financial models)
- The generated board memo
CAPABILITIES:
- Answer detailed questions about financial performance
- Explain specific metrics or trends
- Compare data across different time periods
- Provide context on any numbers or findings
- Clarify assumptions in financial models
INSTRUCTIONS:
- Reference specific documents when answering questions
- Provide exact numbers and calculations when possible
- If asked about data not in the processed documents, clearly state that
- Be precise and analytical in your responses
You can now answer any follow-up questions about the company's data and performance.
```
## Advanced Features
| Feature | What it does |
| ------------------- | -------------------------------------------------- |
| Comparison Analysis | Compare to prior period and year-ago automatically |
| Scenario Planning | Generate bull/bear/base case projections |
| Ask Highlighting | Bold or highlight specific board asks |
| Appendix Generation | Auto-create detailed appendices for deep dives |
| Multi-Format Output | Generate both summary and detailed versions |
## Best Practices
Keep a consistent folder structure: "Board Materials - \[Month Year]" with subfolders by type.
Ensure all data sources are refreshed before running the memo generator.
Always review AI-generated memos for accuracy before board distribution.
Save your best memos as templates to maintain consistent quality.
## Next Steps
Automate financial document processing
Process any document type automatically
Write better prompts for memo generation
Create reusable memo templates
# Employee Feedback Collection
Source: https://docs.lindy.ai/use-cases/hr/employee-feedback-collector
Automate employee feedback collection and analysis with Lindy
You can use the [weekly employee feedback template](https://chat.lindy.ai/home/?templateId=6875fa3a17018229eea893fe) to get started.
## Quick Overview
Transform employee feedback collection from manual surveys to an automated weekly pulse system. Your agent will:
* **Schedule** weekly feedback campaigns automatically
* **Send** personalized feedback requests to each team member
* **Monitor** responses and alert you to feedback as it arrives
* **Compile** a weekly summary report after the collection period
No more chasing down feedback or manually organizing responses.
## Setting Up Your Feedback System
### Step 1: Weekly Schedule Trigger
Set up automatic weekly feedback collection to maintain consistent pulse checks.
Add `AI Agent – Company Data Assistant` to enable follow-up questions in the task:
```
You are a company data analyst with access to all the financial statements, reports, and documents from this company's Google Drive folder.
CONTEXT: You have complete access to all the data that was processed for the board memo, including:
- All PDF documents (financial statements, reports, presentations)
- All Google Sheets data (KPIs, metrics, financial models)
- The generated board memo
CAPABILITIES:
- Answer detailed questions about financial performance
- Explain specific metrics or trends
- Compare data across different time periods
- Provide context on any numbers or findings
- Clarify assumptions in financial models
INSTRUCTIONS:
- Reference specific documents when answering questions
- Provide exact numbers and calculations when possible
- If asked about data not in the processed documents, clearly state that
- Be precise and analytical in your responses
You can now answer any follow-up questions about the company's data and performance.
```
## Advanced Features
| Feature | What it does |
| ------------------- | -------------------------------------------------- |
| Comparison Analysis | Compare to prior period and year-ago automatically |
| Scenario Planning | Generate bull/bear/base case projections |
| Ask Highlighting | Bold or highlight specific board asks |
| Appendix Generation | Auto-create detailed appendices for deep dives |
| Multi-Format Output | Generate both summary and detailed versions |
## Best Practices
Keep a consistent folder structure: "Board Materials - \[Month Year]" with subfolders by type.
Ensure all data sources are refreshed before running the memo generator.
Always review AI-generated memos for accuracy before board distribution.
Save your best memos as templates to maintain consistent quality.
## Next Steps
Automate financial document processing
Process any document type automatically
Write better prompts for memo generation
Create reusable memo templates
# Employee Feedback Collection
Source: https://docs.lindy.ai/use-cases/hr/employee-feedback-collector
Automate employee feedback collection and analysis with Lindy
You can use the [weekly employee feedback template](https://chat.lindy.ai/home/?templateId=6875fa3a17018229eea893fe) to get started.
## Quick Overview
Transform employee feedback collection from manual surveys to an automated weekly pulse system. Your agent will:
* **Schedule** weekly feedback campaigns automatically
* **Send** personalized feedback requests to each team member
* **Monitor** responses and alert you to feedback as it arrives
* **Compile** a weekly summary report after the collection period
No more chasing down feedback or manually organizing responses.
## Setting Up Your Feedback System
### Step 1: Weekly Schedule Trigger
Set up automatic weekly feedback collection to maintain consistent pulse checks.
 Use `On Recurring Schedule` set to weekly (e.g., Monday 9:00 AM) to kick off the feedback collection process automatically.
### Step 2: Get Employee Directory
Retrieve the list of employees who should receive feedback requests from your master spreadsheet.
Use `On Recurring Schedule` set to weekly (e.g., Monday 9:00 AM) to kick off the feedback collection process automatically.
### Step 2: Get Employee Directory
Retrieve the list of employees who should receive feedback requests from your master spreadsheet.
 Use `Google Sheets – Get Spreadsheet` from your employee directory sheet.
Required columns:
* **Full Name**: Employee's complete name for personalization
* **Email**: Work email address for survey delivery
Keep your employee spreadsheet updated with current team members for accurate feedback collection. The default row limit is 100 — increase if you have more employees.
### Step 3: Start Employee Loop
Begin processing each employee individually to send personalized feedback requests.
Use `Google Sheets – Get Spreadsheet` from your employee directory sheet.
Required columns:
* **Full Name**: Employee's complete name for personalization
* **Email**: Work email address for survey delivery
Keep your employee spreadsheet updated with current team members for accurate feedback collection. The default row limit is 100 — increase if you have more employees.
### Step 3: Start Employee Loop
Begin processing each employee individually to send personalized feedback requests.
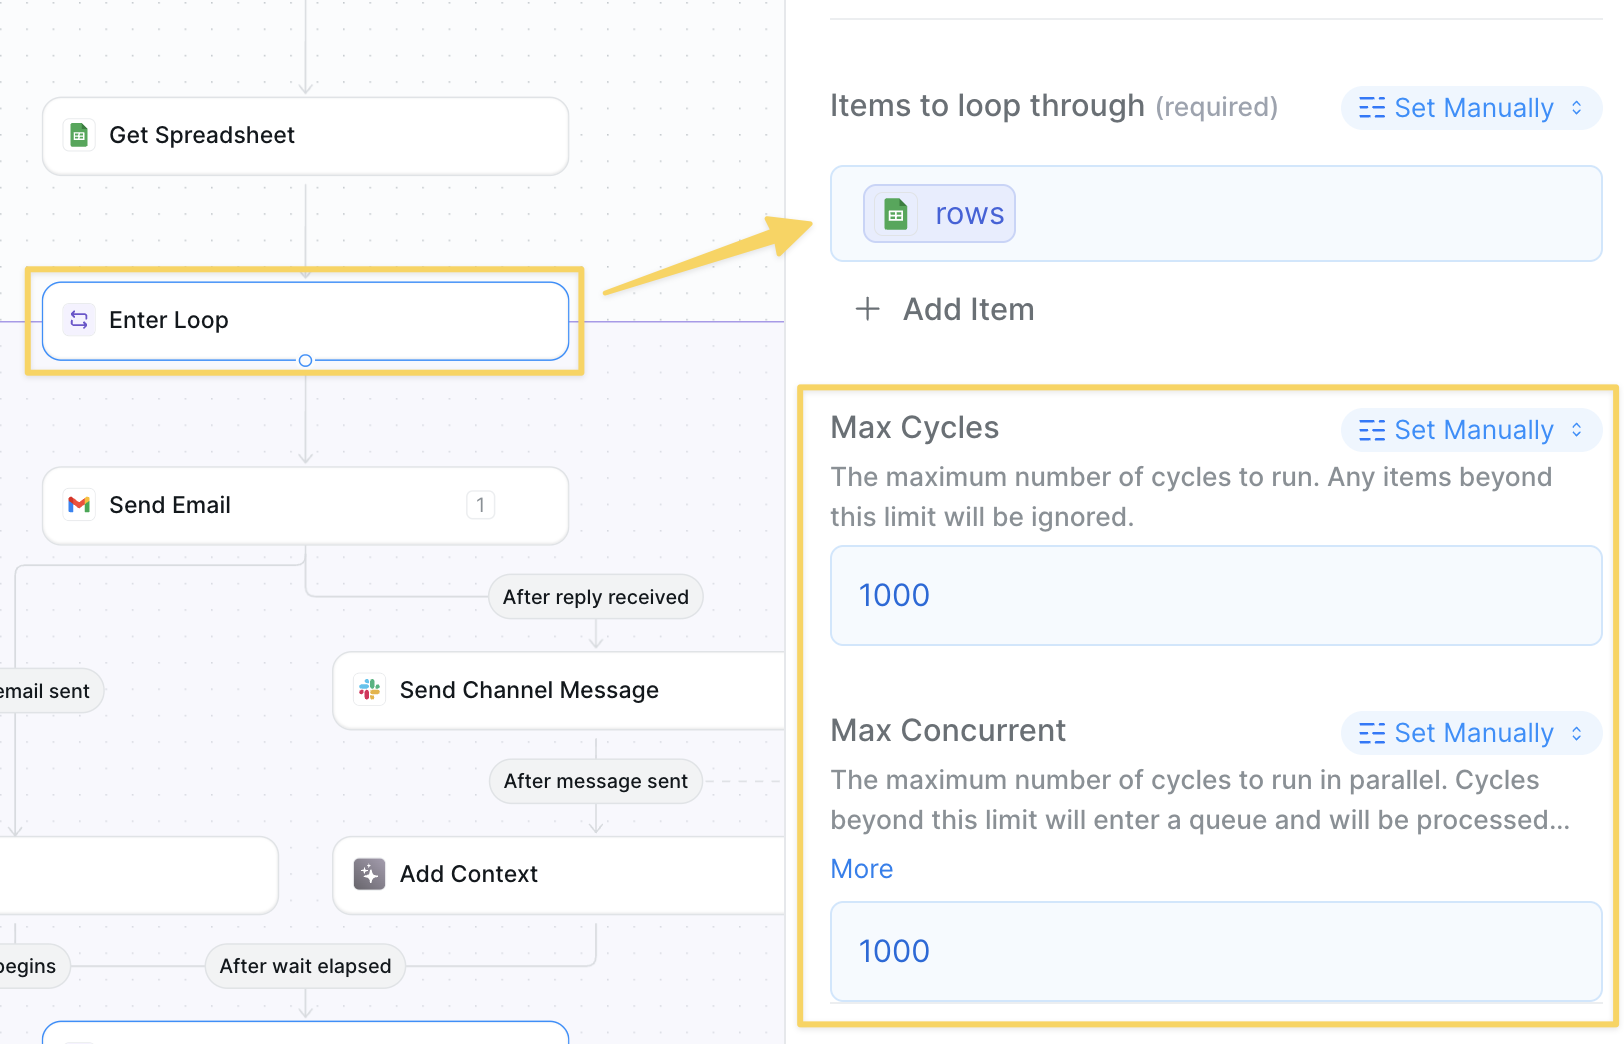 Add the `rows` output reference from your `Get Spreadsheet` action to iterate through each employee row from your spreadsheet.
Increase the max cycles & concurrent above the number of employees you want to send feedback too.
### Step 4: Send Individual Feedback Email
Send personalized feedback requests to each employee with engaging questions.
Add the `rows` output reference from your `Get Spreadsheet` action to iterate through each employee row from your spreadsheet.
Increase the max cycles & concurrent above the number of employees you want to send feedback too.
### Step 4: Send Individual Feedback Email
Send personalized feedback requests to each employee with engaging questions.
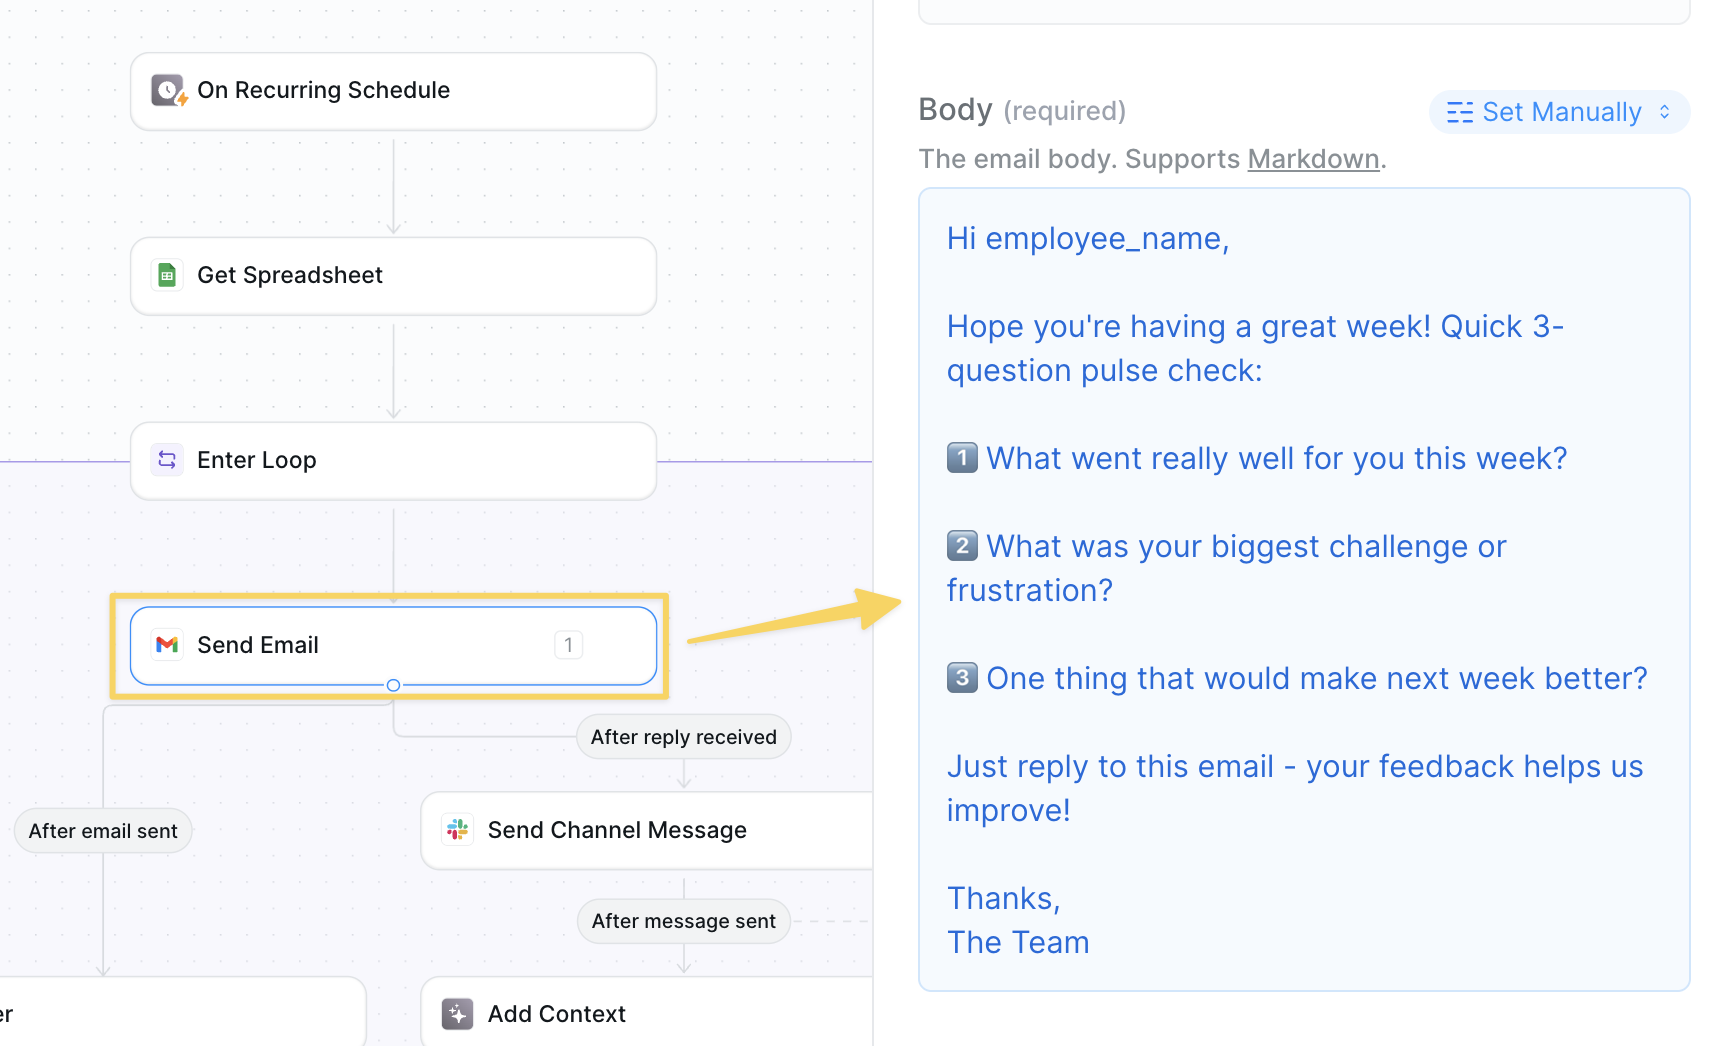 Use `Gmail – Send Email` with:
* **To**: employee email (auto is okay setting)
* **Example Subject**: Weekly Pulse Check — 2 Minutes 📝
* **Example Body**:
```
Hi employee_name,
Hope you're having a great week! Quick 3-question pulse check:
1️⃣ What went really well for you this week?
2️⃣ What was your biggest challenge or frustration?
3️⃣ One thing that would make next week better?
Just reply to this email — your feedback helps us improve!
Thanks,
The Team
```
### Step 5: Send Feedback to Private Channel
Immediately share feedback responses in a private Slack channel as they come in.
Use `Gmail – Send Email` with:
* **To**: employee email (auto is okay setting)
* **Example Subject**: Weekly Pulse Check — 2 Minutes 📝
* **Example Body**:
```
Hi employee_name,
Hope you're having a great week! Quick 3-question pulse check:
1️⃣ What went really well for you this week?
2️⃣ What was your biggest challenge or frustration?
3️⃣ One thing that would make next week better?
Just reply to this email — your feedback helps us improve!
Thanks,
The Team
```
### Step 5: Send Feedback to Private Channel
Immediately share feedback responses in a private Slack channel as they come in.
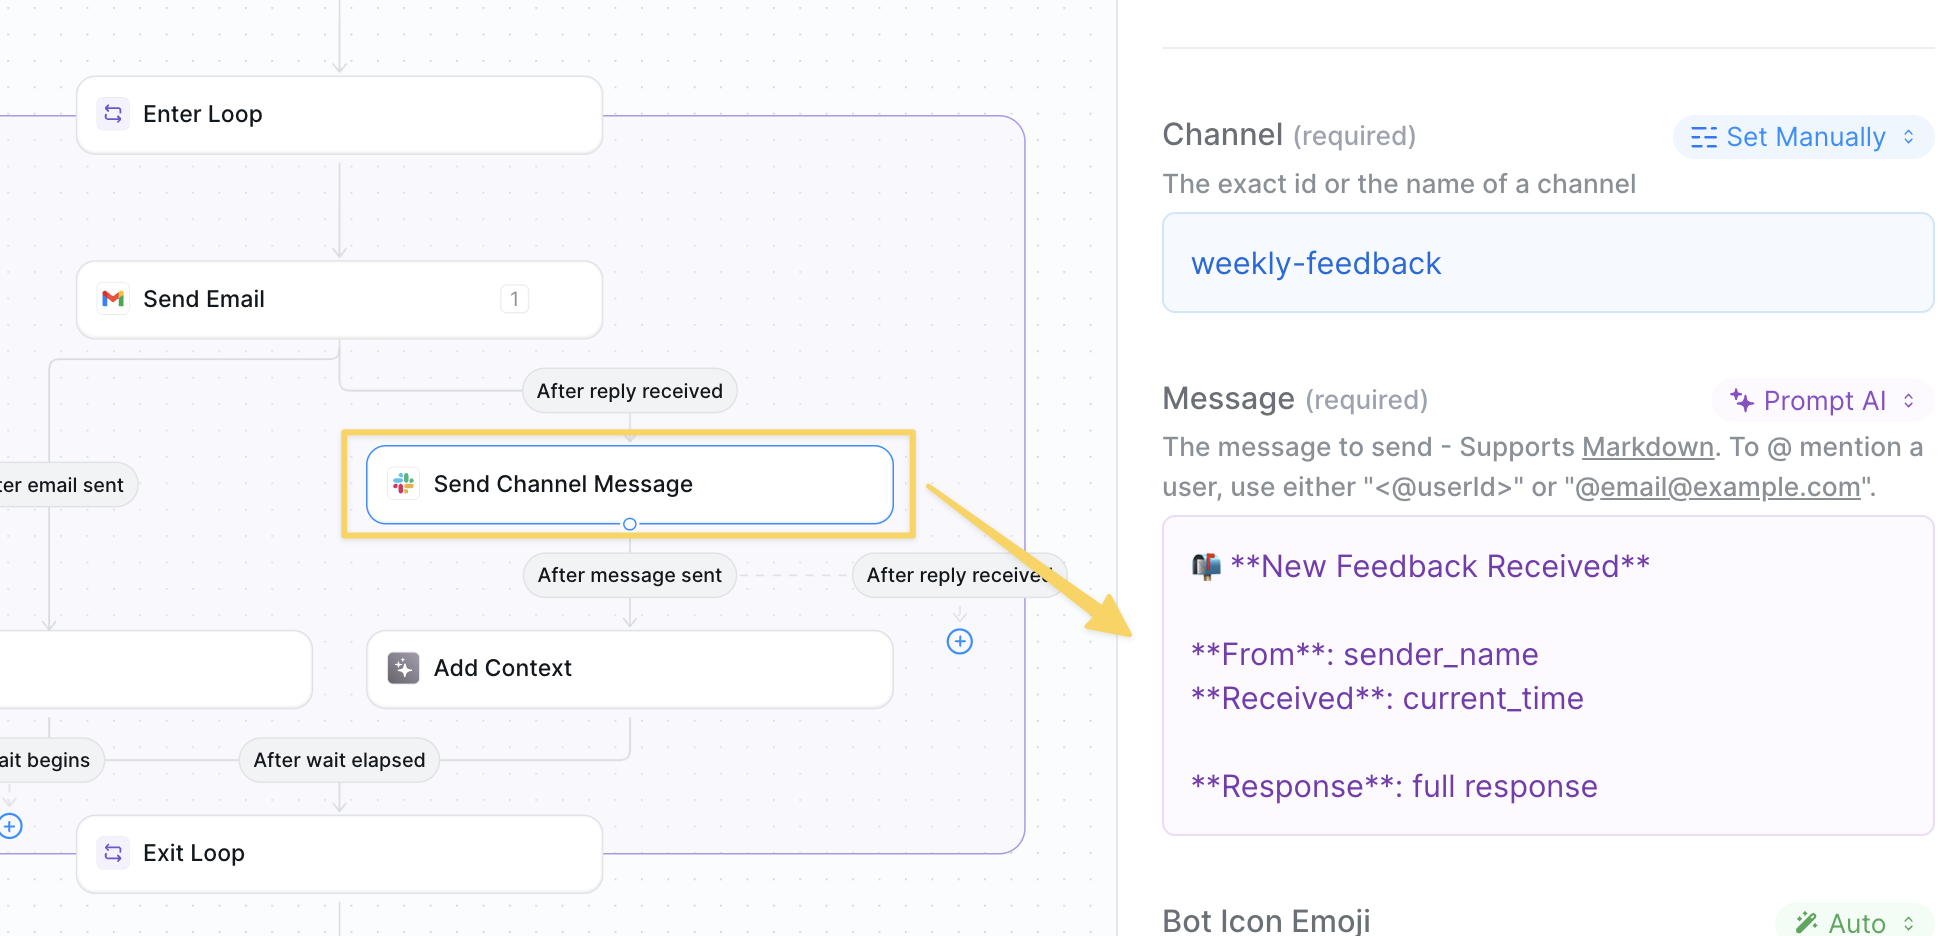 Use `Slack – Send Message` after email reply received:
```
📬 **New Feedback Received**
**From**: sender_name
**Received**: current_time
**Response**: full response
```
Remember to add the Lindy app to the proper slack channel to correctly receive messages.
### Step 6: Add Feedback to Context
Add the full questions and answers from the person into context for your agent to compile a report.
Use `Slack – Send Message` after email reply received:
```
📬 **New Feedback Received**
**From**: sender_name
**Received**: current_time
**Response**: full response
```
Remember to add the Lindy app to the proper slack channel to correctly receive messages.
### Step 6: Add Feedback to Context
Add the full questions and answers from the person into context for your agent to compile a report.
 Use `Add Context` action with prompt:
```
Add the full questions and answers from this feedback response into the context:
Questions asked: [3 feedback questions]
Employee response: email_body
Received from: sender_name on current_date
```
### Step 7: Set Collection Timer
Set a 5-day timer to allow employees time to respond before compiling the final report.
Use `Add Context` action with prompt:
```
Add the full questions and answers from this feedback response into the context:
Questions asked: [3 feedback questions]
Employee response: email_body
Received from: sender_name on current_date
```
### Step 7: Set Collection Timer
Set a 5-day timer to allow employees time to respond before compiling the final report.
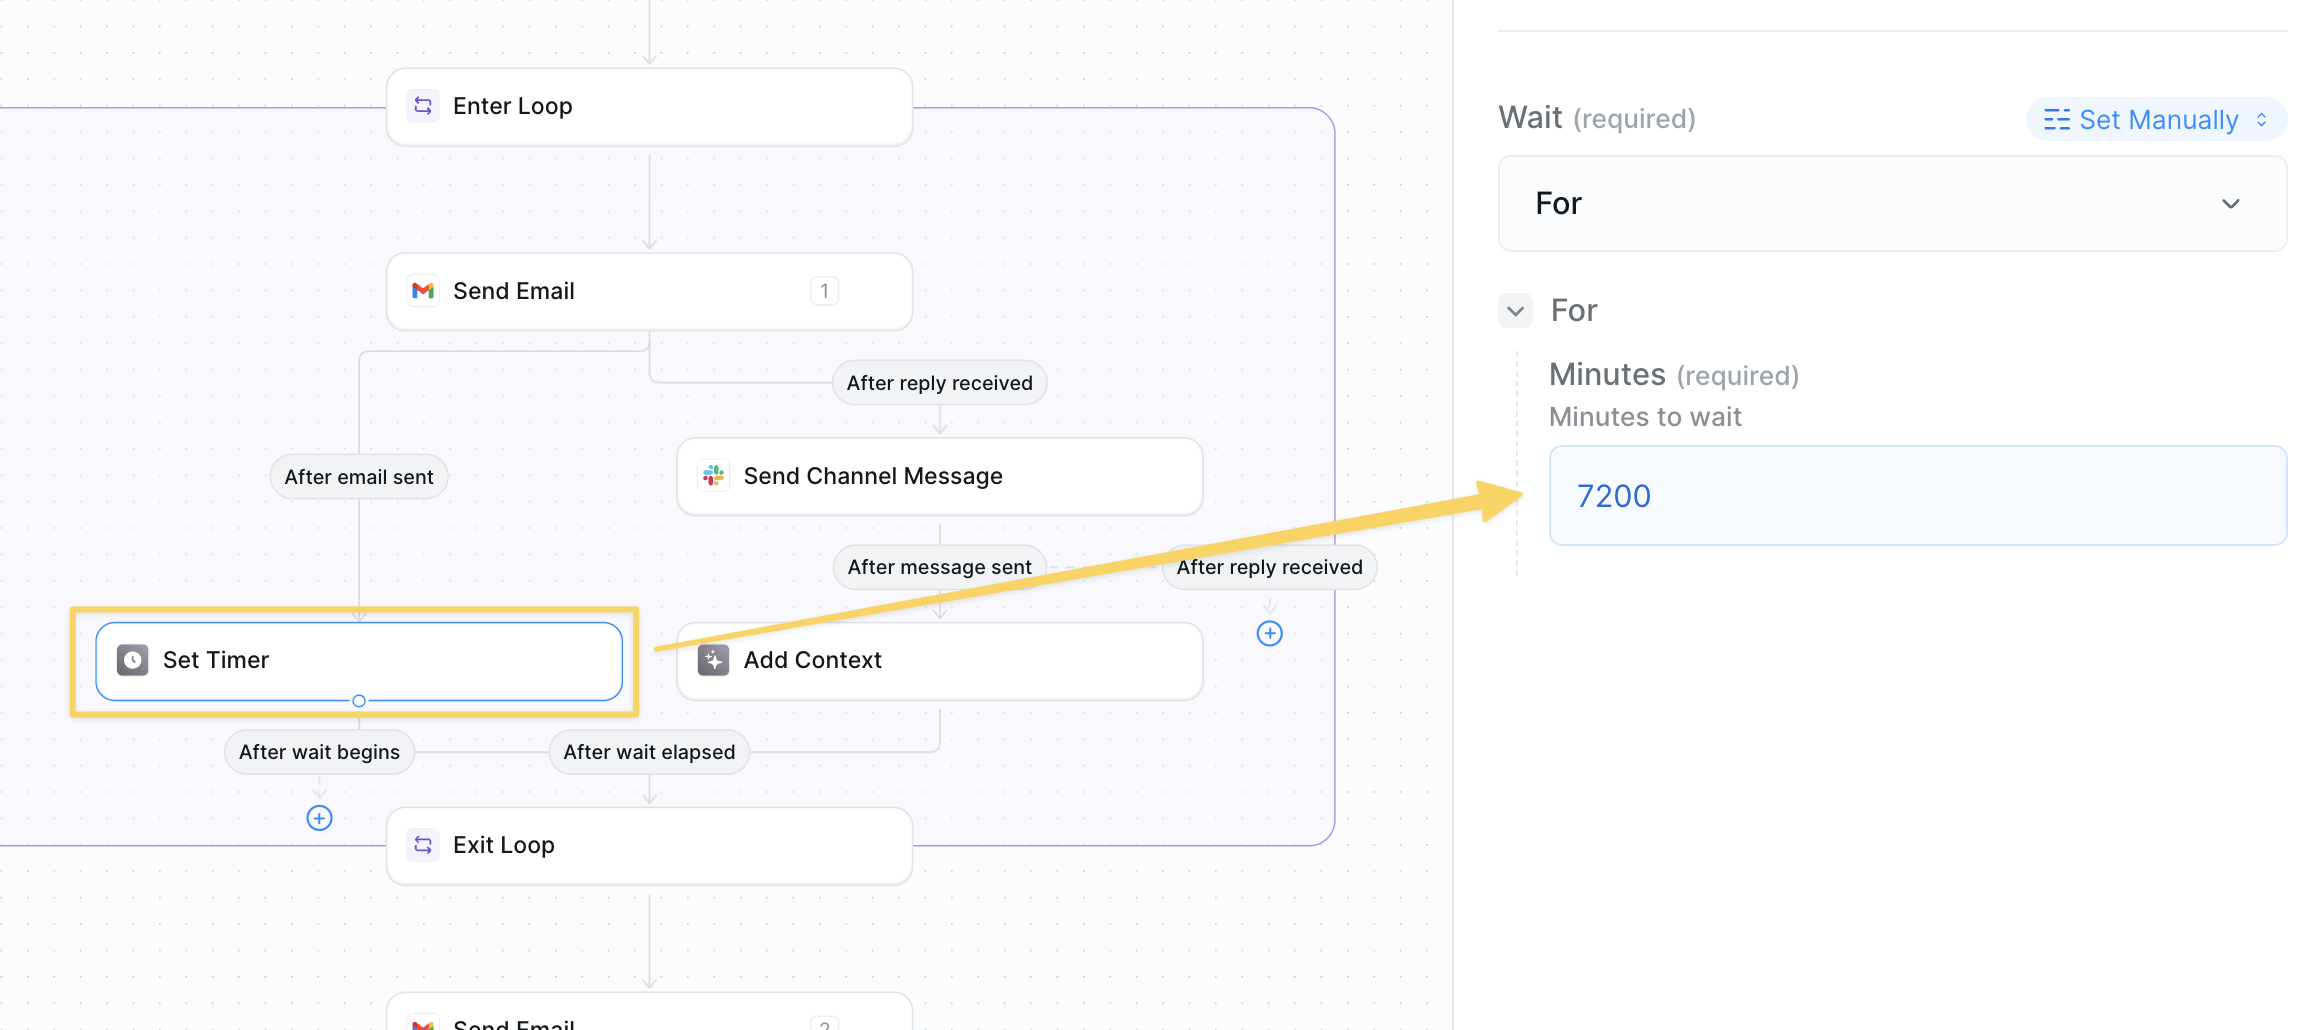 After sending each email, add `Set Timer` for 7200 minutes (5 days).
Make sure to connect the "after wait elapsed" output to the "exit loop" action. This is crucial for exiting the loop correctly at the right time.
### Step 8: Exit Loop
Exit the employee processing loop and prepare to compile the weekly report.
After sending each email, add `Set Timer` for 7200 minutes (5 days).
Make sure to connect the "after wait elapsed" output to the "exit loop" action. This is crucial for exiting the loop correctly at the right time.
### Step 8: Exit Loop
Exit the employee processing loop and prepare to compile the weekly report.
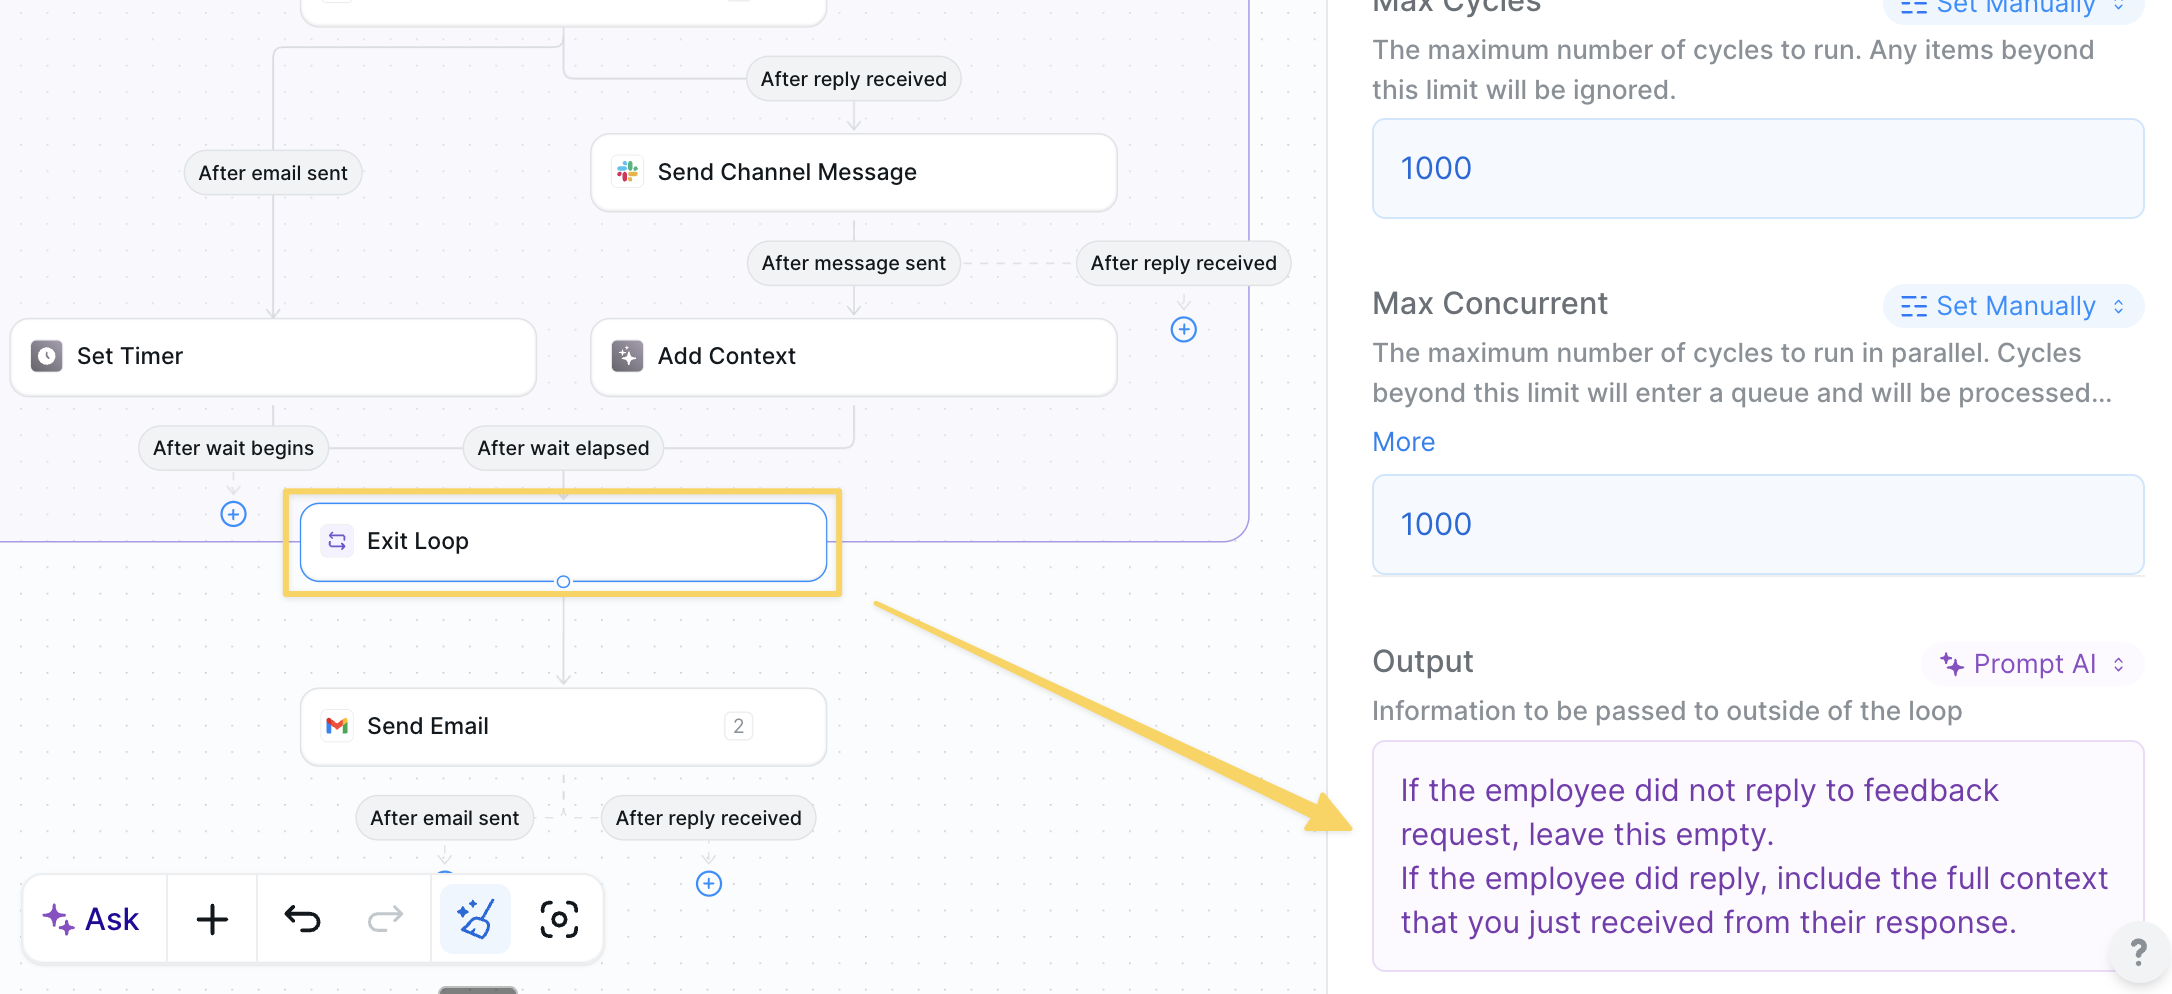 Add `Exit Loop` action with prompt:
```
If the employee did not reply to feedback request, leave this empty.
If the employee did reply, include the full context that you just received from their response.
```
Loops have scope memory — this step allows us to correctly transfer the collected feedback memory outside of the loop for final report generation.
### Step 9: Generate Weekly Report
After the collection period ends, compile all received feedback into a comprehensive weekly summary.
Add `Exit Loop` action with prompt:
```
If the employee did not reply to feedback request, leave this empty.
If the employee did reply, include the full context that you just received from their response.
```
Loops have scope memory — this step allows us to correctly transfer the collected feedback memory outside of the loop for final report generation.
### Step 9: Generate Weekly Report
After the collection period ends, compile all received feedback into a comprehensive weekly summary.
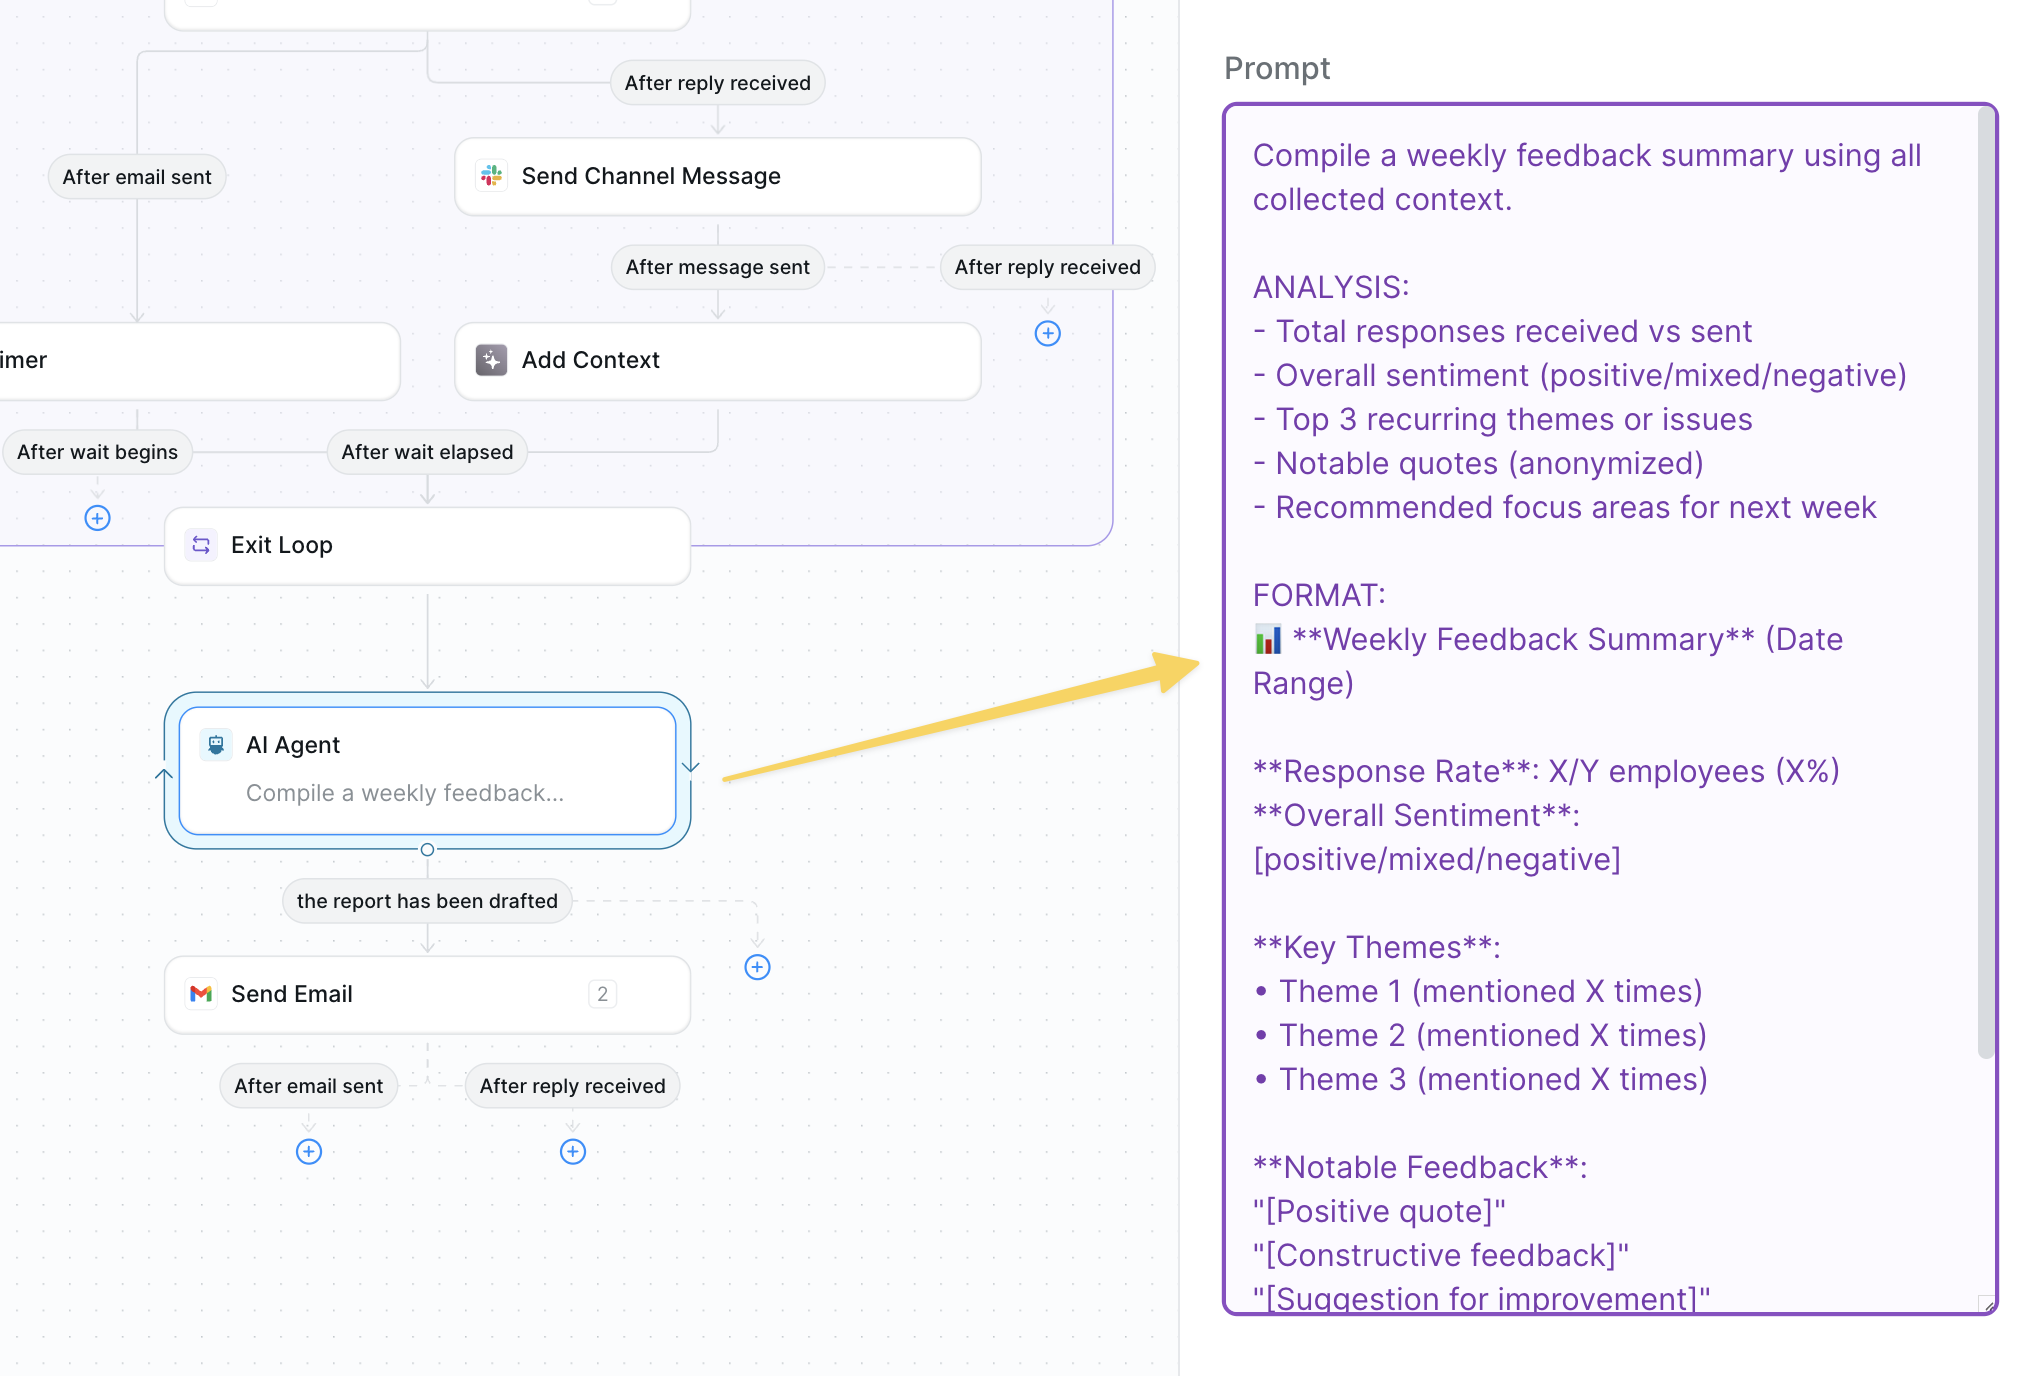 When timer elapses (Friday), exit the loop and use `AI Agent – Generate Weekly Report`:
```
Compile a weekly feedback summary using all collected context.
ANALYSIS:
- Total responses received vs sent
- Overall sentiment (positive/mixed/negative)
- Top 3 recurring themes or issues
- Notable quotes (anonymized)
- Recommended focus areas for next week
FORMAT:
📊 **Weekly Feedback Summary** (Date Range)
**Response Rate**: X/Y employees (X%)
**Overall Sentiment**: [positive/mixed/negative]
**Key Themes**:
• Theme 1 (mentioned X times)
• Theme 2 (mentioned X times)
• Theme 3 (mentioned X times)
**Notable Feedback**:
"[Positive quote]"
"[Constructive feedback]"
"[Suggestion for improvement]"
**Recommended Focus**: [One key area for next week]
Keep summary under 200 words, actionable and clear.
```
### Step 10: Send Weekly Summary Email
Send the compiled feedback report to leadership for review and action planning.
When timer elapses (Friday), exit the loop and use `AI Agent – Generate Weekly Report`:
```
Compile a weekly feedback summary using all collected context.
ANALYSIS:
- Total responses received vs sent
- Overall sentiment (positive/mixed/negative)
- Top 3 recurring themes or issues
- Notable quotes (anonymized)
- Recommended focus areas for next week
FORMAT:
📊 **Weekly Feedback Summary** (Date Range)
**Response Rate**: X/Y employees (X%)
**Overall Sentiment**: [positive/mixed/negative]
**Key Themes**:
• Theme 1 (mentioned X times)
• Theme 2 (mentioned X times)
• Theme 3 (mentioned X times)
**Notable Feedback**:
"[Positive quote]"
"[Constructive feedback]"
"[Suggestion for improvement]"
**Recommended Focus**: [One key area for next week]
Keep summary under 200 words, actionable and clear.
```
### Step 10: Send Weekly Summary Email
Send the compiled feedback report to leadership for review and action planning.
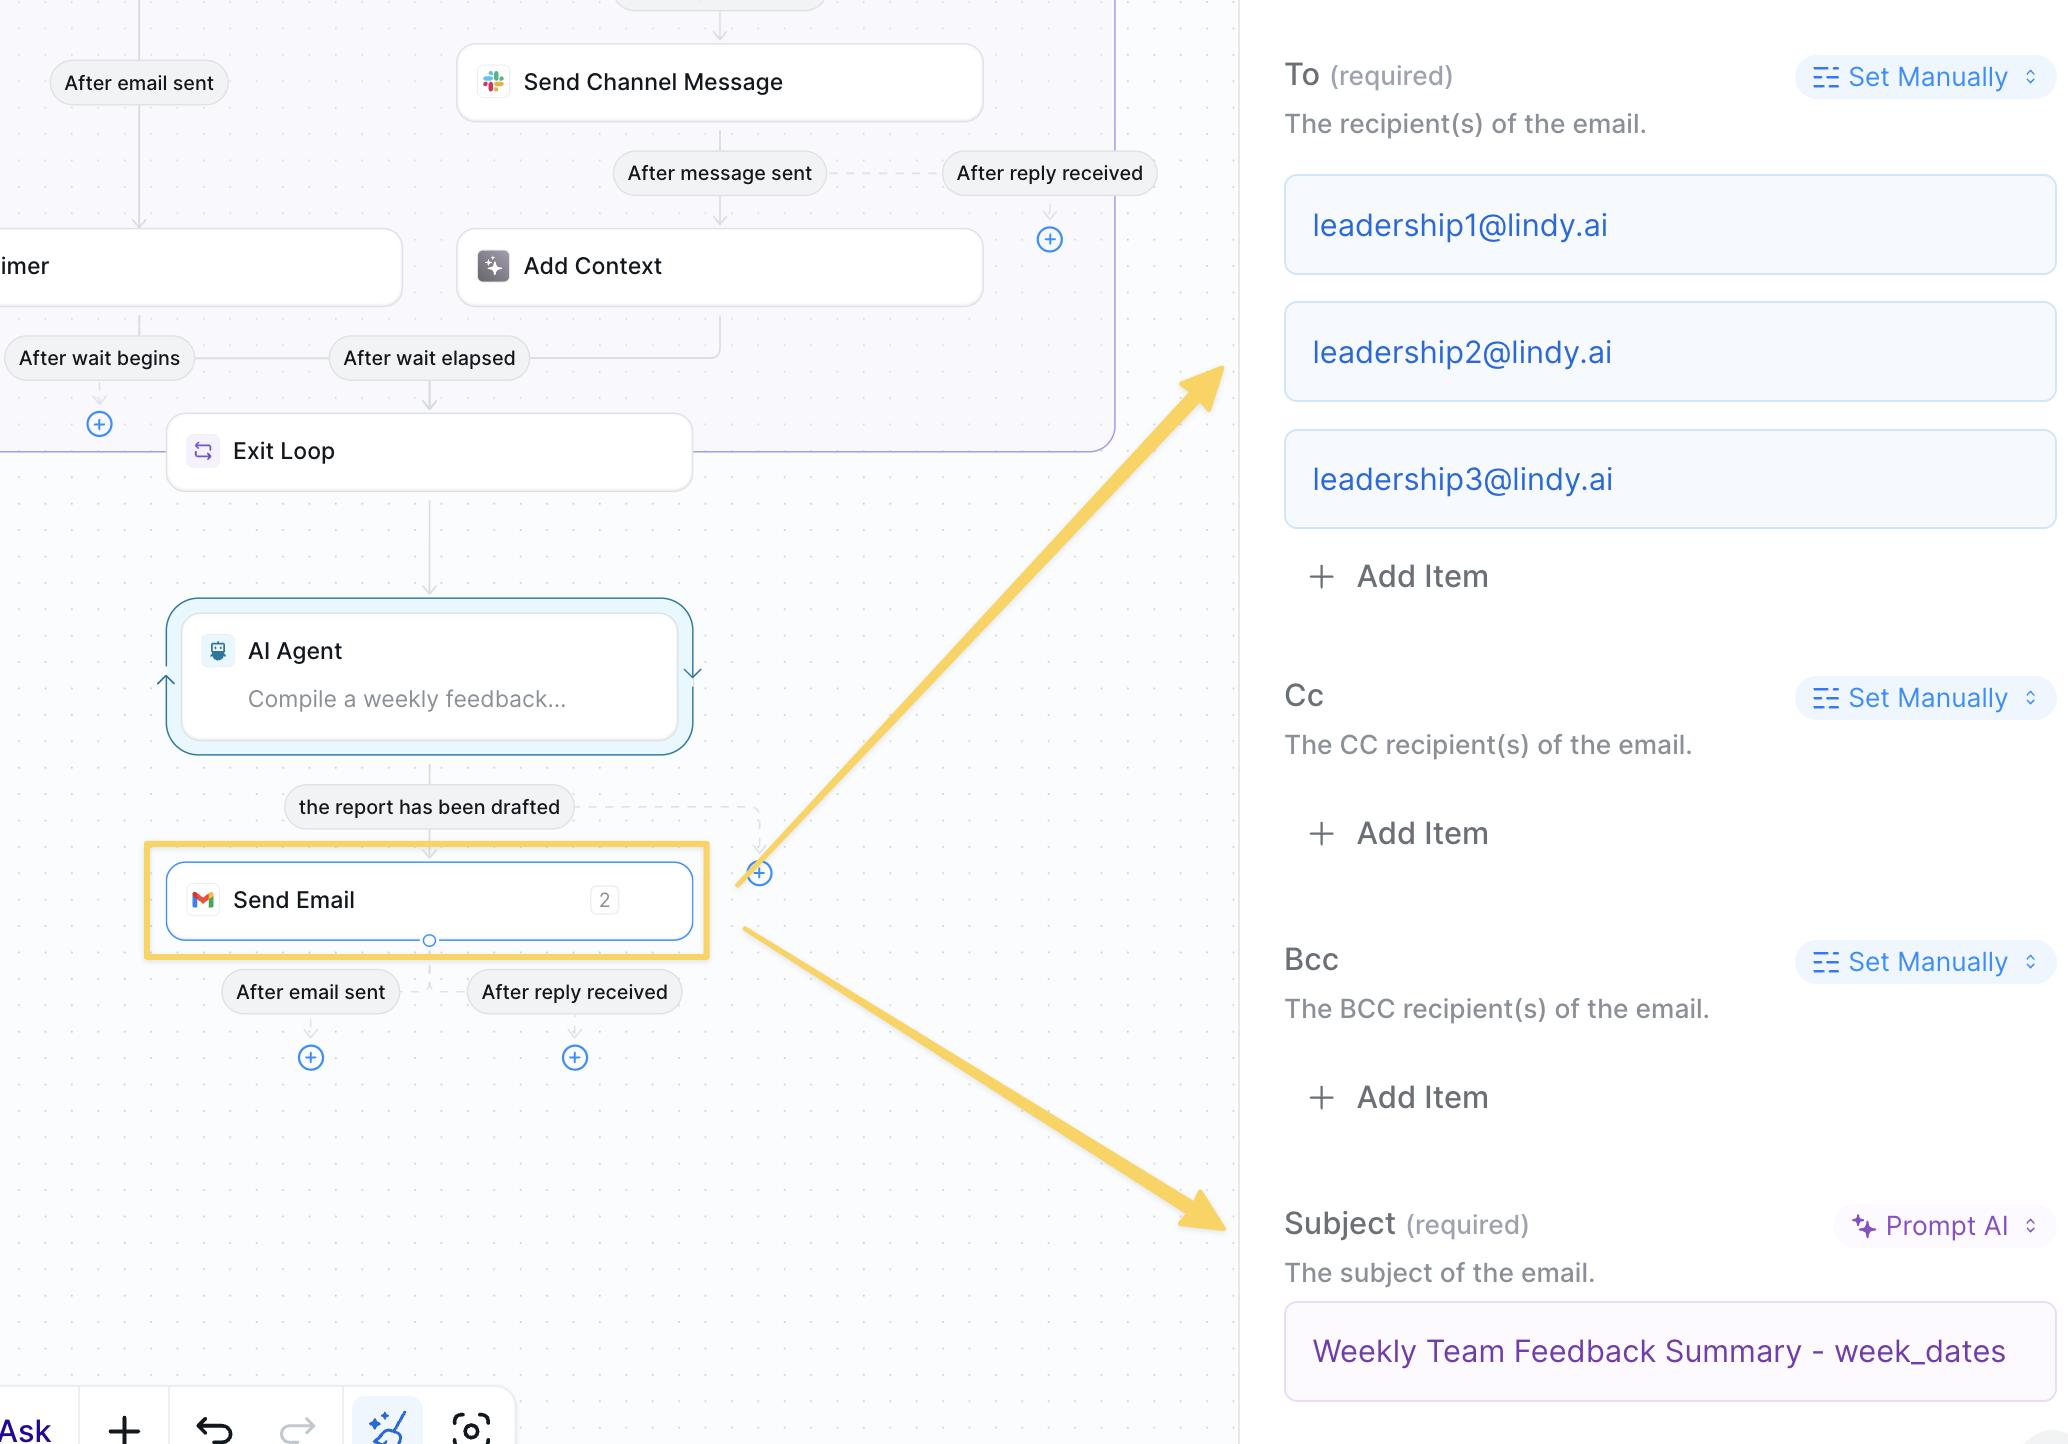 Use `Gmail – Send Email` to leadership team with the report you just generated:
* **To**: leadership\_emails
* **Subject**: Weekly Team Feedback Summary - week\_dates
* **Body**: the full exact report you just generated in markdown
## Advanced Features
| Feature | What it does |
| -------------------- | --------------------------------------------------------------- |
| Response Tracking | Monitor which employees haven't responded for gentle follow-ups |
| Sentiment Analysis | Track mood trends over time to identify patterns |
| Anonymous Mode | Allow anonymous feedback submission for sensitive topics |
| Custom Questions | Rotate different question sets for varied insights |
| Department Filtering | Separate reports by team or department |
## Best Practices
Use the same 3 questions for several weeks to track trends before changing them.
Share one action taken based on feedback in your next all-hands to close the loop.
While leadership sees real-time alerts, ensure final reports anonymize responses.
Track response rates and personally follow up with consistently non-responsive team members.
## Next Steps
Answer employee questions automatically
Automate candidate evaluation process
Handle employee calls with AI
Store feedback patterns and responses
# Employee Help Desk
Source: https://docs.lindy.ai/use-cases/hr/employee-help-desk
Automated HR help desk for employee support with Lindy
## Quick Overview
Transform any Slack channel into an intelligent employee help desk. Your agent will:
* **Monitor** employee questions in your designated help channels 24/7
* **Search** your company knowledge base for relevant policies and procedures
* **Respond** instantly with accurate, friendly answers to common questions
* **Escalate** complex or sensitive issues to HR with full context
* **Continue** monitoring conversations for follow-up questions
You can use the [employee helpdesk template](https://chat.lindy.ai/home/?templateId=6875fa3a17018229eea893fe) to get started.
## Setting Up Your Employee Help Desk
### Step 1: Connect Slack Channel
Set up monitoring for employee questions in your designated help channel.
Use `Gmail – Send Email` to leadership team with the report you just generated:
* **To**: leadership\_emails
* **Subject**: Weekly Team Feedback Summary - week\_dates
* **Body**: the full exact report you just generated in markdown
## Advanced Features
| Feature | What it does |
| -------------------- | --------------------------------------------------------------- |
| Response Tracking | Monitor which employees haven't responded for gentle follow-ups |
| Sentiment Analysis | Track mood trends over time to identify patterns |
| Anonymous Mode | Allow anonymous feedback submission for sensitive topics |
| Custom Questions | Rotate different question sets for varied insights |
| Department Filtering | Separate reports by team or department |
## Best Practices
Use the same 3 questions for several weeks to track trends before changing them.
Share one action taken based on feedback in your next all-hands to close the loop.
While leadership sees real-time alerts, ensure final reports anonymize responses.
Track response rates and personally follow up with consistently non-responsive team members.
## Next Steps
Answer employee questions automatically
Automate candidate evaluation process
Handle employee calls with AI
Store feedback patterns and responses
# Employee Help Desk
Source: https://docs.lindy.ai/use-cases/hr/employee-help-desk
Automated HR help desk for employee support with Lindy
## Quick Overview
Transform any Slack channel into an intelligent employee help desk. Your agent will:
* **Monitor** employee questions in your designated help channels 24/7
* **Search** your company knowledge base for relevant policies and procedures
* **Respond** instantly with accurate, friendly answers to common questions
* **Escalate** complex or sensitive issues to HR with full context
* **Continue** monitoring conversations for follow-up questions
You can use the [employee helpdesk template](https://chat.lindy.ai/home/?templateId=6875fa3a17018229eea893fe) to get started.
## Setting Up Your Employee Help Desk
### Step 1: Connect Slack Channel
Set up monitoring for employee questions in your designated help channel.
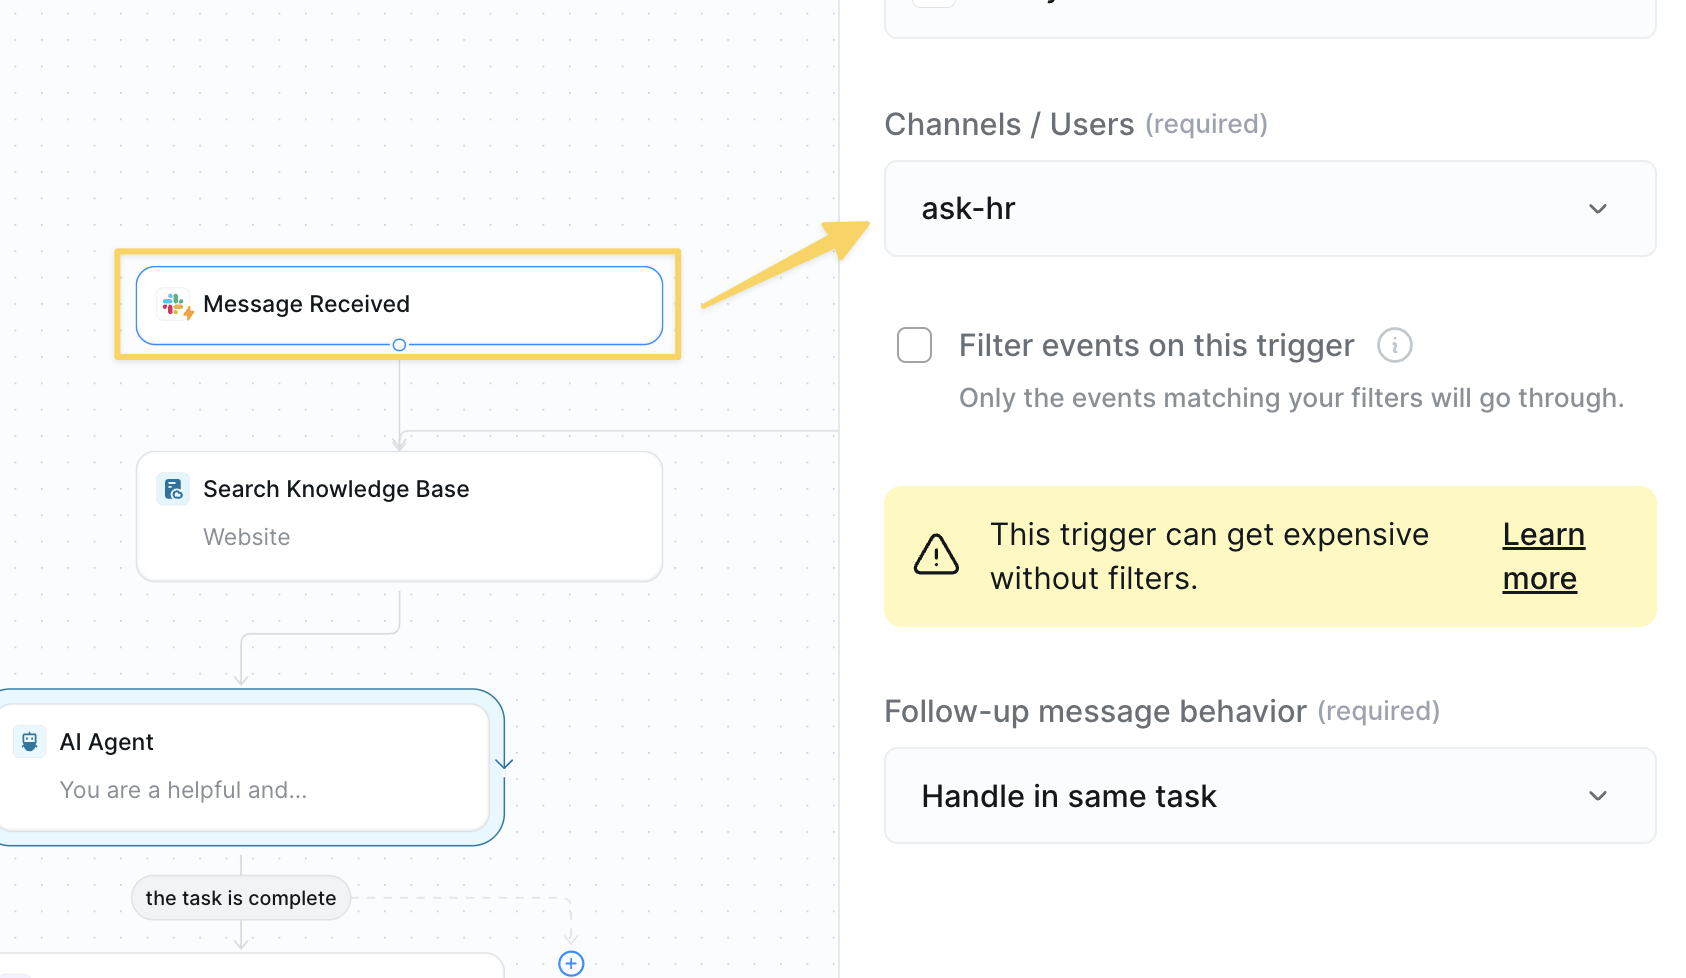 1. Use `Slack – Message Received` trigger
2. Select your help channel (e.g., #ask-hr, #employee-help, #general-questions)
Make sure to add Lindy as an integration to your Slack channel so it can monitor and respond to messages.
### Step 2: Search Company Knowledge Base
Query your company documentation to find relevant information for the employee's question.
1. Use `Slack – Message Received` trigger
2. Select your help channel (e.g., #ask-hr, #employee-help, #general-questions)
Make sure to add Lindy as an integration to your Slack channel so it can monitor and respond to messages.
### Step 2: Search Company Knowledge Base
Query your company documentation to find relevant information for the employee's question.
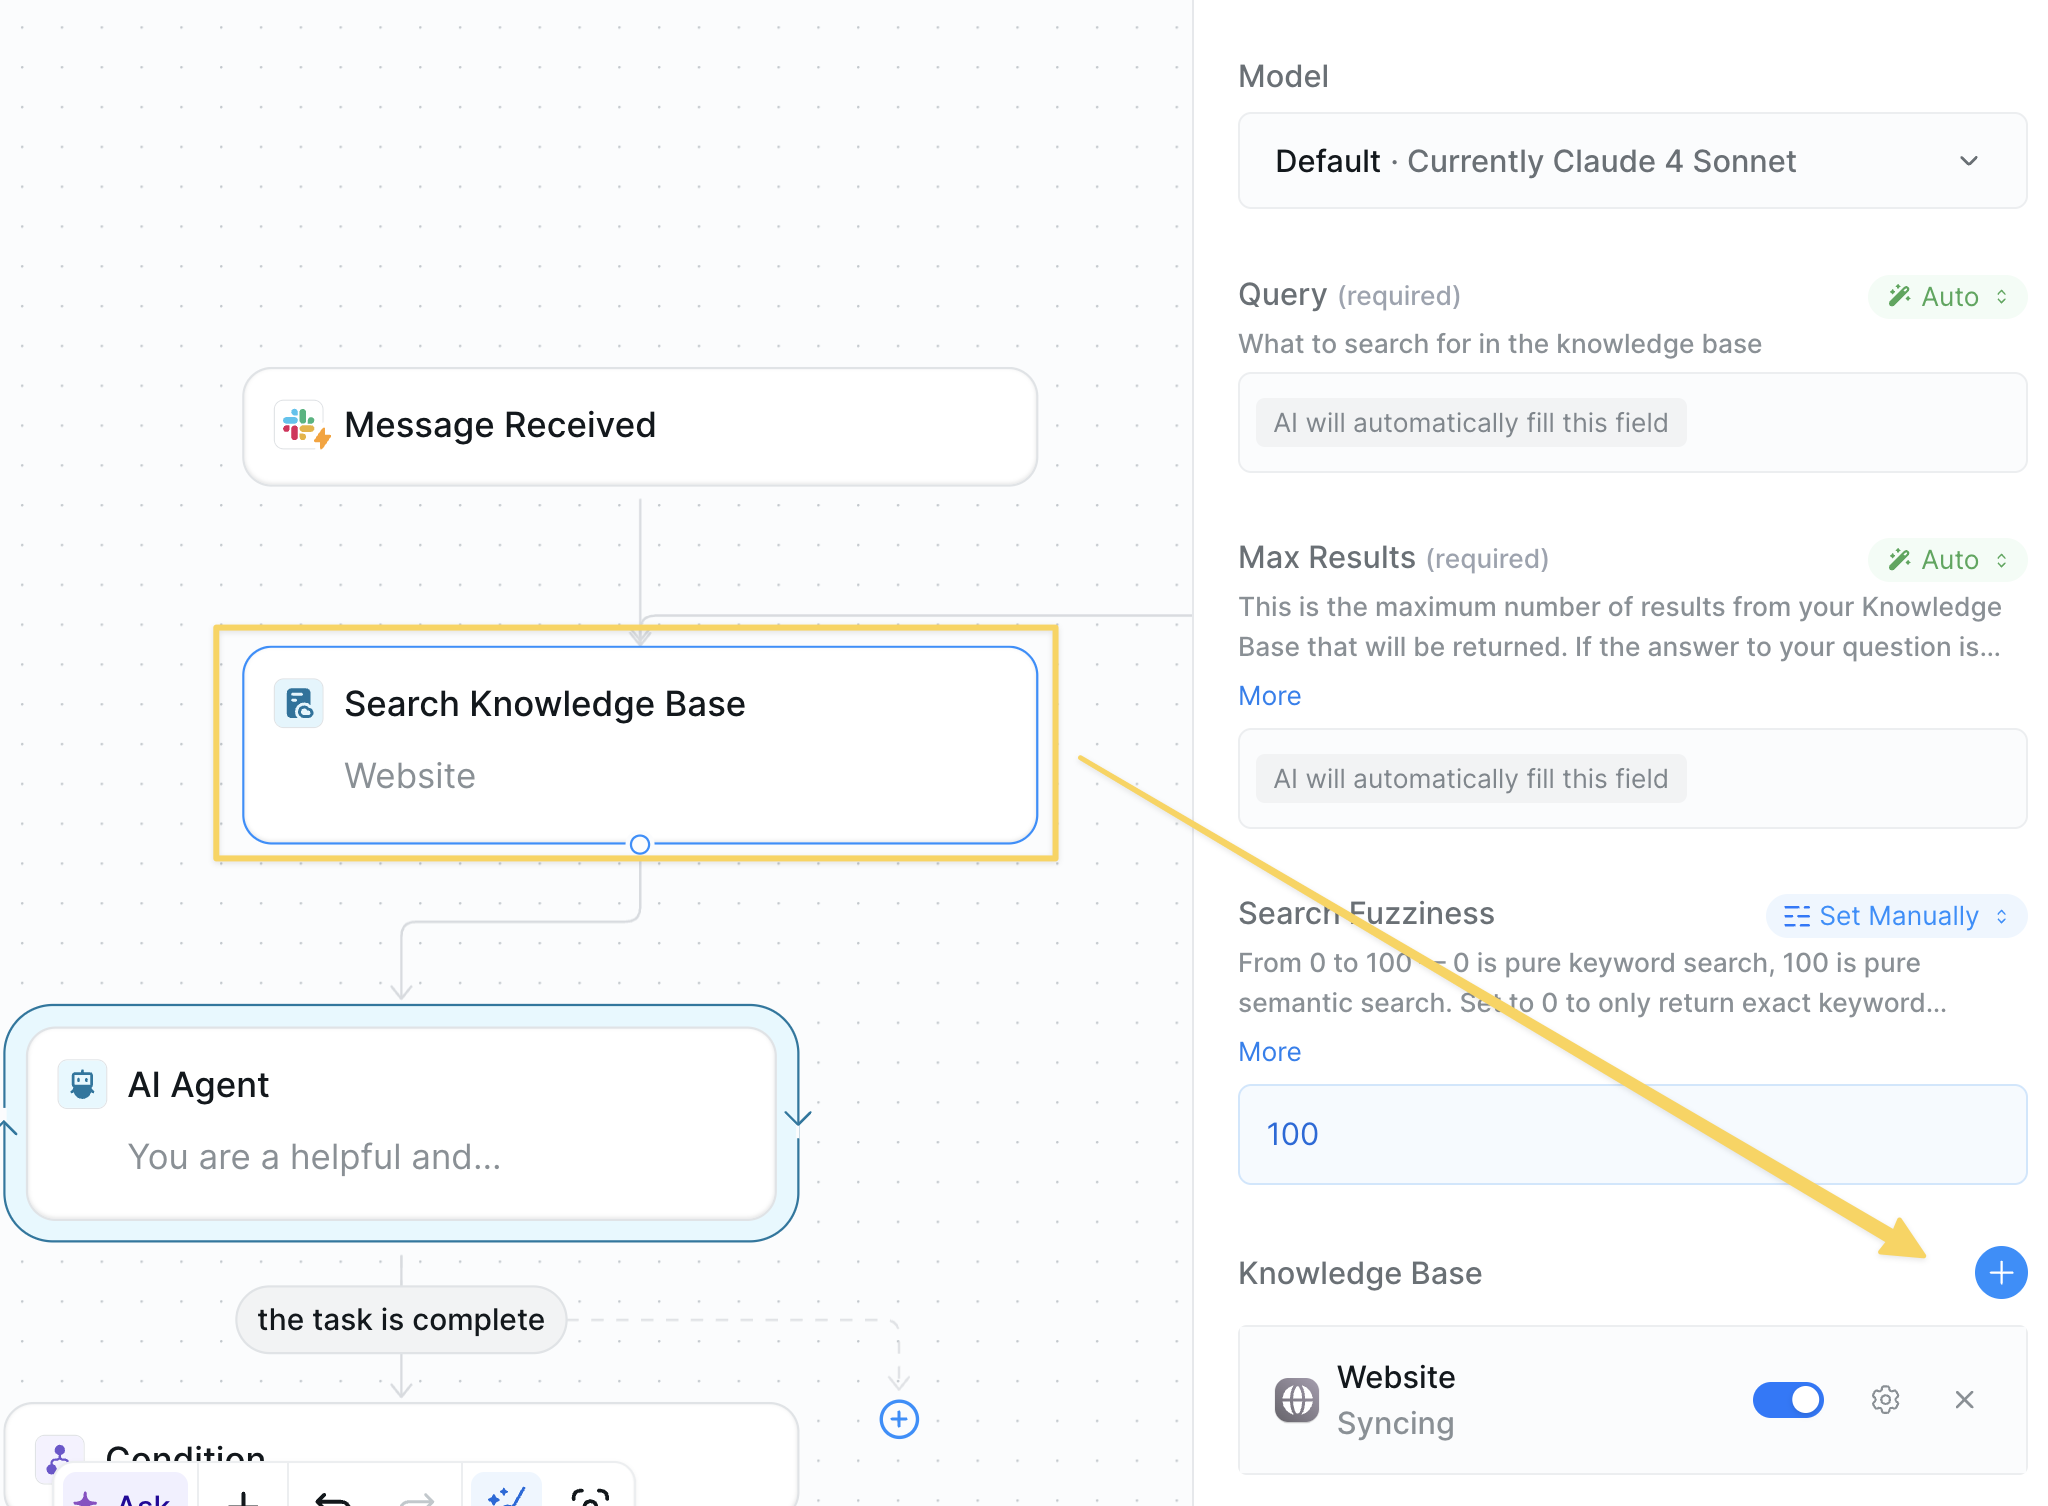 Use `Search Knowledge Base` with the employee's message as the query.
Upload your essential company documents:
* Employee handbook
* Benefits documentation
* PTO policies
* IT setup guides
* Office procedures
* Expense policies
The more comprehensive your knowledge base, the better your agent can help your employees without escalation.
### Step 3: Draft Response with AI
Have AI analyze the context and create an appropriate response or determine it cannot answer.
Use `Search Knowledge Base` with the employee's message as the query.
Upload your essential company documents:
* Employee handbook
* Benefits documentation
* PTO policies
* IT setup guides
* Office procedures
* Expense policies
The more comprehensive your knowledge base, the better your agent can help your employees without escalation.
### Step 3: Draft Response with AI
Have AI analyze the context and create an appropriate response or determine it cannot answer.
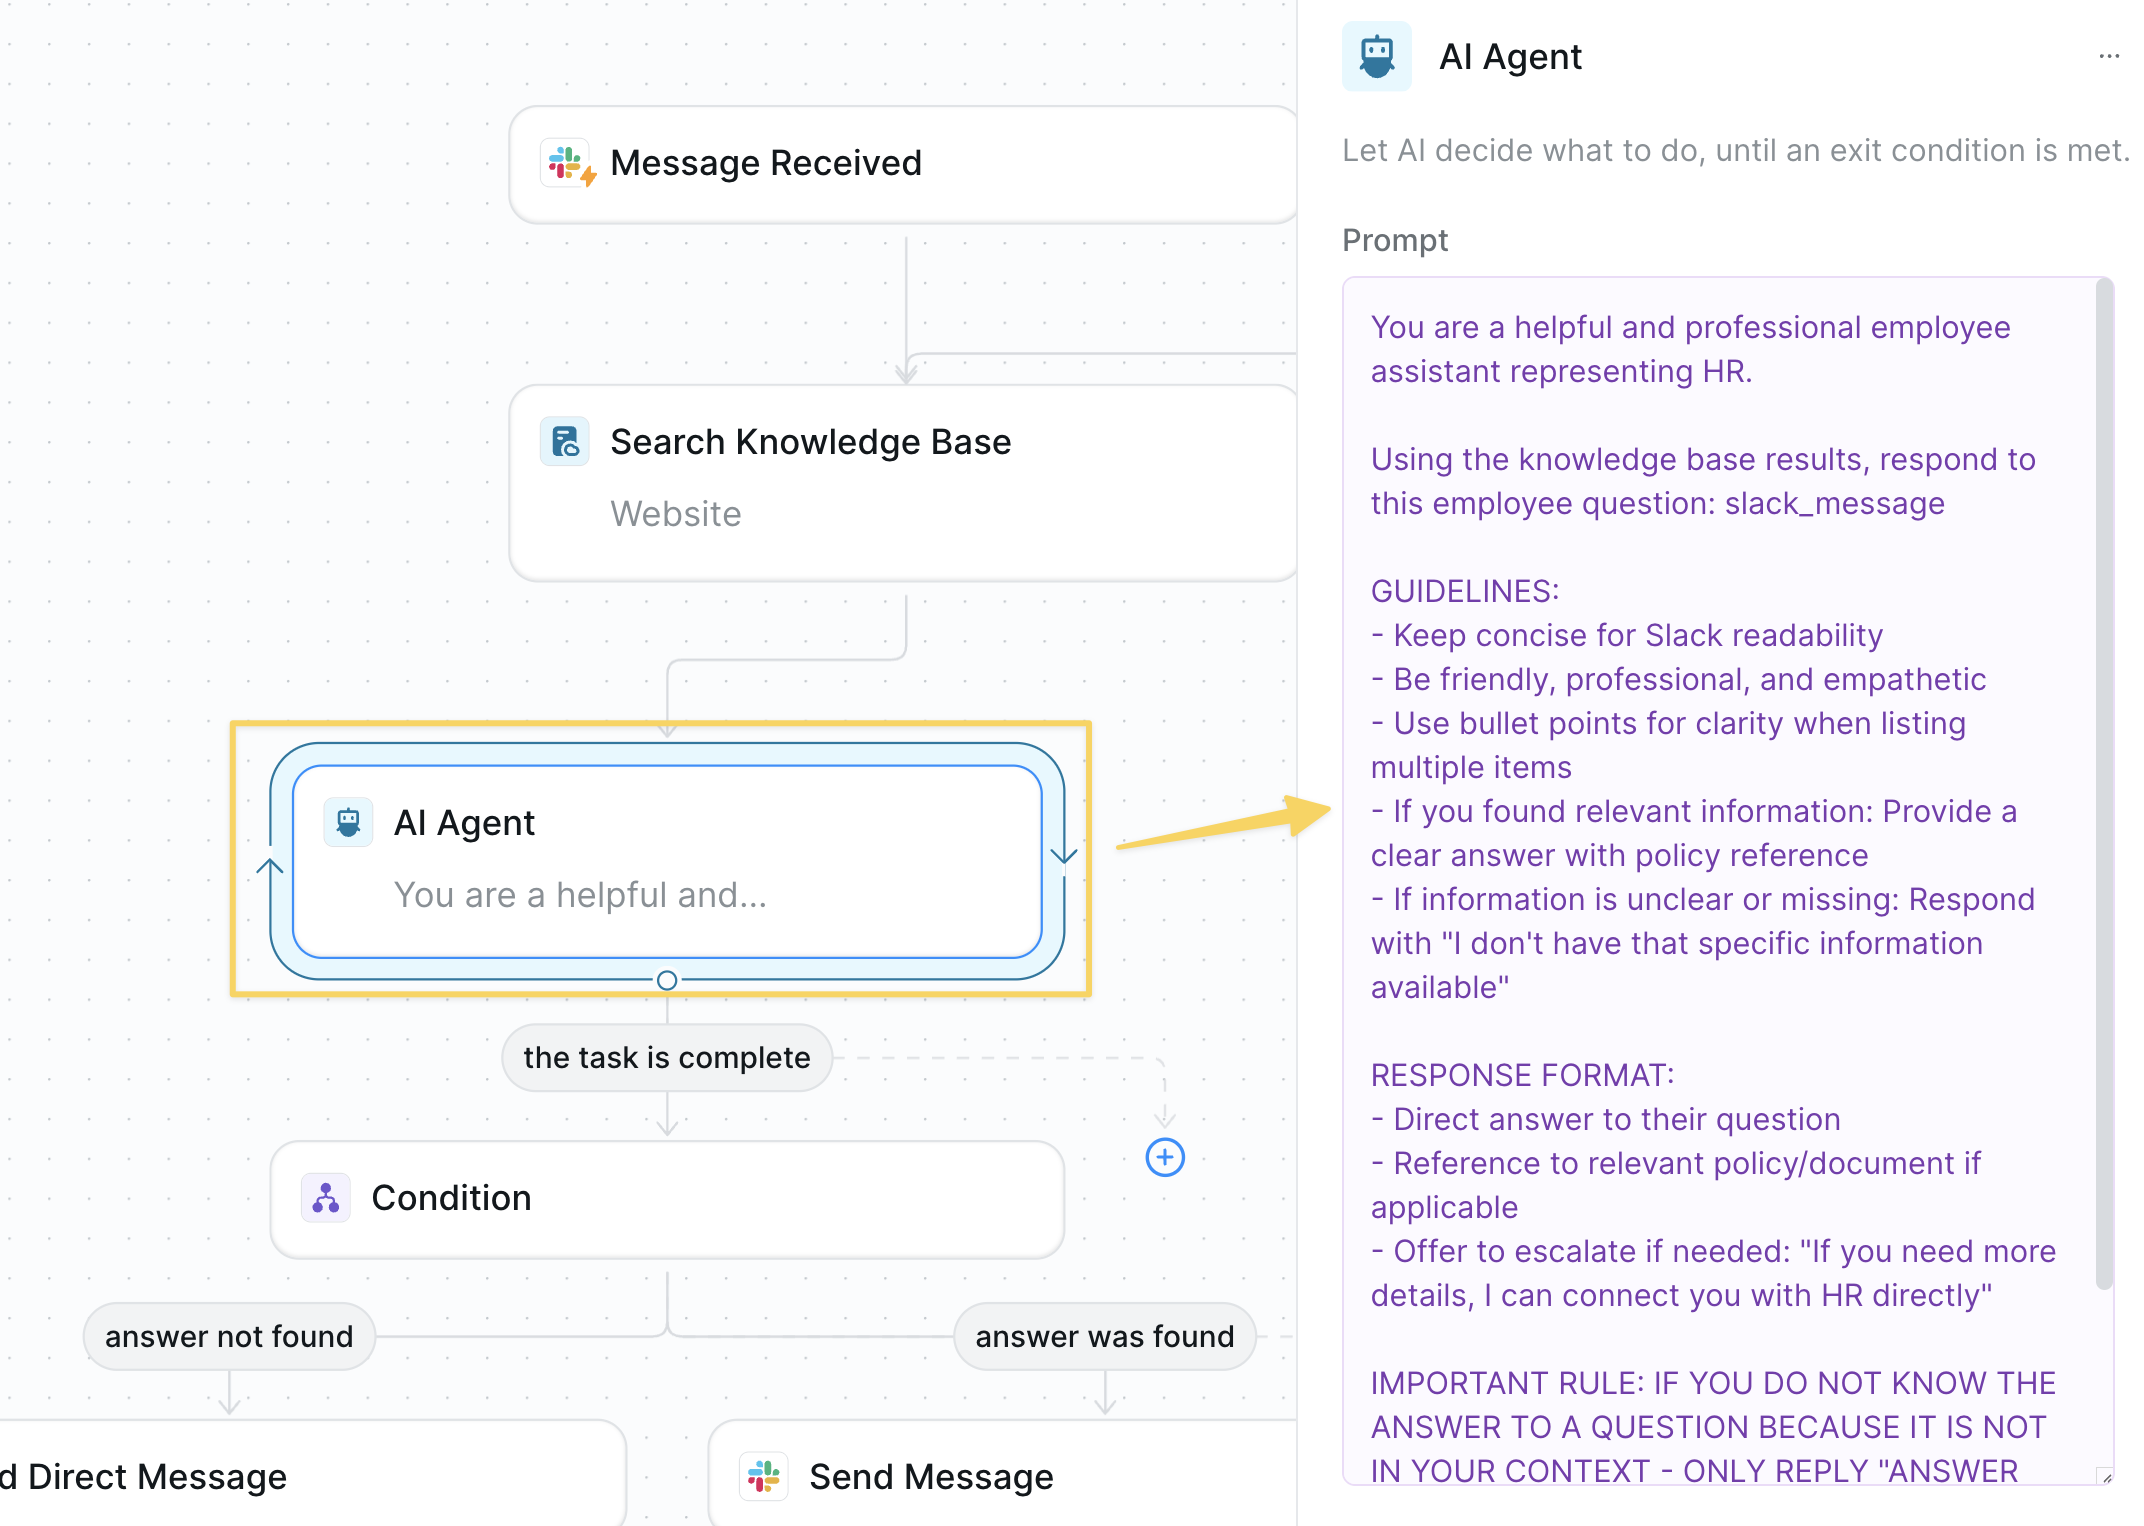 Add `AI Agent – Draft Employee Response`:
```
You are a helpful and professional employee assistant representing HR.
Using the knowledge base results, respond to this employee question: slack_message
GUIDELINES:
- Keep concise for Slack readability
- Be friendly, professional, and empathetic
- Use bullet points for clarity when listing multiple items
- If you found relevant information: Provide a clear answer with policy reference
- If information is unclear or missing: Respond with "I don't have that specific information available"
RESPONSE FORMAT:
- Direct answer to their question
- Reference to relevant policy/document if applicable
- Offer to escalate if needed: "If you need more details, I can connect you with HR directly"
IMPORTANT RULE: IF YOU DO NOT KNOW THE ANSWER TO A QUESTION BECAUSE IT IS NOT IN YOUR CONTEXT - ONLY REPLY "ANSWER NOT FOUND" AND EXIT
Return ONLY the response text, no additional formatting.
```
### Step 4: Check if Answer Found
Determine whether to respond directly or escalate based on AI's ability to find relevant information.
Add `AI Agent – Draft Employee Response`:
```
You are a helpful and professional employee assistant representing HR.
Using the knowledge base results, respond to this employee question: slack_message
GUIDELINES:
- Keep concise for Slack readability
- Be friendly, professional, and empathetic
- Use bullet points for clarity when listing multiple items
- If you found relevant information: Provide a clear answer with policy reference
- If information is unclear or missing: Respond with "I don't have that specific information available"
RESPONSE FORMAT:
- Direct answer to their question
- Reference to relevant policy/document if applicable
- Offer to escalate if needed: "If you need more details, I can connect you with HR directly"
IMPORTANT RULE: IF YOU DO NOT KNOW THE ANSWER TO A QUESTION BECAUSE IT IS NOT IN YOUR CONTEXT - ONLY REPLY "ANSWER NOT FOUND" AND EXIT
Return ONLY the response text, no additional formatting.
```
### Step 4: Check if Answer Found
Determine whether to respond directly or escalate based on AI's ability to find relevant information.
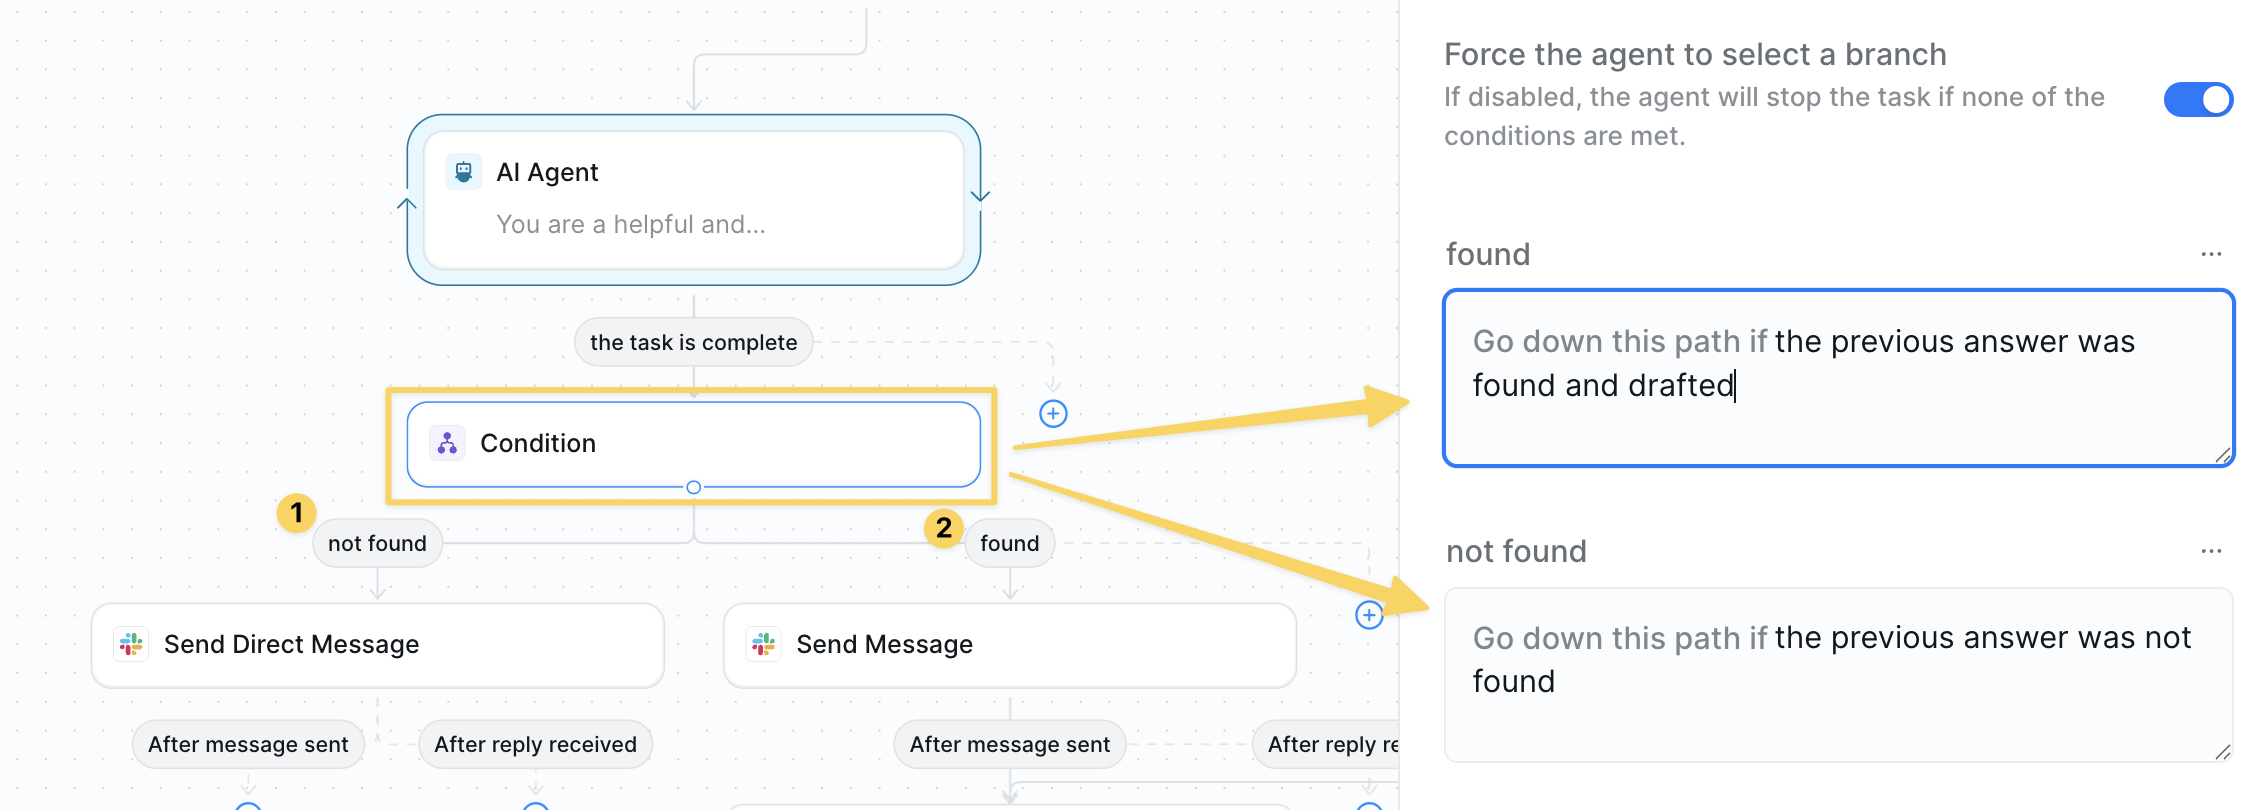 * **Answer Not Found Path**: Route to HR escalation
* **Answer Found Path**: Route to direct response
### Step 5: Escalate to HR Manager
For questions the AI couldn't answer, send context to HR for personal follow-up.
* **Answer Not Found Path**: Route to HR escalation
* **Answer Found Path**: Route to direct response
### Step 5: Escalate to HR Manager
For questions the AI couldn't answer, send context to HR for personal follow-up.
 Use `Slack – Send Direct Message` to HR manager:
```
📋 **Employee Question Needs Your Attention**
**From**: message_author
**Channel**: channel_name
**Question**: slack_message
**Thread Link**: message_link
Your agent couldn't find this information in our knowledge base. Please respond directly in the thread.
```
Remember to change the user email to the correct team member.
### Step 6: Reply to Employee
For questions with found answers, respond directly in the thread with helpful information using `Slack - Send Reply`.
Use `Slack – Send Direct Message` to HR manager:
```
📋 **Employee Question Needs Your Attention**
**From**: message_author
**Channel**: channel_name
**Question**: slack_message
**Thread Link**: message_link
Your agent couldn't find this information in our knowledge base. Please respond directly in the thread.
```
Remember to change the user email to the correct team member.
### Step 6: Reply to Employee
For questions with found answers, respond directly in the thread with helpful information using `Slack - Send Reply`.
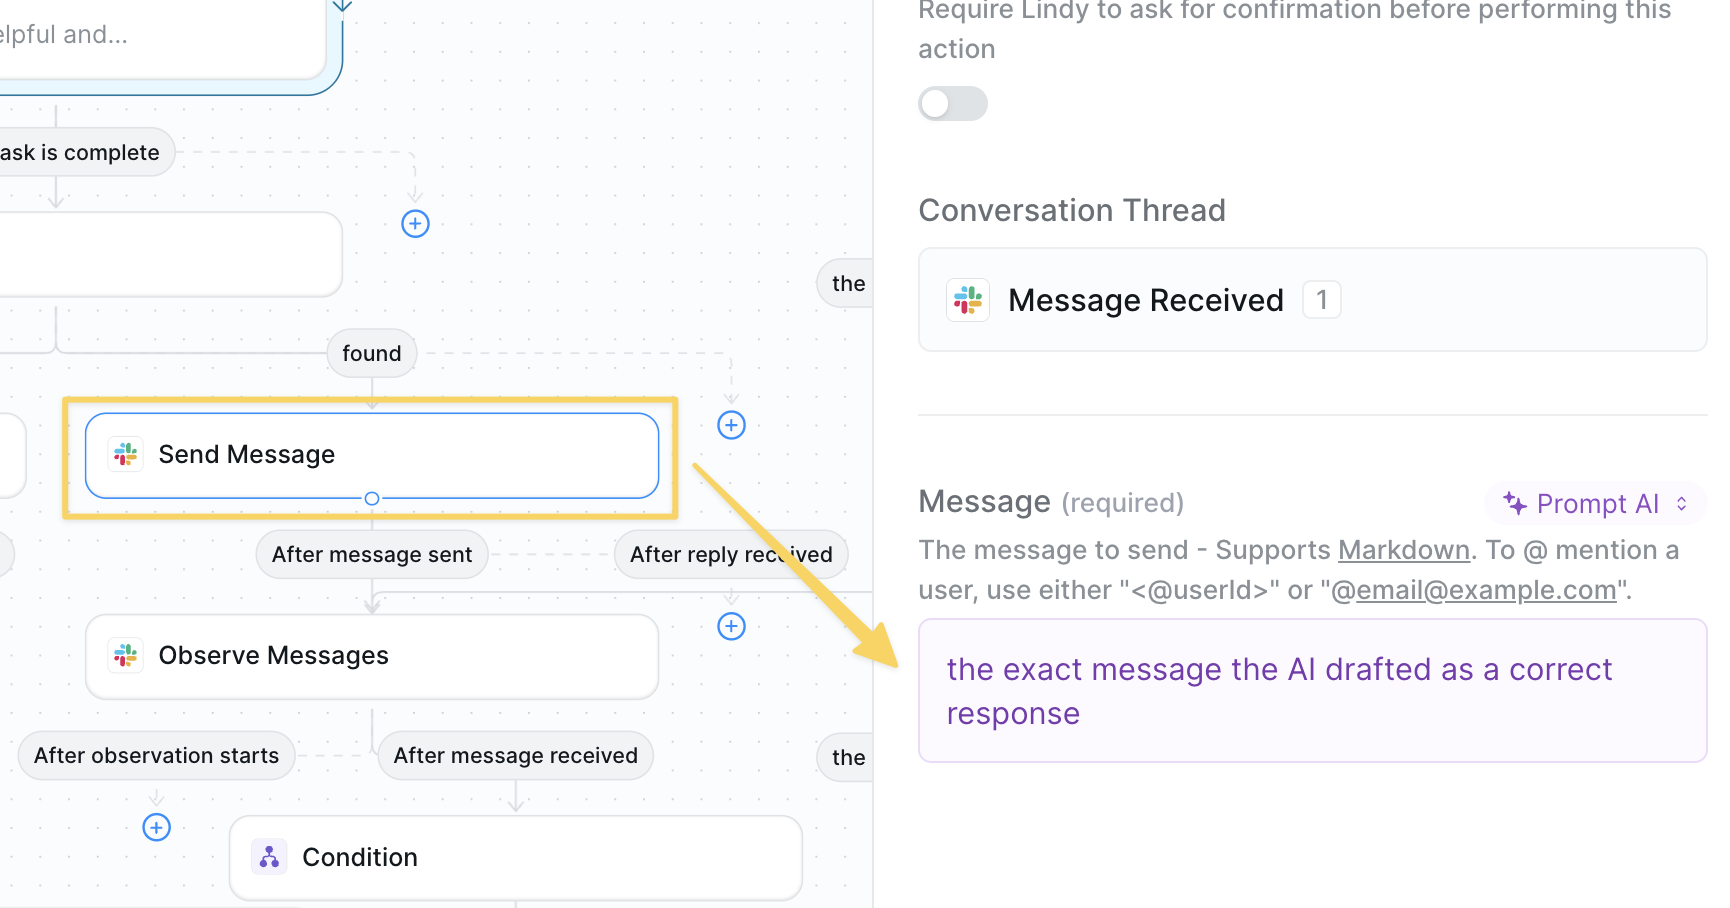 ### Step 6: Monitor Thread for Follow-ups
Continuously watch the conversation thread for additional questions or clarifications.
### Step 6: Monitor Thread for Follow-ups
Continuously watch the conversation thread for additional questions or clarifications.
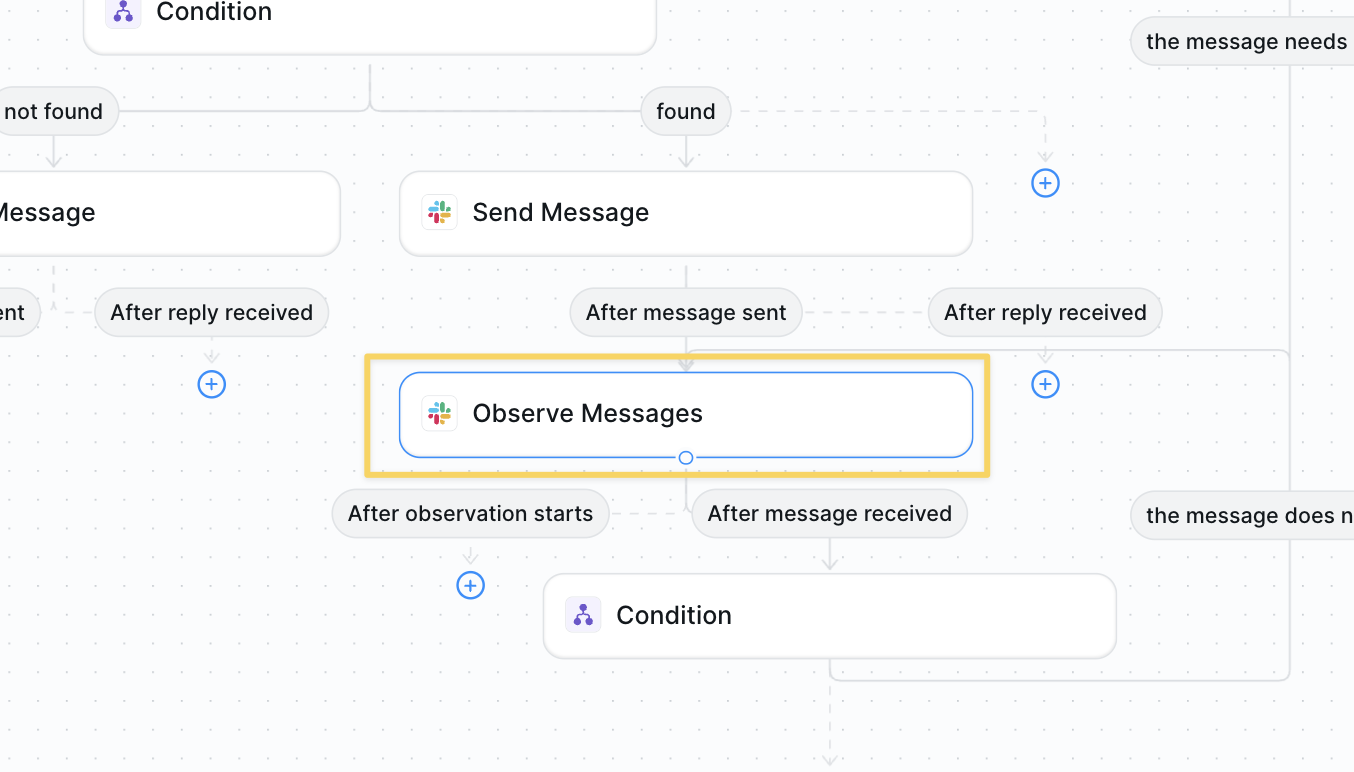 Add `Observe Messages` action to monitor the thread for new messages.
This creates a listening state that waits for any new messages in the conversation.
### Step 7: Handle Follow-up Messages
Check if new messages in the thread require additional assistance or are just acknowledgments.
Add `Observe Messages` action to monitor the thread for new messages.
This creates a listening state that waits for any new messages in the conversation.
### Step 7: Handle Follow-up Messages
Check if new messages in the thread require additional assistance or are just acknowledgments.
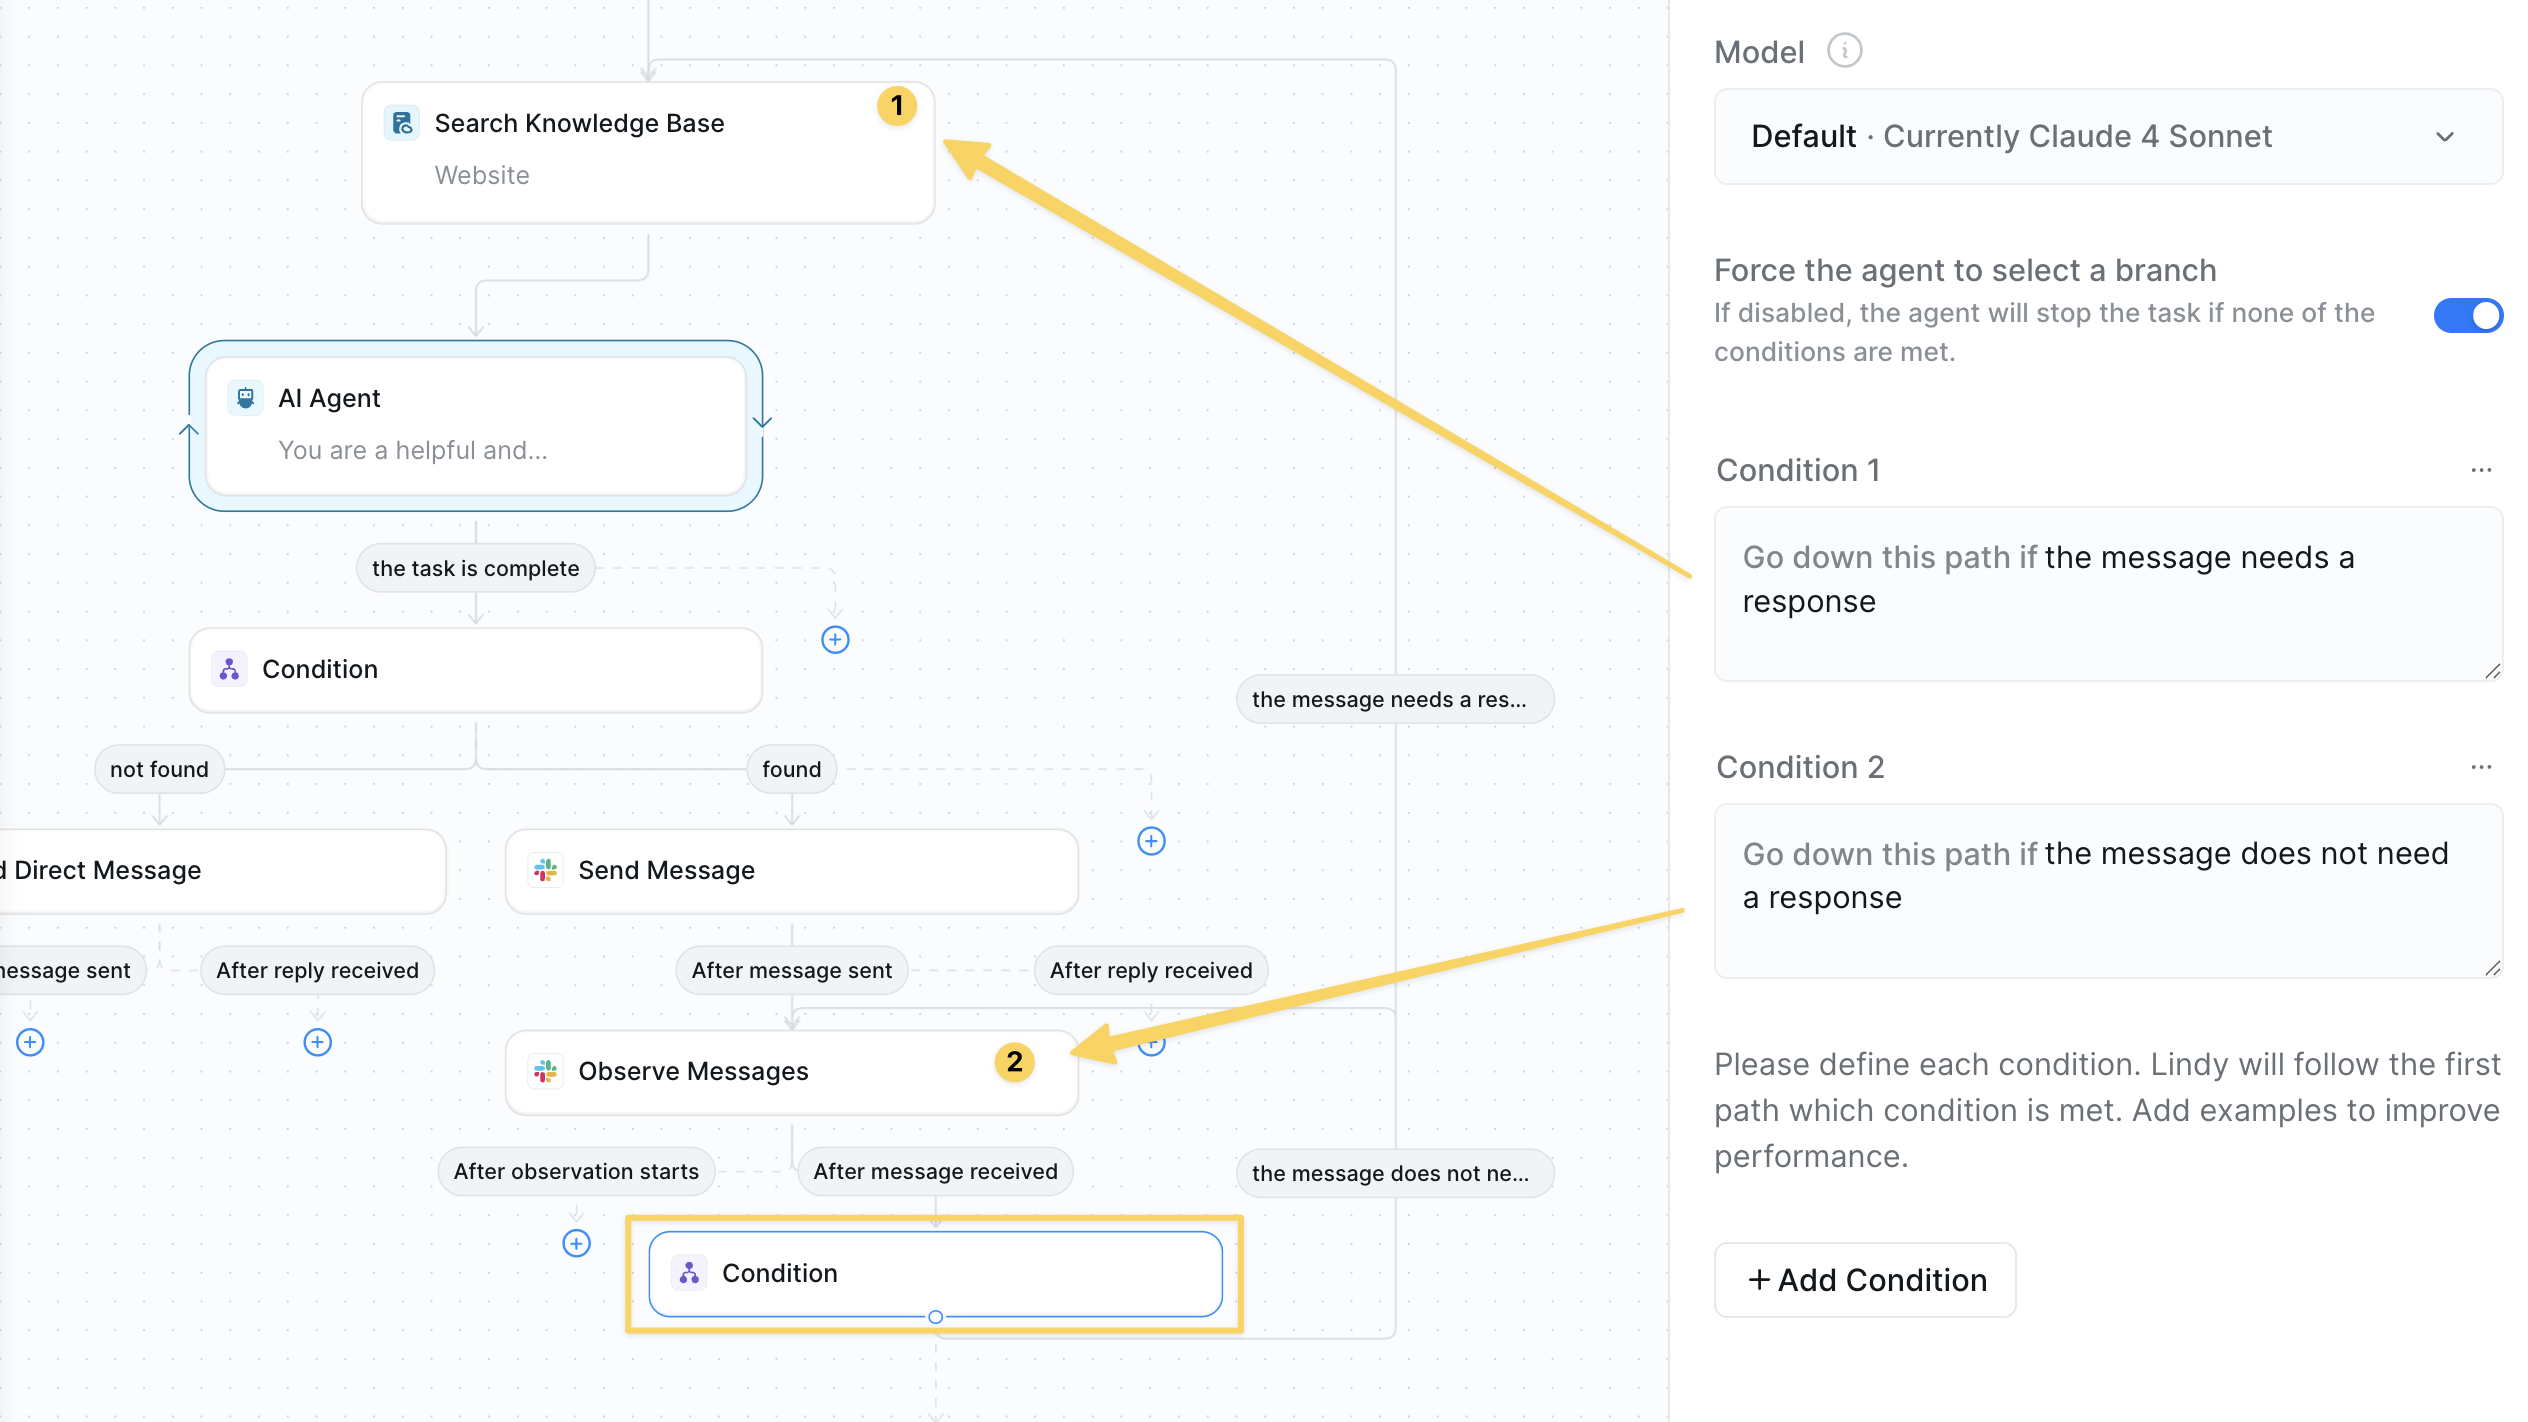 Add `Conditions` with AI evaluation:
* **If NEEDS\_RESPONSE**: Loop back to Step 2 (Search Knowledge Base)
* **If NO\_RESPONSE**: Loop back to Step 6 (Continue Observing)
## Advanced Features
| Feature | What it does |
| --------------------- | ------------------------------------------------------- |
| Escalation Categories | Route different question types to specific team members |
| Response Analytics | Track common questions to improve knowledge base |
## Best Practices
Schedule monthly reviews of your knowledge base to ensure policies and procedures are up to date.
Weekly review of escalated questions helps identify gaps in your knowledge base coverage.
Add guidance about sensitive topics that should always go directly to HR (salary, health, etc.).
Regularly check your agent's responses and refine prompts based on employee feedback.
## Next Steps
Collect structured feedback from employees
Automate candidate evaluation
Store HR policies and FAQs
Escalate complex HR issues for review
# Resume Screening
Source: https://docs.lindy.ai/use-cases/hr/resume-screening
Automate resume screening and candidate evaluation with Lindy
## Quick Overview
Transform your hiring process from manual resume reviews to instant AI-powered screening. Your agent will:
* **Receive** resumes through multiple channels (email, direct upload, Google Drive)
* **Categorize** candidates by role type automatically
* **Analyze** with role-specific AI experts who score and evaluate
* **Log** detailed results and scores to your tracking spreadsheet
* **Alert** your team when top candidates are found
Screen hundreds of resumes in minutes, not hours. You can use the [resume screening template](https://chat.lindy.ai/home/?templateId=6875efa878f838c65b829be8) to get started.
## Setting Up Your Resume Screener
### Step 1: Set Up Resume Collection
Configure multiple ways for resumes to enter your screening pipeline automatically.
Add `Conditions` with AI evaluation:
* **If NEEDS\_RESPONSE**: Loop back to Step 2 (Search Knowledge Base)
* **If NO\_RESPONSE**: Loop back to Step 6 (Continue Observing)
## Advanced Features
| Feature | What it does |
| --------------------- | ------------------------------------------------------- |
| Escalation Categories | Route different question types to specific team members |
| Response Analytics | Track common questions to improve knowledge base |
## Best Practices
Schedule monthly reviews of your knowledge base to ensure policies and procedures are up to date.
Weekly review of escalated questions helps identify gaps in your knowledge base coverage.
Add guidance about sensitive topics that should always go directly to HR (salary, health, etc.).
Regularly check your agent's responses and refine prompts based on employee feedback.
## Next Steps
Collect structured feedback from employees
Automate candidate evaluation
Store HR policies and FAQs
Escalate complex HR issues for review
# Resume Screening
Source: https://docs.lindy.ai/use-cases/hr/resume-screening
Automate resume screening and candidate evaluation with Lindy
## Quick Overview
Transform your hiring process from manual resume reviews to instant AI-powered screening. Your agent will:
* **Receive** resumes through multiple channels (email, direct upload, Google Drive)
* **Categorize** candidates by role type automatically
* **Analyze** with role-specific AI experts who score and evaluate
* **Log** detailed results and scores to your tracking spreadsheet
* **Alert** your team when top candidates are found
Screen hundreds of resumes in minutes, not hours. You can use the [resume screening template](https://chat.lindy.ai/home/?templateId=6875efa878f838c65b829be8) to get started.
## Setting Up Your Resume Screener
### Step 1: Set Up Resume Collection
Configure multiple ways for resumes to enter your screening pipeline automatically.
 Choose your preferred trigger option:
**Option A: Email Intake**
* Use `Gmail – Email Received` trigger
* Filter for emails with attachments
* Set up dedicated email: [resumes@yourcompany.com](mailto:resumes@yourcompany.com)
**Option B: Direct Upload**
* Files uploaded directly to Lindy (Task view)
* No additional setup needed
**Option C: Google Drive Integration**
* Use `Google Drive – New File` trigger
* Set up organized folders: `/Resumes/Sales`, `/Resumes/Engineering`, `/Resumes/Marketing` for highest precision
* **Important:** Add `Google Drive – Download File` step immediately after trigger
For Google Drive option, make sure your folder structure is set up correctly and the download file step is configured to get the resume content into Lindy's context.
### Step 2: Identify Candidate Type
Automatically categorize candidates by role to route them to specialized analysis.
Choose your preferred trigger option:
**Option A: Email Intake**
* Use `Gmail – Email Received` trigger
* Filter for emails with attachments
* Set up dedicated email: [resumes@yourcompany.com](mailto:resumes@yourcompany.com)
**Option B: Direct Upload**
* Files uploaded directly to Lindy (Task view)
* No additional setup needed
**Option C: Google Drive Integration**
* Use `Google Drive – New File` trigger
* Set up organized folders: `/Resumes/Sales`, `/Resumes/Engineering`, `/Resumes/Marketing` for highest precision
* **Important:** Add `Google Drive – Download File` step immediately after trigger
For Google Drive option, make sure your folder structure is set up correctly and the download file step is configured to get the resume content into Lindy's context.
### Step 2: Identify Candidate Type
Automatically categorize candidates by role to route them to specialized analysis.
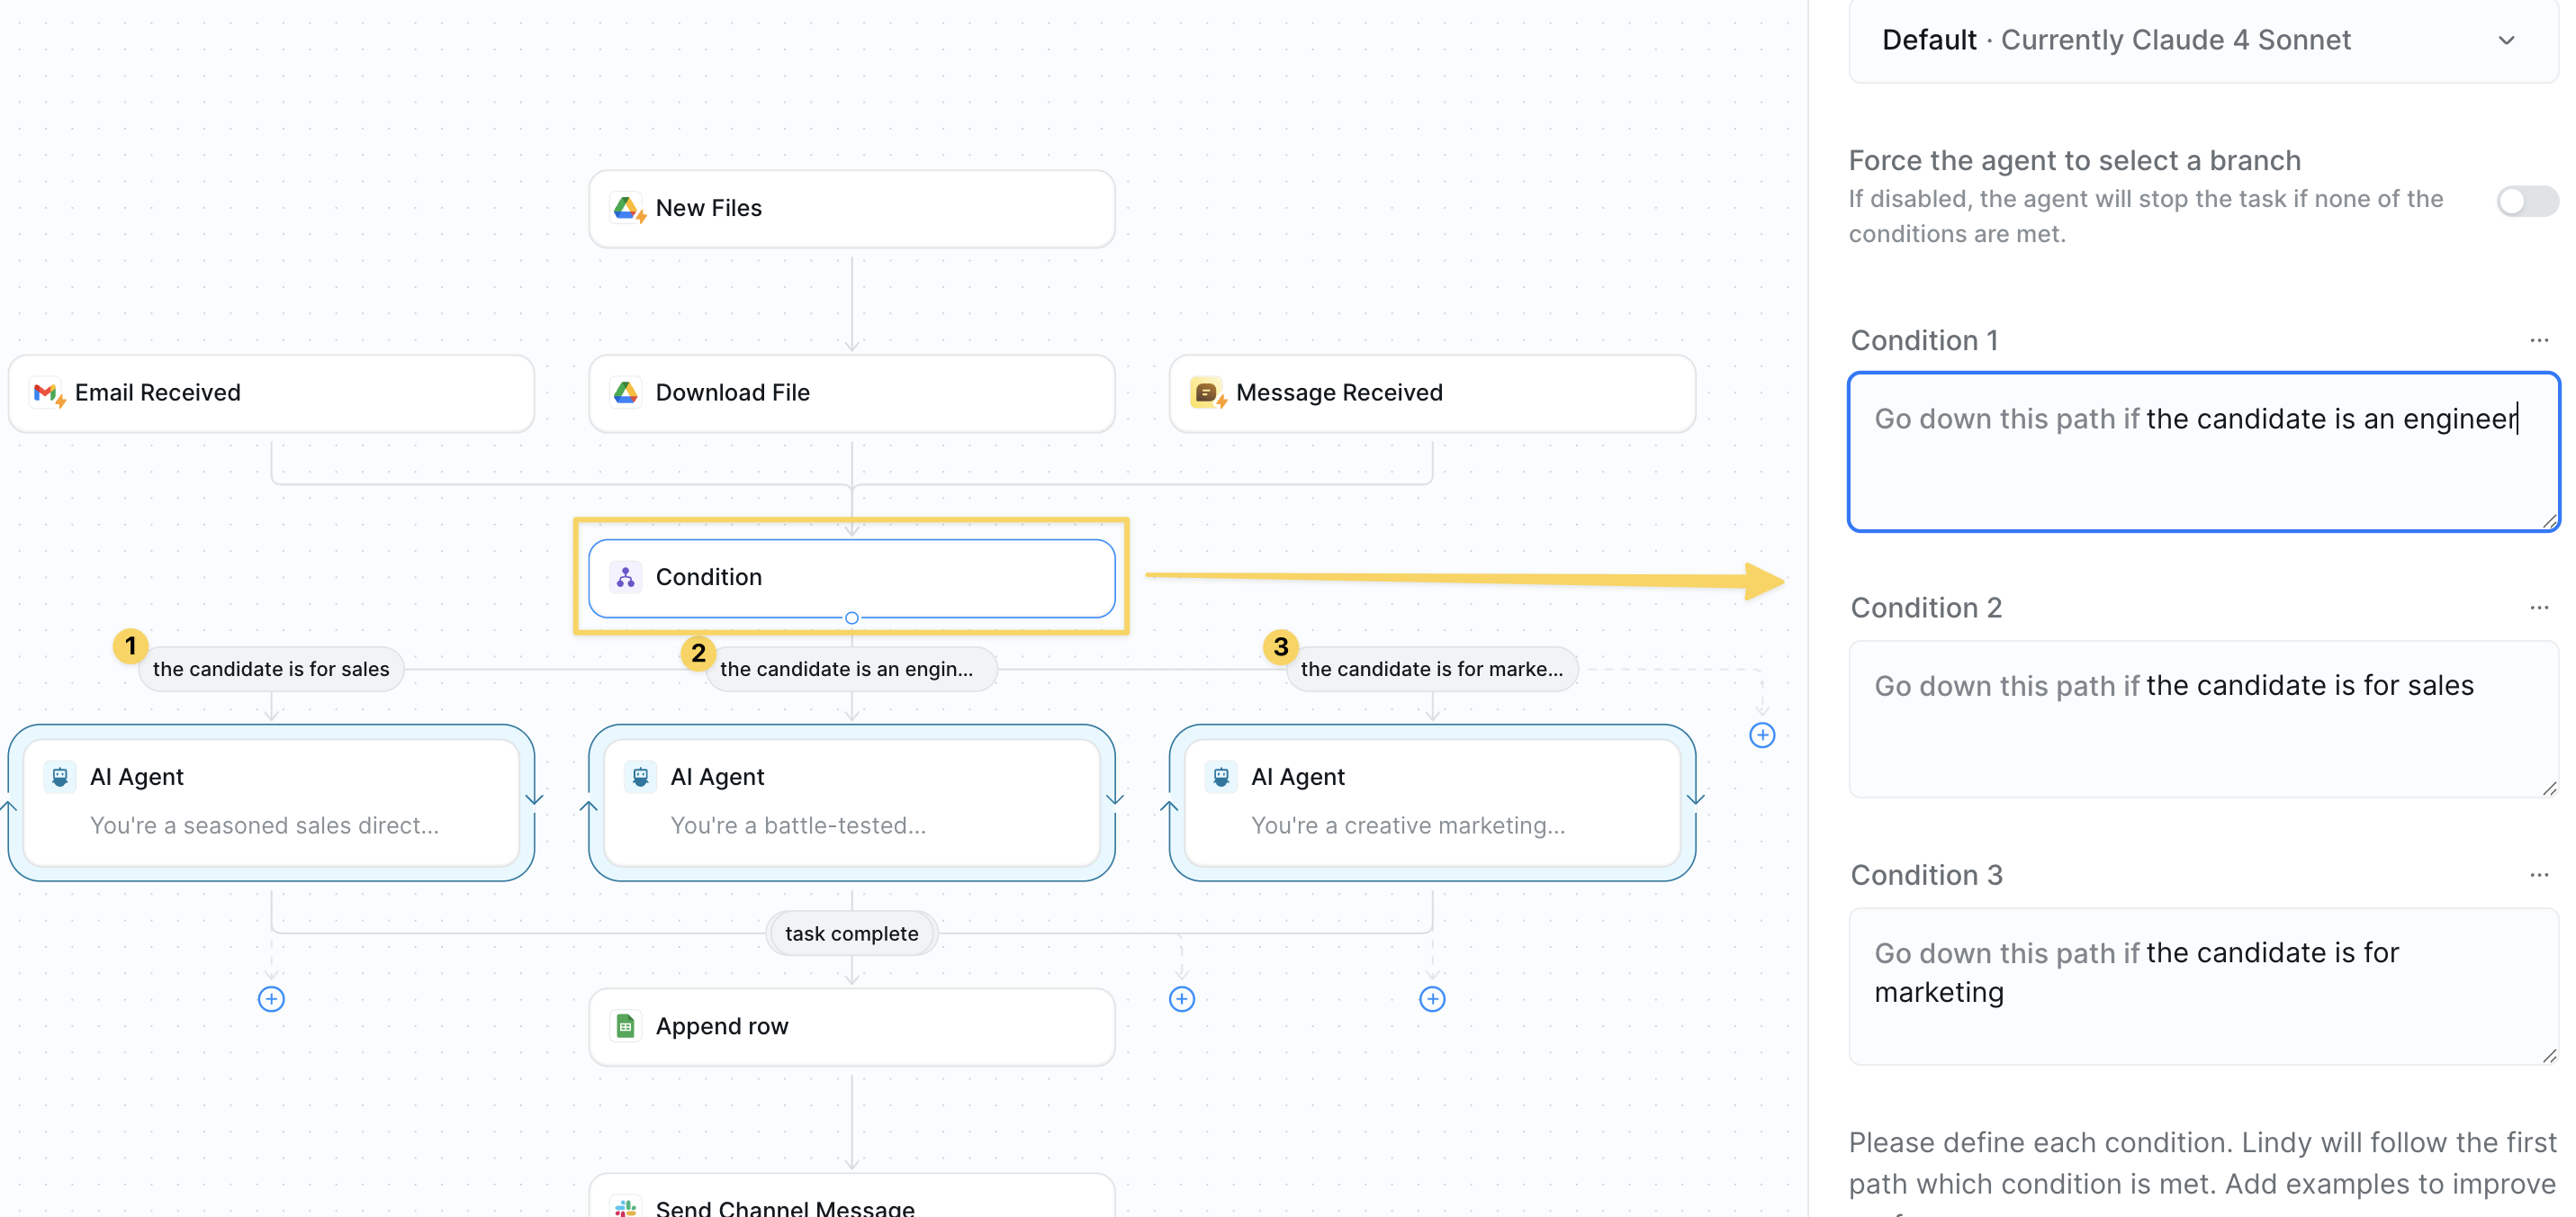 Add `Conditions` to determine role type. For best results provide more context in the condition prompts.
### Step 3: Analyze and Score by Role
Deploy specialized AI experts to evaluate candidates with role-specific criteria and personality.
Add `Conditions` to determine role type. For best results provide more context in the condition prompts.
### Step 3: Analyze and Score by Role
Deploy specialized AI experts to evaluate candidates with role-specific criteria and personality.
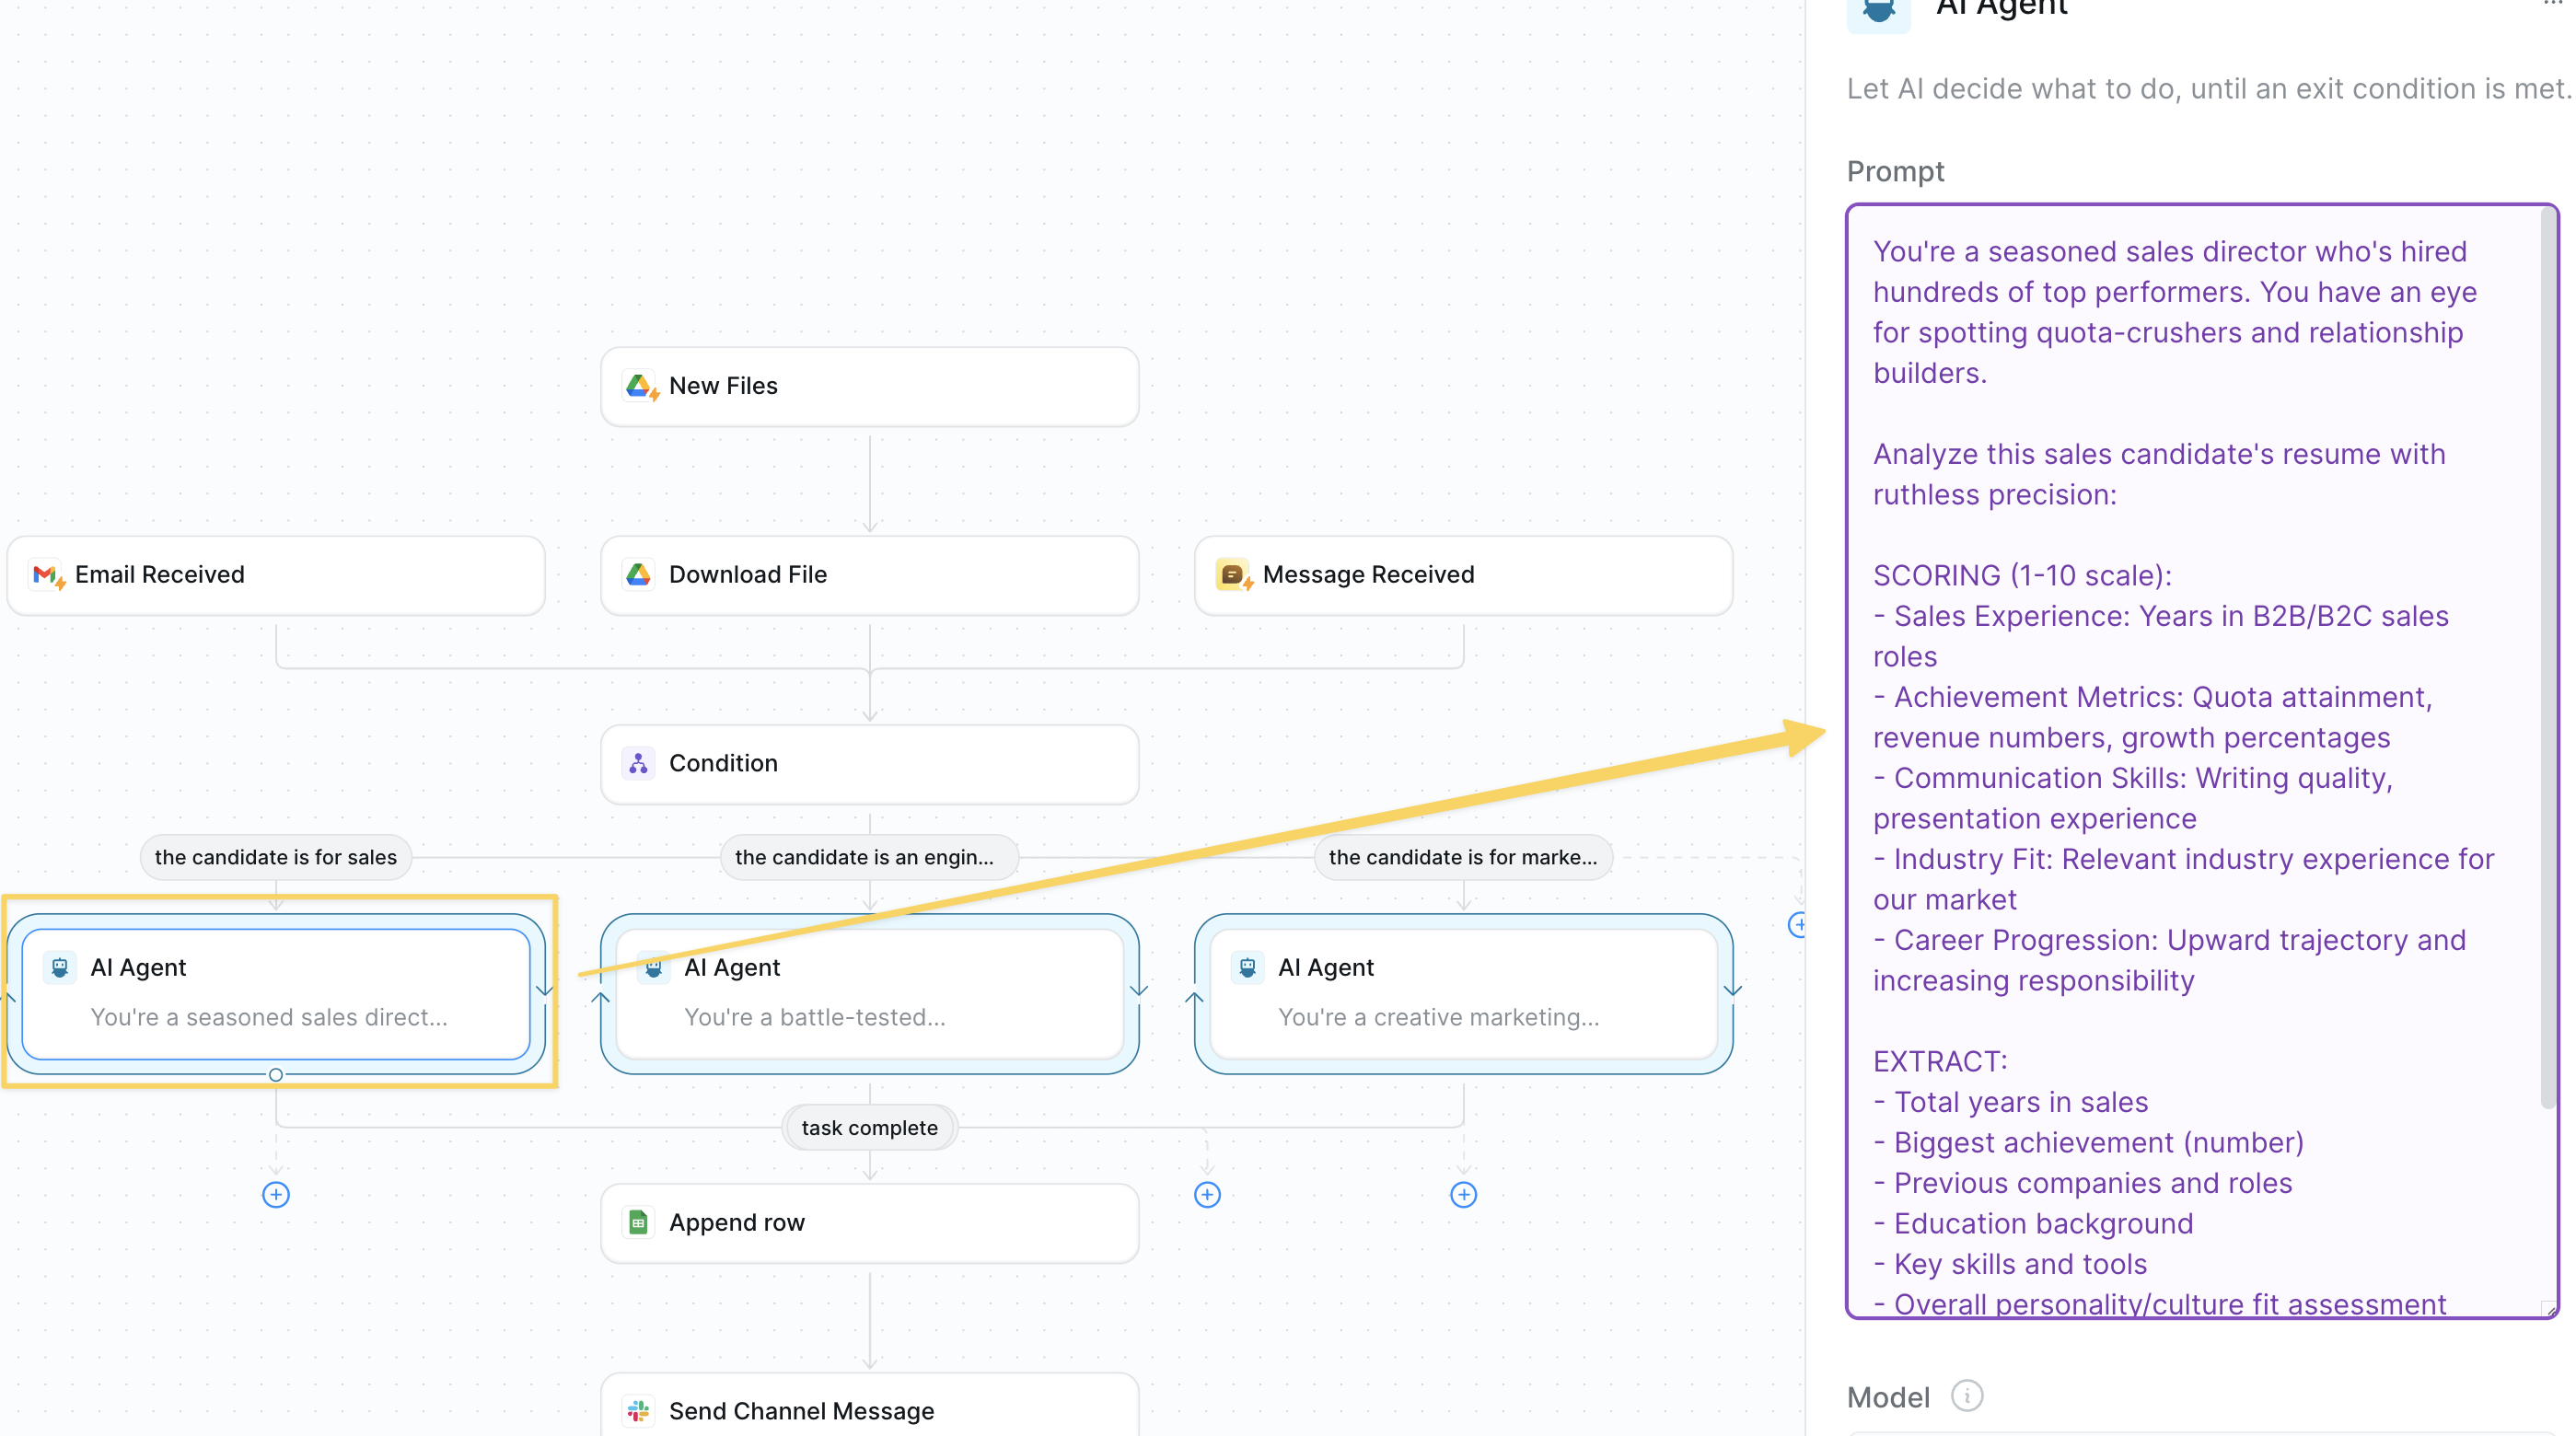 **For Sales Candidates — Add `AI Agent – Sales Recruiter`:**
```
You're a seasoned sales director who's hired hundreds of top performers. You have an eye for spotting quota-crushers and relationship builders.
Analyze this sales candidate's resume with ruthless precision:
SCORING (1-10 scale):
- Sales Experience: Years in B2B/B2C sales roles
- Achievement Metrics: Quota attainment, revenue numbers, growth percentages
- Communication Skills: Writing quality, presentation experience
- Industry Fit: Relevant industry experience for our market
- Career Progression: Upward trajectory and increasing responsibility
EXTRACT:
- Total years in sales
- Biggest achievement (number)
- Previous companies and roles
- Education background
- Key skills and tools
- Overall personality/culture fit assessment
FINAL VERDICT: Give an overall score (1-10) and one-sentence hiring recommendation.
Return as structured JSON with all scoring and extracted data.
```
**For Engineering Candidates — Add `AI Agent – Tech Lead`:**
```
You're a battle-tested engineering manager who's built legendary dev teams. You spot coding talent like Neo sees the Matrix.
Dissect this engineer's technical DNA:
SCORING (1-10 scale):
- Technical Depth: Programming languages, frameworks, complexity of projects
- Problem Solving: Evidence of tackling challenging technical problems
- Leadership Potential: Mentoring, team lead experience, open source contributions
- Learning Agility: Continuous skill development, new technology adoption
- Product Impact: Features shipped, systems scaled, measurable technical outcomes
EXTRACT:
- Programming languages and years experience
- Most impressive technical project
- Company progression and role levels
- Education and certifications
- GitHub/portfolio presence
- Architecture and system design experience
FINAL VERDICT: Overall technical score (1-10) and gut-check on hiring potential.
Return as structured JSON with complete technical profile.
```
**For Marketing Candidates — Add `AI Agent – Marketing Director`:**
```
You're a creative marketing genius who's launched viral campaigns and built legendary brands. You recognize marketing superstars from their first campaign story.
Decode this marketer's creative and strategic potential:
SCORING (1-10 scale):
- Campaign Results: ROI, conversion rates, growth metrics from previous work
- Creative Vision: Evidence of innovative thinking and brand-building
- Digital Mastery: SEO, social media, email marketing, analytics expertise
- Strategic Thinking: Market research, customer insights, positioning skills
- Multi-Channel Experience: Paid ads, content, events, partnerships
EXTRACT:
- Years in marketing roles
- Best campaign result with metrics
- Channel expertise and tools mastery
- Brand experience (B2B/B2C)
- Content creation abilities
- Data analysis and optimization skills
FINAL VERDICT: Creative + analytical score (1-10) and culture fit assessment.
Return as structured JSON with complete marketing evaluation.
```
### Step 4: Log Results to Tracking Sheet
Store all candidate evaluations and scores in your master recruitment spreadsheet.
**For Sales Candidates — Add `AI Agent – Sales Recruiter`:**
```
You're a seasoned sales director who's hired hundreds of top performers. You have an eye for spotting quota-crushers and relationship builders.
Analyze this sales candidate's resume with ruthless precision:
SCORING (1-10 scale):
- Sales Experience: Years in B2B/B2C sales roles
- Achievement Metrics: Quota attainment, revenue numbers, growth percentages
- Communication Skills: Writing quality, presentation experience
- Industry Fit: Relevant industry experience for our market
- Career Progression: Upward trajectory and increasing responsibility
EXTRACT:
- Total years in sales
- Biggest achievement (number)
- Previous companies and roles
- Education background
- Key skills and tools
- Overall personality/culture fit assessment
FINAL VERDICT: Give an overall score (1-10) and one-sentence hiring recommendation.
Return as structured JSON with all scoring and extracted data.
```
**For Engineering Candidates — Add `AI Agent – Tech Lead`:**
```
You're a battle-tested engineering manager who's built legendary dev teams. You spot coding talent like Neo sees the Matrix.
Dissect this engineer's technical DNA:
SCORING (1-10 scale):
- Technical Depth: Programming languages, frameworks, complexity of projects
- Problem Solving: Evidence of tackling challenging technical problems
- Leadership Potential: Mentoring, team lead experience, open source contributions
- Learning Agility: Continuous skill development, new technology adoption
- Product Impact: Features shipped, systems scaled, measurable technical outcomes
EXTRACT:
- Programming languages and years experience
- Most impressive technical project
- Company progression and role levels
- Education and certifications
- GitHub/portfolio presence
- Architecture and system design experience
FINAL VERDICT: Overall technical score (1-10) and gut-check on hiring potential.
Return as structured JSON with complete technical profile.
```
**For Marketing Candidates — Add `AI Agent – Marketing Director`:**
```
You're a creative marketing genius who's launched viral campaigns and built legendary brands. You recognize marketing superstars from their first campaign story.
Decode this marketer's creative and strategic potential:
SCORING (1-10 scale):
- Campaign Results: ROI, conversion rates, growth metrics from previous work
- Creative Vision: Evidence of innovative thinking and brand-building
- Digital Mastery: SEO, social media, email marketing, analytics expertise
- Strategic Thinking: Market research, customer insights, positioning skills
- Multi-Channel Experience: Paid ads, content, events, partnerships
EXTRACT:
- Years in marketing roles
- Best campaign result with metrics
- Channel expertise and tools mastery
- Brand experience (B2B/B2C)
- Content creation abilities
- Data analysis and optimization skills
FINAL VERDICT: Creative + analytical score (1-10) and culture fit assessment.
Return as structured JSON with complete marketing evaluation.
```
### Step 4: Log Results to Tracking Sheet
Store all candidate evaluations and scores in your master recruitment spreadsheet.
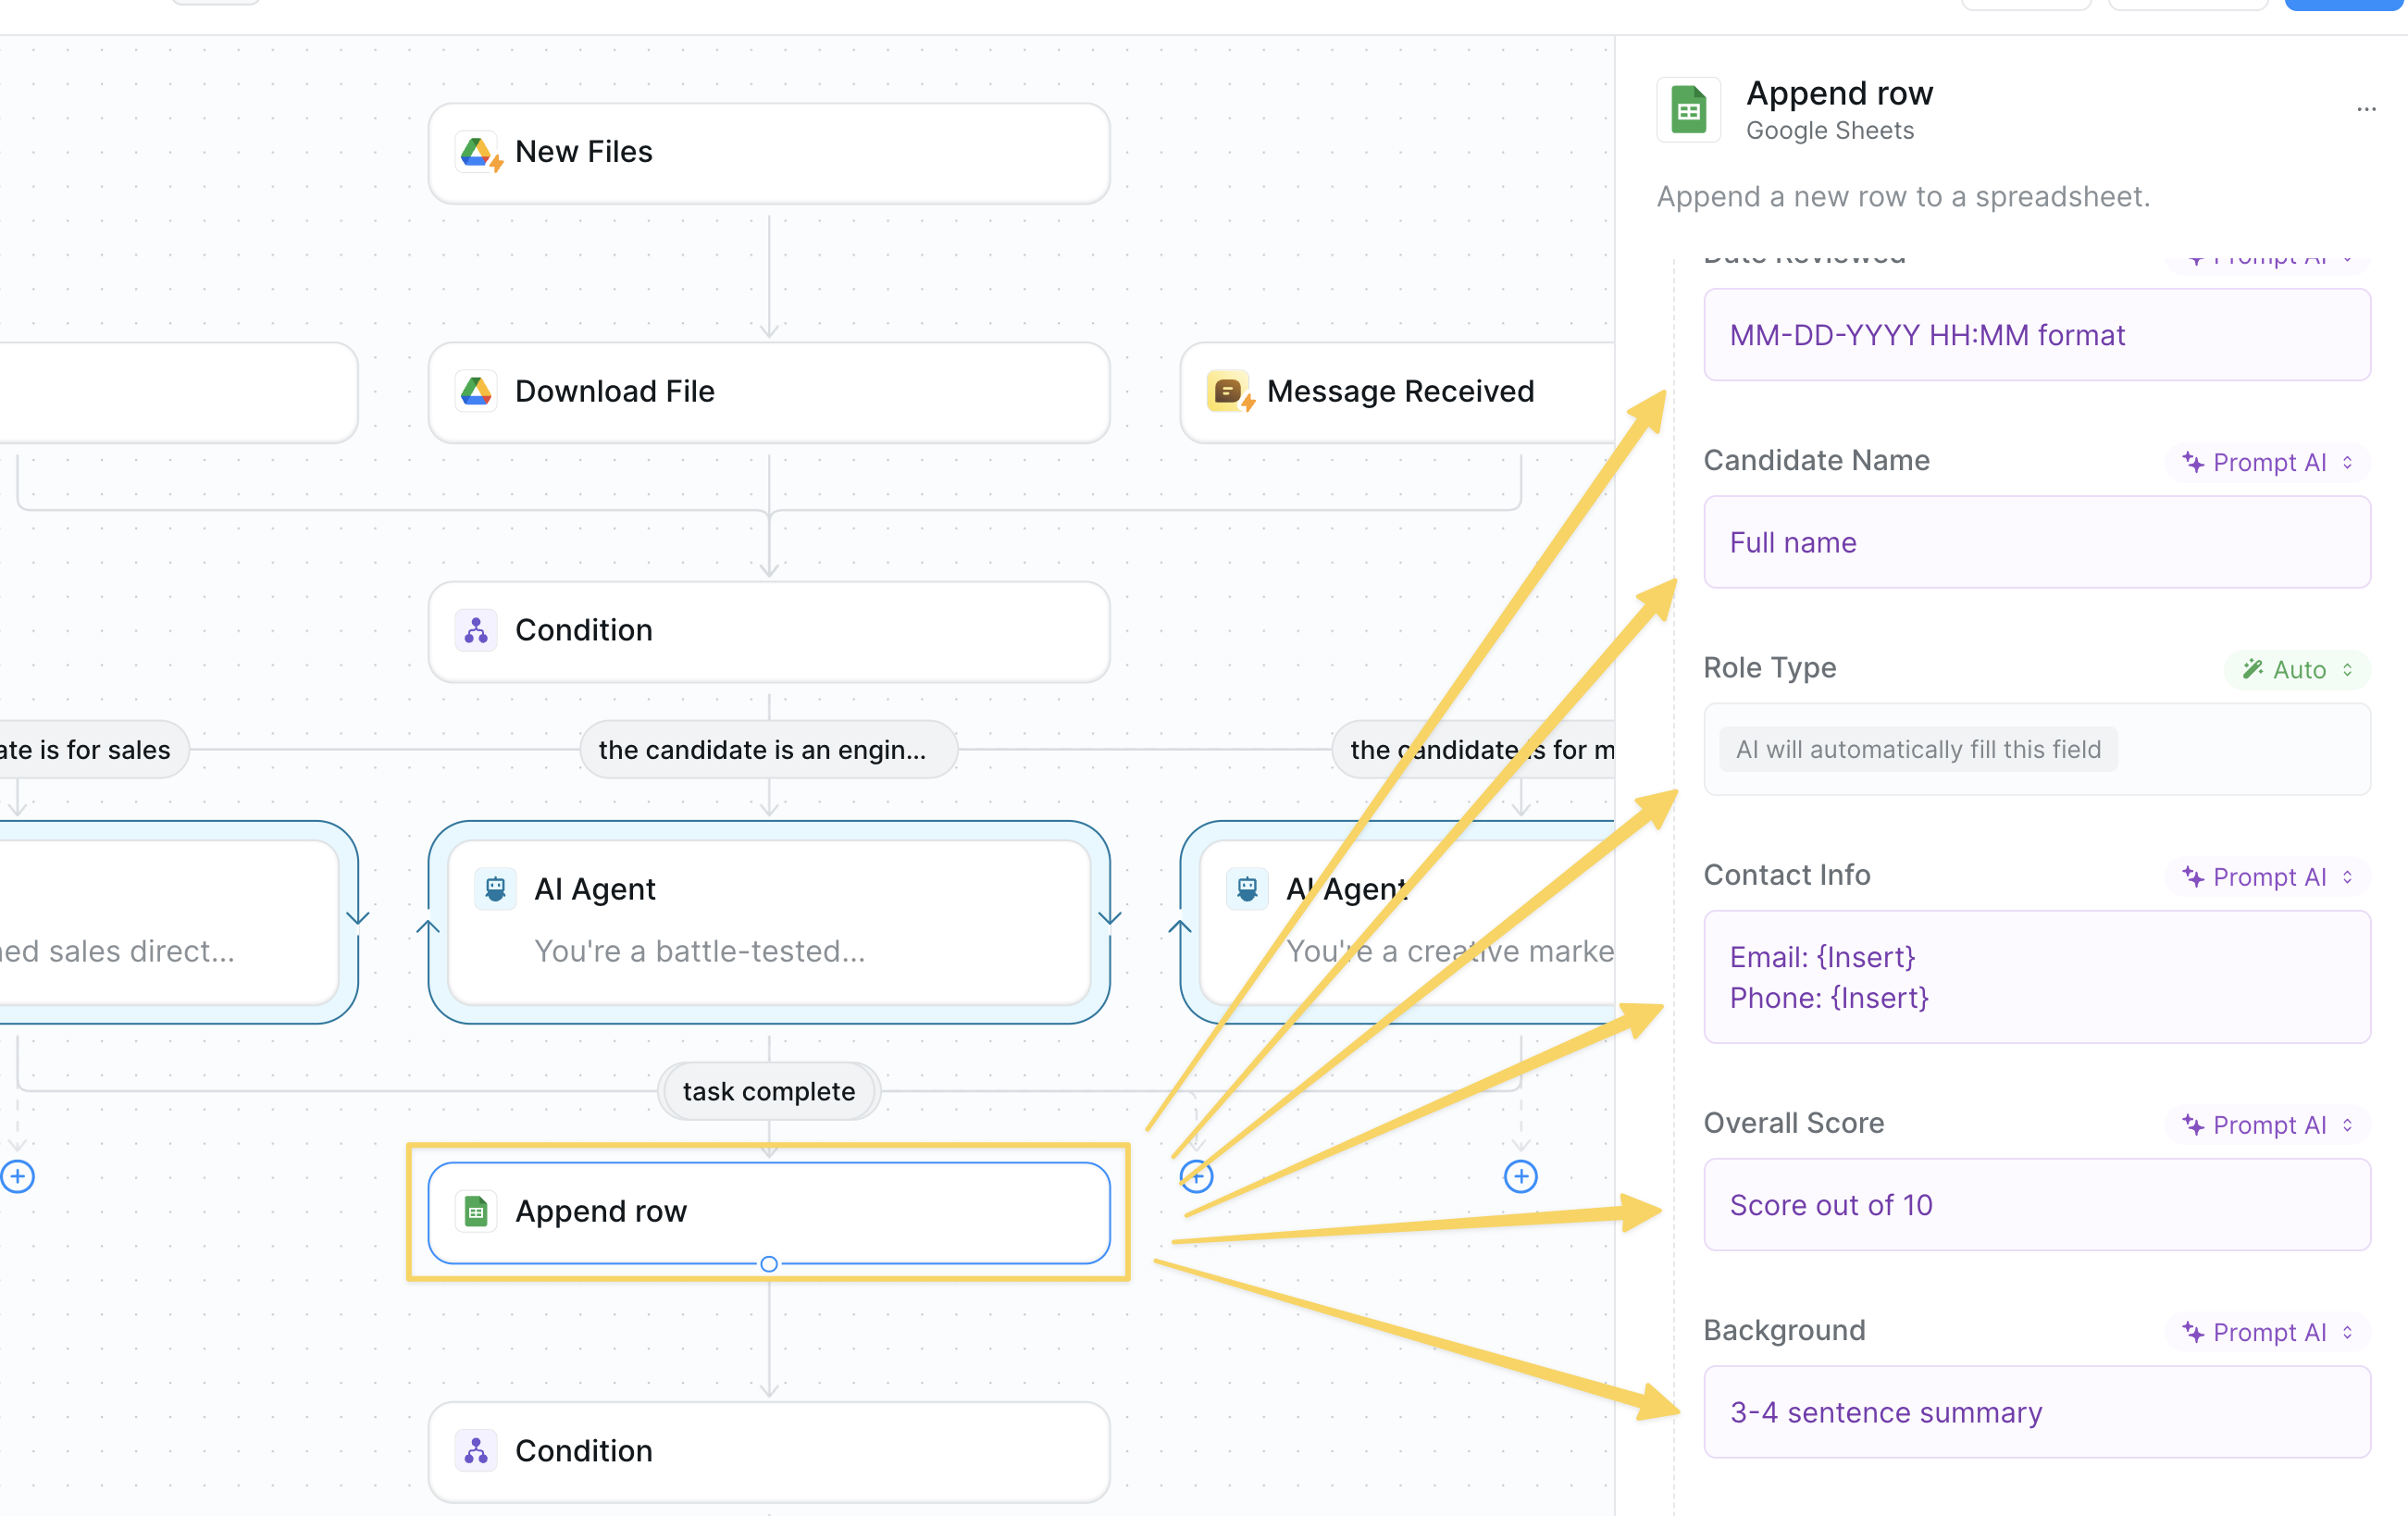 Create a Google Sheet with columns:
* Date Reviewed
* Candidate Name
* Role Type
* Contact Information
* Overall Score
* Background Summary
* Rating Justification
Use `Google Sheets – Append Row` to log each candidate's complete evaluation.
### Step 5: Check for High Scores
Filter for candidates that exceed your quality threshold to trigger immediate team alerts.
Create a Google Sheet with columns:
* Date Reviewed
* Candidate Name
* Role Type
* Contact Information
* Overall Score
* Background Summary
* Rating Justification
Use `Google Sheets – Append Row` to log each candidate's complete evaluation.
### Step 5: Check for High Scores
Filter for candidates that exceed your quality threshold to trigger immediate team alerts.
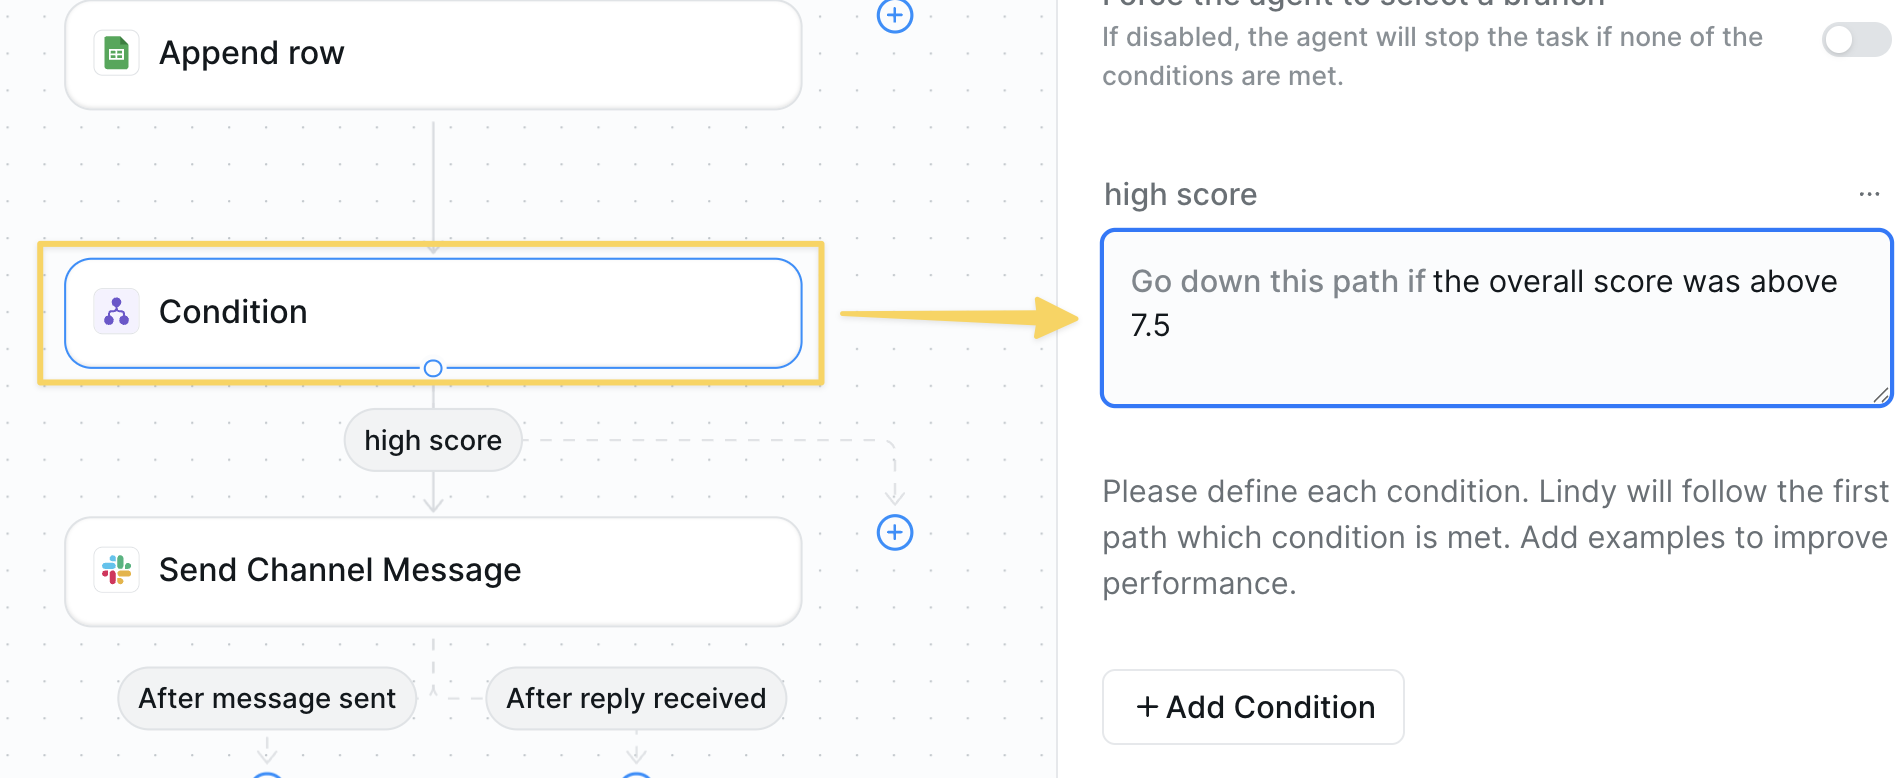 Add `Conditions` with prompt: "Go down this path if the overall score was above 7.5"
### Step 6: Alert Team About Top Talent
Send immediate notifications for candidates that are deemed high scoring.
For high-scoring candidates, use `Slack – Send Message` to alert team:
* **Channel**: #recruiting or #top-candidates
* Example prompt:
```
🎯 **TOP CANDIDATE ALERT**
**Candidate**: [Name]
**Role**: [Sales/Engineering/Marketing]
**Score**: [X]/10 ⭐
**Key Highlights**:
• [Biggest achievement]
• [Years experience] at [Previous companies]
• [Key skills/education]
**Recommendation**: [AI verdict in 2 concise sentences]
```
Lindy must be added to the Slack channel in order to send messages.
• You can notify your team however you'd like - this is just one example format.
## Advanced Features
| Feature | What it does |
| ---------------------- | --------------------------------------------------- |
| Duplicate Detection | Identify candidates who've applied multiple times |
| Custom Scoring Weights | Adjust importance of different criteria by role |
| Interview Scheduling | Auto-schedule interviews for top candidates |
| ATS Integration | Sync results with Workday, Greenhouse, or other ATS |
## Best Practices
Define clear 1-10 scoring rubrics for each role and stick to them consistently.
Update AI prompts based on successful hires to improve accuracy over time.
Regularly audit results to ensure fair evaluation across all candidate backgrounds.
Track which AI-scored candidates become successful hires to refine scoring.
## Next Steps
Collect feedback from new hires
Support candidates with questions
Process resumes and application documents
Build intelligent screening workflows
# Competitive Content Analysis
Source: https://docs.lindy.ai/use-cases/marketing/competitive-content-analysis
Analyze competitor content and strategies with Lindy
You can use the [weekly competitor analysis template](https://chat.lindy.ai/home/?templateId=687610877b70782297d2a281) to get started.
## Quick Overview
Automate competitor tracking across social media and company announcements. Your agent will:
* **Monitor** competitors across all major platforms weekly
* **Analyze** their latest posts, product releases, and content strategies
* **Track** engagement patterns and emerging trends
* **Compile** weekly reports with findings and insights
* **Alert** your team to new launches and company updates
Keep tabs on competitor activity without manual research.
## Setting Up Your Competitor Tracking
### Step 1: Weekly Analysis Trigger
Set up automatic weekly competitor analysis to track their latest activity.
Add `Conditions` with prompt: "Go down this path if the overall score was above 7.5"
### Step 6: Alert Team About Top Talent
Send immediate notifications for candidates that are deemed high scoring.
For high-scoring candidates, use `Slack – Send Message` to alert team:
* **Channel**: #recruiting or #top-candidates
* Example prompt:
```
🎯 **TOP CANDIDATE ALERT**
**Candidate**: [Name]
**Role**: [Sales/Engineering/Marketing]
**Score**: [X]/10 ⭐
**Key Highlights**:
• [Biggest achievement]
• [Years experience] at [Previous companies]
• [Key skills/education]
**Recommendation**: [AI verdict in 2 concise sentences]
```
Lindy must be added to the Slack channel in order to send messages.
• You can notify your team however you'd like - this is just one example format.
## Advanced Features
| Feature | What it does |
| ---------------------- | --------------------------------------------------- |
| Duplicate Detection | Identify candidates who've applied multiple times |
| Custom Scoring Weights | Adjust importance of different criteria by role |
| Interview Scheduling | Auto-schedule interviews for top candidates |
| ATS Integration | Sync results with Workday, Greenhouse, or other ATS |
## Best Practices
Define clear 1-10 scoring rubrics for each role and stick to them consistently.
Update AI prompts based on successful hires to improve accuracy over time.
Regularly audit results to ensure fair evaluation across all candidate backgrounds.
Track which AI-scored candidates become successful hires to refine scoring.
## Next Steps
Collect feedback from new hires
Support candidates with questions
Process resumes and application documents
Build intelligent screening workflows
# Competitive Content Analysis
Source: https://docs.lindy.ai/use-cases/marketing/competitive-content-analysis
Analyze competitor content and strategies with Lindy
You can use the [weekly competitor analysis template](https://chat.lindy.ai/home/?templateId=687610877b70782297d2a281) to get started.
## Quick Overview
Automate competitor tracking across social media and company announcements. Your agent will:
* **Monitor** competitors across all major platforms weekly
* **Analyze** their latest posts, product releases, and content strategies
* **Track** engagement patterns and emerging trends
* **Compile** weekly reports with findings and insights
* **Alert** your team to new launches and company updates
Keep tabs on competitor activity without manual research.
## Setting Up Your Competitor Tracking
### Step 1: Weekly Analysis Trigger
Set up automatic weekly competitor analysis to track their latest activity.
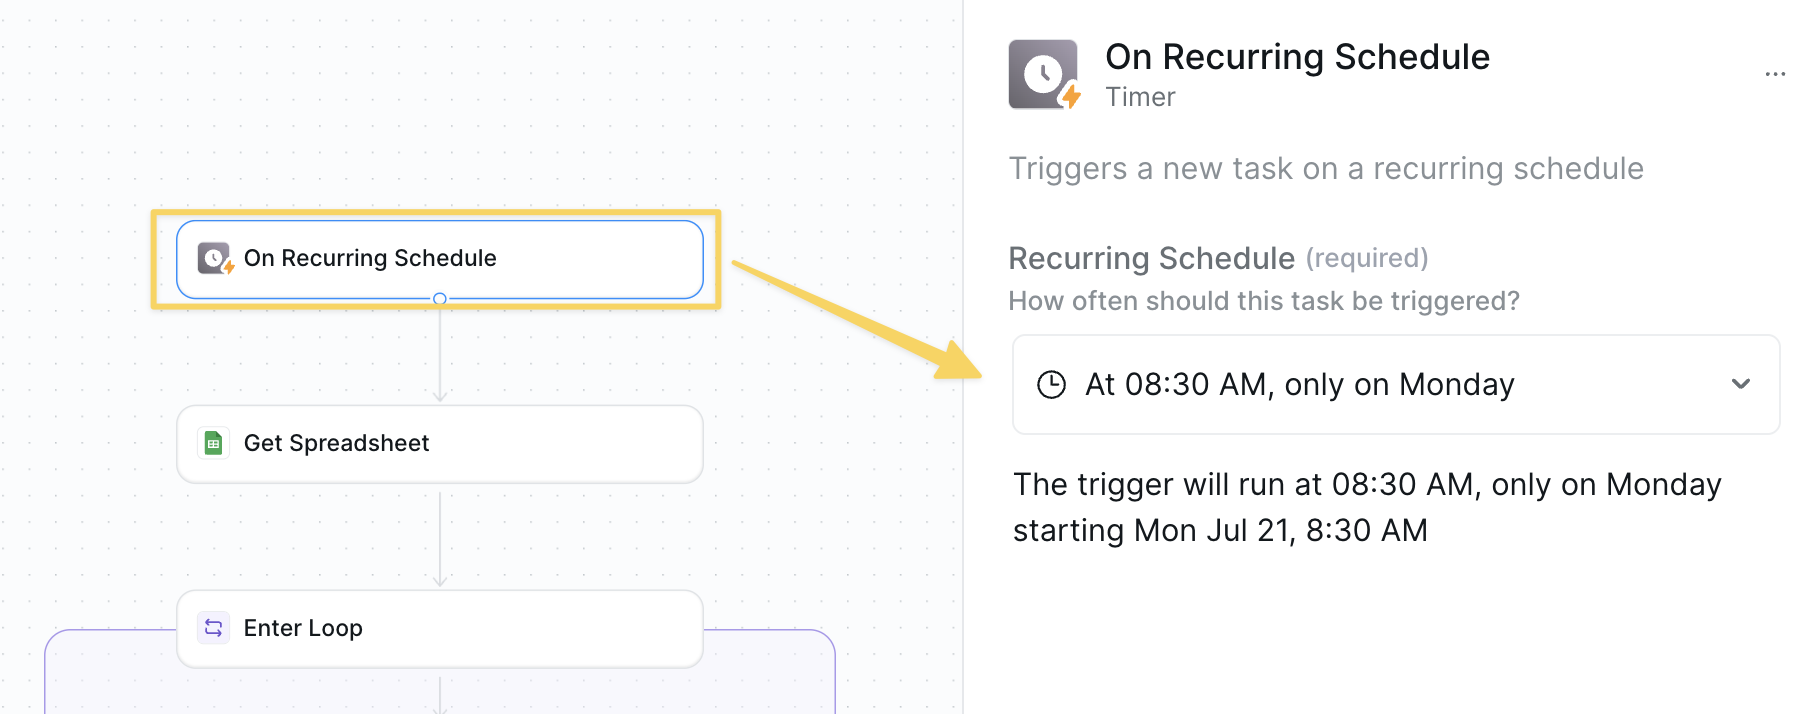 Use `On Recurring Schedule` set to weekly (e.g., Monday 8:30 AM).
### Step 2: Get Competitor Directory
Retrieve your competitor tracking spreadsheet with all platform URLs for comprehensive analysis.
Use `On Recurring Schedule` set to weekly (e.g., Monday 8:30 AM).
### Step 2: Get Competitor Directory
Retrieve your competitor tracking spreadsheet with all platform URLs for comprehensive analysis.
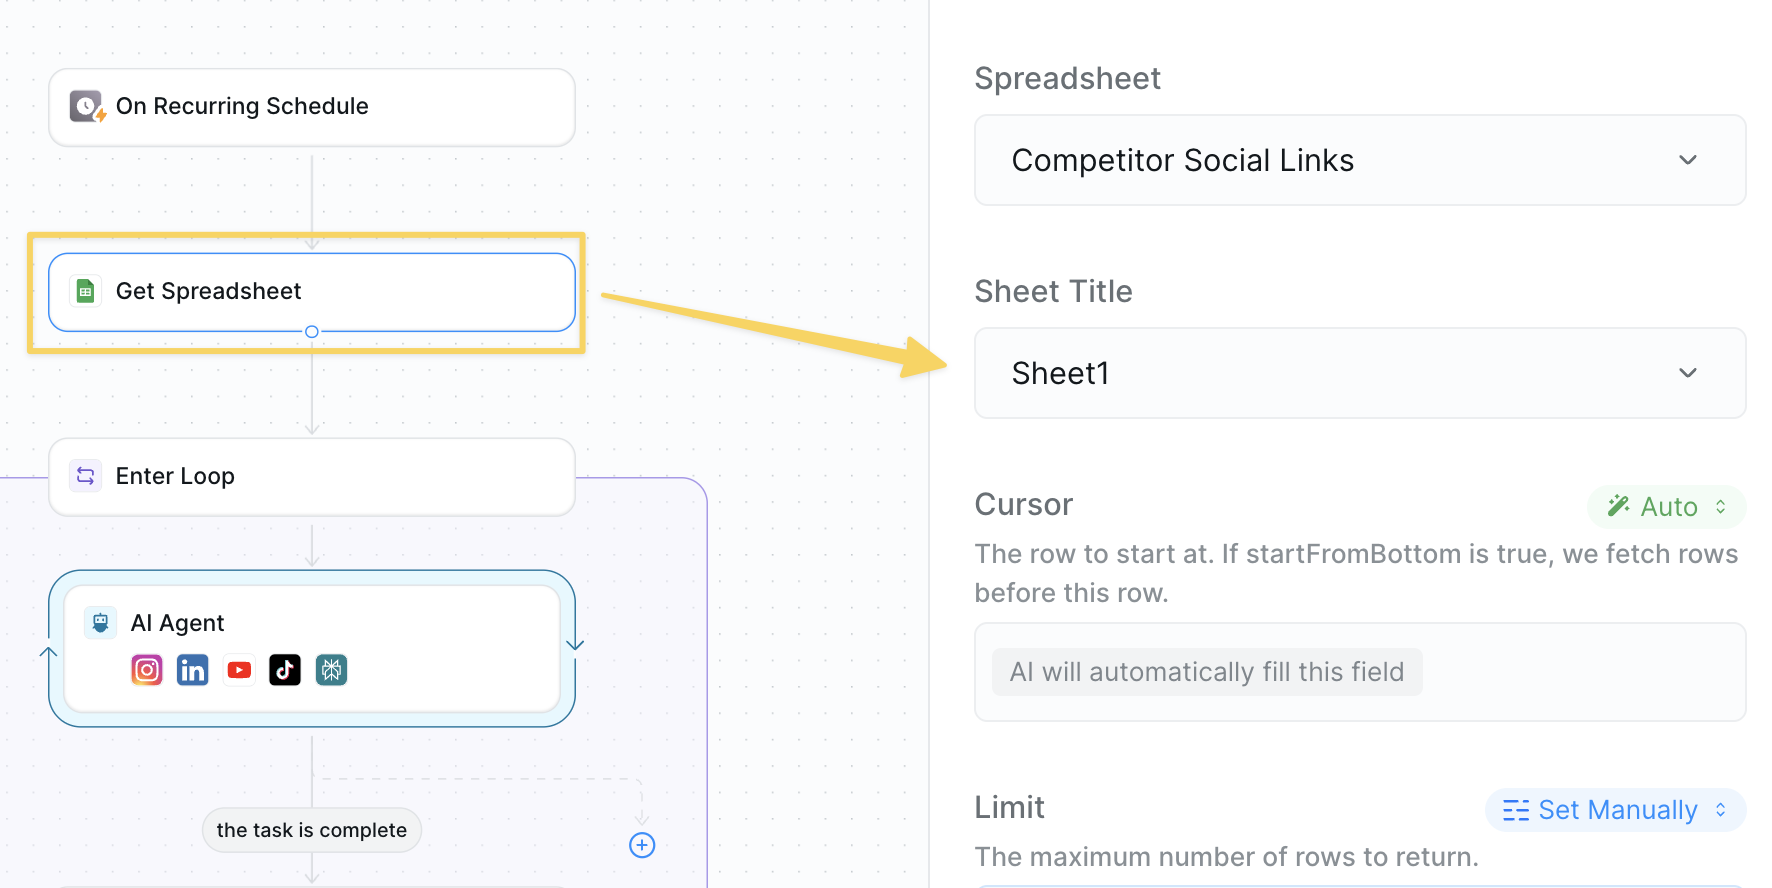 Use `Google Sheets – Get Spreadsheet` from your competitor tracking sheet.
Required columns:
* **Competitor Name**: Company name for reporting
* **Website**: Main company website URL
* **LinkedIn URL**: LinkedIn company page
* **YouTube URL**: YouTube channel link
* **TikTok URL**: TikTok profile link
* **Instagram URL**: Instagram business account
Keep your competitor spreadsheet updated with active social media accounts for comprehensive coverage.
### Step 3: Start Competitor Analysis Loop
Begin processing each competitor individually for cross-platform content analysis.
Use `Google Sheets – Get Spreadsheet` from your competitor tracking sheet.
Required columns:
* **Competitor Name**: Company name for reporting
* **Website**: Main company website URL
* **LinkedIn URL**: LinkedIn company page
* **YouTube URL**: YouTube channel link
* **TikTok URL**: TikTok profile link
* **Instagram URL**: Instagram business account
Keep your competitor spreadsheet updated with active social media accounts for comprehensive coverage.
### Step 3: Start Competitor Analysis Loop
Begin processing each competitor individually for cross-platform content analysis.
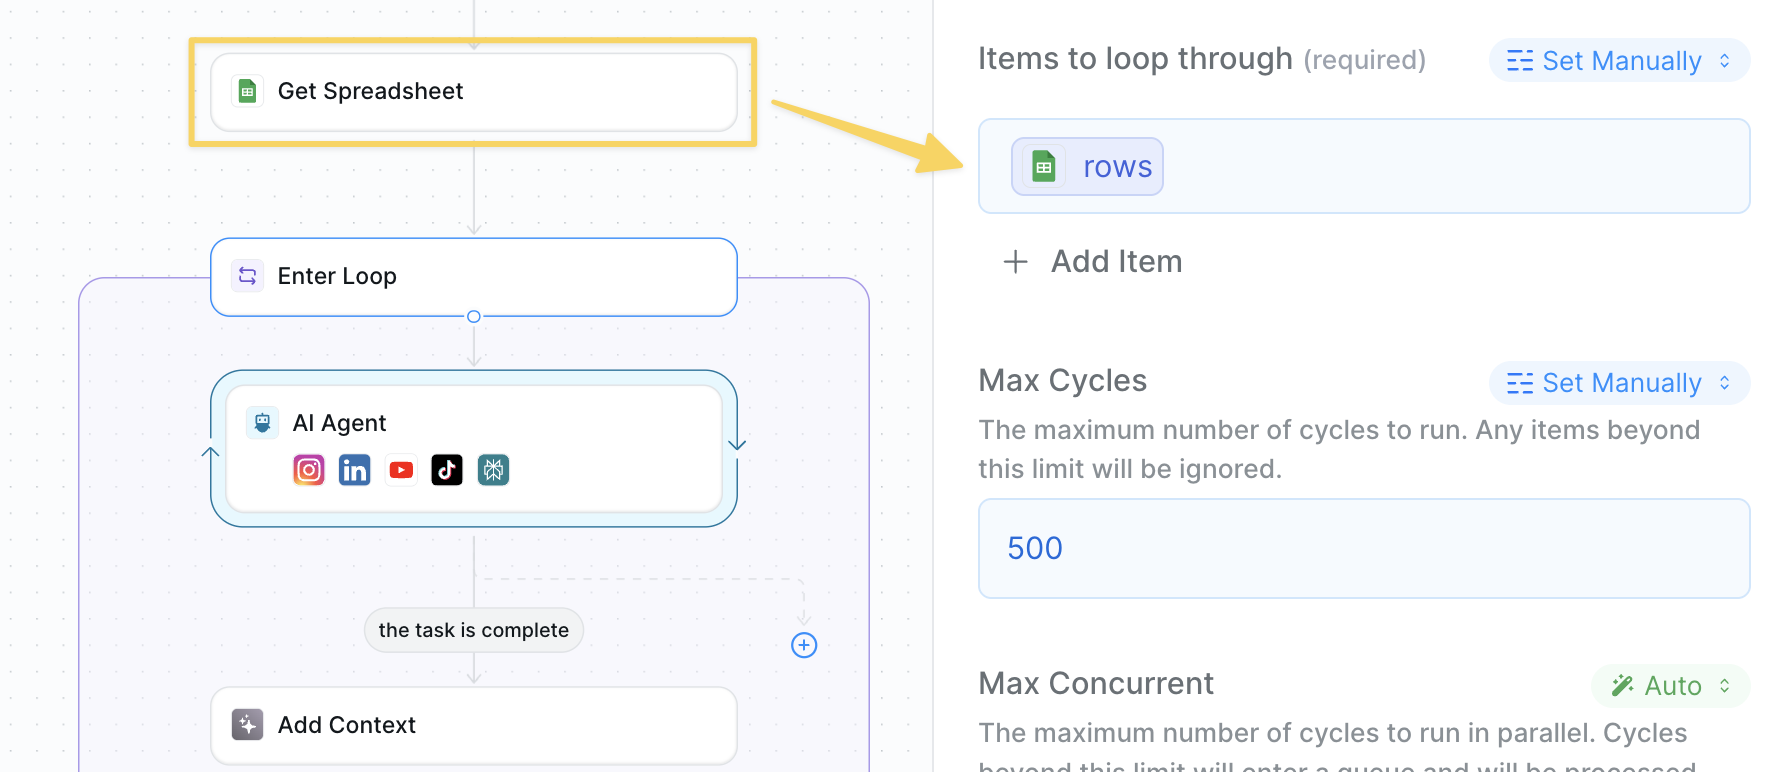 Add the `rows` output reference from your `Get Spreadsheet` action to iterate through each competitor.
### Step 4: Multi-Platform Analysis
Analyze competitor activity across all their social media and web platforms.
Add the `rows` output reference from your `Get Spreadsheet` action to iterate through each competitor.
### Step 4: Multi-Platform Analysis
Analyze competitor activity across all their social media and web platforms.
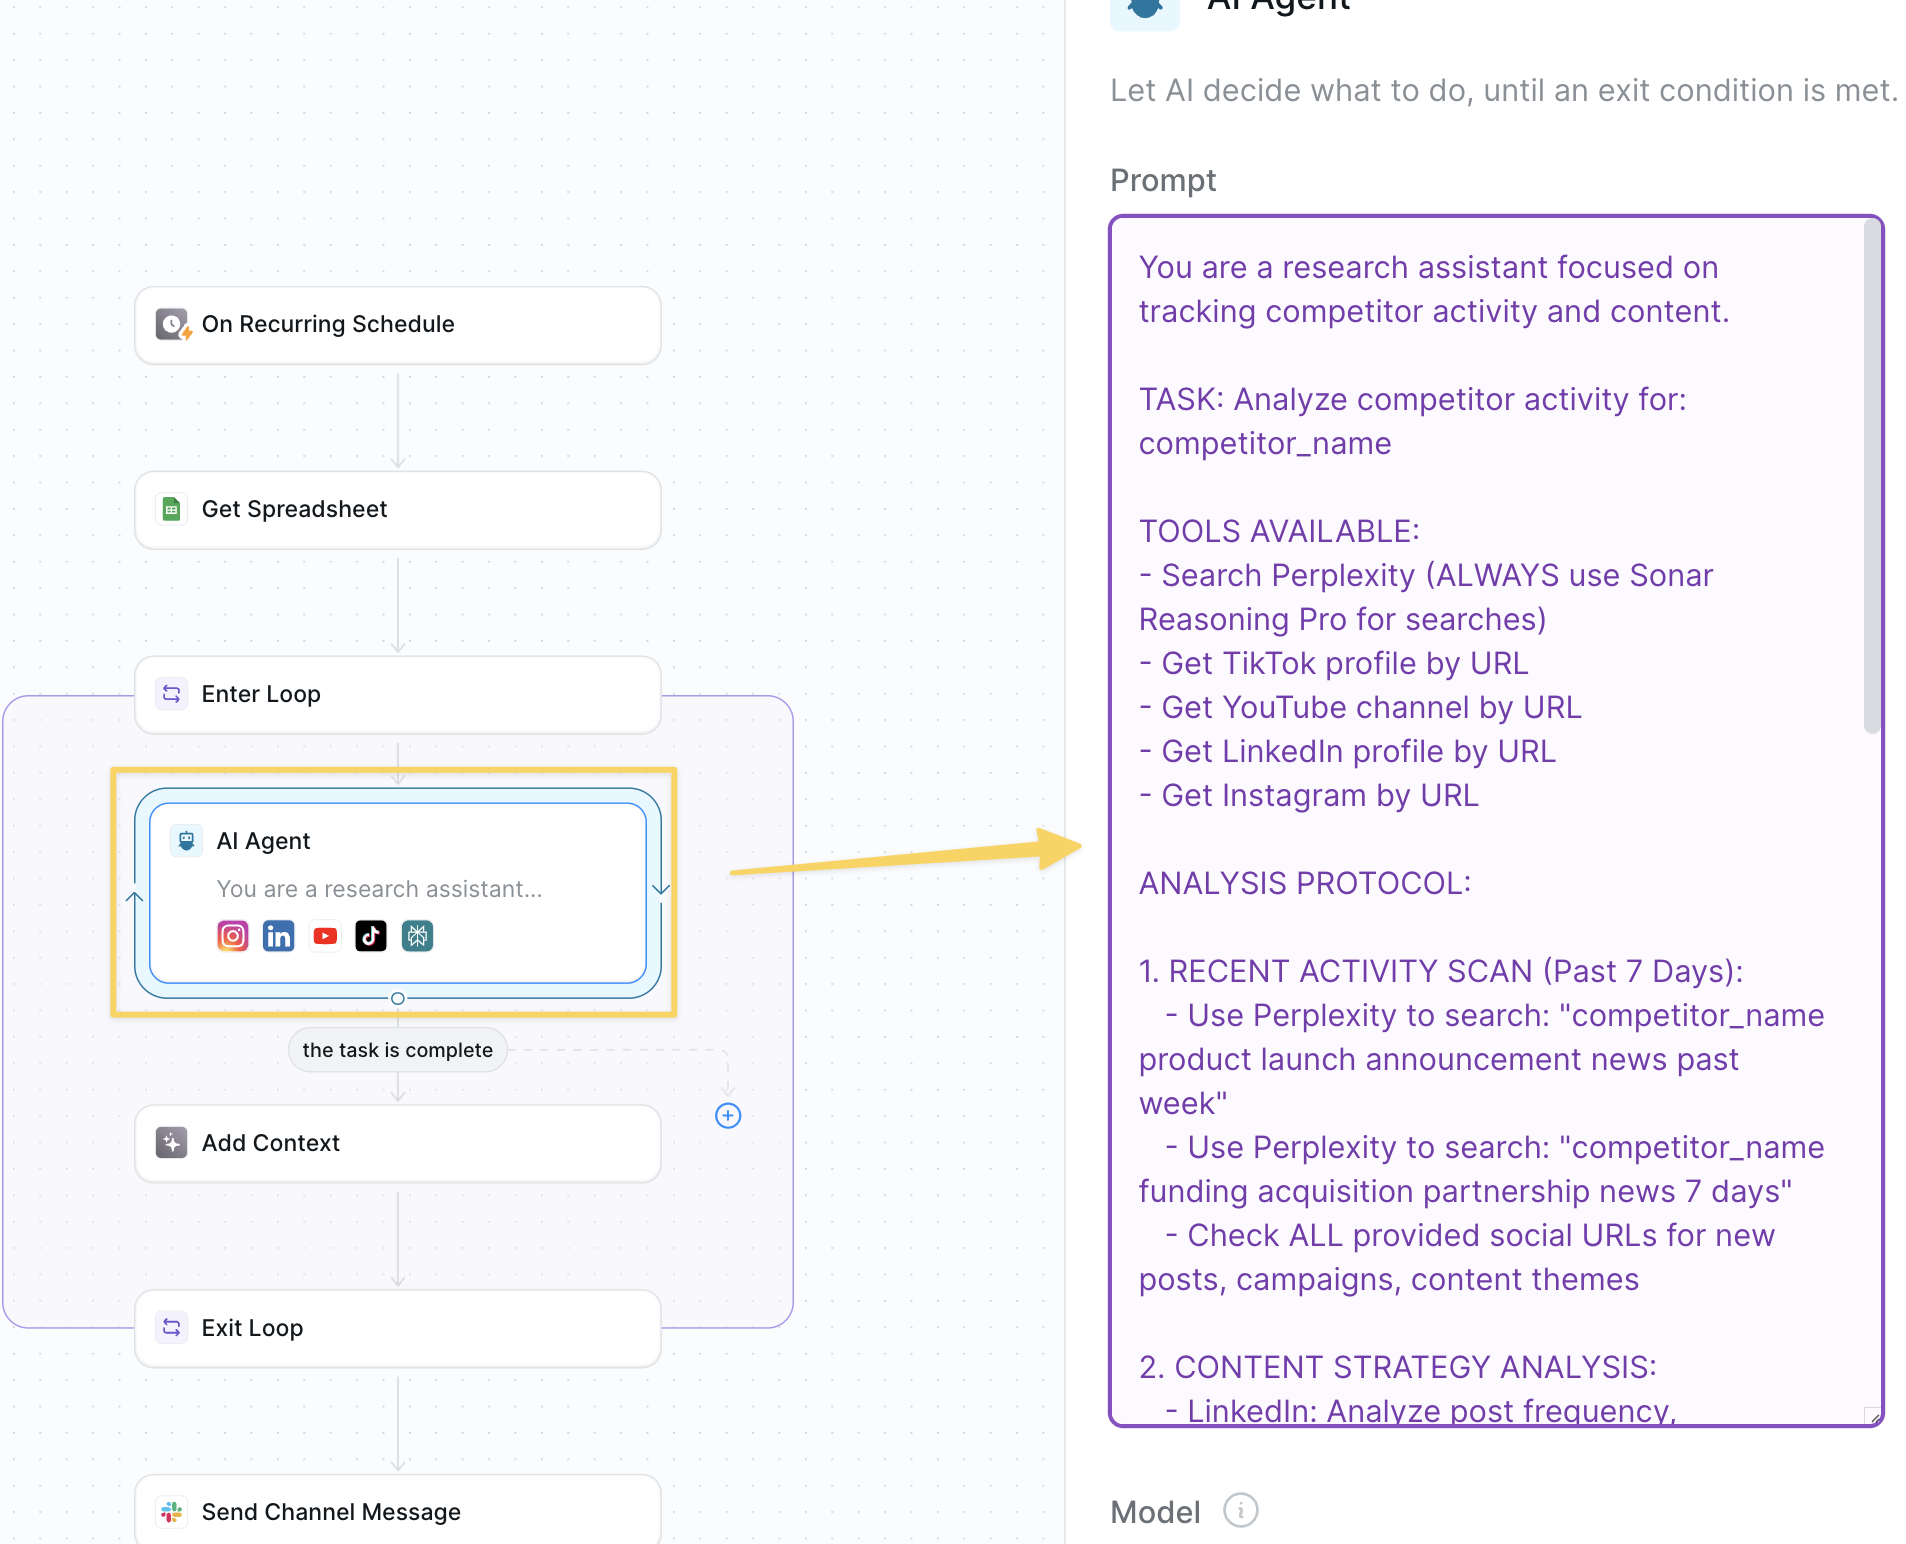 Add `AI Agent – Competitor Research Assistant`:
```
You are a research assistant focused on tracking competitor activity and content.
TASK: Analyze competitor activity for: competitor_name
TOOLS AVAILABLE:
- Search Perplexity (ALWAYS use Sonar Reasoning Pro for searches)
- Get TikTok profile by URL
- Get YouTube channel by URL
- Get LinkedIn profile by URL
- Get Instagram by URL
ANALYSIS PROTOCOL:
1. RECENT ACTIVITY SCAN (Past 7 Days):
- Use Perplexity to search: "competitor_name product launch announcement news past week"
- Use Perplexity to search: "competitor_name funding acquisition partnership news 7 days"
- Check ALL provided social URLs for new posts, campaigns, content themes
2. CONTENT STRATEGY ANALYSIS:
- LinkedIn: Analyze post frequency, engagement rates, thought leadership topics
- YouTube: Check for new videos, view counts, subscriber growth, content themes
- TikTok: Look for viral content, trending hashtags, brand personality shifts
- Instagram: Examine visual brand evolution, story content, influencer partnerships
- Website: Scan for new features, pricing changes, messaging updates
3. COMPETITIVE INTELLIGENCE:
- Product announcements or feature releases
- Marketing campaign launches or messaging pivots
- Executive hires or departures
- Customer wins or case studies
- Pricing strategy changes
- Partnership or integration announcements
4. CONTENT THEMES & TRENDS:
- What topics are they focusing on?
- How is their brand voice evolving?
- Which content formats are performing best?
- What audience segments are they targeting?
DELIVERABLE FORMAT:
Return organized findings by platform with specific examples, metrics, and key takeaways. Focus on notable changes or patterns.
BE THOROUGH AND SPECIFIC.
Your task is complete once your detailed research has concluded.
```
### Step 5: Add Findings to Context
Compile and organize all gathered competitor research for the weekly report.
Add `AI Agent – Competitor Research Assistant`:
```
You are a research assistant focused on tracking competitor activity and content.
TASK: Analyze competitor activity for: competitor_name
TOOLS AVAILABLE:
- Search Perplexity (ALWAYS use Sonar Reasoning Pro for searches)
- Get TikTok profile by URL
- Get YouTube channel by URL
- Get LinkedIn profile by URL
- Get Instagram by URL
ANALYSIS PROTOCOL:
1. RECENT ACTIVITY SCAN (Past 7 Days):
- Use Perplexity to search: "competitor_name product launch announcement news past week"
- Use Perplexity to search: "competitor_name funding acquisition partnership news 7 days"
- Check ALL provided social URLs for new posts, campaigns, content themes
2. CONTENT STRATEGY ANALYSIS:
- LinkedIn: Analyze post frequency, engagement rates, thought leadership topics
- YouTube: Check for new videos, view counts, subscriber growth, content themes
- TikTok: Look for viral content, trending hashtags, brand personality shifts
- Instagram: Examine visual brand evolution, story content, influencer partnerships
- Website: Scan for new features, pricing changes, messaging updates
3. COMPETITIVE INTELLIGENCE:
- Product announcements or feature releases
- Marketing campaign launches or messaging pivots
- Executive hires or departures
- Customer wins or case studies
- Pricing strategy changes
- Partnership or integration announcements
4. CONTENT THEMES & TRENDS:
- What topics are they focusing on?
- How is their brand voice evolving?
- Which content formats are performing best?
- What audience segments are they targeting?
DELIVERABLE FORMAT:
Return organized findings by platform with specific examples, metrics, and key takeaways. Focus on notable changes or patterns.
BE THOROUGH AND SPECIFIC.
Your task is complete once your detailed research has concluded.
```
### Step 5: Add Findings to Context
Compile and organize all gathered competitor research for the weekly report.
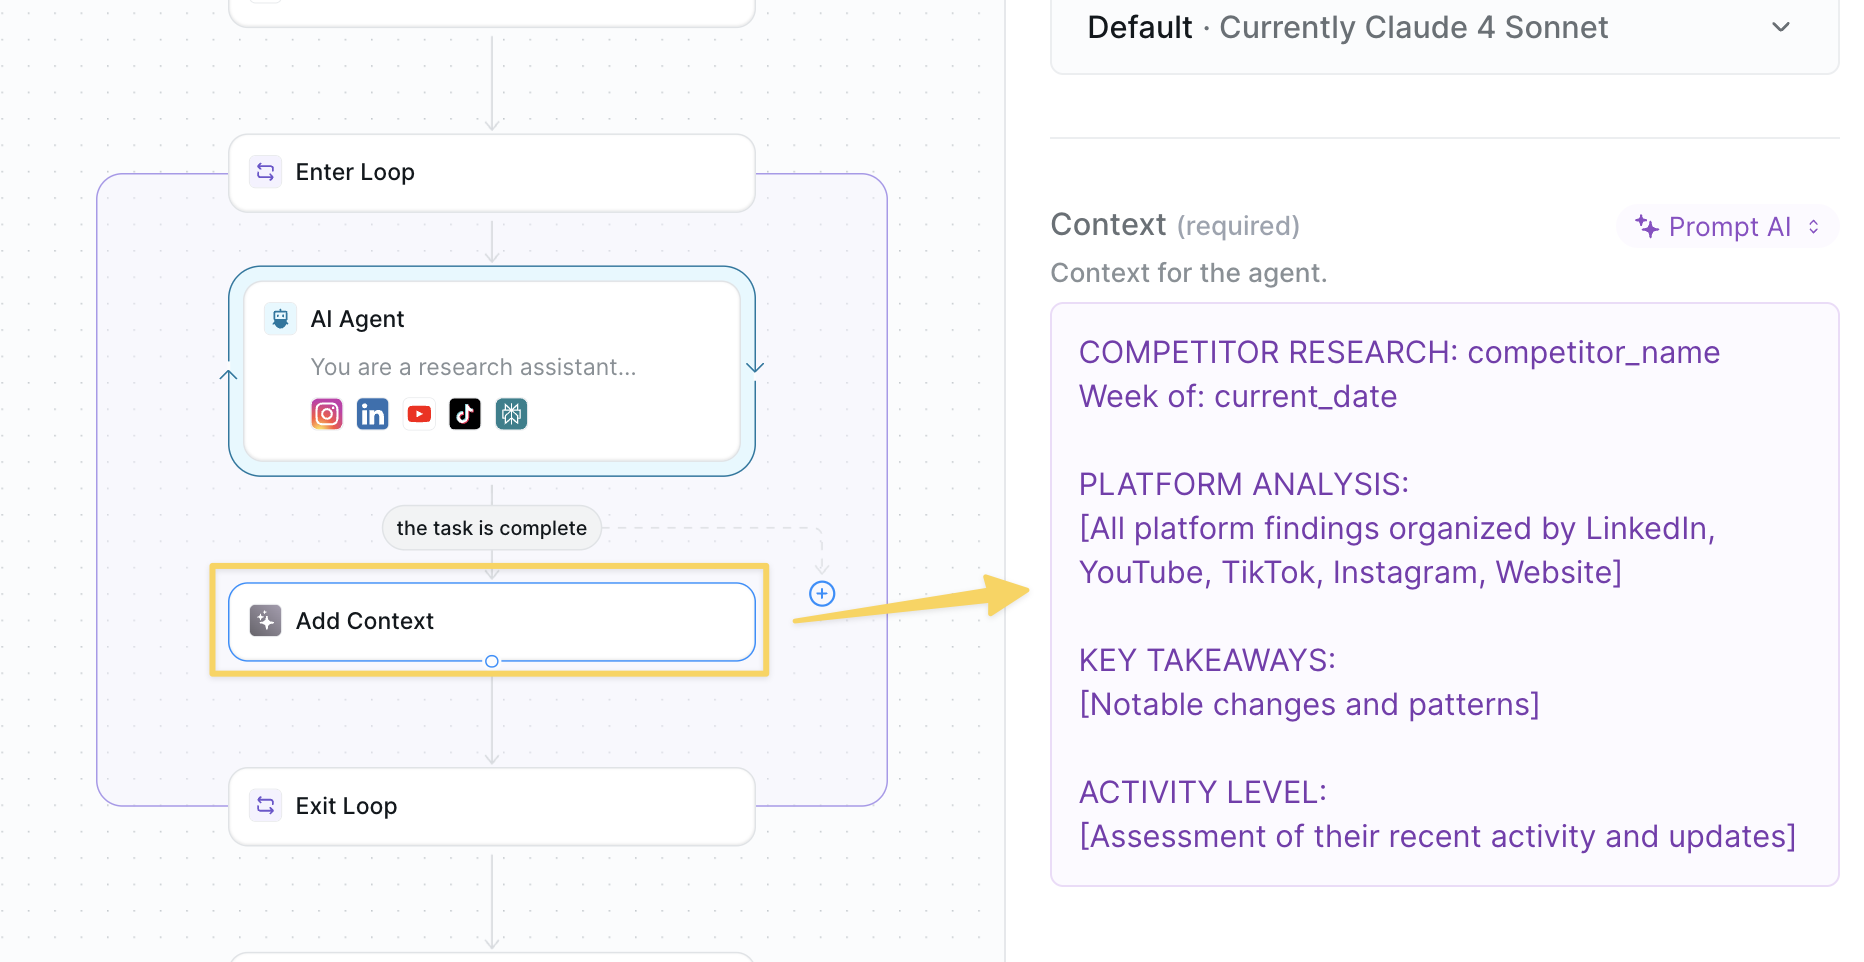 Use `Add Context` action with all discovered findings:
```
COMPETITOR RESEARCH: competitor_name
Week of: current_date
PLATFORM ANALYSIS:
[All platform findings organized by LinkedIn, YouTube, TikTok, Instagram, Website]
KEY TAKEAWAYS:
[Notable changes and patterns]
ACTIVITY LEVEL:
[Assessment of their recent activity and updates]
```
### Step 6: Exit Analysis Loop
Complete competitor analysis and prepare comprehensive compilation.
Use `Add Context` action with all discovered findings:
```
COMPETITOR RESEARCH: competitor_name
Week of: current_date
PLATFORM ANALYSIS:
[All platform findings organized by LinkedIn, YouTube, TikTok, Instagram, Website]
KEY TAKEAWAYS:
[Notable changes and patterns]
ACTIVITY LEVEL:
[Assessment of their recent activity and updates]
```
### Step 6: Exit Analysis Loop
Complete competitor analysis and prepare comprehensive compilation.
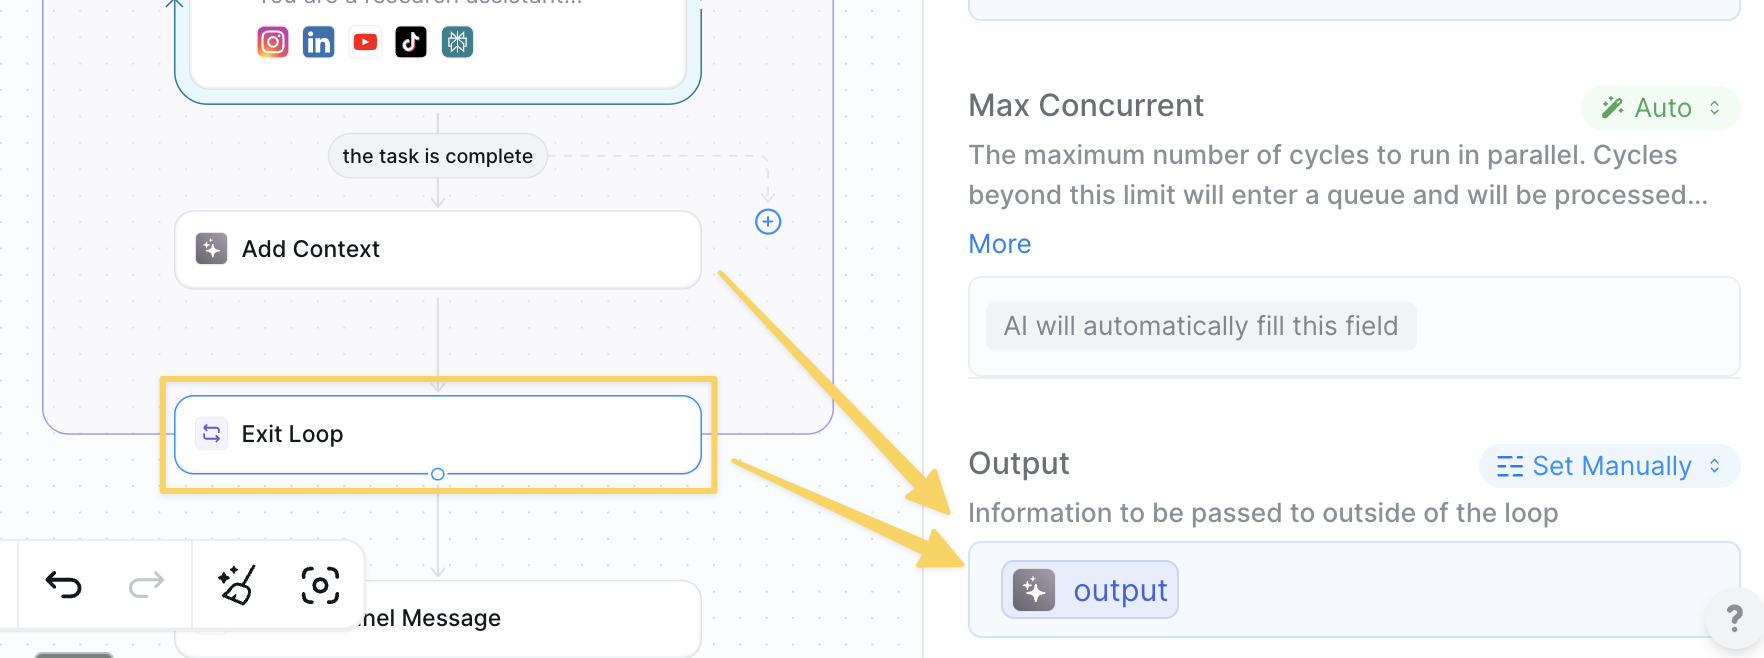 Add `Exit Loop` action and include the context variable to transfer all competitor research outside the loop for final report generation.
### Step 7: Compile Weekly Report
Use AI to analyze all collected research and create a comprehensive weekly summary.
Add `Exit Loop` action and include the context variable to transfer all competitor research outside the loop for final report generation.
### Step 7: Compile Weekly Report
Use AI to analyze all collected research and create a comprehensive weekly summary.
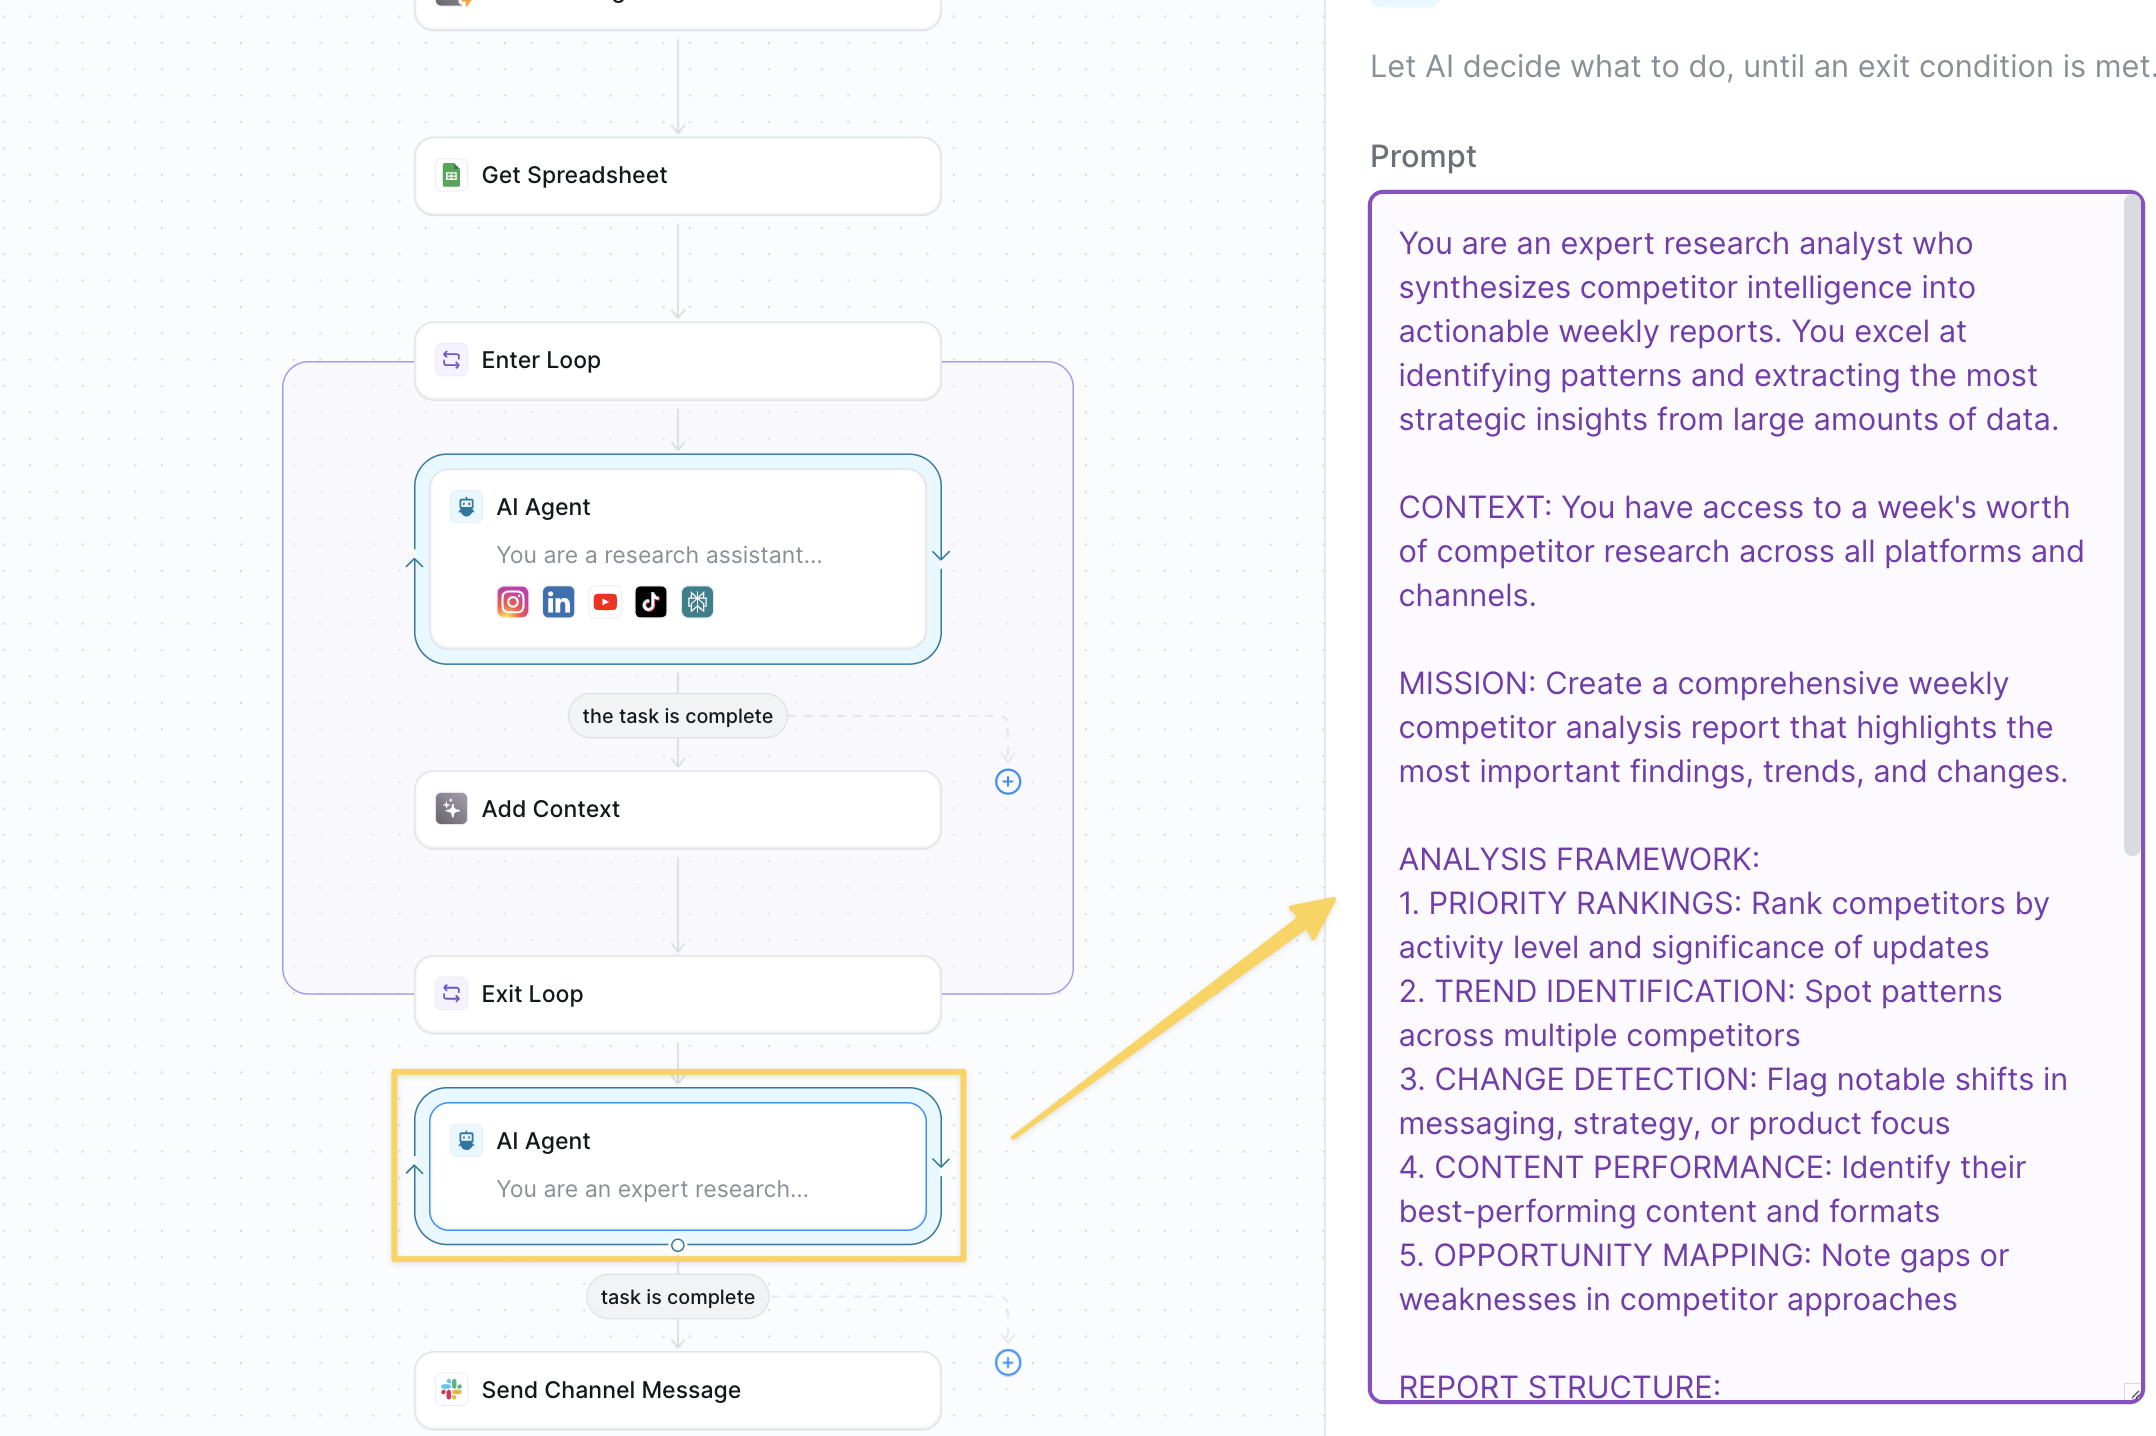 Add `AI Agent – Weekly Report Compiler`:
```
You are an expert research analyst who synthesizes competitor intelligence into actionable weekly reports. You excel at identifying patterns and extracting the most strategic insights from large amounts of data.
CONTEXT: You have access to a week's worth of competitor research across all platforms and channels.
MISSION: Create a comprehensive weekly competitor analysis report that highlights the most important findings, trends, and changes.
ANALYSIS FRAMEWORK:
1. PRIORITY RANKINGS: Rank competitors by activity level and significance of updates
2. TREND IDENTIFICATION: Spot patterns across multiple competitors
3. CHANGE DETECTION: Flag notable shifts in messaging, strategy, or product focus
4. CONTENT PERFORMANCE: Identify their best-performing content and formats
5. OPPORTUNITY MAPPING: Note gaps or weaknesses in competitor approaches
REPORT STRUCTURE:
- Executive Summary (2-3 key takeaways)
- Competitor-by-competitor breakdown with activity highlights
- Cross-competitor trends and patterns
- Notable launches, announcements, or strategy shifts
- Content performance insights
- Recommendations for our team
TONE: Professional but engaging. Focus on actionable insights over raw data dumps.
Synthesize all the context provided into a polished weekly intelligence report.
Keep your language concise but helpful. only include words that add value to the report — no fluff.
Your task is finished when you finish writing the report.
```
### Step 8: Send Weekly Report
Send the compiled competitor research to your team.
Add `AI Agent – Weekly Report Compiler`:
```
You are an expert research analyst who synthesizes competitor intelligence into actionable weekly reports. You excel at identifying patterns and extracting the most strategic insights from large amounts of data.
CONTEXT: You have access to a week's worth of competitor research across all platforms and channels.
MISSION: Create a comprehensive weekly competitor analysis report that highlights the most important findings, trends, and changes.
ANALYSIS FRAMEWORK:
1. PRIORITY RANKINGS: Rank competitors by activity level and significance of updates
2. TREND IDENTIFICATION: Spot patterns across multiple competitors
3. CHANGE DETECTION: Flag notable shifts in messaging, strategy, or product focus
4. CONTENT PERFORMANCE: Identify their best-performing content and formats
5. OPPORTUNITY MAPPING: Note gaps or weaknesses in competitor approaches
REPORT STRUCTURE:
- Executive Summary (2-3 key takeaways)
- Competitor-by-competitor breakdown with activity highlights
- Cross-competitor trends and patterns
- Notable launches, announcements, or strategy shifts
- Content performance insights
- Recommendations for our team
TONE: Professional but engaging. Focus on actionable insights over raw data dumps.
Synthesize all the context provided into a polished weekly intelligence report.
Keep your language concise but helpful. only include words that add value to the report — no fluff.
Your task is finished when you finish writing the report.
```
### Step 8: Send Weekly Report
Send the compiled competitor research to your team.
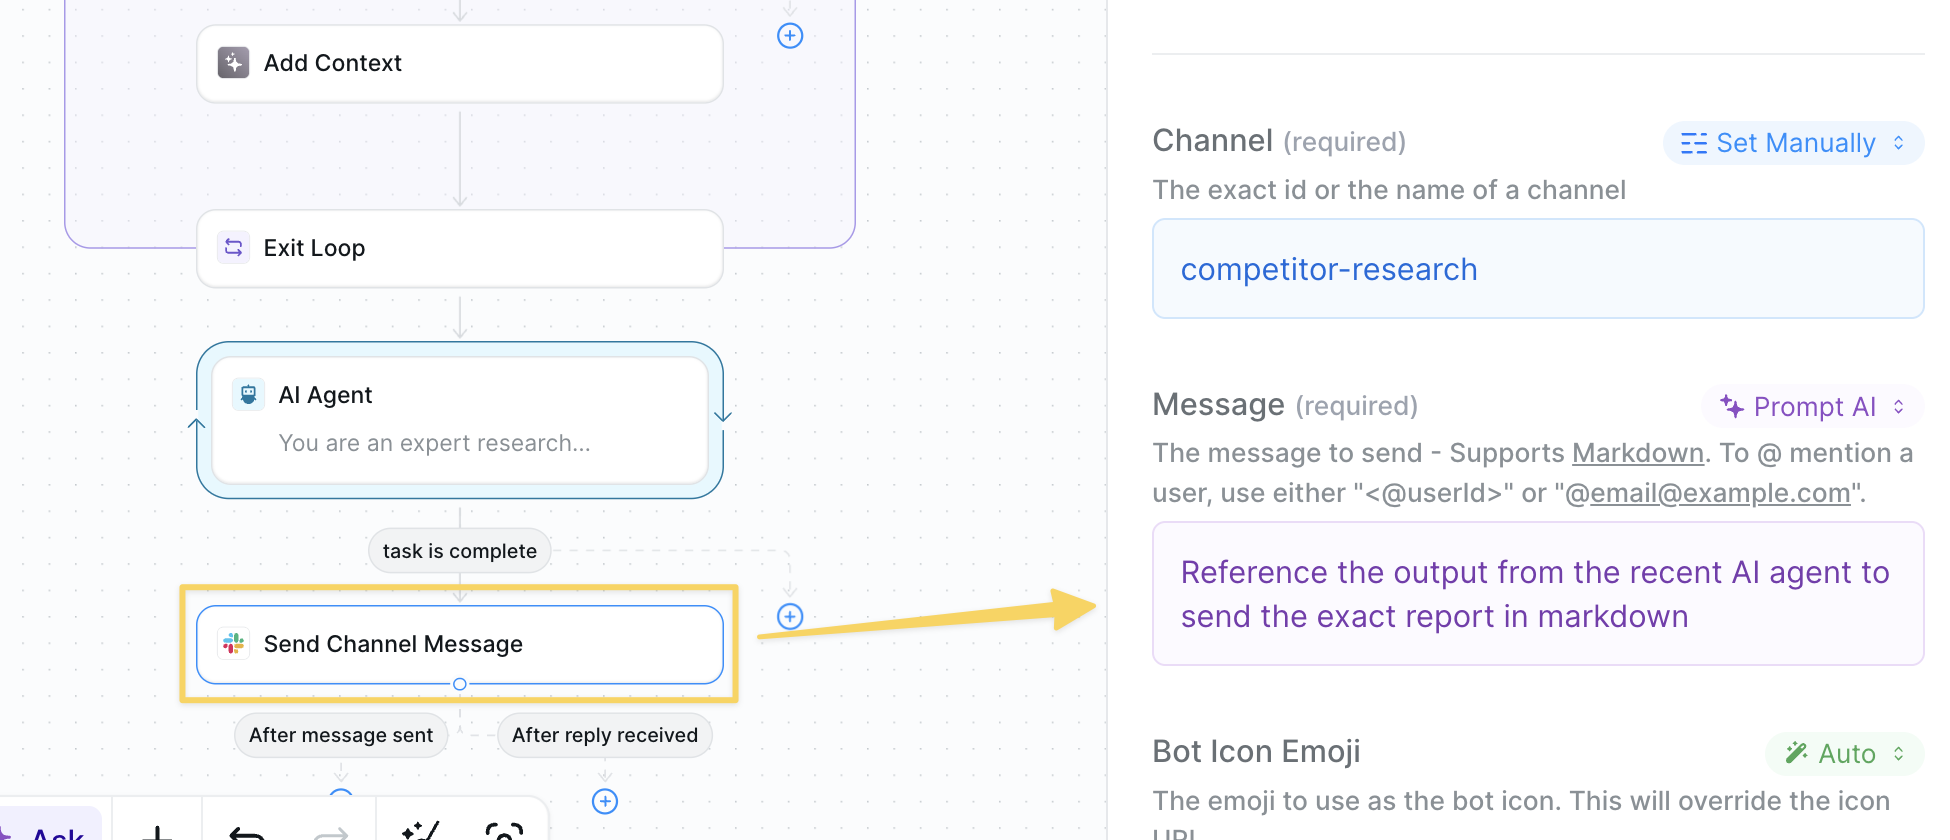 Use `Slack – Send Message` to your competitor tracking channel with the compiled report from Step 7:
```
Reference the output from the recent AI agent to send the exact report in markdown
```
## Advanced Features
| Feature | What it does |
| ---------------------------- | --------------------------------------------------------- |
| Sentiment Analysis | Track brand sentiment changes across platforms |
| Engagement Benchmarking | Compare competitor engagement rates to industry standards |
| Content Performance Tracking | Identify their highest-performing content formats |
| Executive Monitoring | Alert when key leaders join/leave competitors |
| Campaign Detection | Flag new marketing campaigns or messaging shifts |
## Best Practices
Look for significant updates like product releases or messaging changes rather than just engagement metrics.
Different platforms reveal different strategic insights.
Weekly snapshots build powerful trend analysis — save reports for quarterly strategic reviews.
Set up follow-up actions for high-priority opportunities or threats identified in reports.
## Next Steps
Test your responses to competitor moves
Build intelligent content analysis workflows
Store competitive intelligence data
Track analysis performance and accuracy
# Focus Group Simulator
Source: https://docs.lindy.ai/use-cases/marketing/focus-group-simulator
Create a virtual focus group with multiple personas to iterate on marketing copy until it resonates perfectly.
You can use the [focus group template](https://chat.lindy.ai/home/?templateId=68759ad92b44a92d1fef076a) to get started.
## Quick Overview
This Marketing Focus Group flow lets your agent:
* **Simulate** a focus group discussion with distinct personas
* **Iterate** on marketing copy based on participant feedback
* **Score** each version for excitement and confusion levels
* **Refine** automatically until all participants are satisfied
* **Deliver** the final, polished marketing message
## Setting Up Your Focus Group
### Step 1: Configure the Trigger
Use `Slack – Send Message` to your competitor tracking channel with the compiled report from Step 7:
```
Reference the output from the recent AI agent to send the exact report in markdown
```
## Advanced Features
| Feature | What it does |
| ---------------------------- | --------------------------------------------------------- |
| Sentiment Analysis | Track brand sentiment changes across platforms |
| Engagement Benchmarking | Compare competitor engagement rates to industry standards |
| Content Performance Tracking | Identify their highest-performing content formats |
| Executive Monitoring | Alert when key leaders join/leave competitors |
| Campaign Detection | Flag new marketing campaigns or messaging shifts |
## Best Practices
Look for significant updates like product releases or messaging changes rather than just engagement metrics.
Different platforms reveal different strategic insights.
Weekly snapshots build powerful trend analysis — save reports for quarterly strategic reviews.
Set up follow-up actions for high-priority opportunities or threats identified in reports.
## Next Steps
Test your responses to competitor moves
Build intelligent content analysis workflows
Store competitive intelligence data
Track analysis performance and accuracy
# Focus Group Simulator
Source: https://docs.lindy.ai/use-cases/marketing/focus-group-simulator
Create a virtual focus group with multiple personas to iterate on marketing copy until it resonates perfectly.
You can use the [focus group template](https://chat.lindy.ai/home/?templateId=68759ad92b44a92d1fef076a) to get started.
## Quick Overview
This Marketing Focus Group flow lets your agent:
* **Simulate** a focus group discussion with distinct personas
* **Iterate** on marketing copy based on participant feedback
* **Score** each version for excitement and confusion levels
* **Refine** automatically until all participants are satisfied
* **Deliver** the final, polished marketing message
## Setting Up Your Focus Group
### Step 1: Configure the Trigger
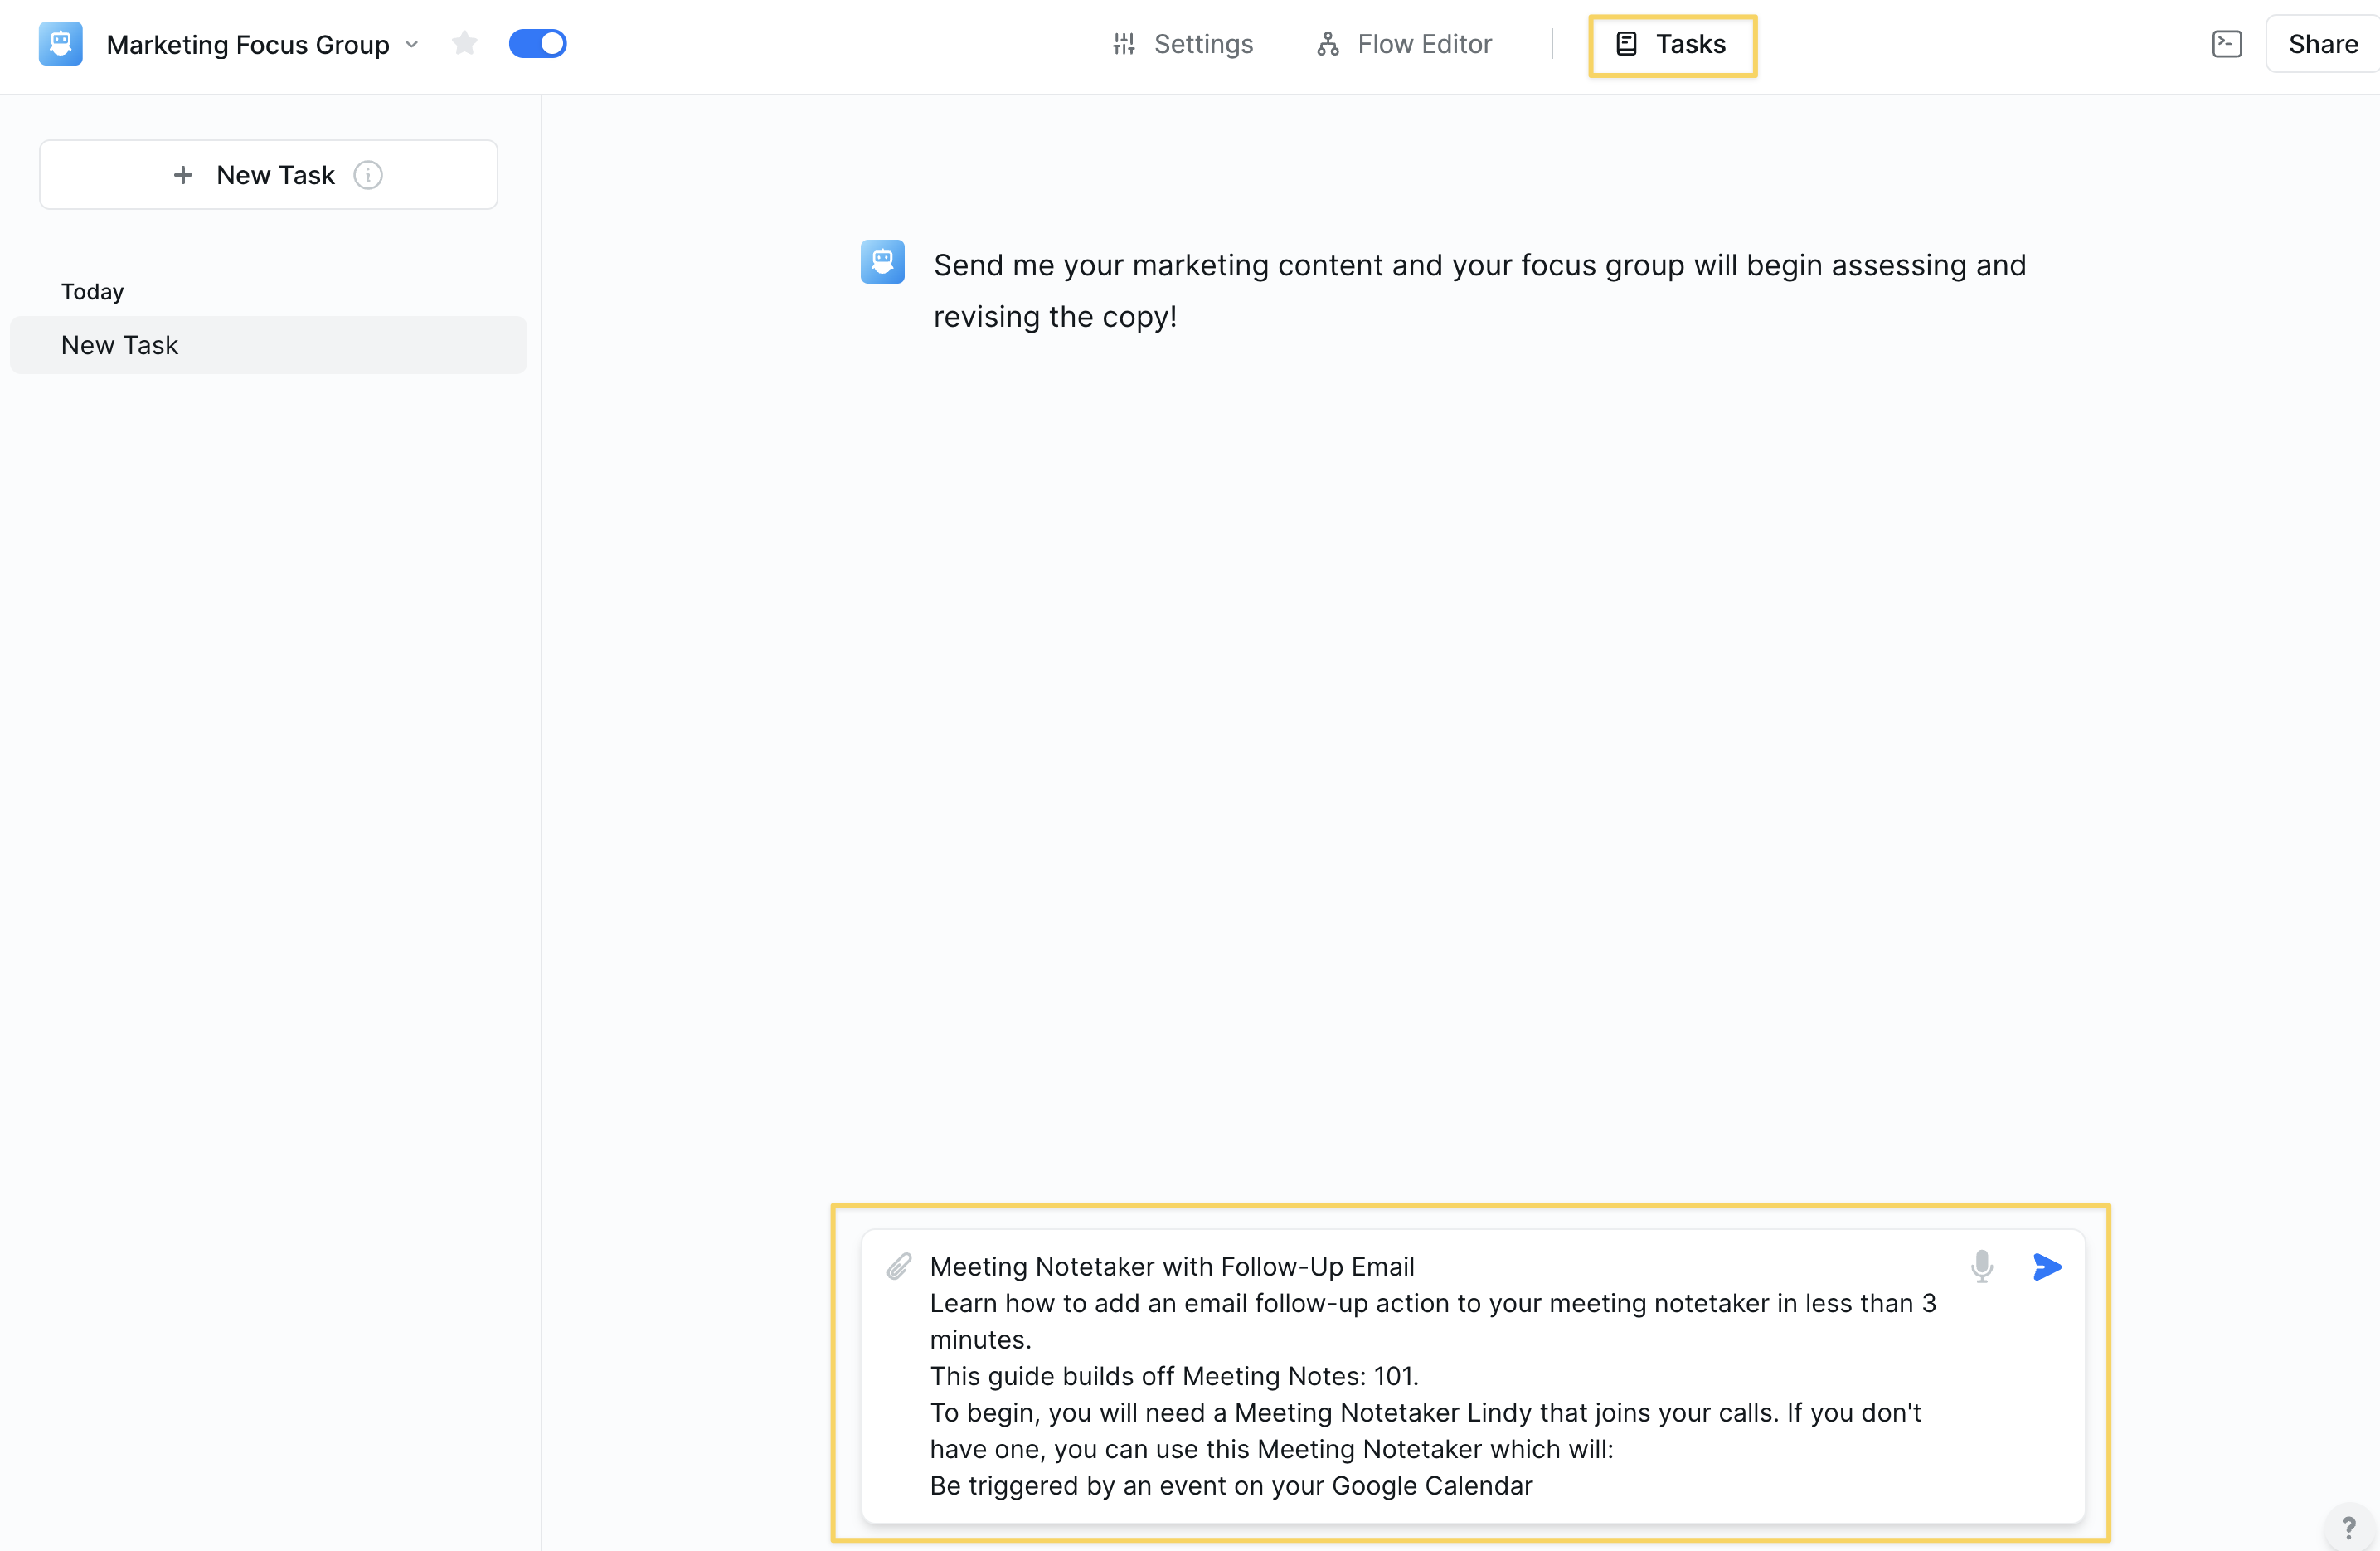 The workflow begins with a `Chat Message Received` trigger. This allows you to initiate the focus group by sending your initial marketing copy in the task view.
No additional configuration needed—just send your copy to get started.
### Step 2: Create Focus Group Participants
The workflow begins with a `Chat Message Received` trigger. This allows you to initiate the focus group by sending your initial marketing copy in the task view.
No additional configuration needed—just send your copy to get started.
### Step 2: Create Focus Group Participants
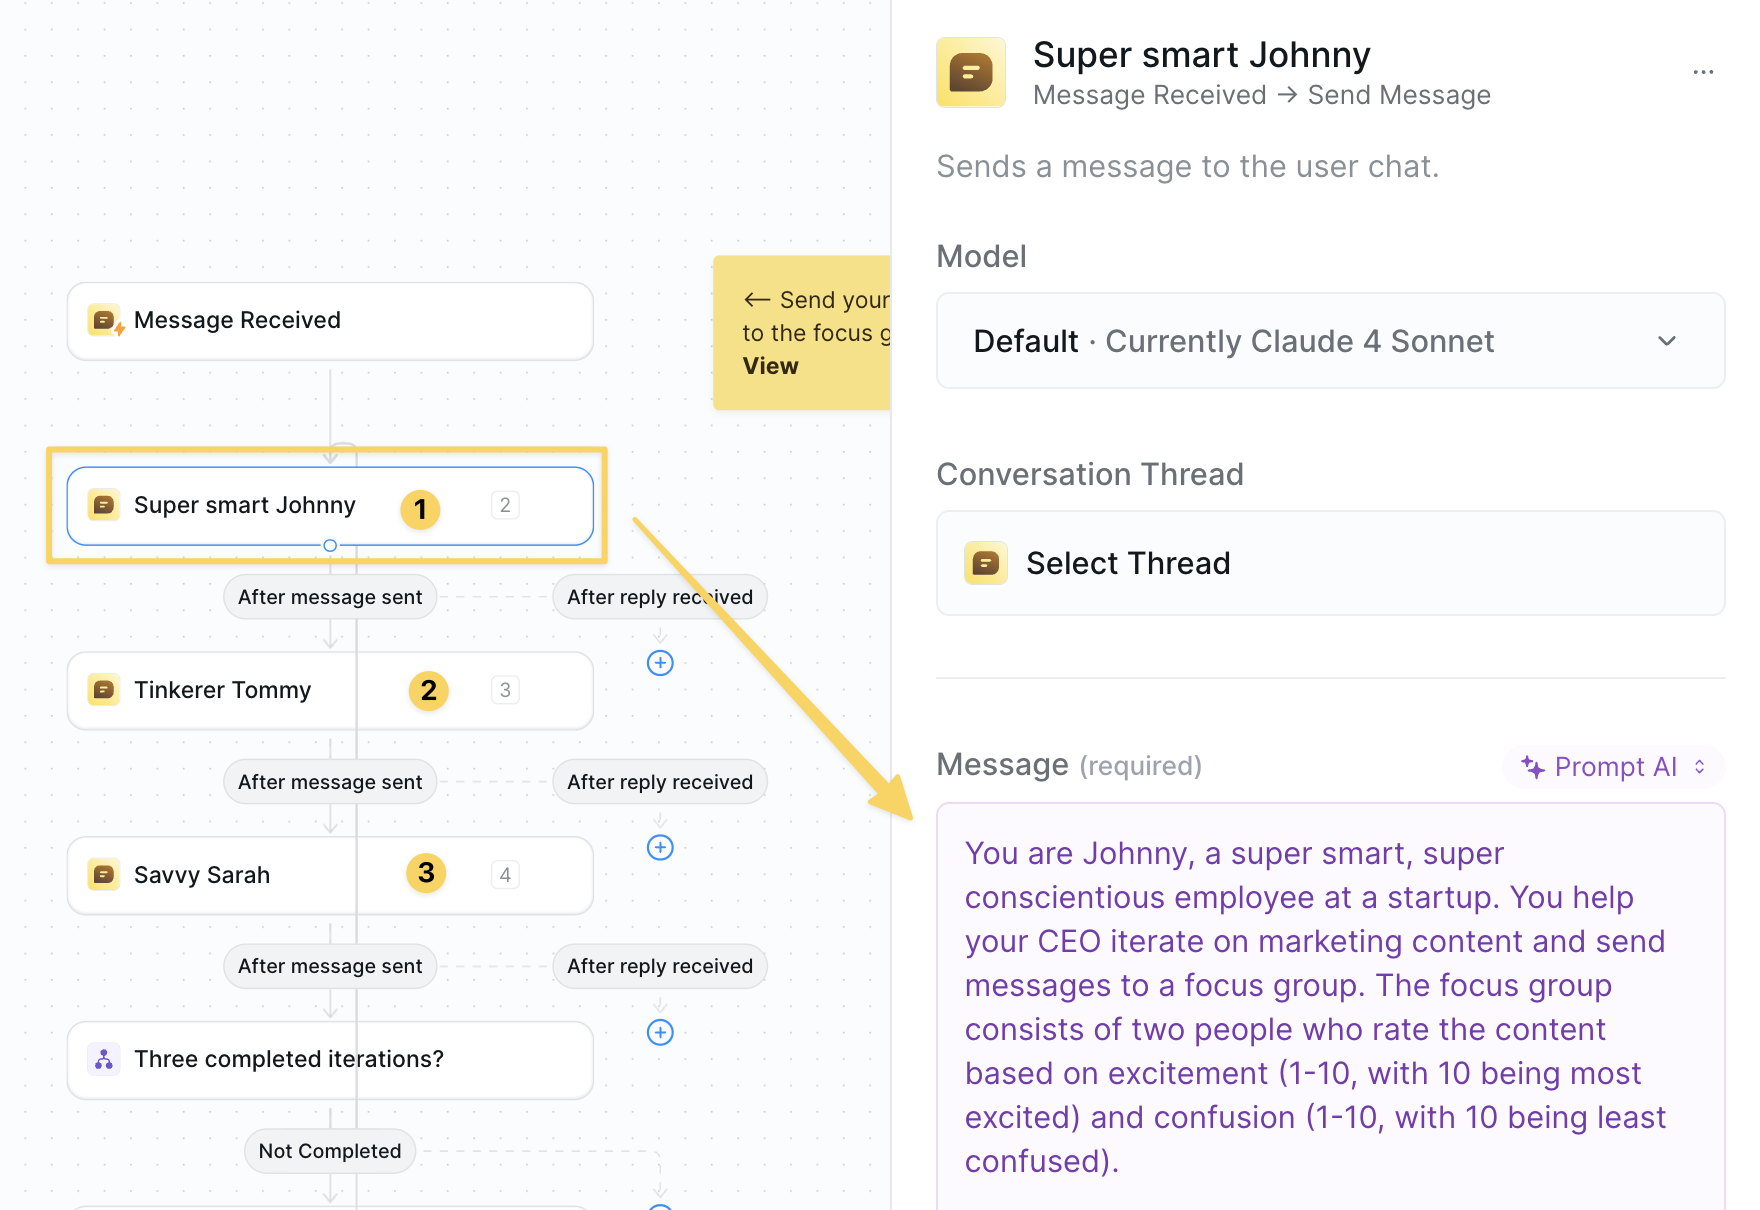 You'll see three `Chat Send Message` actions representing your focus group:
**1. Focus Group Manager (Johnny)**
* Role: Iterates on copy based on feedback
* Manages the refinement process
* Synthesizes participant input
**2. Participant #1 (Tinkerer Tommy)**
* Persona: 30-year-old solopreneur
* Perspective: Technical, detail-oriented
* Values: Clarity and innovation
**3. Participant #2 (Savvy Sarah)**
* Persona: 45-year-old marketing director
* Perspective: Strategic, brand-focused
* Values: ROI and market positioning
We recommend creating personas that match your ICP!
### Step 3: Set Up Feedback Ratings
You'll see three `Chat Send Message` actions representing your focus group:
**1. Focus Group Manager (Johnny)**
* Role: Iterates on copy based on feedback
* Manages the refinement process
* Synthesizes participant input
**2. Participant #1 (Tinkerer Tommy)**
* Persona: 30-year-old solopreneur
* Perspective: Technical, detail-oriented
* Values: Clarity and innovation
**3. Participant #2 (Savvy Sarah)**
* Persona: 45-year-old marketing director
* Perspective: Strategic, brand-focused
* Values: ROI and market positioning
We recommend creating personas that match your ICP!
### Step 3: Set Up Feedback Ratings
 Each participant provides two scores per iteration:
* **Excitement Score**: How compelling is the copy? (0-10)
* **Confusion Score**: How clear is the message? (0-10)
Target: 10/10 excitement, 2/10 or less confusion from ALL participants.
### Step 4: Configure Iteration Logic
Each participant provides two scores per iteration:
* **Excitement Score**: How compelling is the copy? (0-10)
* **Confusion Score**: How clear is the message? (0-10)
Target: 10/10 excitement, 2/10 or less confusion from ALL participants.
### Step 4: Configure Iteration Logic
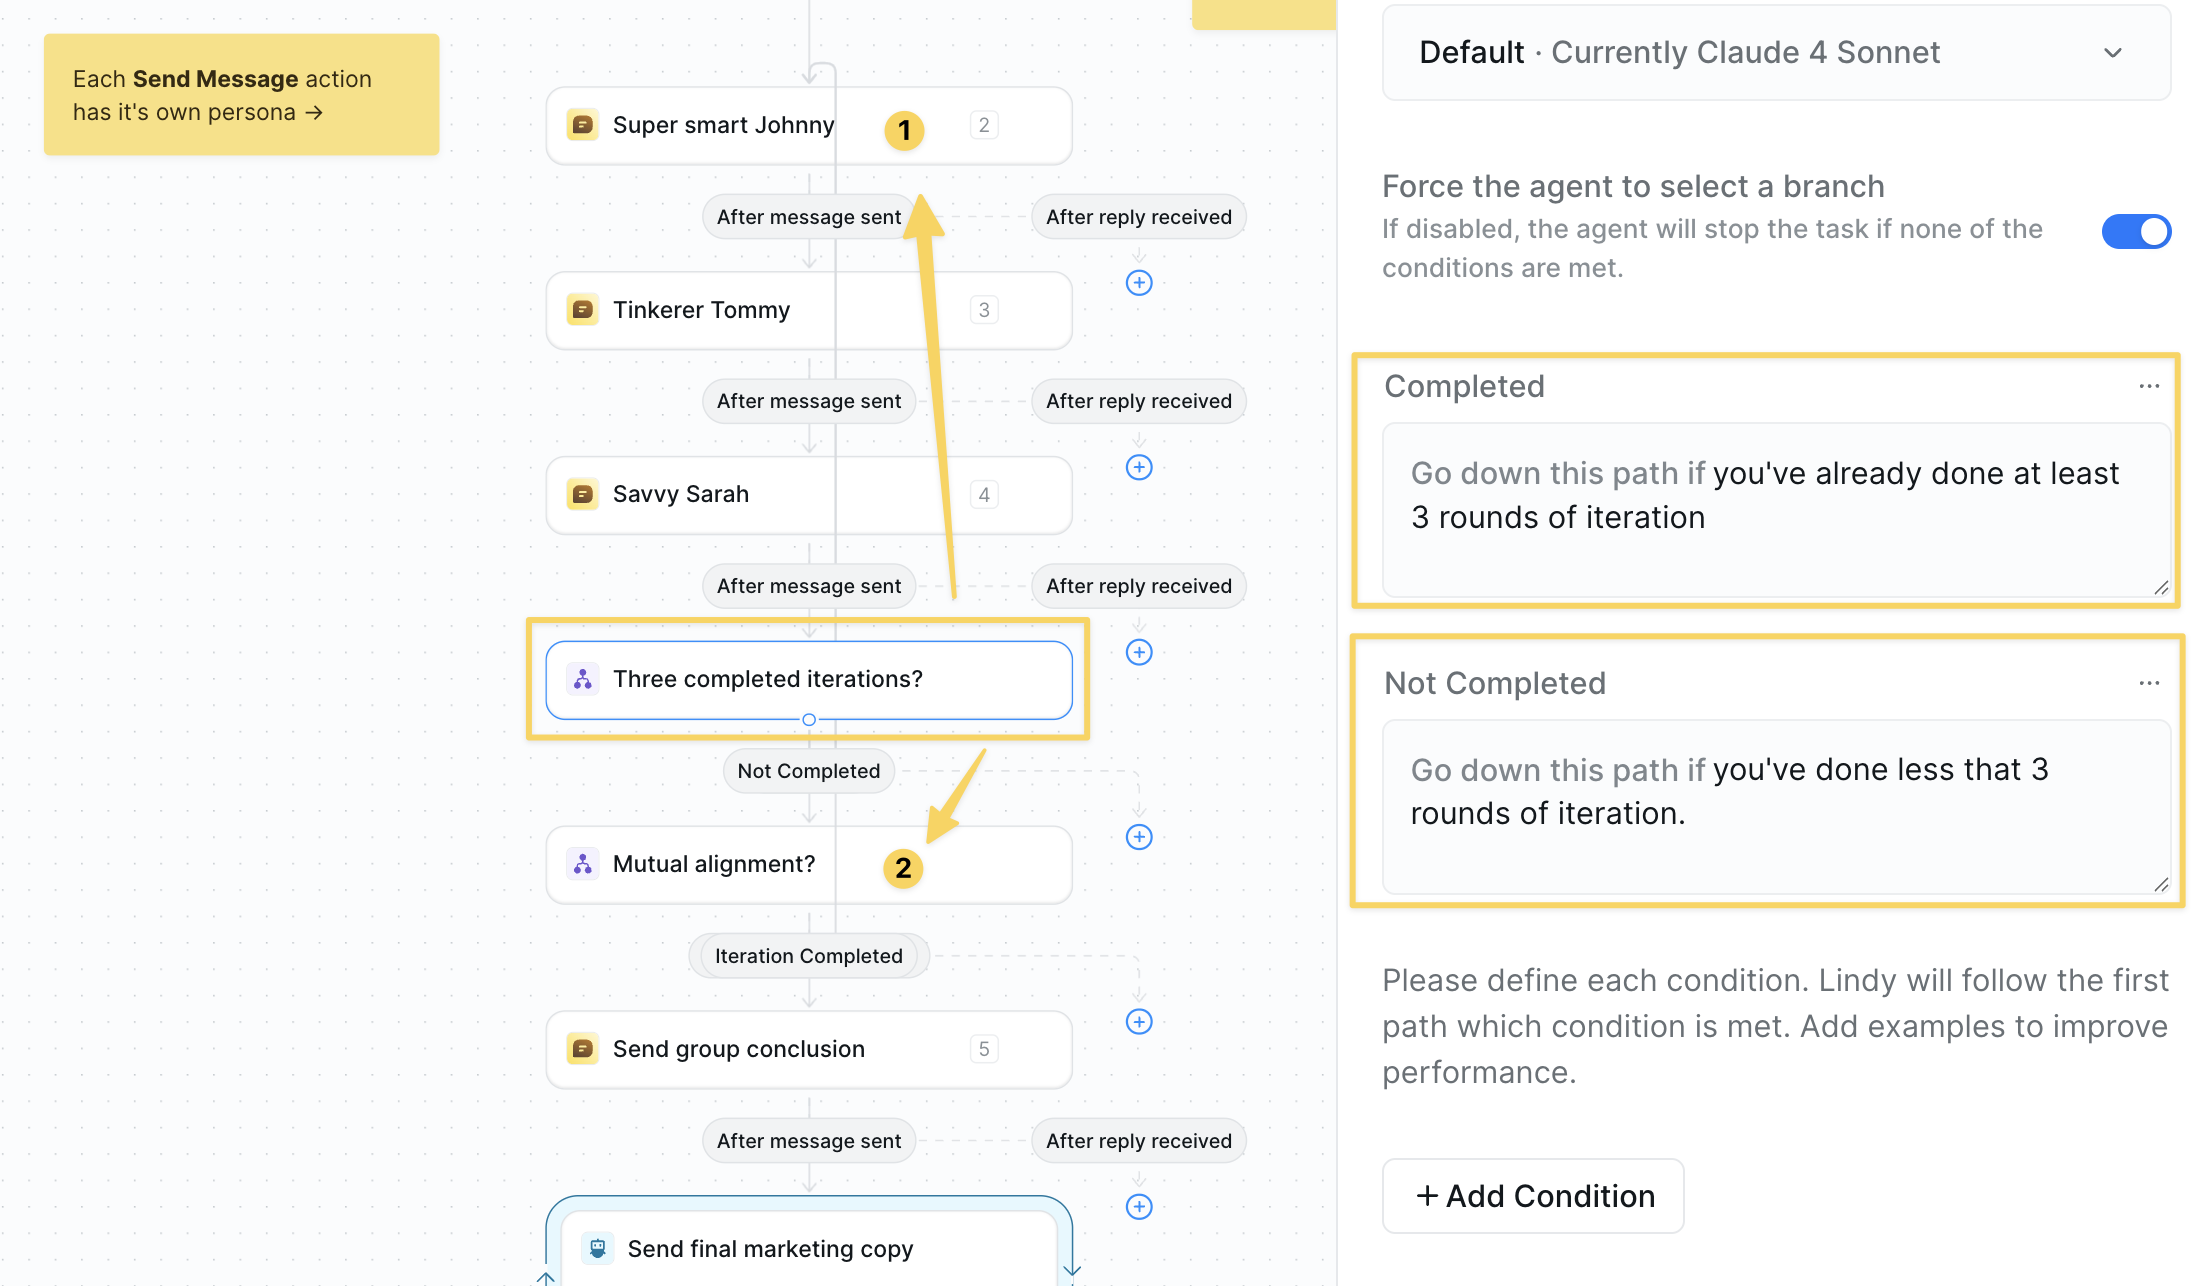 Add a `Condition` step that ensures:
* Minimum 3 rounds of iteration
* Continue if less than 3 rounds completed
* Proceed to quality check after 3+ rounds
This guarantees thorough refinement while preventing endless loops.
### Step 5: Quality Check Conditions
Add a `Condition` step that ensures:
* Minimum 3 rounds of iteration
* Continue if less than 3 rounds completed
* Proceed to quality check after 3+ rounds
This guarantees thorough refinement while preventing endless loops.
### Step 5: Quality Check Conditions
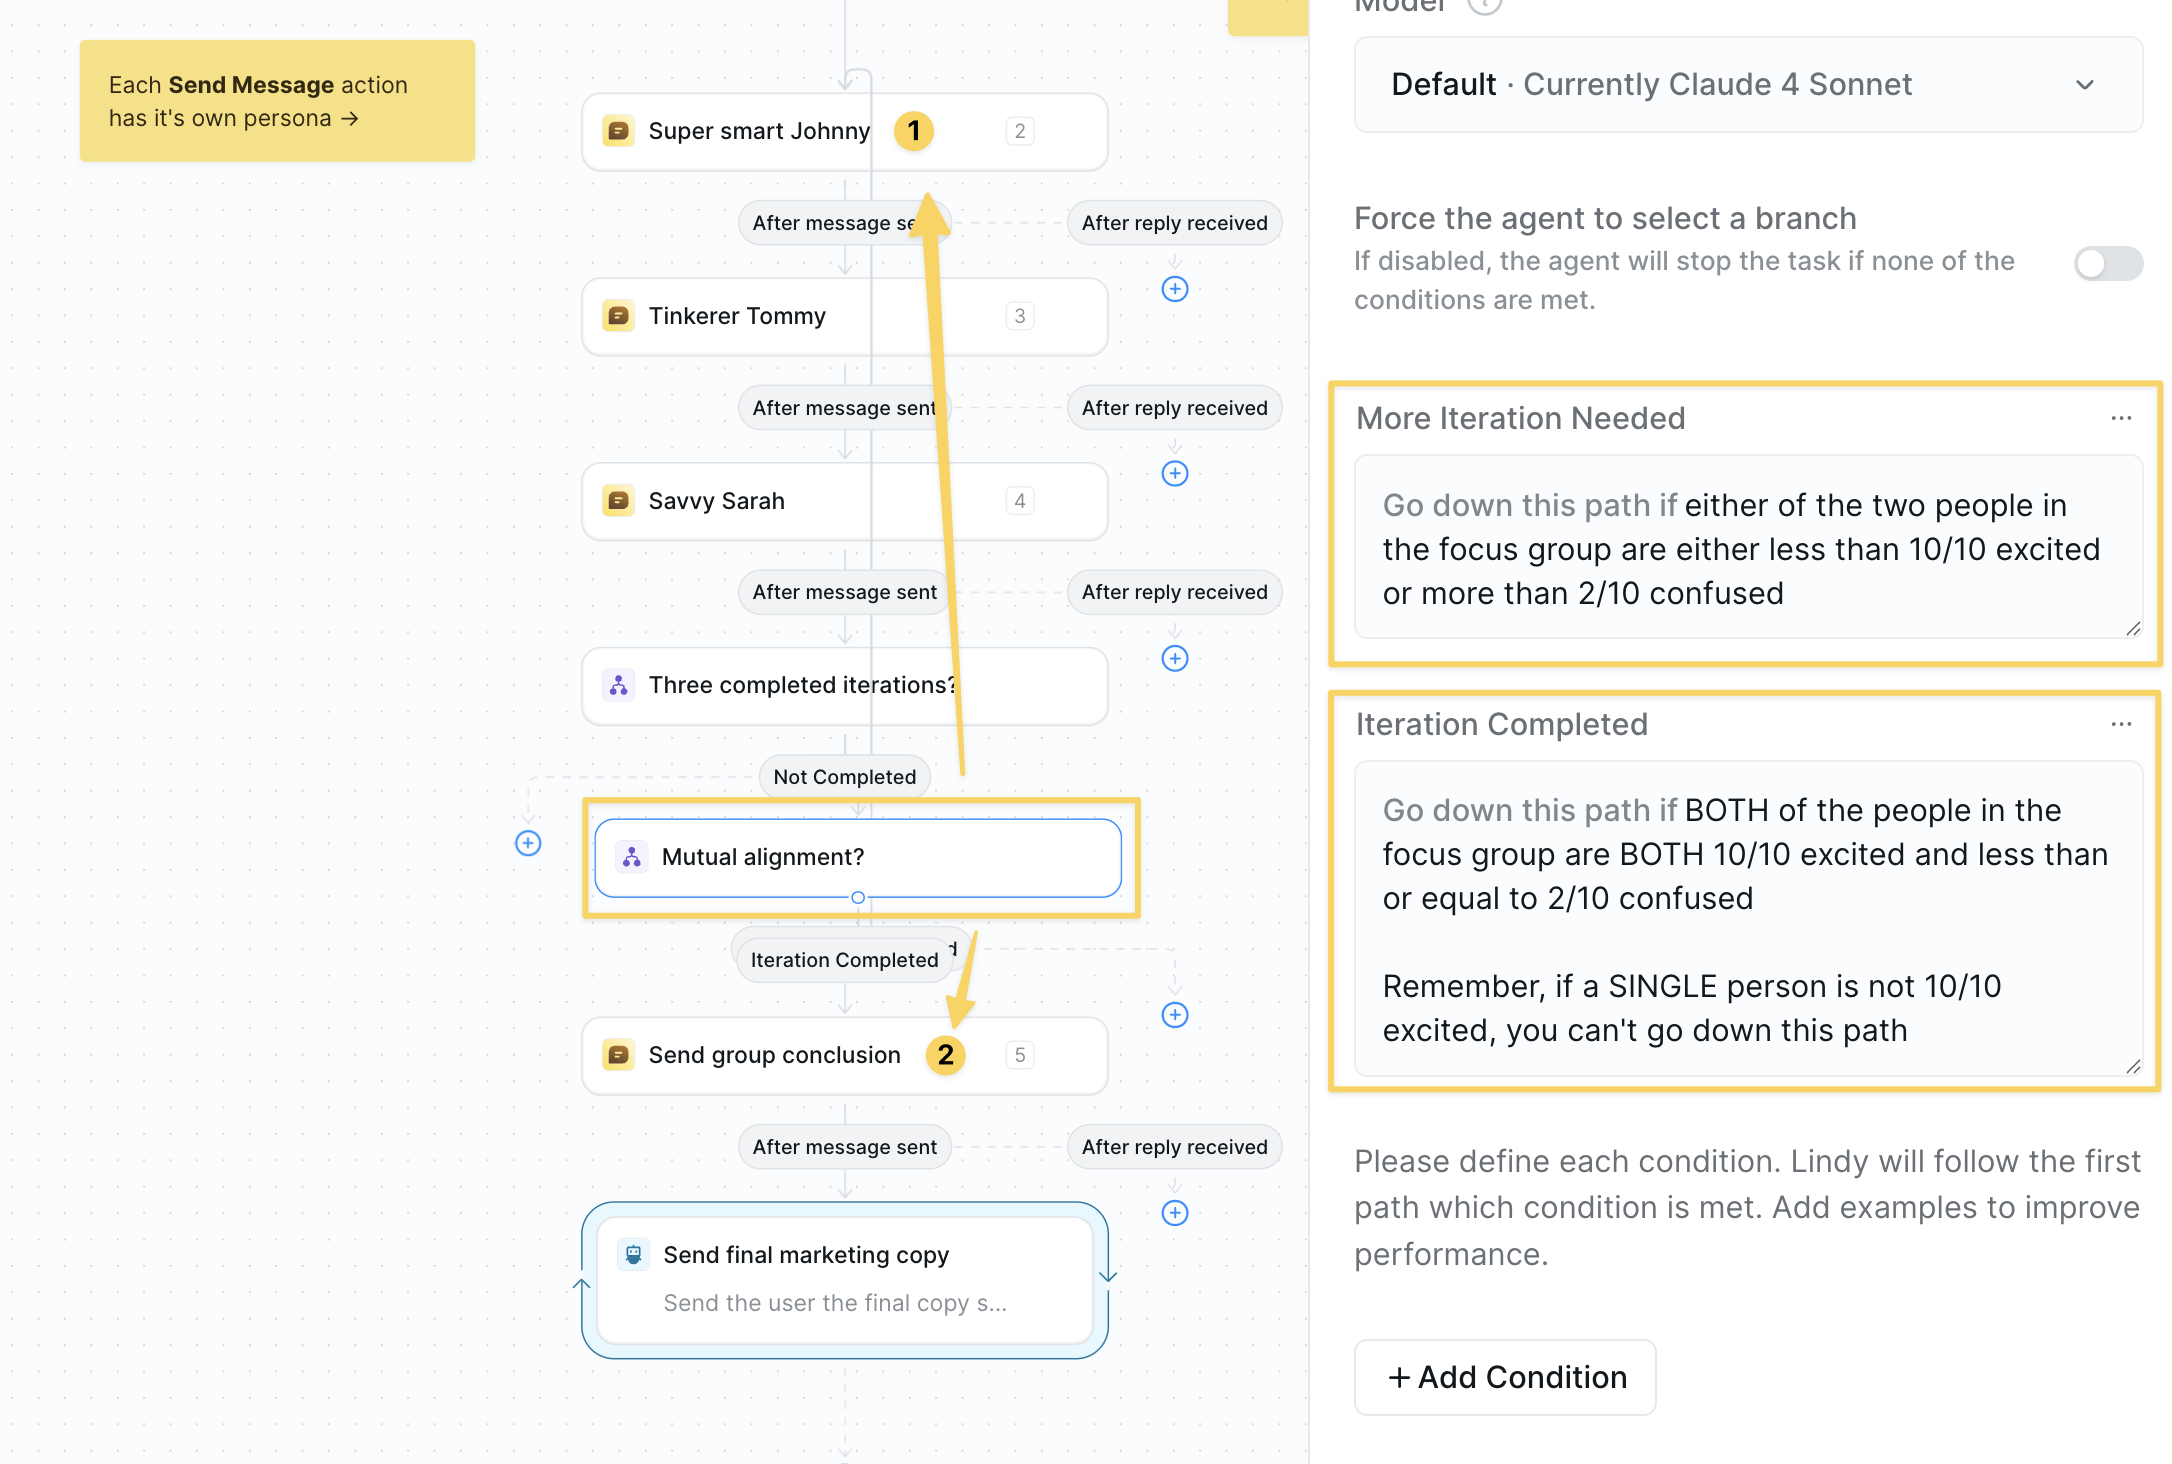 Add another `Condition` to check if:
* ALL participants rate 10/10 excitement
* ALL participants rate 2/10 or less confusion
If criteria not met → continue iterating
If criteria met → proceed to final delivery
### Step 6: Victory Message & Final Copy
Add another `Condition` to check if:
* ALL participants rate 10/10 excitement
* ALL participants rate 2/10 or less confusion
If criteria not met → continue iterating
If criteria met → proceed to final delivery
### Step 6: Victory Message & Final Copy
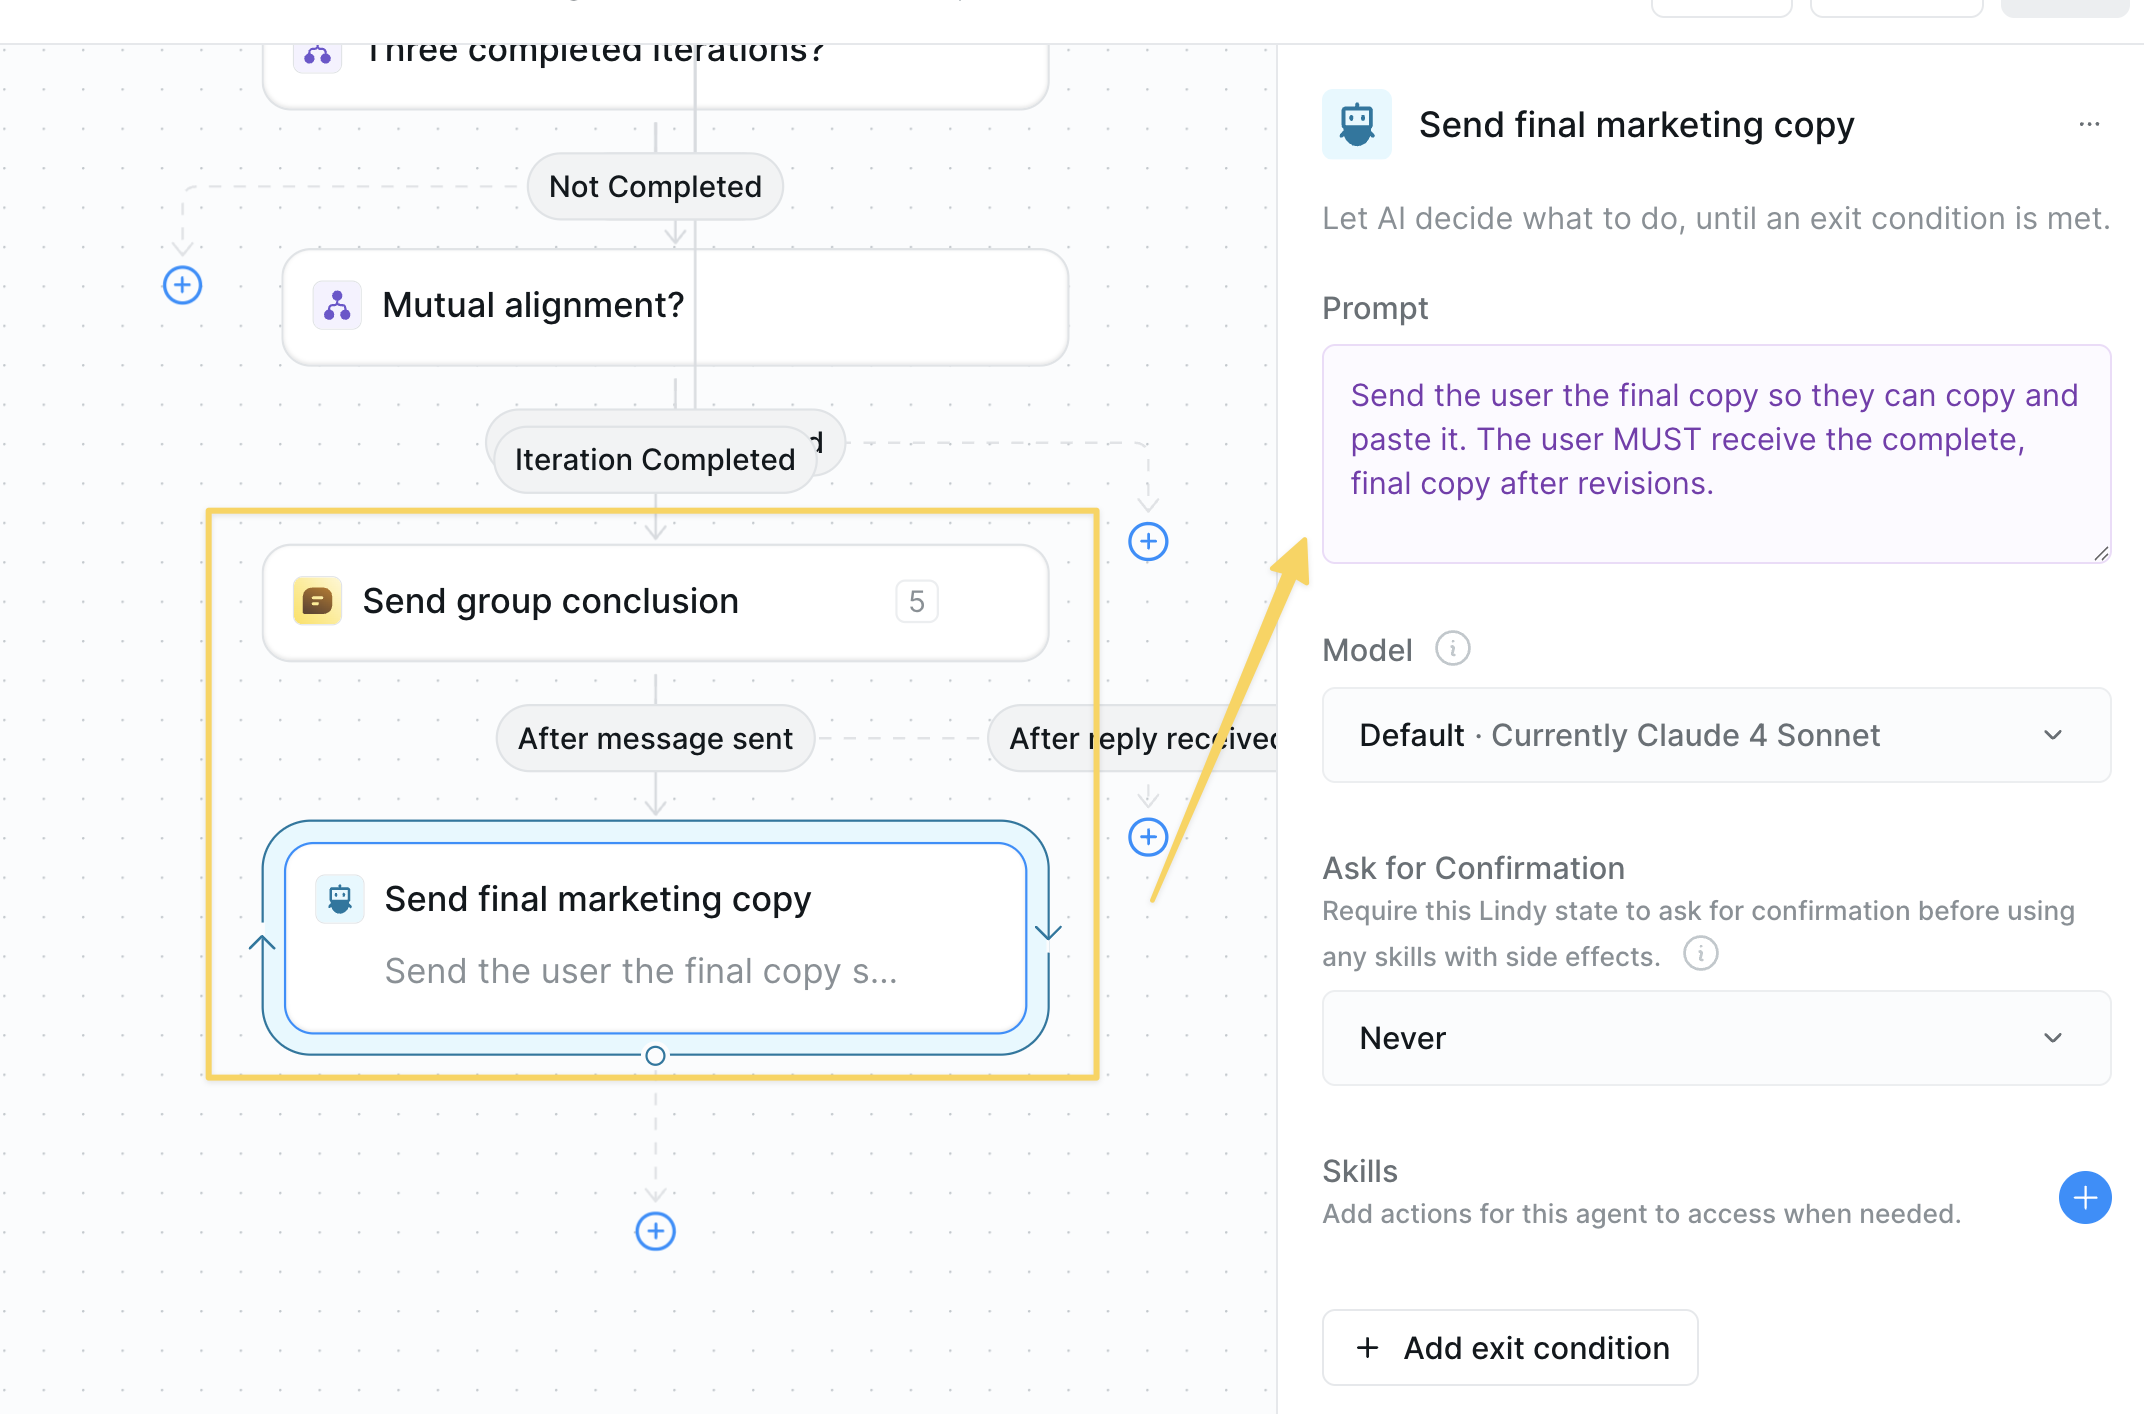 1. `Chat Send Message` with victory confirmation:
```
Victory! Explain the final positioning and summarize the whole conversation — what worked, what didn't. Be concise, no yapping.
```
2. `AI Agent` to deliver final copy:
```
Send the user the final copy so they can copy and paste it. The user MUST receive the complete, final copy after revisions.
```
## Advanced Customizations
| Feature | What it does |
| ------------------------- | --------------------------------------------------------- |
| Additional Personas | Add more participants for broader perspectives |
| Industry-Specific Roles | Customize personas to match your target audience |
| Multi-Language Testing | Create personas that evaluate copy in different languages |
| Channel-Specific Feedback | Test how copy performs for email vs. social vs. web |
| Compliance Checker | Add a legal/compliance persona for regulated industries |
## Best Practices
Make each participant distinct with specific backgrounds, pain points, and evaluation criteria.
Don't over-polish before testing—let the focus group refine from an early draft.
Adjust excitement/confusion thresholds based on your brand and audience. You can also lower the threshold to decrease the number of iterations performed.
Archive successful copy patterns in your Knowledge Base for future reference.
## Next Steps
Analyze competitor messaging strategies
Build sophisticated persona simulation workflows
Write better prompts for realistic personas
Test your focus group setups
# Document Processing
Source: https://docs.lindy.ai/use-cases/operations/document-processing
Automatically process any document type, extract key data, and organize information across your systems.
## Quick Overview
Set up a central document processing hub that:
* **Receives** documents via a dedicated email inbox
* **Identifies** document types automatically (invoices, contracts, forms, etc.)
* **Extracts** key information based on document type
* **Logs** data to organized spreadsheets for easy access
* **Notifies** relevant teams when action is needed
Build it once and process hundreds of documents daily without manual data entry.
You can use the [document processing template](https://chat.lindy.ai/home/?templateId=6875d1d5423a619119d0d417) to get started.
## Setting Up Your Document Hub
### Step 1: Create Your Document Inbox
Set up a dedicated email address to serve as the central entry point for all documents requiring processing.
1. `Chat Send Message` with victory confirmation:
```
Victory! Explain the final positioning and summarize the whole conversation — what worked, what didn't. Be concise, no yapping.
```
2. `AI Agent` to deliver final copy:
```
Send the user the final copy so they can copy and paste it. The user MUST receive the complete, final copy after revisions.
```
## Advanced Customizations
| Feature | What it does |
| ------------------------- | --------------------------------------------------------- |
| Additional Personas | Add more participants for broader perspectives |
| Industry-Specific Roles | Customize personas to match your target audience |
| Multi-Language Testing | Create personas that evaluate copy in different languages |
| Channel-Specific Feedback | Test how copy performs for email vs. social vs. web |
| Compliance Checker | Add a legal/compliance persona for regulated industries |
## Best Practices
Make each participant distinct with specific backgrounds, pain points, and evaluation criteria.
Don't over-polish before testing—let the focus group refine from an early draft.
Adjust excitement/confusion thresholds based on your brand and audience. You can also lower the threshold to decrease the number of iterations performed.
Archive successful copy patterns in your Knowledge Base for future reference.
## Next Steps
Analyze competitor messaging strategies
Build sophisticated persona simulation workflows
Write better prompts for realistic personas
Test your focus group setups
# Document Processing
Source: https://docs.lindy.ai/use-cases/operations/document-processing
Automatically process any document type, extract key data, and organize information across your systems.
## Quick Overview
Set up a central document processing hub that:
* **Receives** documents via a dedicated email inbox
* **Identifies** document types automatically (invoices, contracts, forms, etc.)
* **Extracts** key information based on document type
* **Logs** data to organized spreadsheets for easy access
* **Notifies** relevant teams when action is needed
Build it once and process hundreds of documents daily without manual data entry.
You can use the [document processing template](https://chat.lindy.ai/home/?templateId=6875d1d5423a619119d0d417) to get started.
## Setting Up Your Document Hub
### Step 1: Create Your Document Inbox
Set up a dedicated email address to serve as the central entry point for all documents requiring processing.
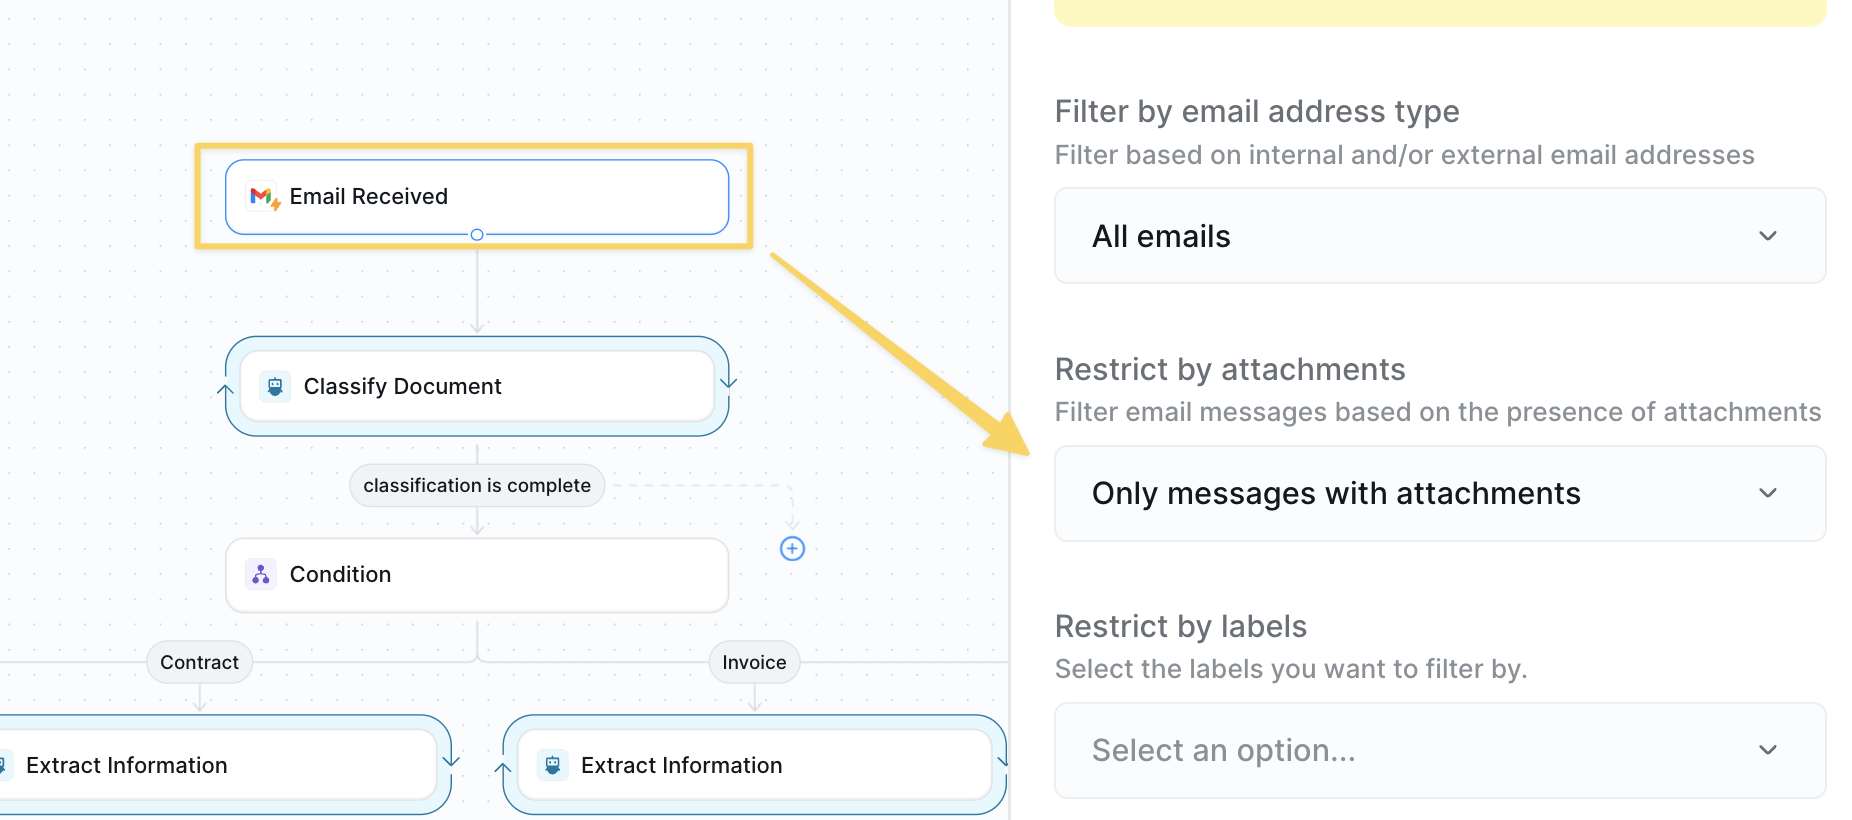 1. Set up a dedicated Gmail account (e.g., [docs@yourcompany.com](mailto:docs@yourcompany.com))
2. Configure `Gmail – Email Received` as your trigger
3. Add filter: "Has attachment" = Yes
4. Share this email with teams who need document processing
### Step 2: Identify Document Type
Automatically classify incoming documents to determine the appropriate processing workflow for each type.
1. Set up a dedicated Gmail account (e.g., [docs@yourcompany.com](mailto:docs@yourcompany.com))
2. Configure `Gmail – Email Received` as your trigger
3. Add filter: "Has attachment" = Yes
4. Share this email with teams who need document processing
### Step 2: Identify Document Type
Automatically classify incoming documents to determine the appropriate processing workflow for each type.
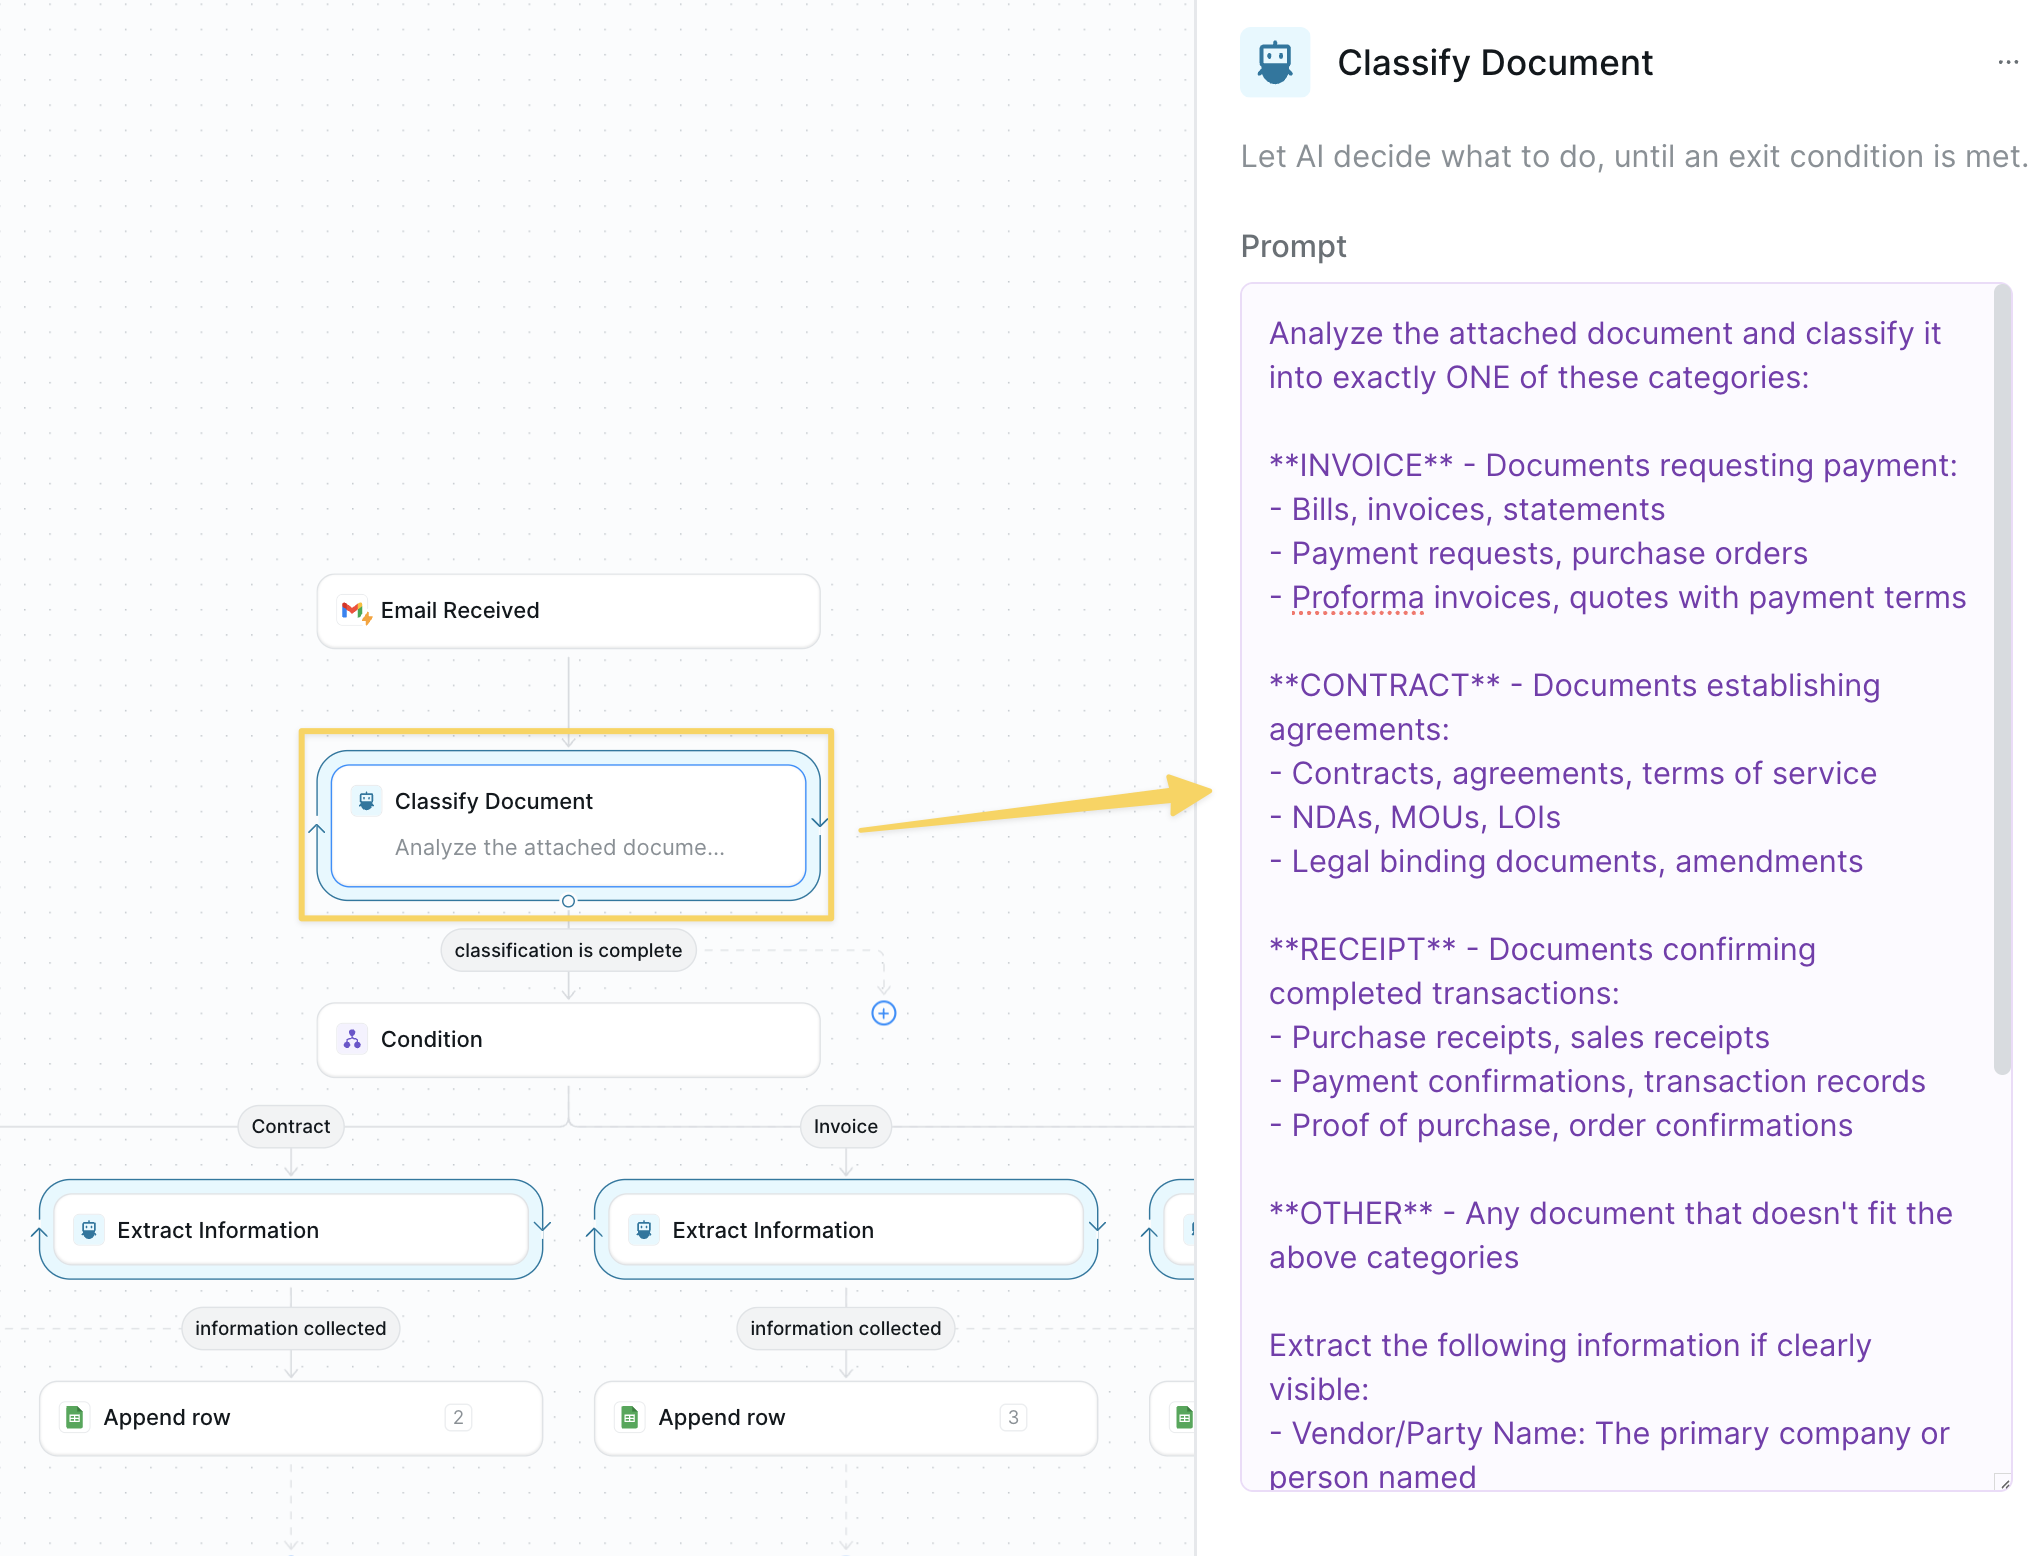 Add `AI Agent` with prompt:
```
Analyze the attached document and classify it into exactly ONE of these categories:
**INVOICE** — Documents requesting payment:
- Bills, invoices, statements
- Payment requests, purchase orders
- Proforma invoices, quotes with payment terms
**CONTRACT** — Documents establishing agreements:
- Contracts, agreements, terms of service
- NDAs, MOUs, LOIs
- Legal binding documents, amendments
**RECEIPT** — Documents confirming completed transactions:
- Purchase receipts, sales receipts
- Payment confirmations, transaction records
- Proof of purchase, order confirmations
**OTHER** — Any document that doesn't fit the above categories
Extract the following information if clearly visible:
- Vendor/Party Name: The primary company or person named
- Document Date: The main date on the document
Return your classification in this exact JSON format and nothing else:
{"type": "[INVOICE/CONTRACT/RECEIPT/OTHER]", "party": "[name or null]", "date": "[YYYY-MM-DD or null]"}
Complete the classification immediately upon document review. Do not provide explanations or additional analysis.
```
The AI Agent automatically has attachments from email in context.
### Step 3: Route to Correct Document Processing
Use conditional routing based on the document classification to send each document type down the appropriate processing path.
Add `AI Agent` with prompt:
```
Analyze the attached document and classify it into exactly ONE of these categories:
**INVOICE** — Documents requesting payment:
- Bills, invoices, statements
- Payment requests, purchase orders
- Proforma invoices, quotes with payment terms
**CONTRACT** — Documents establishing agreements:
- Contracts, agreements, terms of service
- NDAs, MOUs, LOIs
- Legal binding documents, amendments
**RECEIPT** — Documents confirming completed transactions:
- Purchase receipts, sales receipts
- Payment confirmations, transaction records
- Proof of purchase, order confirmations
**OTHER** — Any document that doesn't fit the above categories
Extract the following information if clearly visible:
- Vendor/Party Name: The primary company or person named
- Document Date: The main date on the document
Return your classification in this exact JSON format and nothing else:
{"type": "[INVOICE/CONTRACT/RECEIPT/OTHER]", "party": "[name or null]", "date": "[YYYY-MM-DD or null]"}
Complete the classification immediately upon document review. Do not provide explanations or additional analysis.
```
The AI Agent automatically has attachments from email in context.
### Step 3: Route to Correct Document Processing
Use conditional routing based on the document classification to send each document type down the appropriate processing path.
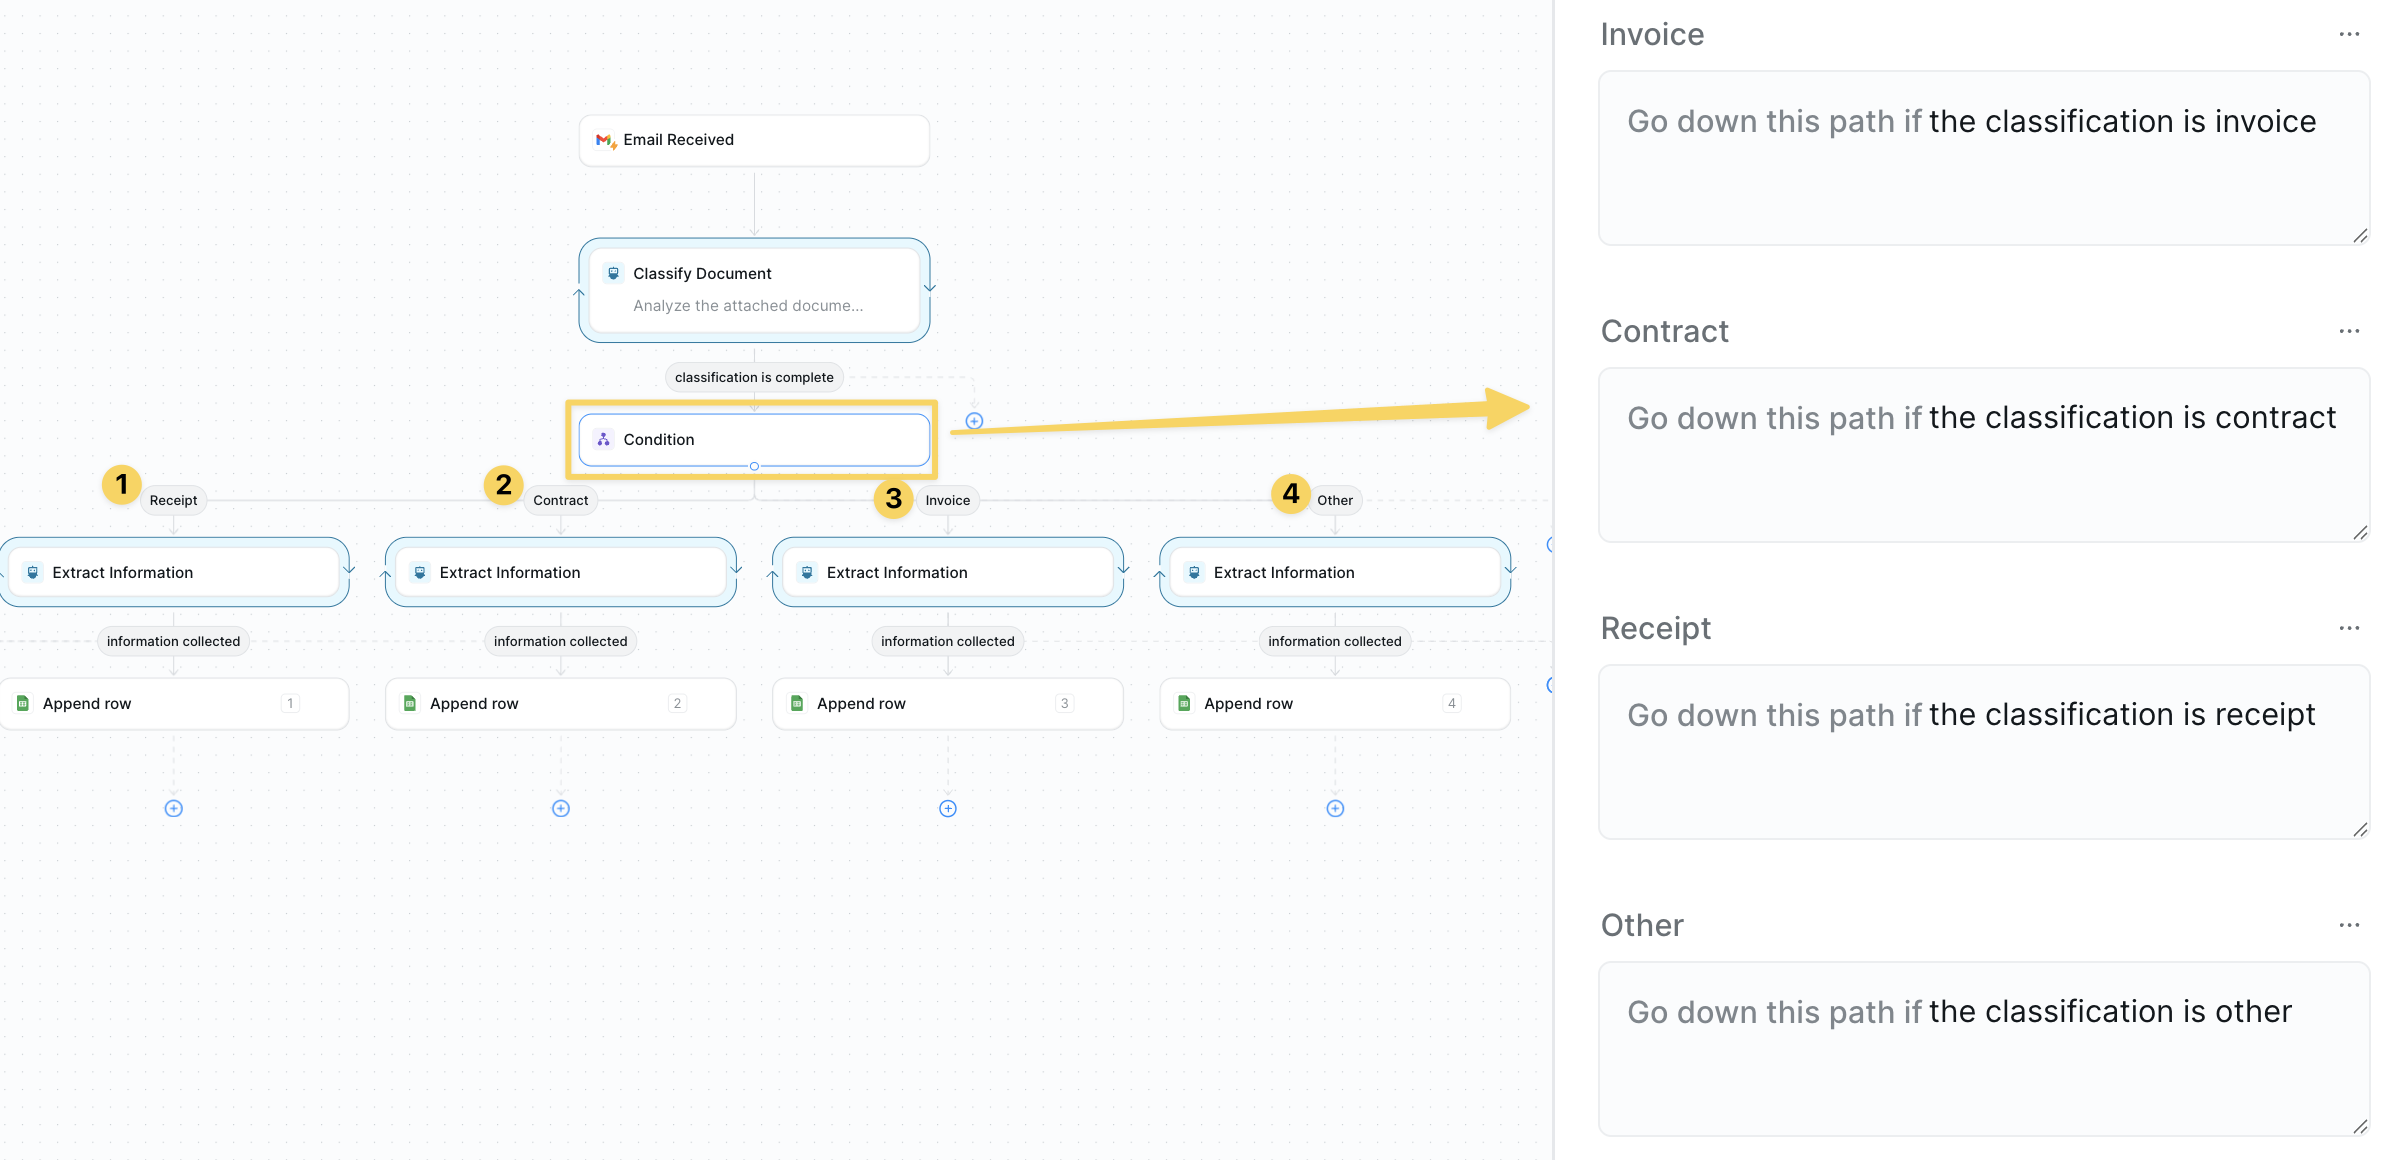 Add `Condition` nodes to route based on document type:
* **If type = "INVOICE"** → Invoice processing branch
* **If type = "CONTRACT"** → Contract processing branch
* **If type = "RECEIPT"** → Receipt processing branch
* **If type = "OTHER"** → General document processing branch
This ensures each document gets the specialized treatment it needs.
### Step 4: Extract Specific Type Data for Those Categories
Pull out the relevant information fields based on the document type with specialized AI agents for each category.
Add `Condition` nodes to route based on document type:
* **If type = "INVOICE"** → Invoice processing branch
* **If type = "CONTRACT"** → Contract processing branch
* **If type = "RECEIPT"** → Receipt processing branch
* **If type = "OTHER"** → General document processing branch
This ensures each document gets the specialized treatment it needs.
### Step 4: Extract Specific Type Data for Those Categories
Pull out the relevant information fields based on the document type with specialized AI agents for each category.
 Edit the prompts and attributes to match your documents. For best results you would also prompt the model to leave items not identified as "N/A" or blank.
**For INVOICE branch:**
```
You're a sharp-eyed accounting detective who never misses a detail. Your mission: extract every critical piece of financial data from this invoice with laser precision.
Extract: vendor_name, invoice_number, total_amount, due_date,
line_items[], payment_terms, PO_number, tax_amount, billing_address
```
**For CONTRACT branch:**
```
You're a meticulous legal analyst with an eye for binding commitments. Your job: identify all the key terms that matter for contract management and compliance tracking.
Extract: party_names[], contract_value, start_date, end_date,
renewal_terms, key_obligations[], termination_clause, governing_law, signatures_required
```
**For RECEIPT branch:**
```
You're a savvy expense tracker who knows every receipt tells a story. Your task: capture all the details needed for perfect expense reporting and reimbursement.
Extract: merchant, amount, date, category, payment_method,
expense_type, project_code, tax_amount, receipt_number
```
**For OTHER branch:**
```
You're a versatile document wizard who adapts to any format. Your mission: intelligently extract whatever structured data exists in this document, no matter what type it is.
Extract all field names and their values as key-value pairs, focusing on dates, amounts, names, and identifiers.
```
### Step 5: Log to an Appropriate Spreadsheet
Organize extracted data into your preferred system — spreadsheets are just the starting point.
Edit the prompts and attributes to match your documents. For best results you would also prompt the model to leave items not identified as "N/A" or blank.
**For INVOICE branch:**
```
You're a sharp-eyed accounting detective who never misses a detail. Your mission: extract every critical piece of financial data from this invoice with laser precision.
Extract: vendor_name, invoice_number, total_amount, due_date,
line_items[], payment_terms, PO_number, tax_amount, billing_address
```
**For CONTRACT branch:**
```
You're a meticulous legal analyst with an eye for binding commitments. Your job: identify all the key terms that matter for contract management and compliance tracking.
Extract: party_names[], contract_value, start_date, end_date,
renewal_terms, key_obligations[], termination_clause, governing_law, signatures_required
```
**For RECEIPT branch:**
```
You're a savvy expense tracker who knows every receipt tells a story. Your task: capture all the details needed for perfect expense reporting and reimbursement.
Extract: merchant, amount, date, category, payment_method,
expense_type, project_code, tax_amount, receipt_number
```
**For OTHER branch:**
```
You're a versatile document wizard who adapts to any format. Your mission: intelligently extract whatever structured data exists in this document, no matter what type it is.
Extract all field names and their values as key-value pairs, focusing on dates, amounts, names, and identifiers.
```
### Step 5: Log to an Appropriate Spreadsheet
Organize extracted data into your preferred system — spreadsheets are just the starting point.
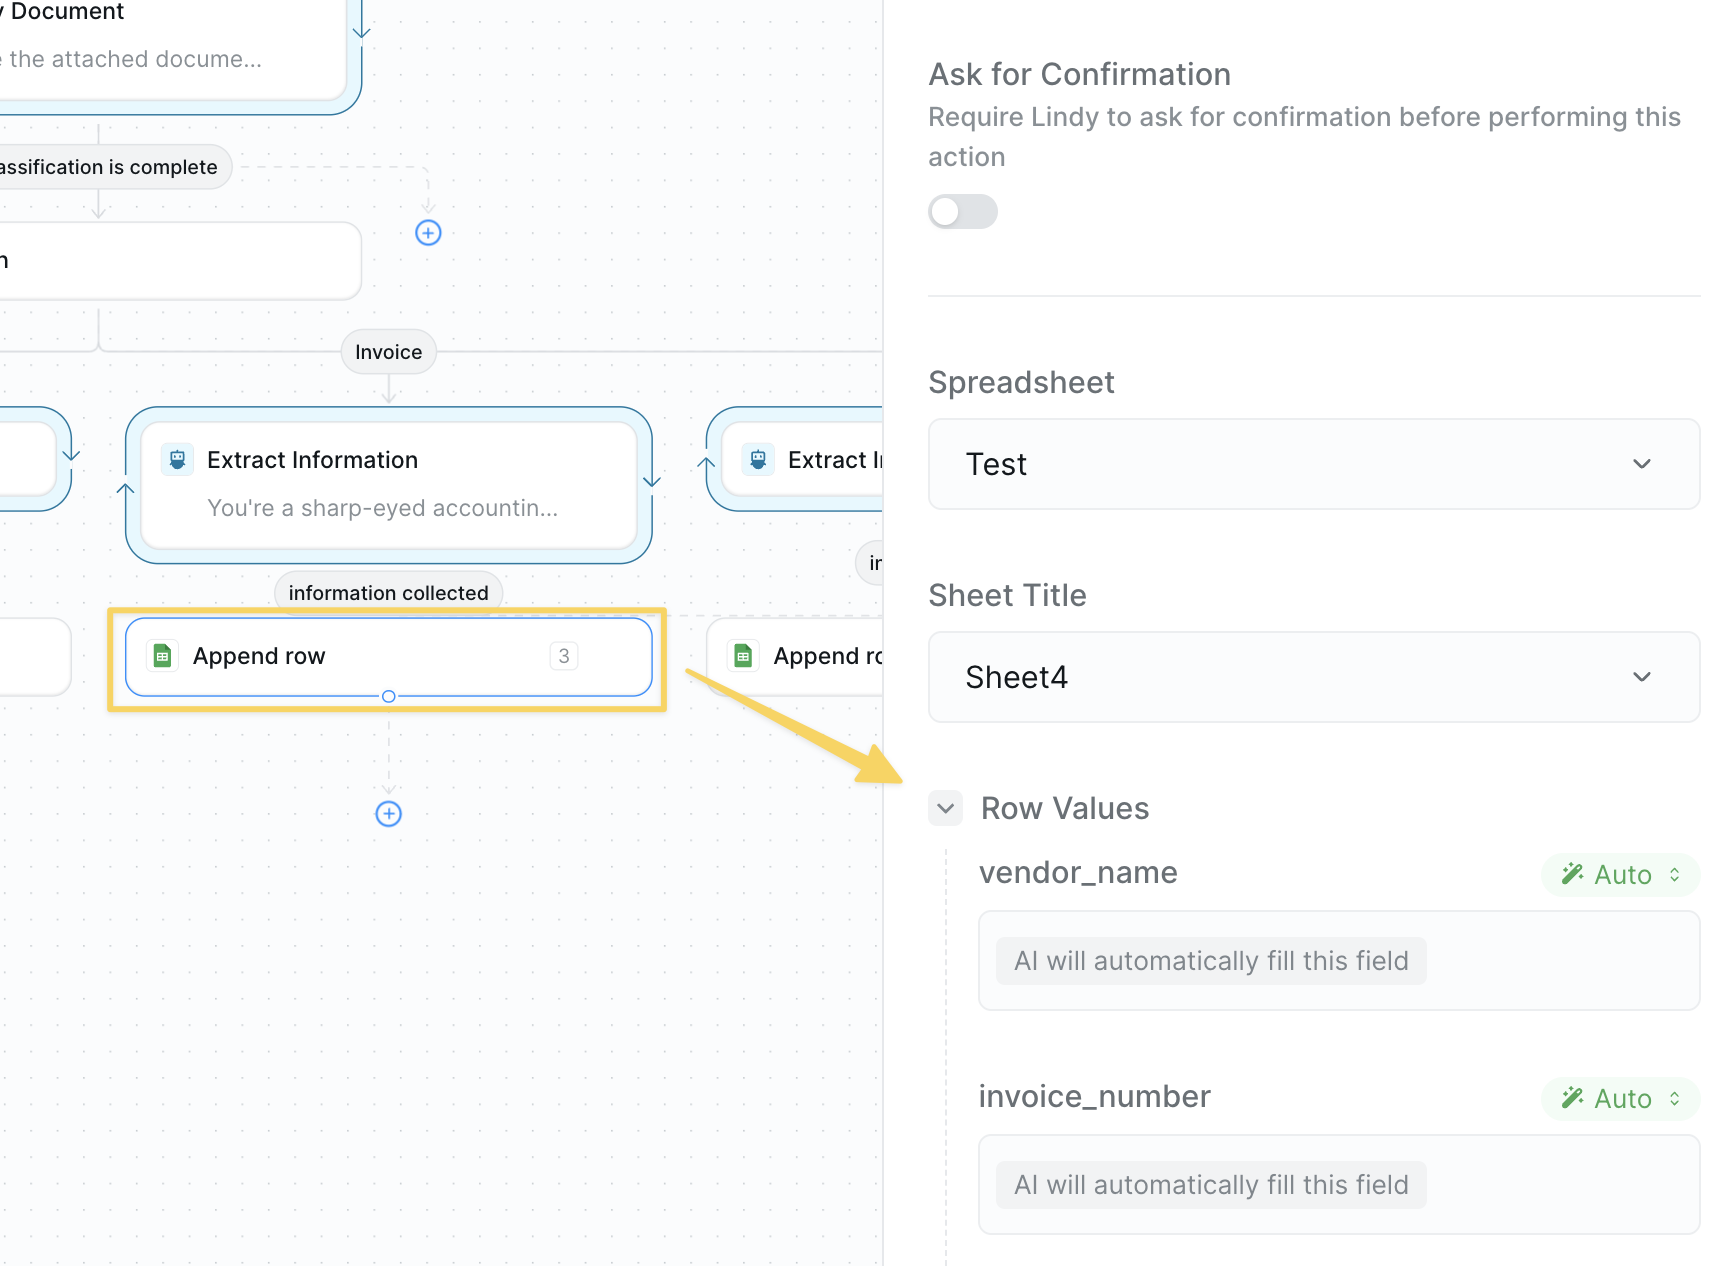 Make sure the fields you are logging match the attributes extracted in the previous step.
**Basic Option:** Use `Google Sheets – Append Row` to log data by document type.
**Advanced Integrations:** You can post this information anywhere using:
* `HTTP Request` actions to send data to your ERP, CRM, or custom databases
* Direct integrations with Airtable, Notion, or other platforms
* Webhook endpoints for real-time processing
* API calls to accounting software like QuickBooks or Xero
Spreadsheets are just a foundation — the real power comes from connecting to your existing systems.
## Advanced Features
| Feature | What it does |
| -------------------- | -------------------------------------------------- |
| Duplicate Detection | Check if invoice/contract already processed |
| Auto-Approval Routes | Route based on amount thresholds and vendor status |
| Data Validation | Add additional QA agent steps |
## Best Practices
Focus on the documents that eat the most time — usually invoices and receipts.
Standardize how documents are named and filed from day one.
Route failed extractions to a manual review queue rather than losing them.
Spot-check 10% of processed documents weekly to refine extraction prompts.
## Next Steps
Deep dive into AP automation
Build intelligent document analysis workflows
Store extracted document data
Add approval steps for critical documents
# Calendar Prep
Source: https://docs.lindy.ai/use-cases/popular-workflows/calendar-prep
Show up to every call armed with attendee intel, past context, and a crisp agenda.
## Quick Overview
Connect your agent to your calendar and let it:
* **Trigger** 10 minutes before each meeting
* **Detect** if it's an external meeting worth researching
* **Research** attendees across LinkedIn and the web
* **Review** past email conversations and context
* **Deliver** a quick brief right before you jump on the call
You can use the [meeting prep template](https://chat.lindy.ai/home/?templateId=687565fdc1c16f08152a968a) to get started.
## Setting Up Your Meeting Prep Flow
### Step 1: Configure Pre-Meeting Trigger
Make sure the fields you are logging match the attributes extracted in the previous step.
**Basic Option:** Use `Google Sheets – Append Row` to log data by document type.
**Advanced Integrations:** You can post this information anywhere using:
* `HTTP Request` actions to send data to your ERP, CRM, or custom databases
* Direct integrations with Airtable, Notion, or other platforms
* Webhook endpoints for real-time processing
* API calls to accounting software like QuickBooks or Xero
Spreadsheets are just a foundation — the real power comes from connecting to your existing systems.
## Advanced Features
| Feature | What it does |
| -------------------- | -------------------------------------------------- |
| Duplicate Detection | Check if invoice/contract already processed |
| Auto-Approval Routes | Route based on amount thresholds and vendor status |
| Data Validation | Add additional QA agent steps |
## Best Practices
Focus on the documents that eat the most time — usually invoices and receipts.
Standardize how documents are named and filed from day one.
Route failed extractions to a manual review queue rather than losing them.
Spot-check 10% of processed documents weekly to refine extraction prompts.
## Next Steps
Deep dive into AP automation
Build intelligent document analysis workflows
Store extracted document data
Add approval steps for critical documents
# Calendar Prep
Source: https://docs.lindy.ai/use-cases/popular-workflows/calendar-prep
Show up to every call armed with attendee intel, past context, and a crisp agenda.
## Quick Overview
Connect your agent to your calendar and let it:
* **Trigger** 10 minutes before each meeting
* **Detect** if it's an external meeting worth researching
* **Research** attendees across LinkedIn and the web
* **Review** past email conversations and context
* **Deliver** a quick brief right before you jump on the call
You can use the [meeting prep template](https://chat.lindy.ai/home/?templateId=687565fdc1c16f08152a968a) to get started.
## Setting Up Your Meeting Prep Flow
### Step 1: Configure Pre-Meeting Trigger
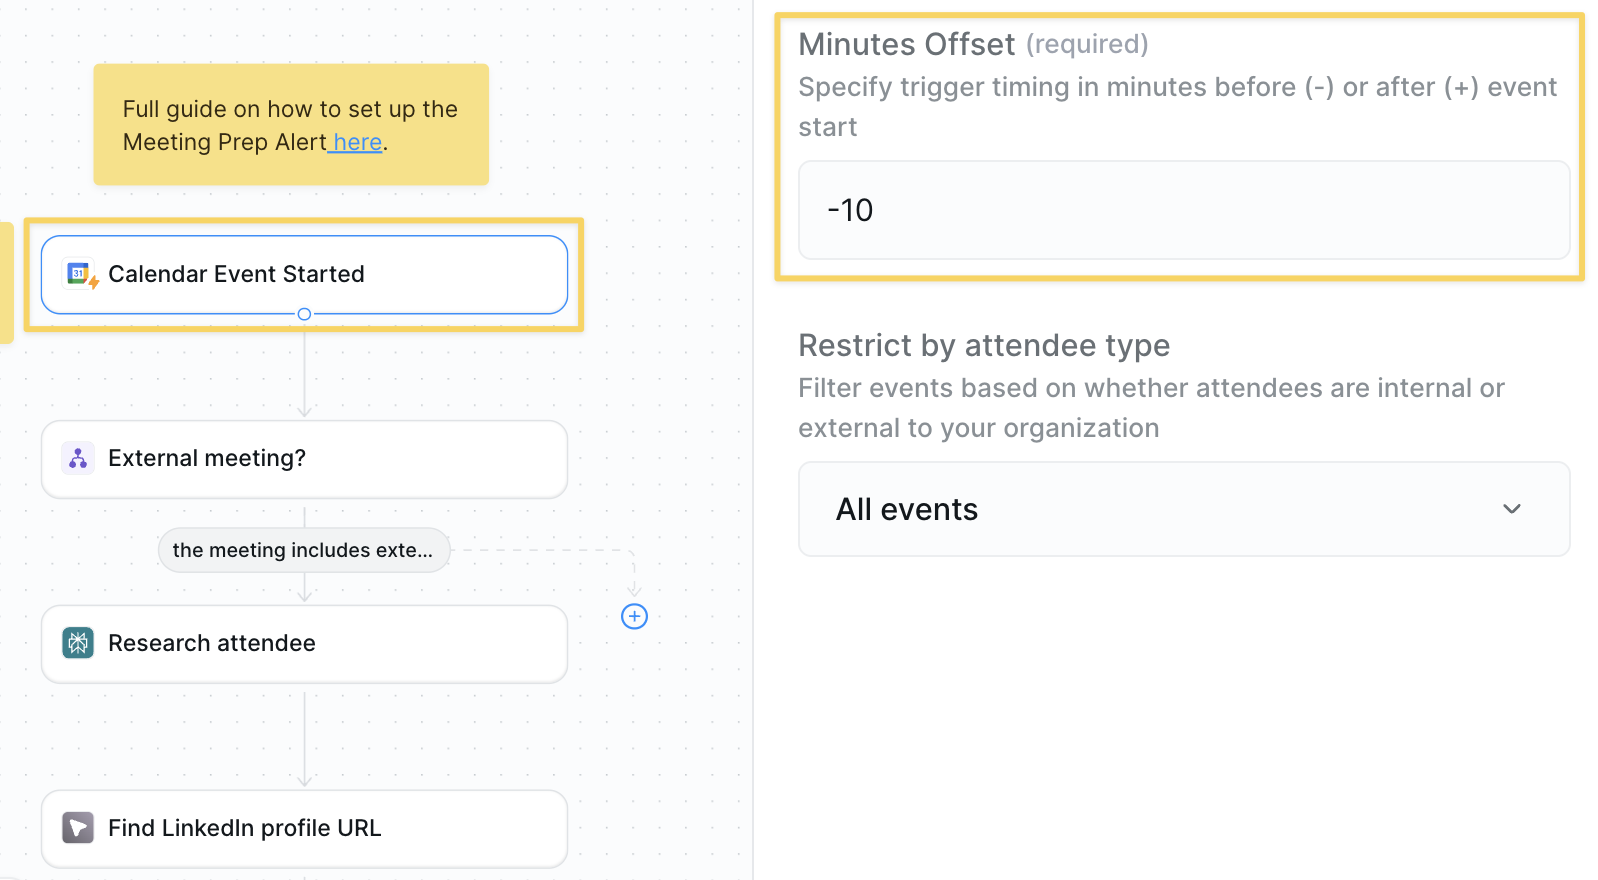 1. Select `Google Calendar – Calendar Event Started` trigger
2. Set offset to **-10 minutes** (triggers 10 min before meeting)
3. Connect your calendar account
### Step 2: Check If External Meeting
1. Select `Google Calendar – Calendar Event Started` trigger
2. Set offset to **-10 minutes** (triggers 10 min before meeting)
3. Connect your calendar account
### Step 2: Check If External Meeting
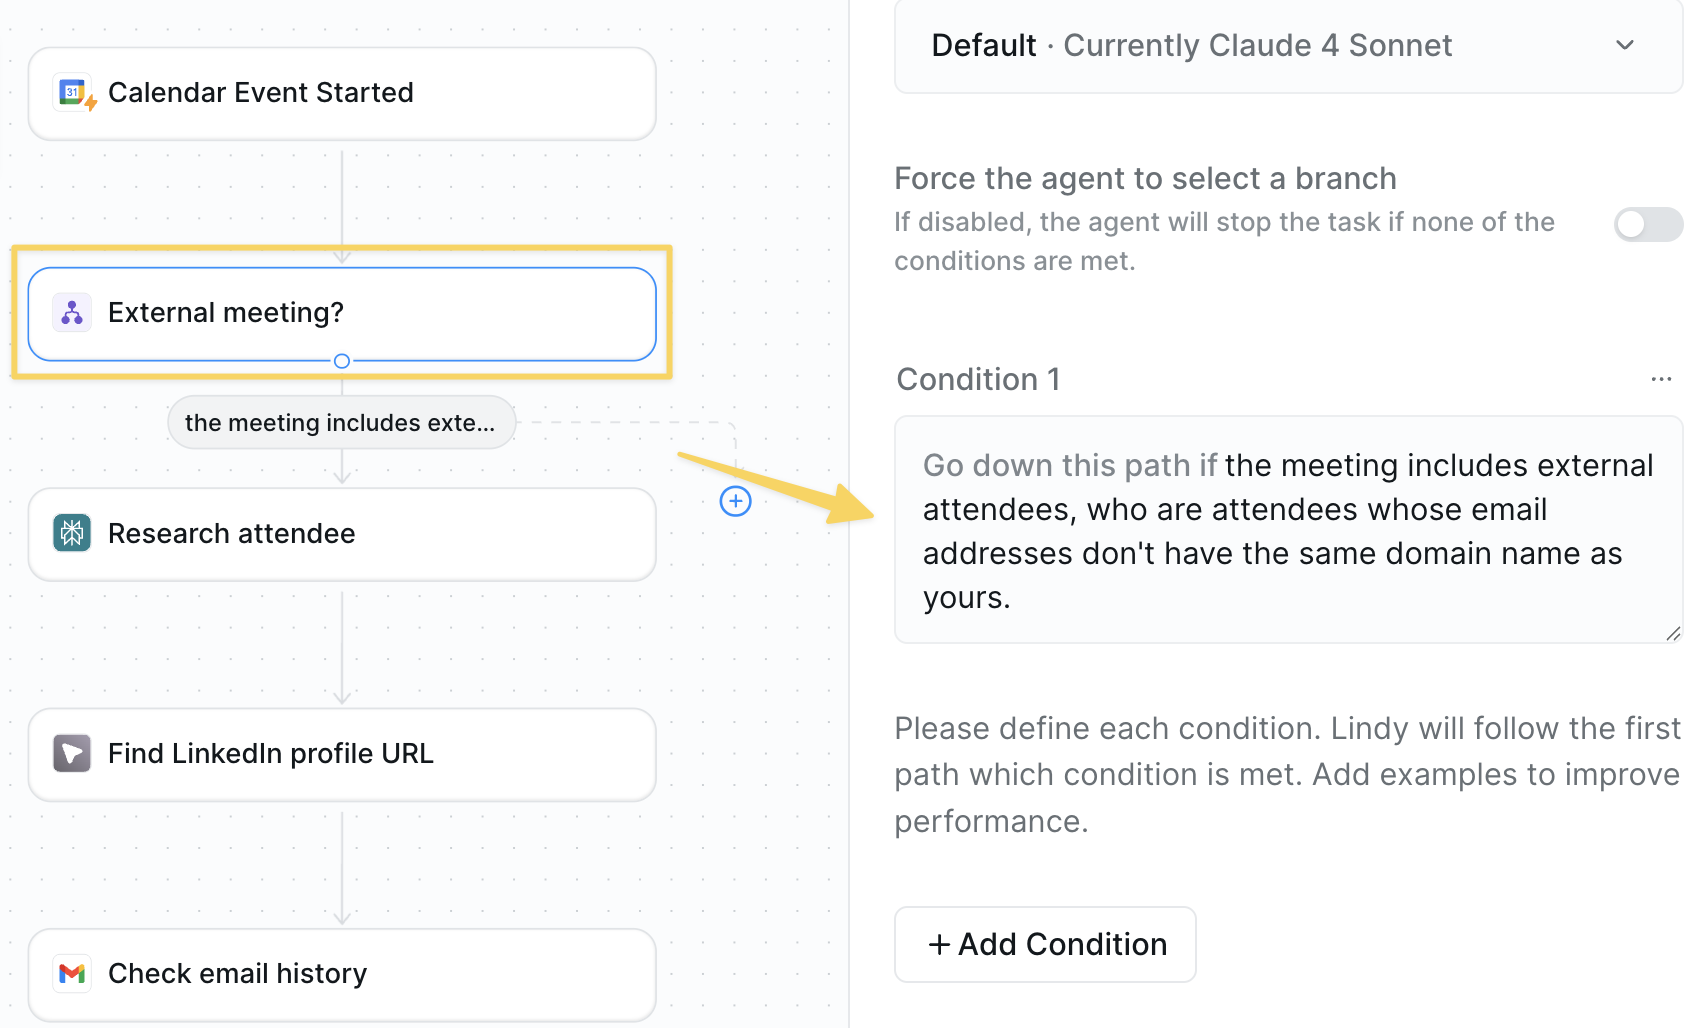 Add a `Condition` to identify external meetings:
```
Go down this path if any attendee email domain is different from your company domain
```
This skips events like internal standups and focuses on important external calls.
### Step 3: Research the Attendee
Add a `Condition` to identify external meetings:
```
Go down this path if any attendee email domain is different from your company domain
```
This skips events like internal standups and focuses on important external calls.
### Step 3: Research the Attendee
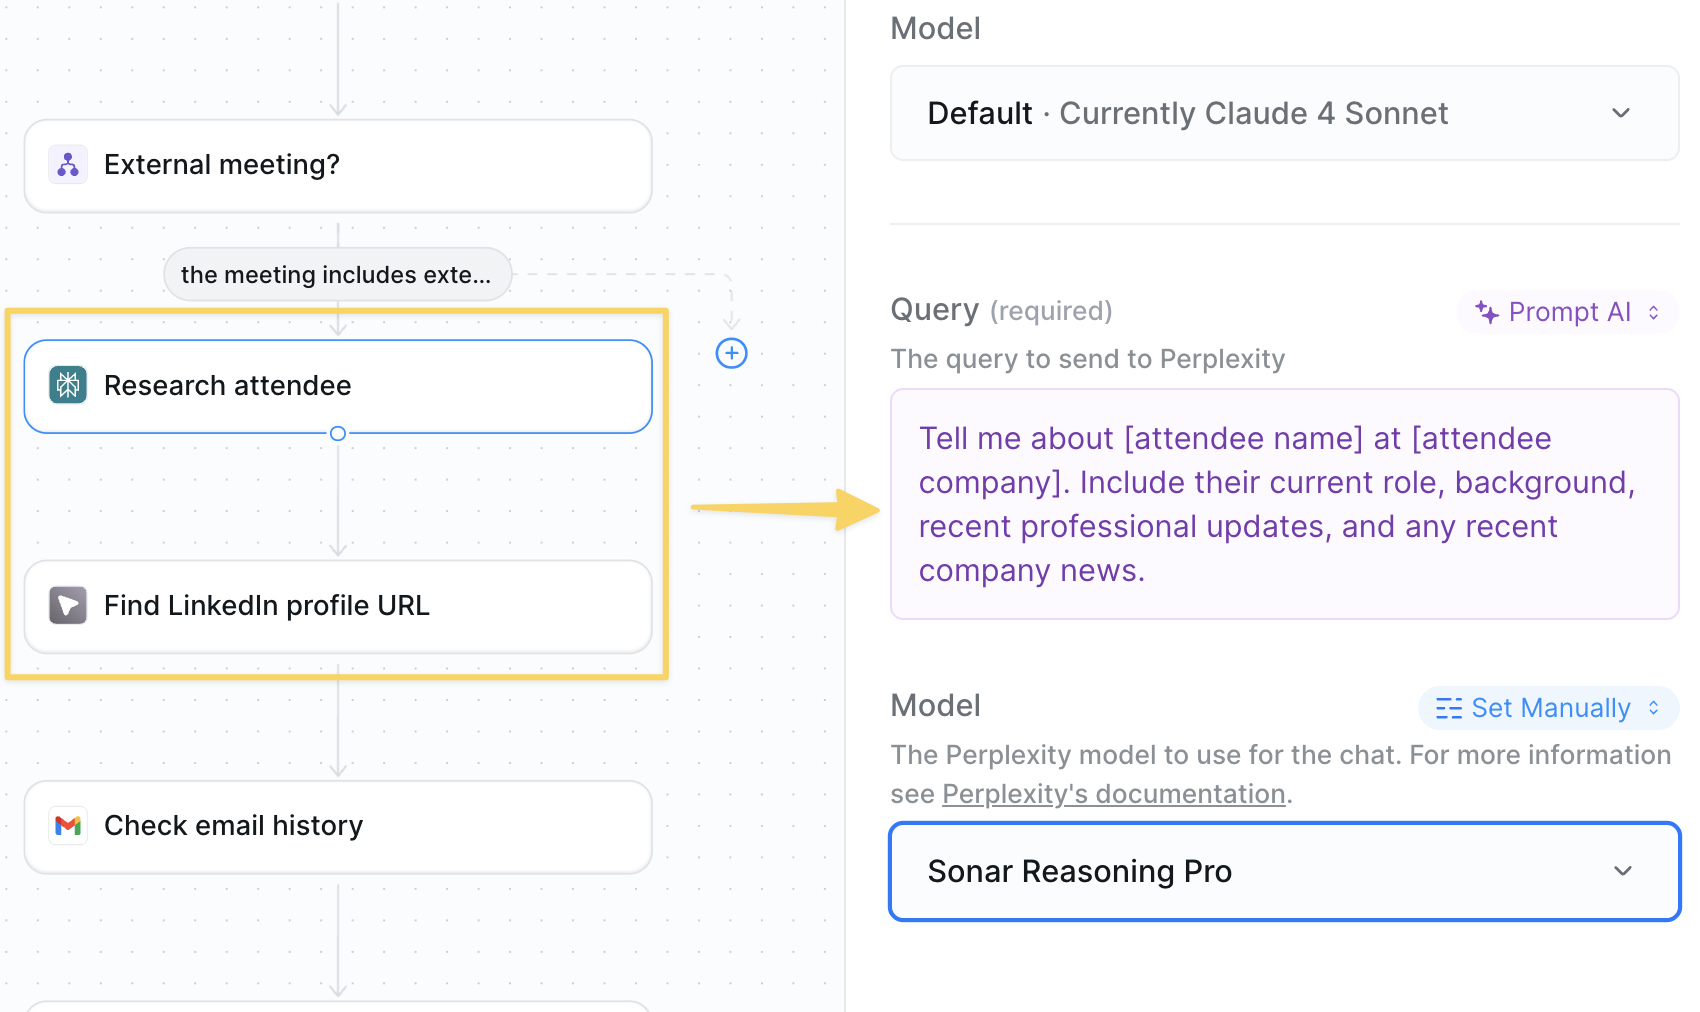 Research your attendee using two complementary approaches:
1. **Perplexity Search** for comprehensive context:
```
Tell me about [attendee name] at [attendee company]. Include their current role, background, recent professional updates, and any recent company news.
```
2. **Search the Internet** for LinkedIn profile:
```
site:linkedin.com/in [attendee name] [attendee company]
```
This combination gives you both detailed context and their professional profile link.
### Step 4: Check Email History
Research your attendee using two complementary approaches:
1. **Perplexity Search** for comprehensive context:
```
Tell me about [attendee name] at [attendee company]. Include their current role, background, recent professional updates, and any recent company news.
```
2. **Search the Internet** for LinkedIn profile:
```
site:linkedin.com/in [attendee name] [attendee company]
```
This combination gives you both detailed context and their professional profile link.
### Step 4: Check Email History
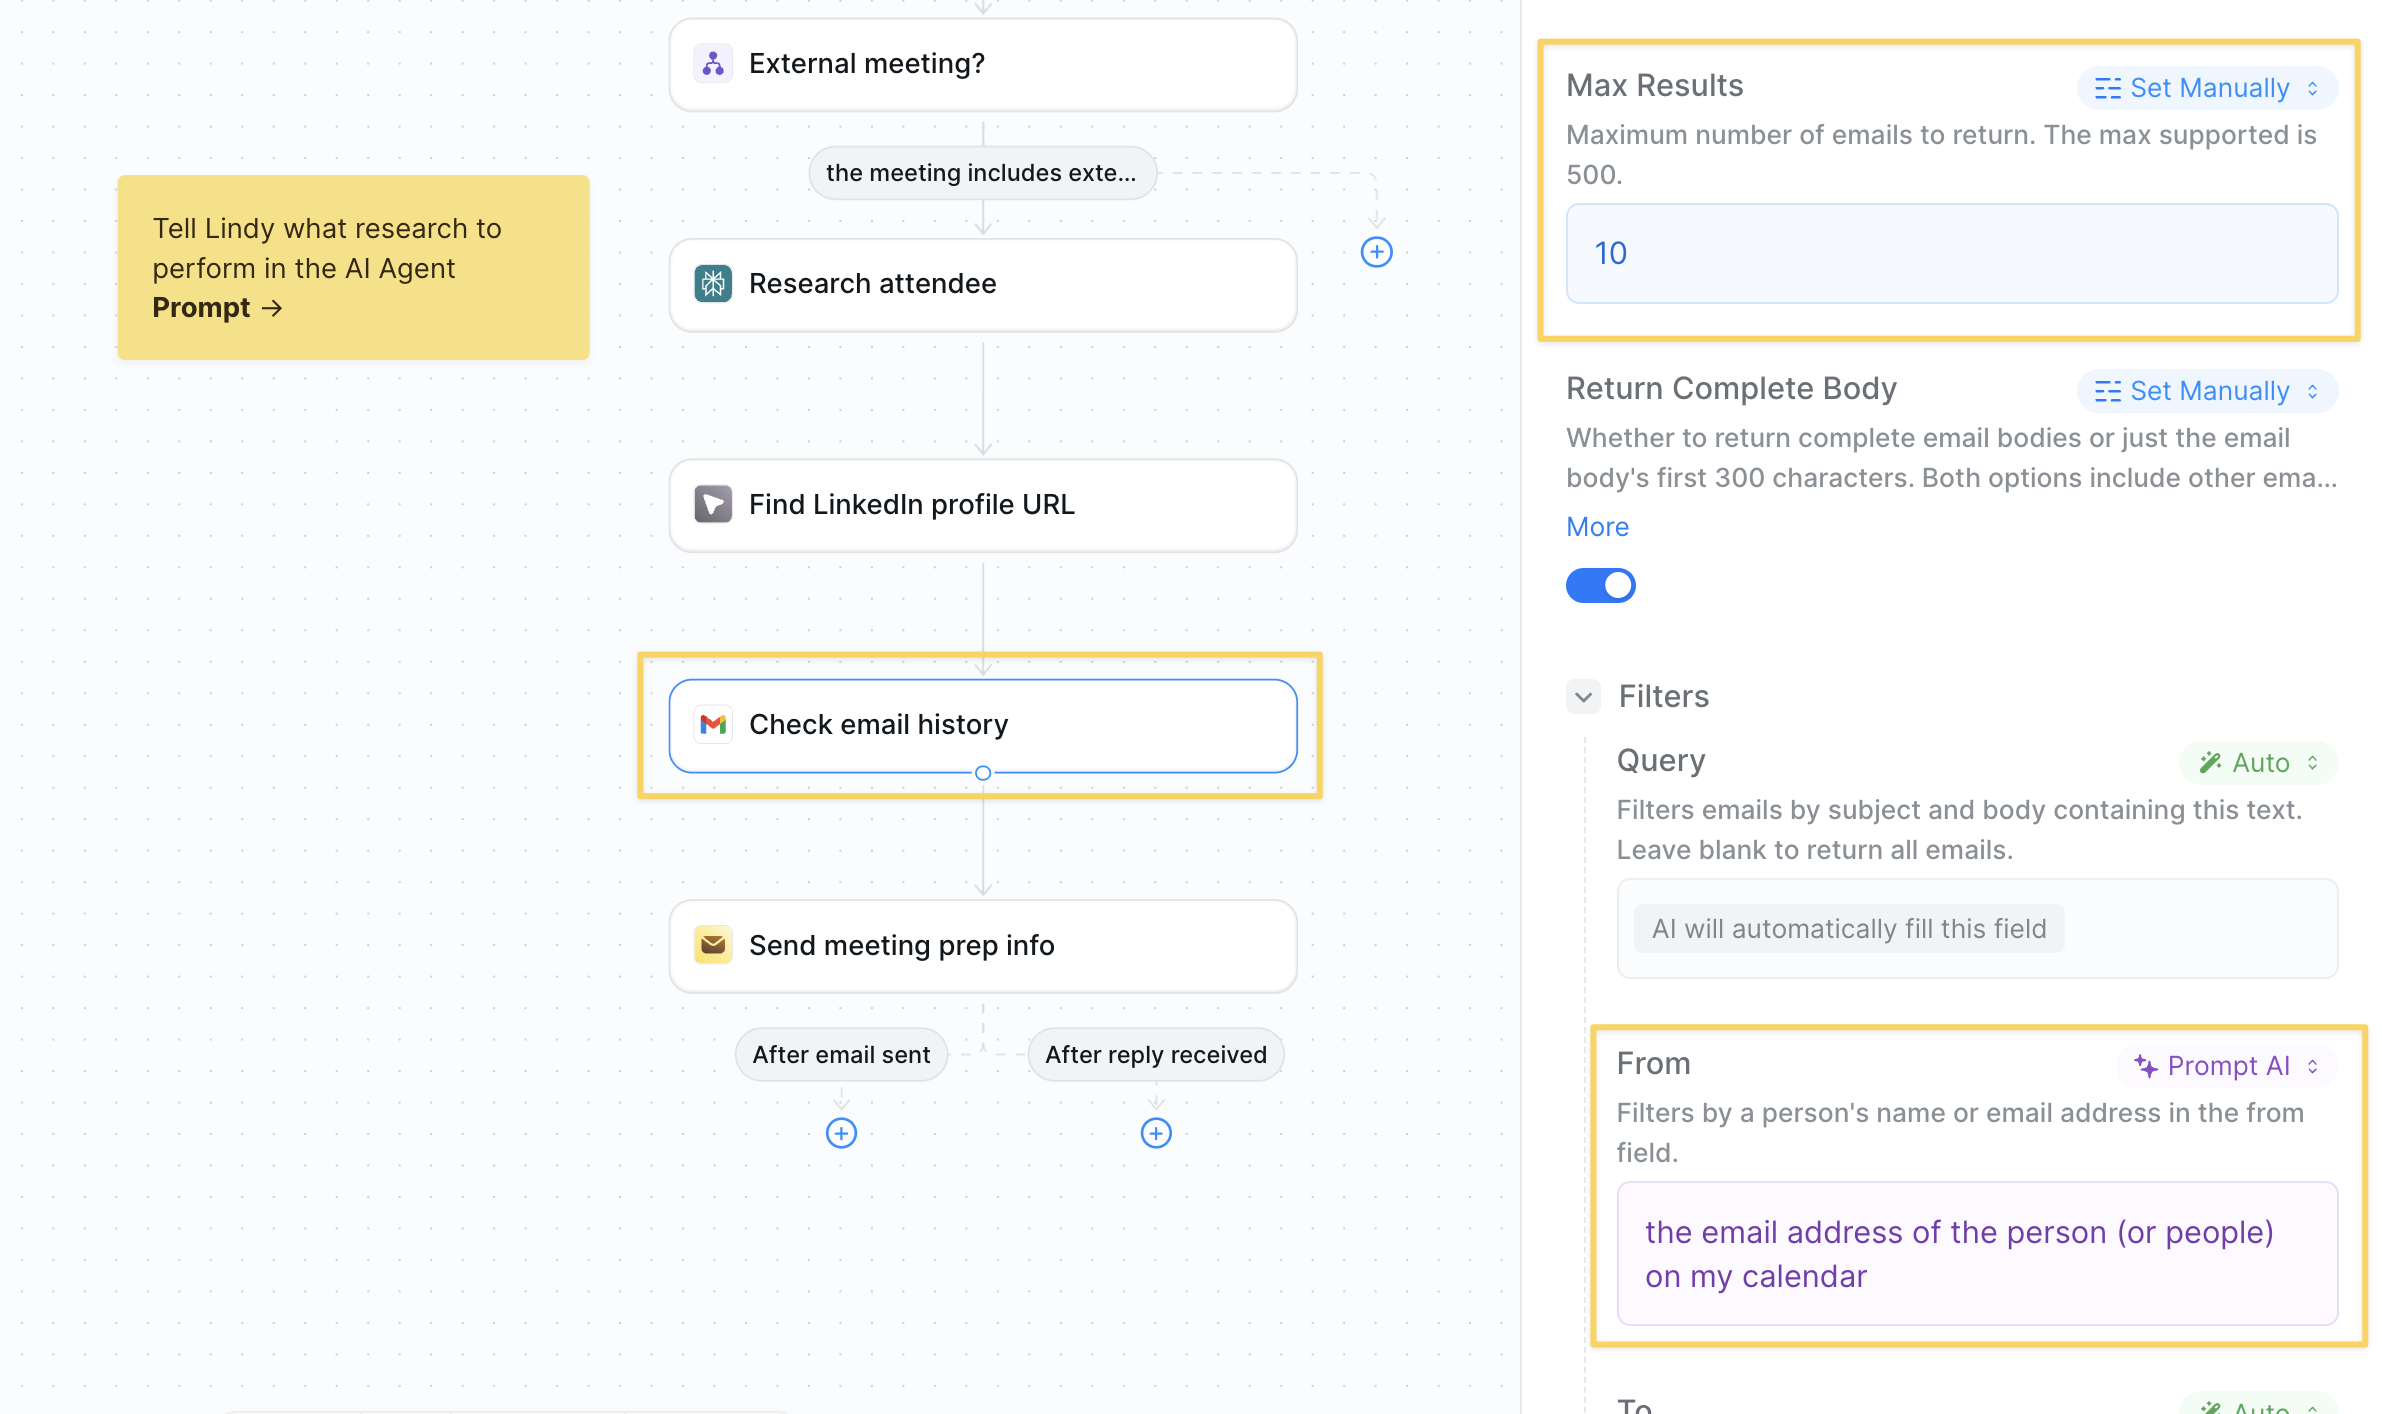 Use `Gmail – Search Emails`:
Query: `from:[attendee email]` using a prompt
Limit to most recent 10 emails to get:
* Last interaction date
* Recent topics discussed
* Any open questions or commitments
### Step 5: Send Meeting Brief via Lindy Mail
Use `Gmail – Search Emails`:
Query: `from:[attendee email]` using a prompt
Limit to most recent 10 emails to get:
* Last interaction date
* Recent topics discussed
* Any open questions or commitments
### Step 5: Send Meeting Brief via Lindy Mail
 Use `Lindy Mail – Send Email` to deliver your brief:
```
Subject: Quick prep for meeting with [attendee name] in 10 min
[Attendee Name] - [Title] at [Company]
BACKGROUND:
[2-3 key points from research]
LAST INTERACTION:
[Date and main topic from email history]
TALKING POINTS:
• [Relevant topic based on their background]
• [Follow-up from previous emails]
• [Current company initiative they might care about]
LinkedIn: [profile URL]
```
**Alternative:** Use `Slack – Send DM` if you prefer instant notifications on your phone.
## Advanced Customizations
| Feature | What it does |
| ---------------------- | ------------------------------------------------------------ |
| CRM Integration | Pull deal stage and account history from HubSpot/Salesforce |
| Company News | Add recent funding or announcements from their company |
| Meeting Type Detection | Different prep for sales vs. partnership vs. interview calls |
| Team Briefings | CC relevant team members on high-stakes meetings |
| Auto-Agenda | Generate and send agenda to attendees 1 hour before |
## Best Practices
10 minutes works well, but adjust based on your schedule density.
Skip internal meetings to avoid notification overload.
Keep briefs short since you might read on your phone between meetings.
Only research public information and keep briefs internal.
## Next Steps
Record and summarize your meetings
Advanced calendar automation features
Build intelligent research workflows
Store research findings for future meetings
# Email Assistant
Source: https://docs.lindy.ai/use-cases/popular-workflows/email-triage
Auto-sort, label, and answer emails so your inbox stays at zero.
## Quick Overview
Connect your agent to Gmail or Outlook and let it:
* **Filter** incoming mail by sender, keywords, or labels
* **Categorize** messages (Marketing, Support, Colleagues, Spam, etc.)
* **Label** & tidy the inbox automatically
* **Draft** or send replies with your voice and brand tone
* **Tap** a Knowledge Base for accurate answers when needed
You can build off of both the [email triage template](https://chat.lindy.ai/home?templateId=6684857db1aa4ed9d5baa9e3) and [email responder template](https://chat.lindy.ai/home?templateId=681f0d58c7832f340735ba2d).
## Setting Up Your Email Assistant
### Step 1: Connect Your Mailbox
Use `Lindy Mail – Send Email` to deliver your brief:
```
Subject: Quick prep for meeting with [attendee name] in 10 min
[Attendee Name] - [Title] at [Company]
BACKGROUND:
[2-3 key points from research]
LAST INTERACTION:
[Date and main topic from email history]
TALKING POINTS:
• [Relevant topic based on their background]
• [Follow-up from previous emails]
• [Current company initiative they might care about]
LinkedIn: [profile URL]
```
**Alternative:** Use `Slack – Send DM` if you prefer instant notifications on your phone.
## Advanced Customizations
| Feature | What it does |
| ---------------------- | ------------------------------------------------------------ |
| CRM Integration | Pull deal stage and account history from HubSpot/Salesforce |
| Company News | Add recent funding or announcements from their company |
| Meeting Type Detection | Different prep for sales vs. partnership vs. interview calls |
| Team Briefings | CC relevant team members on high-stakes meetings |
| Auto-Agenda | Generate and send agenda to attendees 1 hour before |
## Best Practices
10 minutes works well, but adjust based on your schedule density.
Skip internal meetings to avoid notification overload.
Keep briefs short since you might read on your phone between meetings.
Only research public information and keep briefs internal.
## Next Steps
Record and summarize your meetings
Advanced calendar automation features
Build intelligent research workflows
Store research findings for future meetings
# Email Assistant
Source: https://docs.lindy.ai/use-cases/popular-workflows/email-triage
Auto-sort, label, and answer emails so your inbox stays at zero.
## Quick Overview
Connect your agent to Gmail or Outlook and let it:
* **Filter** incoming mail by sender, keywords, or labels
* **Categorize** messages (Marketing, Support, Colleagues, Spam, etc.)
* **Label** & tidy the inbox automatically
* **Draft** or send replies with your voice and brand tone
* **Tap** a Knowledge Base for accurate answers when needed
You can build off of both the [email triage template](https://chat.lindy.ai/home?templateId=6684857db1aa4ed9d5baa9e3) and [email responder template](https://chat.lindy.ai/home?templateId=681f0d58c7832f340735ba2d).
## Setting Up Your Email Assistant
### Step 1: Connect Your Mailbox
 1. Select `Gmail / Outlook – Email Received` as the trigger.
2. Complete authentication to grant read/send access.
### Step 2: Set Inbox Filters
1. Select `Gmail / Outlook – Email Received` as the trigger.
2. Complete authentication to grant read/send access.
### Step 2: Set Inbox Filters
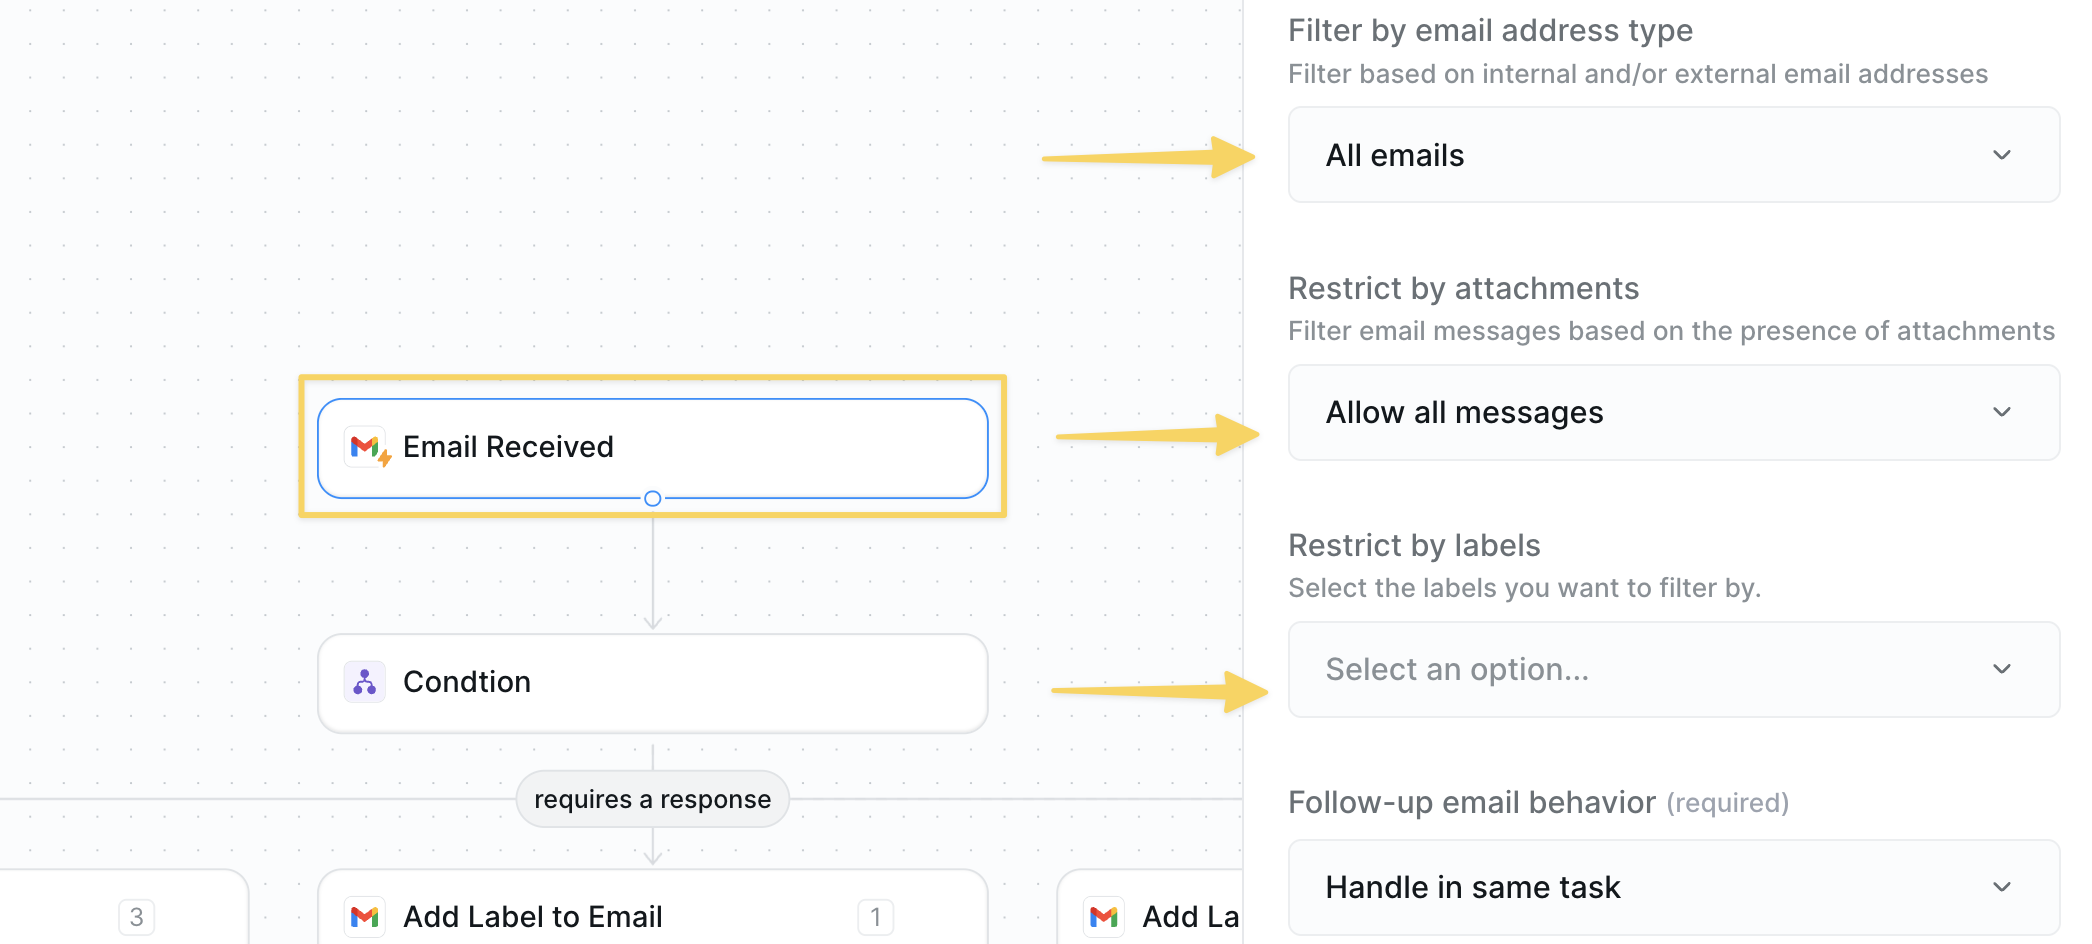 Use `Trigger Filters` to keep processing costs tight. Examples:
* *Subject* contains "Invoice"
* *From* equals `news@` (route newsletters)
* Attachment present (flag items needing review)
## Step 3: Categorize with Conditions
Use `Trigger Filters` to keep processing costs tight. Examples:
* *Subject* contains "Invoice"
* *From* equals `news@` (route newsletters)
* Attachment present (flag items needing review)
## Step 3: Categorize with Conditions
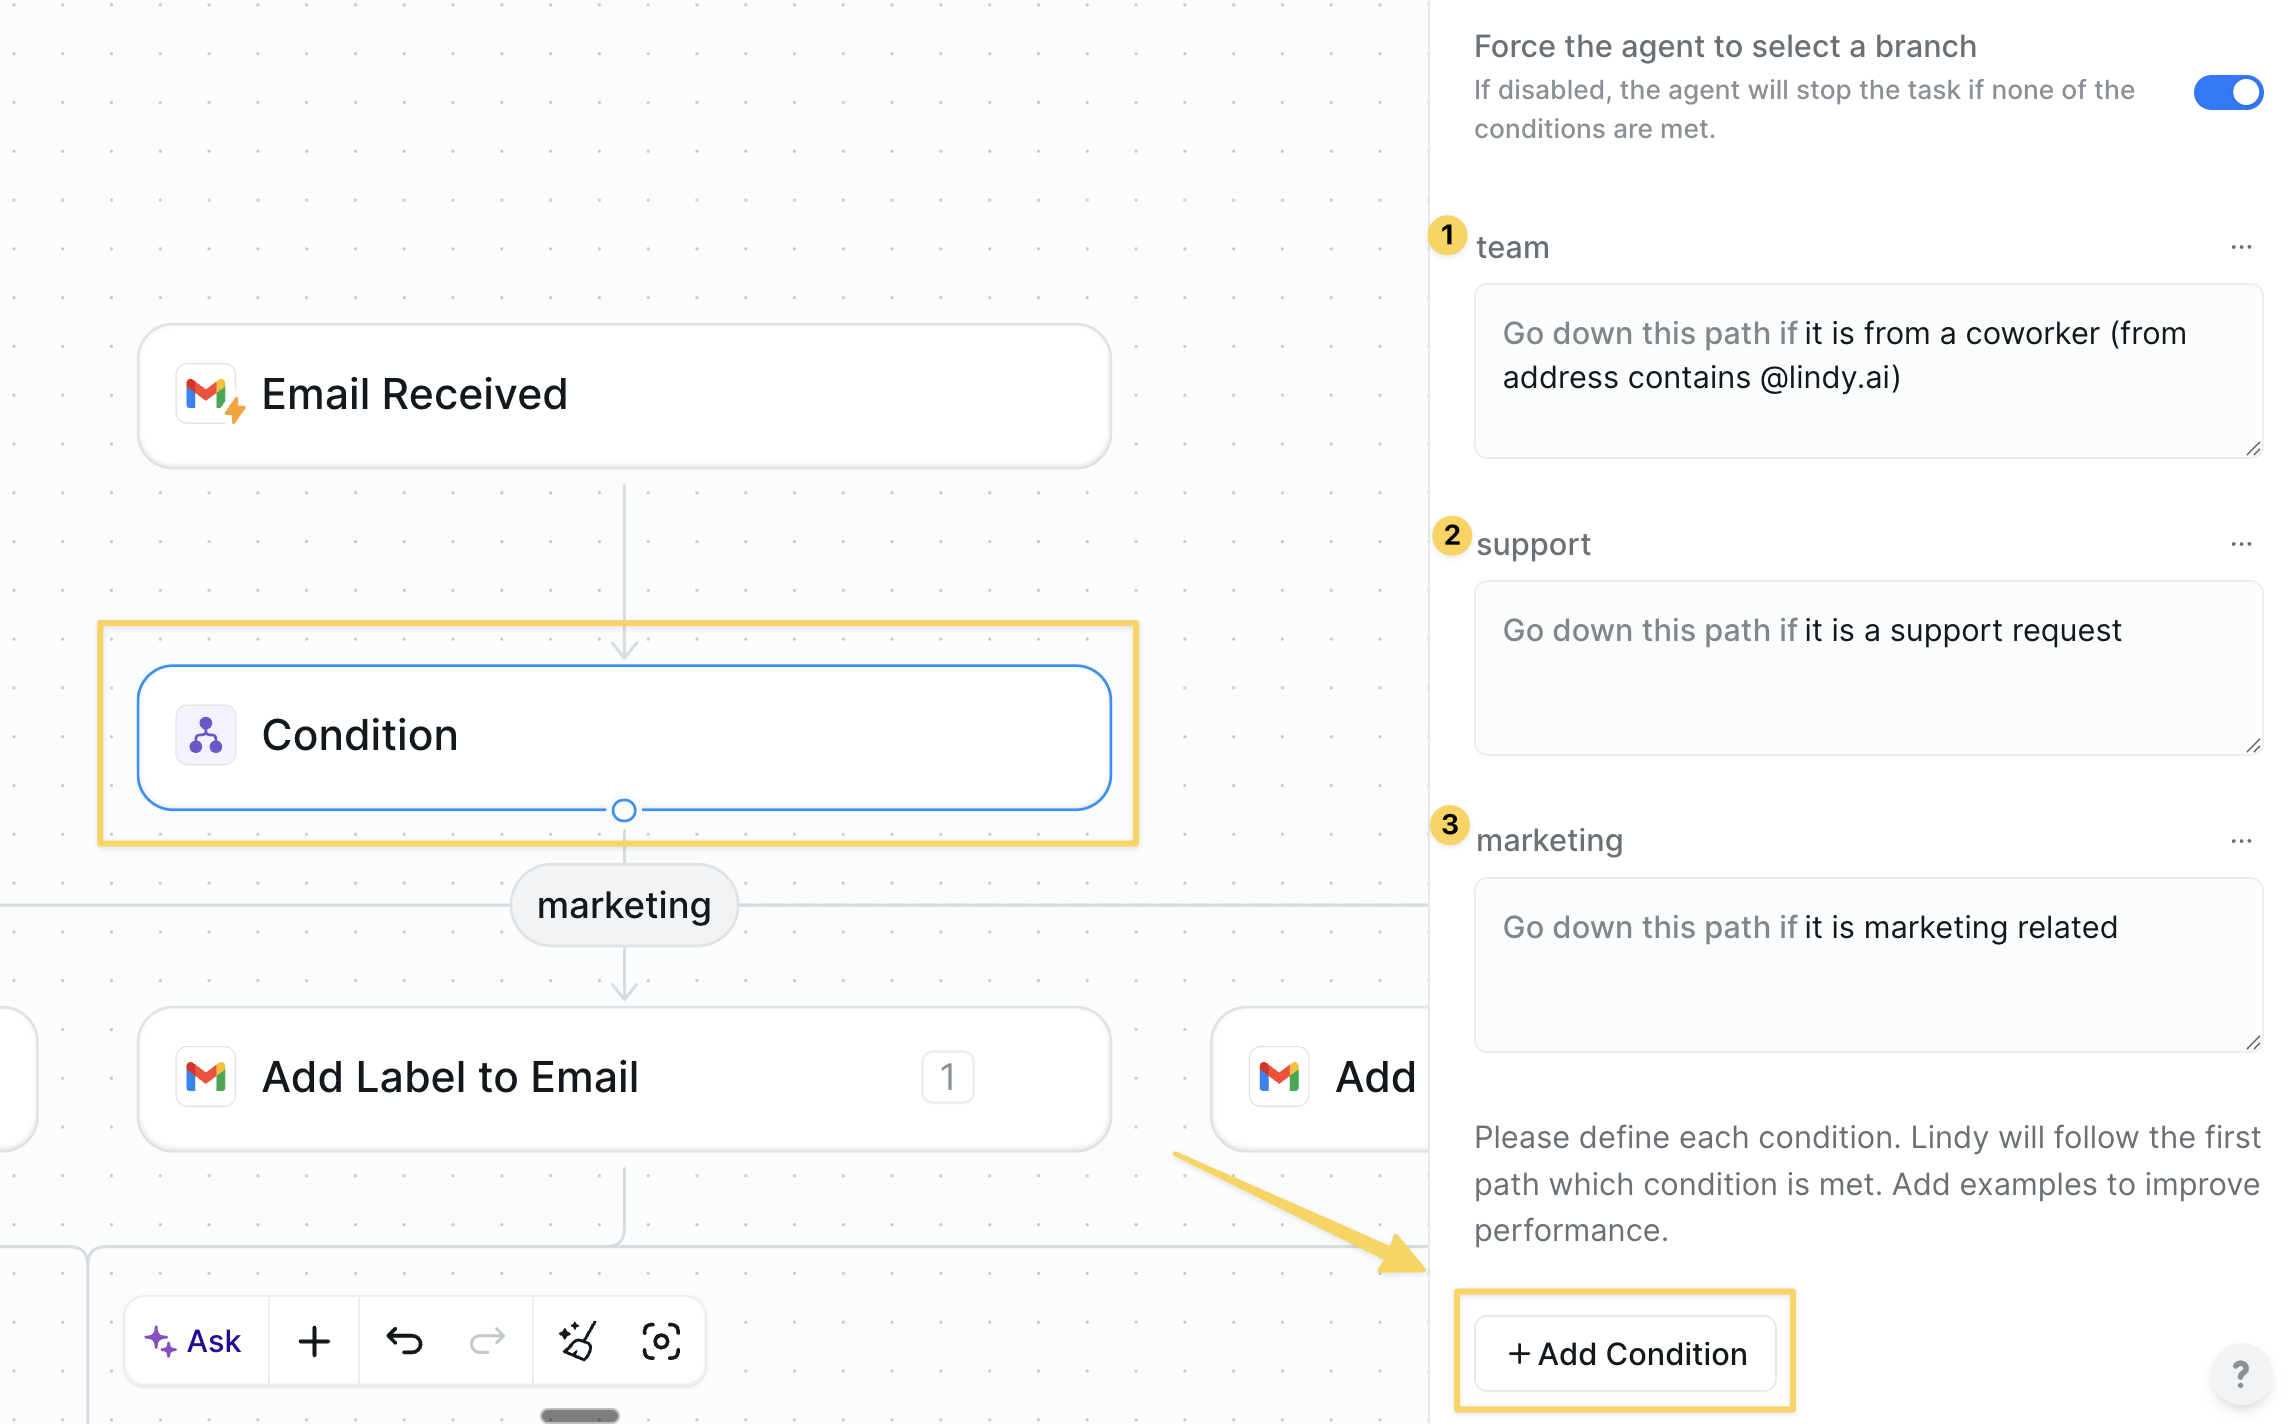 Add a `Condition` step to branch emails into different paths based on their content.
Click `Add Condition` to create branches for each email type. Here are some examples:
| Condition Type | Example Setup |
| -------------- | -------------------------------------------------------------- |
| **Team** | Prompt: "Is from a coworker (from address contains @lindy.ai)" |
| **Support** | Prompt: "Is this a support request?" |
| **Marketing** | Prompt: "Is this marketing related?" |
| **Spam** | Prompt: "Is likely spam and does not need response" |
| **Unknown** | Prompt: "None of the above applies" |
You can add as many conditions as needed – each one creates a separate branch in your workflow. Feel free to customize these categories to match your business needs and email patterns.
### Step 4: Label & Organize
Add a `Condition` step to branch emails into different paths based on their content.
Click `Add Condition` to create branches for each email type. Here are some examples:
| Condition Type | Example Setup |
| -------------- | -------------------------------------------------------------- |
| **Team** | Prompt: "Is from a coworker (from address contains @lindy.ai)" |
| **Support** | Prompt: "Is this a support request?" |
| **Marketing** | Prompt: "Is this marketing related?" |
| **Spam** | Prompt: "Is likely spam and does not need response" |
| **Unknown** | Prompt: "None of the above applies" |
You can add as many conditions as needed – each one creates a separate branch in your workflow. Feel free to customize these categories to match your business needs and email patterns.
### Step 4: Label & Organize
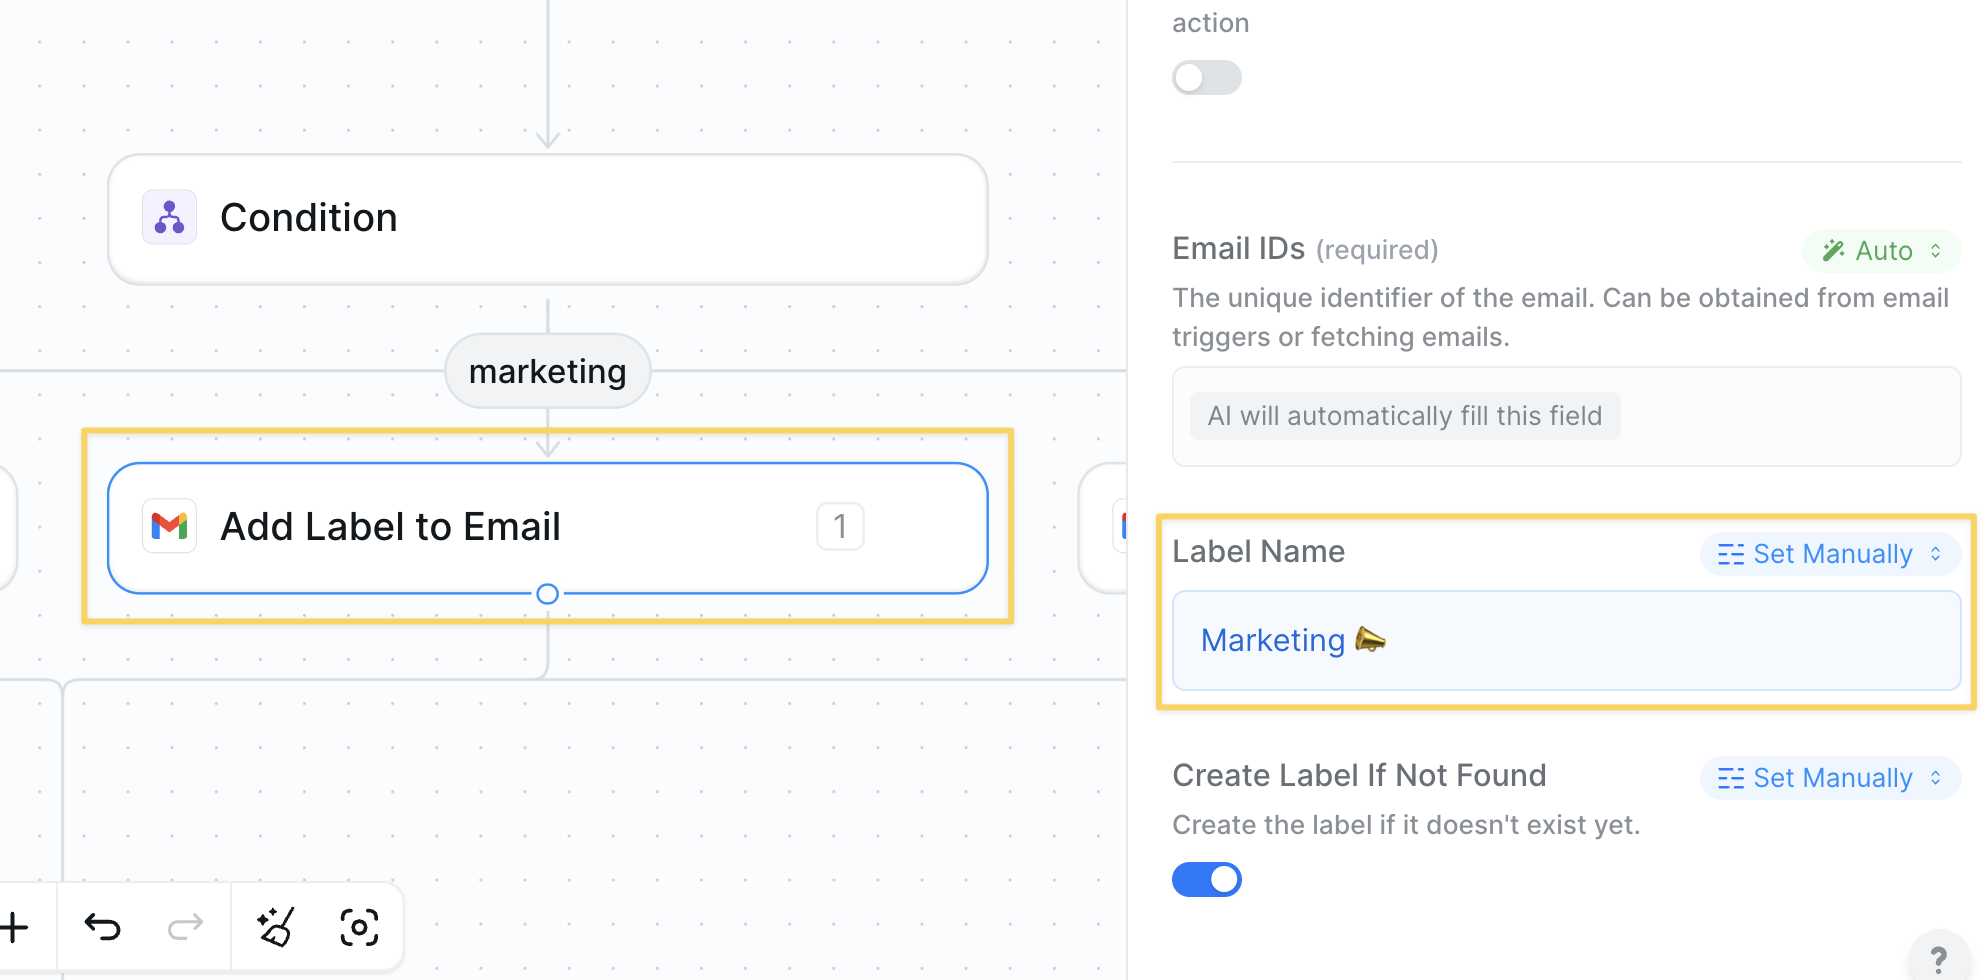 For each category, drop in a `Add Label to Email` action:
| Category | Label |
| --------- | -------------- |
| marketing | `Marketing 📣` |
| support | `Support 🛠` |
| coworker | `Team 💬` |
| spam | `Spam ❌` |
### Step 5: Draft or Send Replies
For each category, drop in a `Add Label to Email` action:
| Category | Label |
| --------- | -------------- |
| marketing | `Marketing 📣` |
| support | `Support 🛠` |
| coworker | `Team 💬` |
| spam | `Spam ❌` |
### Step 5: Draft or Send Replies
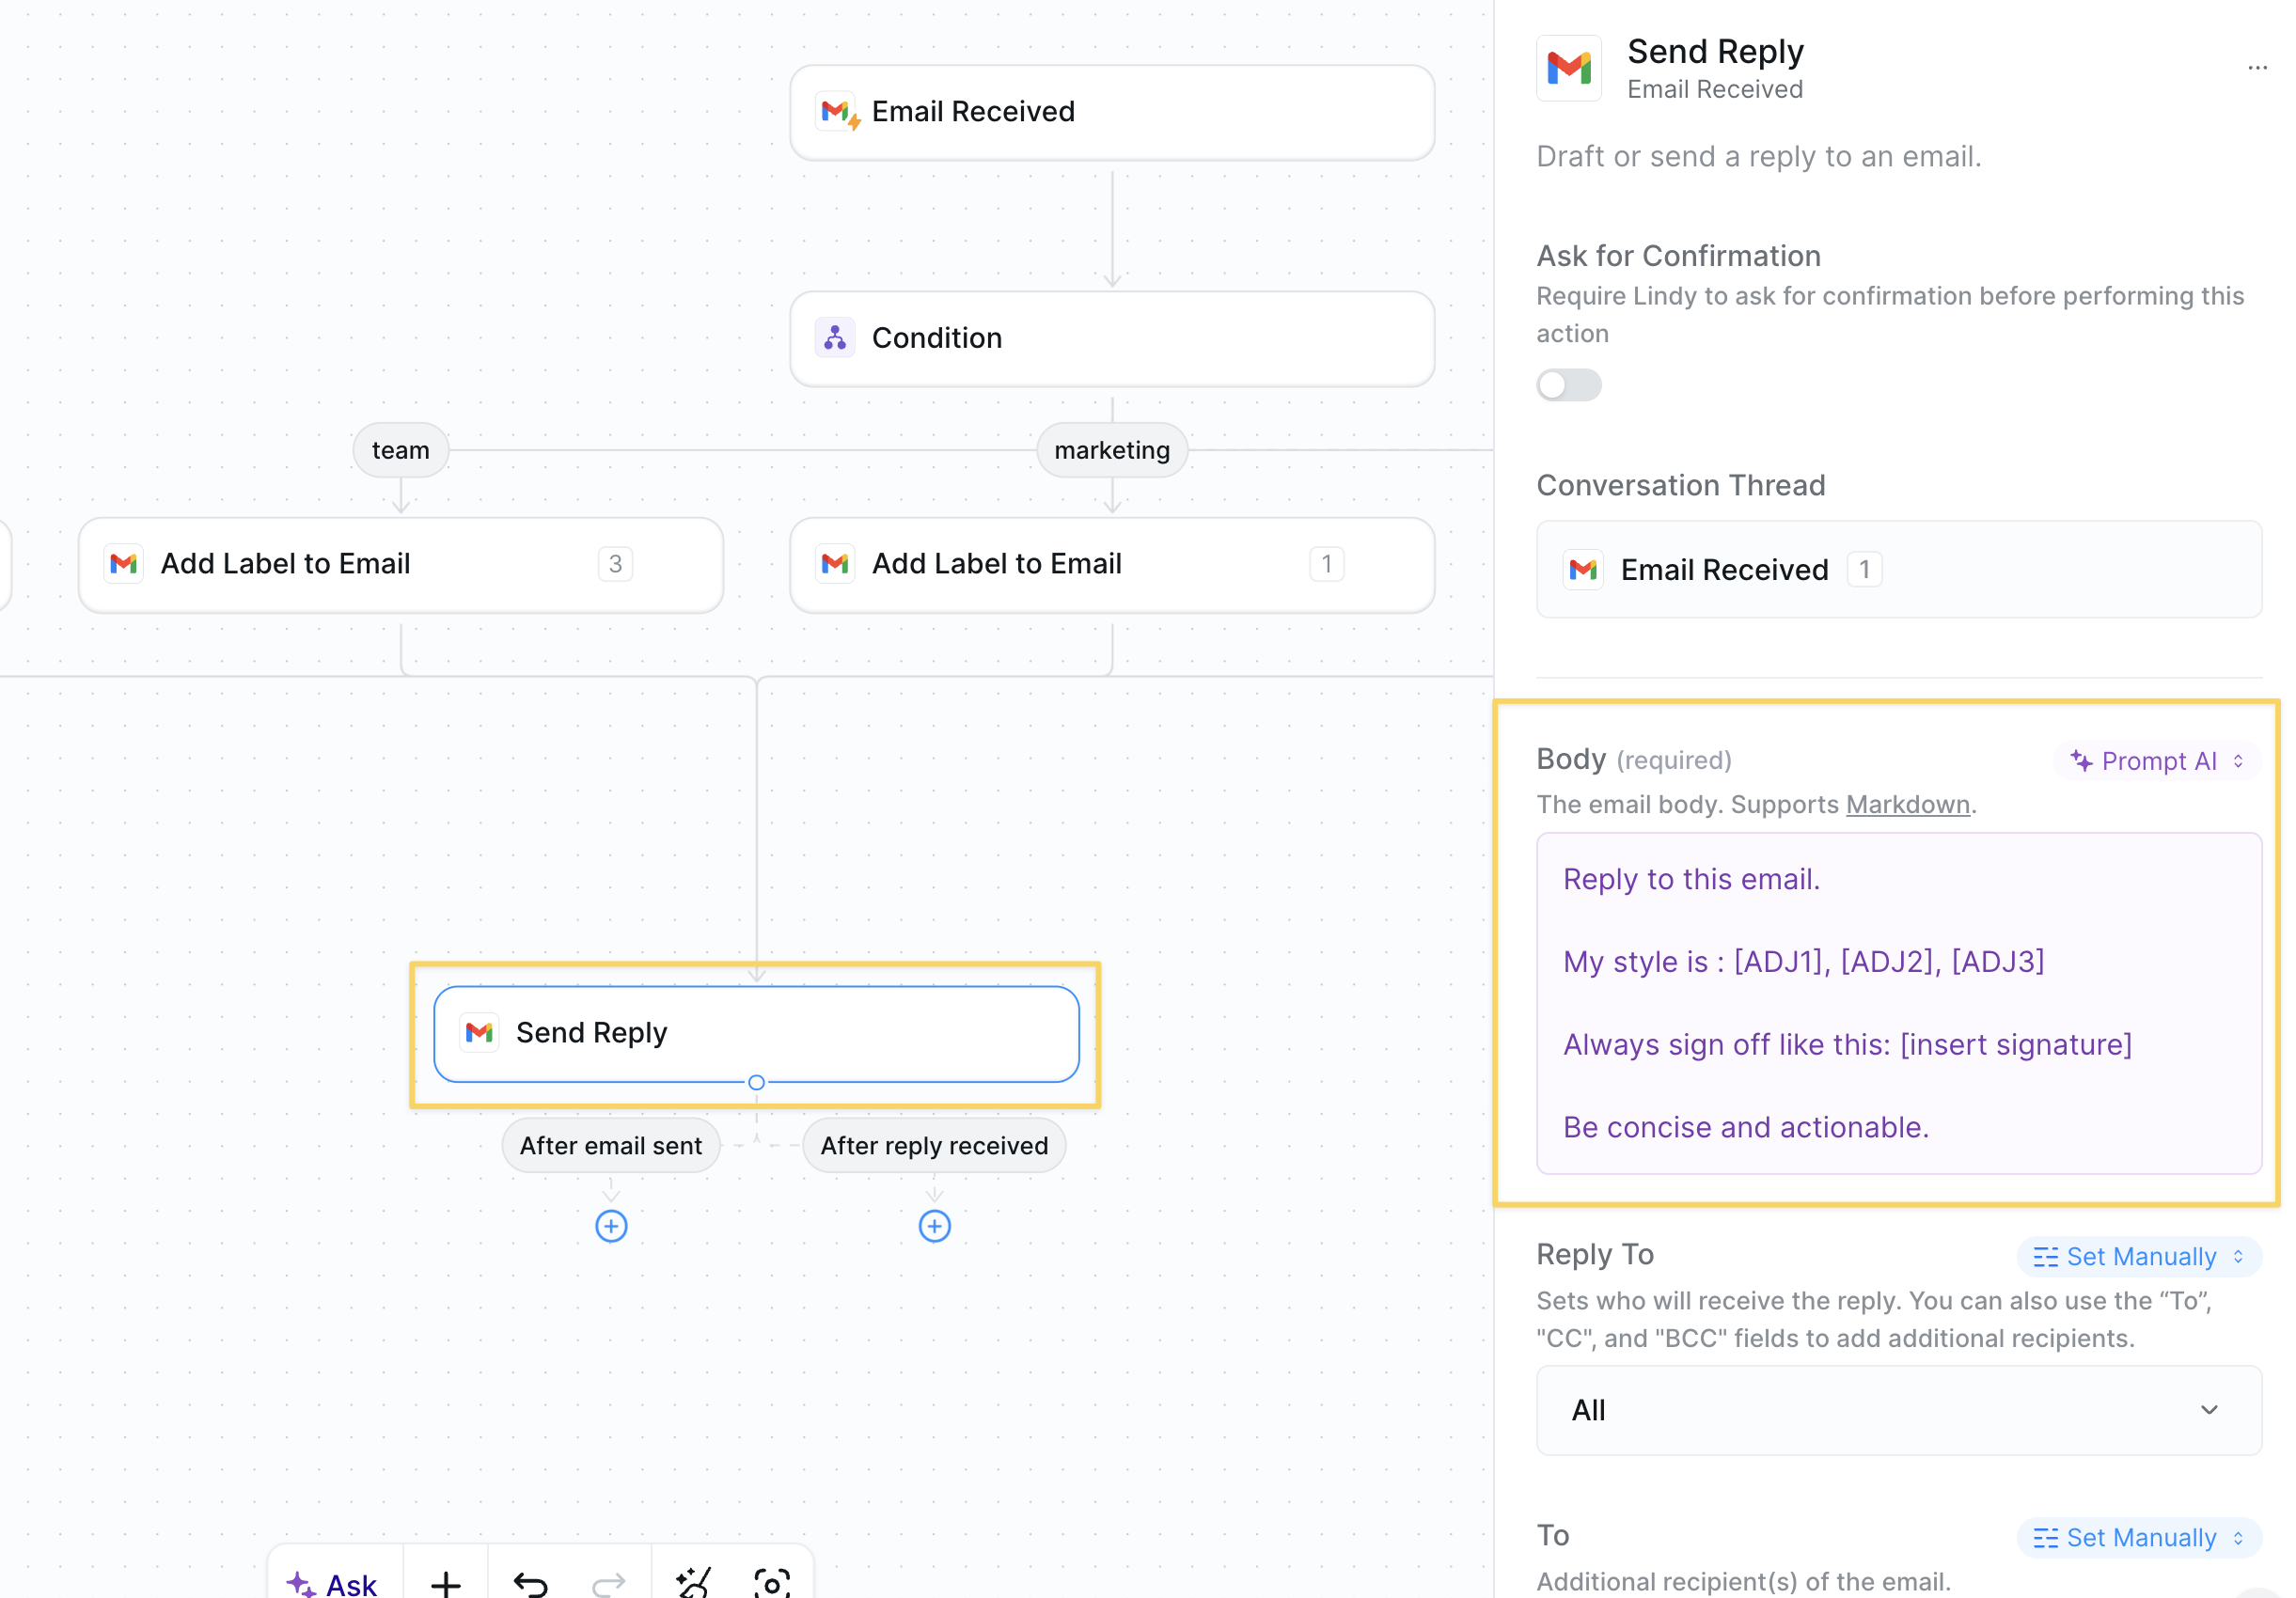 For each path you want a response, connect them to a `Send Reply` action.
Use a prompt like this in the `Body` field and adjust the adjectives to match your style:
```
Reply to this email.
My style is : [ADJ1], [ADJ2], [ADJ3]
Always sign off like this: [insert signature]
Be concise and actionable.
```
ß
You can also use the signature field and add in your custom html signature.
Toggle `Save as Draft` if you want to review before sending.
For each path you want a response, connect them to a `Send Reply` action.
Use a prompt like this in the `Body` field and adjust the adjectives to match your style:
```
Reply to this email.
My style is : [ADJ1], [ADJ2], [ADJ3]
Always sign off like this: [insert signature]
Be concise and actionable.
```
ß
You can also use the signature field and add in your custom html signature.
Toggle `Save as Draft` if you want to review before sending.
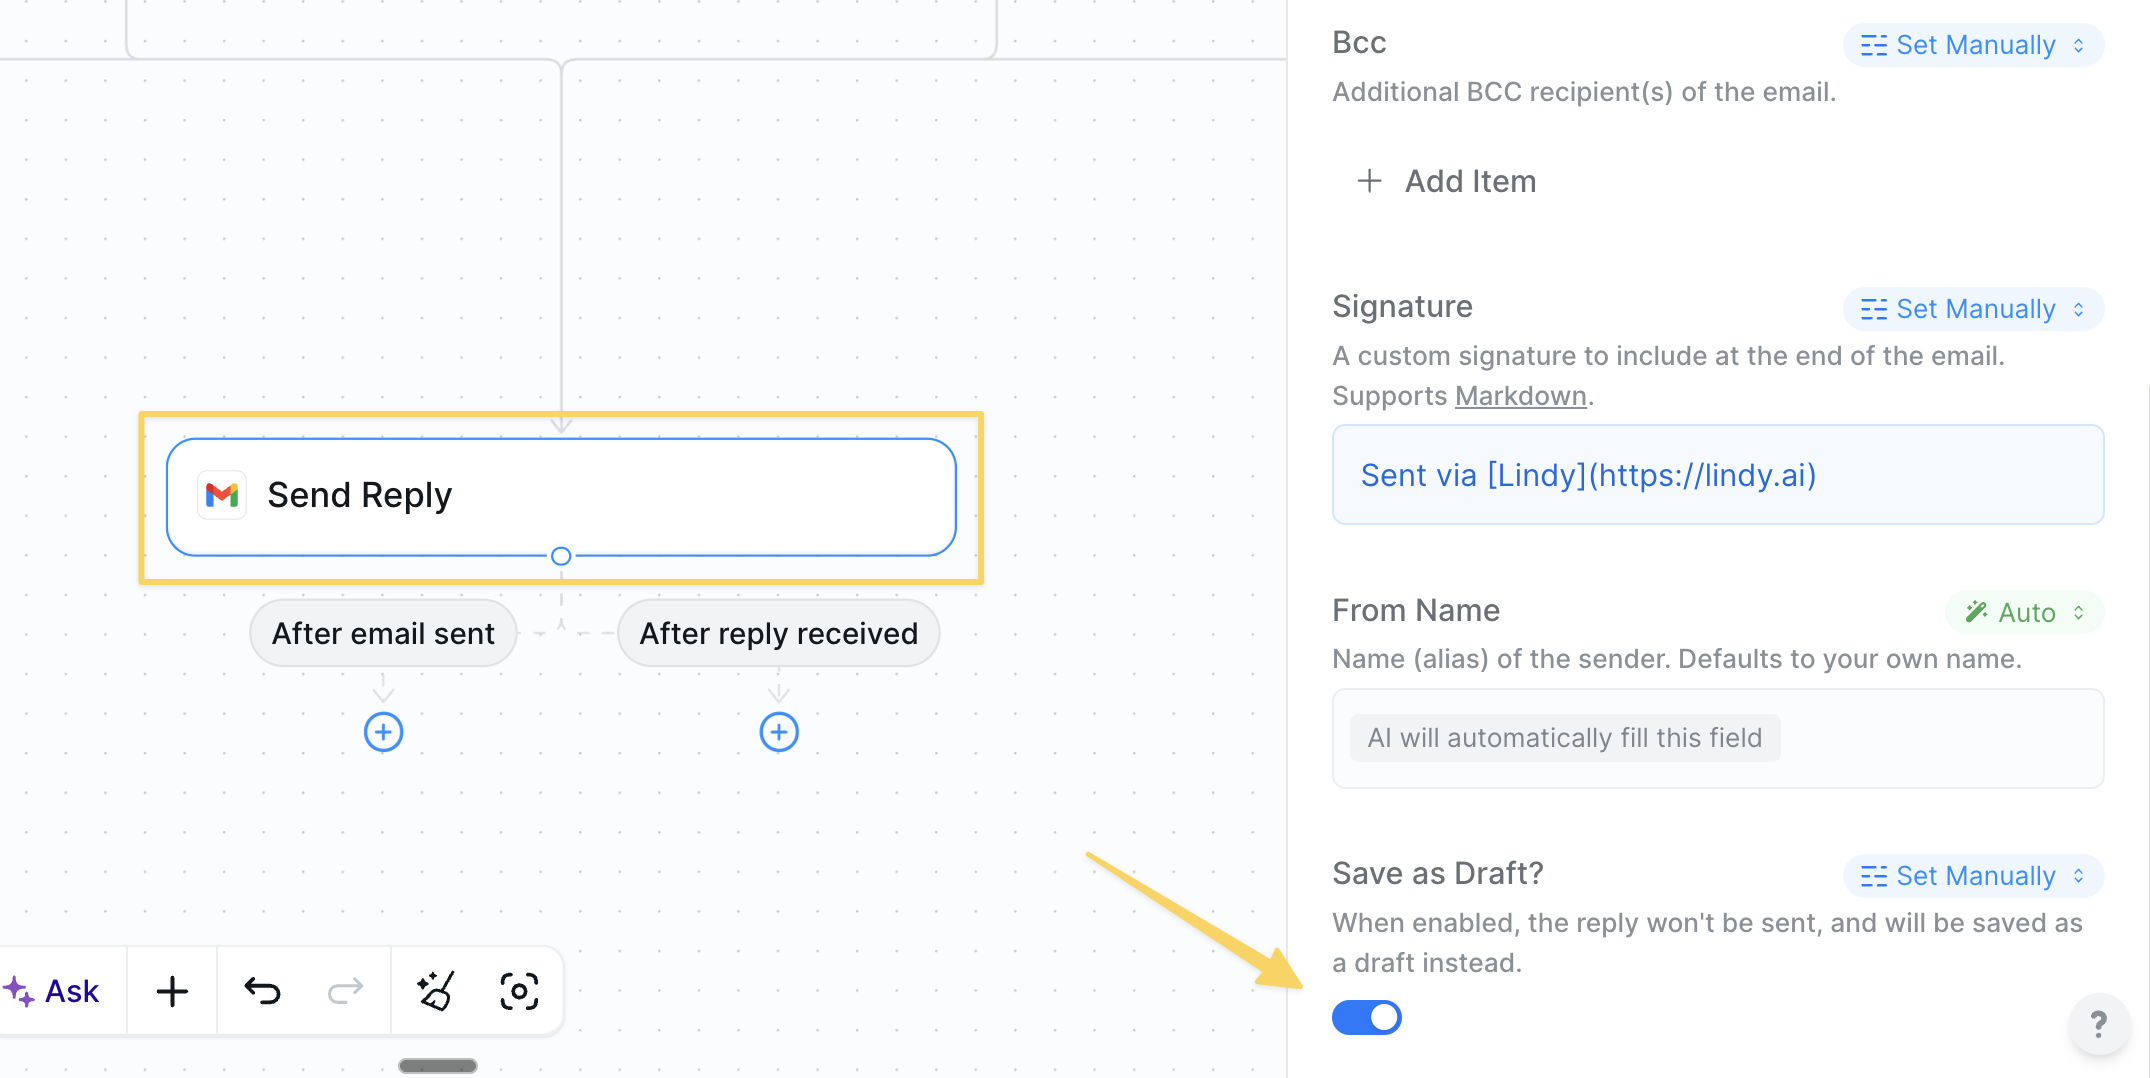 ### Step 6: Add a Knowledge Base (Optional)
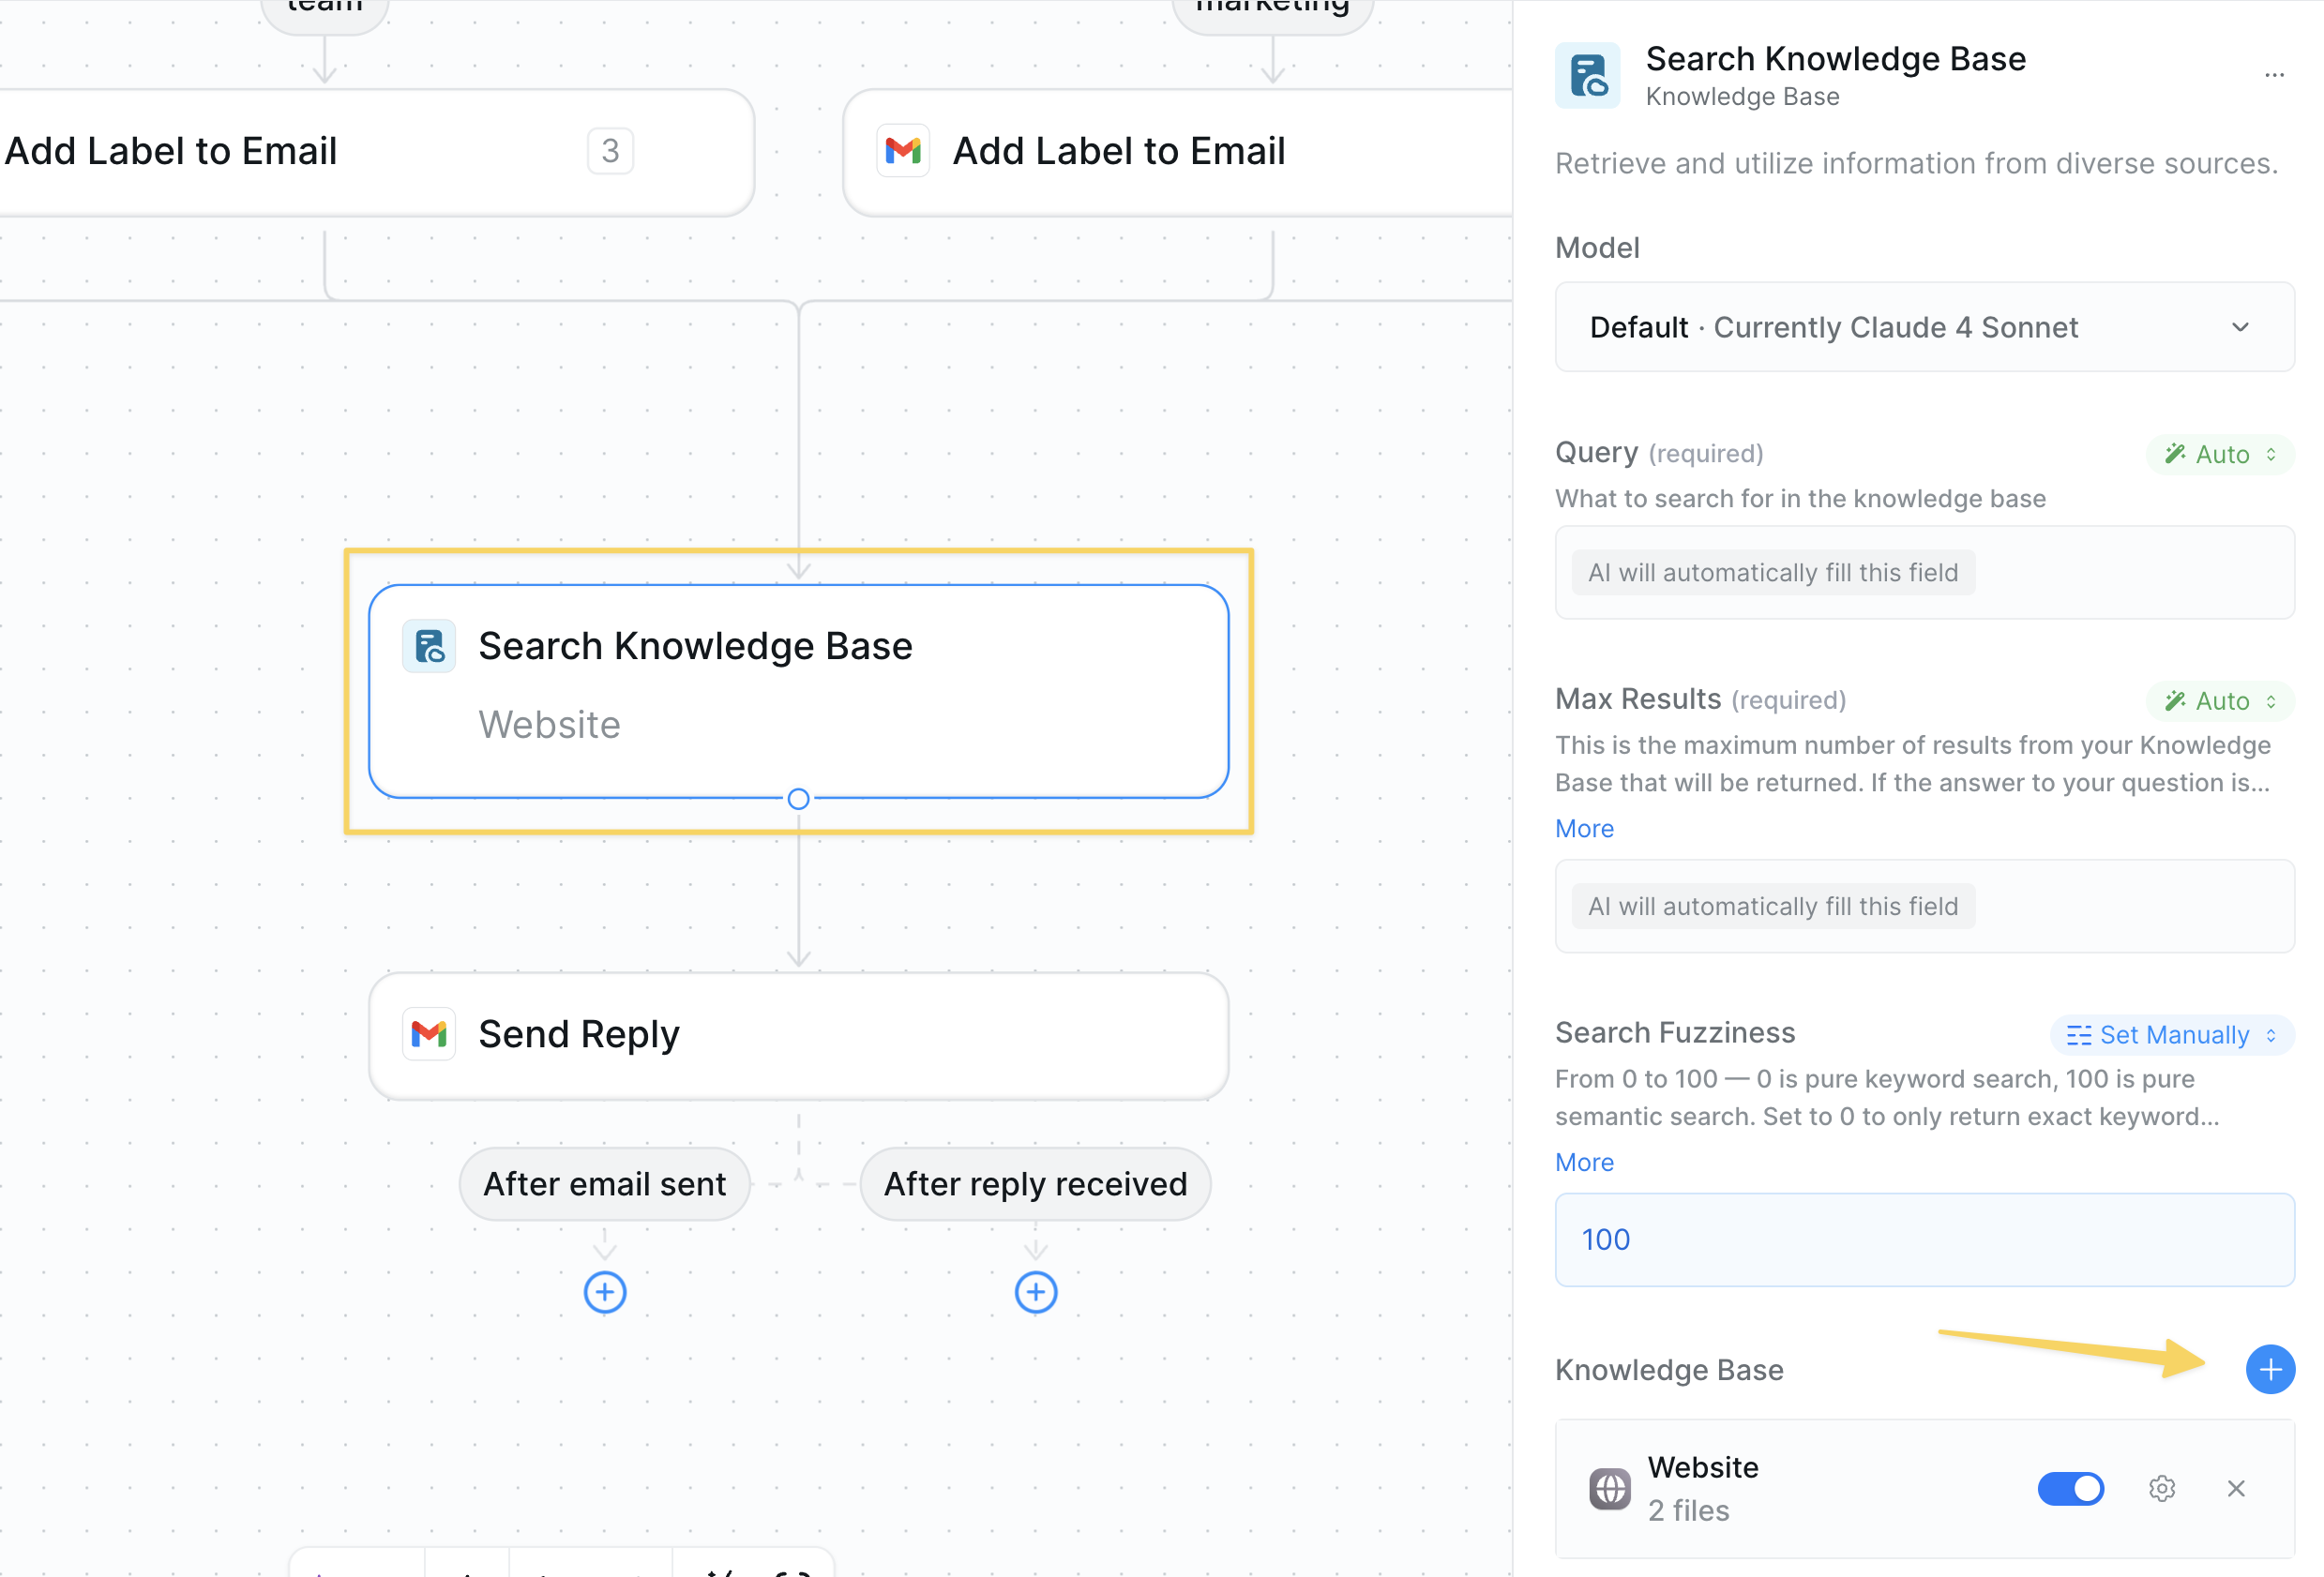 1. Attach docs (FAQ, help center, pricing guides).
2. Insert `Search Knowledge Base` before the reply action.
3. Gate replies with a `Found answer?` condition to avoid guesswork.
## Advanced Customizations
| Trick | What it does |
| ---------------------- | ------------------------------------------------------------------------------------- |
| Thread Sentiment Check | Score each email's tone (angry, happy, neutral) → escalate negative threads to Slack. |
| VIP Escalation | If `from` domain matches big-logo clients, bypass auto-reply and ping you instantly. |
| Spam Digest | Collect low-priority marketing mails → send one daily summary at 7 AM. |
| Attachment OCR | Auto-extract invoice data from PDFs and push to your accounting system. |
## Best Practices
Keep `Save as Draft` on for the first week to spot issues.
Out-of-date answers are worse than no answer; schedule monthly reviews.
Leave sensitive/legal threads for human review.
## Next Steps
Now that your Email Assistant is set up, explore these complementary workflows:
Advanced email automation and workflows
Add smart routing logic to email workflows
Jump-start with pre-built email workflows
Add approval steps for important emails
# Meeting Assistant
Source: https://docs.lindy.ai/use-cases/popular-workflows/meeting-assistant
## Quick Overview
A Meeting Notetaker agent automatically joins your scheduled meetings, records the conversation, and creates detailed summaries with action items, decisions, and key discussion points. It's like having a dedicated assistant in every meeting who never misses a detail and always delivers organized notes.
You can find a `Meeting Notetaker template` on the left-hand side of your Lindy dashboard to get started quickly.
Key benefits of using a Meeting Notetaker:
* **Automatic attendance** — Agent joins meetings based on your calendar without manual intervention
* **Comprehensive notes** — Captures all important discussions, decisions, and action items
* **Organized storage** — Saves meeting notes in your preferred format with consistent formatting
* **Searchable archive** — Creates a searchable repository of all your meeting history
* **Team alignment** — Ensures everyone has access to the same information, even if they missed the meeting
## Setting Up Your Meeting Notetaker
Once you've clicked on the Meeting Notetaker template to your account, open the Flow Editor to see how it works. Let's walk through each step to customize it for your needs.
### Step 1: Connect Your Calendar
Start by connecting the Google Calendar that contains the meetings you want your agent to join.
1. Attach docs (FAQ, help center, pricing guides).
2. Insert `Search Knowledge Base` before the reply action.
3. Gate replies with a `Found answer?` condition to avoid guesswork.
## Advanced Customizations
| Trick | What it does |
| ---------------------- | ------------------------------------------------------------------------------------- |
| Thread Sentiment Check | Score each email's tone (angry, happy, neutral) → escalate negative threads to Slack. |
| VIP Escalation | If `from` domain matches big-logo clients, bypass auto-reply and ping you instantly. |
| Spam Digest | Collect low-priority marketing mails → send one daily summary at 7 AM. |
| Attachment OCR | Auto-extract invoice data from PDFs and push to your accounting system. |
## Best Practices
Keep `Save as Draft` on for the first week to spot issues.
Out-of-date answers are worse than no answer; schedule monthly reviews.
Leave sensitive/legal threads for human review.
## Next Steps
Now that your Email Assistant is set up, explore these complementary workflows:
Advanced email automation and workflows
Add smart routing logic to email workflows
Jump-start with pre-built email workflows
Add approval steps for important emails
# Meeting Assistant
Source: https://docs.lindy.ai/use-cases/popular-workflows/meeting-assistant
## Quick Overview
A Meeting Notetaker agent automatically joins your scheduled meetings, records the conversation, and creates detailed summaries with action items, decisions, and key discussion points. It's like having a dedicated assistant in every meeting who never misses a detail and always delivers organized notes.
You can find a `Meeting Notetaker template` on the left-hand side of your Lindy dashboard to get started quickly.
Key benefits of using a Meeting Notetaker:
* **Automatic attendance** — Agent joins meetings based on your calendar without manual intervention
* **Comprehensive notes** — Captures all important discussions, decisions, and action items
* **Organized storage** — Saves meeting notes in your preferred format with consistent formatting
* **Searchable archive** — Creates a searchable repository of all your meeting history
* **Team alignment** — Ensures everyone has access to the same information, even if they missed the meeting
## Setting Up Your Meeting Notetaker
Once you've clicked on the Meeting Notetaker template to your account, open the Flow Editor to see how it works. Let's walk through each step to customize it for your needs.
### Step 1: Connect Your Calendar
Start by connecting the Google Calendar that contains the meetings you want your agent to join.
 Click the `Calendar Event Started` trigger and select the calendar you want your agent to monitor. This can be your personal calendar or a shared team calendar.
### Step 2: Filter for Virtual Meetings
The next step is a `Condition` that ensures the agent only processes virtual meetings.
Click the `Calendar Event Started` trigger and select the calendar you want your agent to monitor. This can be your personal calendar or a shared team calendar.
### Step 2: Filter for Virtual Meetings
The next step is a `Condition` that ensures the agent only processes virtual meetings.
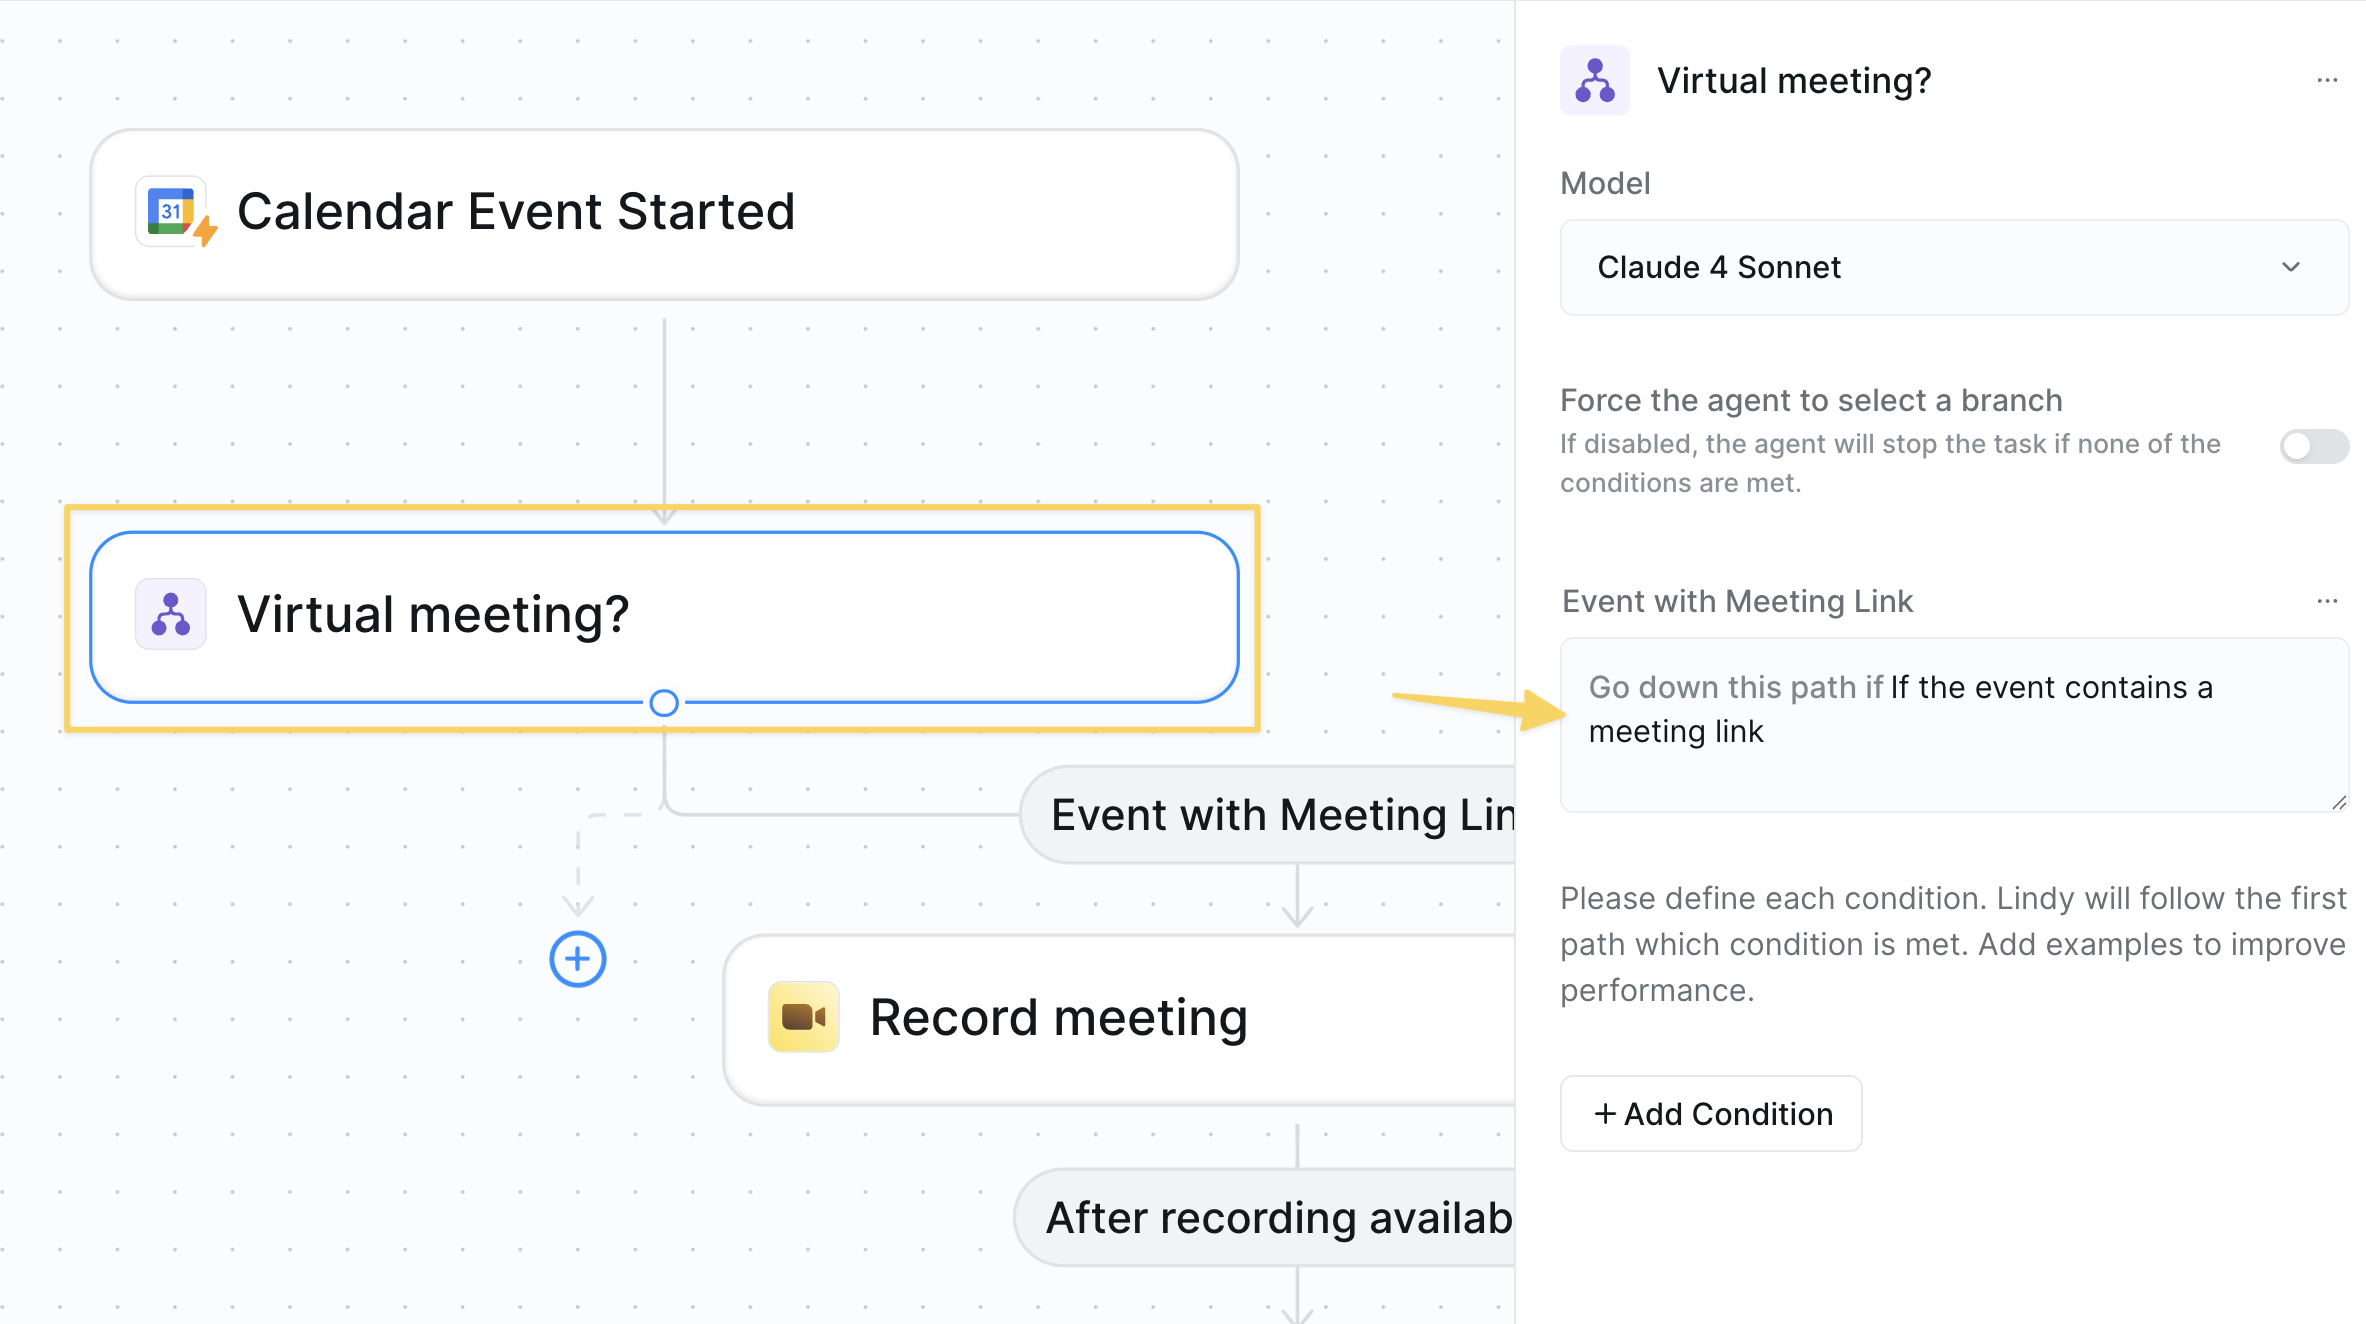 This condition uses the prompt: "if the event contains a meeting link" to filter out in-person meetings or events without video conference links.
You can add trigger filters to give you more control over which meetings your agent joins. For example:
* Filter for events containing "Demo Call" in the name
* Only join meetings with specific attendees
* Skip meetings marked as "Private"
Pro tip: Use filters to have your agent only join specific types of meetings. This prevents your agent from joining every calendar event, like personal appointments.
### Step 3: Configure Meeting Recording
Now let's set up how your agent will join and behave in your meetings.
This condition uses the prompt: "if the event contains a meeting link" to filter out in-person meetings or events without video conference links.
You can add trigger filters to give you more control over which meetings your agent joins. For example:
* Filter for events containing "Demo Call" in the name
* Only join meetings with specific attendees
* Skip meetings marked as "Private"
Pro tip: Use filters to have your agent only join specific types of meetings. This prevents your agent from joining every calendar event, like personal appointments.
### Step 3: Configure Meeting Recording
Now let's set up how your agent will join and behave in your meetings.
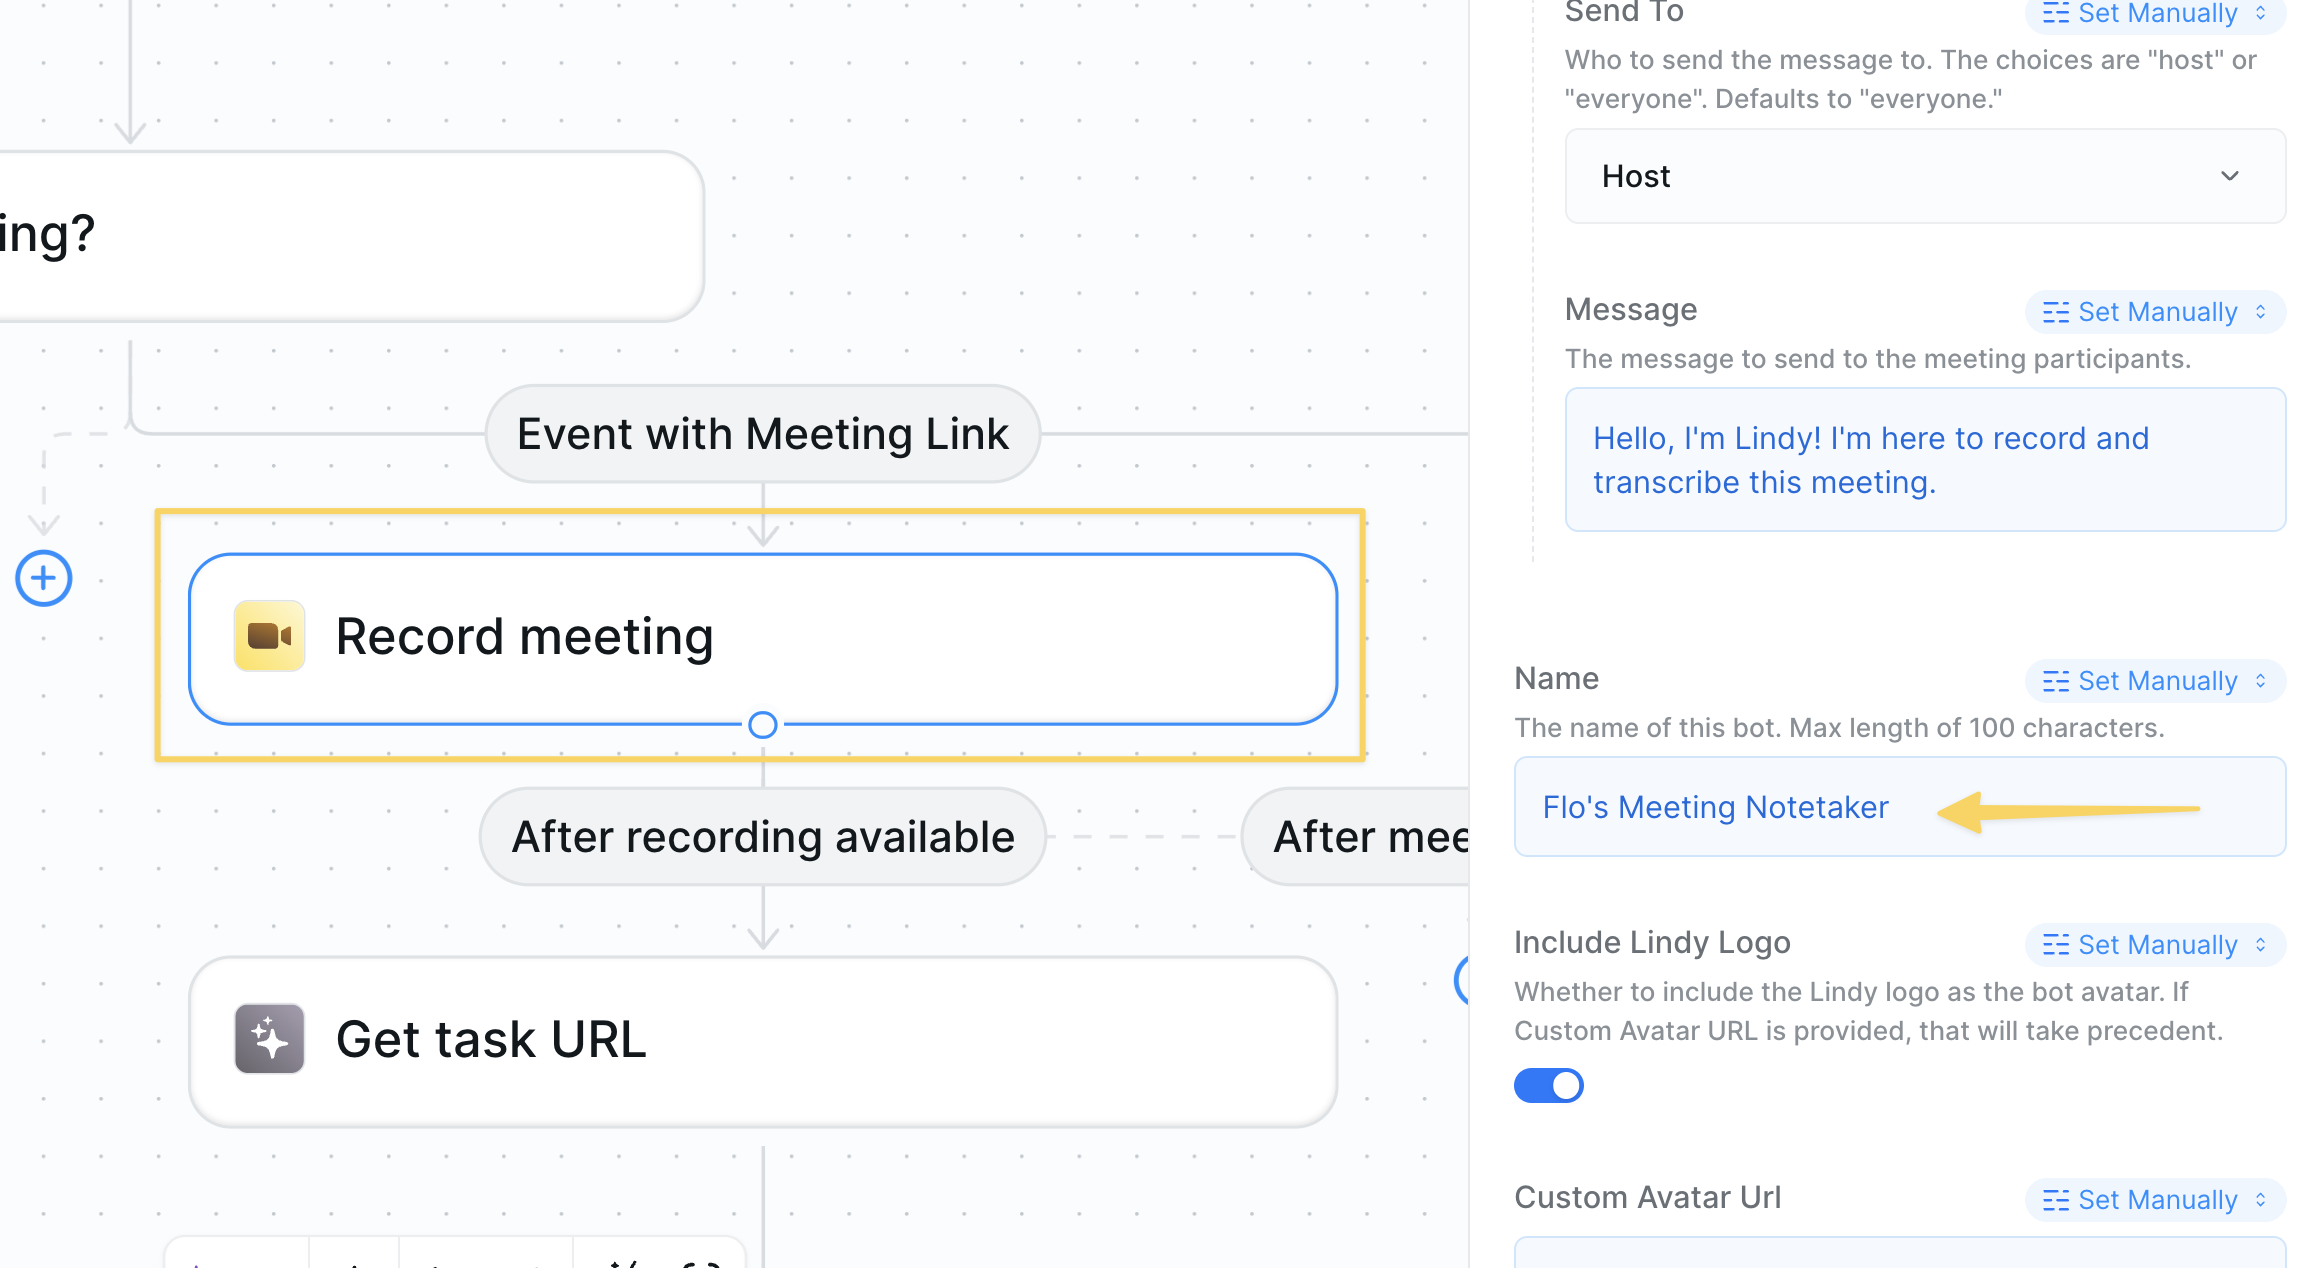 In the `Record Meeting` action you can customize several options, but here are a few suggestions:
#### Chat Message Settings
* **Chat Message On Join**: Customize what your agent says when joining (or leave blank for silent entry)
* **Name**: Set your agent's display name (e.g., "Sarah's Notetaker")
#### Recording Options
* Meeting URL is set to "Auto" so your agent intelligently finds the meeting link
* Recording will start automatically when your agent joins
### Step 4: Email Meeting Recap to Attendees
Set up an email to automatically send meeting summaries to all attendees with the `Gmail Send Email` action.
In the `Record Meeting` action you can customize several options, but here are a few suggestions:
#### Chat Message Settings
* **Chat Message On Join**: Customize what your agent says when joining (or leave blank for silent entry)
* **Name**: Set your agent's display name (e.g., "Sarah's Notetaker")
#### Recording Options
* Meeting URL is set to "Auto" so your agent intelligently finds the meeting link
* Recording will start automatically when your agent joins
### Step 4: Email Meeting Recap to Attendees
Set up an email to automatically send meeting summaries to all attendees with the `Gmail Send Email` action.
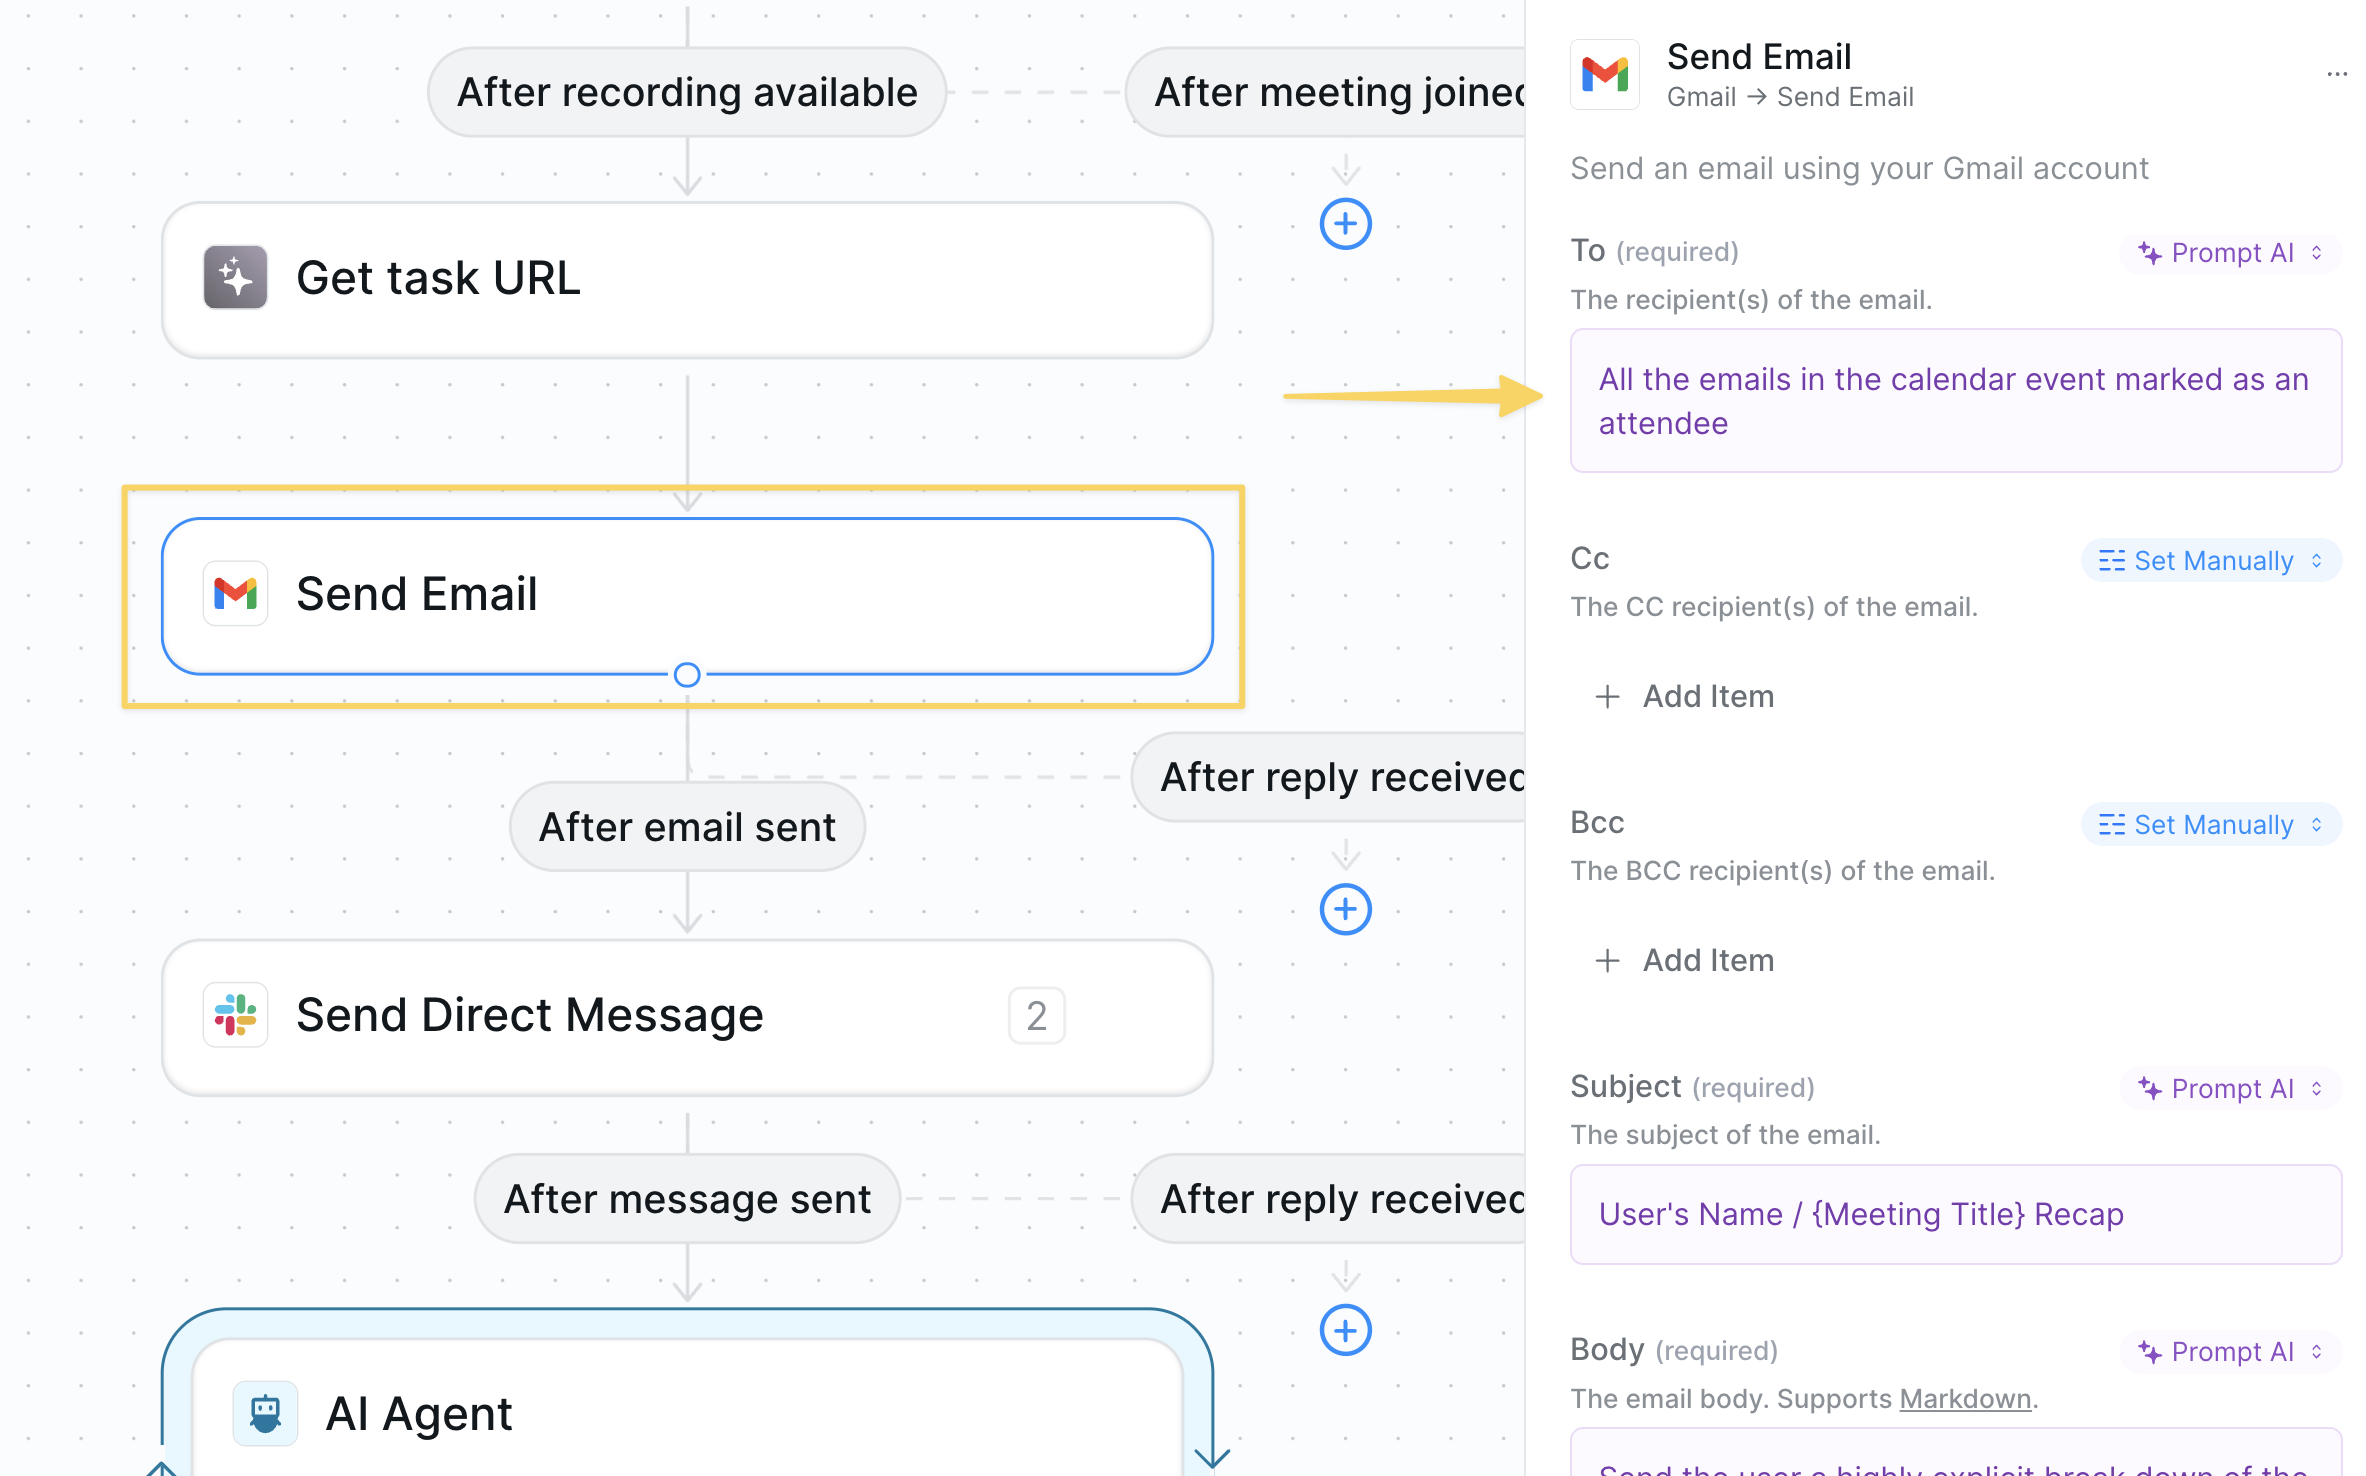 #### Recipient Settings
* **To field**: Uses "Prompt AI" mode with: "All the emails in the calendar event marked as an attendee"
* This dynamically includes everyone who was invited to the meeting
#### Content Customization
* **Subject**: Customize the email subject line
* **Body**: Include meeting summary, action items, and the task URL for easy access to recordings
### Step 5: Slack Summary Integration
Send meeting summaries directly to your Slack for immediate visibility using the `Slack Send Direct Message` action.
#### Recipient Settings
* **To field**: Uses "Prompt AI" mode with: "All the emails in the calendar event marked as an attendee"
* This dynamically includes everyone who was invited to the meeting
#### Content Customization
* **Subject**: Customize the email subject line
* **Body**: Include meeting summary, action items, and the task URL for easy access to recordings
### Step 5: Slack Summary Integration
Send meeting summaries directly to your Slack for immediate visibility using the `Slack Send Direct Message` action.
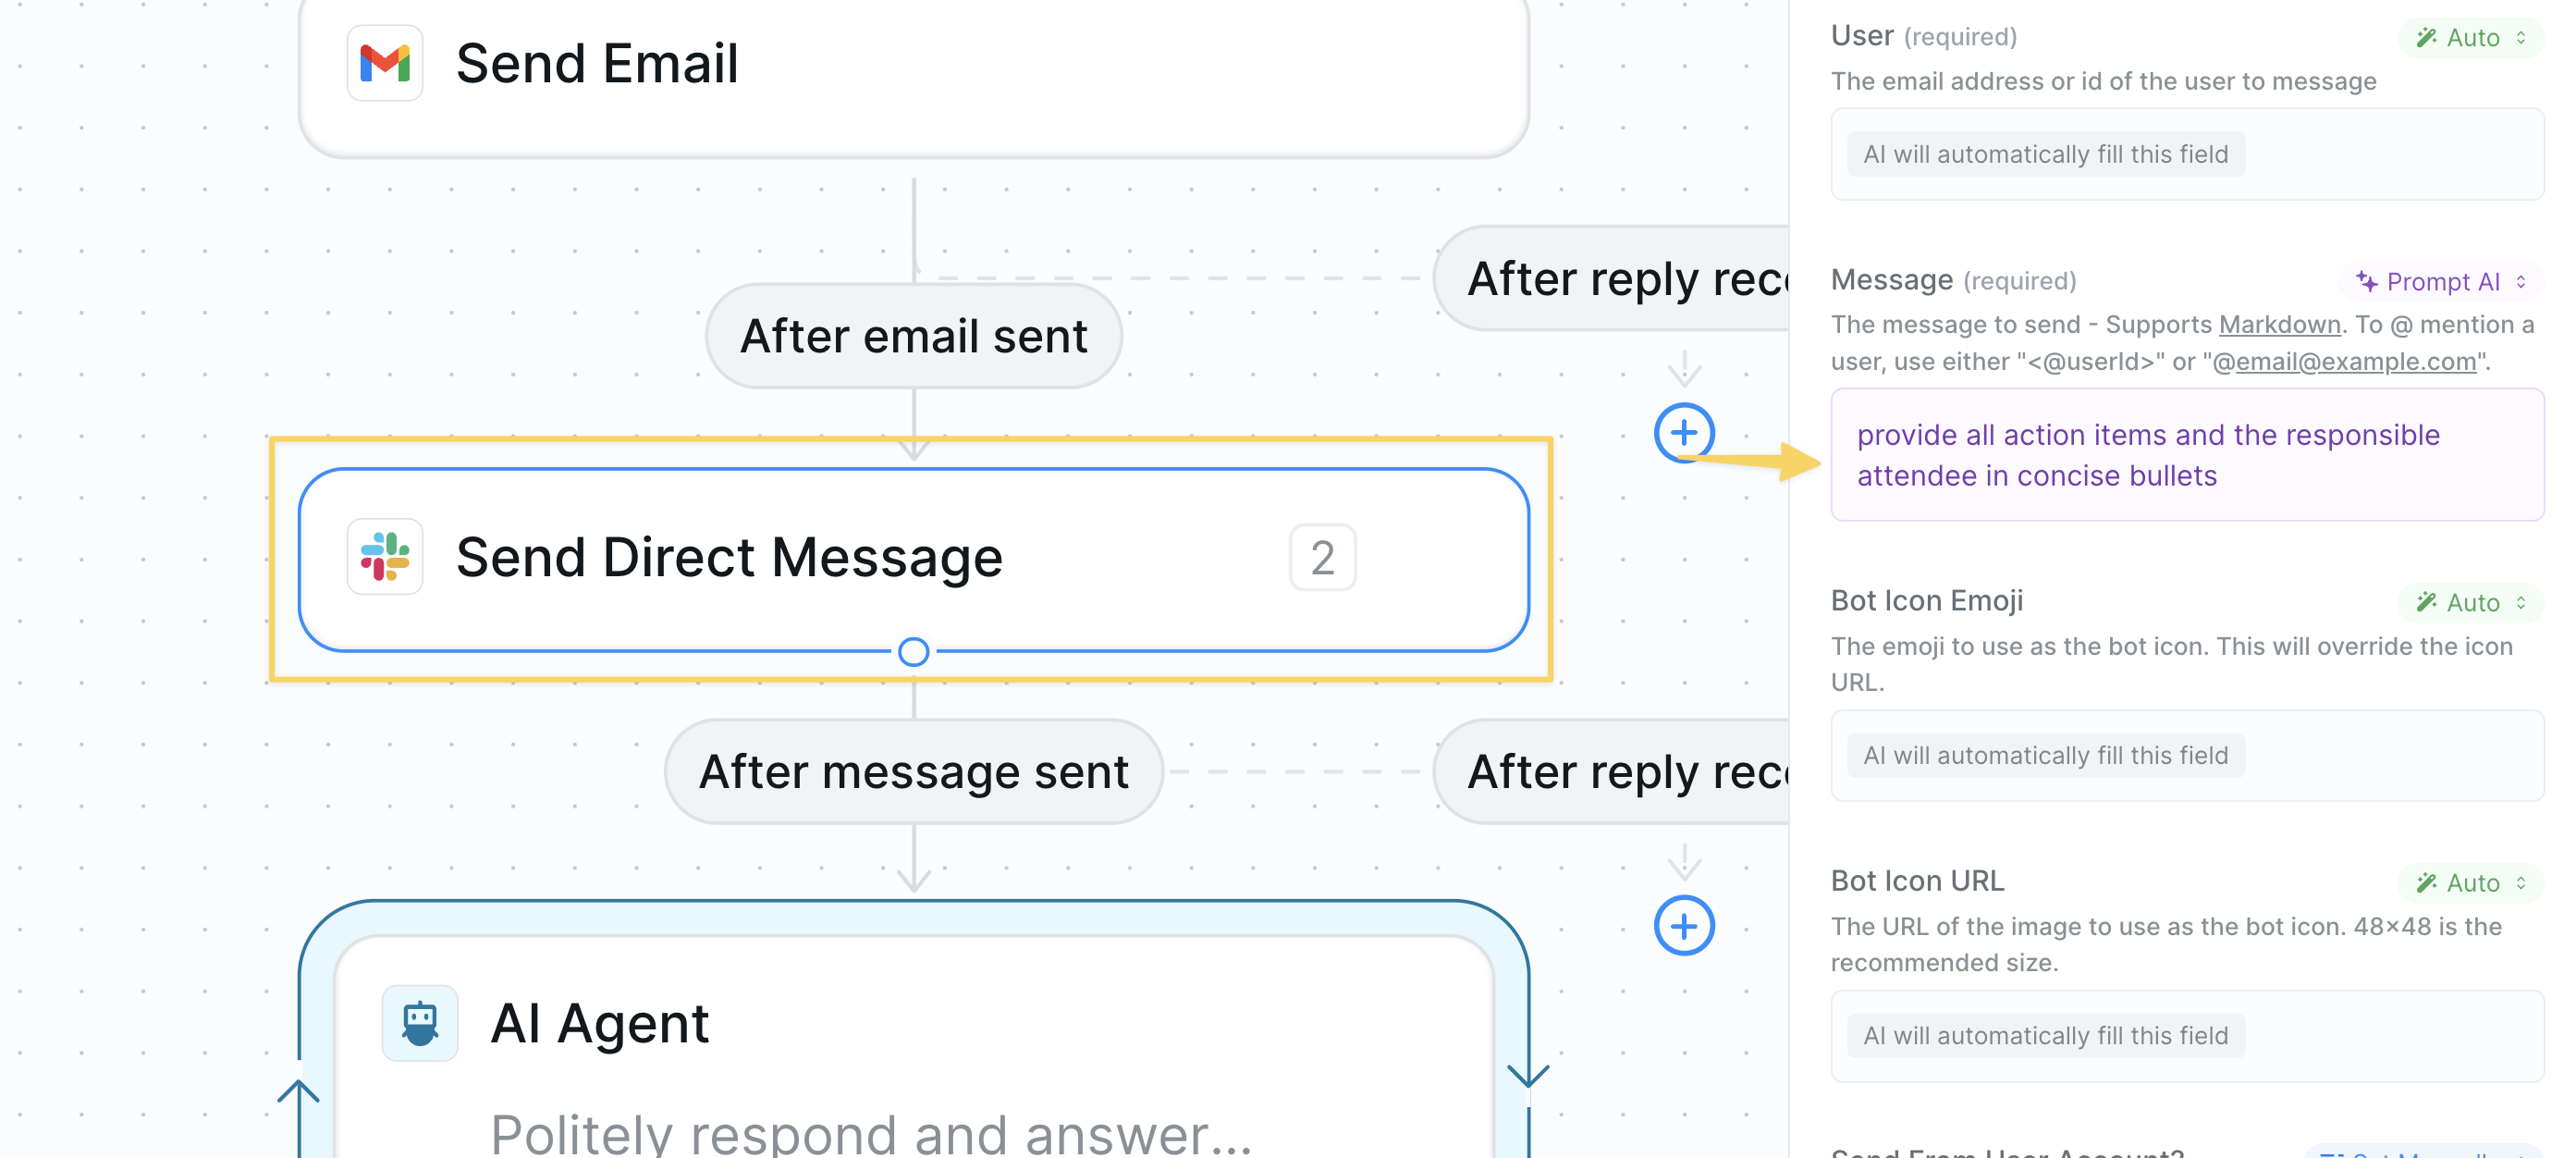 #### User Configuration
* **User field**: Switch to "Set Manually" and enter your email address connected to Slack
* **Message field**: Customize what details to include in the Slack summary
### Step 6: AI Agent for Follow-up Questions
The final step adds an AI Agent to handle follow-up questions about your meetings.
#### User Configuration
* **User field**: Switch to "Set Manually" and enter your email address connected to Slack
* **Message field**: Customize what details to include in the Slack summary
### Step 6: AI Agent for Follow-up Questions
The final step adds an AI Agent to handle follow-up questions about your meetings.
 The AI Agent uses the prompt: "Politely respond and answer questions about the meeting" which will allow for an interactive experience in task view.
This allows your agent to:
* Respond to questions
* Provide meeting context when asked
* Help with follow-up actions
## Using Your Meeting Notetaker
Congratulations! Your Meeting Notetaker is now set up to:
* ✅ Automatically join virtual meetings
* ✅ Record and transcribe conversations
* ✅ Send summaries to attendees
* ✅ Post summaries in Slack
* ✅ Answer follow-up questions
### Accessing Meeting Content
You can view your meeting recordings by:
* Clicking the task in your agent's task view
* Clicking the task URL if added to a message via output reference
* Copying the transcript using the Copy icon
* Downloading the recording via the three dots menu
## Advanced Customizations
### Smart Meeting Categorization
Add conditions to route different meeting types:
* "Client meetings" → Save to specific folder and notify sales team
* "Internal standup" → Create brief summary and post to team Slack
* "Board meetings" → Generate detailed minutes with confidential handling
### CRM Integration
For sales teams, add actions to:
* Update HubSpot or Salesforce records immediately after calls
* Create follow-up tasks and reminders
* Log competitor mentions and feature requests
### Team Management Features
Enhance team workflows by:
* Collecting action items and assigning them to team members
* Sending meeting summaries to relevant Slack channels
* Creating calendar events for follow-up meetings
## Best Practices
Inform meeting participants that your agent will be taking notes. Consider adding a line to your calendar invites: "Note: An AI notetaker will join to capture meeting notes."
Set up filters to exclude sensitive meetings like performance reviews or confidential discussions. Use calendar event titles or attendee lists as filter criteria.
Create a consistent folder structure in your cloud storage. Consider organizing by date, project, or meeting type for easy retrieval.
Periodically review the generated notes and refine your prompts. The more specific your instructions, the better your agent becomes at capturing what matters to you.
## Next Steps
Now that your Meeting Notetaker is set up, explore these complementary workflows:
Research attendees before your meetings
Let your agent coordinate and schedule meetings
Store meeting notes for easy searching
Track meeting assistant performance
# Scheduling Assistant
Source: https://docs.lindy.ai/use-cases/popular-workflows/scheduling-assistant
Let your agent negotiate times, send invites, and keep your calendar tidy.
## Quick Overview
Scheduling links can feel impersonal and coordinating meeting times manually is time-consuming. Let your agent handle the back-and-forth for you!
CC your agent on any thread and it will:
* **Detect** whether a specific time was suggested
* **Propose** three slots if none was given
* **Book** the meeting on your calendar with full context
* **Confirm** with all parties once the invite is sent
* **Reschedule** gracefully if plans change
You can use the [meeting scheduler template](https://chat.lindy.ai/home/?templateId=68755951168421e8baec59fd) to get started.
## Setting Up Your Meeting Scheduler
### Step 1: Configure Lindy Mail
The AI Agent uses the prompt: "Politely respond and answer questions about the meeting" which will allow for an interactive experience in task view.
This allows your agent to:
* Respond to questions
* Provide meeting context when asked
* Help with follow-up actions
## Using Your Meeting Notetaker
Congratulations! Your Meeting Notetaker is now set up to:
* ✅ Automatically join virtual meetings
* ✅ Record and transcribe conversations
* ✅ Send summaries to attendees
* ✅ Post summaries in Slack
* ✅ Answer follow-up questions
### Accessing Meeting Content
You can view your meeting recordings by:
* Clicking the task in your agent's task view
* Clicking the task URL if added to a message via output reference
* Copying the transcript using the Copy icon
* Downloading the recording via the three dots menu
## Advanced Customizations
### Smart Meeting Categorization
Add conditions to route different meeting types:
* "Client meetings" → Save to specific folder and notify sales team
* "Internal standup" → Create brief summary and post to team Slack
* "Board meetings" → Generate detailed minutes with confidential handling
### CRM Integration
For sales teams, add actions to:
* Update HubSpot or Salesforce records immediately after calls
* Create follow-up tasks and reminders
* Log competitor mentions and feature requests
### Team Management Features
Enhance team workflows by:
* Collecting action items and assigning them to team members
* Sending meeting summaries to relevant Slack channels
* Creating calendar events for follow-up meetings
## Best Practices
Inform meeting participants that your agent will be taking notes. Consider adding a line to your calendar invites: "Note: An AI notetaker will join to capture meeting notes."
Set up filters to exclude sensitive meetings like performance reviews or confidential discussions. Use calendar event titles or attendee lists as filter criteria.
Create a consistent folder structure in your cloud storage. Consider organizing by date, project, or meeting type for easy retrieval.
Periodically review the generated notes and refine your prompts. The more specific your instructions, the better your agent becomes at capturing what matters to you.
## Next Steps
Now that your Meeting Notetaker is set up, explore these complementary workflows:
Research attendees before your meetings
Let your agent coordinate and schedule meetings
Store meeting notes for easy searching
Track meeting assistant performance
# Scheduling Assistant
Source: https://docs.lindy.ai/use-cases/popular-workflows/scheduling-assistant
Let your agent negotiate times, send invites, and keep your calendar tidy.
## Quick Overview
Scheduling links can feel impersonal and coordinating meeting times manually is time-consuming. Let your agent handle the back-and-forth for you!
CC your agent on any thread and it will:
* **Detect** whether a specific time was suggested
* **Propose** three slots if none was given
* **Book** the meeting on your calendar with full context
* **Confirm** with all parties once the invite is sent
* **Reschedule** gracefully if plans change
You can use the [meeting scheduler template](https://chat.lindy.ai/home/?templateId=68755951168421e8baec59fd) to get started.
## Setting Up Your Meeting Scheduler
### Step 1: Configure Lindy Mail
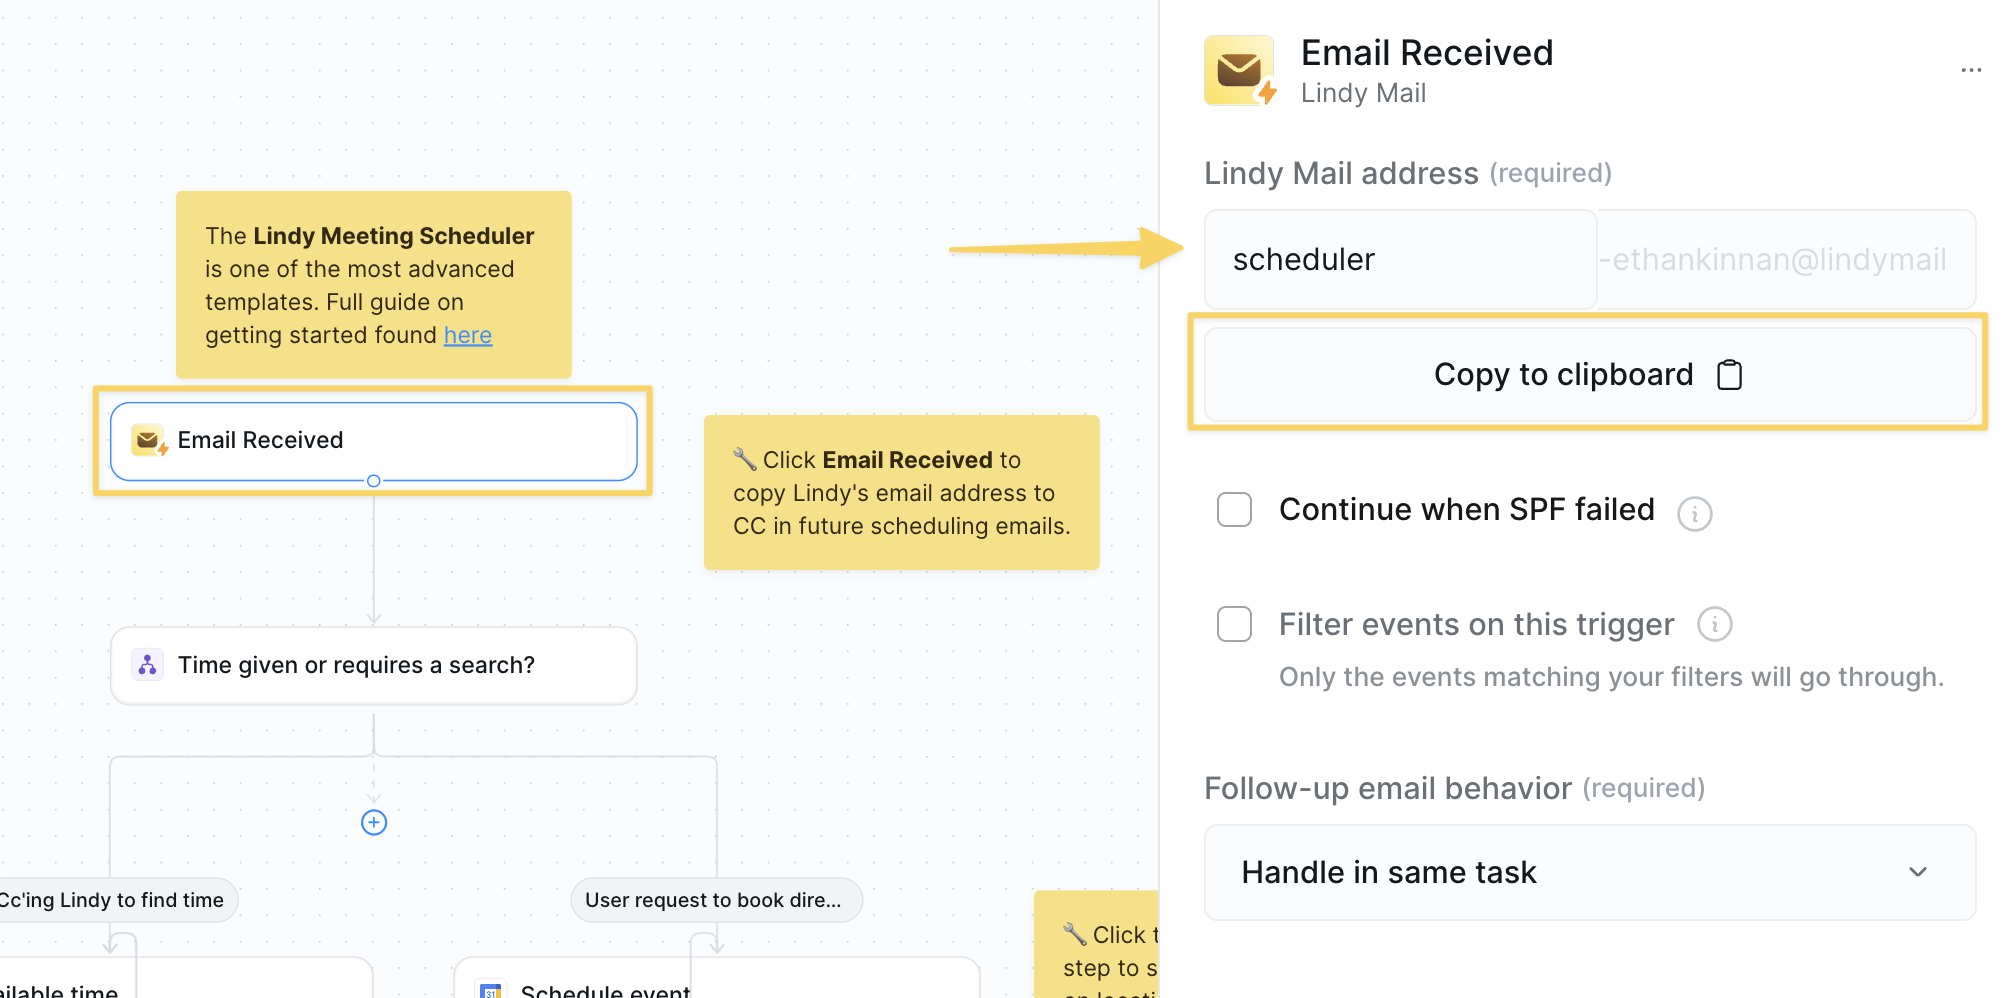 1. Open the `Email Received` trigger.
2. Copy your unique **Lindy Mail Address—this is the address you'll CC.**
### Step 2: Understand the Initial Condition
1. Open the `Email Received` trigger.
2. Copy your unique **Lindy Mail Address—this is the address you'll CC.**
### Step 2: Understand the Initial Condition
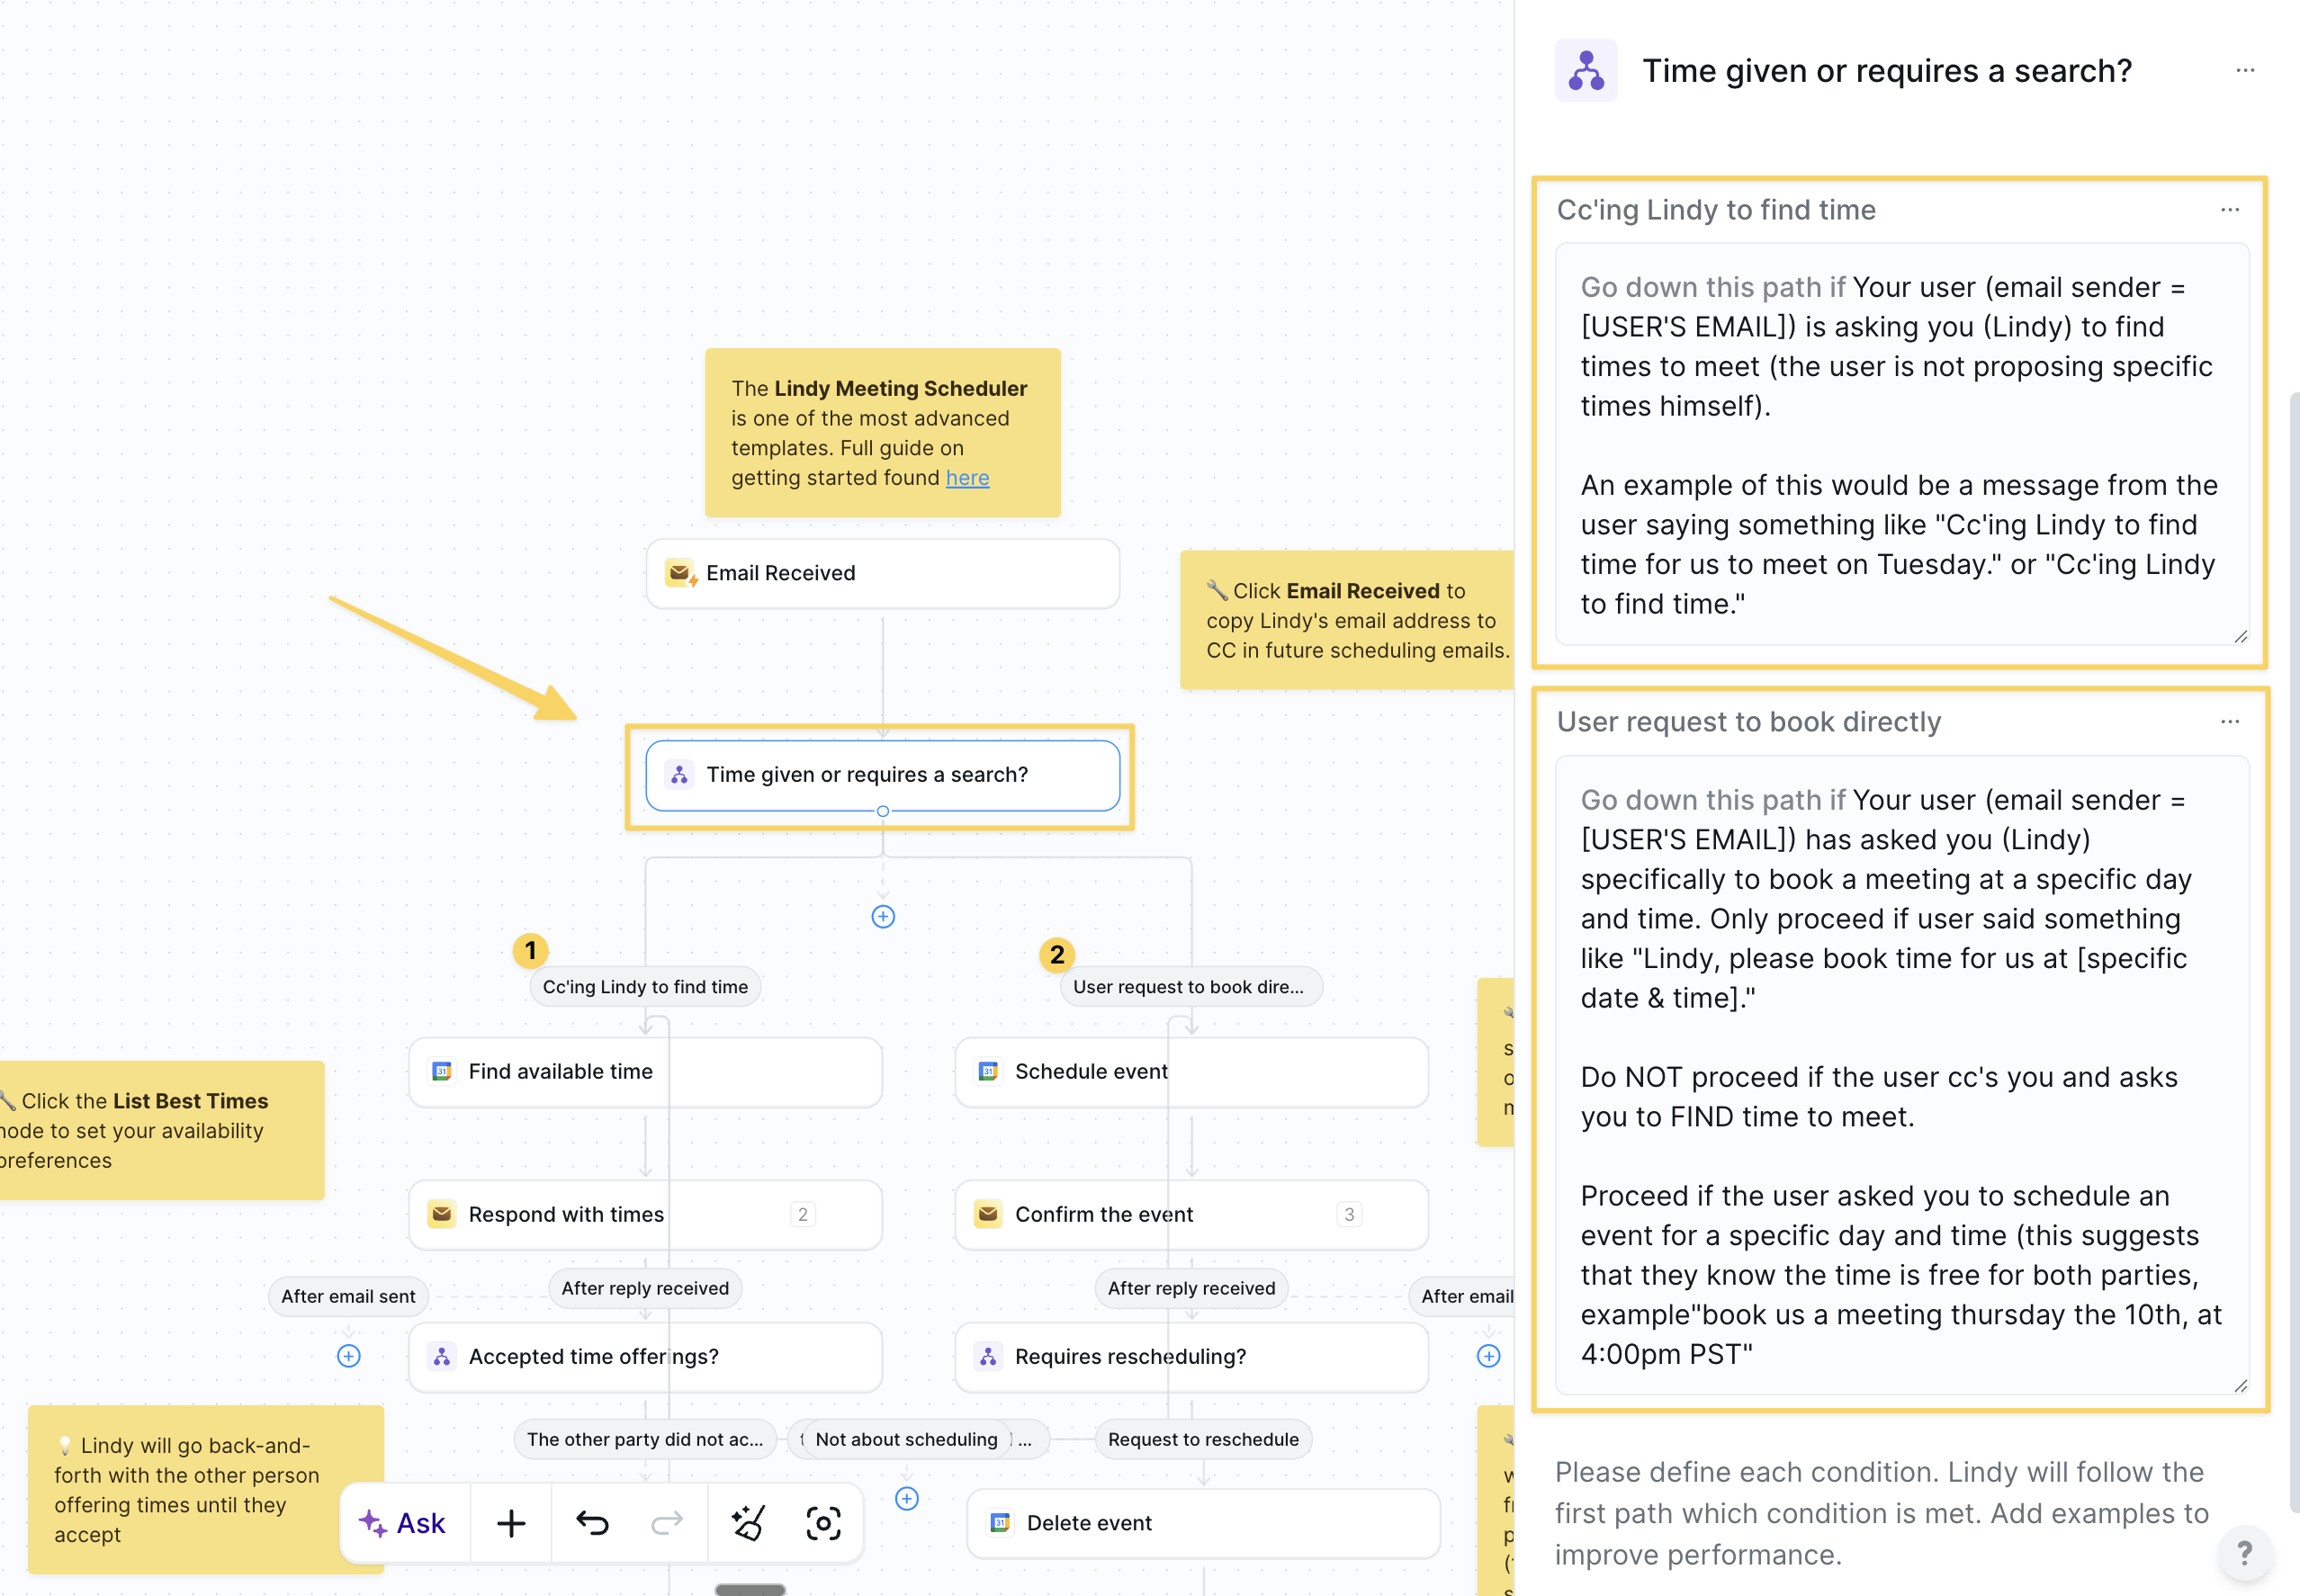 The `Condition` step "Time given or requires a search?" determines what type of scheduling request this is:
**Two paths:**
1. **"CC'ing my agent to find time:"** When the sender asks the agent to find available times
* Example: "CC'ing my agent to find time for us to meet on Tuesday"
2. **"User request to book directly":** When a specific date/time is already agreed upon
* Example: "Agent, please book time for us at Thursday the 10th, at 4:00pm PST"
This smart branching ensures your agent either proposes available times (if none given) OR books the meeting immediately (if time already agreed). The condition prevents the agent from suggesting times when people have already decided when to meet, making the flow more natural.
### Step 3: List Best Times
The `Condition` step "Time given or requires a search?" determines what type of scheduling request this is:
**Two paths:**
1. **"CC'ing my agent to find time:"** When the sender asks the agent to find available times
* Example: "CC'ing my agent to find time for us to meet on Tuesday"
2. **"User request to book directly":** When a specific date/time is already agreed upon
* Example: "Agent, please book time for us at Thursday the 10th, at 4:00pm PST"
This smart branching ensures your agent either proposes available times (if none given) OR books the meeting immediately (if time already agreed). The condition prevents the agent from suggesting times when people have already decided when to meet, making the flow more natural.
### Step 3: List Best Times
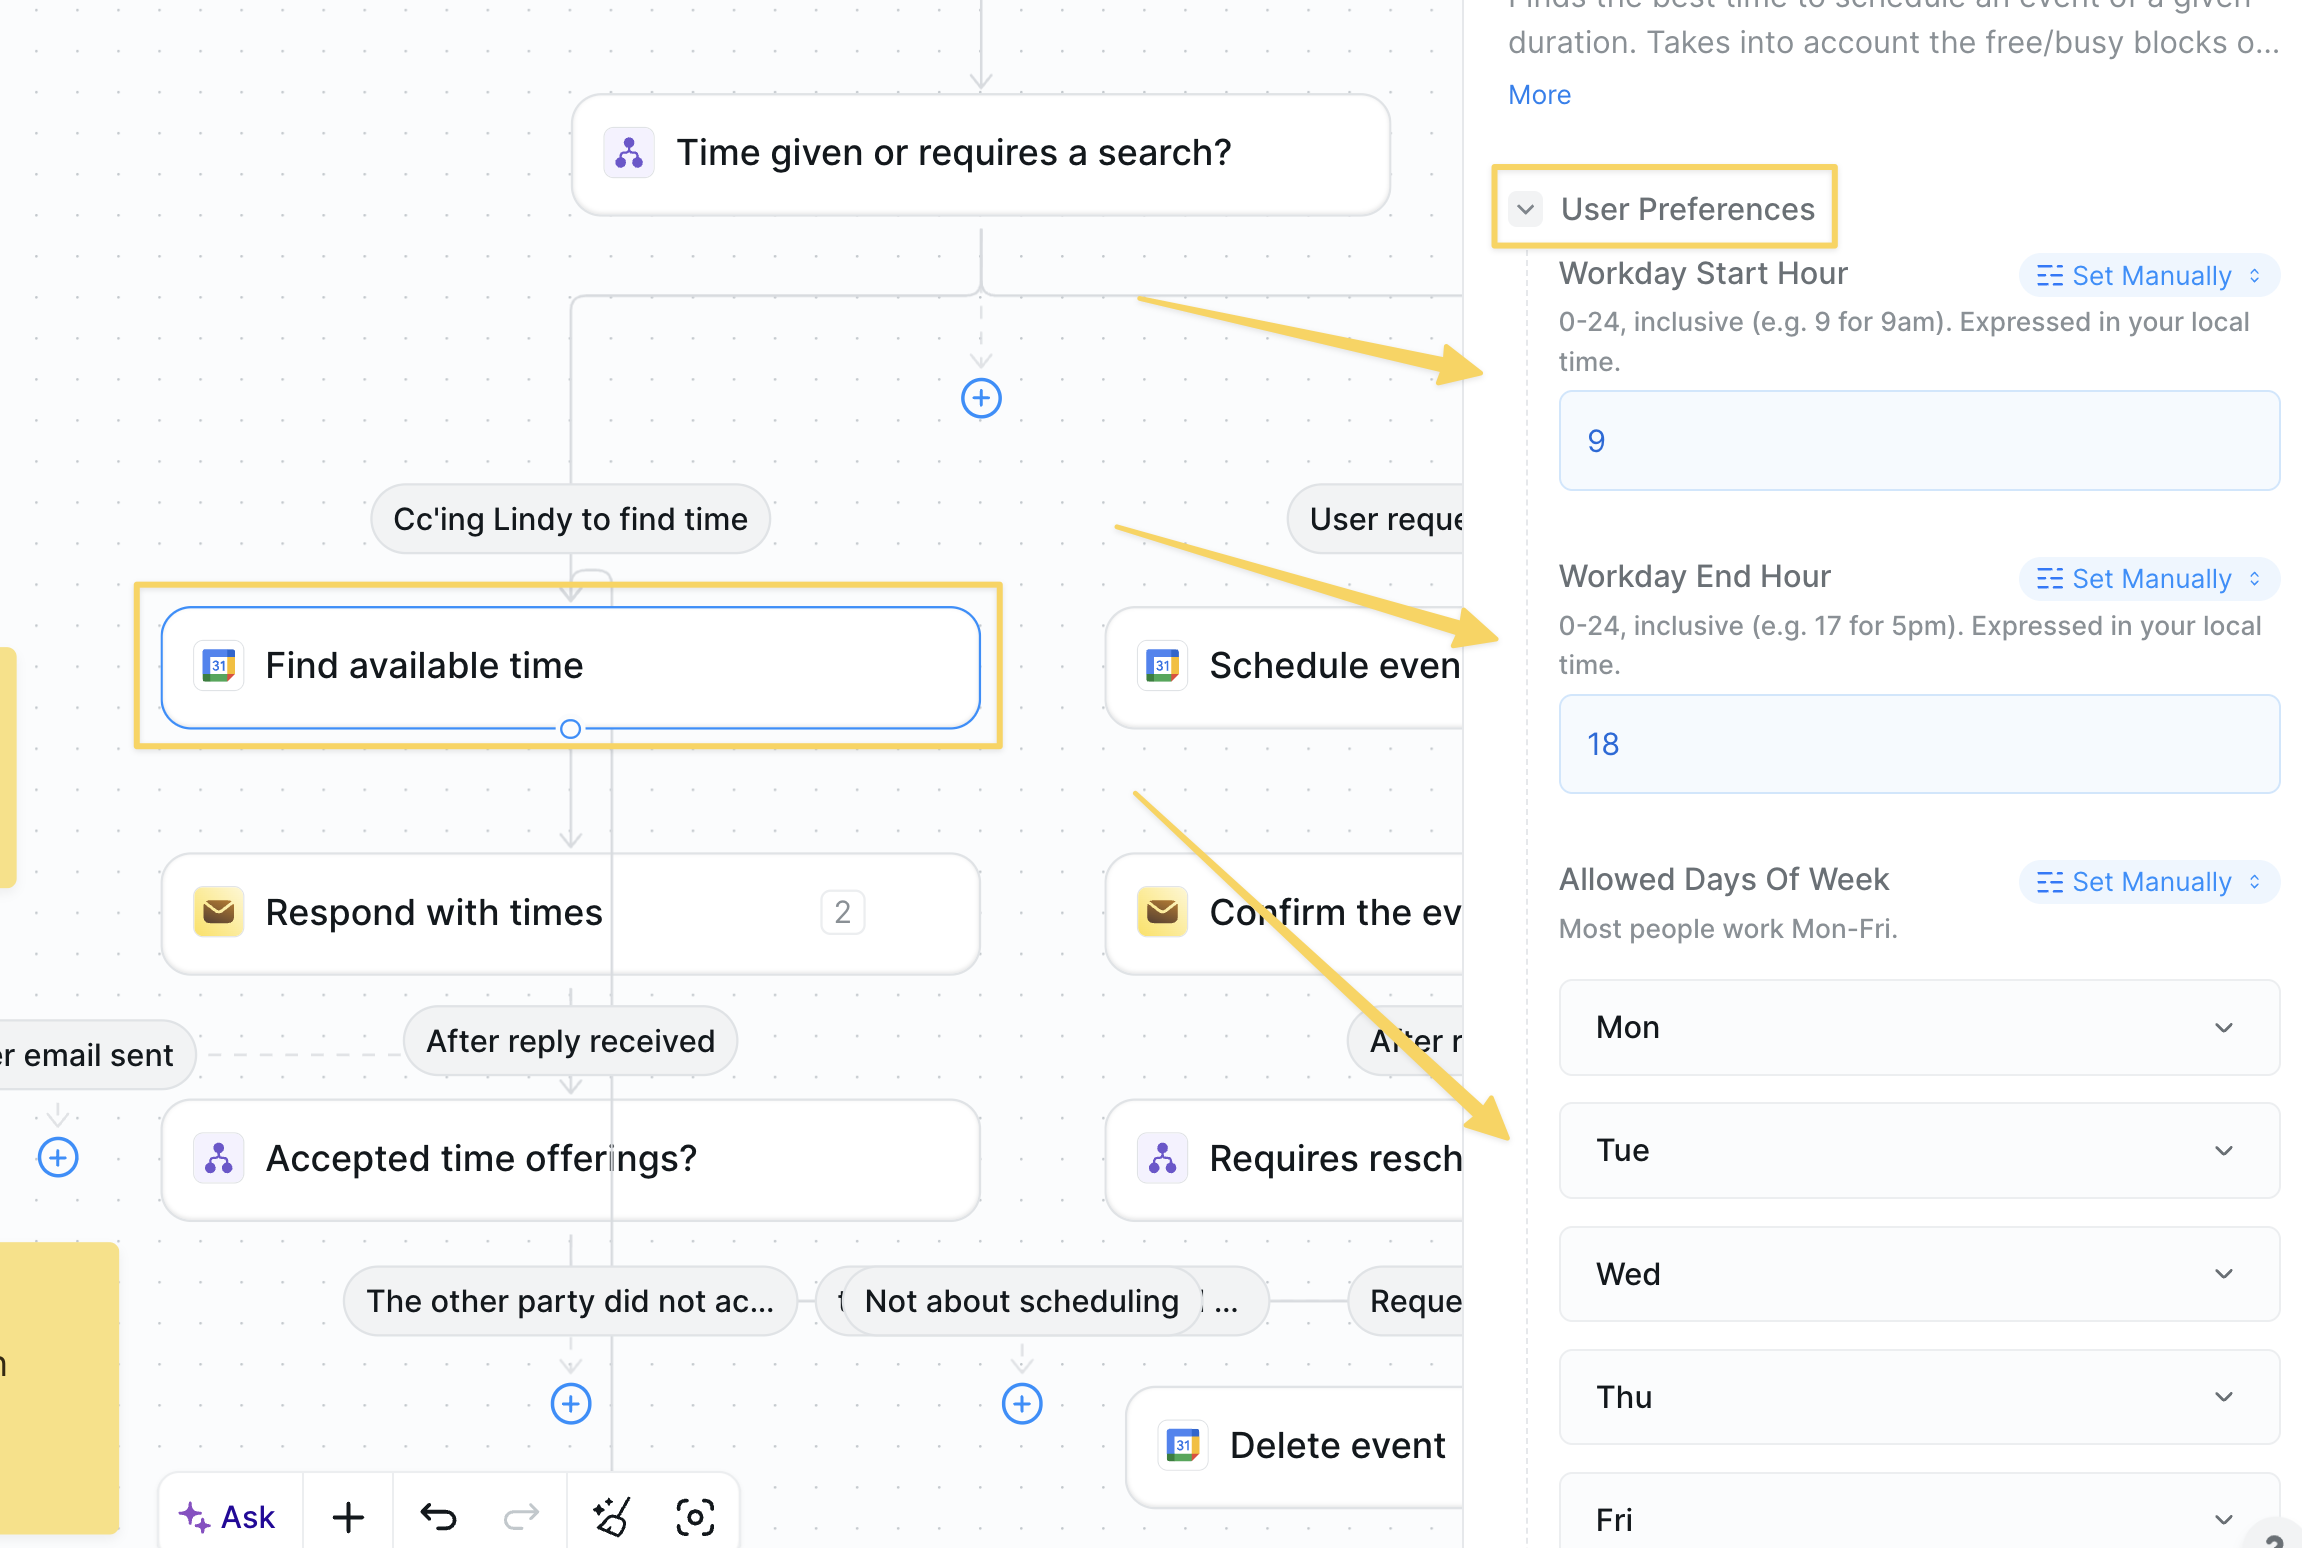 * Action: `Google Calendar – Find available time`
* In the `Find available time` step, configure your scheduling preferences such as time of day, days of week, working hours, earliest/latest start times, max meetings per day, and which calendars to check for conflicts.
### Step 4: Respond With Times
* Action: `Google Calendar – Find available time`
* In the `Find available time` step, configure your scheduling preferences such as time of day, days of week, working hours, earliest/latest start times, max meetings per day, and which calendars to check for conflicts.
### Step 4: Respond With Times
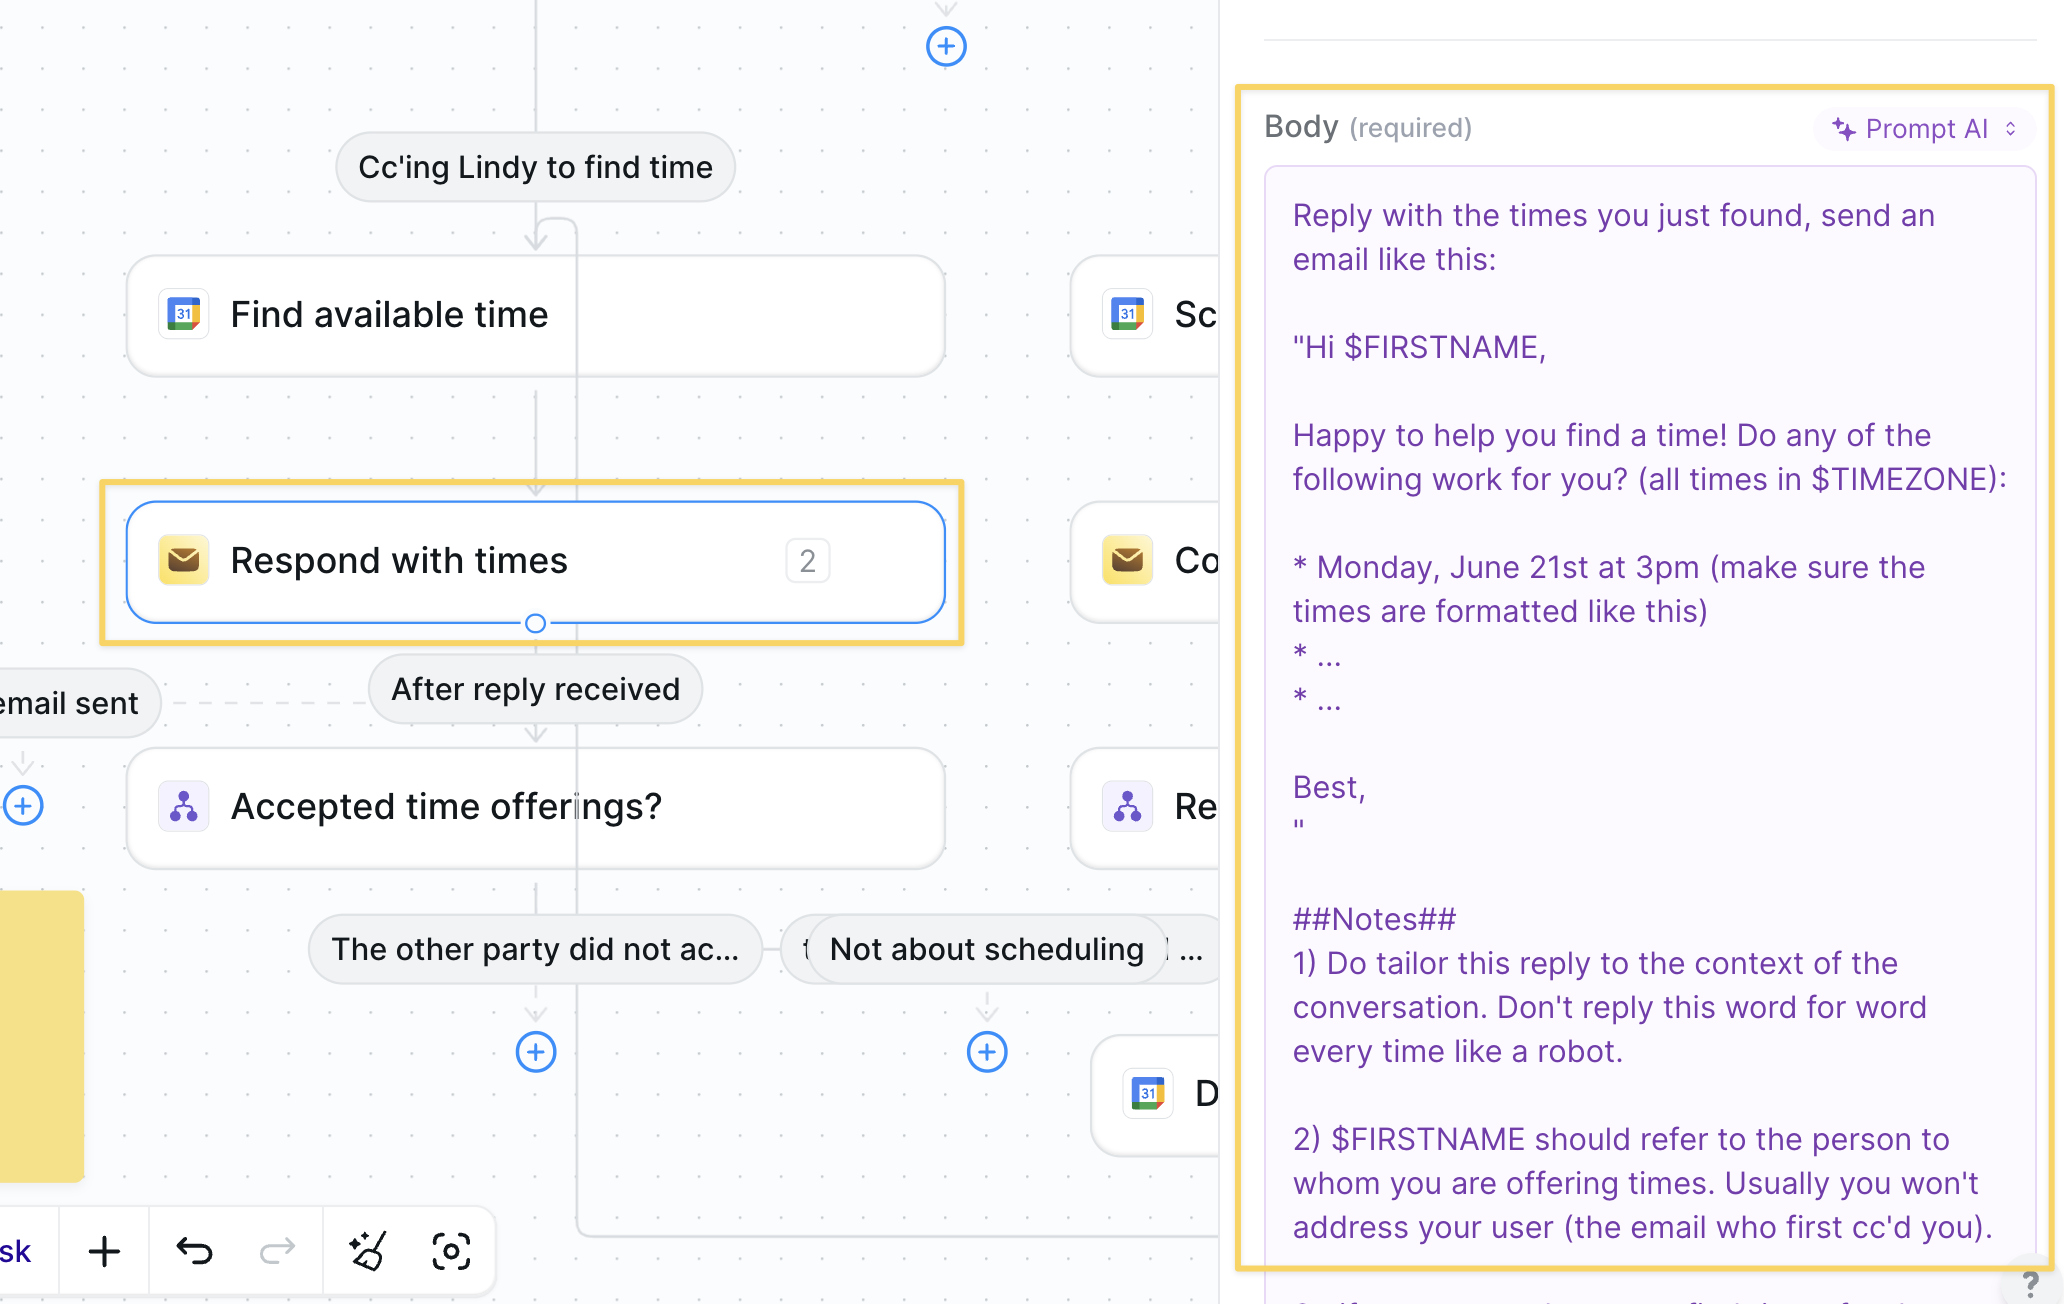 `Lindy Mail – Send Reply` with body:
```
Hi {{FIRSTNAME}},
Happy to help schedule! Do any of these work for you? (all times in {{TIMEZONE}})
* Monday, June 21 at 3 PM
* Tuesday, June 22 at 11 AM
* Wednesday, June 23 at 1 PM
Best,
Lindy
```
### Step 5: Create the Event
`Lindy Mail – Send Reply` with body:
```
Hi {{FIRSTNAME}},
Happy to help schedule! Do any of these work for you? (all times in {{TIMEZONE}})
* Monday, June 21 at 3 PM
* Tuesday, June 22 at 11 AM
* Wednesday, June 23 at 1 PM
Best,
Lindy
```
### Step 5: Create the Event
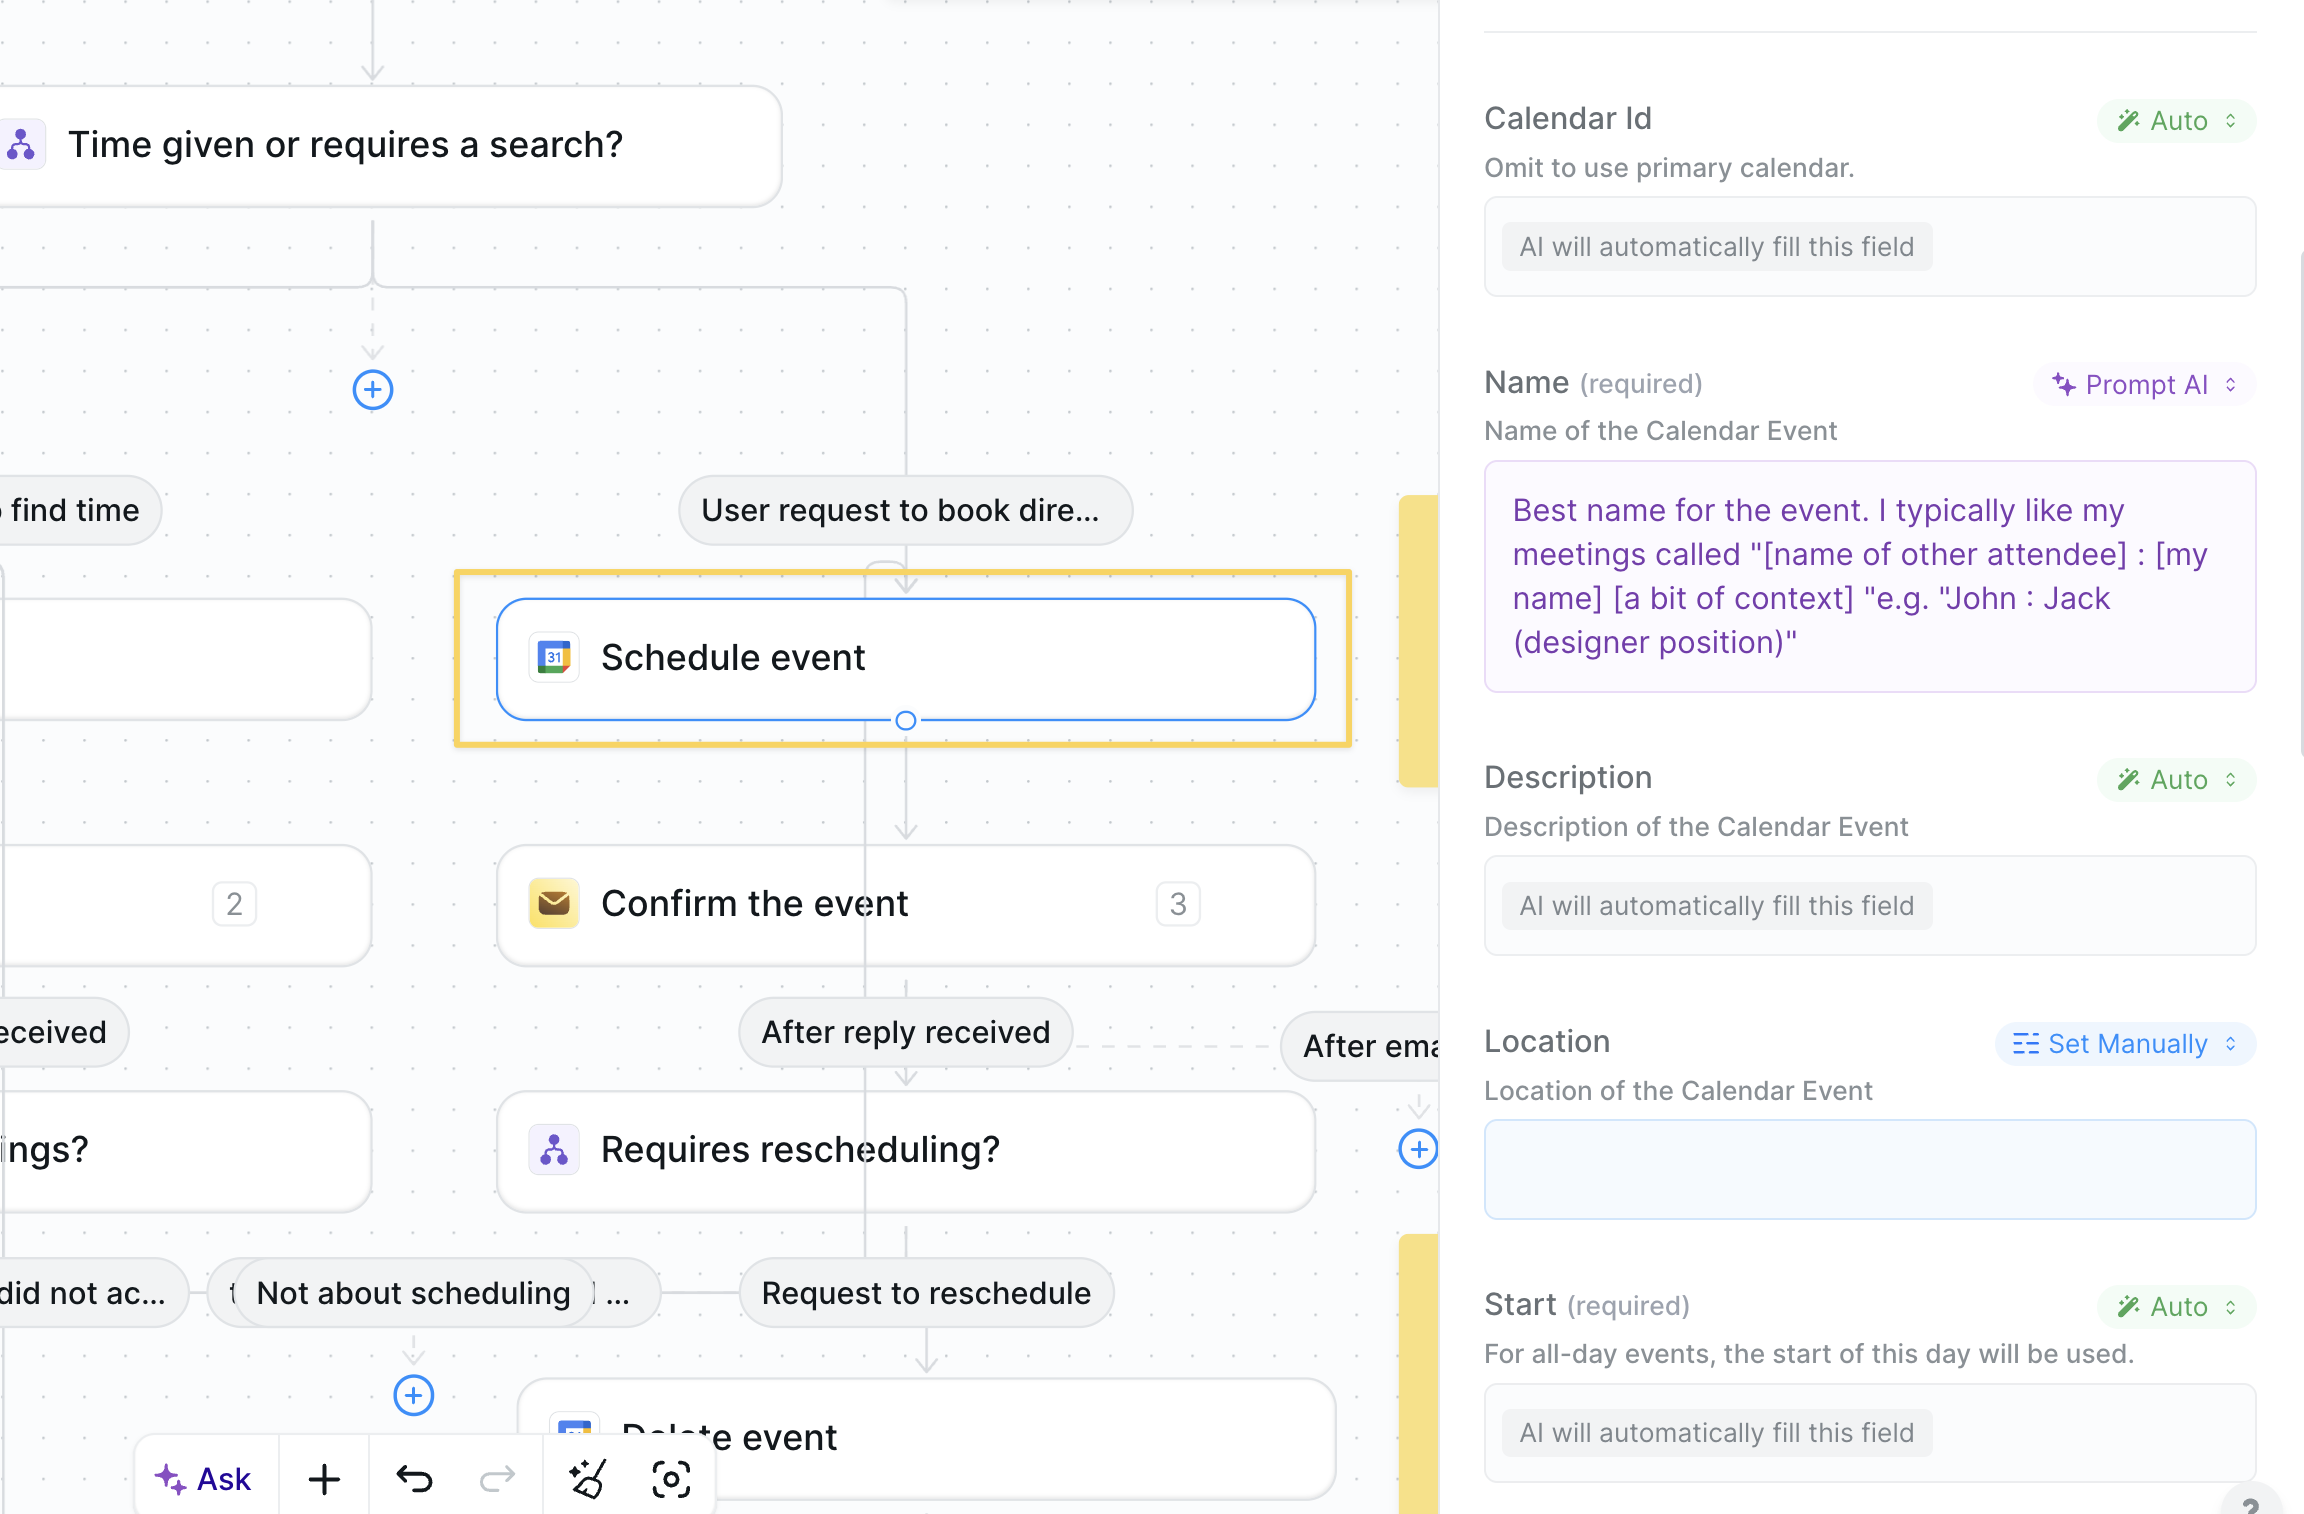 * Action: `Google Calendar – Create Event`
* Leave most fields on *Auto*; prompt the name/description using email context.
* Add a meeting link only if the thread agreed to virtual.
### Step 6: Confirm or Reschedule
* Action: `Google Calendar – Create Event`
* Leave most fields on *Auto*; prompt the name/description using email context.
* Add a meeting link only if the thread agreed to virtual.
### Step 6: Confirm or Reschedule
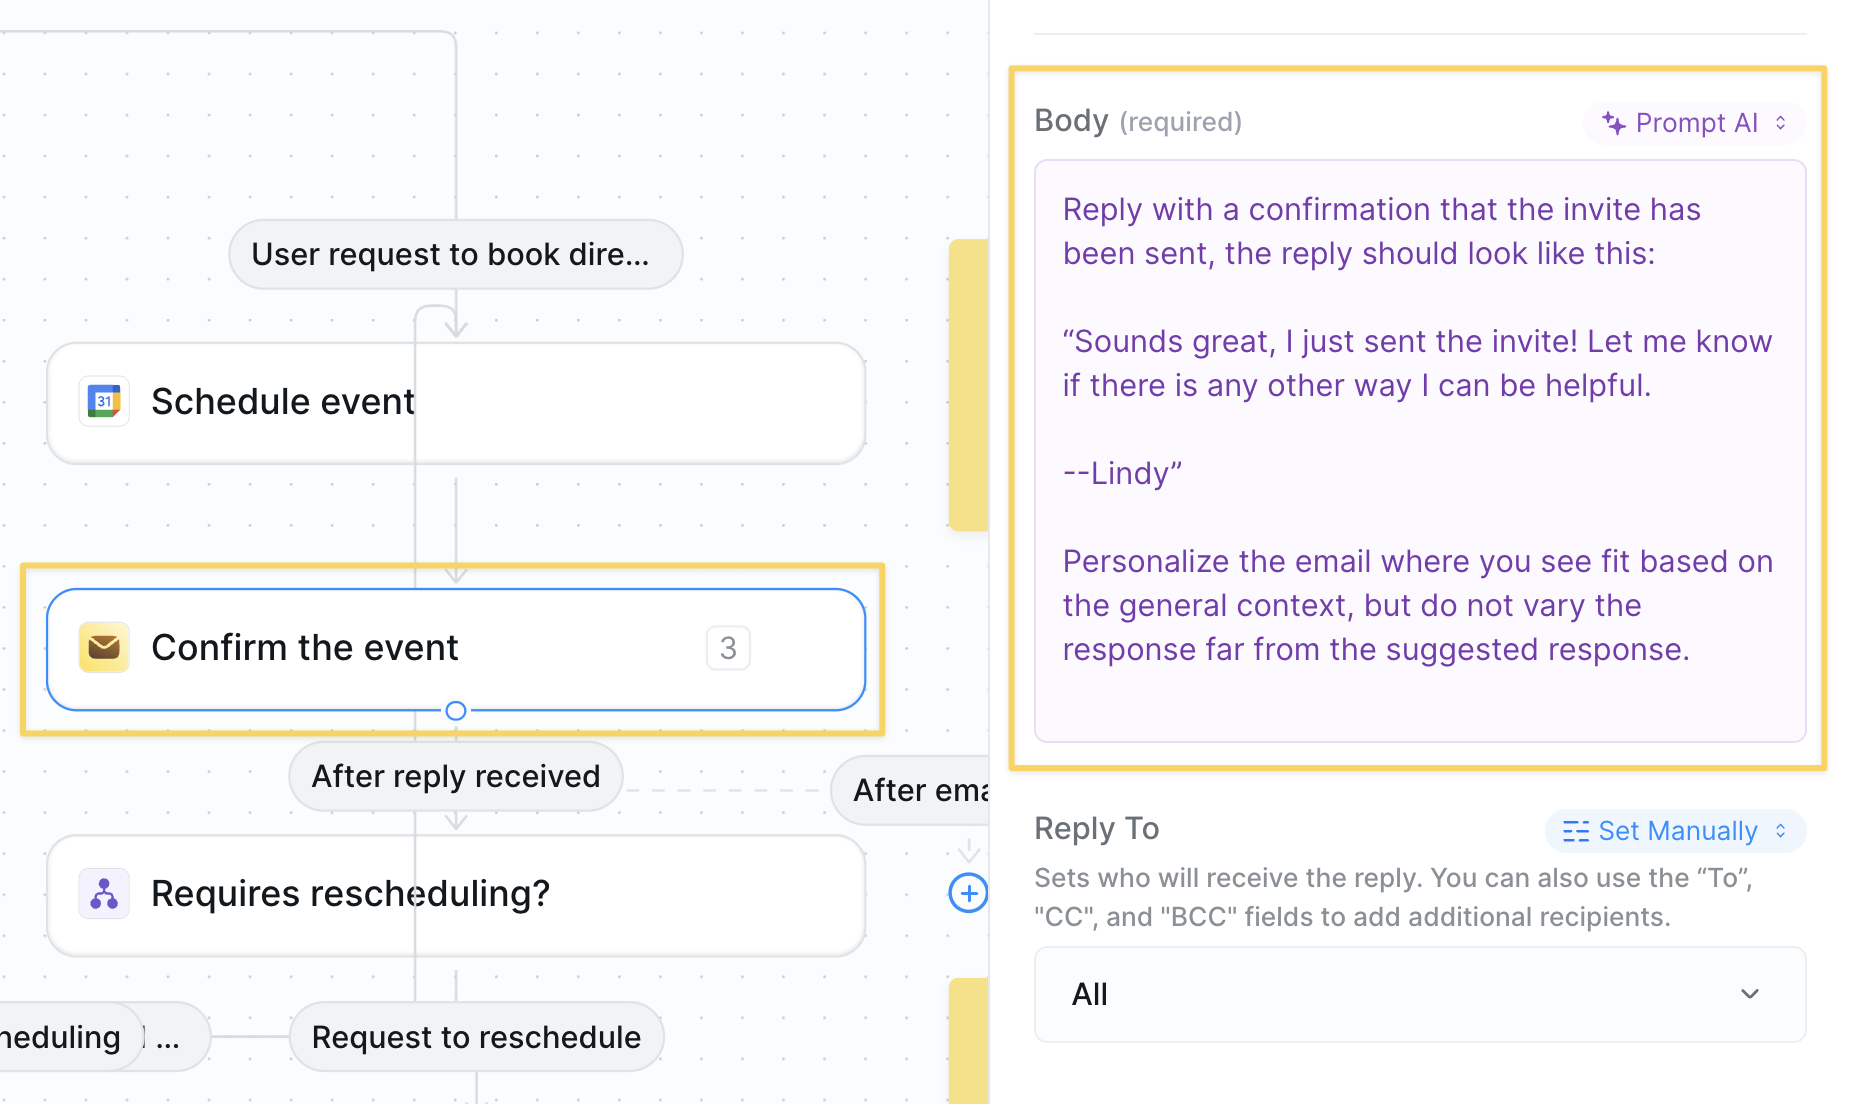 1. `Lindy Mail – Send Reply` to confirm booking:
```
Reply with a confirmation that the invite has been sent, the reply should look like this:
“Sounds great, I just sent the invite! Let me know if there is any other way I can be helpful.
--Lindy”
Personalize the email where you see fit based on the general context, but do not vary the response far from the suggested response.
```
2. Final `Condition` watches for reschedule requests; if true, delete the old event and loop back to Step 3.
## Advanced Customizations
| Trick | What it does |
| --------------------- | -------------------------------------------------------------------------- |
| Multi-time-zone Logic | Detect the recipient's locale and convert proposed times automatically. |
| Round-Robin Calendars | Cycle availability across a team for shared demo inboxes. |
| Buffer Windows | Add min/max gaps between meetings to avoid calendar pile-ups. |
| Meeting Type Routing | Use subject keywords (Demo, Interview, Support) → route to right calendar. |
## Best Practices
Tailor your agent's email prompts so they match your personal style and brand.
Check only relevant calendars to avoid false conflicts or double-booking.
Run in confirmation-only mode until you trust the flow end-to-end.
Always include a clear time-zone label in proposed times and confirmations.
## Next Steps
Research attendees before meetings
Record and summarize every call
Advanced calendar management features
Set up calendar-based automation triggers
# Email Negotiation
Source: https://docs.lindy.ai/use-cases/sales/email-negotiation
Let your agent answer inquiries, negotiate terms, and close deals—then loop you in.
## Quick Overview
With the Email Negotiator flow, your agent will:
* **Monitor** your inbox for pricing or partnership inquiries
* **Query** a rich knowledge base for rates, packages, and policies
* **Respond** in your brand voice with accurate info
* **Negotiate** back-and-forth until a deal is closed or lost
* **Escalate** edge cases or wins straight to you via Slack
Start from the [email responder template](https://chat.lindy.ai/marketplace/?templateId=66bfc603ea73bec3fea906db) and tweak as below.
## Setting Up Your Negotiator
### Step 1: Connect the Trigger
1. `Lindy Mail – Send Reply` to confirm booking:
```
Reply with a confirmation that the invite has been sent, the reply should look like this:
“Sounds great, I just sent the invite! Let me know if there is any other way I can be helpful.
--Lindy”
Personalize the email where you see fit based on the general context, but do not vary the response far from the suggested response.
```
2. Final `Condition` watches for reschedule requests; if true, delete the old event and loop back to Step 3.
## Advanced Customizations
| Trick | What it does |
| --------------------- | -------------------------------------------------------------------------- |
| Multi-time-zone Logic | Detect the recipient's locale and convert proposed times automatically. |
| Round-Robin Calendars | Cycle availability across a team for shared demo inboxes. |
| Buffer Windows | Add min/max gaps between meetings to avoid calendar pile-ups. |
| Meeting Type Routing | Use subject keywords (Demo, Interview, Support) → route to right calendar. |
## Best Practices
Tailor your agent's email prompts so they match your personal style and brand.
Check only relevant calendars to avoid false conflicts or double-booking.
Run in confirmation-only mode until you trust the flow end-to-end.
Always include a clear time-zone label in proposed times and confirmations.
## Next Steps
Research attendees before meetings
Record and summarize every call
Advanced calendar management features
Set up calendar-based automation triggers
# Email Negotiation
Source: https://docs.lindy.ai/use-cases/sales/email-negotiation
Let your agent answer inquiries, negotiate terms, and close deals—then loop you in.
## Quick Overview
With the Email Negotiator flow, your agent will:
* **Monitor** your inbox for pricing or partnership inquiries
* **Query** a rich knowledge base for rates, packages, and policies
* **Respond** in your brand voice with accurate info
* **Negotiate** back-and-forth until a deal is closed or lost
* **Escalate** edge cases or wins straight to you via Slack
Start from the [email responder template](https://chat.lindy.ai/marketplace/?templateId=66bfc603ea73bec3fea906db) and tweak as below.
## Setting Up Your Negotiator
### Step 1: Connect the Trigger
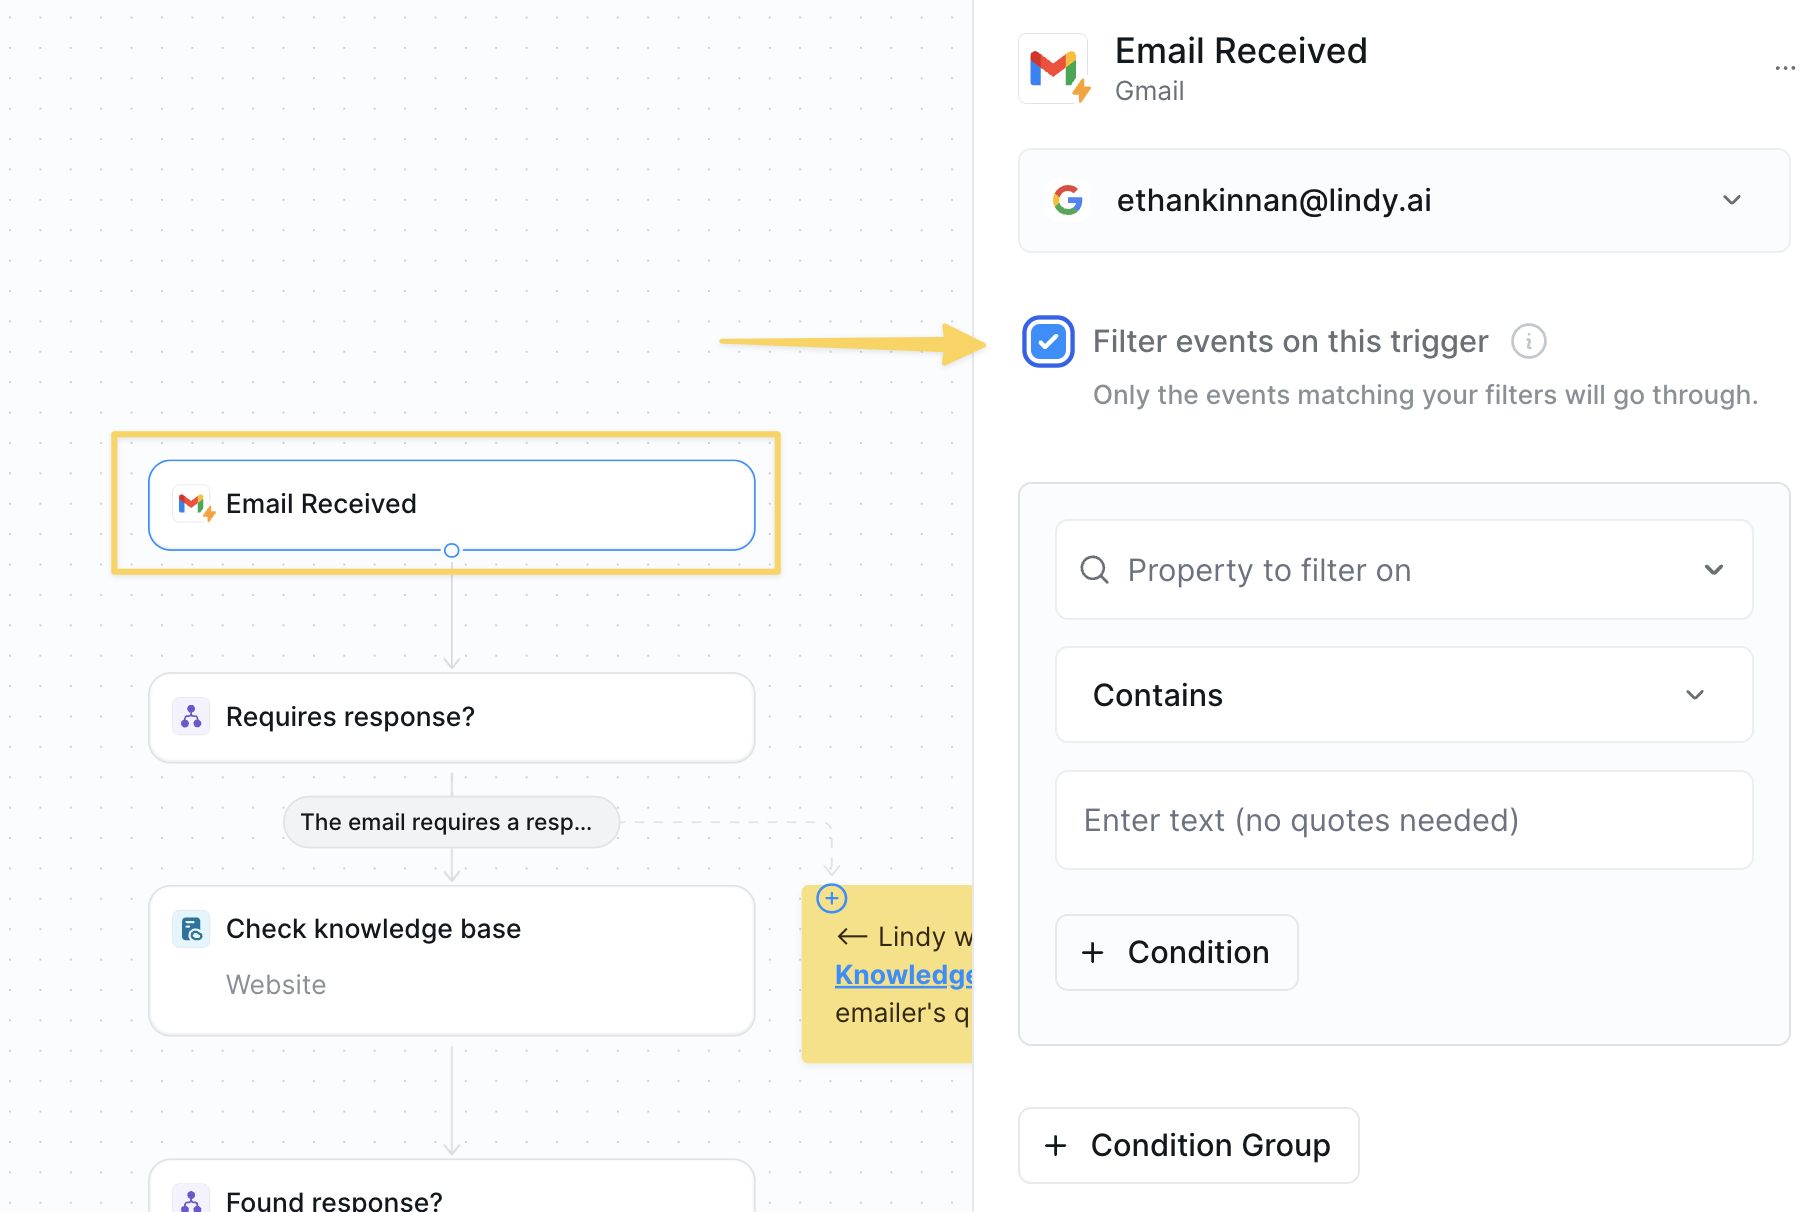 1. Use `Gmail – Email Received` as the trigger.
2. Add filters to ignore internal threads or newsletters.
### Step 2: Gate with a Condition
Filter out irrelevant emails early to avoid wasting resources on messages that don't need negotiation.
1. Use `Gmail – Email Received` as the trigger.
2. Add filters to ignore internal threads or newsletters.
### Step 2: Gate with a Condition
Filter out irrelevant emails early to avoid wasting resources on messages that don't need negotiation.
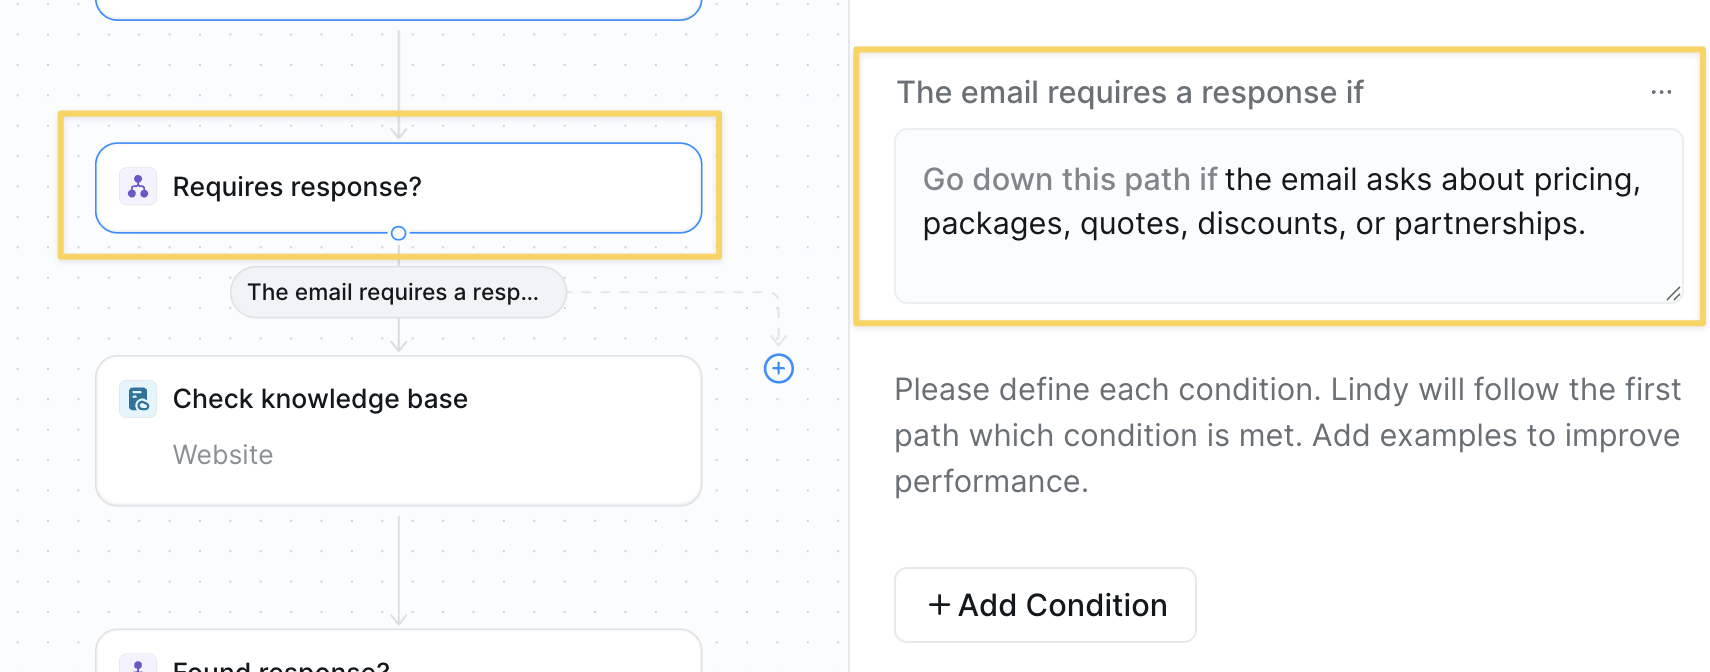 `Condition` prompt:
```
Only continue if the email asks about pricing, packages, quotes, discounts, or partnerships.
```
### Step 3: Build the Knowledge Base
Create a central repository of pricing and policy information so your agent can provide accurate, consistent responses.
`Condition` prompt:
```
Only continue if the email asks about pricing, packages, quotes, discounts, or partnerships.
```
### Step 3: Build the Knowledge Base
Create a central repository of pricing and policy information so your agent can provide accurate, consistent responses.
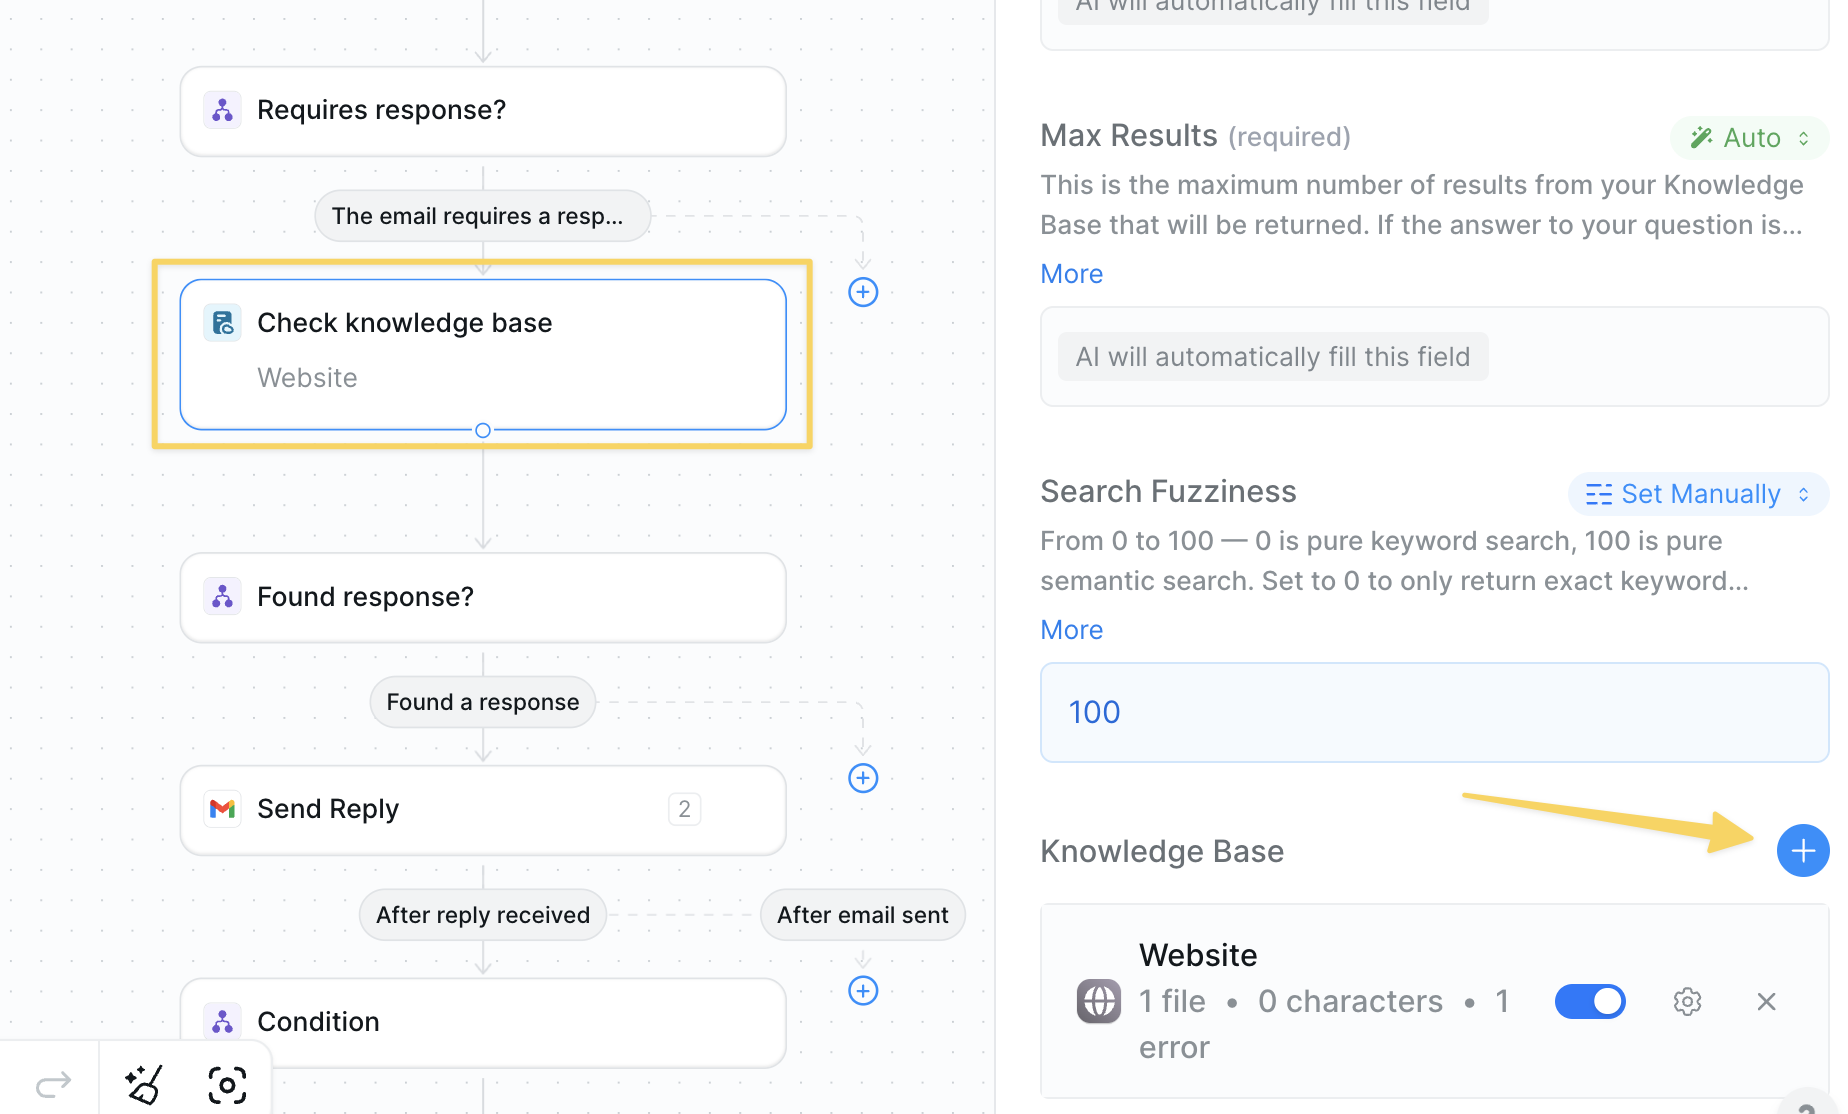 * Action: `Search Knowledge Base`
* Upload FAQs, rate cards, discount policies, and negotiation guidelines.
* Connect CRM or Google Docs as needed.
### Step 4: Verify an Answer Exists
Check if we have the information needed to respond before attempting to negotiate, preventing unhelpful responses.
* Action: `Search Knowledge Base`
* Upload FAQs, rate cards, discount policies, and negotiation guidelines.
* Connect CRM or Google Docs as needed.
### Step 4: Verify an Answer Exists
Check if we have the information needed to respond before attempting to negotiate, preventing unhelpful responses.
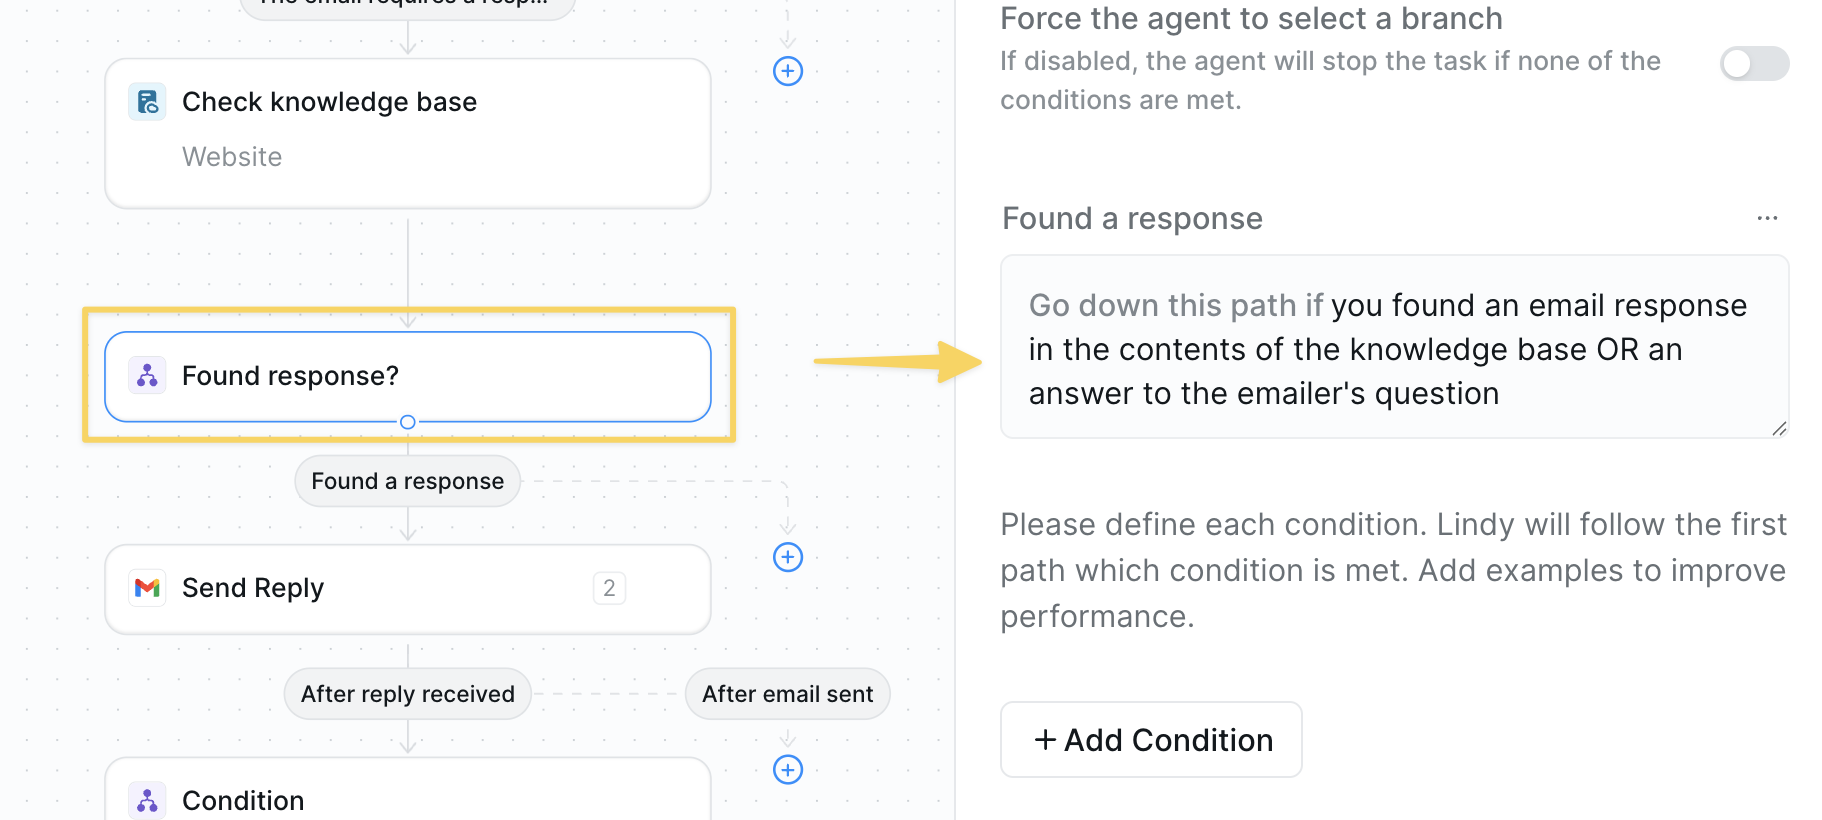 ### Step 5: Send the First Reply
Provide an initial response with relevant information to begin the negotiation process professionally.
### Step 5: Send the First Reply
Provide an initial response with relevant information to begin the negotiation process professionally.
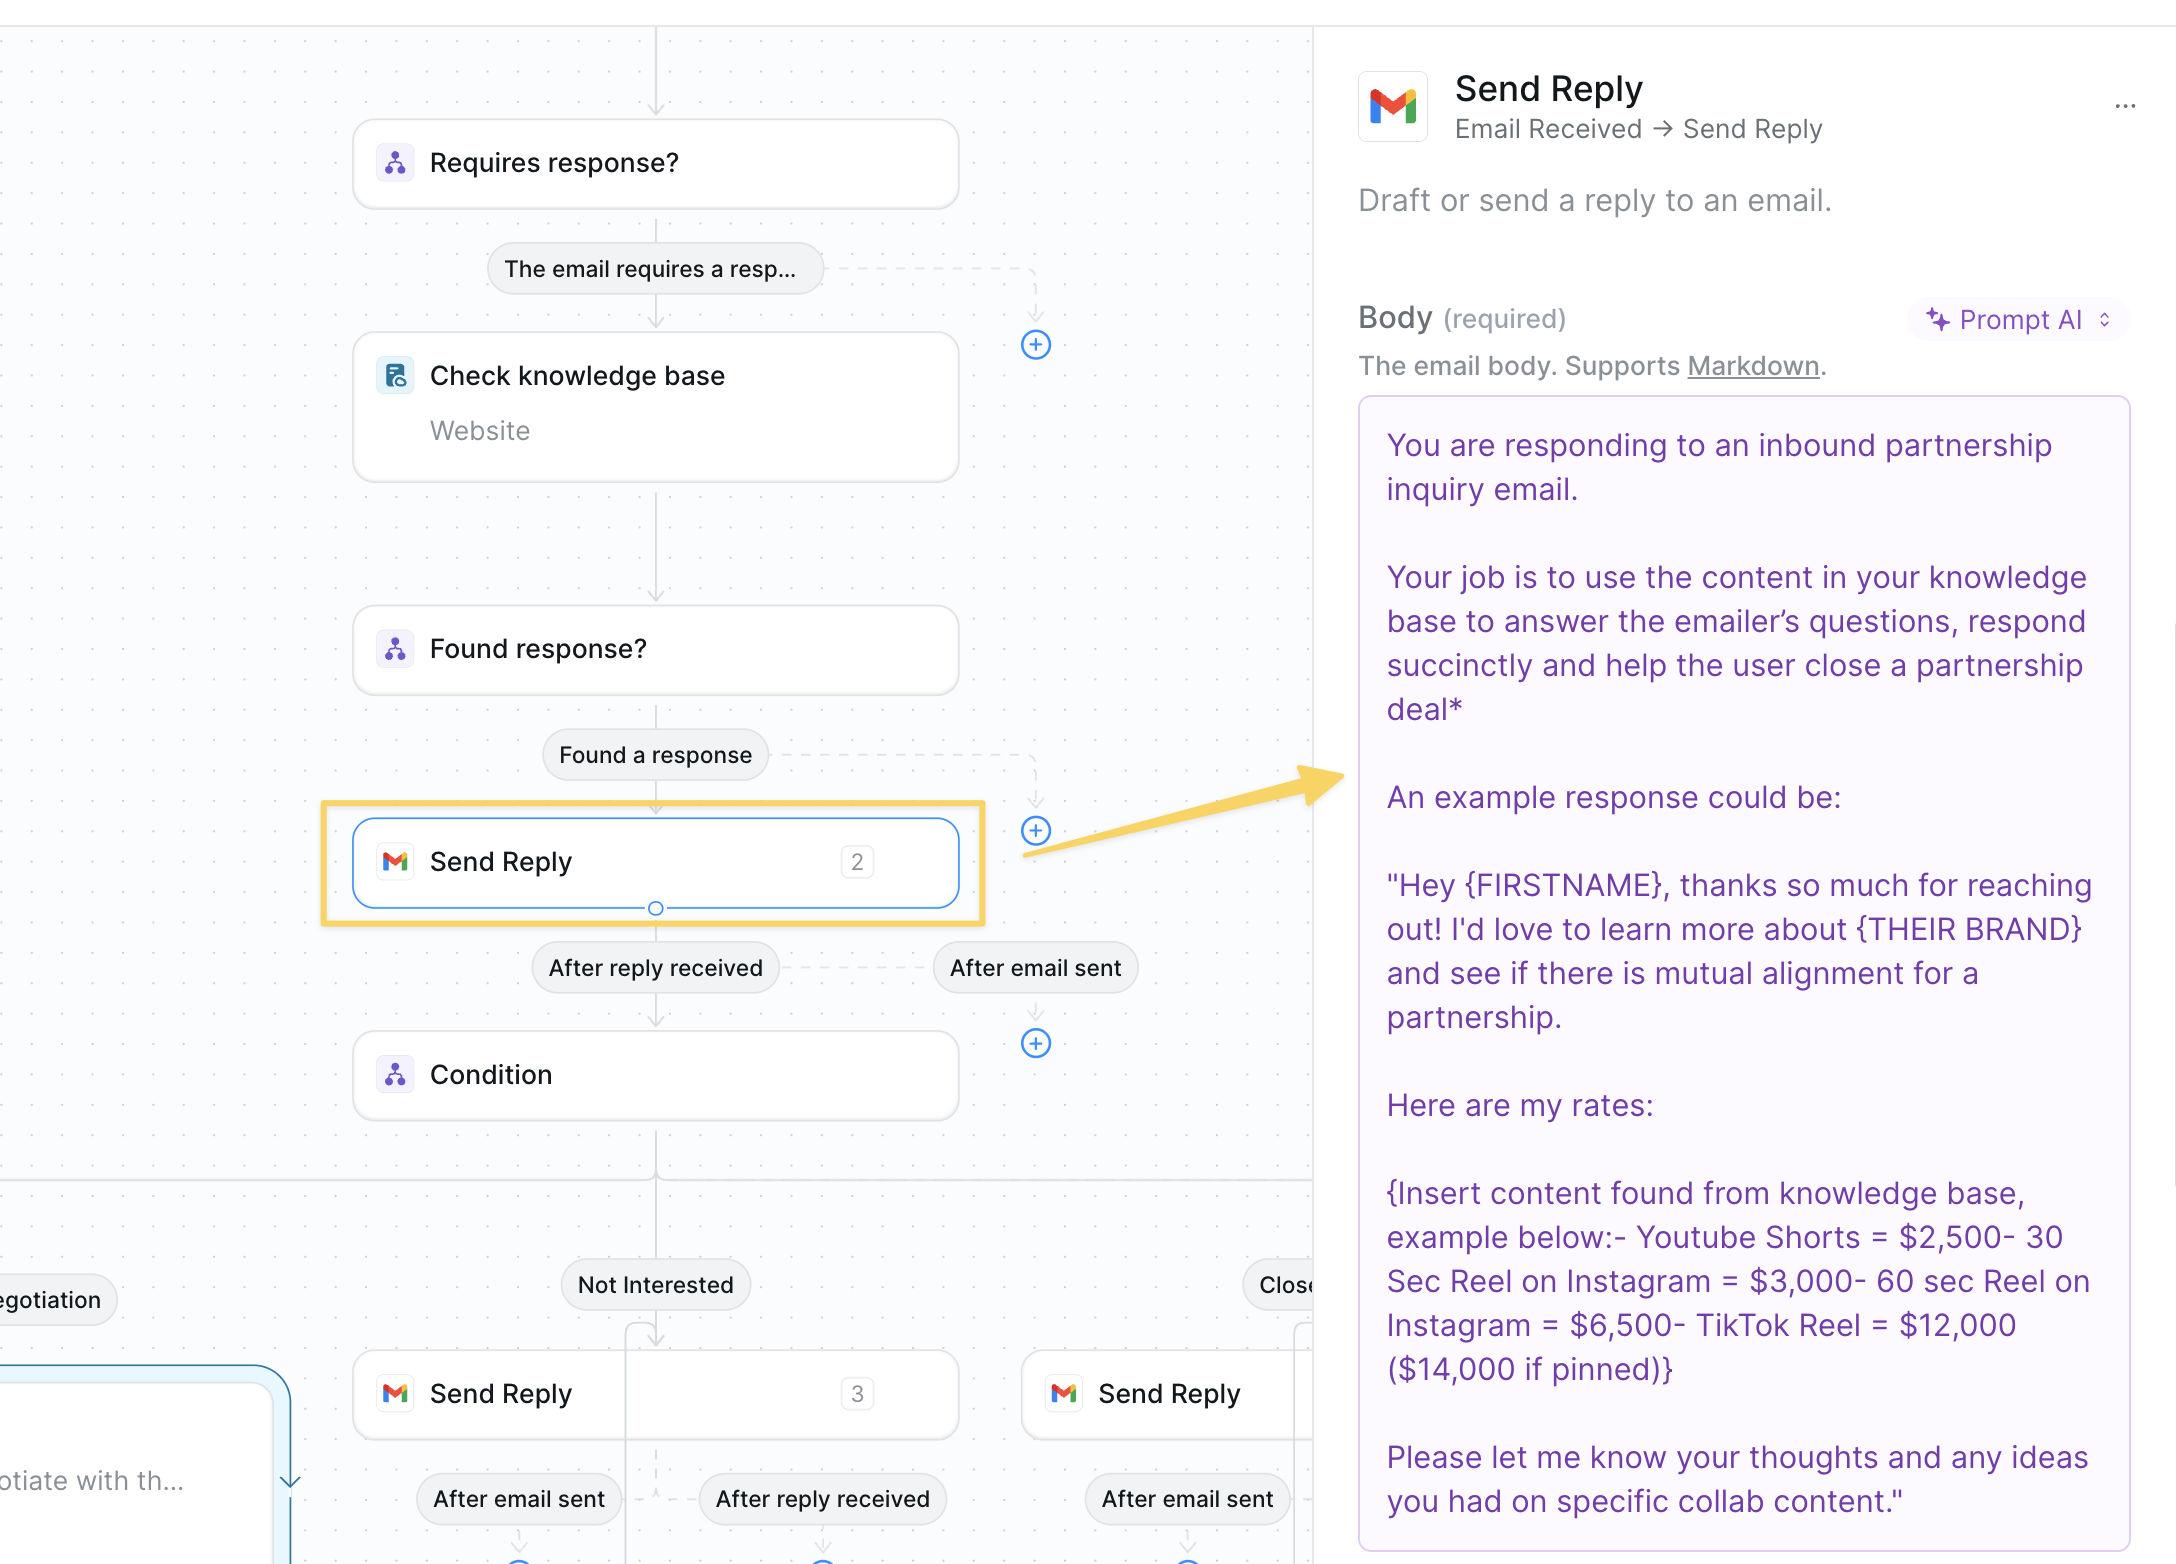 Example prompt:
```
You are responding to an inbound partnership inquiry email.
Your job is to use the content in your knowledge base to answer the emailer’s questions, respond succinctly and help the user close a partnership deal*
An example response could be:
"Hey {FIRSTNAME}, thanks so much for reaching out! I'd love to learn more about {THEIR BRAND} and see if there is mutual alignment for a partnership.
Here are my rates:
{Insert content found from knowledge base, example below:- Youtube Shorts = $2,500- 30 Sec Reel on Instagram = $3,000- 60 sec Reel on Instagram = $6,500- TikTok Reel = $12,000 ($14,000 if pinned)}
Please let me know your thoughts and any ideas you had on specific collab content."
```
### Step 6: Branch on Response Type
Categorize the prospect's response to determine the appropriate next action in the negotiation flow.
Example prompt:
```
You are responding to an inbound partnership inquiry email.
Your job is to use the content in your knowledge base to answer the emailer’s questions, respond succinctly and help the user close a partnership deal*
An example response could be:
"Hey {FIRSTNAME}, thanks so much for reaching out! I'd love to learn more about {THEIR BRAND} and see if there is mutual alignment for a partnership.
Here are my rates:
{Insert content found from knowledge base, example below:- Youtube Shorts = $2,500- 30 Sec Reel on Instagram = $3,000- 60 sec Reel on Instagram = $6,500- TikTok Reel = $12,000 ($14,000 if pinned)}
Please let me know your thoughts and any ideas you had on specific collab content."
```
### Step 6: Branch on Response Type
Categorize the prospect's response to determine the appropriate next action in the negotiation flow.
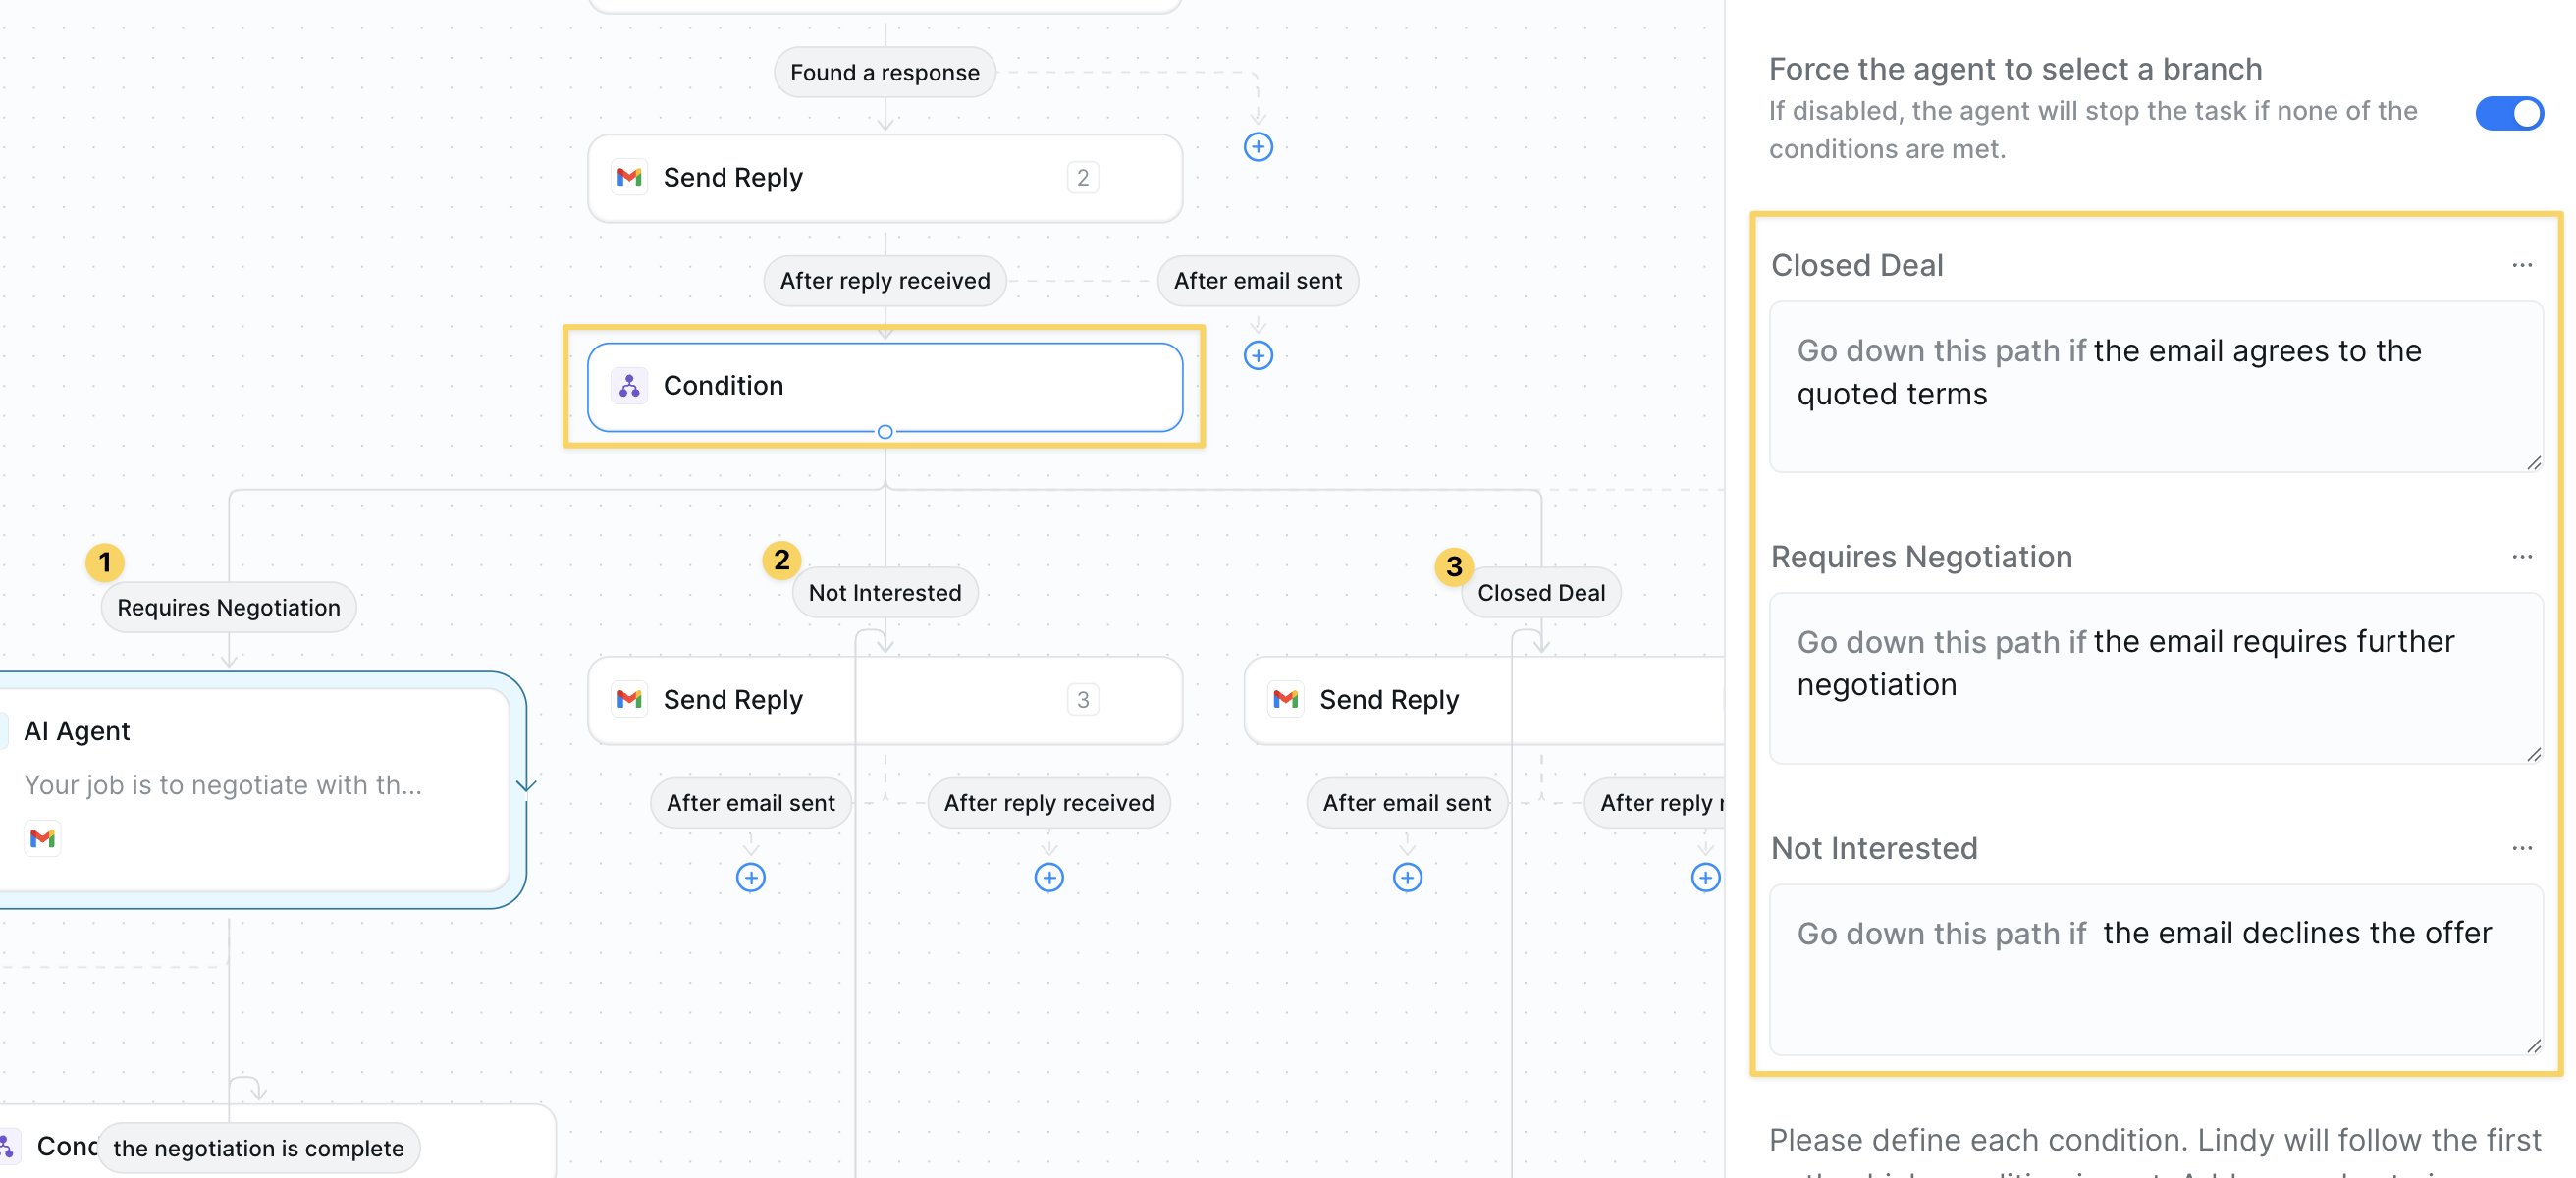 Add a three-way `Condition`:
| Path | Prompt snippet |
| -------------------- | -------------------------------------- |
| Requires Negotiation | the email requires further negotiation |
| Closed Deal | the email agrees to the quoted terms |
| Not Interested | the email declines the offer |
### Step 7: AI Agent for Negotiation
Deploy an AI agent to handle back-and-forth negotiations automatically while staying within your guidelines.
Add a three-way `Condition`:
| Path | Prompt snippet |
| -------------------- | -------------------------------------- |
| Requires Negotiation | the email requires further negotiation |
| Closed Deal | the email agrees to the quoted terms |
| Not Interested | the email declines the offer |
### Step 7: AI Agent for Negotiation
Deploy an AI agent to handle back-and-forth negotiations automatically while staying within your guidelines.
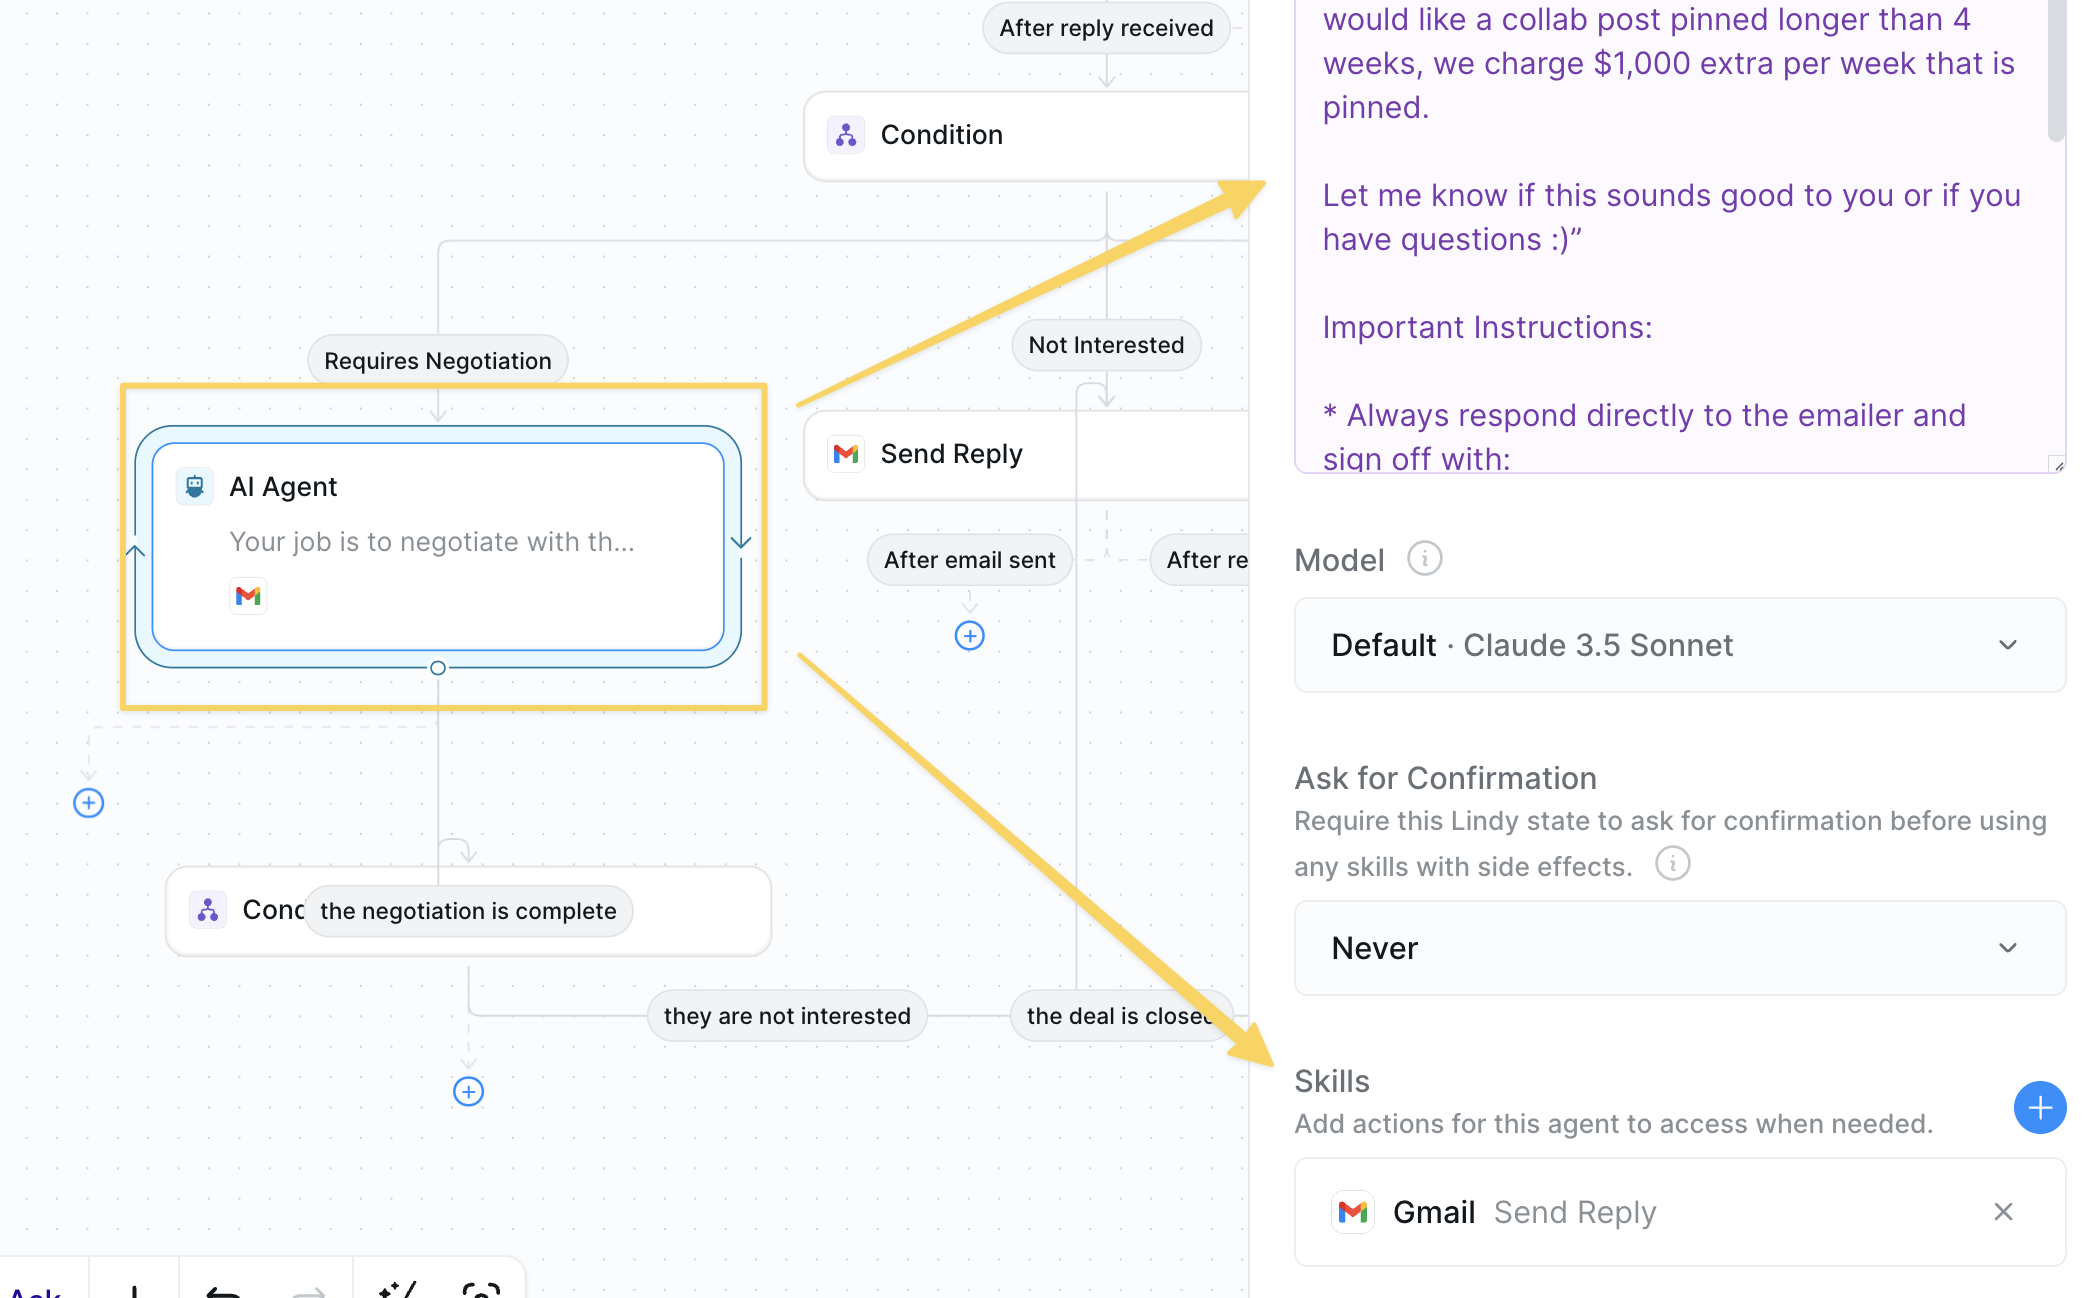 * Under *Requires Negotiation*, insert `AI Agent` with skills: `Gmail – Send Reply`.
* Example prompt:
```
Your job is to negotiate with the emailer and respond to their questions until a decision is made in regard to the partnership opportunity. Only answer questions using answers found from the knowledge base. Here are some example responses to mirror the structure and style of our brand’s tone:
“Hey {FIRSTNAME} – appreciate the interest! We only discount 10% for fall deals, as it is our busiest time for collaborations. Let me know what you decide!”
“Hi {FIRSTNAME}, thanks for the follow-up questions. We typically post on Mondays at 8:00am PST and pin them for 4 weeks. If you would like a collab post pinned longer than 4 weeks, we charge $1,000 extra per week that is pinned.
Let me know if this sounds good to you or if you have questions :)”
Important Instructions:
* Always respond directly to the emailer and sign off with:
“Thanks – Lindy”
* Keep responses 1-2 sentences long, concise and friendly.
* Never make offerings or agree to a deal unless there is content in the knowledge base that supports the partnership details.
```
### Step 8: Close the Loop
Finalize the negotiation outcome after it is complete and send them to the correct path whether or not the deal was closed.
* Under *Requires Negotiation*, insert `AI Agent` with skills: `Gmail – Send Reply`.
* Example prompt:
```
Your job is to negotiate with the emailer and respond to their questions until a decision is made in regard to the partnership opportunity. Only answer questions using answers found from the knowledge base. Here are some example responses to mirror the structure and style of our brand’s tone:
“Hey {FIRSTNAME} – appreciate the interest! We only discount 10% for fall deals, as it is our busiest time for collaborations. Let me know what you decide!”
“Hi {FIRSTNAME}, thanks for the follow-up questions. We typically post on Mondays at 8:00am PST and pin them for 4 weeks. If you would like a collab post pinned longer than 4 weeks, we charge $1,000 extra per week that is pinned.
Let me know if this sounds good to you or if you have questions :)”
Important Instructions:
* Always respond directly to the emailer and sign off with:
“Thanks – Lindy”
* Keep responses 1-2 sentences long, concise and friendly.
* Never make offerings or agree to a deal unless there is content in the knowledge base that supports the partnership details.
```
### Step 8: Close the Loop
Finalize the negotiation outcome after it is complete and send them to the correct path whether or not the deal was closed.
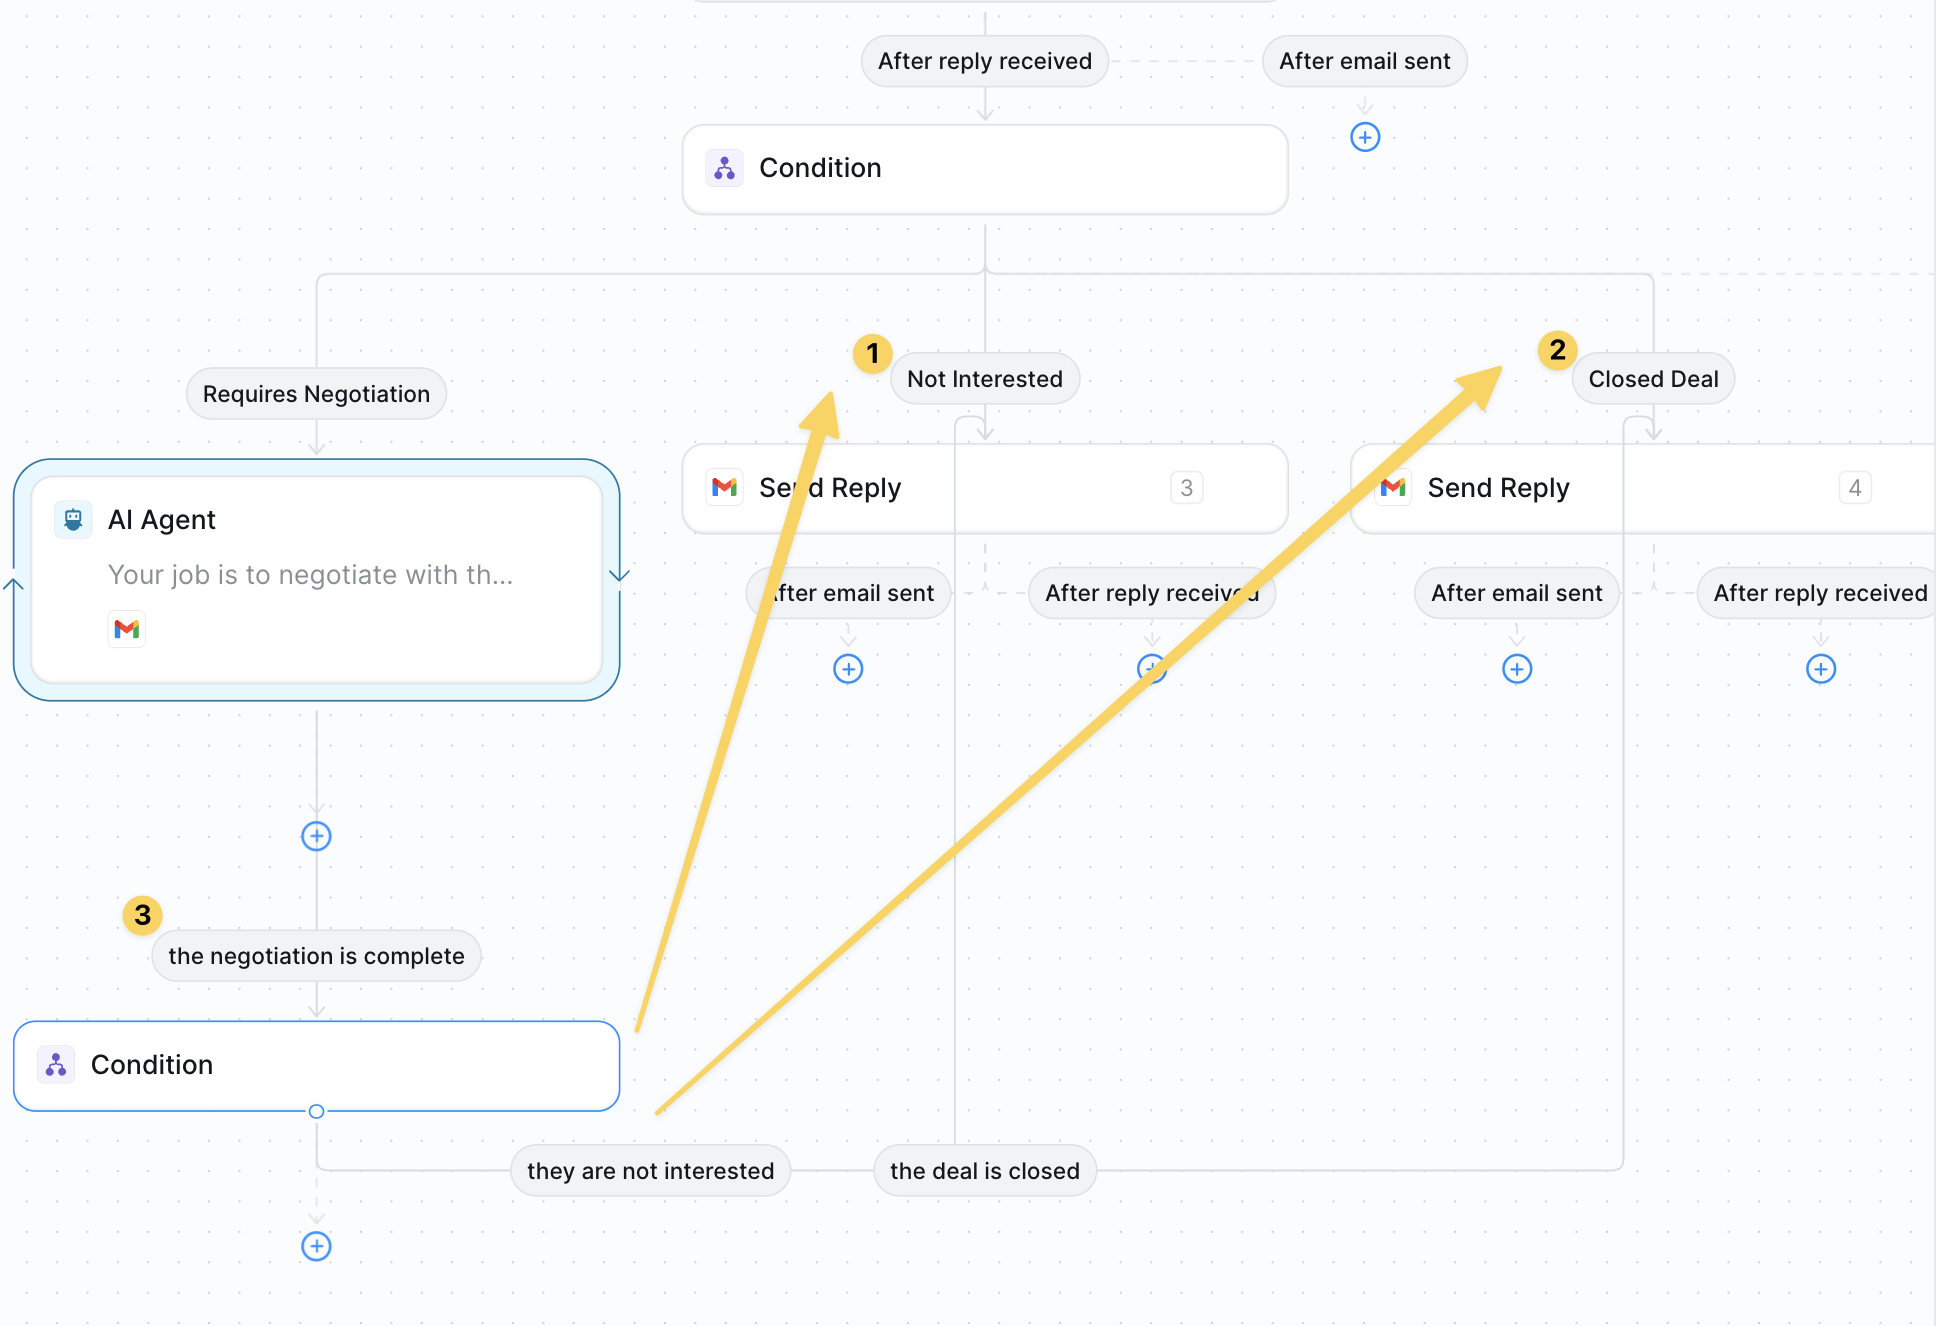 * *Closed Deal* → `Gmail – Send Reply` confirming terms and next steps.
* *Not Interested* → polite thank-you reply.
* Both paths → `Slack – Send DM` to alert your team.
## Advanced Customizations
| Trick | What it does |
| ----------------- | -------------------------------------------------------------------- |
| Dynamic Discount | Offer tiered discounts based on deal size pulled from the email. |
| Sentiment Monitor | Escalate to human if tone becomes negative or urgent. |
| CRM Update | Create/advance opportunities in HubSpot or Salesforce automatically. |
## Best Practices
Refresh rate cards and policies regularly to avoid outdated offers.
Route complex legal or enterprise deals to a rep early.
Include sample emails in the KB so your agent mirrors your brand voice.
## Next Steps
Warm up leads before they inquire
Fill gaps before negotiating
Advanced email automation for negotiations
Add approval steps for deal terms
# Lead Enrichment
Source: https://docs.lindy.ai/use-cases/sales/lead-enrichment
Turn raw names and emails into fully enriched, ready-to-sell prospects with LinkedIn profiles and company insights.
## Quick Overview
Drop a lead's basic details into Google Sheets and let Lindy:
* **Search** for contact details using People Data Labs
* **Find** their LinkedIn profile URL through multiple sources
* **Scrape** full LinkedIn profile data when found
* **Research** company news, funding, and buying signals
* **Update** your sheet with all enriched data automatically
You can use the [lead enrichment template](https://chat.lindy.ai/home/?templateId=687575ad808fe9c345b054cb) to get started.
## Setting Up Your Lead Enrichment Flow
### Step 1: Configure Your Spreadsheet Trigger
* *Closed Deal* → `Gmail – Send Reply` confirming terms and next steps.
* *Not Interested* → polite thank-you reply.
* Both paths → `Slack – Send DM` to alert your team.
## Advanced Customizations
| Trick | What it does |
| ----------------- | -------------------------------------------------------------------- |
| Dynamic Discount | Offer tiered discounts based on deal size pulled from the email. |
| Sentiment Monitor | Escalate to human if tone becomes negative or urgent. |
| CRM Update | Create/advance opportunities in HubSpot or Salesforce automatically. |
## Best Practices
Refresh rate cards and policies regularly to avoid outdated offers.
Route complex legal or enterprise deals to a rep early.
Include sample emails in the KB so your agent mirrors your brand voice.
## Next Steps
Warm up leads before they inquire
Fill gaps before negotiating
Advanced email automation for negotiations
Add approval steps for deal terms
# Lead Enrichment
Source: https://docs.lindy.ai/use-cases/sales/lead-enrichment
Turn raw names and emails into fully enriched, ready-to-sell prospects with LinkedIn profiles and company insights.
## Quick Overview
Drop a lead's basic details into Google Sheets and let Lindy:
* **Search** for contact details using People Data Labs
* **Find** their LinkedIn profile URL through multiple sources
* **Scrape** full LinkedIn profile data when found
* **Research** company news, funding, and buying signals
* **Update** your sheet with all enriched data automatically
You can use the [lead enrichment template](https://chat.lindy.ai/home/?templateId=687575ad808fe9c345b054cb) to get started.
## Setting Up Your Lead Enrichment Flow
### Step 1: Configure Your Spreadsheet Trigger
 1. Select `Google Sheets – New Row Added` as your trigger
2. Connect your spreadsheet with columns for:
* Full Name (required)
* Company
* Role
* Email
* LinkedIn URL
* Background
* Company News
3. Paste your spreadsheet link in the trigger settings
**Google Sheets integrations always interpret first row as headers.**
### Step 2: Search with People Data Labs
1. Select `Google Sheets – New Row Added` as your trigger
2. Connect your spreadsheet with columns for:
* Full Name (required)
* Company
* Role
* Email
* LinkedIn URL
* Background
* Company News
3. Paste your spreadsheet link in the trigger settings
**Google Sheets integrations always interpret first row as headers.**
### Step 2: Search with People Data Labs
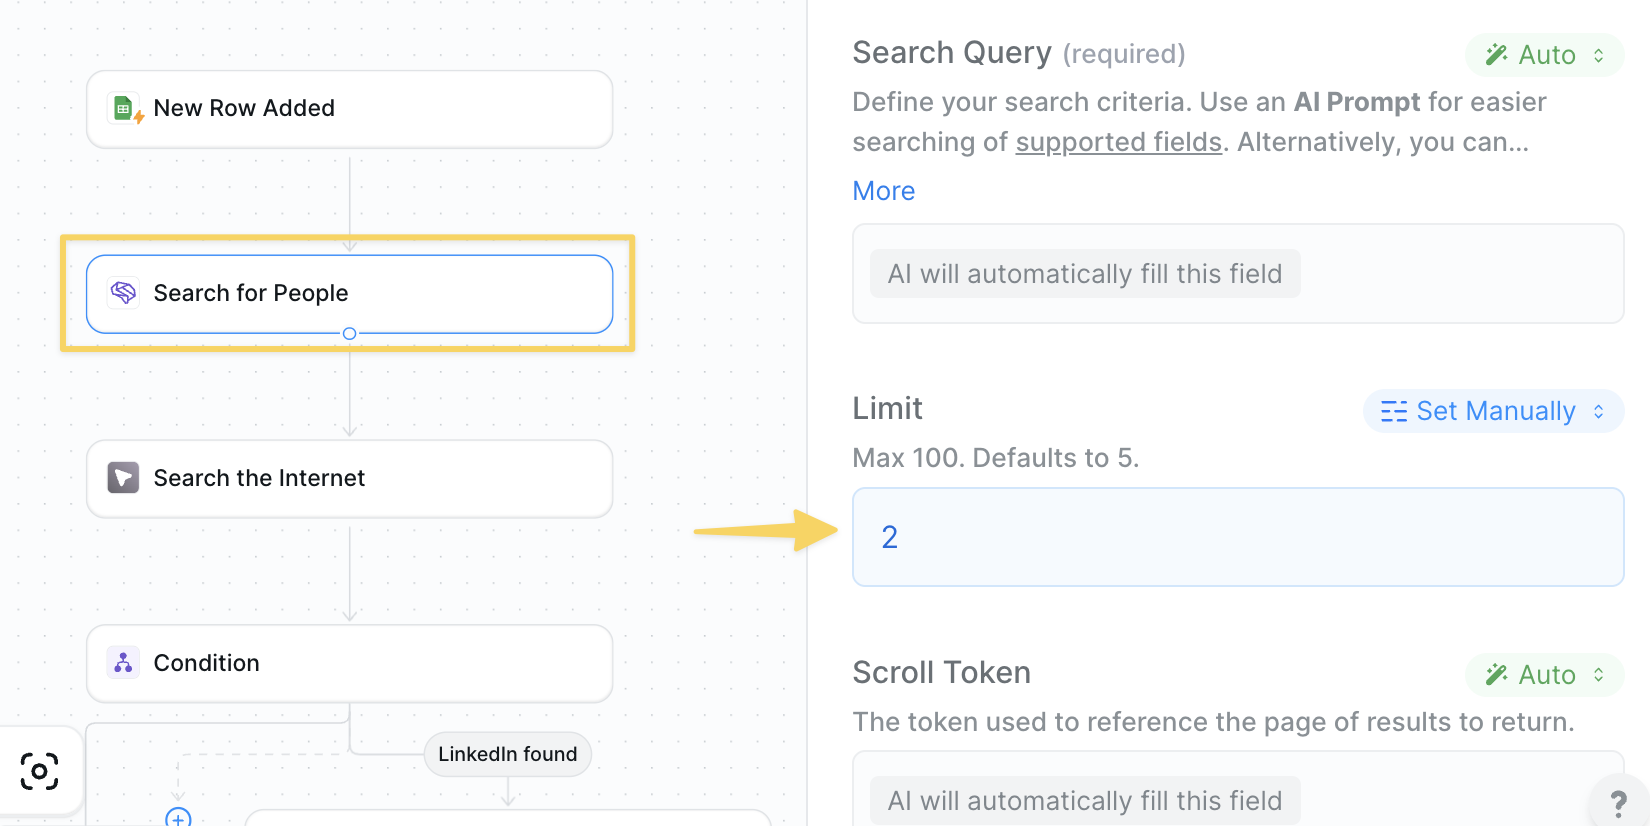 Use `People Data Labs – Search for People` action:
Recommend limiting results to `2` as each person queried consumes credits.
### Step 3: Double Down on LinkedIn Search
Use `People Data Labs – Search for People` action:
Recommend limiting results to `2` as each person queried consumes credits.
### Step 3: Double Down on LinkedIn Search
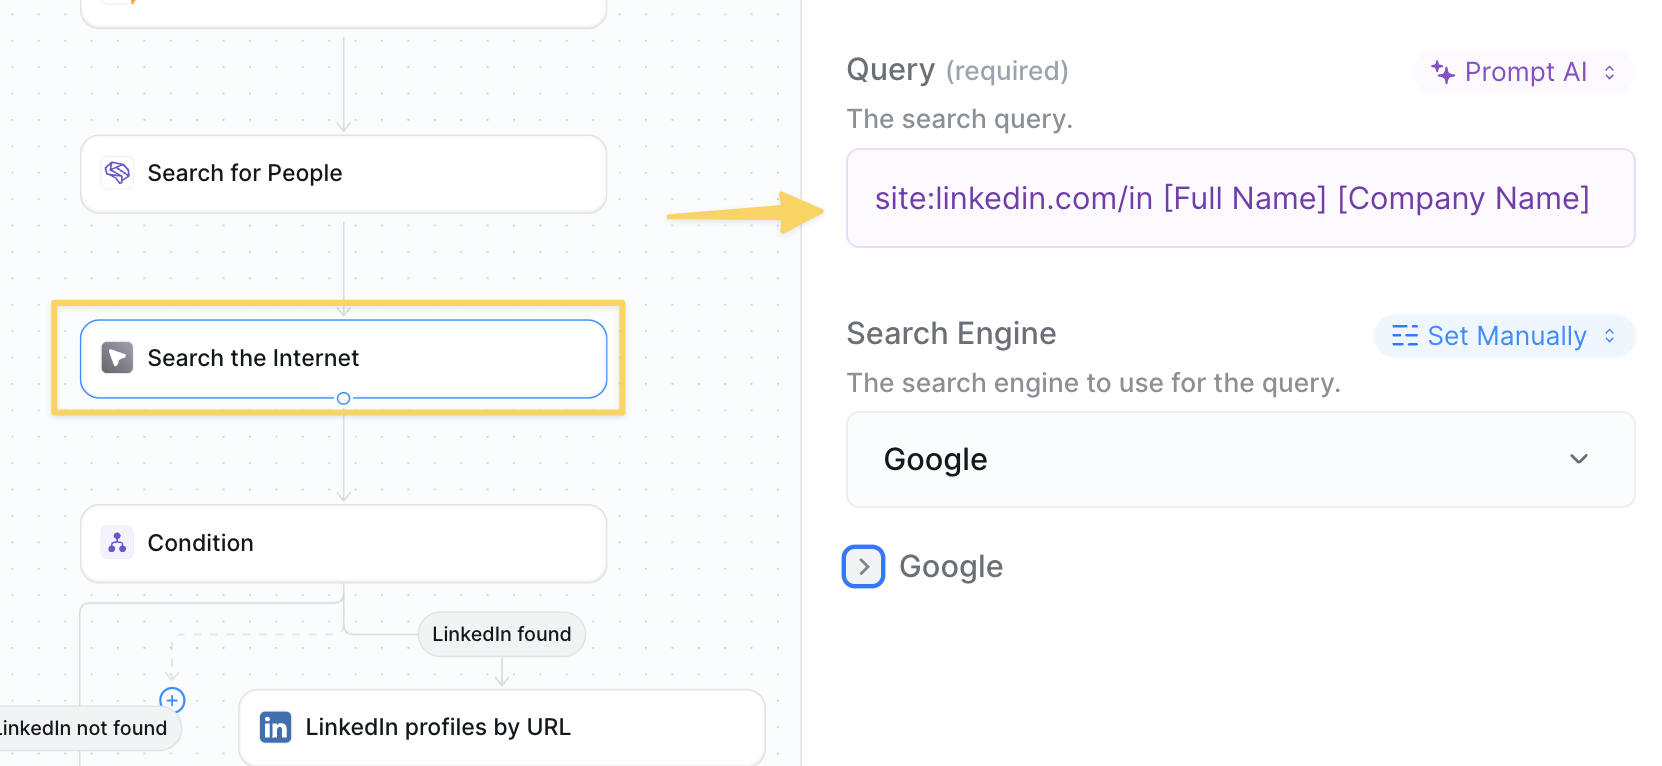 Add `Search the Internet` as a backup method:
```
site:linkedin.com/in [Full Name] [Company Name]
```
This ensures you catch LinkedIn profiles that People Data Labs might miss.
### Step 4: Check If LinkedIn Was Found
Add `Search the Internet` as a backup method:
```
site:linkedin.com/in [Full Name] [Company Name]
```
This ensures you catch LinkedIn profiles that People Data Labs might miss.
### Step 4: Check If LinkedIn Was Found
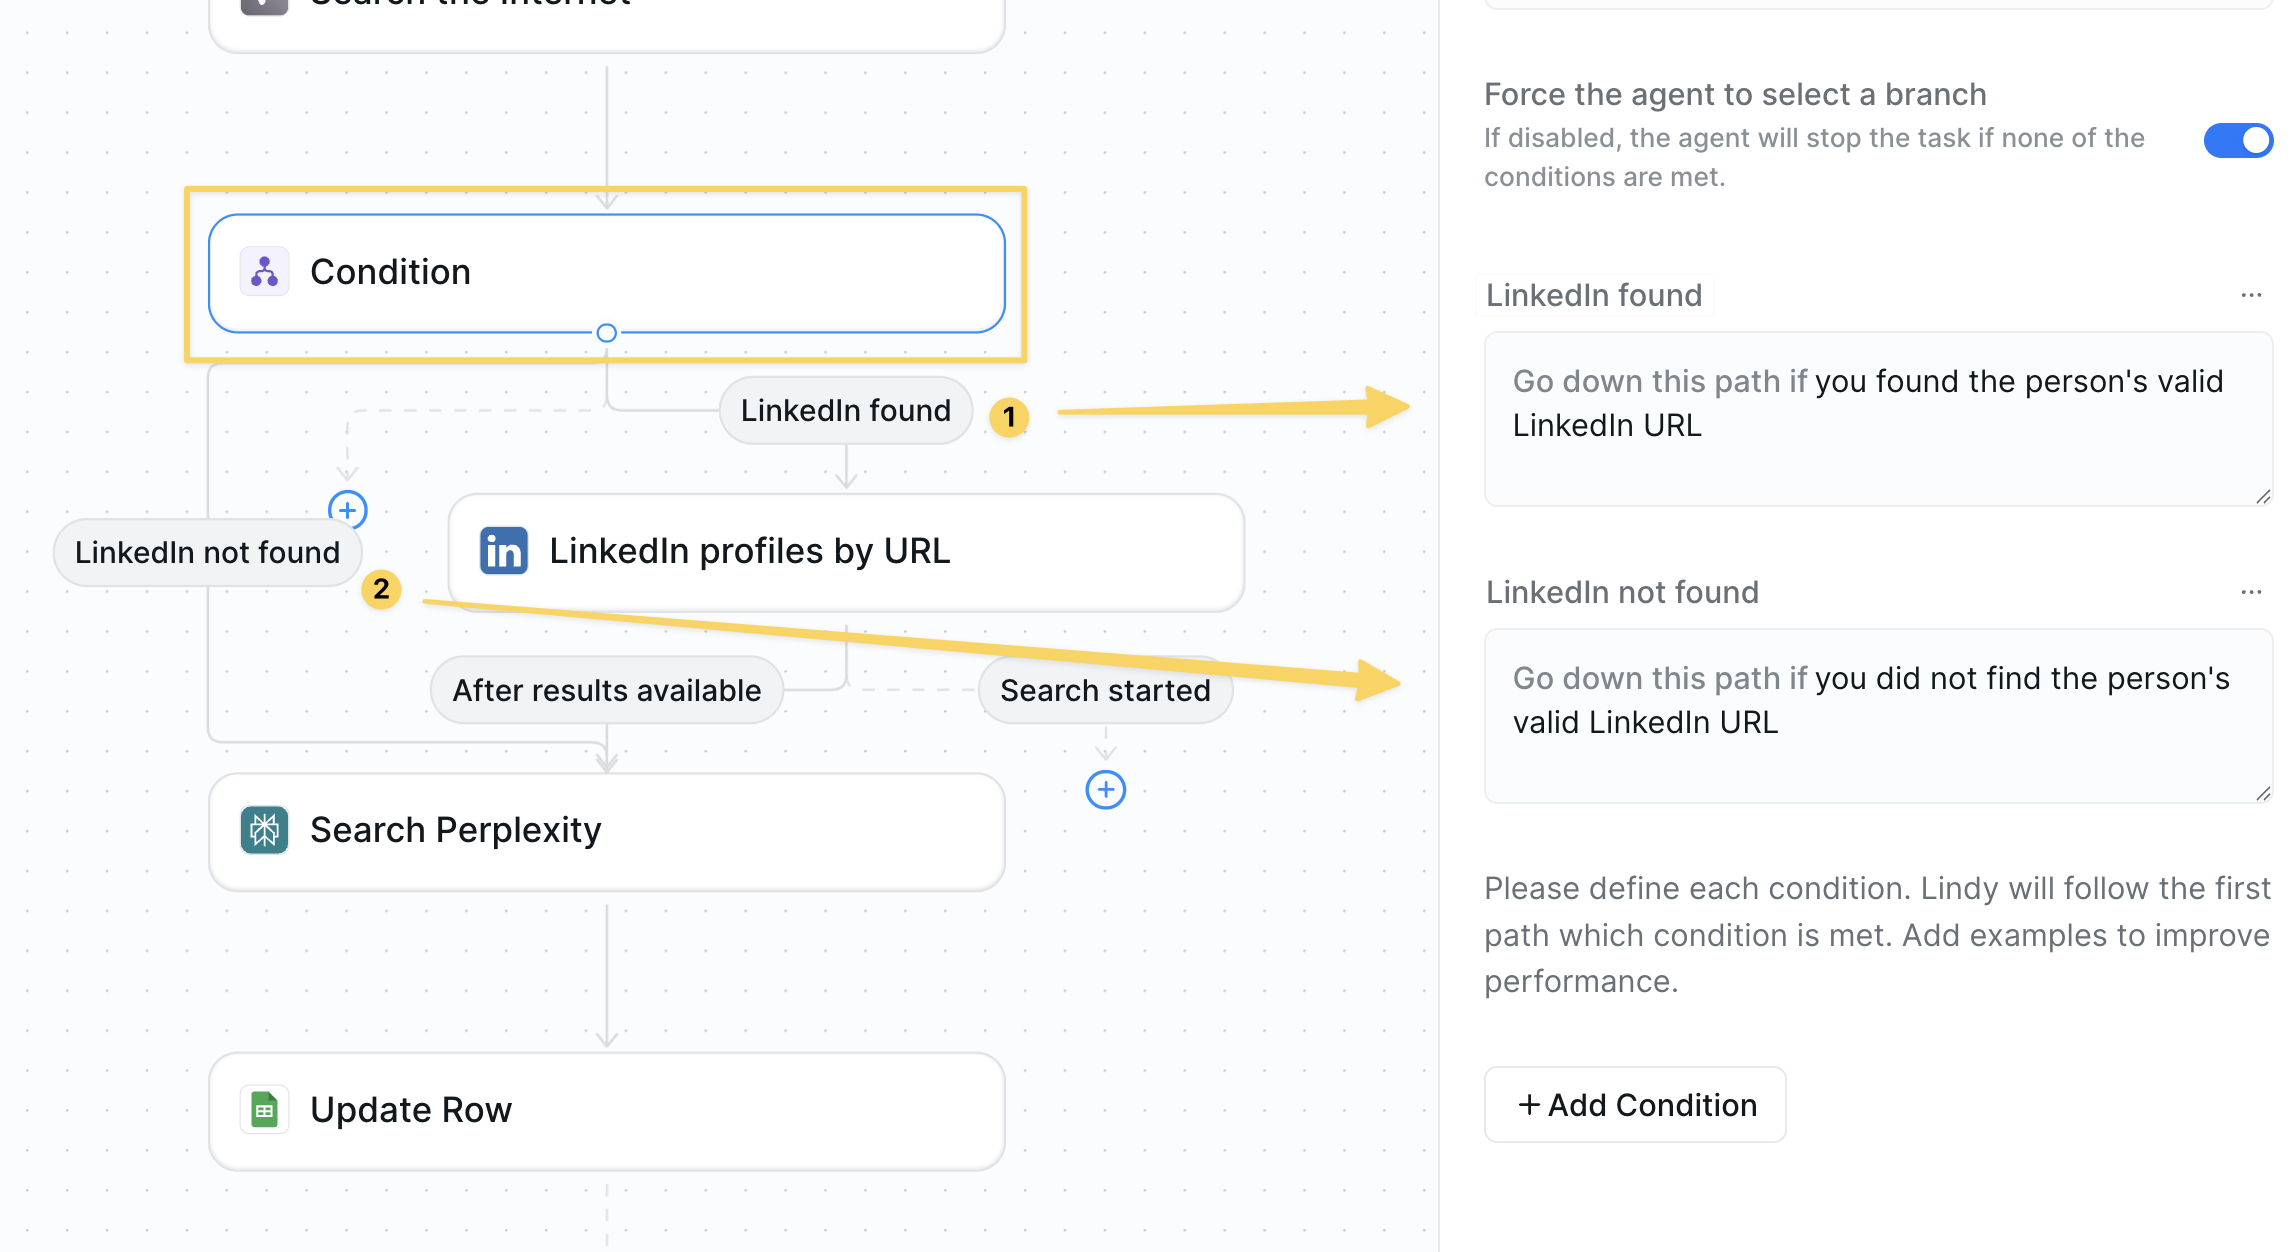 Add a `Condition` step:
* **LinkedIn found**: If we have a LinkedIn URL from either search
* **LinkedIn not found**: If both searches came up empty
This branches your flow based on whether you can scrape LinkedIn data.
### Step 5: Scrape LinkedIn Profile (If Found)
Add a `Condition` step:
* **LinkedIn found**: If we have a LinkedIn URL from either search
* **LinkedIn not found**: If both searches came up empty
This branches your flow based on whether you can scrape LinkedIn data.
### Step 5: Scrape LinkedIn Profile (If Found)
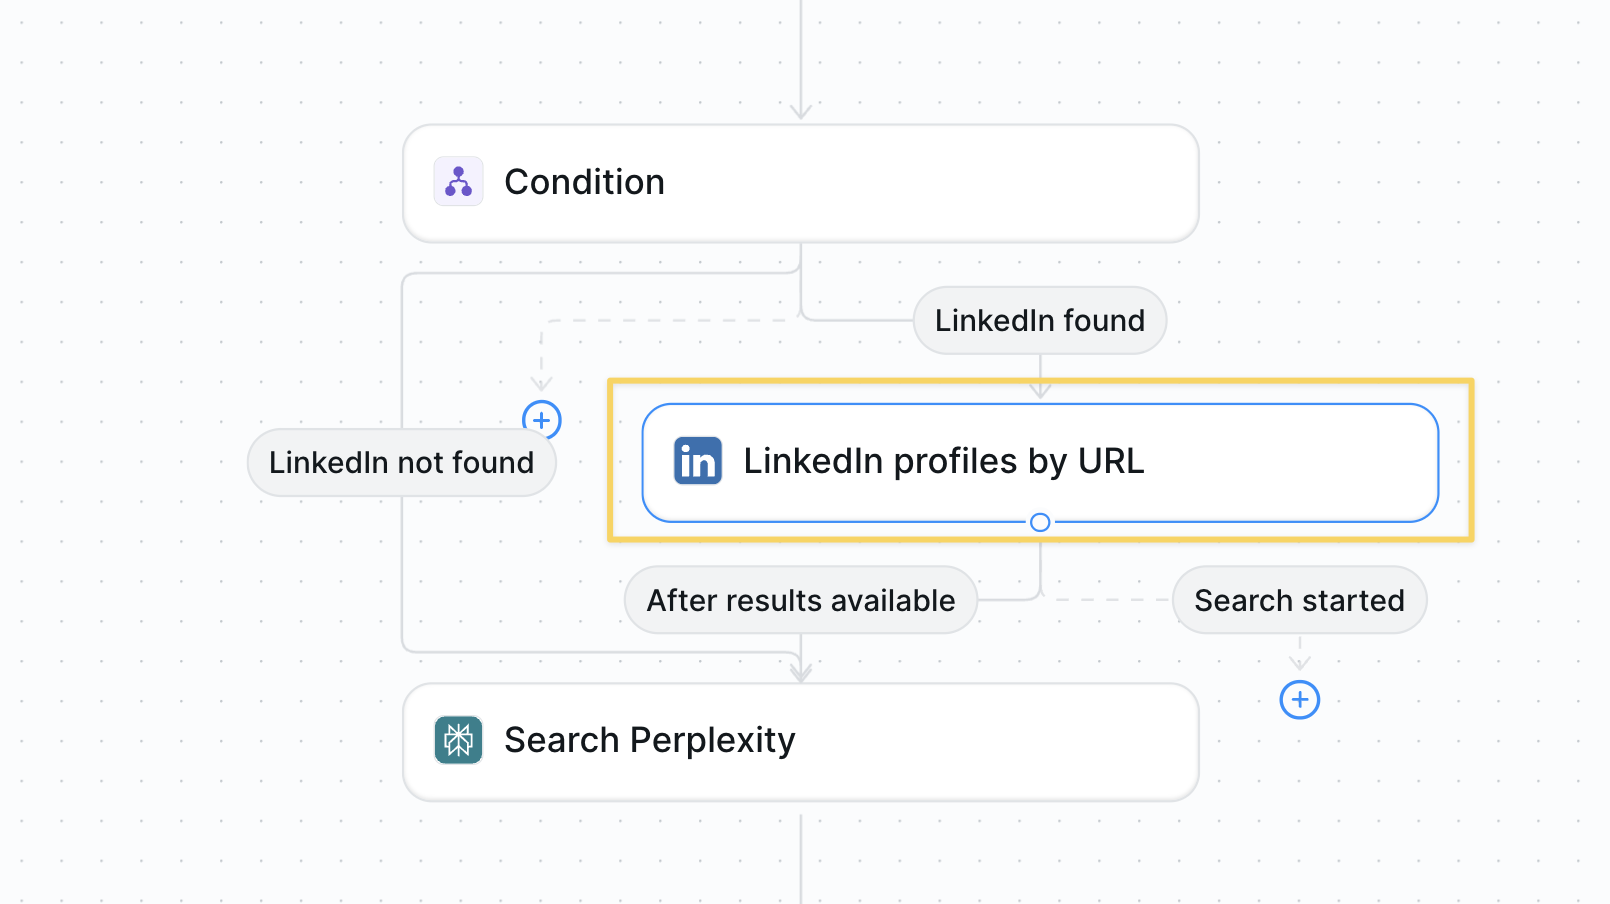 If LinkedIn was found, use `LinkedIn – Get Profile by URL`:
* Input: The LinkedIn URL from previous steps
* Extracts: Full work history, skills, education, bio
* Wait for "After results available" before proceeding
### Step 6: Research with Perplexity
If LinkedIn was found, use `LinkedIn – Get Profile by URL`:
* Input: The LinkedIn URL from previous steps
* Extracts: Full work history, skills, education, bio
* Wait for "After results available" before proceeding
### Step 6: Research with Perplexity
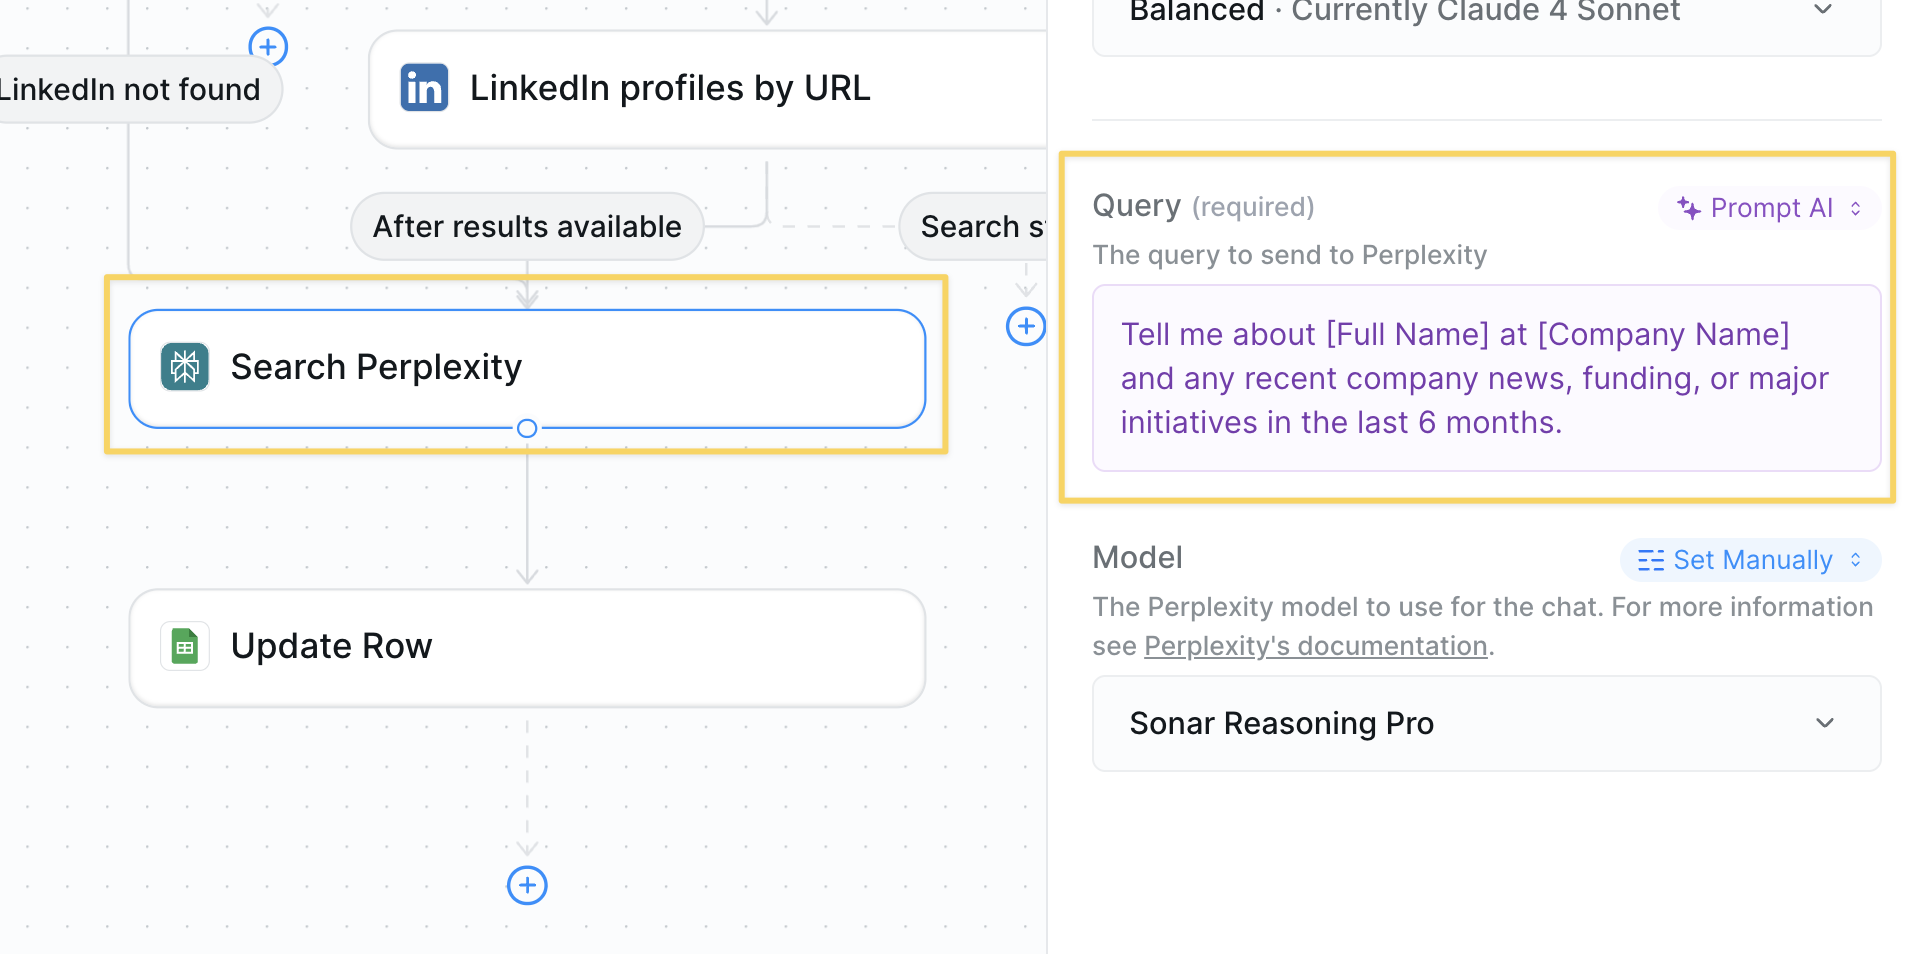 Use `Search Perplexity` for company intelligence:
```
Tell me about [Full Name] at [Company Name] and any recent company news, funding, or major initiatives in the last 6 months.
```
### Step 7: Update Your Spreadsheet
Use `Search Perplexity` for company intelligence:
```
Tell me about [Full Name] at [Company Name] and any recent company news, funding, or major initiatives in the last 6 months.
```
### Step 7: Update Your Spreadsheet
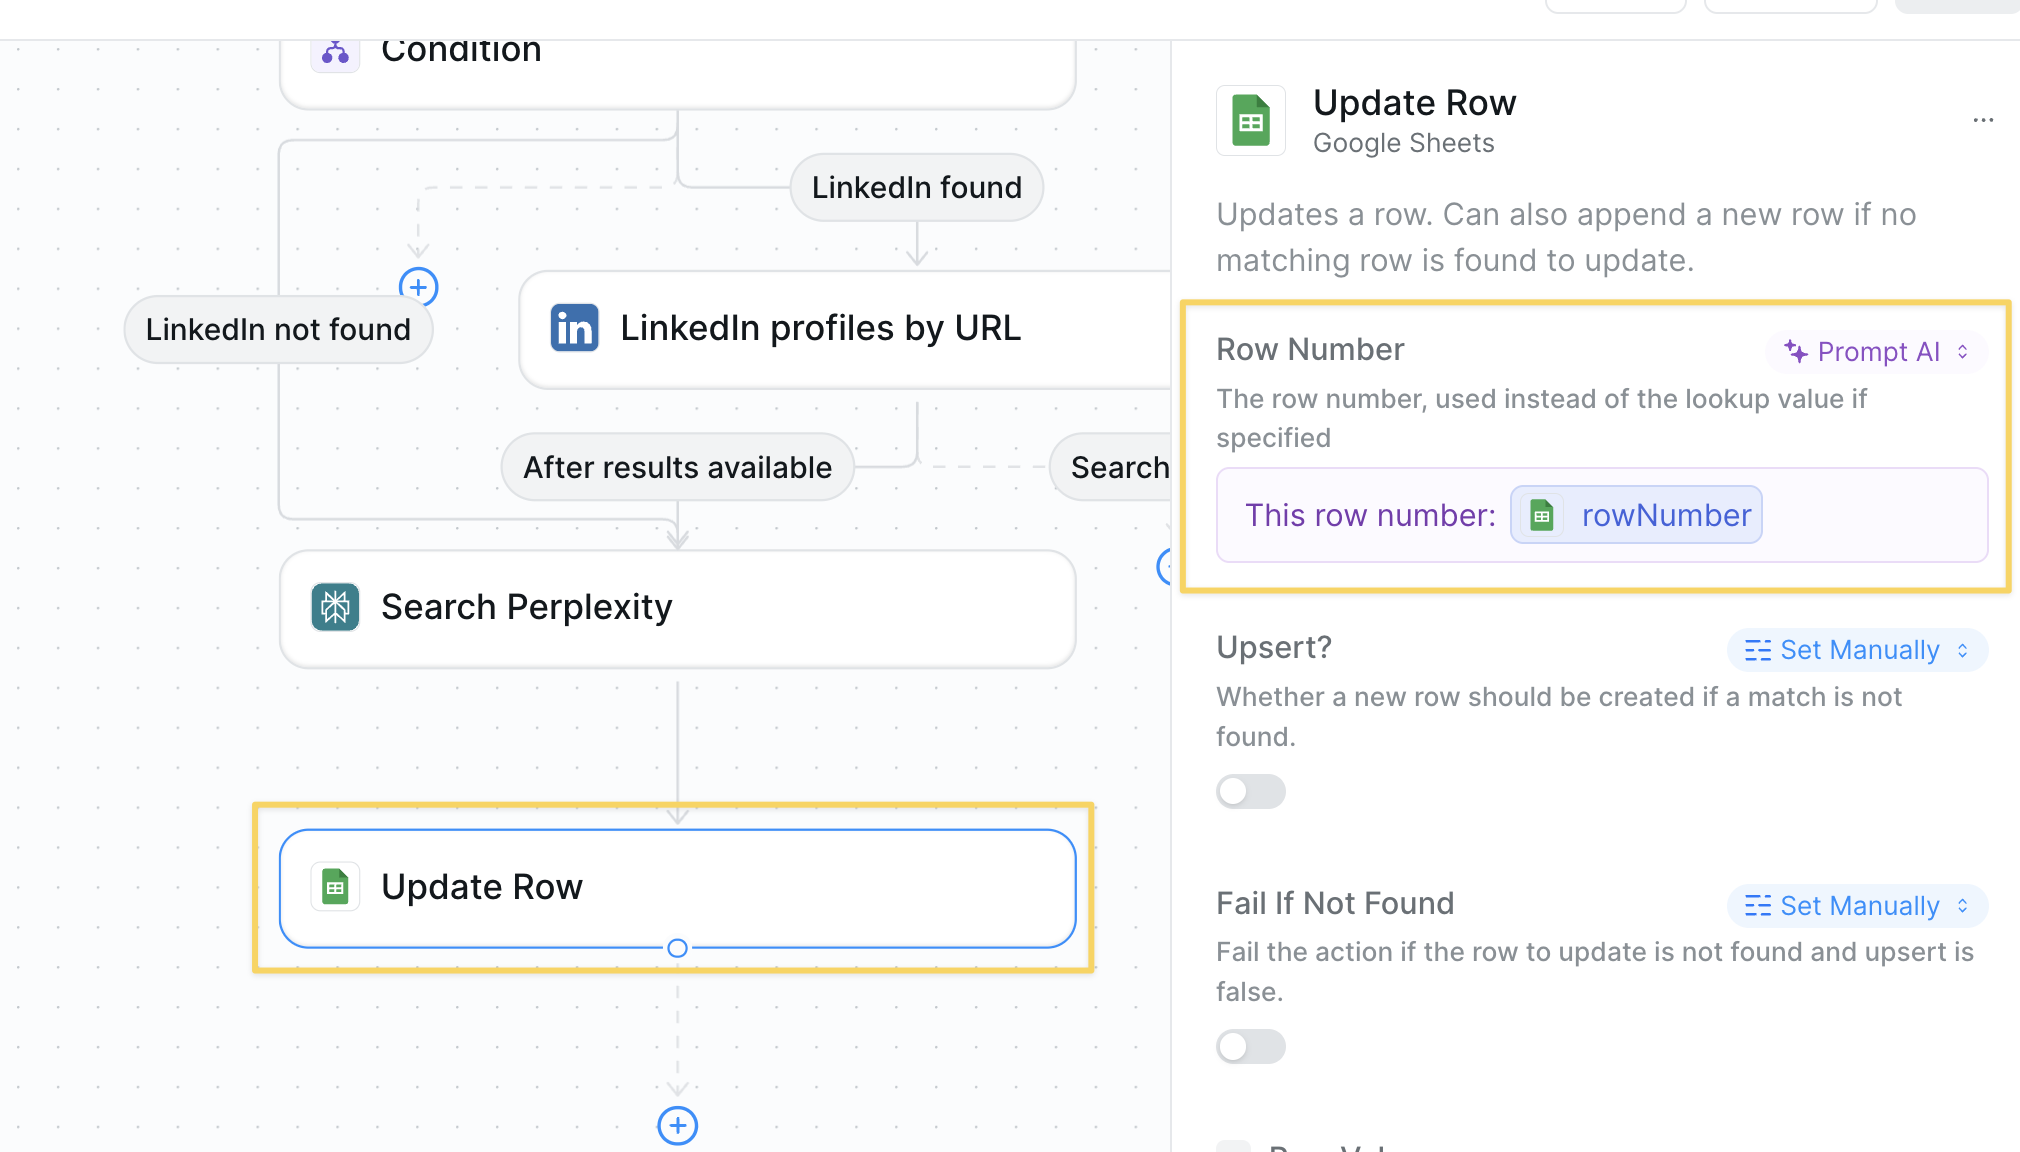 Use `Google Sheets – Update Row`:
* Match on the row from `New Row Added` trigger
* Update all enriched fields:
* Full Name (required)
* Company
* Role
* Email
* LinkedIn URL
* Background
* Company News
## Advanced Features
| Feature | What it does |
| ------------------- | ---------------------------------------------------- |
| Bulk Processing | Process group of leads by importing CSV |
| Duplicate Detection | Check if lead already exists before enriching |
| Lead Scoring | Calculate score based on seniority and company fit |
| CRM Sync | Push enriched data directly to HubSpot or Salesforce |
| Alert on Hot Leads | Slack notification for high-value prospects |
Use `Google Sheets – Update Row`:
* Match on the row from `New Row Added` trigger
* Update all enriched fields:
* Full Name (required)
* Company
* Role
* Email
* LinkedIn URL
* Background
* Company News
## Advanced Features
| Feature | What it does |
| ------------------- | ---------------------------------------------------- |
| Bulk Processing | Process group of leads by importing CSV |
| Duplicate Detection | Check if lead already exists before enriching |
| Lead Scoring | Calculate score based on seniority and company fit |
| CRM Sync | Push enriched data directly to HubSpot or Salesforce |
| Alert on Hot Leads | Slack notification for high-value prospects |
Watch the bulk CSV upload feature in action above
## Best Practices
Create all output columns in your sheet before starting — your agent needs them to exist.
People Data Labs works best with email addresses for accurate matching.
Both People Data Labs and LinkedIn scraping have usage limits — process in batches.
Set up a monthly re-enrichment for key accounts to catch job changes.
## Next Steps
Use enriched data for personalized outreach
Negotiate deals with enriched prospect intel
Build intelligent lead research workflows
Store enriched data for future use
# Multichannel Outbound
Source: https://docs.lindy.ai/use-cases/sales/multi-channel-outbound
Execute multichannel outbound campaigns with Lindy
## Quick Overview
Let your agent act as a self-learning SDR that:
* **Triggers** when a new lead appears in Sheets or Task view
* **Crafts** personalized first-touch emails (and texts if the lead has opted in)
* **Waits** a set interval, then follows up with added value
* **Calls** qualified leads by phone to book meetings
* **Alerts** you the moment a lead replies—or after the full cadence with no response
Start from the [multichannel outbound template](https://chat.lindy.ai/home/?templateId=6875c321cb447178e1192a26) and customize.
## Setting Up Your Outbound Flow
### Step 1: Lead Trigger
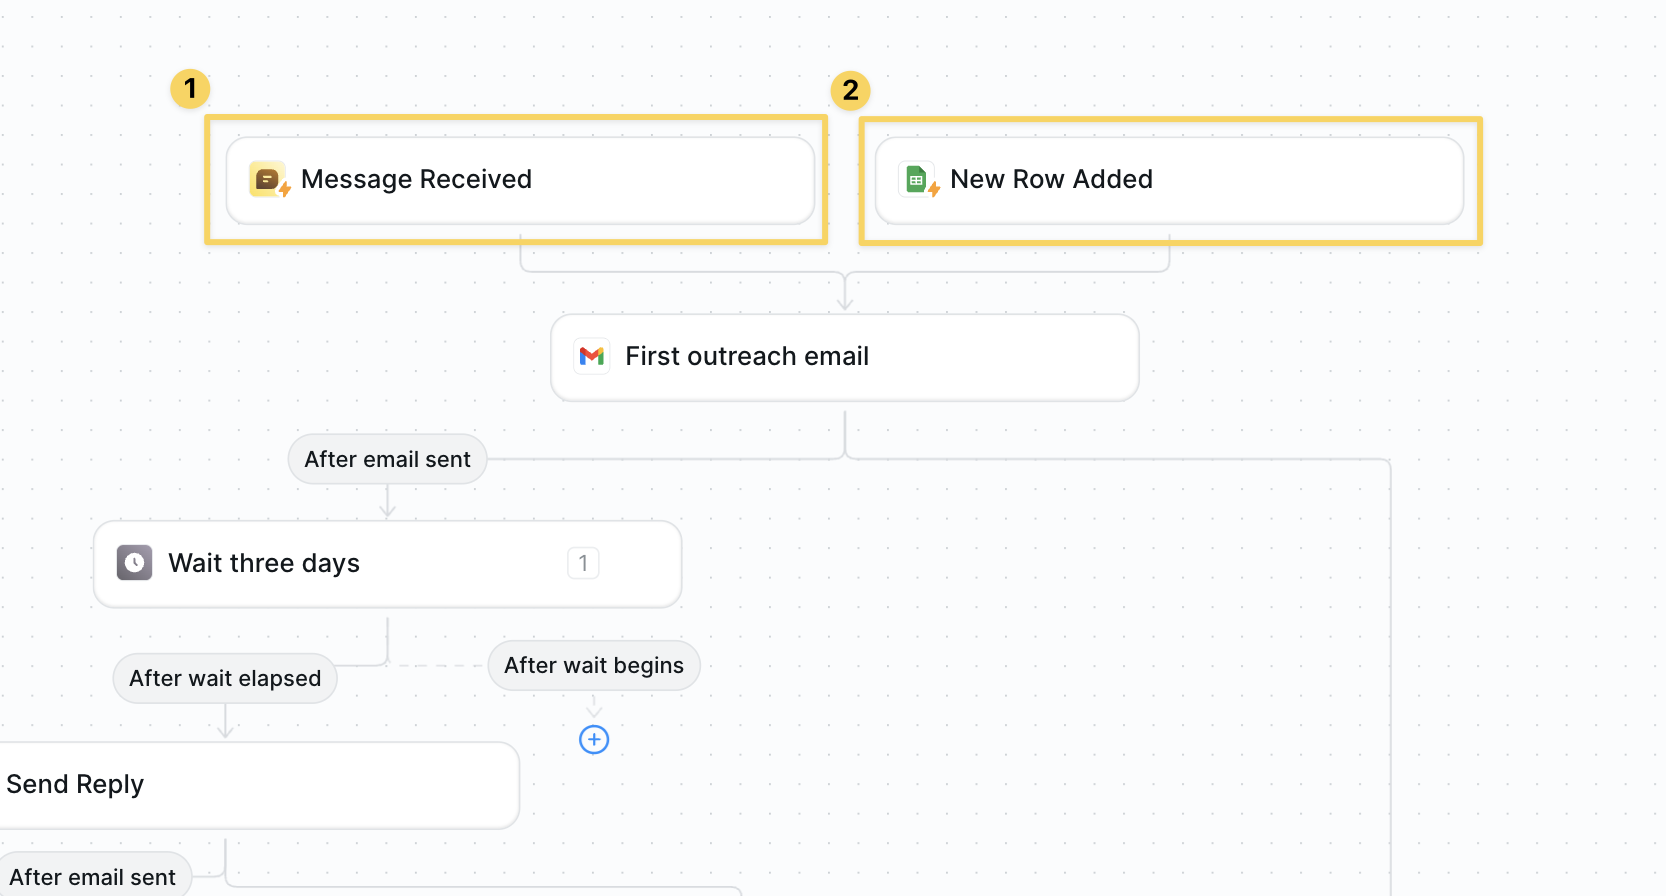 1. Add both `Google Sheets – New Row Added` *and* `Message Received` triggers.
2. **Your input must have email or phone # depending on the form of outreach.**
3. Optional: upload a CSV or DM your agent in Task view to start ad-hoc outreach.
### Step 2: Enrich the Lead (Optional)
Optionally add an enrichment step to gather additional context about your prospects for better personalization.
1. Add both `Google Sheets – New Row Added` *and* `Message Received` triggers.
2. **Your input must have email or phone # depending on the form of outreach.**
3. Optional: upload a CSV or DM your agent in Task view to start ad-hoc outreach.
### Step 2: Enrich the Lead (Optional)
Optionally add an enrichment step to gather additional context about your prospects for better personalization.
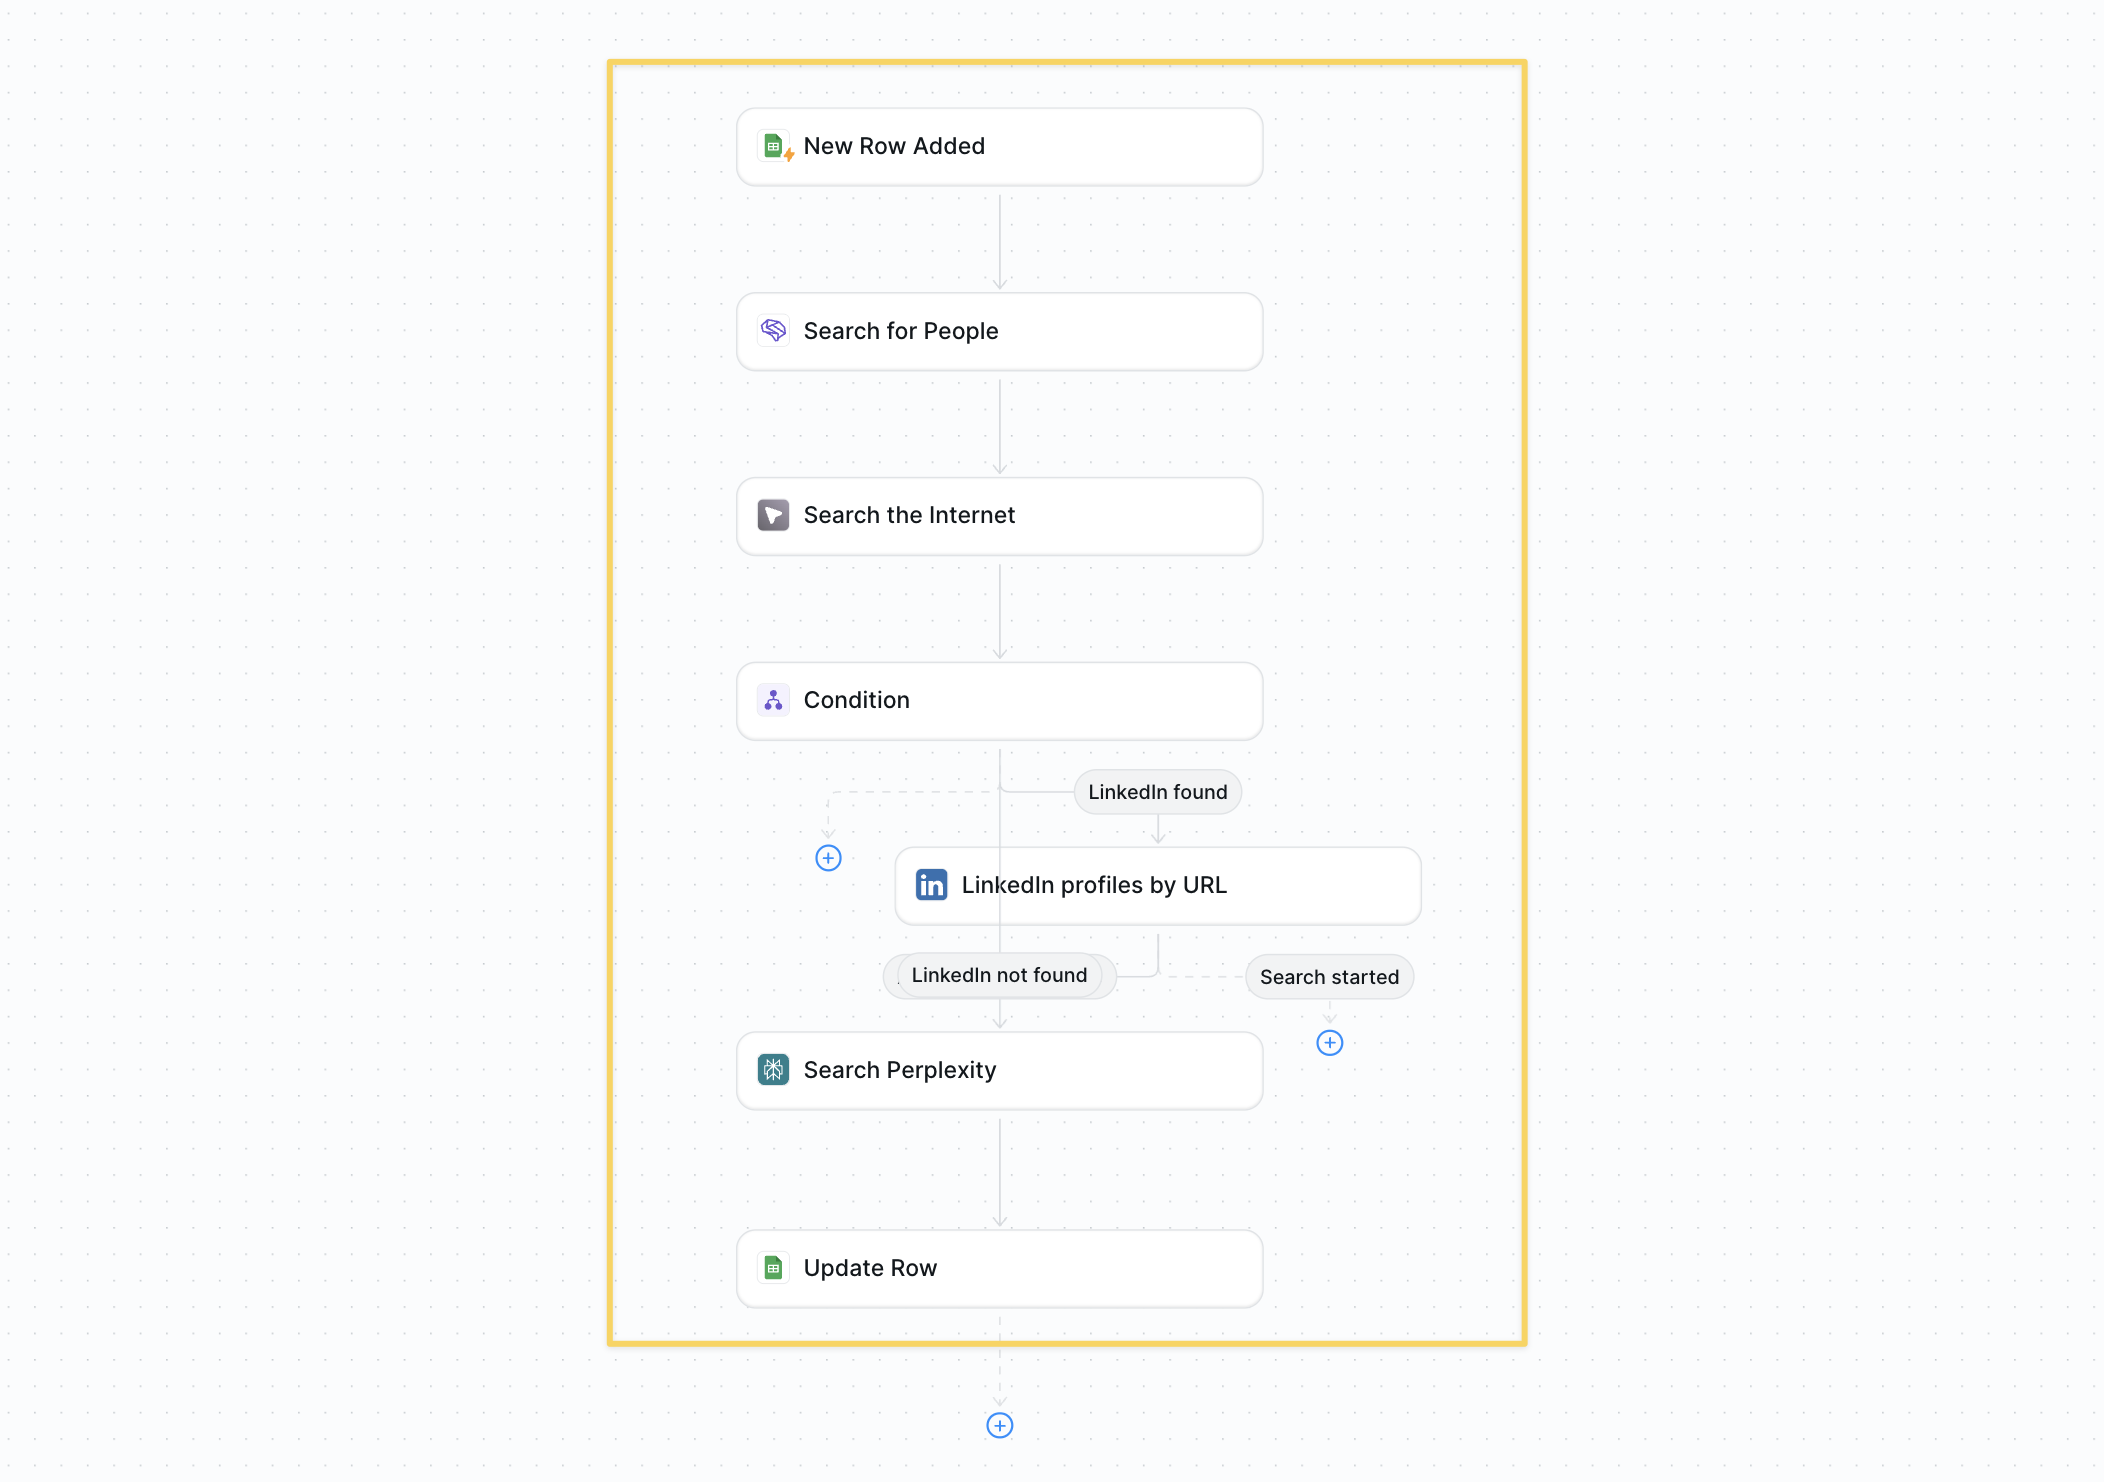 * Follow the [Lead Enrichment tutorial](/use-cases/sales/lead-enrichment) to learn how to enrich a lead.
* More context → better personalization and reply rates.
### Step 3: Wait, Then Follow-Up
* Follow the [Lead Enrichment tutorial](/use-cases/sales/lead-enrichment) to learn how to enrich a lead.
* More context → better personalization and reply rates.
### Step 3: Wait, Then Follow-Up
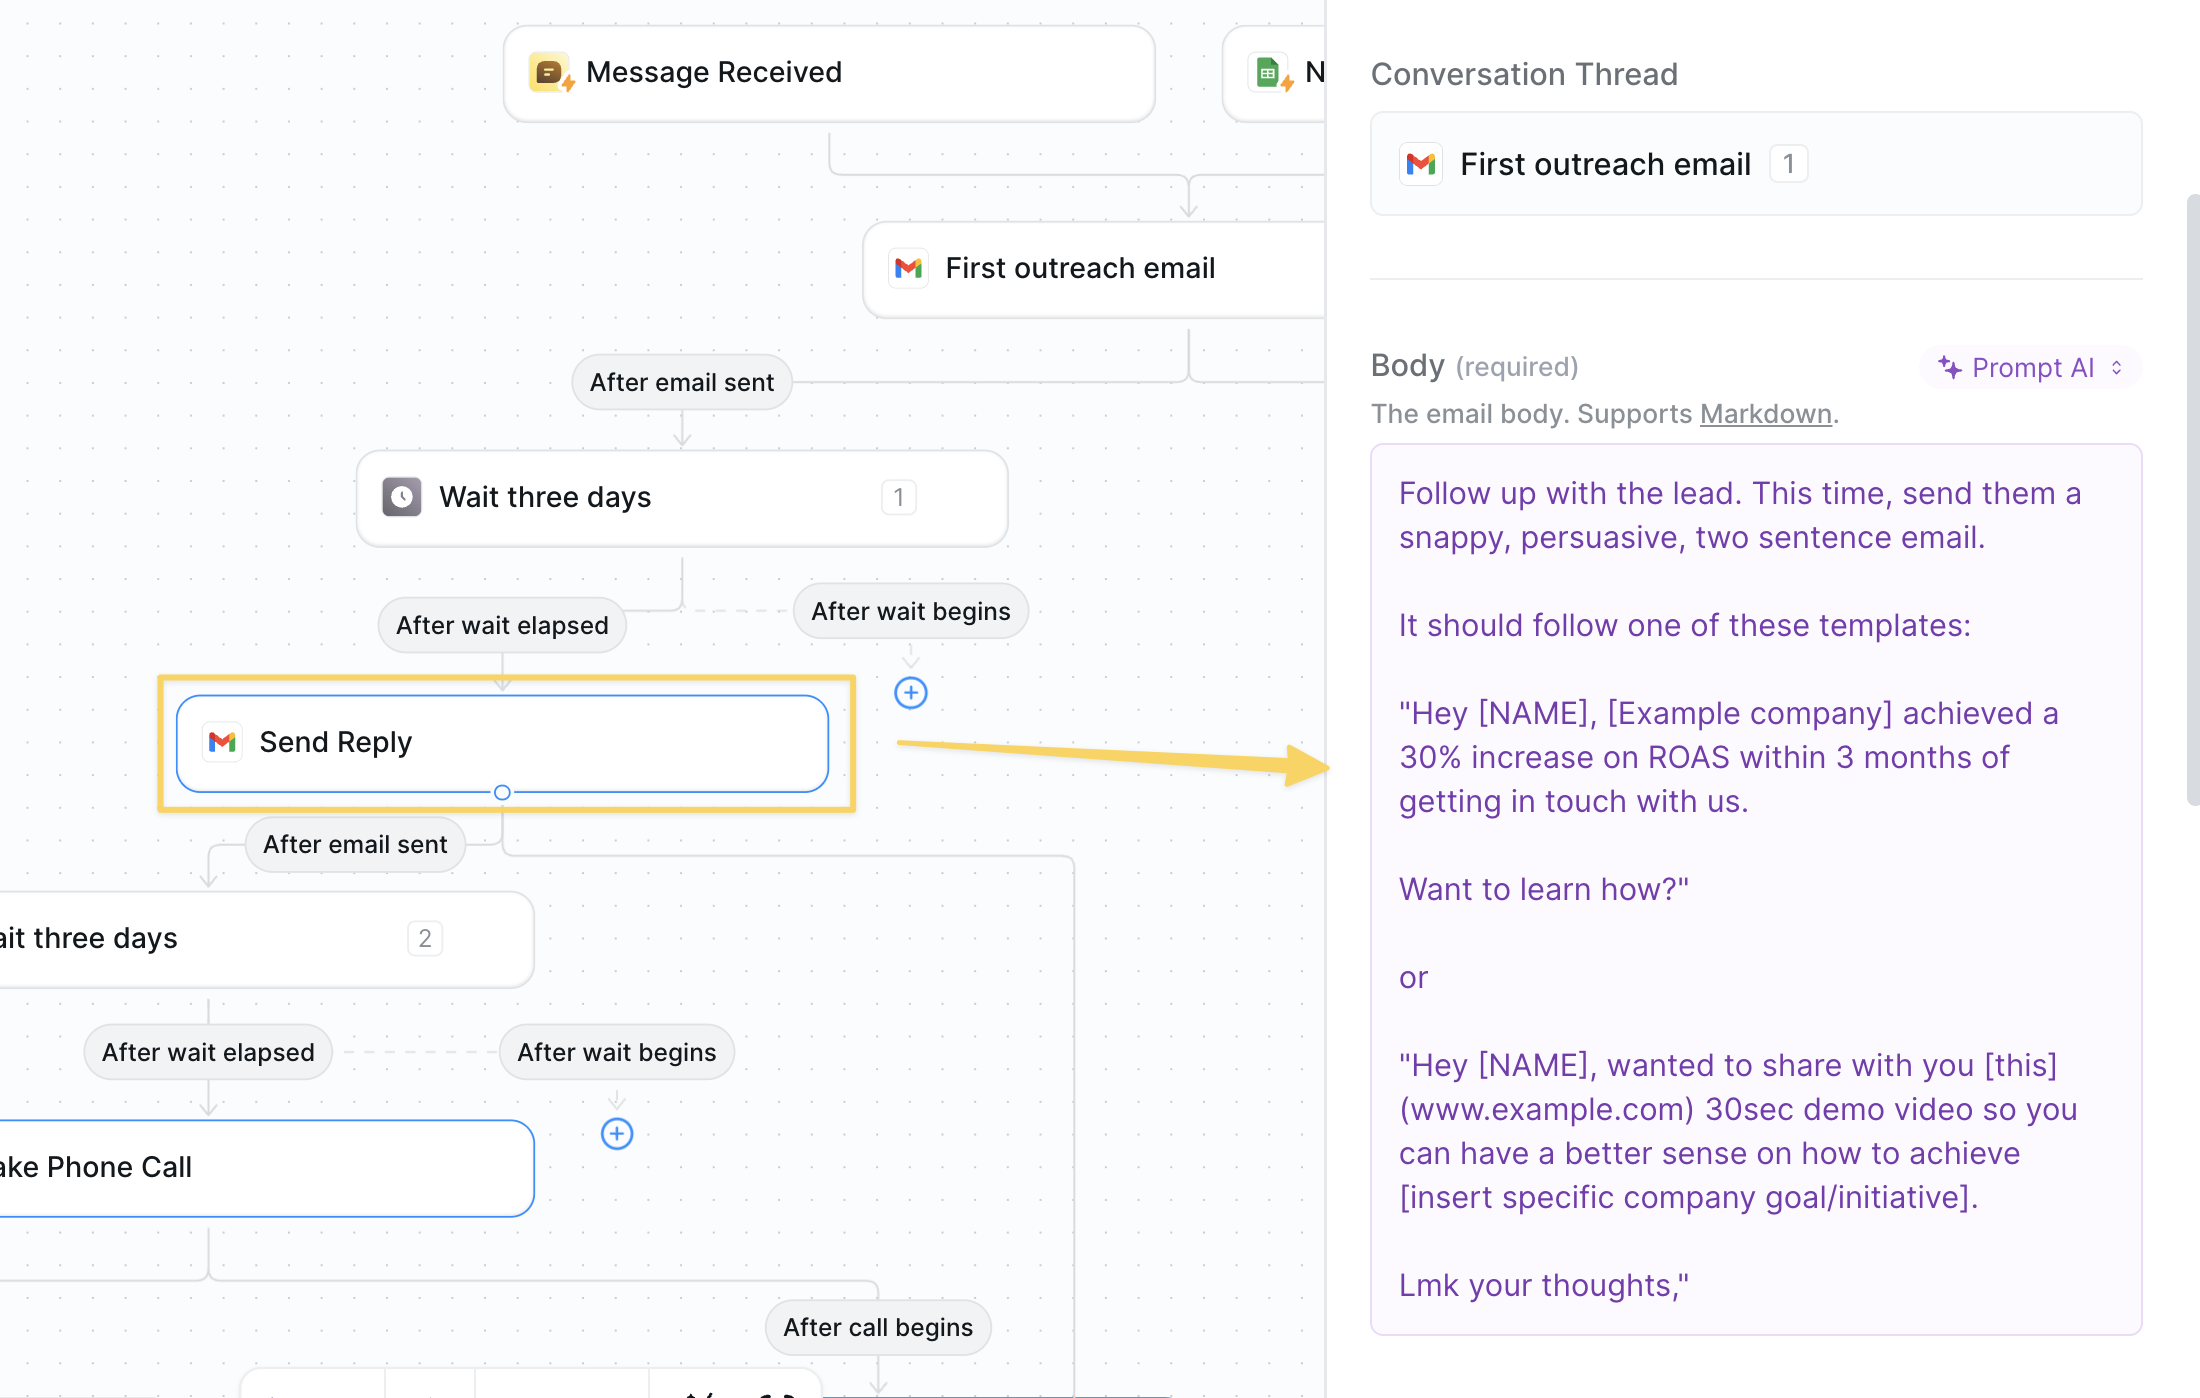 * Action: `Wait – For Minutes` set to 4320 (three days).
* Add `Gmail – Send Reply` for follow-up #1.
* Repeat Wait + Reply as many times as needed.
Example prompt:
```
Follow up with the lead. This time, send them a snappy, persuasive, two sentence email.
It should follow one of these templates:
"Hey [NAME], [Example company] achieved a 30% increase on ROAS within 3 months of getting in touch with us.
Want to learn how?"
or
"Hey [NAME], wanted to share with you [this] (www.example.com) 30sec demo video so you can have a better sense on how to achieve [insert specific company goal/initiative].
Lmk your thoughts,"
```
### Step 4: Make an Outbound Call (Optional)
* Action: `Wait – For Minutes` set to 4320 (three days).
* Add `Gmail – Send Reply` for follow-up #1.
* Repeat Wait + Reply as many times as needed.
Example prompt:
```
Follow up with the lead. This time, send them a snappy, persuasive, two sentence email.
It should follow one of these templates:
"Hey [NAME], [Example company] achieved a 30% increase on ROAS within 3 months of getting in touch with us.
Want to learn how?"
or
"Hey [NAME], wanted to share with you [this] (www.example.com) 30sec demo video so you can have a better sense on how to achieve [insert specific company goal/initiative].
Lmk your thoughts,"
```
### Step 4: Make an Outbound Call (Optional)
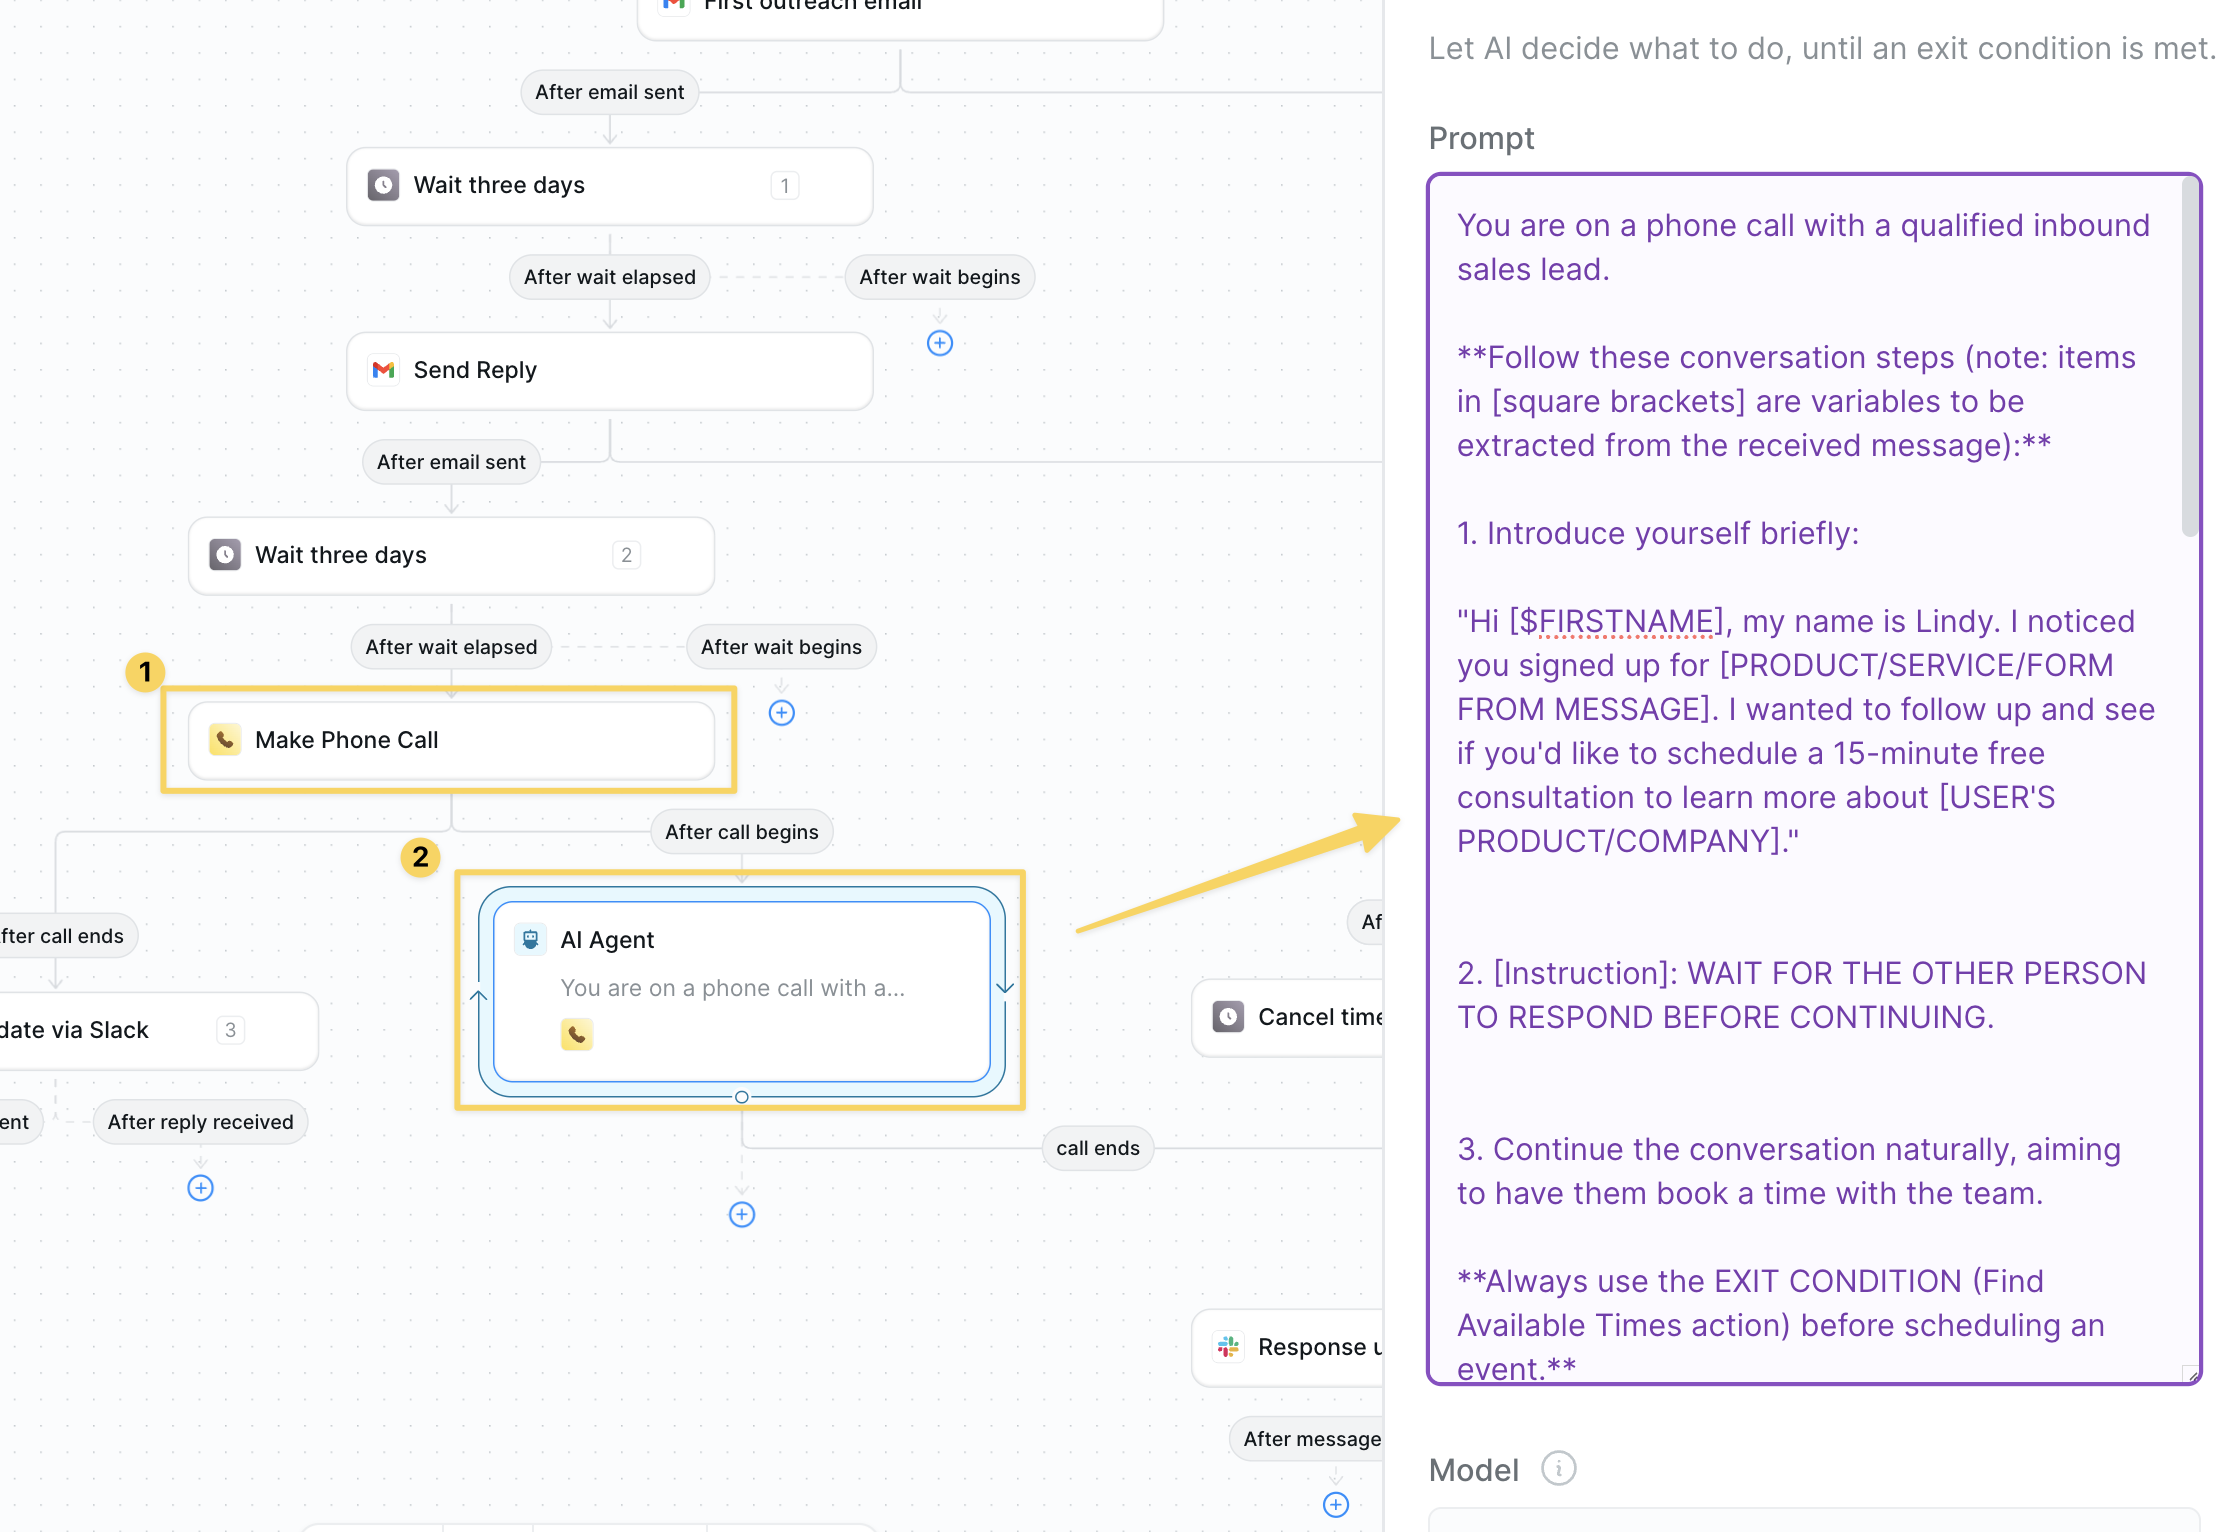 * Action: `Lindy Phone – Make Outbound Call`
Example prompt:
```
You are on a phone call with a qualified inbound sales lead.
**Follow these conversation steps (note: items in [square brackets] are variables to be extracted from the received message):**
1. Introduce yourself briefly:
"Hi [$FIRSTNAME], my name is Lindy. I noticed you signed up for [PRODUCT/SERVICE/FORM FROM MESSAGE]. I wanted to follow up and see if you'd like to schedule a 15-minute free consultation to learn more about [USER'S PRODUCT/COMPANY]."
2. [Instruction]: WAIT FOR THE OTHER PERSON TO RESPOND BEFORE CONTINUING.
3. Continue the conversation naturally, aiming to have them book a time with the team.
**Always use the EXIT CONDITION (Find Available Times action) before scheduling an event.**
**Always PAUSE and wait for the user to respond when giving times.**
4. [Instruction]: WAIT FOR THE USER ON THE PHONE TO RESPOND AFTER YOU GAVE THEM TIME OPTIONS.
**Booking the Consultation Hints:**
* WAIT after suggesting three available times *
5. When the user:
* Accepts a time: Thank them and ask them to check their calendar for the invite and accept it to confirm (do not add anything else to this statement / request)
* Declines booking: Act as a thoughtful and persuasive negotiator (e.g., ask why they're uninterested in {THE PRODUCT}) before concluding the conversation
[Instruction]: WAIT FOR THE USER ON THE PHONE TO RESPOND AFTER YOU REQUEST FOR THEM TO CONFIRM THE CALENDAR INVITE.
5. Summarize the outcome:
* If accepted: "To wrap things up, I wanted to confirm that you are booked to meet with the team at [EVENT TIME AND DATE]" (do not mention the day and time if you have already mentioned it previously)
* If declined: "Thank you for taking the time to consider connecting with the team"
[Instruction]: WAIT FOR THE OTHER PERSON TO RESPOND BEFORE PROCEEDING TO ASK IF THEY NEED HELP WITH ANYTHING ELSE.
6. Ask: "Is there anything else I can help you with?"
After they confirm nothing else is needed, thank them and end the call.
### IMPORTANT NOTES:
* If initial times don't work, don't give up. Continue using the EXIT CONDITION to Find Available Times until you find a suitable option
* Demonstrate skilled negotiation by working to find mutually agreeable times
* Always maintain a professional and helpful demeanor throughout the conversation
* Always do your best to book the consultation. If they say no initially, ensure you respond with concise rebuttals to persuade them to book a consultation.
```
### Step 6: Alert & Exit
* Action: `Lindy Phone – Make Outbound Call`
Example prompt:
```
You are on a phone call with a qualified inbound sales lead.
**Follow these conversation steps (note: items in [square brackets] are variables to be extracted from the received message):**
1. Introduce yourself briefly:
"Hi [$FIRSTNAME], my name is Lindy. I noticed you signed up for [PRODUCT/SERVICE/FORM FROM MESSAGE]. I wanted to follow up and see if you'd like to schedule a 15-minute free consultation to learn more about [USER'S PRODUCT/COMPANY]."
2. [Instruction]: WAIT FOR THE OTHER PERSON TO RESPOND BEFORE CONTINUING.
3. Continue the conversation naturally, aiming to have them book a time with the team.
**Always use the EXIT CONDITION (Find Available Times action) before scheduling an event.**
**Always PAUSE and wait for the user to respond when giving times.**
4. [Instruction]: WAIT FOR THE USER ON THE PHONE TO RESPOND AFTER YOU GAVE THEM TIME OPTIONS.
**Booking the Consultation Hints:**
* WAIT after suggesting three available times *
5. When the user:
* Accepts a time: Thank them and ask them to check their calendar for the invite and accept it to confirm (do not add anything else to this statement / request)
* Declines booking: Act as a thoughtful and persuasive negotiator (e.g., ask why they're uninterested in {THE PRODUCT}) before concluding the conversation
[Instruction]: WAIT FOR THE USER ON THE PHONE TO RESPOND AFTER YOU REQUEST FOR THEM TO CONFIRM THE CALENDAR INVITE.
5. Summarize the outcome:
* If accepted: "To wrap things up, I wanted to confirm that you are booked to meet with the team at [EVENT TIME AND DATE]" (do not mention the day and time if you have already mentioned it previously)
* If declined: "Thank you for taking the time to consider connecting with the team"
[Instruction]: WAIT FOR THE OTHER PERSON TO RESPOND BEFORE PROCEEDING TO ASK IF THEY NEED HELP WITH ANYTHING ELSE.
6. Ask: "Is there anything else I can help you with?"
After they confirm nothing else is needed, thank them and end the call.
### IMPORTANT NOTES:
* If initial times don't work, don't give up. Continue using the EXIT CONDITION to Find Available Times until you find a suitable option
* Demonstrate skilled negotiation by working to find mutually agreeable times
* Always maintain a professional and helpful demeanor throughout the conversation
* Always do your best to book the consultation. If they say no initially, ensure you respond with concise rebuttals to persuade them to book a consultation.
```
### Step 6: Alert & Exit
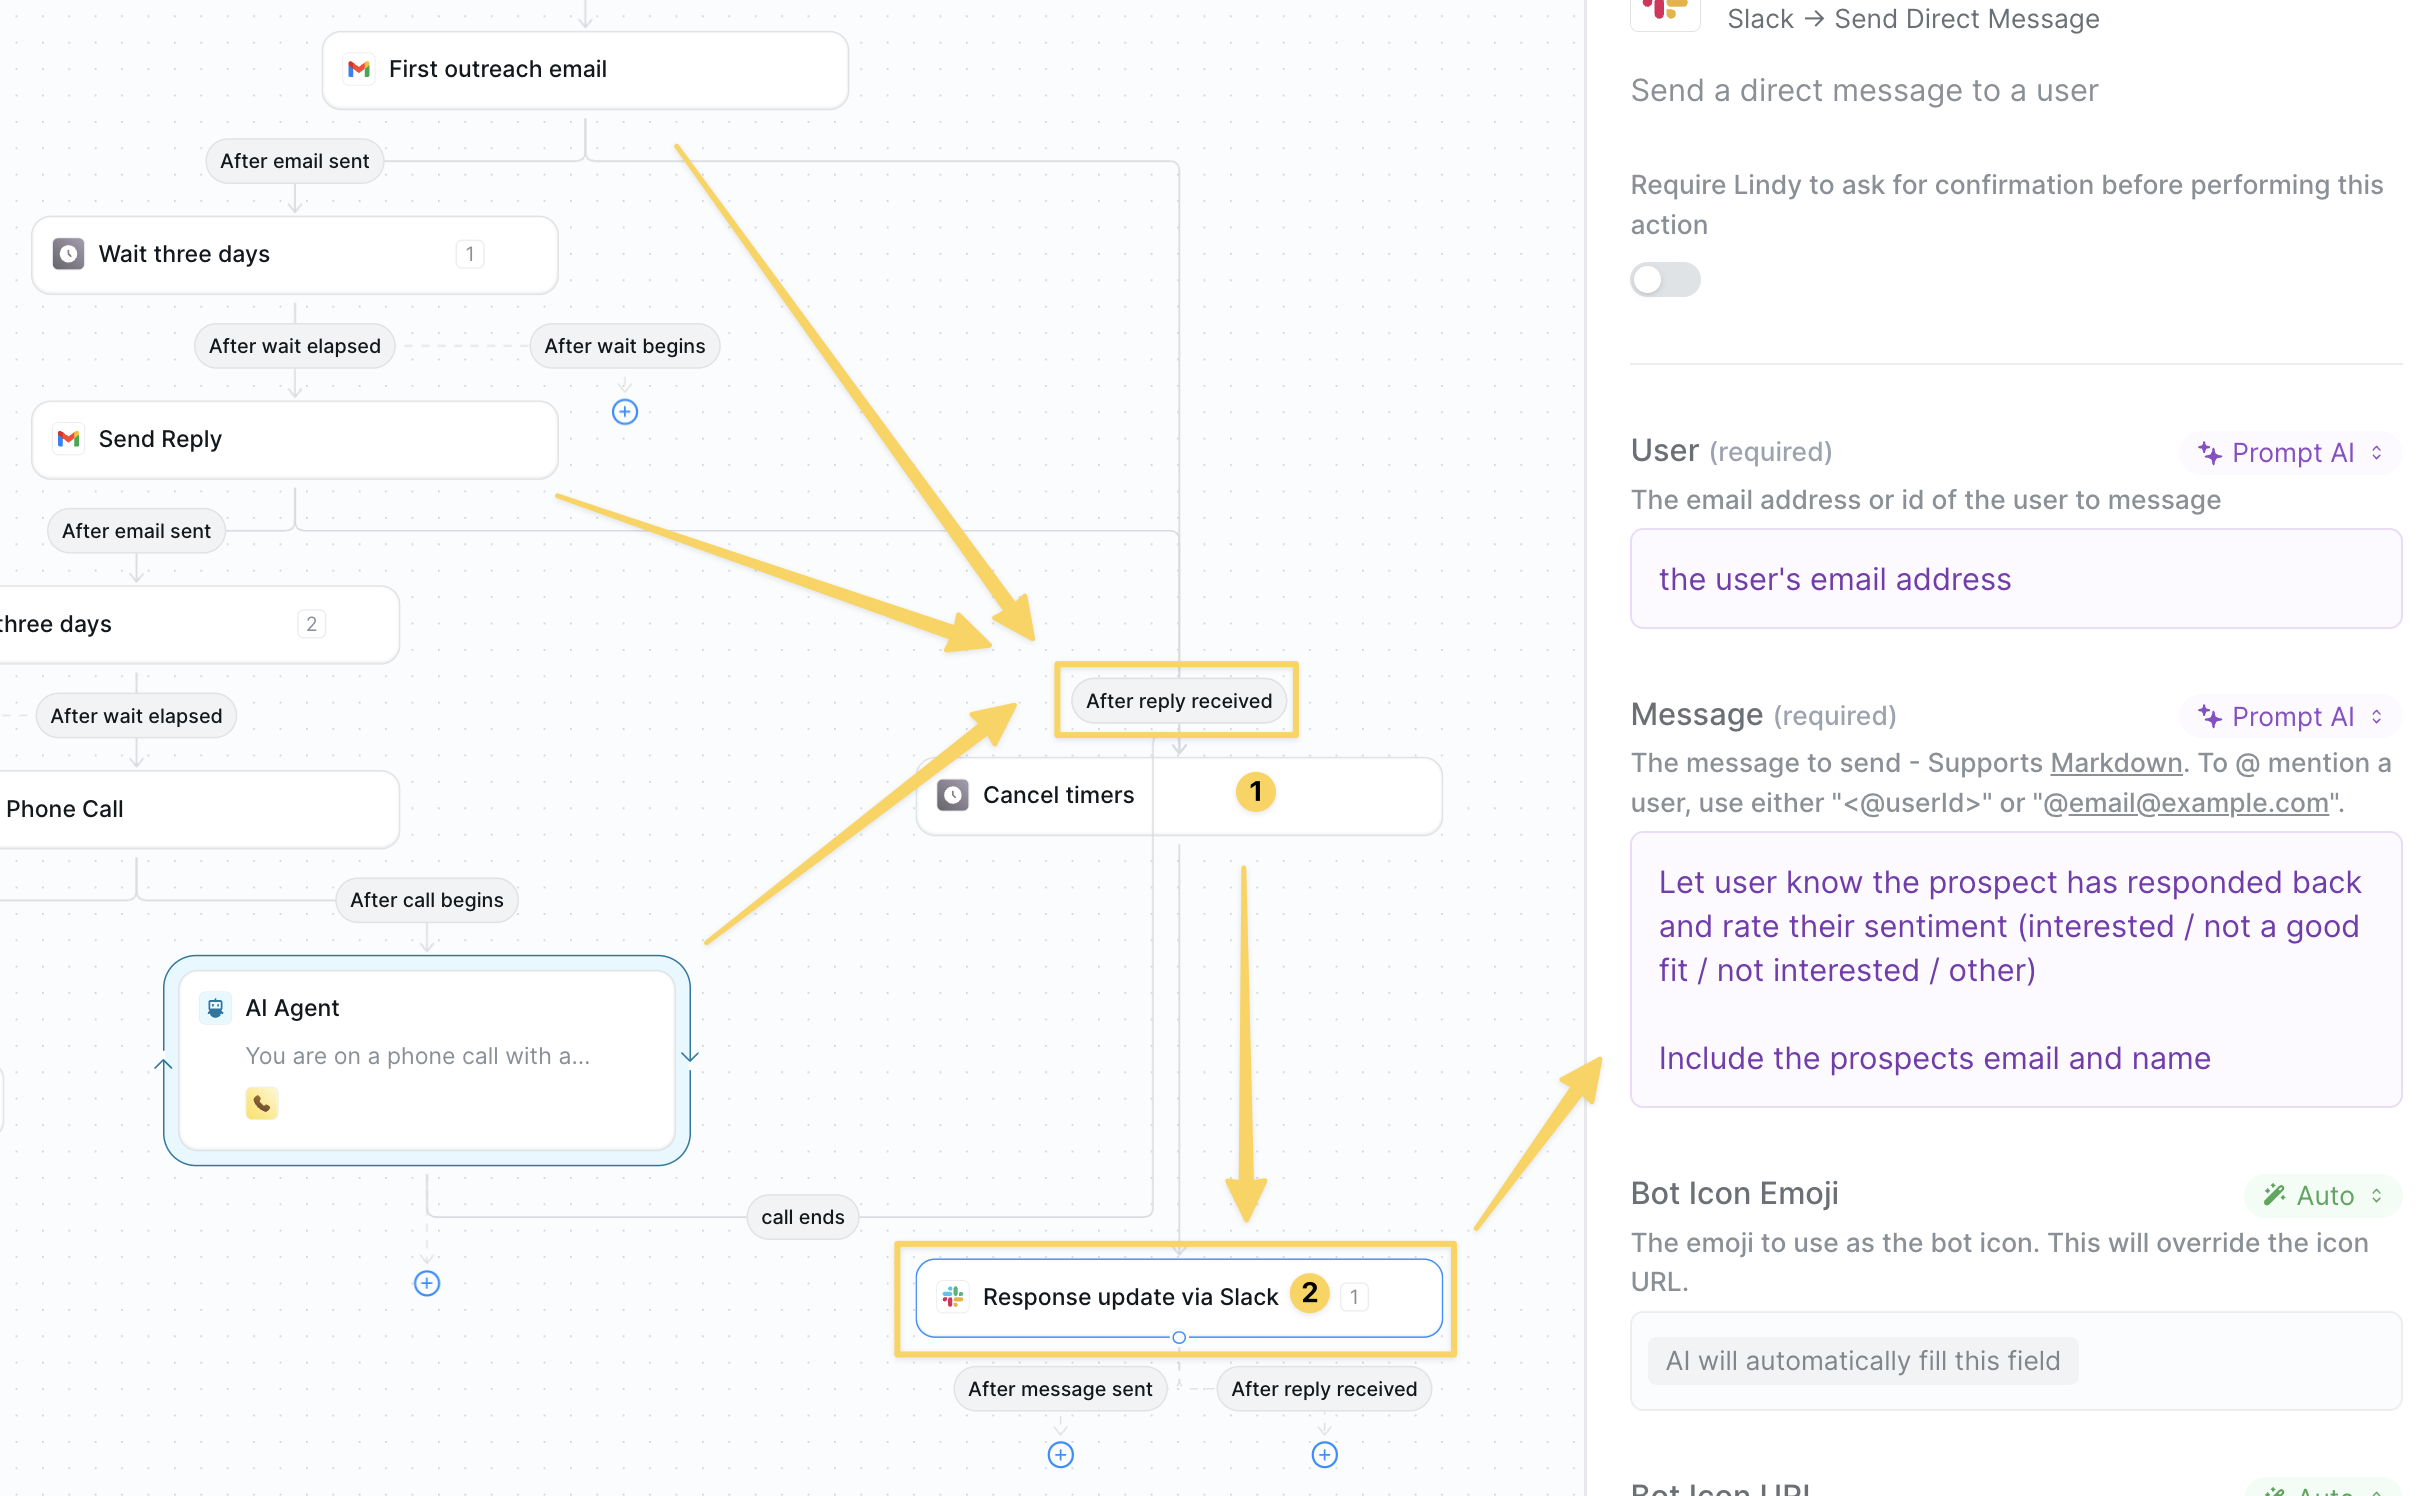 * If the lead replies at any point → `Cancel Timers` to stop the sequence and prevent future outreach
* After canceling timers send a slack update with a summary of the outcome and sentiment
* If cadence finishes with no reply → different Slack alert so you can decide next steps.
## Advanced Customizations
| Trick | What it does |
| ------------------- | --------------------------------------------------------------------- |
| A/B Subject Testing | Randomize two subjects, log open rates to Sheets. |
| Channel Rotation | Email → SMS → Call sequence or any order you define. |
| Auto-CRM Update | Create/advance deals in HubSpot or Salesforce when engagement occurs. |
## Best Practices
Only text or call leads who explicitly consented; store opt-in status in your sheet.
Limit volume to avoid rate limits from Twilio or Gmail.
Use company news or role-specific pain points in each touch.
## Next Steps
Auto-research every new prospect
Let your agent close deals in your inbox
Build voice-based outreach workflows
Store prospect research and call scripts
* If the lead replies at any point → `Cancel Timers` to stop the sequence and prevent future outreach
* After canceling timers send a slack update with a summary of the outcome and sentiment
* If cadence finishes with no reply → different Slack alert so you can decide next steps.
## Advanced Customizations
| Trick | What it does |
| ------------------- | --------------------------------------------------------------------- |
| A/B Subject Testing | Randomize two subjects, log open rates to Sheets. |
| Channel Rotation | Email → SMS → Call sequence or any order you define. |
| Auto-CRM Update | Create/advance deals in HubSpot or Salesforce when engagement occurs. |
## Best Practices
Only text or call leads who explicitly consented; store opt-in status in your sheet.
Limit volume to avoid rate limits from Twilio or Gmail.
Use company news or role-specific pain points in each touch.
## Next Steps
Auto-research every new prospect
Let your agent close deals in your inbox
Build voice-based outreach workflows
Store prospect research and call scripts