Quick Overview
Transform your Slack workspace into an AI-powered productivity hub with Lindy’s Slack integration. Build intelligent bots that can answer questions, route tickets, send alerts, and automate team communications—all without writing a single line of code. Key benefits of Slack + Lindy:- Instant knowledge access - Answer team questions using your internal documents
- Smart automation - Route messages, escalate tickets, and send notifications
- 24/7 availability - AI assistance that never sleeps
- Context awareness - Understand intent and provide relevant responses
- Seamless integration - Works with your existing Slack channels and workflows
Available Triggers
Slack Message Received
Monitor specific channels or direct messages for new activity: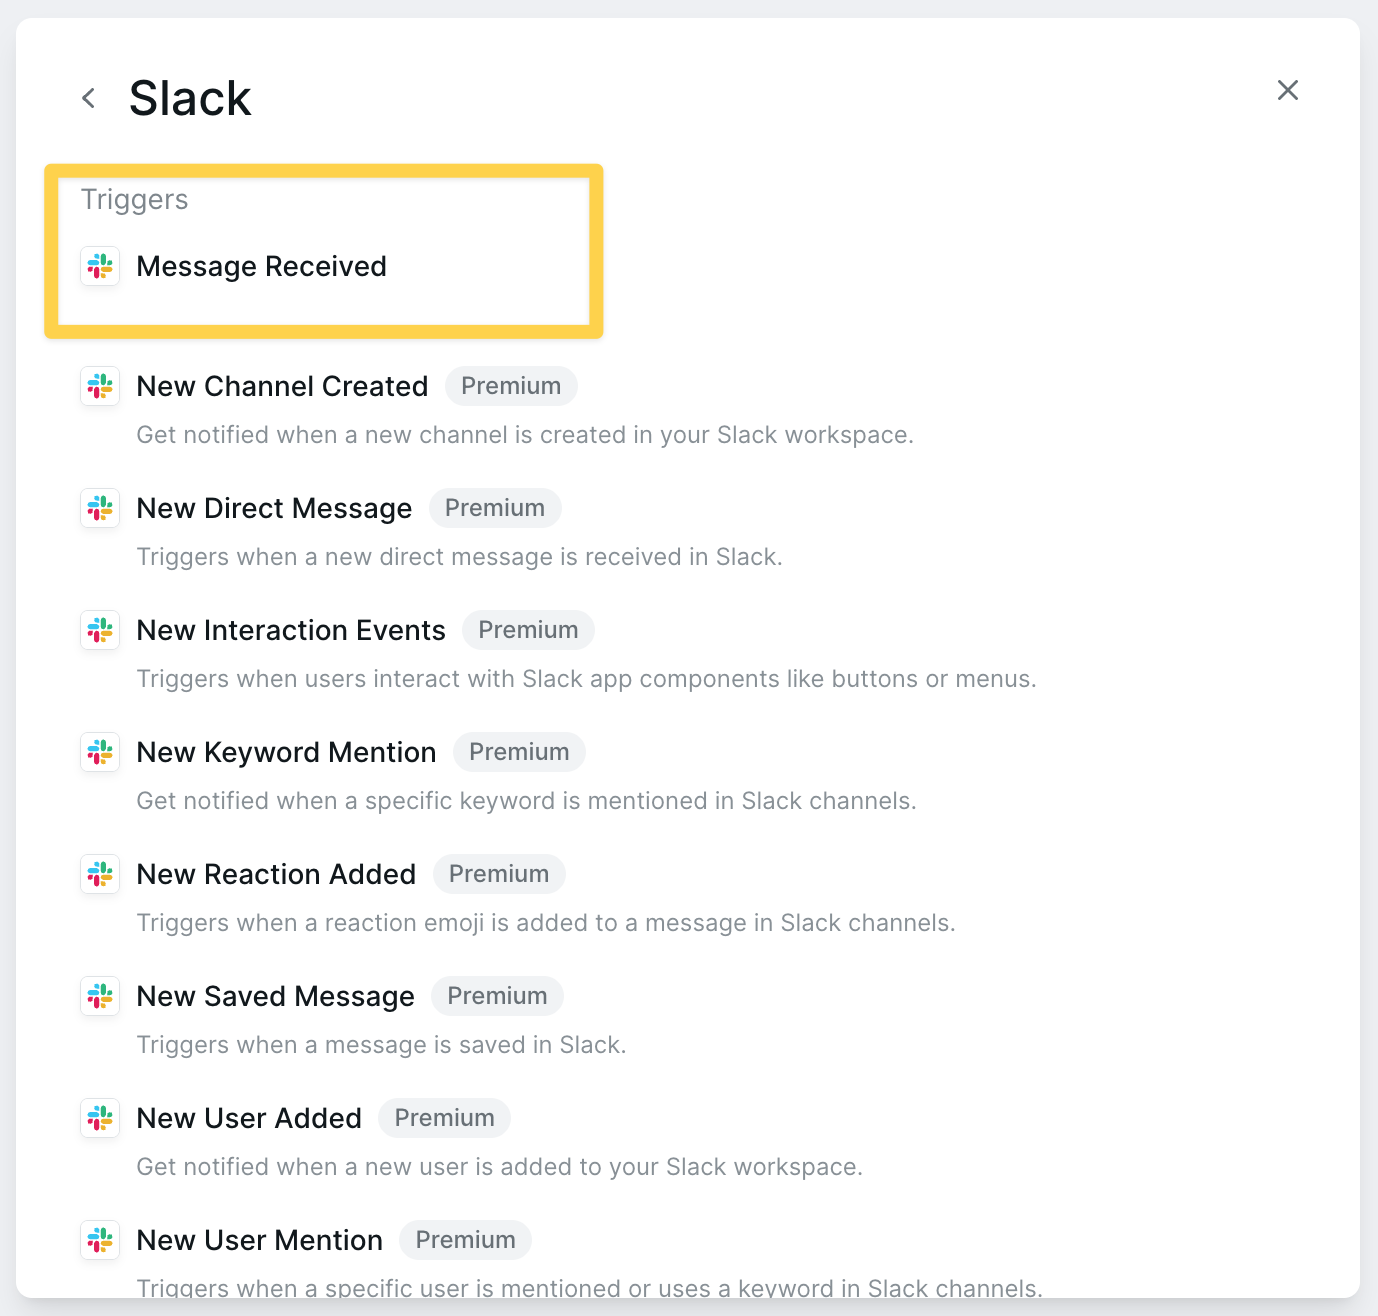
Available Actions
Send Channel Message

- Specific channels - Monitor selected channels only
- All channels - Listen to every channel in your workspace
- Direct messages - Respond to private messages
- Keyword filters - Trigger only on specific words or phrases
- User filters - React to messages from specific team members
Step-by-Step Setup Guide
Building Your First Slack Bot
1
Create a New Lindy
Start by creating a new agent specifically for Slack automation.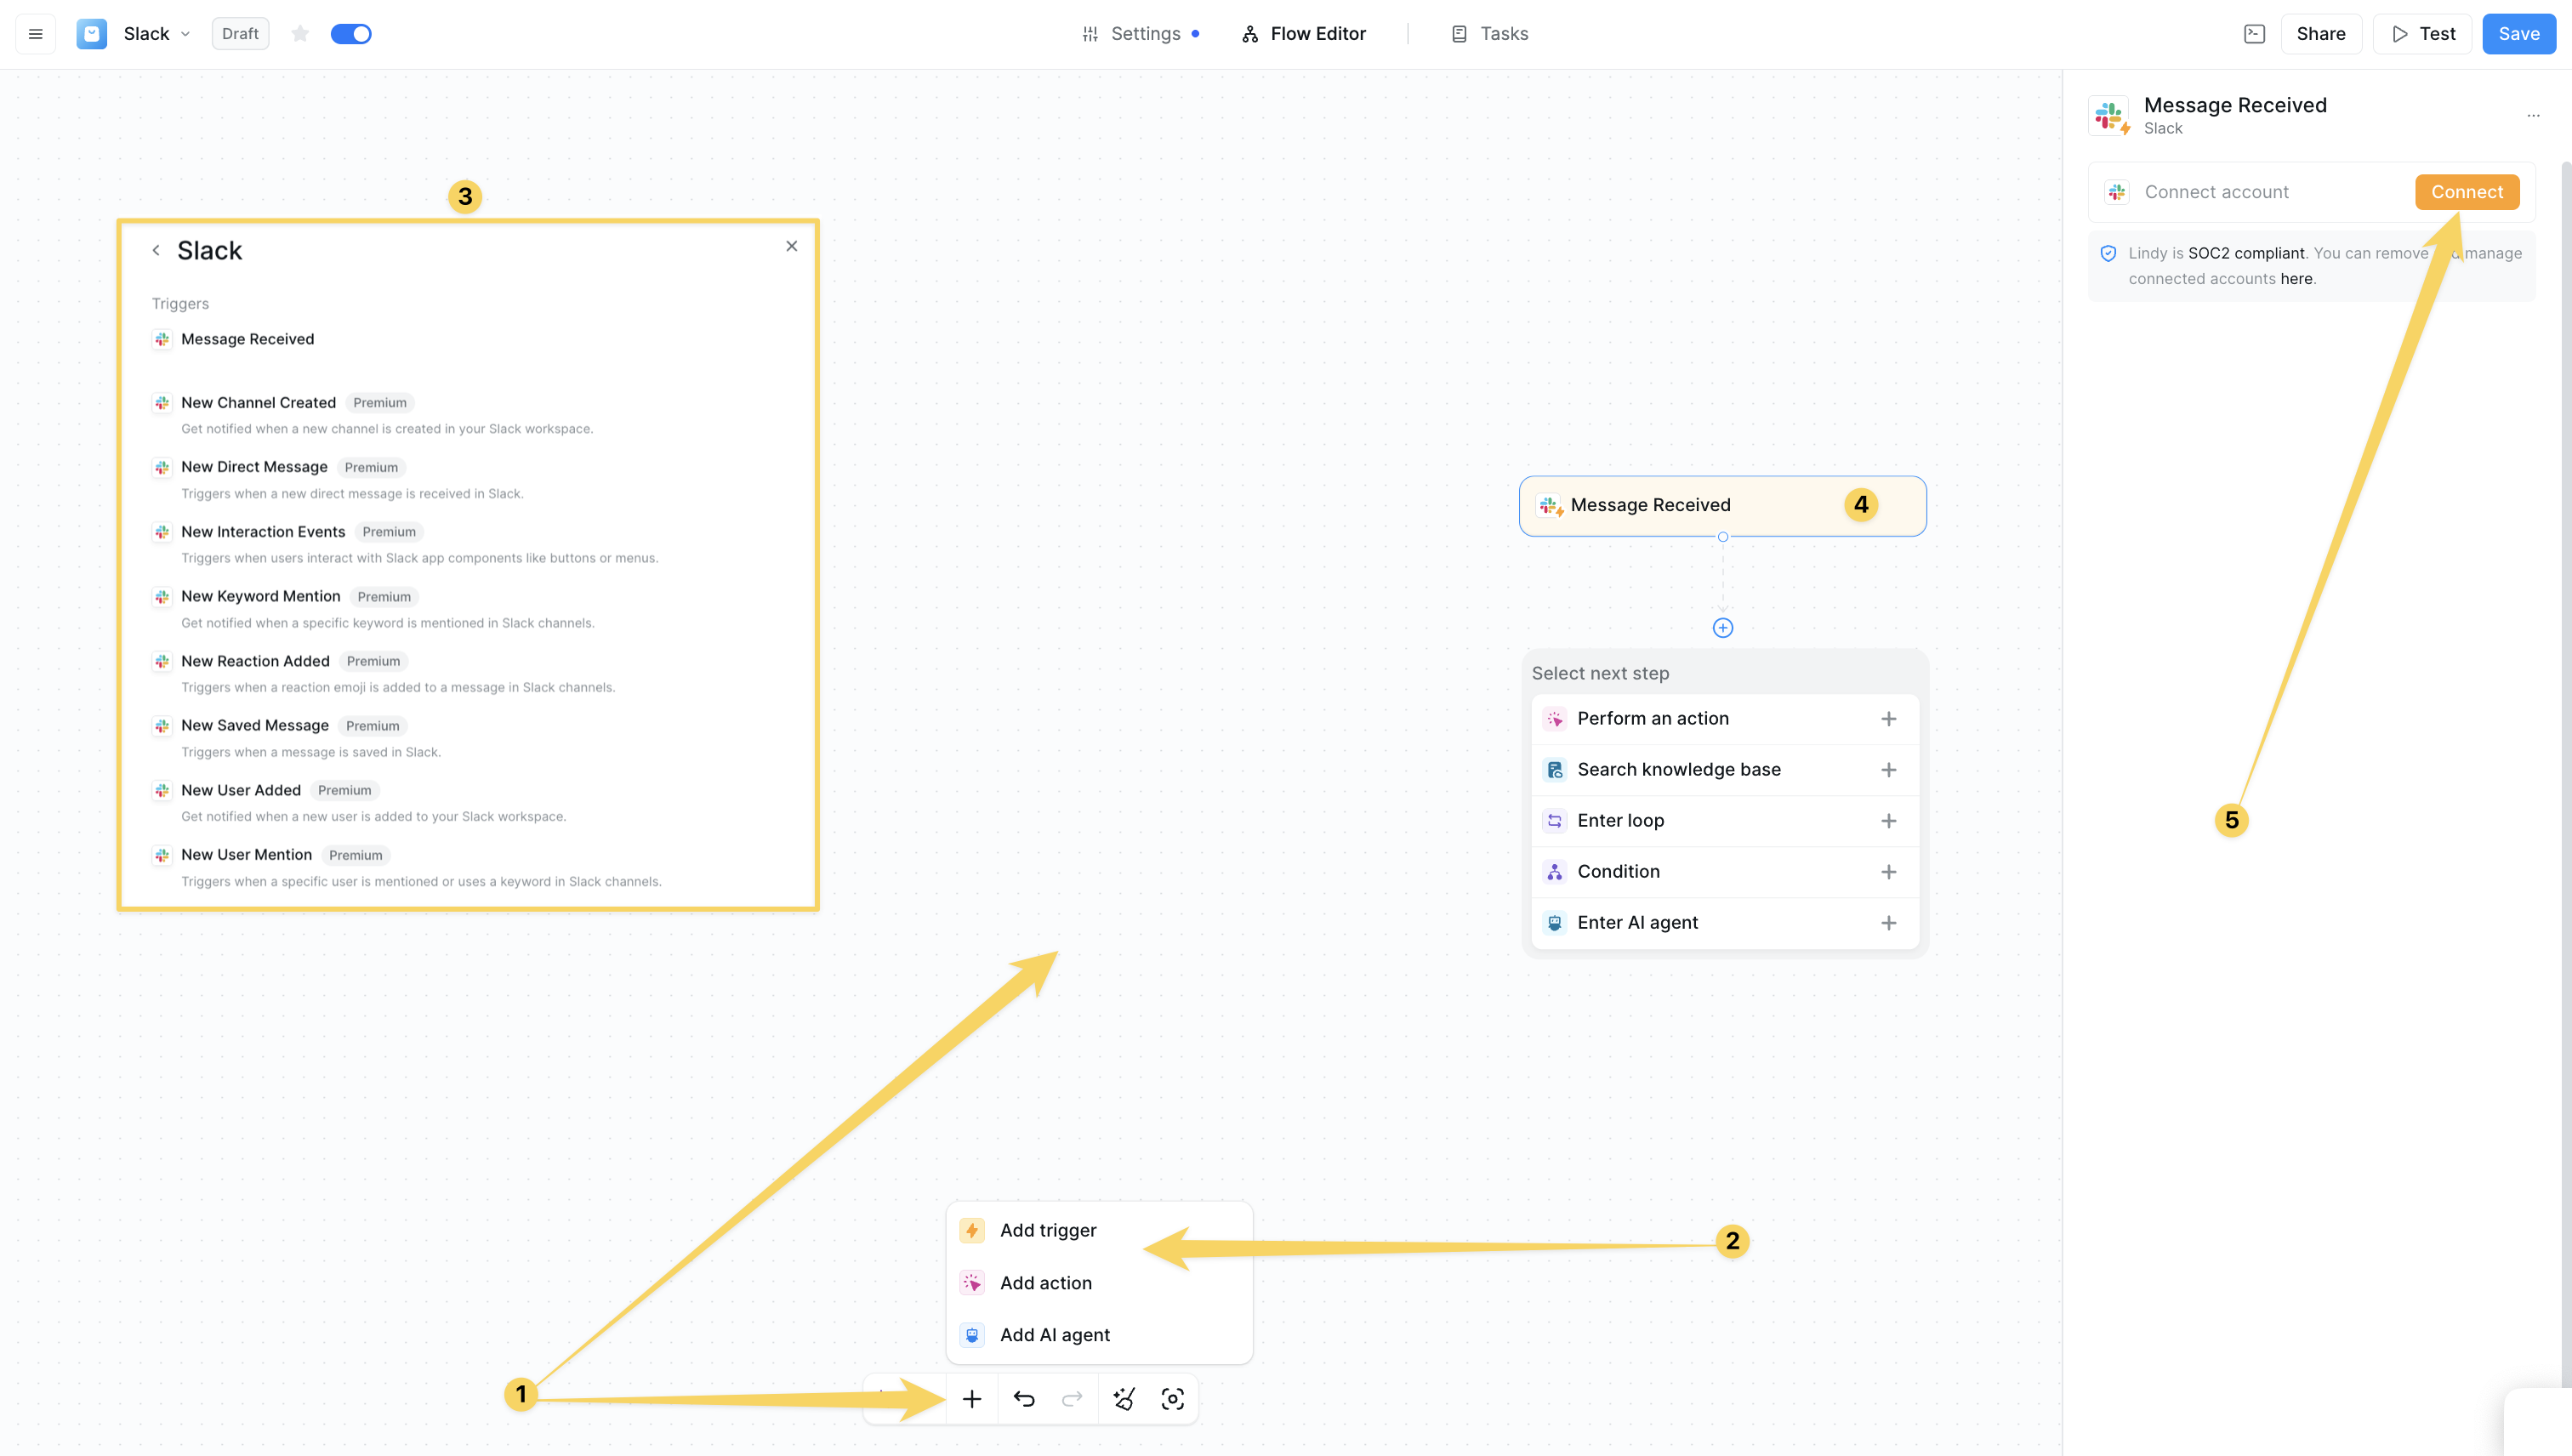
2
Add Slack Message Trigger
Click on “Select Trigger” and choose “Slack Message Received” from the list of available triggers. This will make your bot wake up whenever a message is posted in your Slack workspace.In the trigger configuration:
- Channel Selection: Choose specific channels to monitor (like #support or #general) or select “All” to monitor your entire workspace
- Direct Messages: Enable if you want the bot to respond to private messages
- Integration Setup: Authorize your Slack workspace by clicking “Connect” and following the OAuth flow
3
Set Up Filters (Optional)
Add trigger filters to control when your bot responds and avoid unnecessary activations:Filter by Keywords : Set the bot to only trigger when messages contain specific words
- Example: “Hey Lindy”, “help”, “support”, “question”
- Useful to prevent the bot from responding to other bots or specific users
- Example: Exclude #random or #general but include #support
4
Add Conditions
Click the ”+” button and select “Condition” to create smart routing logic that determines when your bot should actually respond:Example Conditions:
- “the message contains a question about company policies or procedures”
- “the user is asking for help with our product or service”
- “the message is a support request that needs immediate attention”
5
Connect Knowledge Base
Add a “Search Knowledge Base” step to give your bot access to company information:Knowledge Base Setup:
- Upload your company documentation, FAQs, policies, and procedures
- Include website content, Notion pages, Google Docs, or PDF files
- Organize content by categories (HR, IT, Product, etc.)
- Set the search to look for relevant information based on the user’s question
- Configure how many results to return (typically 3-5 for best performance)
- Choose between semantic search (meaning-based) or keyword search
6
Configure Response Action
Add a “Send Message” action to define how your bot responds:Message Configuration:Advanced Options:
- Channel: Choose to respond in the same channel, send a DM, or post to a specific channel
- Thread Reply: Enable to keep conversations organized within message threads
- Add fallback responses for when no knowledge base match is found
- Include escalation paths to human team members
- Set up follow-up actions like logging the interaction
Common Use Cases
Customer Support Bot
Setup Process
Setup Process
- Trigger: Slack Message Received in #support channel
- Condition: Message contains a customer inquiry or support request
- Action: Search knowledge base for solutions
- Response: Provide answer or escalate to human agent
Example Configuration
Example Configuration
HR Assistant Bot
Common Questions Handled
Common Questions Handled
- PTO policies and vacation requests
- Benefits information and enrollment
- Company handbook and procedures
- Office hours and remote work policies
- Expense reporting and reimbursements
Setup Example
Setup Example
Sales Alert System
Integration Flow
Integration Flow
- External Trigger: New lead added to CRM (HubSpot, Salesforce)
- Processing: Extract lead information and qualification data
- Notification: Send formatted alert to #sales channel
- Follow-up: Include next steps and assignment suggestions
Alert Template
Alert Template
Meeting Notes Distribution
Automated Workflow
Automated Workflow
- Trigger: Meeting ends (calendar integration)
- Processing: Generate meeting summary using AI
- Distribution: Send summary to relevant Slack channels
- Action Items: Extract and assign follow-up tasks
Summary Format
Summary Format
Best Practices
Bot Personality and Tone
Setting the Right Tone
Setting the Right Tone
Configure your bot’s personality to match your company culture:Professional: “I’m here to help with your questions about our policies and procedures.”Friendly: “Hey there! 👋 What can I help you with today?”Technical: “I can assist you with documentation, code examples, and troubleshooting steps.”
Response Guidelines
Response Guidelines
- Keep responses concise but complete
- Include relevant links and resources
- Use emojis sparingly and appropriately
- Always provide next steps or alternatives
- Maintain consistency across all interactions
Performance Optimization
Response Time
Response Time
- Keep knowledge base content organized and up-to-date
- Use specific conditions to avoid unnecessary processing
- Cache frequently requested information
- Set appropriate timeouts for external integrations
Accuracy Improvement
Accuracy Improvement
- Regularly review and update knowledge base content
- Monitor bot interactions and user feedback
- Refine conditions based on actual usage patterns
- Test bot responses with different question phrasings
Security and Privacy
Security Guidelines:- Limit bot access to appropriate channels only
- Use private channels for sensitive discussions
- Regularly audit bot permissions and access
- Implement data retention policies for bot interactions
- Train team members on proper bot usage
Testing Your Slack Bot
Testing Checklist
1
Basic Functionality
- Test trigger activation with sample messages
- Verify response accuracy and tone
- Check knowledge base search results
- Confirm proper channel targeting
2
Edge Cases
- Test with typos and informal language
- Try questions outside the knowledge base
- Test concurrent requests from multiple users
- Verify error handling and fallback responses
3
Integration Testing
- Test external system connections
- Verify data synchronization
- Check notification delivery
- Validate escalation workflows
Troubleshooting
Bot Not Responding
Bot Not Responding
Common causes:
- Incorrect channel permissions
- Overly restrictive filters
- Bot not properly connected to Slack
- Trigger conditions not met
- Check integration status in dashboard
- Review and adjust trigger filters
- Verify channel membership
- Test with simple, direct messages
Incorrect Responses
Incorrect Responses
Common causes:
- Outdated knowledge base content
- Ambiguous or unclear prompts
- Insufficient training data
- Context not properly understood
- Update knowledge base with current information
- Refine response prompts with examples
- Add more specific conditions
- Provide feedback to improve responses
Performance Issues
Performance Issues
Common causes:
- Large knowledge base without optimization
- Complex conditions causing delays
- External API timeouts
- High concurrent usage
- Optimize knowledge base structure
- Simplify conditions where possible
- Implement caching for common queries
- Consider load balancing for high usage
Next Steps
Ready to supercharge your Slack workspace? Here are some ways to expand your automation:Gmail Integration
Connect email workflows with Slack notifications
Google Calendar
Automate meeting scheduling and reminders
HubSpot CRM
Sync sales data and lead notifications
Human in the Loop
Add approval workflows for sensitive actions